height MITSUBISHI ECLIPSE CROSS 2019 Owner's Manual (in English)
[x] Cancel search | Manufacturer: MITSUBISHI, Model Year: 2019, Model line: ECLIPSE CROSS, Model: MITSUBISHI ECLIPSE CROSS 2019Pages: 423, PDF Size: 75.41 MB
Page 5 of 423
Instruments and controls
1-1
1
Overview
N00100202892
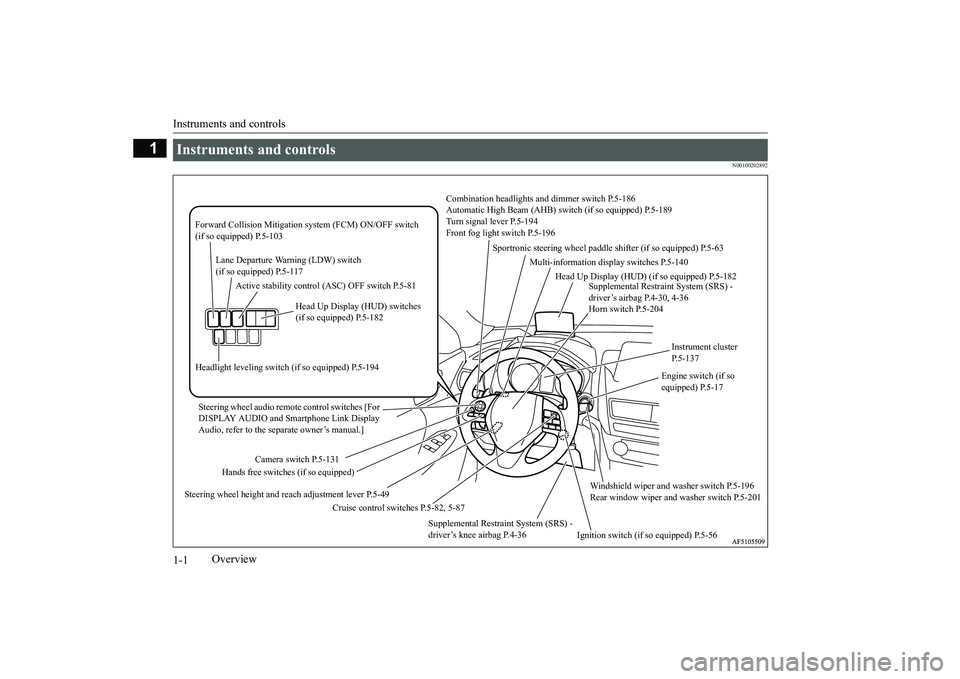
Instruments and controls
Combination headlights and dimmer switch P.5-186
Automatic High Beam (AHB) switch (if so equipped) P.5-189
Turn signal lever P.5-194
Front fog light switch P.5-196
Steering wheel audio remote control switches [For
DISPLAY AUDIO and Smartphone Link Display
Audio, refer to the separate owner’s manual.]Active stability control (ASC) OFF switch P.5-81
Supplemental Restraint System (SRS) -
driver’s airbag P.4-30, 4-36
Horn switch P.5-204
Instrument cluster
P.5-137
Windshield wiper and washer switch P.5-196
Rear window wiper and washer switch P.5-201
Cruise control switches P.5-82, 5-87 Steering wheel height and reach adjustment lever P.5-49Engine switch (if so
equipped) P.5-17 Sportronic steering wheel paddle shifter (if so equipped) P.5-63
Lane Departure Warning (LDW) switch
(if so equipped) P.5-117 Forward Collision Mitigation system (FCM) ON/OFF switch
(if so equipped) P.5-103
Supplemental Restraint System (SRS) -
driver’s knee airbag P.4-36
Ignition switch (if so equipped) P.5-56 Head Up Display (HUD) switches
(if so equipped) P.5-182
Headlight leveling switch (if so equipped) P.5-194
Camera switch P.5-131
Hands free switches (if so equipped)Multi-information display switches P.5-140
Head Up Display (HUD) (if so equipped) P.5-182
BK0266800US.book 1 ページ 2018年6月28日 木曜日 午後3時45分
Page 39 of 423
Seats 4-2 Seat and restraint systems
4
N00408401610
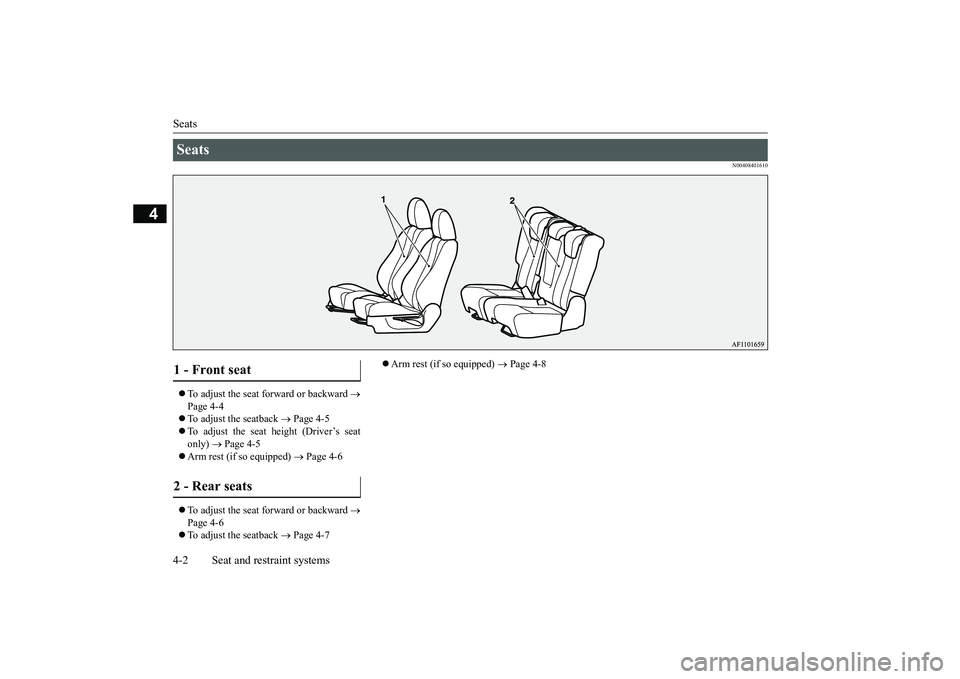
To adjust the seat forward or backward
Page 4-4 To adjust the seatback
Page 4-5
To adjust the seat height (Driver’s seat only)
Page 4-5
Arm rest (if so equipped)
Page 4-6
To adjust the seat forward or backward
Page 4-6 To adjust the seatback
Page 4-7
Arm rest (if so equipped)
Page 4-8
Seats 1 - Front seat 2 - Rear seats BK0266800US.bo
ok 2 ページ 2018年6月27日 水曜日 午後5時6分
Page 42 of 423
Front seats
Seat and restraint systems 4-5
4
N00402001441
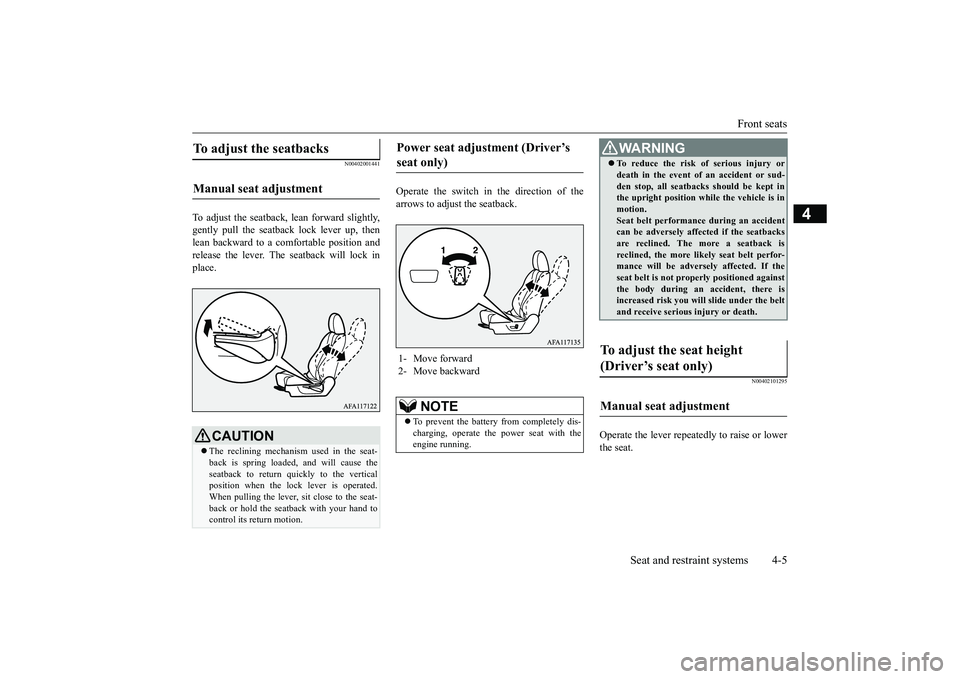
To adjust the seatback, lean forward slightly, gently pull the seatb
ack lock lever up, then
lean backward to a comfortable position and release the lever. The seatback will lock in place.
Operate the switch in the direction of the arrows to adjust the seatback.
N00402101295
Operate the lever repeatedly to raise or lowerthe seat.
To adjust the seatbacks Manual seat adjustment
CAUTION The reclining mechanism used in the seat- back is spring loaded
, and will cause the
seatback to return quickly to the vertical position when the lock lever is operated.When pulling the lever, sit close to the seat- back or hold the seatback with your hand to control its return motion.
Power seat adjustment (Driver’s seat only) 1- Move forward 2- Move backward
NOTE
To prevent the battery from completely dis- charging, operate the power seat with the engine running.
WA R N I N G To reduce the risk of serious injury or death in the event of an accident or sud- den stop, all seatbacks should be kept in the upright position while the vehicle is in motion.Seat belt performance during an accident can be adversely affected if the seatbacks are reclined. The more a seatback isreclined, the more likely seat belt perfor- mance will be adversely affected. If the seat belt is not properly positioned againstthe body during an accident, there is increased risk you will slide under the belt and receive serious injury or death.
To adjust the seat height (Driver’s seat only) Manual seat adjustment
BK0266800US.bo
ok 5 ページ 2018年6月27日 水曜日 午後5時6分
Page 43 of 423
Rear seats 4-6 Seat and restraint systems
4
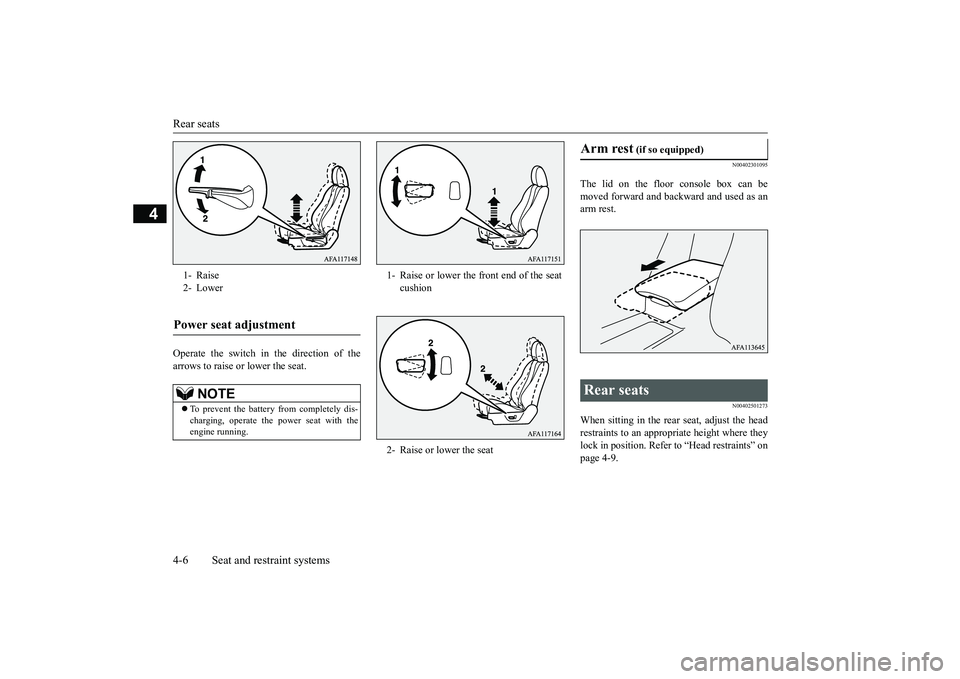
Operate the switch in the direction of the arrows to raise or lower the seat.
N00402301095
The lid on the floor console box can bemoved forward and backward and used as an arm rest.
N00402501273
When sitting in the rear seat, adjust the headrestraints to an appropriate height where they lock in position. Refer to “Head restraints” onpage 4-9.
1- Raise 2- LowerPower seat adjustment
NOTE
To prevent the battery from completely dis- charging, operate the power seat with theengine running.
1- Raise or lower the front end of the seat
cushion
2- Raise or lower the seat
Arm rest
(if so equipped)
Rear seats
BK0266800US.bo
ok 6 ページ 2018年6月27日 水曜日 午後5時6分
Page 47 of 423
Head restraints 4-10 Seat and restraint systems
4
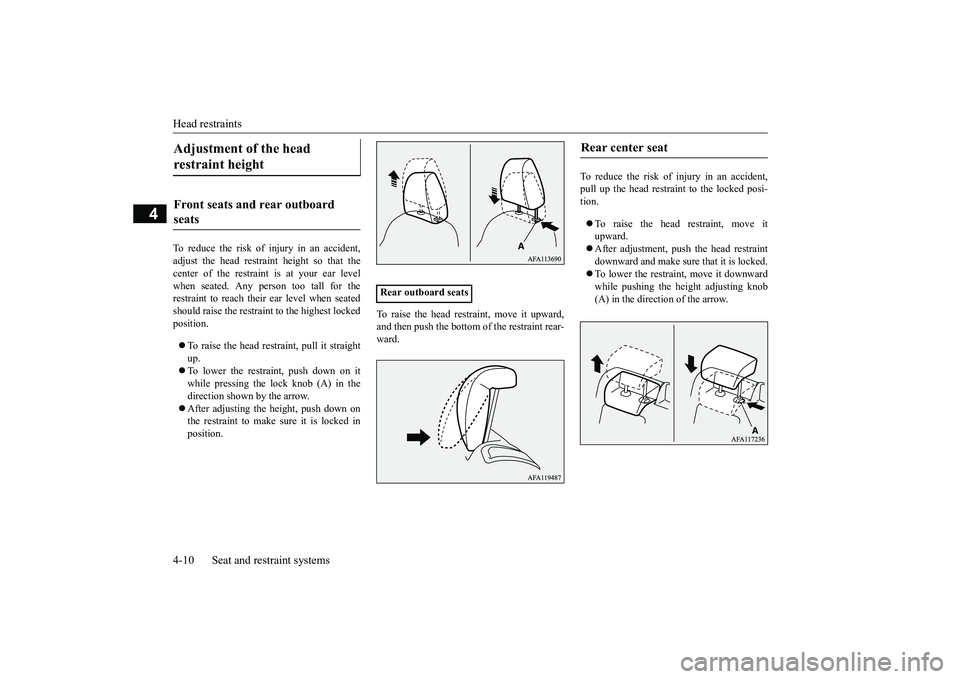
To reduce the risk of injury in an accident, adjust the head restraint height so that thecenter of the restraint is at your ear levelwhen seated. Any person too tall for the restraint to reach their ear level when seated should raise the restraint to the highest lockedposition. To raise the head restraint, pull it straight up. To lower the restraint, push down on it while pressing the lock knob (A) in the direction shown by the arrow. After adjusting the height, push down on the restraint to make sure it is locked in position.
To raise the head restraint, move it upward, and then push the bottom of the restraint rear-ward.
To reduce the risk of injury in an accident, pull up the head restraint to the locked posi-tion. To raise the head restraint, move it upward. After adjustment, push the head restraint downward and make sure that it is locked. To lower the restraint, move it downward while pushing the height adjusting knob (A) in the direction of the arrow.
Adjustment of the head restraint height Front seats and rear outboard seats
Rear outboard seats
Rear center seat
BK0266800US.bo
ok 10 ページ 2018年6月27日 水曜日 午後5時6分
Page 48 of 423
Head restraints
Seat and restraint systems 4-11
4
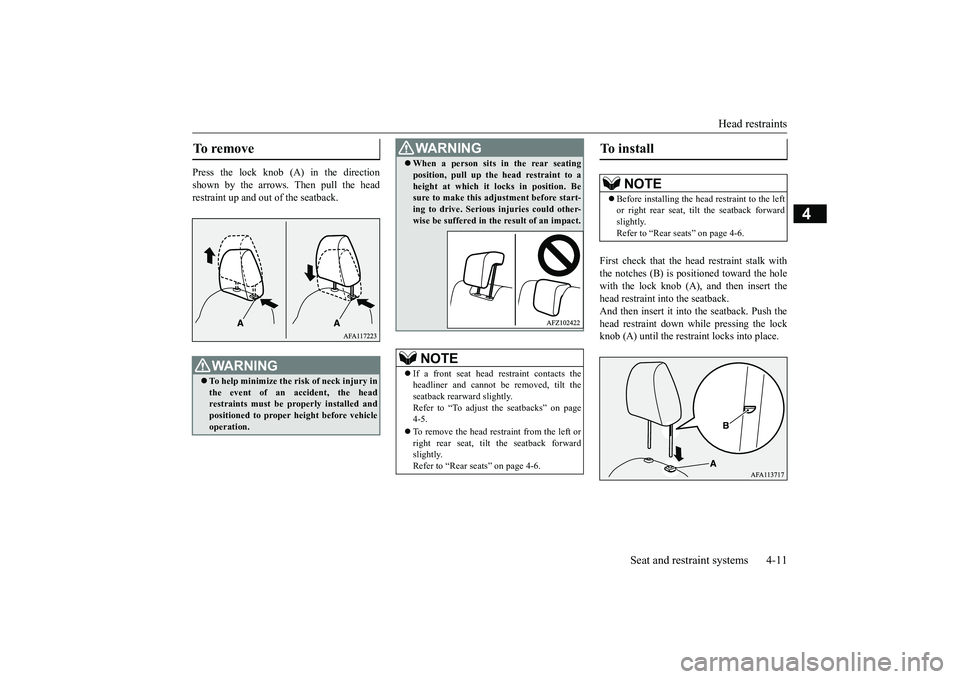
Press the lock knob (A) in the direction shown by the arrows. Then pull the head restraint up and out of the seatback.
First check that the head restraint stalk with the notches (B) is positioned toward the holewith the lock knob (A), and then insert the head restraint into the seatback. And then insert it into the seatback. Push thehead restraint down while pressing the lock knob (A) until the restraint locks into place.
To remove
WA R N I N G To help minimize the risk of neck injury in the event of an accident, the head restraints must be properly installed and positioned to proper height before vehicleoperation.
WA R N I N G When a person sits in the rear seating position, pull up the head restraint to a height at which it locks in position. Be sure to make this adjustment before start- ing to drive. Serious injuries could other-wise be suffered in th
e result of an impact.
NOTE
If a front seat head restraint contacts the headliner and cannot be removed, tilt the seatback rearward slightly.Refer to “To adjust the seatbacks” on page 4-5. To remove the head restraint from the left or right rear seat, tilt the seatback forward slightly. Refer to “Rear seats” on page 4-6.
To install
NOTE
Before installing the head restraint to the left or right rear seat, tilt the seatback forward slightly. Refer to “Rear seats” on page 4-6.
BK0266800US.bo
ok 11 ページ 2018年6月27日 水曜日 午後5時6分
Page 56 of 423
Seat belts
Seat and restraint systems 4-19
4
If the ignition switch is turned to the “ON” position or the operation mode is put in ON without the driver’s seat belt being fastened, a warning light will come on and a tone willsound for approximately 6 seconds to remind you to fasten your seat belt. If the vehicle is driven with the seat belt stillunfastened, the warning light will blink and the tone will sound intermittently until the seat belt is fastened. At the same time, “FAS-TEN SEAT BELT” is displayed on the infor-mation screen in the multi-information display.
N00418301276
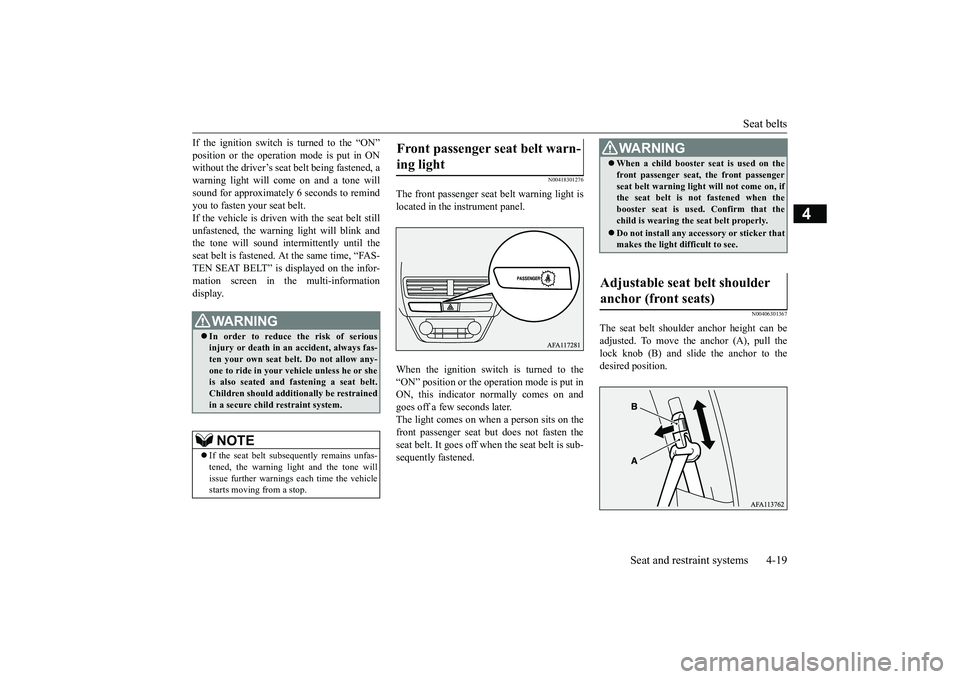
The front passenger seat belt warning light is located in the instrument panel. When the ignition switch is turned to the “ON” position or the operation mode is put inON, this indicator normally comes on and goes off a few seconds later. The light comes on when a person sits on thefront passenger seat but does not fasten the seat belt. It goes off when the seat belt is sub- sequently fastened.
N00406301367
The seat belt shoulder anchor height can beadjusted. To move the anchor (A), pull the lock knob (B) and slide the anchor to the desired position.
WA R N I N G In order to reduce the risk of serious injury or death in an accident, always fas-ten your own seat belt. Do not allow any- one to ride in your vehicle unless he or she is also seated and fastening a seat belt.Children should additionally be restrained in a secure child restraint system.NOTE
If the seat belt subsequently remains unfas- tened, the warning light and the tone will issue further warnings each time the vehiclestarts moving from a stop.
Front passenger seat belt warn- ing light
WA R N I N G When a child booster seat is used on the front passenger seat, the front passenger seat belt warning light will not come on, if the seat belt is not fastened when the booster seat is used. Confirm that thechild is wearing the seat belt properly. Do not install any accessory or sticker that makes the light difficult to see.
Adjustable seat belt shoulder anchor (front seats)
BK0266800US.bo
ok 19 ページ 2018年6月27日 水曜日 午後5時6分
Page 59 of 423
Child restraint systems 4-22 Seat and restraint systems
4
The seat belt pre-tensioners will operate under the same conditions as the airbag con- trol unit. When the seat belt pre-tensioners activate, some smoke is released and a loud noise willbe heard. The smoke is not harmful, but care should be taken not to intentionally inhale it, as it may cause some temporary irritation topeople with respiratory problems. Even in the event of a severe impact, the pre- tensioners will not operate if the seat belts arenot fastened. The seat belt pre-tensioners maynot activate in certain
collisions, even though
the vehicle may appear to be severely dam- aged. Such non-activation does not mean thatsomething is wrong with the seat belt pre-ten- sioner system, but rather that the collision forces were not severe enough to activate thesystem.
N00408701147
This warning light tells you if there is a prob-lem involving the SRS airbags and/or the seatbelt pre-tensioner system. Refer to “SRS warning light/display” on page 4-36.
N00408900126
In the event of an accident, the seat belt force limiter system will help reduce the force applied to the driver and front seat passenger.
N00407101812
When transporting infants or small childrenin your vehicle, an appropriate child restraint system must always be used. This is requiredby law in the U.S. and Canada. Child restraint systems specifically designed for infants and small children are offered byseveral manufacturers. Choose only a child restraint system with a label certifying that it complies with Federal Motor Vehicle SafetyStandard 213 (FMVSS 213) or Motor Vehicle Restraint Systems and Booster Seats Safety Regulations (RSSR). Look for the manufac-turer’s statement of compliance on the box and child restraint system itself.
The child restraint system should be appropri- ate for your child’s weight and height, and should properly fit your vehicle’s seat. For detailed information, refer to the instruc-tion manual accompanying the child restraint system. All children should be properly restrained in a restraint device that offers the maximum protection for their size and age as specifiedby local, state, or provincial laws. Be sure to check local, state, or provincial requirements for child size and age that mayvary from the recommendations listed below. Children less than 2 years old and who weigh 22 pounds (10 kg) or less MUST ride in a rear-facing child safety seat thatMUST ONLY be used in the rear seat. Children older than 2 years of age and who weigh less than 40 pounds (18 kg) orwho are less than 40 inches (100 cm) tall must be in a forward-facing restraint used only in the rear seat.
WA R N I N G The seat belt pre-tensioner system is designed to work only once. After the seat belt pre-tensioners have been activated, they will not work again. They must promptly be replaced and the entire seat belt pre-tensioner system inspected by anauthorized Mitsubishi Motors dealer.
SRS warning Force limiter system Child restraint systems
Recommendations for child restraint system selection
BK0266800US.bo
ok 22 ページ 2018年6月27日 水曜日 午後5時6分
Page 84 of 423
5
Features and controlsKeys ..........................................
.......................................................5-3
Electronic immobilizer (Anti-thef
t starting system) ........................5-4
Keyless entry system (if so equipped) ..............................................5-6 Free-hand Advanced Security Transmitter (F.A.S.T.-key) (if so equipped) .
.................................................
........................5-12
Door locks .......................
...............................................................5-31
Power door locks ............
...............................................................5-33
Child safety locks for r
ear door .....................................................5-34
Liftgate ......................................
.....................................................5-35
Theft-alarm system
................................................
........................5-37
Power window control
...........................................
........................5-39
Power panoramic sunroof (if
so equipped).....................................5-42
Parking brake ..................
...............................................................5-45
Steering wheel height and reach adjustment ..................................5-49 Inside rearview mirro
r ...........................................
........................5-50
Outside rearview mirr
ors ...............................................................5-52
Ignition switch ......
.................................................
........................5-56
Starting the engine
.................................................
........................5-57
Turbocharger operation
..........................................
........................5-59
Continuously variable trans
mission (CVT) ...................................5-59
S-AWC (Super-All Wheel Control) (if so equipped) .....................5-66 4-wheel drive operation
.........................................
........................5-68
Inspection and maintenance following rough road operation ........5-70Cautions on the handling of 4-wheel drive vehicles ......................5-71 Service brake ..................
...............................................................5-72
Brake auto hold (if so
equipped) ....................................................5-73
Hill start assist .......
.................................................
........................5-75
Brake assist system
................................................
........................5-76
Anti-lock braking syst
em .....................................
......................... 5-77
Electric power steering syst
em (EPS) ........................................... 5-79
Active stability control
(ASC) ....................
................................... 5-79
Cruise control ................
.................................................
............... 5-82
Adaptive Cruise Control System (ACC) (if so equipped) .............. 5-87 Forward Collision Mitigation system (FCM) (if so equipped) ...... 5-99 Blind Spot Warning (BSW) (with Lane Change Assist) (if so equipped) ..........
.................................................
............. 5-107
Rear Cross Traffic Alert (RCTA) (if so equipped) ....................... 5-113 Lane Departure Warning (LDW) (if so equipped) ....................... 5-117Tire pressure monitoring sy
stem (TPMS) ................................... 5-120
Rear-view camera ..........
.................................................
............. 5-125
Multi Around Monitor (if so
equipped)........................................ 5-127
Instrument cluster
.................................................
....................... 5-137
Multi-information disp
lay ....................................
....................... 5-138
Indicator light, warning light, and information screen display list
..............................................
....................... 5-158
Indicators .................................
.................................................... 5-178
Warning lights ................
.................................................
............. 5-179
Information screen disp
lay ........................
................................. 5-181
Head Up Display (HUD) (if
so equipped).................................... 5-182
Combination headlights and dimmer switch ............................... 5-186Headlight leveling switch (if
so equipped)................................... 5-194
Turn signal lever ..
.................................................
....................... 5-194
Hazard warning flasher
switch .................................................... 5-195
ECO mode switch ..........
.................................................
............. 5-196
Front fog light switch
...........................................
....................... 5-196
Wiper and washer swit
ch ......................................
....................... 5-196
BK0266800US.bo
ok 1 ページ 2018年6月27日 水曜日 午後5時6分
Page 132 of 423
Steering wheel height and reach adjustment
Features and controls 5-49
5
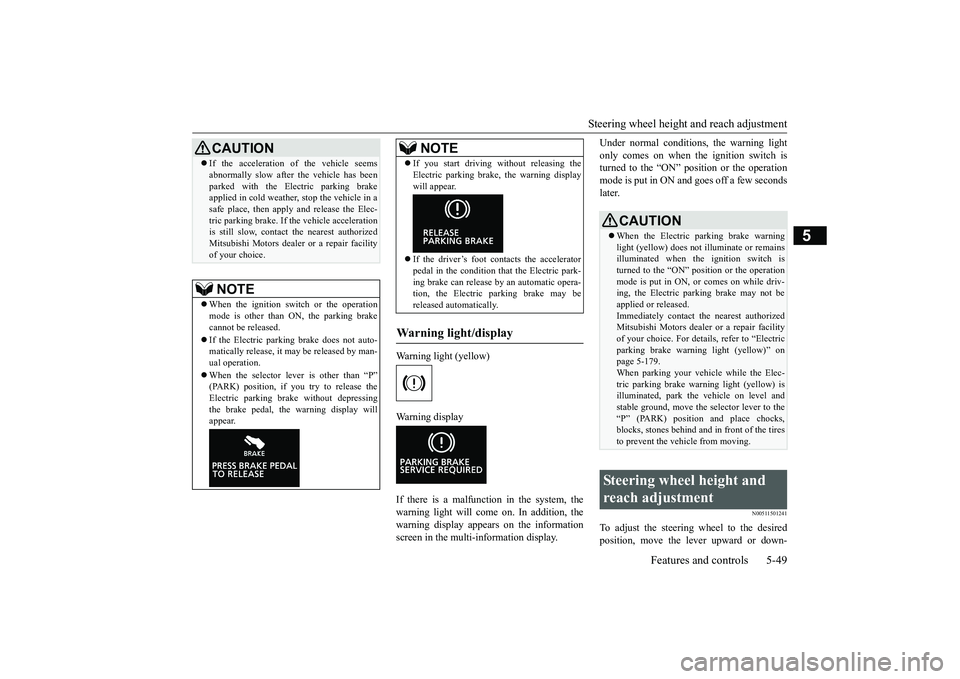
Warning light (yellow) Warning display If there is a malfunction in the system, the warning light will come on. In addition, thewarning display appears on the informationscreen in the multi-information display.
Under normal conditions, the warning light only comes on when the ignition switch is turned to the “ON” position or the operation mode is put in ON and goes off a few secondslater.
N00511501241
To adjust the steering wheel to the desiredposition, move the lever upward or down-
If the acceleration of the vehicle seems abnormally slow after the vehicle has been parked with the Electric parking brake applied in cold weather, stop the vehicle in a safe place, then apply and release the Elec-tric parking brake. If the vehicle acceleration is still slow, contact the nearest authorized Mitsubishi Motors dealer or a repair facilityof your choice.NOTE
When the ignition switch or the operation mode is other than ON, the parking brake cannot be released. If the Electric parking brake does not auto- matically release, it may be released by man-ual operation. When the selector lever is other than “P” (PARK) position, if you try to release the Electric parking brake without depressing the brake pedal, the warning display willappear.CAUTION
If you start driving without releasing the Electric parking brake, the warning display will appear. If the driver’s foot contacts the accelerator pedal in the condition that the Electric park-ing brake can release by an automatic opera- tion, the Electric parking brake may be released automatically.
Warning light/display
NOTE
CAUTION When the Electric parking brake warning light (yellow) does not illuminate or remains illuminated when the ignition switch isturned to the “ON” position or the operation mode is put in ON, or comes on while driv- ing, the Electric parking brake may not beapplied or released. Immediately contact the nearest authorized Mitsubishi Motors dealer or a repair facilityof your choice. For details, refer to “Electric parking brake warning light (yellow)” on page 5-179.When parking your vehicle while the Elec- tric parking brake warning light (yellow) is illuminated, park the vehicle on level andstable ground, move the selector lever to the “P” (PARK) position and place chocks, blocks, stones behind and in front of the tiresto prevent the vehicle from moving.
Steering wheel height and reach adjustment
BK0266800US.bo
ok 49 ページ 2018年6月27日 水曜日 午後5時6分