flat tire MITSUBISHI ECLIPSE CROSS 2020 (in English) User Guide
[x] Cancel search | Manufacturer: MITSUBISHI, Model Year: 2020, Model line: ECLIPSE CROSS, Model: MITSUBISHI ECLIPSE CROSS 2020Pages: 427, PDF Size: 78.05 MB
Page 210 of 427
Tire pressure monitoring system (TPMS)
Features and controls 5-129
5
allow the TPMS to continue to function prop- erly.
N00532801579
1. If the tire pressure monitoring system warning light illuminates, avoiding hard braking, sharp steering maneuvers andhigh speeds. You should stop and adjustthe tires to the proper inflation pressure as soon as possible. Adjust the spare tire at the same time. Refer to “Tires” on page9-12.
2. If the tire pressure monitoring system warning light remains illuminated after you have been driving for approximately20 minutes after you adjust the tire infla- tion pressure, one or more of the tires may have a puncture. Inspect the tire and if ithas a puncture, have it repaired by anauthorized Mitsubishi Motors dealer as soon as possible.
The tire pressure monitoring system may not work normally in the following circum-stances: A wireless facility or device using the same frequency is near the vehicle. Snow or ice is stuck inside the fenders and/or on the wheels. The tire inflation pressure sensor’s battery is dead. Wheels other than Mitsubishi genuine wheels are being used. Wheels that are not fitted with tire infla- tion pressure sensors are being used. Wheels whose ID co
des are not memo-
rized by the vehicle are used. Compact spare tire is fitted as a road wheel.
If the warning light / display illuminates while driving
NOTE
In addition, the warning display is displayed on the information screen in the multi-infor- mation display. When inspecting or adjusting the tire pres- sure, do not apply excessive force to thevalve stem to avoid breakage. After inspecting or adjusting the tire pres- sure, always reinstall the valve cap on the valve stem. Without the valve cap, dirt or moisture could get into the valve, resulting in damage to the tire inflation pressure sensor. Do not use metal valve caps, which may cause a metal reaction, resulting in corrosionand damage of the tire inflation pressure sen- sors.
Once adjustments have been made, the warn- ing light will go off after a few minutes of driving.WA R N I N G If the warning light / display illuminates while you are driving, avoid hard braking,sharp steering maneuvers and high speeds. Driving with an under-inflated tireadversely affects vehicle performance and can result in an accident.CAUTION If a tire has a puncture, replace that tire with the spare tire. Driving on a punctured tire could lead to an accident. The warning light / display may not illumi- nate immediately in the event of a tire blow-out or rapid leak.NOTE
NOTE
To avoid the risk of damage to the tire infla- tion pressure sensors, have any punctured tire repaired by an authorized Mitsubishi Motors dealer. If the tire repair is not done by an authorized Mitsubishi Motors dealer, it isnot covered by your warranty. Do not use an aerosol puncture-repair spray on any tire. Such a spray could damage the tire inflation pressure sensors.Have any puncture repaired by an authorized Mitsubishi Motors dealer.
BK0277700US.book
129 ページ 2019年3月8日 金曜日 午前9時23分
Page 211 of 427
Tire pressure monitoring system (TPMS) 5-130 Features and controls
5
A window tint that affects the radio wave signals is installed.
N00532900081
If new wheels with new tire inflation pressuresensors are installed, their ID codes must beprogrammed into the tire pressure monitoring system. Have tire and wheel replacement per- formed by an authorized Mitsubishi Motorsdealer to avoid the risk of damaging the tire inflation pressure sensors. If the wheel replacement is not done by an authorizedMitsubishi Motors dealer, it is not covered by your warranty.
N00584300042
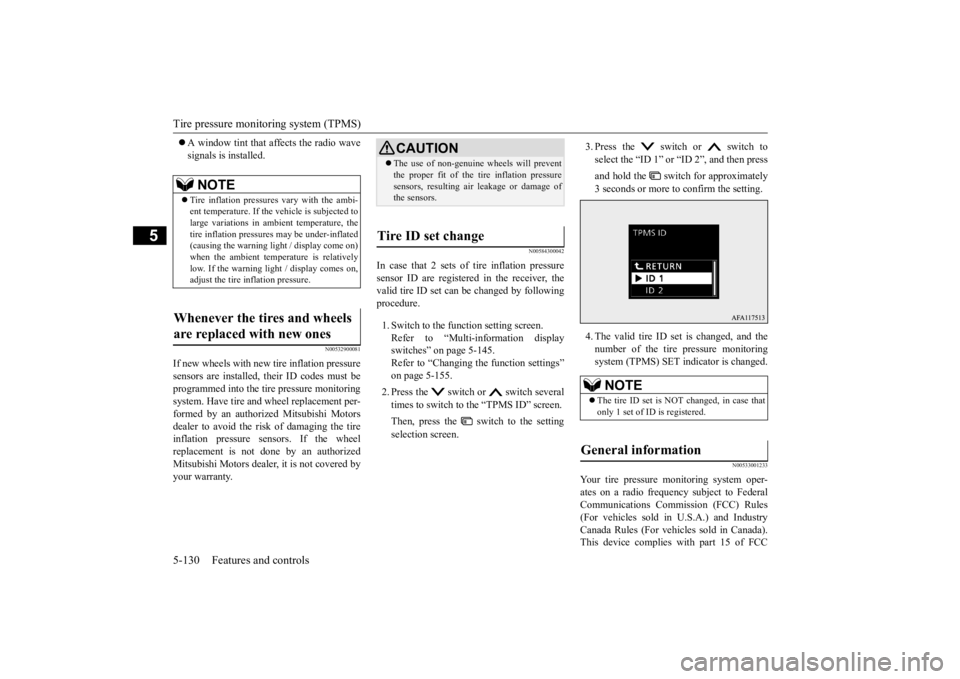
In case that 2 sets of tire inflation pressuresensor ID are registered in the receiver, the valid tire ID set can be changed by followingprocedure. 1. Switch to the function setting screen. Refer to “Multi-information display switches” on page 5-145.Refer to “Changing the function settings” on page 5-155. 2. Press the switch or switch several times to switch to the “TPMS ID” screen. Then, press the switch to the setting selection screen.
3. Press the switch or switch to select the “ID 1” or “ID 2”, and then press and hold the switch for approximately 3 seconds or more to confirm the setting. 4. The valid tire ID set is changed, and the number of the tire pressure monitoringsystem (TPMS) SET indicator is changed.
N00533001233
Your tire pressure monitoring system oper- ates on a radio frequency subject to Federal Communications Commission (FCC) Rules(For vehicles sold in U.S.A.) and Industry Canada Rules (For vehicles sold in Canada). This device complies with part 15 of FCC
NOTE
Tire inflation pressures vary with the ambi- ent temperature. If the
vehicle is subjected to
large variations in ambient temperature, thetire inflation pressures may be under-inflated (causing the warning light / display come on) when the ambient temperature is relativelylow. If the warning light / display comes on, adjust the tire inflation pressure.
Whenever the tires and wheels are replaced with new ones
CAUTION The use of non-genuine wheels will prevent the proper fit of the tire inflation pressure sensors, resulting air leakage or damage of the sensors.
Tire ID set change
NOTE
The tire ID set is NOT changed, in case that only 1 set of ID is registered.
General information
BK0277700US.book
130 ページ 2019年3月8日 金曜日 午前9時23分
Page 277 of 427

Combination headlights and dimmer switch 5-196 Features and controls
5
The sensitivity of the sensor can be temporar- ily lowering in the following ways. 1. Park your vehicle in a safe place and the ignition switch is turned to the “OFF” position or the operation mode is put inOFF.
NOTE
The headlights may not be switched from high beam to low beam under the following circumstances. • A vehicle in front or oncoming vehicle is hindered by any object such as continuous bends, elevated median/island, traffic signs, roadside trees. • Your vehicle passes an oncoming vehicle suddenly on a bend with poor visibility. • Another vehicle crosses ahead of your vehi- cle.
The headlights may remain at low beam (or be switched from high beam to low beam)when a reflective object (e.g. street light, traffic signal, noticeboard and signboard) reflects light. Any of the following factors may influence the headlight beam switching timing: • How brightly the exterior lights of a vehicle in front or oncoming vehicle illuminate. • Movement or direction of a vehicle in front or oncoming vehicle. • Only right or left exterior light of a vehicle in front or oncoming vehicle is illuminat-ing. • A vehicle in front or oncoming vehicle is a motorcycle. • Road conditions (gradient, bends and road surface). • The number of occupants and luggage load.
The AHB recognizes environmental condi- tions by sensing a light source ahead of your vehicle. Therefore, you may feel like some- thing is not quite right when the headlight beams are switched automatically. The system may not detect a light vehicle such as a bicycle. The system may not detect an ambient brightness precisely. This causes the trafficto be dazzled by high beam or the low beam to be maintained. In such cases, you should switch the headlight beams manually. • In bad weather (heavy rain, fog, snow or sandstorm). • The windshield is dirty or fogged up. • The windshield is cracked or broken. • The sensor is deformed or dirty.• A light, which is similar to the headlights or tail lights, is shining around your vehicle. • A vehicle in front or oncoming vehicle is driven without lights,
the exterior lights are
dirty or discolored, or the direction of the headlight beams is adjusted improperly. • It becomes dark and bright suddenly and continuously around your vehicle. • Your vehicle is driven on uneven surfaces. • Your vehicle is driven on a winding road.• A reflective object such as a noticeboard or a mirror reflects a light ahead of your vehi- cle.NOTE
• When lights of the vehicle in front or head-lights of an oncoming vehicle blend into the other lights. • The rear end of a vehicle in front (such as a container truck) reflect a strong light. • Your vehicle's headlight
is broken or dirty.
• Your vehicle is inclined due to a flat tire or towing. • The warning display appears. (Refer to “System problem warning” onpage 5-197.)
Observe the precautions below to maintain good usage conditions: • Do not attempt to disassemble the sensor.• Do not affix a sticker or label on the wind- shield near the sensor. • Avoid overload. • Do not modify your vehicle. • When the windshield is replaced, use the Mitsubishi Motors genuine parts.
To adjust the sensitivity of the sensor
NOTE
BK0277700US.book
196 ページ 2019年3月8日 金曜日 午前9時23分
Page 311 of 427
Driving precaution 6-2 Driving safety
6
N00629301119
Your vehicle has been designed for both nor- mal and occasional off-road use. However,avoid driving the vehicle through areas where the tires may get stuck in deep sand or mud as your vehicle is designed primarily for use onpavement, unlike a conventional off-road vehicle. Keep in mind that 2-wh
eel drive vehicles are
less capable than 4-wheel drive vehicles for driving on muddy, slippery, wet or snow-cov- ered roads. Utility vehicles have higher ground clearance and a narrower track, which enables them to perform in a wide variety of off-road situa- tions. Because of the higher ground clear-ance, these vehicles have a higher center of gravity, which makes them handle differently than ordinary vehicles when driving on pave-ment. They are not designed to maneuver or corner at the same speed on pavement as con- ventional 2-wheel drive passenger cars anymore than low-slung sports cars are designed
to perform satisfactorily in off-road condi- tions. Always drive safely and steer the vehicle carefully. Avoid operating the vehicle in amanner that might require sharp turns or abrupt maneuvers. As with other vehicles of this type, failure to operate this vehicle cor-rectly can result in loss of control or vehicle rollover. In a rollover crash, an unbelted person is sig-nificantly more likely to die than a personwearing a seat belt. Before starting the vehi- cle, always make certain that you and all your passengers are properly wearing their seatbelts (with children in the rear seat, in appro- priate restraints).
N00628801218
Fuel economy is dependent on many factors.Your personal driving habits can have a sig- nificant effect on your fuel consumption.Several recommendations for achieving the greatest fuel economy are listed below. Whenever accelerating from a stop, always accelerate slowly and smoothly. When parked for even a short period, do not idle the engine. Shut it off. Plan your trips to avoid unnecessary stops.
Keep your tires inflated to the recom- mended pressures. When driving a 4-wheel drive vehicle on highways or dry improved roads, set thedrive mode to “AUTO”. For freeway driving, maintain a speed of approximately 50 mph (80 km/h) whentraffic, roadway and weather conditions safely permit. Keep your air cleaner filter clean and your vehicle lubricated according to the recom-mendations in this manual. Always keep your vehicle well main- tained. A poorly maintained enginewastes fuel and costs money. Never overload your vehicle.
N00628900049
Drunk driving is one of the most frequent causes of accidents. Your driving ability can be seriously impairedeven with blood alcohol levels far below the legal minimum. If you have been drinking, don’t drive. Ride with a designated non-drinking driver, call a cab or a friend, or use public transportation. Drinking coffee or tak- ing a cold shower will not make you sober.Similarly, prescription and nonprescription drugs affect your alertness, perception and reaction time. Consult with your doctor or
Driving precaution
WA R N I N G Utility vehicles have
a significantly higher
rollover rate than other types of vehicles. Avoid abrupt maneuvers and excessive speed. Always buckle up.
Fuel economy
Driving, alcohol and drugs
BK0277700US.bo
ok 2 ページ 2019年3月8日 金曜日 午前9時23分
Page 313 of 427
Vehicle preparation before driving 6-4 Driving safety
6
N00629001842
For a safer and more enjoyable trip, always check for the following: Before starting the vehicle, make certain that you and all passengers are seated and wearing their seat belts properly (with children in the rear seat, in appropriaterestraints), and that all the doors and the liftgate are locked. Move the driver’s seat as far backward as possible, while keeping good visibility, and good control of the steering wheel, brakes, accelerator, and controls. Checkthe instrument panel indicators and multi- information display for any possible prob- lem. Similarly, the front passenger seat should also be moved as far back as possible. Make sure that infants and small children are properly restrained in accordance with all laws and regulations.
Check these by selecting the defroster mode, and set the blower switch on high. You shouldbe able to feel the air blowing against the windshield. Refer to “Defrosting or defogging (wind-shield, door windows)” on page 7-13, 7-22. Check all the tires for heavy tread wear or uneven wear patterns. Look for stones, nails,glass, or other objects stuck in the tread. Look for any tread cuts or sidewall cracks. Check the wheel nuts for tightness, and the tires(including spare tire) for proper pressure. Replace your tires before they are heavily worn out.As your vehicle is equipped with a tire pres- sure monitoring system, there is a risk of damage to the tire inflation pressure sensorswhen the tire is replaced on the rim. Tire replacement should, only, be performed by an authorized Mitsubishi Motors dealer. Have someone watch while you turn all the exterior lights on and off. Also check the turn
signal indicators and high-beam indicators on the instrument panel. Check the ground under the vehicle after parking overnight, for fuel, water, oil, or other leaks. Make sure all the fluid levels are correct. Also, if you can smell fuel, you needto find out why immediately and have itfixed.
N00629201147
Even this vehicle’s safety equipment, andyour safest driving, cannot guarantee that you can avoid an accident or injury. However, if you give extra attention to the followingareas, you can better protect yourself and your passengers: Drive defensively. Be aware of traffic, road and weather conditions. Leave plentyof stopping distance between your vehicle and the vehicle ahead. Before changing lanes, check your mir- rors, blind spots, and use your turn signal light. While driving, watch the behavior of other drivers, bicyclists, and pedestrians.
Vehicle preparation before driving Seat belts and seats
Defrosters Tires Lights
Fluid leaks Safe driving techniques
BK0277700US.bo
ok 4 ページ 2019年3月8日 金曜日 午前9時23分
Page 316 of 427
Loading information Driving safety 6-7
6
Vehicle maximum load on the tire: load on an individual tire that is determined by distributing to each axle its share of the maximum loaded vehicle weight anddividing by two. Vehicle normal load on the tire: load on an individual tire that is determined by dis-tributing to each axle its share of the curb weight, accessory weight, and normal occupant weight and dividing by two. Maximum loaded vehicle weight: the sum of - (a) Curb weight; (b) Accessory weight;(c) Vehicle capacity weight; and (d) Production options weight. Curb weight: the weight of a motor vehi- cle with standard equipment including the maximum capacity of fuel, oil, and cool- ant. Accessory weight: the combined weight (in excess of those standard items which may be replaced) of automatic transaxle,power steering, power brakes, power win- dows, power seats, radio, and heater, to the extent that these items are available asfactory-installed equipment (whether installed or not). Vehicle capacity weight: the rated cargo and luggage load plus 150 lbs (68 kg) * times the vehicle’s designated seating capacity.
Production options weight: the combined weight of those installed regular produc- tion options weighing over 5 lbs (2.3 kg) in excess of those standard items whichthey replace, not previously considered in curb weight or accessory weight, includ- ing heavy duty brakes, ride levelers, roofrack, heavy duty battery, and special trim. Normal occupant weight: 150 lbs (68 kg) * times the number of specified occupants (3 in the case of your vehicle) Occupant distribution: Occupant distribu- tion within the passenger compartment (In your vehicle the distribution is 2 in front,1 in rear seat)
N00630101423
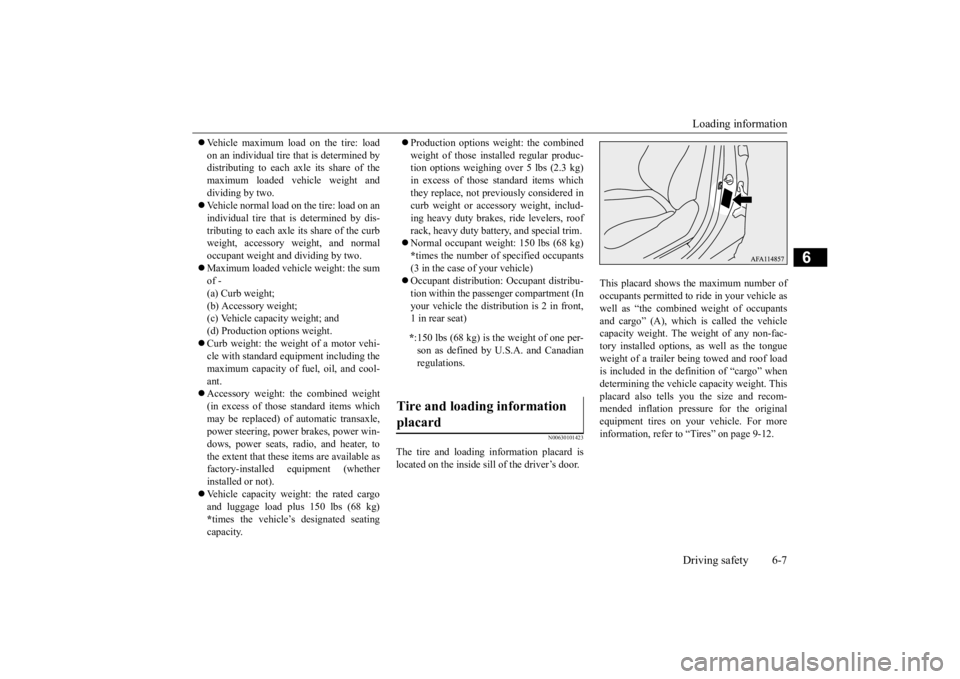
The tire and loading information placard is located on the inside sill of the driver’s door.
This placard shows the maximum number of occupants permitted to ride in your vehicle aswell as “the combined weight of occupants and cargo” (A), which is called the vehicle capacity weight. The weight of any non-fac-tory installed options, as well as the tongue weight of a trailer being towed and roof load is included in the definition of “cargo” whendetermining the vehicle capacity weight. Thisplacard also tells you the size and recom- mended inflation pressure for the original equipment tires on your vehicle. For moreinformation, refer to “Tires” on page 9-12.
* :150 lbs (68 kg) is the weight of one per- son as defined by U.S.A. and Canadianregulations.
Tire and loading information placard
BK0277700US.bo
ok 7 ページ 2019年3月8日 金曜日 午前9時23分
Page 323 of 427
Trailer towing 6-14 Driving safety
6
Towing a trailer requires a certain amount of experience. Before setting out for the open road, you’llwant to get to know your trailer. Acquaint
yourself with the feel
of handling and braking
with the added weight of the trailer. Always keep in mind that the vehicle you are driving is now a good deal longer and not nearly asresponsive as your vehicle is without a trailer. Before you start, check the trailer hitch, safety chains, tires and mirror adjustment. Be sure your vehicle’s tires are inflated to the cold inflation pressure listed in the manual.You’ll find these numbers on the tire and loading information placard at the sill of the driver’s door.Refer to “Tire inflation pressures” on page 9-15. Stay at least twice as far behind the vehicle ahead as you would when driving your vehi-cle without a trailer. This can help you avoid situations that require heavy braking and sud- den turns.
You’ll need more passing distance up ahead when you’re towing a trailer. And, becauseyou’re a good deal longer, you’ll need to go much farther beyond the passed vehicle before you can return to your lane. Hold the bottom of the steering wheel with one hand. Then, to move the trailer to the left, just move that hand to the left. To move thetrailer to the right, move your hand to the right. Always back up slowly and, if possible, have someone guide you. When you’re turning with a trailer, make wider than normal turns to help prevent thetrailer from striking shoulders, curbs, road signs, trees or other objects.
Operating hints
WA R N I N G If you have a rear window open and you tow a trailer with your vehicle, carbon monoxide gas which you cannot see or smell could come into your vehicle. It cancause unconsciousness or death. Refer to “Exhaust system” on page 9-22. To maximize your safety when towing atrailer:• Have your exhaust system inspected forleaks, and make necessary repairs before starting on your trip.• Keep the rear windows closed.• If exhaust does come into your vehicle through a window or another opening, drive with your front, main heating or cooling system on and with the blower onany speed. This will bring fresh, outside air into your vehicle. Do not use recircu- lation because it only recirculates the airinside your vehicle. Refer to “Air selec- tion switch” on page 7-9.
Driver preparation
Vehicle preparation Tire Following distance
Passing Backing up Making turns
CAUTION Making sharp turns while towing a trailer could cause the trailer to come in contact with the vehicle. Your vehicle could be dam- aged. Avoid making sharp turns while tow-ing a trailer.
BK0277700US.bo
ok 14 ページ 2019年3月8日 金曜日 午前9時23分
Page 357 of 427
How to change a tire 8-6 For emergencies
8
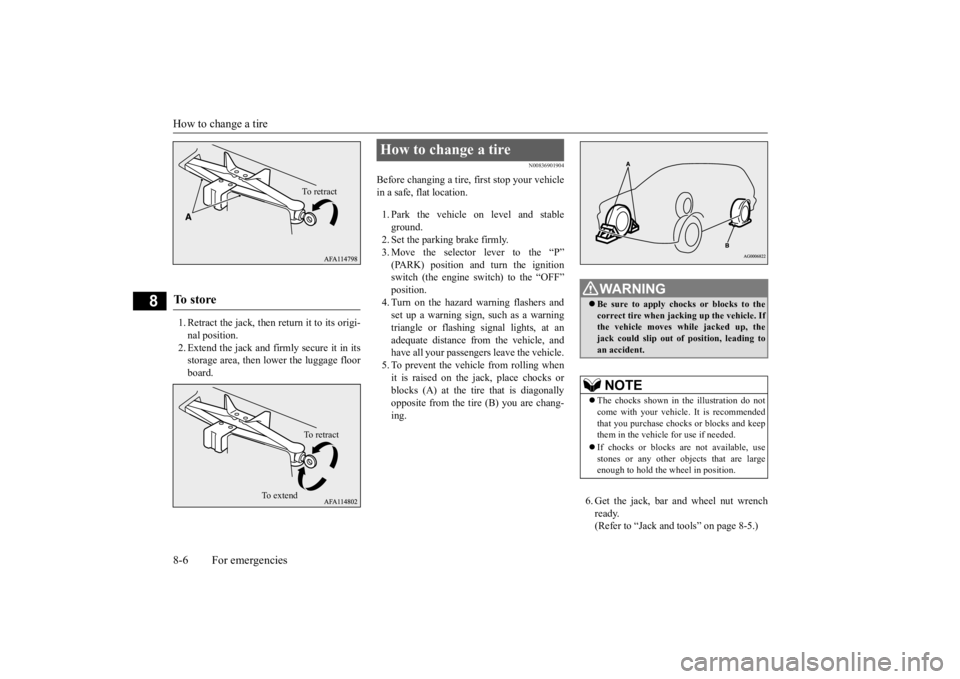
1. Retract the jack, then return it to its origi- nal position.2. Extend the jack and firmly secure it in its storage area, then lo
wer the luggage floor
board.
N00836901904
Before changing a tire, first stop your vehiclein a safe, flat location. 1. Park the vehicle on level and stable ground. 2. Set the parking brake firmly. 3. Move the selector lever to the “P”(PARK) position and turn the ignitionswitch (the engine switch) to the “OFF” position. 4. Turn on the hazard warning flashers andset up a warning sign, such as a warning triangle or flashing signal lights, at an adequate distance from the vehicle, andhave all your passengers leave the vehicle. 5. To prevent the vehicle from rolling when it is raised on the jack, place chocks orblocks (A) at the tire that is diagonally opposite from the tire (B) you are chang- ing.
6. Get the jack, bar and wheel nut wrench ready. (Refer to “Jack and tools” on page 8-5.)
To s t o r e
To r e t r a c tTo r e t r a c t
To e x t e n d
How to change a tire
WA R N I N G Be sure to apply chocks or blocks to the correct tire when jacking up the vehicle. If the vehicle moves while jacked up, thejack could slip out of position, leading to an accident.NOTE
The chocks shown in the illustration do not come with your vehicle. It is recommended that you purchase chocks or blocks and keep them in the vehicle for use if needed. If chocks or blocks are not available, use stones or any other objects that are largeenough to hold the wheel in position.
BK0277700US.bo
ok 6 ページ 2019年3月8日 金曜日 午前9時23分
Page 358 of 427
How to change a tire
For emergencies 8-7
8
N00849601341
The compact spare tire is stored under the luggage floor board of the luggage compart-ment. It is designed to save space in the lug- gage compartment. Its lighter weight makes it easier to use if a flat tire occurs.
N00849701384
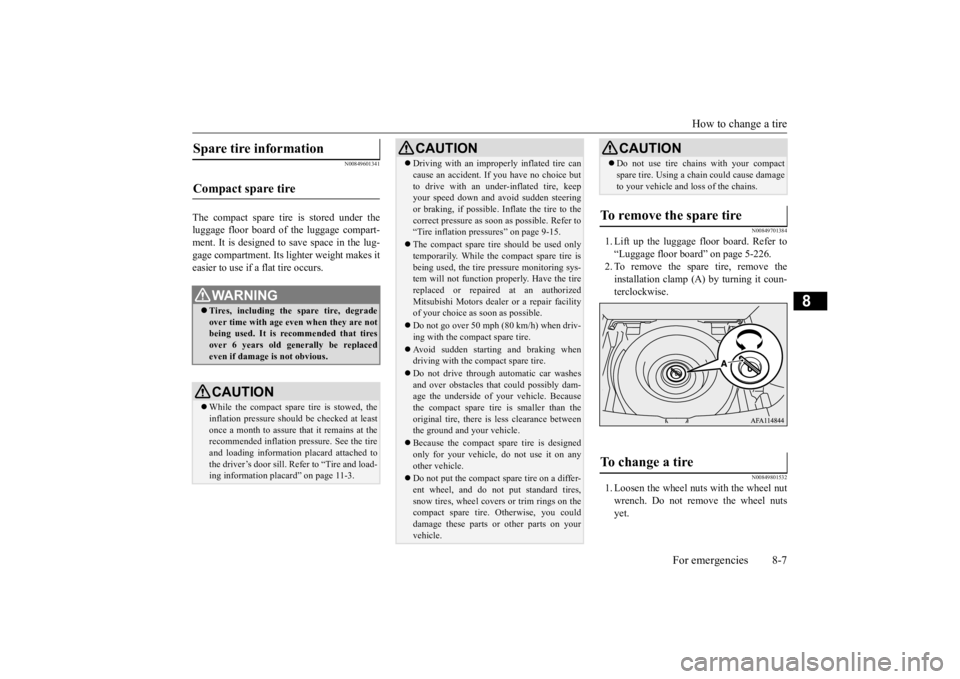
1. Lift up the luggage floor board. Refer to“Luggage floor board” on page 5-226.2. To remove the spare tire, remove theinstallation clamp (A) by turning it coun- terclockwise.
N00849801532
1. Loosen the wheel nuts with the wheel nut wrench. Do not remove the wheel nuts yet.
Spare tire information Compact spare tire
WA R N I N G Tires, including the spare tire, degrade over time with age even when they are notbeing used. It is recommended that tires over 6 years old generally be replaced even if damage is not obvious.CAUTION While the compact spare tire is stowed, the inflation pressure should be checked at least once a month to assure that it remains at therecommended inflation pressure. See the tire and loading information placard attached to the driver’s door sill. Refer to “Tire and load- ing information placard” on page 11-3.
Driving with an improperly inflated tire can cause an accident. If you have no choice but to drive with an under-inflated tire, keep your speed down and avoid sudden steering or braking, if possible
. Inflate the tire to the
correct pressure as soon as possible. Refer to “Tire inflation pressures” on page 9-15. The compact spare tire should be used only temporarily. While the compact spare tire is being used, the tire pressure monitoring sys-tem will not function properly. Have the tire replaced or repaired at an authorized Mitsubishi Motors dealer or a repair facilityof your choice as soon as possible. Do not go over 50 mph (80 km/h) when driv- ing with the compact spare tire. Avoid sudden starting and braking when driving with the compact spare tire. Do not drive through automatic car washes and over obstacles that could possibly dam- age the underside of your vehicle. Because the compact spare tire is smaller than theoriginal tire, there is less clearance between the ground and your vehicle. Because the compact spare tire is designed only for your vehicle, do not use it on any other vehicle. Do not put the compact spare tire on a differ- ent wheel, and do not put standard tires, snow tires, wheel covers or trim rings on the compact spare tire. Otherwise, you coulddamage these parts or other parts on your vehicle.CAUTION
Do not use tire chains with your compact spare tire. Using a chain could cause damage to your vehicle and loss of the chains.
To remove the spare tire To change a tire
CAUTION
BK0277700US.bo
ok 7 ページ 2019年3月8日 金曜日 午前9時23分
Page 359 of 427
How to change a tire 8-8 For emergencies
8
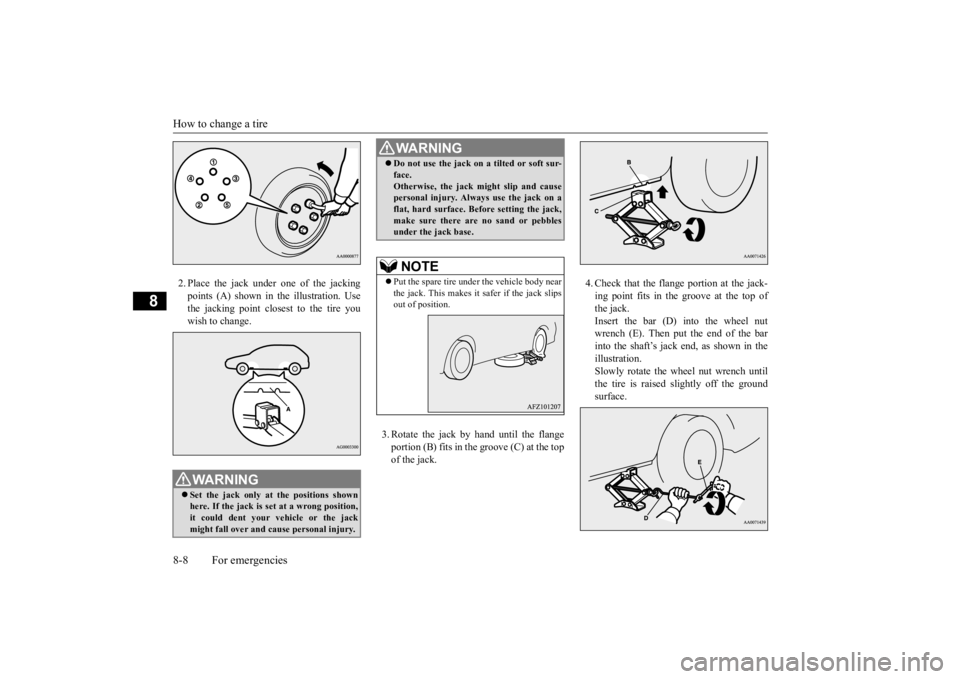
2. Place the jack under
one of the jacking
points (A) shown in the illustration. Use the jacking point closest to the tire youwish to change.
3. Rotate the jack by hand until the flange portion (B) fits in the groove (C) at the topof the jack.
4. Check that the flange portion at the jack- ing point fits in the groove at the top ofthe jack. Insert the bar (D) into the wheel nut wrench (E). Then put the end of the barinto the shaft’s jack end, as shown in the illustration. Slowly rotate the wheel nut wrench untilthe tire is raised slightly off the groundsurface.
WA R N I N G Set the jack only at the positions shown here. If the jack is set at a wrong position,it could dent your vehicle or the jack might fall over and cause personal injury.
Do not use the jack on a tilted or soft sur- face. Otherwise, the jack might slip and cause personal injury. Always use the jack on a flat, hard surface. Before setting the jack,make sure there are no sand or pebbles under the jack base.NOTE
Put the spare tire under the vehicle body near the jack. This makes it safer if the jack slipsout of position.WA R N I N G
BK0277700US.bo
ok 8 ページ 2019年3月8日 金曜日 午前9時23分