fuel pressure MITSUBISHI GALANT 1989 Service User Guide
[x] Cancel search | Manufacturer: MITSUBISHI, Model Year: 1989, Model line: GALANT, Model: MITSUBISHI GALANT 1989Pages: 1273, PDF Size: 37.62 MB
Page 79 of 1273

ENGINE
Front of engine I)Intake side
6EN094
Exhaust side
OlR0391
Fuel rail
pr&surehose\0-nng
TSB Revision
(2) Using the special tool, tighten the bolts in the order
shown in two or three steps.
5. INSTALLATION OF RADIATOR UPPER HOSE
Align the mating marks (of the radiator hose and hoseclamp), and then, while applying force in the direction of
the arrow in the illustration, seat the hose clamp to the
trace marks (on the hose) remaining from the prior connection.
Caution Be sure to install the hose clamp at the trace marks (on
the hose) remaining from the prior connection.
3. CONNECTION OF FUEL HIGH PRESSURE HOSE
When connecting the high-pressure fuel hose to the fuel rail, apply a coating of engine oil to the hose union, and in-
sert so that the O-ring is not damaged.
Page 80 of 1273
II-30ENGINE
CYLINDER HEAD GASKET
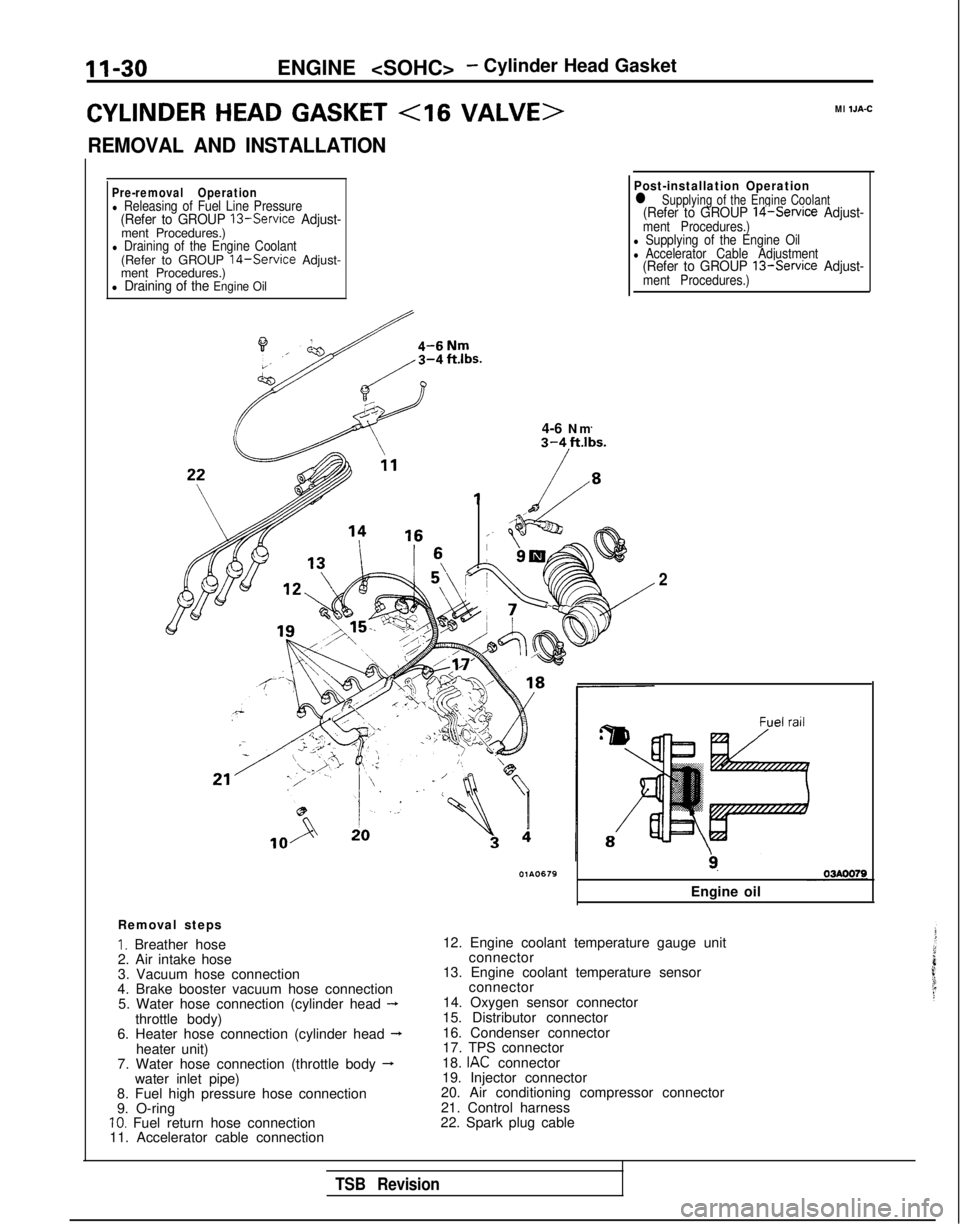
REMOVAL AND INSTALLATION
Ml IJA-C
Pre-removal Operationl Releasing of Fuel Line Pressure(Refer to GROUP 13-Service Adjust-ment Procedures.)l Draining of the Engine Coolant(Refer to GROUP 14-Service Adjust-
ment Procedures.)
l Draining of the Engine Oil
il4-6 Nm
Post-installation Operationl Supplying of the Engine Coolant(Refer to GROUP 14-Service Adjust-ment Procedures.)l Supplying of the Engine Oill Accelerator Cable Adjustment(Refer to GROUP 13-Service Adjust-ment Procedures.)
Removal steps
I. Breather hose
2. Air intake hose
3. Vacuum hose connection
4. Brake booster vacuum hose connection 5. Water hose connection (cylinder head
-throttle body)
6. Heater hose connection (cylinder head --Lheater unit)
7. Water hose connection (throttle body -water inlet pipe)
8. Fuel high pressure hose connection
9. O-ring
10. Fuel return hose connection
11. Accelerator cable connection
2
9.
Engine oil
12. Engine coolant temperature gauge unit connector
13. Engine coolant temperature sensor connector
14. Oxygen sensor connector
15. Distributor connector
16. Condenser connector
17. TPS connector
18.
IAC connector
19. Injector connector
20. Air conditioning compressor connector
21. Control harness
22. Spark plug cable
TSB Revision
Page 104 of 1273
11-54ENGINE
Items For air conditioning compressor DeflectionInspection
New belt
Used belt
Tension
Inspection
New belt
Used belt
For power steering pump
DeflectionInspection
Timing belt Amount of projection of auto tensioner rod
Timing belt “B” tension
Amount of projection of auto tensioner rod (distance between the tensioner arm and
auto tensioner body)
Auto tensioner rod retraction Standard Value
mm (in.) Approx. 8
(.315)
5.0-5.5 (.197-,217)
6.0-7.0 (.236-.276)
N (Ibs.)
250-500 (55-l 10)
470-570 (104-126)
320-400 (71-88)
mm (in.)
6.9-9.0 (.236-,354)
mm (in.) 12 (.47)
mm (in.) 5-7 (.20-.28)
mm (in.) 3.8-4.5 (.15-.18)
rpm 2.5-
3
Limit
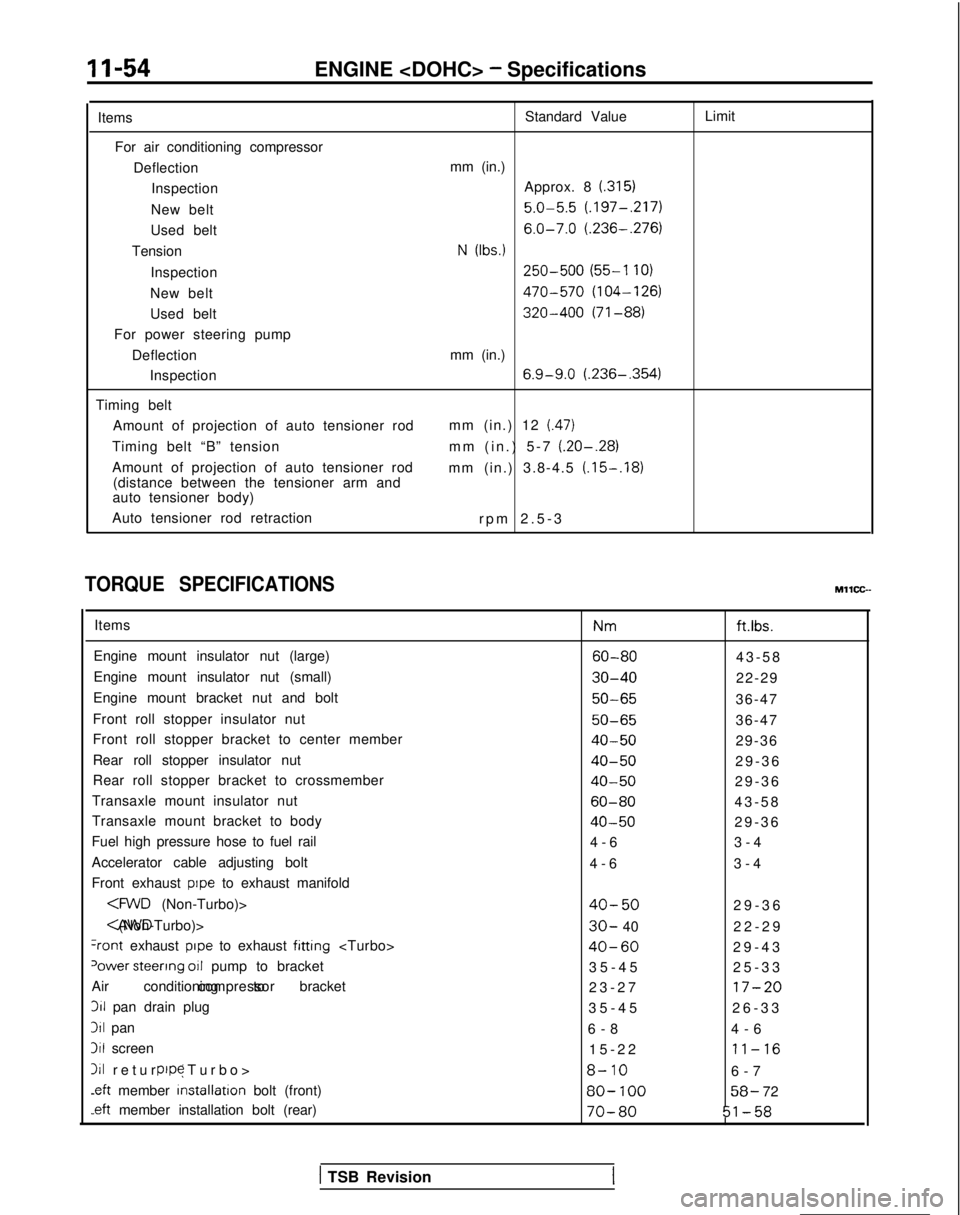
TORQUE SPECIFICATIONS
Items
Engine mount insulator nut (large)
Engine mount insulator nut (small)
Engine mount bracket nut and bolt
Front roll stopper insulator nut
Front roll stopper bracket to center member
Rear roll stopper insulator nut
Rear roll stopper bracket to crossmember
Transaxle mount insulator nut
Transaxle mount bracket to body
Fuel high pressure hose to fuel rail
Accelerator cable adjusting bolt
Front exhaust
pope to exhaust manifold
+ont exhaust pope to exhaust fitting
‘ower steerrng 011 pump to bracket
Air conditioning to bracket compressor311
pan drain plug
311 pan
3il screen
111 return (Turbo
>
pope
.eft
member installation
bolt (front)
-eft member installation bolt (rear) Nm
ft.ibs.
60-8043-5
8
30-4022-29
50-6536-47
50-6536-47
40-5029-36
40-5029-3
6
40-5029-3
6
60-8043-5
8
40-5029-3
6
4-6 3-4
4-6 3-4
40-5029-3
6
30- 40
22-2
9
40-6029-4
3
35-45 25-33
23-27
17-20
35-4
5
26-33
6-8 4-6
15-22
11-16
8-106-
7
80-
10058- 72
70-8051-58
MllCC--
( TSB Revision
Page 109 of 1273
ENGINE
7 Go;;ikv position
switch
(11)Check that there is continuity between the closed throttle
position switch terminal and body.
NOTE
When there is continuity, a clearance will be created between the throttle lever and dash pot rod when the dash
pot rod is pressed lightly.
(12) When there is no continuity, lower the engine speed when the dash pot begins operation to within the standard value
tolerance. Make sure to create continuity between the
closed throttle position switch terminal and body.
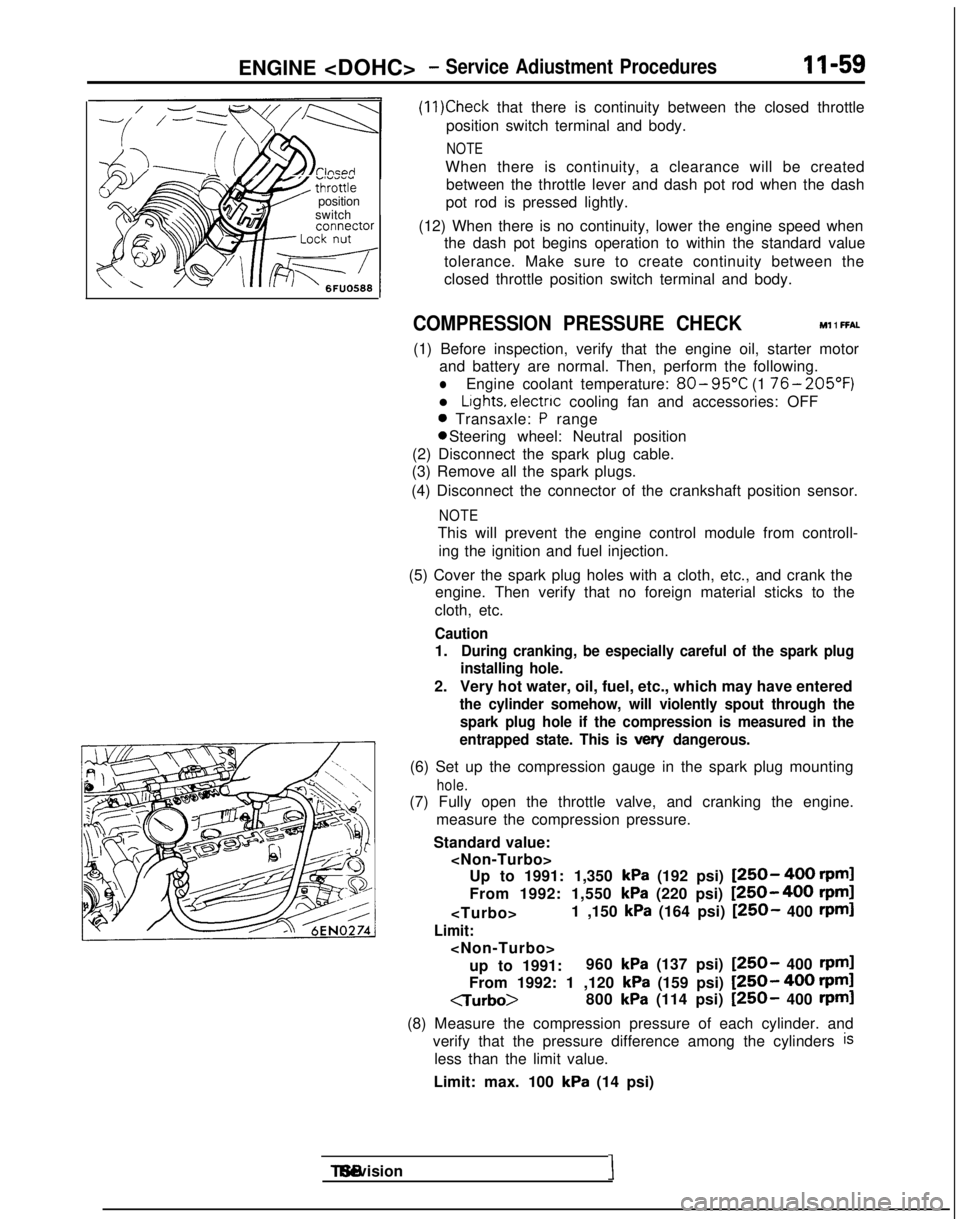
COMPRESSION PRESSURE CHECK Ml 1 FFAL
(1) Before inspection, verify that the engine oil, starter motor
and battery are normal. Then, perform the following.
lEngine coolant temperature: 80- 95°C
(1 76- 205’F)
l Lights, electnc
cooling fan and accessories: OFF
0 Transaxle: P range 0 Steering wheel: Neutral position
(2) Disconnect the spark plug cable.
(3) Remove all the spark plugs.
(4) Disconnect the connector of the crankshaft position sensor.
NOTE
This will prevent the engine control module from controll- ing the ignition and fuel injection.
(5) Cover the spark plug holes with a cloth, etc., and crank the engine. Then verify that no foreign material sticks to the
cloth, etc.
Caution
1.During cranking, be especially careful of the spark plug
installing hole.
2. Very hot water, oil, fuel, etc., which may have entered
the cylinder somehow, will violently spout through the
spark plug hole if the compression is measured in the
entrapped state. This is
vex/ dangerous.
(6) Set up the compression gauge in the spark plug mounting
hole.
(7) Fully open the throttle valve, and cranking the engine.
measure the compression pressure.
Standard value:
kPa (192 psi) [250- 400 rpml
From 1992: 1,550
kPa (220 psi) [250-400 rpm]
Limit:
up to 1991: 960
kPa (137 psi) [250- 400 rpml
From 1992: 1 ,120 kPa (159 psi) [250- 400 rpml
CTurbo>
800
kPa (114 psi) [250- 400 rpml
(8) Measure the compression pressure of each cylinder. and verify that the pressure difference among the cylinders
is
less than the limit value.
Limit: max. 100
kPa (14 psi) TSB Revision
I
Page 110 of 1273
II-60ENGINE
(9) If a cylinder’s compression pressure or pressure differenceis outside the limit, fill a small amount of engine oil through
the spark plug hole and repeat Items (7) and (8) above.
@ If the compression is increased when the oil is filled, the piston
and/or cylinder wall may be worn or
damaged.
@ If the compression is not Increased even though the oil is filled, the valve may be thermally seized, the valve
contact may be improper or pressure may leak at the
gasket. (10)Connect the connector of the crankshaft position sensor.
(1l)lnstall
the spark plug and spark plug cable.
(12)Erase the diagnostic trouble code with the scan tool or re-
connect the battery (-)
cable 10 seconds or more after it
was disconnected.
NOTE
This will erase the memory of the diagnostic trouble code which resulted from disconnection of the crankshaft posi-
tion sensor connector.
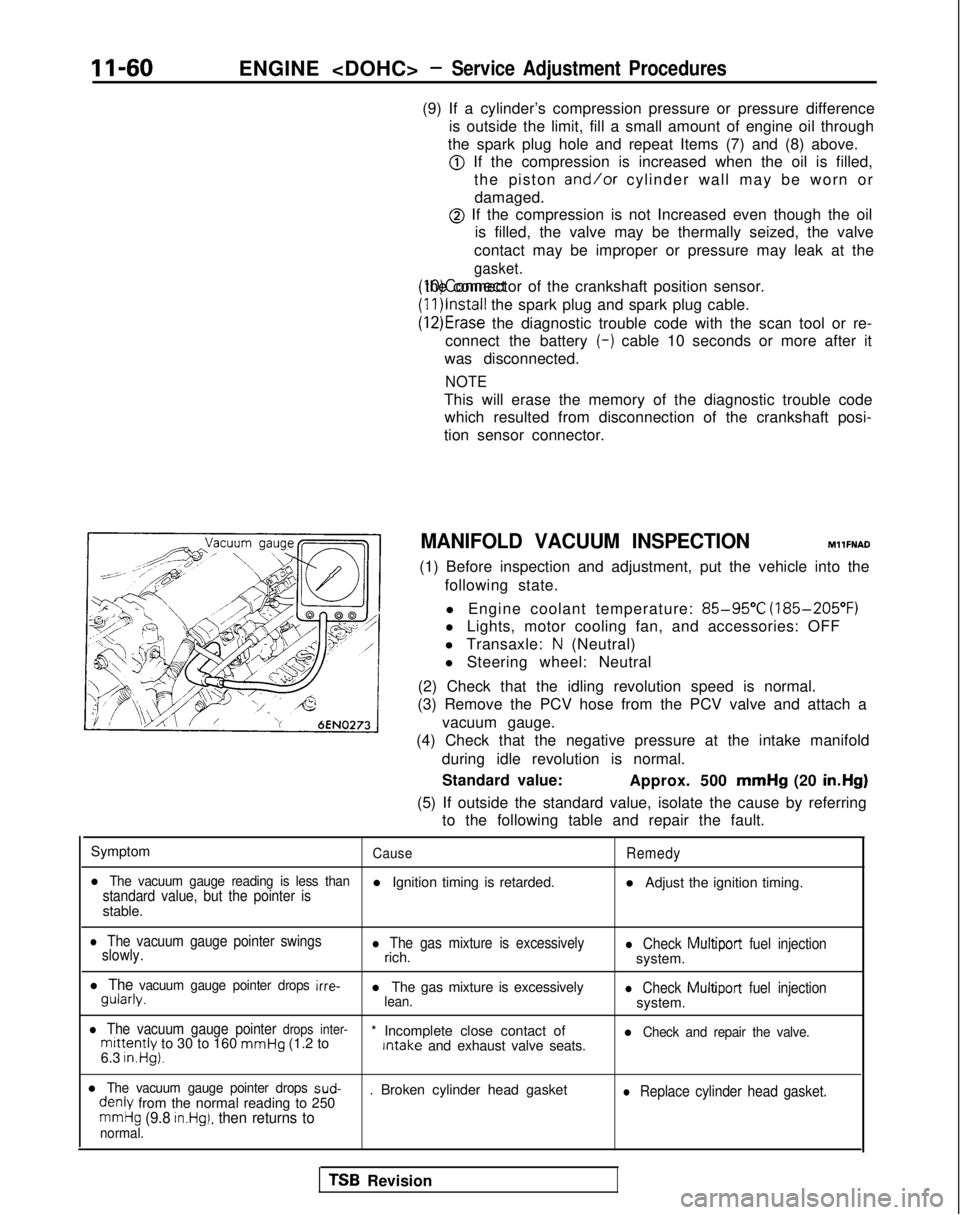
MANIFOLD VACUUM INSPECTION MllFNAD
(1) Before inspection and adjustment, put the vehicle into the following state.
l Engine coolant temperature:
85-95°C (185-205°F)
l Lights, motor cooling fan, and accessories: OFF
l Transaxle:
N (Neutral)
l Steering wheel: Neutral
(2) Check that the idling revolution speed is normal.
(3) Remove the PCV hose from the PCV valve and attach a
vacuum gauge.
(4) Check that the negative pressure at the intake manifold
during idle revolution is normal.
Standard value: Approx. 500 mmHg
(20 in.Hg)
(5) If outside the standard value, isolate the cause by referring to the following table and repair the fault.
Symptom
CauseRemedy
l The vacuum gauge reading is less thanstandard value, but the pointer isl Ignition timing is retarded. l Adjust the ignition timing.
stable.
l The vacuum gauge pointer swings
slowly.l The gas mixture is excessivelyrich.l Check Multiport fuel injectionsystem.
l The vacuum gauge pointer drops irre- gularly.
l The gas mixture is excessively
lean.l Check Multiport
fuel injectionsystem.
l The vacuum gauge pointer drops inter-mittently to 30 to 160 mmHg
(1.2 to * Incomplete close contact of Intake
and exhaust valve seats.l Check and repair the valve.
6.3 in.Hg).
l The vacuum gauge pointer drops sud- denly
from the normal reading to 250 . Broken cylinder head gasketl Replace cylinder head gasket.
mmHg (9.8 in.Hg), then returns tonormal.
TSB Revision
Page 113 of 1273
ENGINE
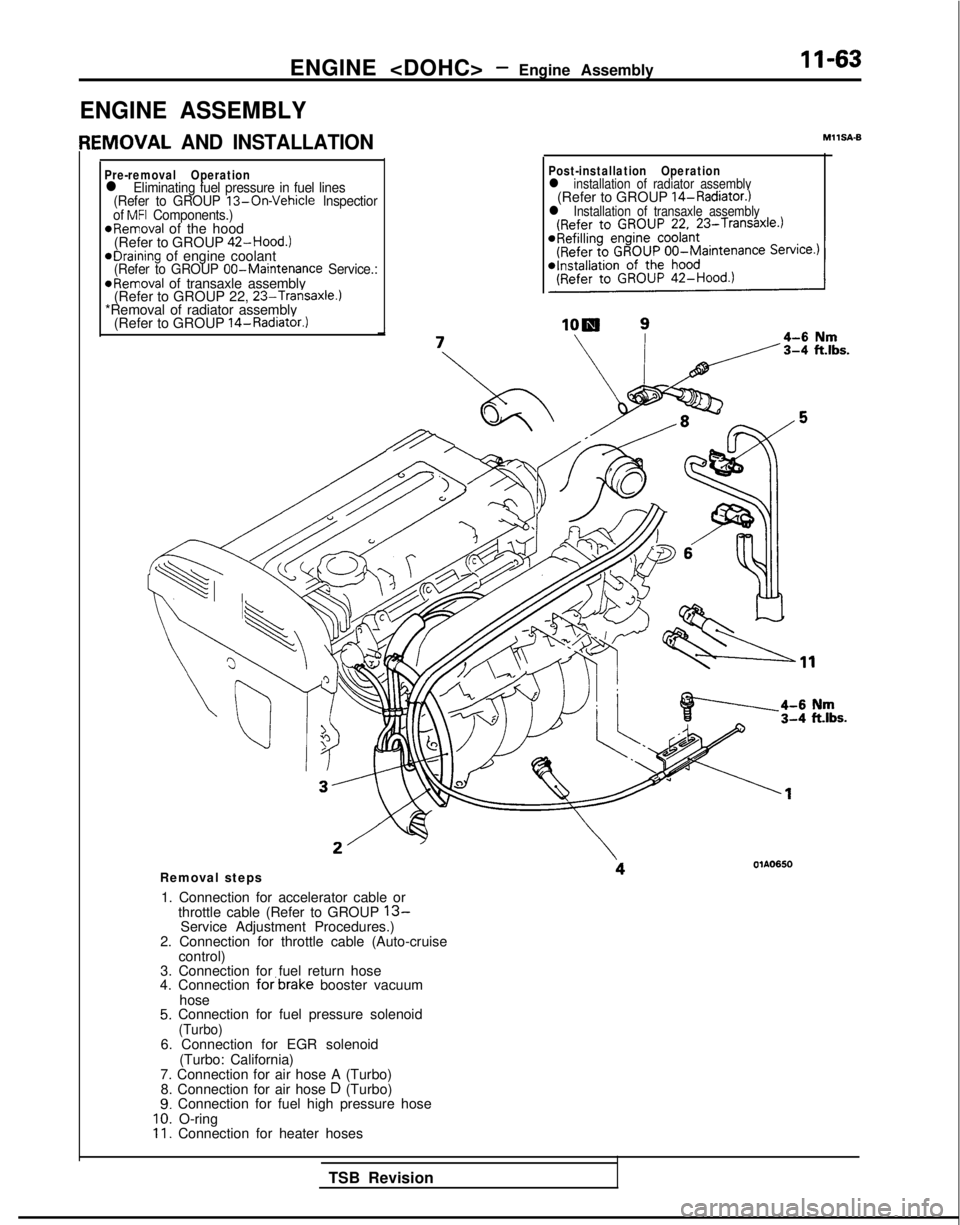
ENGINE ASSEMBLY
IEMOVAL AND INSTALLATION
Pre-removal Operationl Eliminating fuel pressure in fuel lines
(Refer to GROUP 13-On-Vehicle lnspectior
of MFI Components.)*Removal of the hood
(Refer to GROUP 42-Hood.)
eDraining of engine coolant(Refer to GROUP 00-Maintenance
Service.:@Removal of transaxle assembly
(Refer to GROUP 22, 23-Transaxle.)*Removal of radiator assembly
(Refer to GROUP 14-Radiator.)
MIISA-6
Post-installation Operationl installation of radiator assembly(Refer to GROUP 14-Radiator.)l Installation of transaxle assembly
Removal steps
1. Connection for accelerator cable or throttle cable (Refer to GROUP
13-Service Adjustment Procedures.)
2. Connection for throttle cable (Auto-cruise control)
3. Connection for fuel return hose
4. Connection
forbrake booster vacuum
hose
5. Connection for fuel pressure solenoid(Turbo)6. Connection for EGR solenoid (Turbo: California)
7. Connection for air hose A (Turbo) 8. Connection for air hose
D (Turbo)9. Connection for fuel high pressure hose10. O-ring11. Connection for heater hoses
TSB Revision
Page 123 of 1273
ENGINE
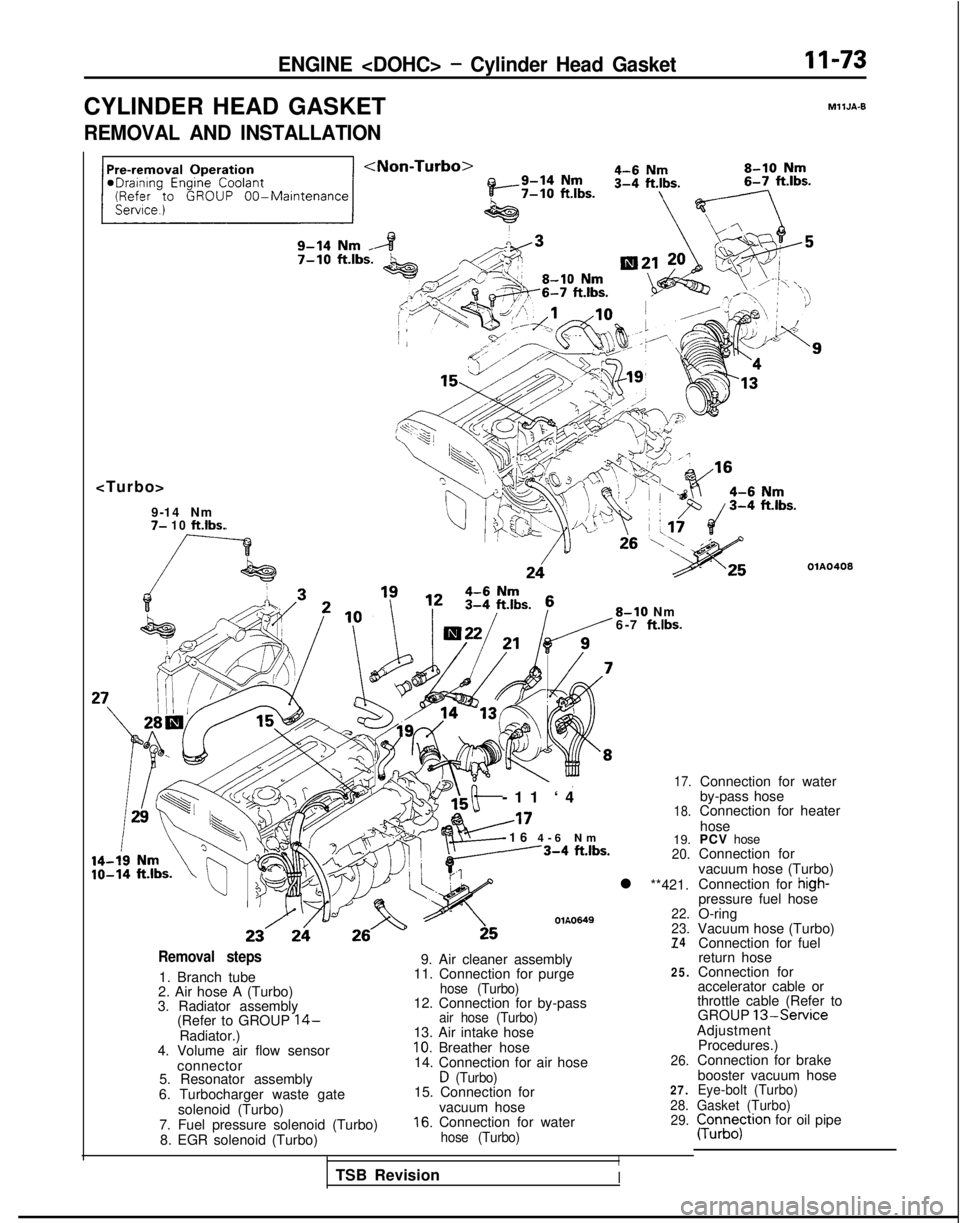
CYLINDER HEAD GASKET
MllJA-9
REMOVAL AND INSTALLATION
7- 10 ft.lbs.
OlA0408
8-10 Nm
6-7 ft.lbs.
-11 ‘
4
A17
-16
4-6 N
m
---3-4
ftlbs.
OlA0649
17.
18.
19.20.
l **421.
22.
23.
74Removal steps
1. Branch tube
2. Air hose A (Turbo)
3. Radiator assembly (Refer to GROUP
14-Radiator.)
4. Volume air flow sensor
connector
5. Resonator assembly
6. Turbocharger waste gate solenoid (Turbo)
7. Fuel pressure solenoid (Turbo) 8. EGR solenoid (Turbo)
-
9. Air cleaner assembly
11. Connection for purge25.
hose (Turbo)12. Connection for by-passair hose (Turbo)13. Air intake hose10. Breather hose
14. Connection for air hose26.
D (Turbo)15. Connection for27.
vacuum hose28.
16. Connection for water29.
hose (Turbo)
I
Connection for water
by-pass hose
Connection for heater
hose
PCV hose
Connection for
vacuum hose (Turbo)
Connection for
high-pressure fuel hose
O-ring
Vacuum hose (Turbo) Connection for fuel
return hose
Connection for
accelerator cable or
throttle cable (Refer to GROUP
13-ServiceAdjustment
Procedures.)
Connection for brake
booster vacuum hose
Eye-bolt (Turbo)
Gasket (Turbo)
pun;;;tron for oil pipe
TSB Revision
I
Page 127 of 1273
![MITSUBISHI GALANT 1989 Service User Guide ENGINE <DOHC>- Cylinder Head GasketII-77
SFAI ING
POINTSGaln
OlA0155
J
Front of engine I)Intake side
]
Exhaust side
SERVICE POINTS OF REMOVALMllJBAUa
21. DISCONNECTION OF HIGH-PRESSURE FUEL HOSE
Cauti](/img/19/57312/w960_57312-126.png "MITSUBISHI GALANT 1989 Service User Guide ENGINE <DOHC>- Cylinder Head GasketII-77
SFAI ING
POINTSGaln
OlA0155
J
Front of engine I)Intake side
]
Exhaust side
SERVICE POINTS OF REMOVALMllJBAUa
21. DISCONNECTION OF HIGH-PRESSURE FUEL HOSE
Cauti")
ENGINE
SFAI ING
POINTSGaln
OlA0155
J
Front of engine I)Intake side
]
Exhaust side
SERVICE POINTS OF REMOVALMllJBAUa
21. DISCONNECTION OF HIGH-PRESSURE FUEL HOSE
Caution
Cover the hose connection with rags to prevent splash
of fuel that could be caused by some residual pressure
in the fuel pipe line.
For information concerning the bleeding of the residualpressure, refer to GROUP
13-On-vehicle Inspection of MFI Components.
56. REMOVAL OF CYLINDER HEAD ASSEMBLY Using the tool, loosen the bolts in the order shown in the
figure (in 2 or 3 cycles) and remove. Then remove the cylin-
der head assembly.
TSB Revision
I
Page 129 of 1273
Intake side
Exhaust side
OlR0391
Fuel rail/
Hig; pressure \
O-ring
hose
03Aoo79
< 1993 models>
(1) Use a scraper to clean the gasket surface")
ENGINE
Front of engine I)Intake side
Exhaust side
OlR0391
Fuel rail/
Hig; pressure \
O-ring
hose
03Aoo79
< 1993 models>
(1) Use a scraper to clean the gasket surface of the cylin- der head assembly.
Caution
Take care that no foreign material gets into the
coolant passages or oil passages.
(2) When installing the cylinder head bolts, check that the shank length of each bolt meets the limit. If the limit is
exceeded, replace the bolt.
Limit: Max. 99.4 mm (3.91 in.)
(3) Apply engine oil to the threaded part of the bolt and the washer.
(4) According to the tightening sequence, tighten the bolts
to the specified torque 80 Nm (58 ftlbs.).
(5) Loosen bolts completely.
(6) Torque bolts to 20 Nm (14.5 ftlbs.).
(7) Tighten bolts
l/4 turns (90”) more.
(8) Tighten bolts
l/4 turns (90”) additionally.
TSB Revision 21. CONNECTION OF HIGH-PRESSURE FUEL HOSE
When connecting the high-pressure fuel hose to the fuelrail, apply a coating of engine oil to the hose union, and in-
sert so that the O-ring is not damaged.
Page 143 of 1273
13-1
FUEL
CONTENTSM’ISAA--
AUTO-CRUISE CONTROL SYSTEM.............
.
332
AUTO-CRUISE CONTROL ............................. 408
SERVICE ADJUSTMENT PROCEDURES .................397
Accelerator Cables
inspectron and Adjustment ........
.
398 Auto-cruise
Control System Inspection
..............397
Individual Parts Inspection ......................
401SPECfAL
TOOLS
.....................................
333
SPECIFICATIONS .................................... 332
TROUBLESHOOTING ................................. 334
Auto-cruise Control Components Location ..........368
Auto-cruise Control
Related Harnesses
..........365
Check Chart
Check Chart
Circuit Diagram ................................
371input Checking................................
.
366
On-board Diagnostic Checking ......................
361Troubleshooting Quick-reference Chart
.
334
Troubleshooting Quick-reference Chart
ENGINE CONTROL...............................
.
328
ENGINE CONTROL ..................................
330
SERVICE ADJUSTMENT PROCEDURES .................329
Accelerator Cable inspectron and Adjustment
...........329
Accelerator Switch Inspection and Adjustment ..........329
SPECIFICATIONS ....................................
328
TROUBLESHOOTlNG................................
.
328
Accelerator
Cable and Accelerator Pedal .............
.
328
FUEL SYSTEM
FUEL FILTER .........................................
327
FUEL LINE AND VAPOR LINE
.
326
FUEL LINE AND VAPOR LINE
.
324
FUEL TANK
.
322
FUELTANK
.
318
GENERAL INFORMATION ............................ 196
ON-VEHICLE INSPECTION OF MFI
COMPONENTS
......251
Air Conditioning Switch and A/C Compressor Clutch Relay .....................................
285
Barometric Pressure Sensor .................... 266
Boost Meter
311Camshaft Position Sensor ........................
.
277Closed Throttle Position Switch
.....................
.
274
Component Location .............................
251Components Inspection Pocedure
................. 255
Crankshaft Position Sensor ..................... 280EGR
Solenord
...................
.
307EGR Temperature Sensor
.............
.
288Engrne Control Module Power Ground
................
.
257
Engine Coolant Temperature Sensor ..................
268Evaporative Emission Purge Solenoid .................
.
307
Fuel Pressure Solenoid
307Fuel Pressure Test...............................
.
312
Fuel Pump ...................................... 258
Heated Oxygen Sensor ............................ 290
Idle Air Control Motor (Stepper Motor) ................
238Ignition Coil and Ignition Power Transistor .............
.
302
Ignition Switch-ST .................................. 284
Ignition Switch-ST and Park/Neutral Position Switch .....284
Injectors .......................................
295Inspection of Engine Control Module Terminal
Voltage .......................................
.
315
Intake Air Temperature Sensor .......................263
Knock Sensor
Power Steering Pressure Switch ......................
284Power Supply and Ignition Switch ...................
.
255Resistor
..............................
.
298Terminal Voltage Check Chart
......................
.
315Throttle Position Sensor
..........................
.
270Turbocharger Waste Gate Solenoid
.........
.
309 Vehicle
Speed Sensor
............................... 284
Volume Air Flow Sensor ............................
261SERVICE ADJUSTMENT PROCEDURES ...............
.
245
Basic
idle Speed Adjustment .......................
.
245
Closed Throttle Position Switch (Fixed
SAS)Adjustment ......................................
.
250
Curb
Idle Speed Inspection
..........................245Throttle Body (Throttle Valve Area) Cleaning
...........
.
248Throttle Position Sensor Adjustment
..................
.
248
SPECIALTOOLS...................................
.
204
SPECIFICATIONS ...................................
201TROUBLESHOOTING ...............................
.
205
Check Engine/Malfunction Indicator Lamp ..............205
Circuit Diagram .................................... 214
Clear Memory of Diagnostic Trouble Code .............
211Explanation and Precaution Related to Harness
Checking ......................................
.
205Explanation of Troubleshooting Procedures
............
.
205Failsafe/Back-up Functions List
.....................
.
211Fuel tank and Fuel Line
............................
.
244
Read Out Diagnostic Trouble Code ...................
211Troubleshooting Table
.............................
.
208(CONTINUED ON NEXT PAGE)