key MITSUBISHI GRANDIS 2008 (in English) User Guide
[x] Cancel search | Manufacturer: MITSUBISHI, Model Year: 2008, Model line: GRANDIS, Model: MITSUBISHI GRANDIS 2008Pages: 458, PDF Size: 18.52 MB
Page 33 of 458
Locking and unlocking
1-11
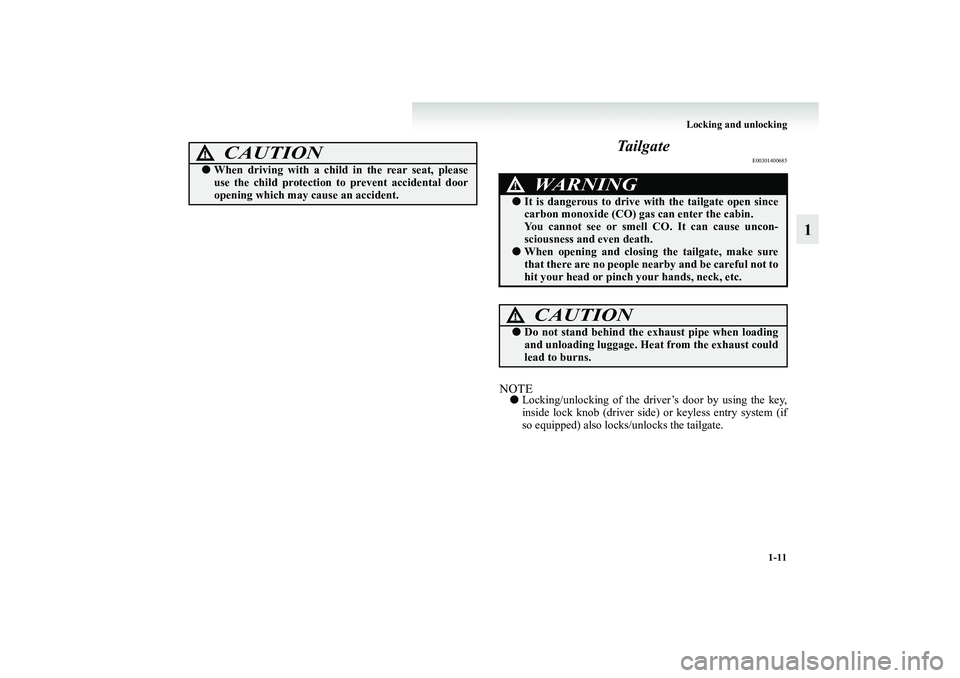
1 Tailgate
E00301400685
NOTE●Locking/unlocking of the driver’s door by using the key,
inside lock knob (driver side) or keyless entry system (if
so equipped) also locks/unlocks the tailgate.
CAUTION
!●When driving with a child in the rear seat, please
use the child protection to prevent accidental door
opening which may cause an accident.
WARNING
!●It is dangerous to drive with the tailgate open since
carbon monoxide (CO) gas can enter the cabin.
You cannot see or smell CO. It can cause uncon-
sciousness and even death.●When opening and closing the tailgate, make sure
that there are no people nearby and be careful not to
hit your head or pinch your hands, neck, etc.
CAUTION
!●Do not stand behind the exhaust pipe when loading
and unloading luggage. Heat from the exhaust could
lead to burns.
BK-XP08E1ENUK.en-uk.book Page 11 Monday, August 13, 2007 2:20 PM
Page 34 of 458
1-12 Locking and unlocking
1
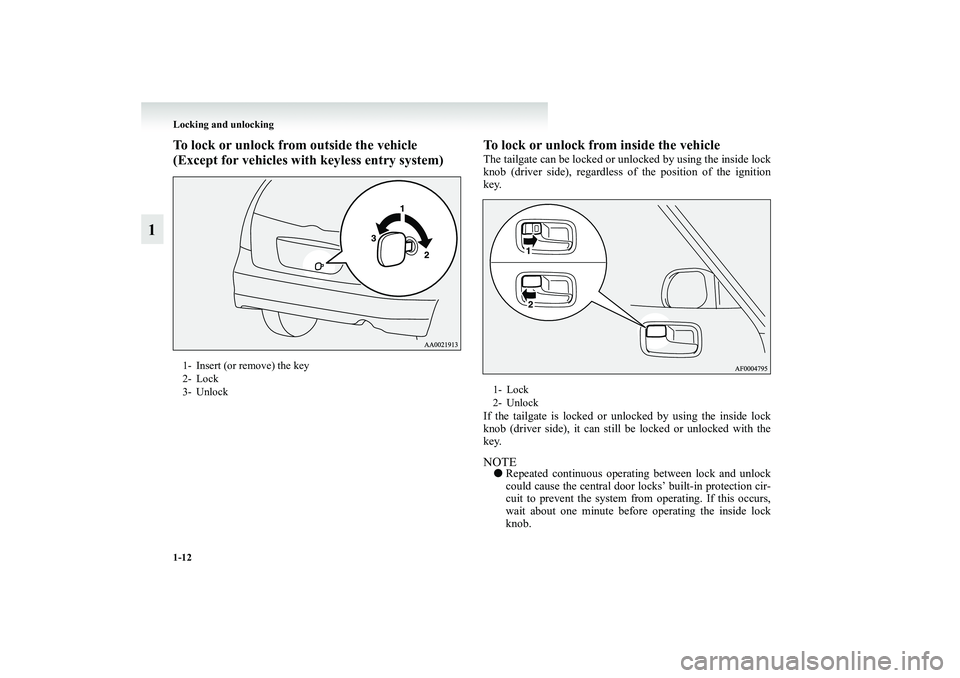
To lock or unlock from outside the vehicle
(Except for vehicles with keyless entry system)To lock or unlock from inside the vehicle
The tailgate can be locked or unlocked by using the inside lock
knob (driver side), regardless of the position of the ignition
key.
If the tailgate is locked or unlocked by using the inside lock
knob (driver side), it can still be locked or unlocked with the
key.NOTE●Repeated continuous operating between lock and unlock
could cause the central door locks’ built-in protection cir-
cuit to prevent the system from operating. If this occurs,
wait about one minute before operating the inside lock
knob.
1- Insert (or remove) the key
2- Lock
3- Unlock
1- Lock
2- Unlock
BK-XP08E1ENUK.en-uk.book Page 12 Monday, August 13, 2007 2:20 PM
Page 39 of 458
Locking and unlocking
1-17
1
NOTE●Repeated operation with the engine stopped will run down
the battery. Operate the window switches only while the
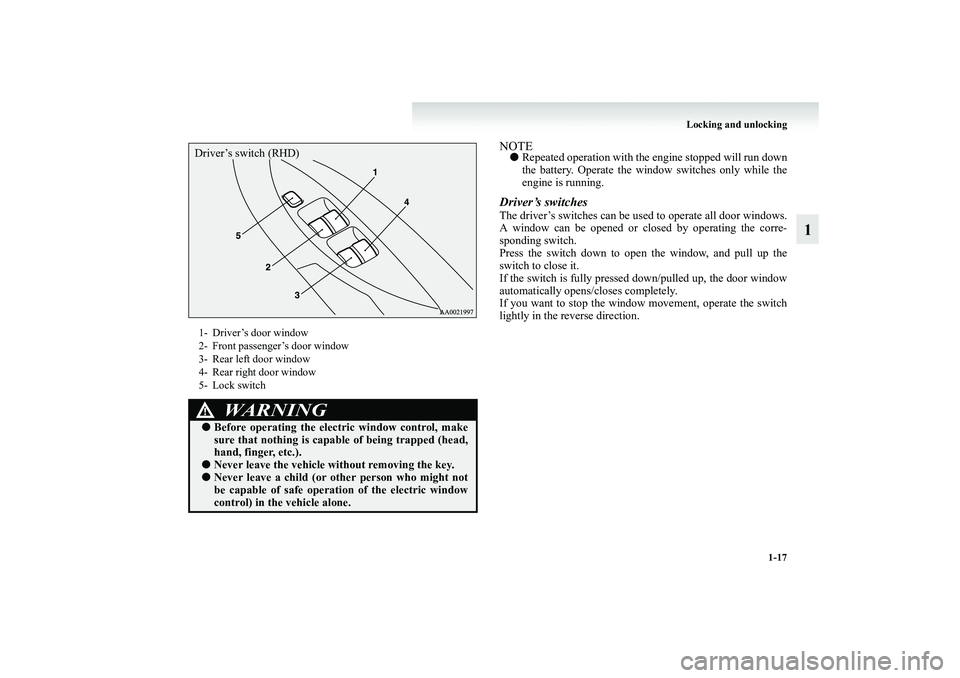
engine is running.Driver’s switchesThe driver’s switches can be used to operate all door windows.
A window can be opened or closed by operating the corre-
sponding switch.
Press the switch down to open the window, and pull up the
switch to close it.
If the switch is fully pressed down/pulled up, the door window
automatically opens/closes completely.
If you want to stop the window movement, operate the switch
lightly in the reverse direction.
1- Driver’s door window
2- Front passenger’s door window
3- Rear left door window
4- Rear right door window
5- Lock switch
WARNING
!●Before operating the electric window control, make
sure that nothing is capable of being trapped (head,
hand, finger, etc.).●Never leave the vehicle without removing the key.●Never leave a child (or other person who might not
be capable of safe operation of the electric window
control) in the vehicle alone.Driver’s switch (RHD)
BK-XP08E1ENUK.en-uk.book Page 17 Monday, August 13, 2007 2:20 PM
Page 46 of 458
1-24 Locking and unlocking
1
NOTE●The sunroof stops just before reaching the fully open posi-
tion.
If the vehicle is driven with the sunroof in this position,
wind throbs is lower than with the sunroof fully open.
●When leaving the vehicle unattended, make sure you
close the sunroof and remove the ignition key.
●Do not try to operate the sunroof if it is frozen closed
(after snow fall or during extreme cold).
●Do not sit or place heavy luggage on the sunroof or roof
opening edge.●Release the switch as soon as the sunroof reaches the fully
open or fully closed position.
●If the sunroof does not operate when the sunroof switch is
operated, release the switch and check whether something
is trapped by the sunroof. If nothing is trapped, we recom-
mend you to have the sunroof checked.
●Depending on the models of ski carriers or roof carriers,
the sunroof may contact with the carrier when the sunroof
is tilted up. Be careful when tilting up the sunroof if such
a ski carrier or a roof carrier is installed.
●Be sure to close the sunroof completely when washing the
vehicle or when leaving the vehicle.
●Be careful, not to put any wax on the weatherstrip (black
rubber) around the sunroof opening. If stained with wax,
the weatherstrip cannot maintain a weatherproof seal with
the sunroof.
●After washing the vehicle or after it has rained, wipe off
any water that is on the sunroof before operating it.
●Operating the sunroof repeatedly with the engine station-
ary will run down the battery. Operate the sunroof while
the engine is running.
WARNING
!●Do not put head, hands or anything else out of the
sunroof opening while driving the vehicle.●Never leave a child (or other person who might not
be capable of safe operation of the sunroof switch) in
the vehicle alone.●Before operating the sunroof, make sure that noth-
ing is capable of being trapped (head, hand, finger,
etc.).
CAUTION
!●The safety mechanism is cancelled just before the
sunroof is fully closed. This allows the sunroof to
close completely.
Therefore be especially careful that no fingers are
trapped in the sunroof.
BK-XP08E1ENUK.en-uk.book Page 24 Monday, August 13, 2007 2:20 PM
Page 84 of 458
2-36 Seat and seat belts
2
When the ignition key is turned to the “ON” position, the warn-
ing lamp will come on and a tone will sound for about 6 sec-
onds. If the front seat belt remains unfastened approximately
1 minute later, the warning lamp will flash and the tone sound
intermittently (each 12 seconds) when the vehicle is driven. If
the passenger subsequently unfastens the seat belt while driv-
ing, the warning lamp and tone will issue further warnings.
And if the seat belt remains unfastened, the warning lamp and
tone will issue further warnings each time the vehicle starts
moving from a stop. When the seat belt is fastened, the warn-
ings will stop. NOTE●When luggage is placed on the front passenger seat, a sen-
sor in the seat cushion may, depending on the weight and
position of the luggage, cause the warning tone to sound
and the warning lamp to come on.
Adjustable seat belt anchor (front seats)
E00405000433
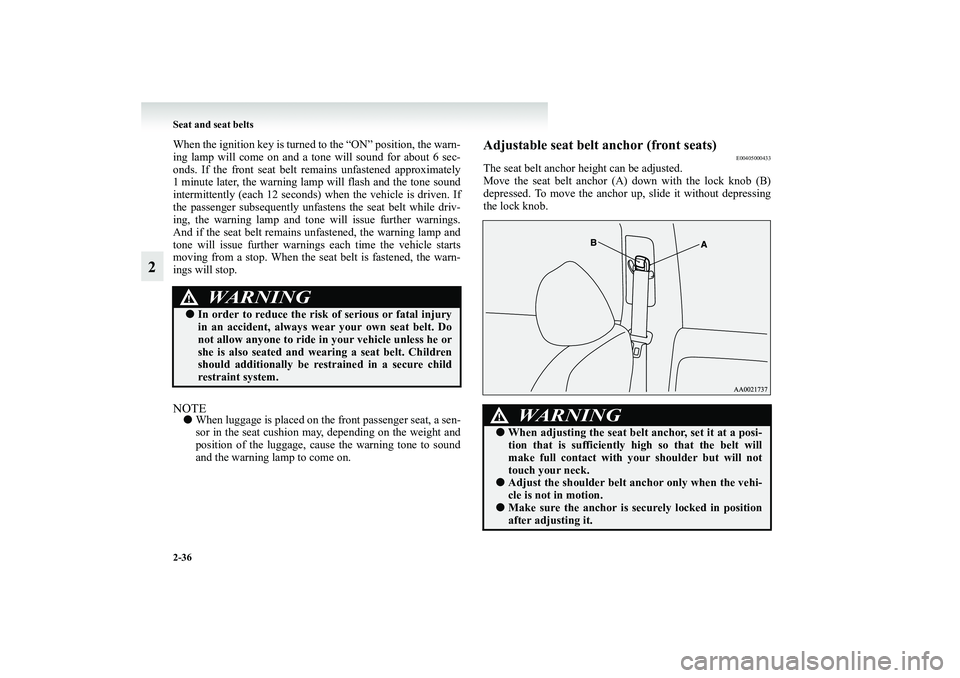
The seat belt anchor height can be adjusted.
Move the seat belt anchor (A) down with the lock knob (B)
depressed. To move the anchor up, slide it without depressing
the lock knob.
WARNING
!●In order to reduce the risk of serious or fatal injury
in an accident, always wear your own seat belt. Do
not allow anyone to ride in your vehicle unless he or
she is also seated and wearing a seat belt. Children
should additionally be restrained in a secure child
restraint system.
WARNING
!●When adjusting the seat belt anchor, set it at a posi-
tion that is sufficiently high so that the belt will
make full contact with your shoulder but will not
touch your neck.●Adjust the shoulder belt anchor only when the vehi-
cle is not in motion.●Make sure the anchor is securely locked in position
after adjusting it.
BK-XP08E1ENUK.en-uk.book Page 36 Monday, August 13, 2007 2:20 PM
Page 93 of 458
Seat and seat belts
2-45
2
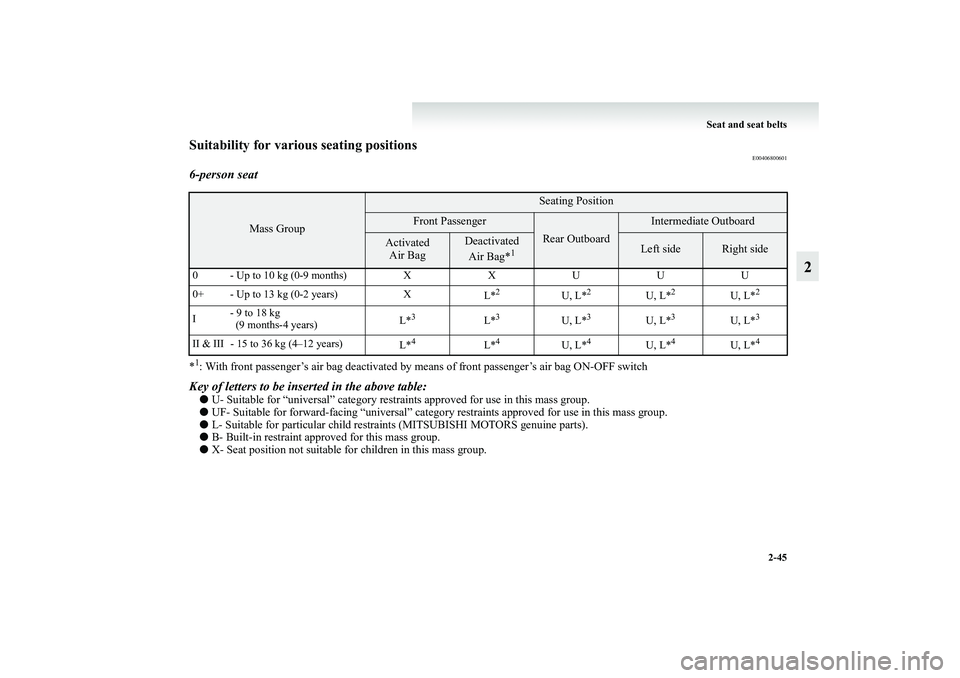
Suitability for various seating positions
E00406800601
6-person seat*1: With front passenger’s air bag deactivated by means of front passenger’s air bag ON-OFF switchKey of letters to be inserted in the above table:●U- Suitable for “universal” category restraints approved for use in this mass group.
●UF- Suitable for forward-facing “universal” category restraints approved for use in this mass group.
●L- Suitable for particular child restraints (MITSUBISHI MOTORS genuine parts).
●B- Built-in restraint approved for this mass group.
●X- Seat position not suitable for children in this mass group.
Mass Group
Seating Position
Front Passenger
Rear Outboard
Intermediate Outboard
Activated
Air Bag
Deactivated
Air Bag*
1
Left side
Right side
0 - Up to 10 kg (0-9 months) X X U U U
0+ - Up to 13 kg (0-2 years) X
L*
2
U, L*
2
U, L*
2
U, L*
2
I- 9 to 18 kg
(9 months-4 years)L*
3
L*
3
U, L*
3
U, L*
3
U, L*
3
II & III - 15 to 36 kg (4–12 years)
L*
4
L*
4
U, L*
4
U, L*
4
U, L*
4
BK-XP08E1ENUK.en-uk.book Page 45 Monday, August 13, 2007 2:20 PM
Page 95 of 458
Seat and seat belts
2-47
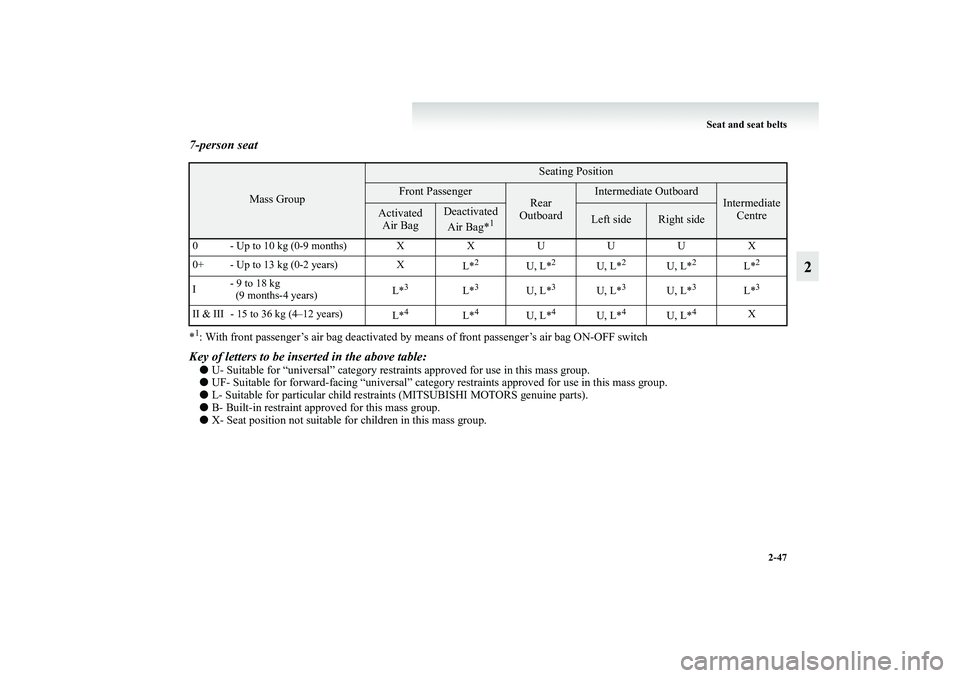
2
7-person seat*1: With front passenger’s air bag deactivated by means of front passenger’s air bag ON-OFF switchKey of letters to be inserted in the above table:●U- Suitable for “universal” category restraints approved for use in this mass group.
●UF- Suitable for forward-facing “universal” category restraints approved for use in this mass group.
●L- Suitable for particular child restraints (MITSUBISHI MOTORS genuine parts).
●B- Built-in restraint approved for this mass group.
●X- Seat position not suitable for children in this mass group.
Mass Group
Seating Position
Front Passenger
Rear
Outboard
Intermediate Outboard
Intermediate
Centre
Activated
Air Bag
Deactivated
Air Bag*
1
Left side
Right side
0- Up to 10 kg (0-9 months)XXUUUX
0+ - Up to 13 kg (0-2 years) X
L*
2
U, L*
2
U, L*
2
U, L*
2
L*
2
I- 9 to 18 kg
(9 months-4 years)L*
3
L*
3
U, L*
3
U, L*
3
U, L*
3
L*
3
II & III - 15 to 36 kg (4–12 years)
L*
4
L*
4
U, L*
4
U, L*
4
U, L*
4
X
BK-XP08E1ENUK.en-uk.book Page 47 Monday, August 13, 2007 2:20 PM
Page 108 of 458
2-60 Seat and seat belts
2
To turn an air bag off
E00410600118
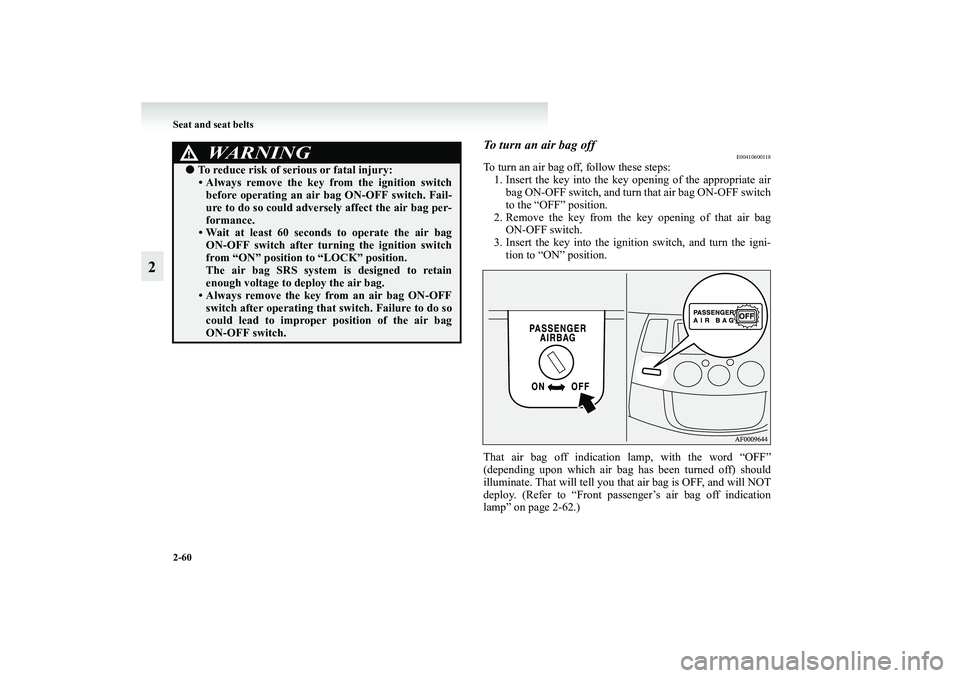
To turn an air bag off, follow these steps:
1. Insert the key into the key opening of the appropriate air
bag ON-OFF switch, and turn that air bag ON-OFF switch
to the “OFF” position.
2. Remove the key from the key opening of that air bag
ON-OFF switch.
3. Insert the key into the ignition switch, and turn the igni-
tion to “ON” position.
That air bag off indication lamp, with the word “OFF”
(depending upon which air bag has been turned off) should
illuminate. That will tell you that air bag is OFF, and will NOT
deploy. (Refer to “Front passenger’s air bag off indication
lamp” on page 2-62.)
WARNING
!●To reduce risk of serious or fatal injury:
• Always remove the key from the ignition switch
before operating an air bag ON-OFF switch. Fail-
ure to do so could adversely affect the air bag per-
formance.
• Wait at least 60 seconds to operate the air bag
ON-OFF switch after turning the ignition switch
from “ON” position to “LOCK” position.
The air bag SRS system is designed to retain
enough voltage to deploy the air bag.
• Always remove the key from an air bag ON-OFF
switch after operating that switch. Failure to do so
could lead to improper position of the air bag
ON-OFF switch.
BK-XP08E1ENUK.en-uk.book Page 60 Monday, August 13, 2007 2:20 PM
Page 109 of 458
Seat and seat belts
2-61
2
That air bag will remain OFF, and will NOT deploy, until it is
again turned ON.
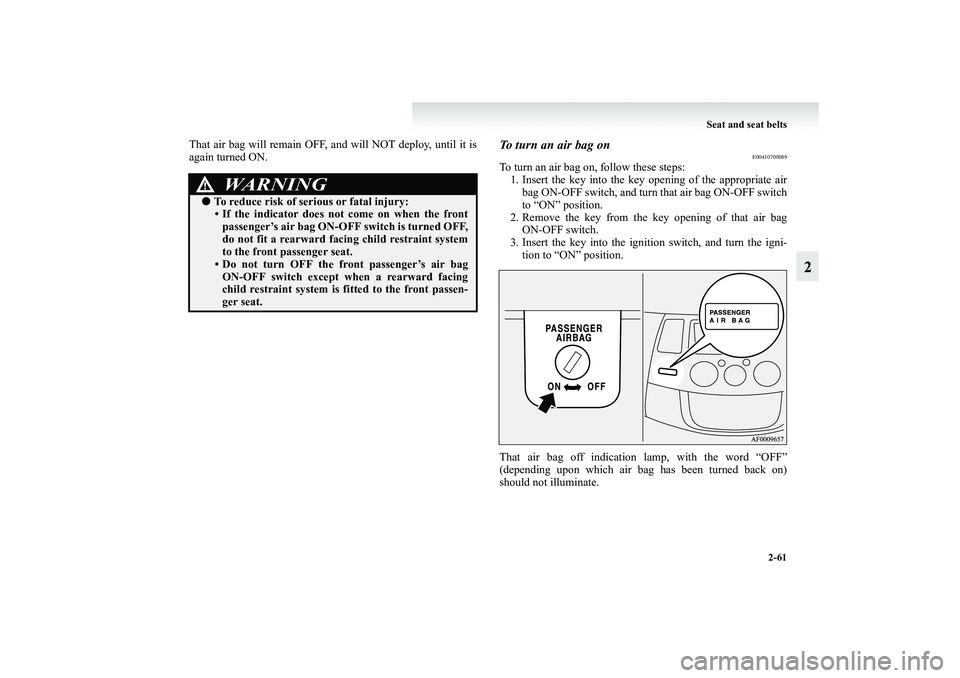
To turn an air bag on
E00410700089
To turn an air bag on, follow these steps:
1. Insert the key into the key opening of the appropriate air
bag ON-OFF switch, and turn that air bag ON-OFF switch
to “ON” position.
2. Remove the key from the key opening of that air bag
ON-OFF switch.
3. Insert the key into the ignition switch, and turn the igni-
tion to “ON” position.
That air bag off indication lamp, with the word “OFF”
(depending upon which air bag has been turned back on)
should not illuminate.
WARNING
!●To reduce risk of serious or fatal injury:
• If the indicator does not come on when the front
passenger’s air bag ON-OFF switch is turned OFF,
do not fit a rearward facing child restraint system
to the front passenger seat.
• Do not turn OFF the front passenger’s air bag
ON-OFF switch except when a rearward facing
child restraint system is fitted to the front passen-
ger seat.
BK-XP08E1ENUK.en-uk.book Page 61 Monday, August 13, 2007 2:20 PM
Page 124 of 458
2-76 Seat and seat belts
2
SRS warning lamp
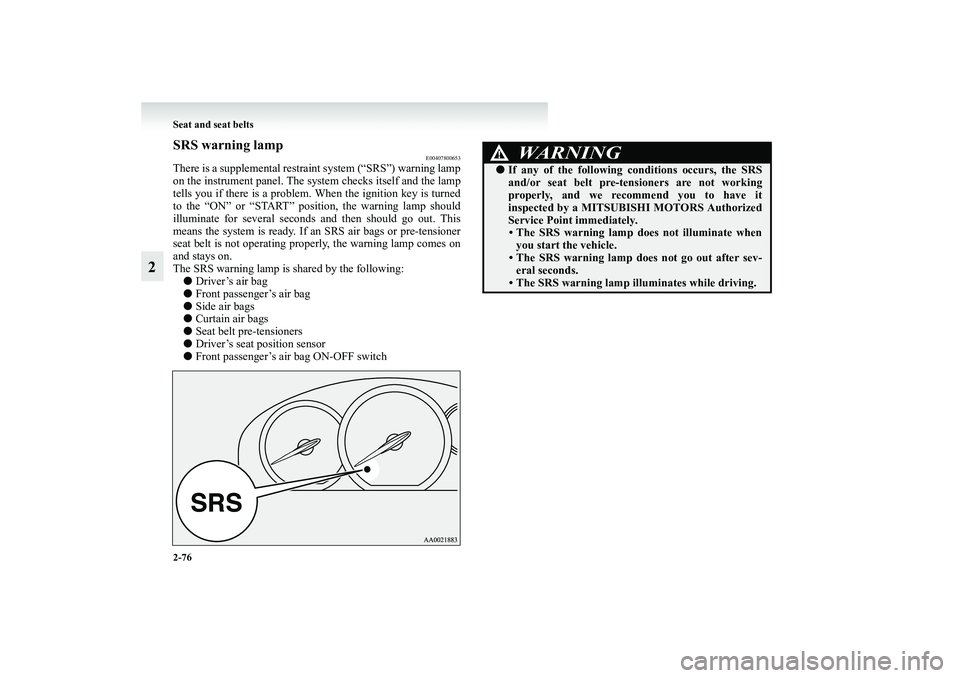
E00407800653
There is a supplemental restraint system (“SRS”) warning lamp
on the instrument panel. The system checks itself and the lamp
tells you if there is a problem. When the ignition key is turned
to the “ON” or “START” position, the warning lamp should
illuminate for several seconds and then should go out. This
means the system is ready. If an SRS air bags or pre-tensioner
seat belt is not operating properly, the warning lamp comes on
and stays on.
The SRS warning lamp is shared by the following:
●Driver’s air bag
●Front passenger’s air bag
●Side air bags
●Curtain air bags
●Seat belt pre-tensioners
●Driver’s seat position sensor
●Front passenger’s air bag ON-OFF switch
WARNING
!●If any of the following conditions occurs, the SRS
and/or seat belt pre-tensioners are not working
properly, and we recommend you to have it
inspected by a MITSUBISHI MOTORS Authorized
Service Point immediately.
• The SRS warning lamp does not illuminate when
you start the vehicle.
• The SRS warning lamp does not go out after sev-
eral seconds.
• The SRS warning lamp illuminates while driving.
BK-XP08E1ENUK.en-uk.book Page 76 Monday, August 13, 2007 2:20 PM