stop start MITSUBISHI GRANDIS 2008 (in English) Owner's Guide
[x] Cancel search | Manufacturer: MITSUBISHI, Model Year: 2008, Model line: GRANDIS, Model: MITSUBISHI GRANDIS 2008Pages: 458, PDF Size: 18.52 MB
Page 227 of 458
Starting and driving
4-55
4
The warning buzzer sounds when the system detects an obsta-
cle during operation.NOTE●After pushing the SONAR switch, corner sensor system
operation differs according to the detection area setting.
• Setting when towbar is not equipped
When the selector lever is moved to the “R”
(REVERSE) position, the corner sensor system will
operate even if corner sensor system operation was
stopped by pushing the SONAR switch.
• Setting when towbar is equipped
When corner sensor system operation was stopped by
pushing the SONAR switch, the corner sensor system
will not operate until the engine has been stopped even
if the selector lever is moved to the “R” (REVERSE)
position.
To resume corner sensor system operation, push the
SONAR switch or stop and restart the engine, and then
move the selector lever to the “R” (REVERSE) position.
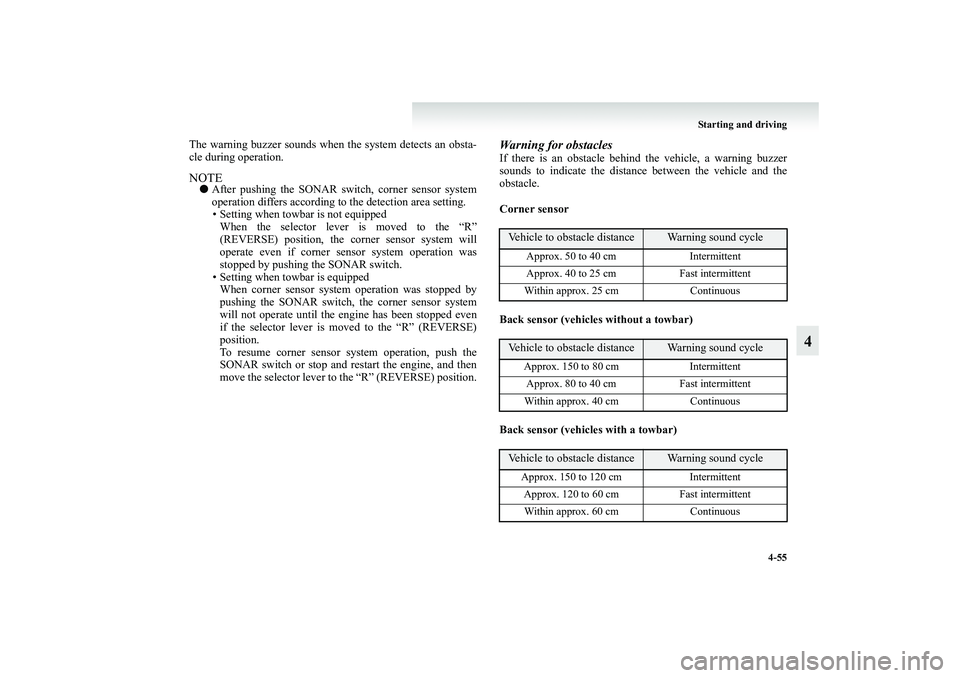
Warning for obstaclesIf there is an obstacle behind the vehicle, a warning buzzer
sounds to indicate the distance between the vehicle and the
obstacle.
Corner sensor
Back sensor (vehicles without a towbar)
Back sensor (vehicles with a towbar)
Vehicle to obstacle distance
Warning sound cycle
Approx. 50 to 40 cm Intermittent
Approx. 40 to 25 cm Fast intermittent
Within approx. 25 cm Continuous
Vehicle to obstacle distance
Warning sound cycle
Approx. 150 to 80 cm Intermittent
Approx. 80 to 40 cm Fast intermittent
Within approx. 40 cm Continuous
Vehicle to obstacle distance
Warning sound cycle
Approx. 150 to 120 cm Intermittent
Approx. 120 to 60 cm Fast intermittent
Within approx. 60 cm Continuous
BK-XP08E1ENUK.en-uk.book Page 55 Monday, August 13, 2007 2:20 PM
Page 228 of 458
4-56 Starting and driving
4
Changing the detection areas
E00615800087
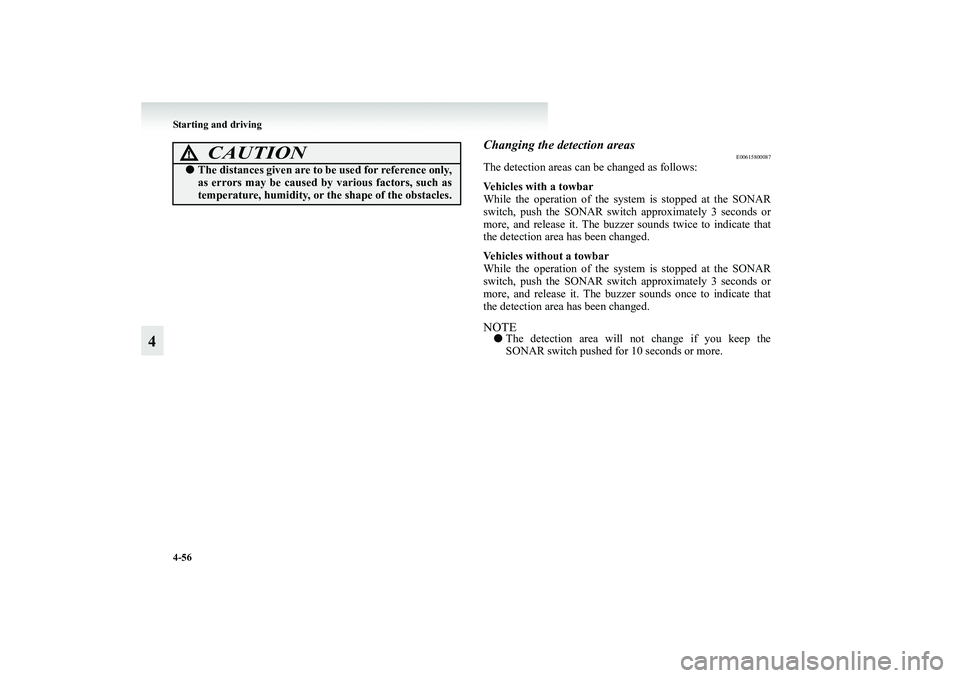
The detection areas can be changed as follows:
Vehicles with a towbar
While the operation of the system is stopped at the SONAR
switch, push the SONAR switch approximately 3 seconds or
more, and release it. The buzzer sounds twice to indicate that
the detection area has been changed.
Vehicles without a towbar
While the operation of the system is stopped at the SONAR
switch, push the SONAR switch approximately 3 seconds or
more, and release it. The buzzer sounds once to indicate that
the detection area has been changed.NOTE●The detection area will not change if you keep the
SONAR switch pushed for 10 seconds or more.
CAUTION
!●The distances given are to be used for reference only,
as errors may be caused by various factors, such as
temperature, humidity, or the shape of the obstacles.
BK-XP08E1ENUK.en-uk.book Page 56 Monday, August 13, 2007 2:20 PM
Page 229 of 458
Starting and driving
4-57
4
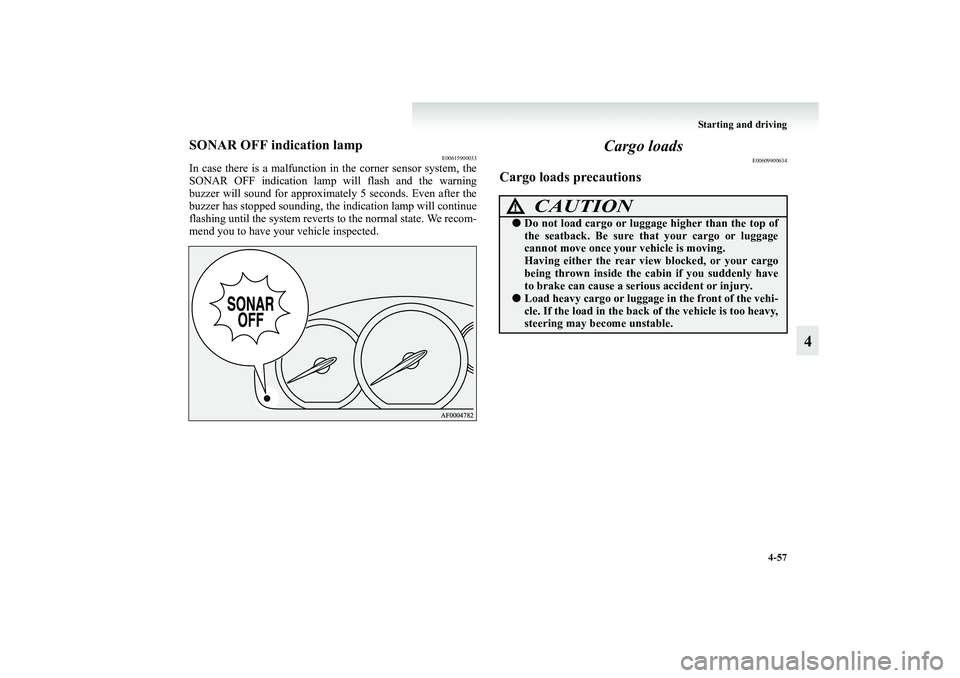
SONAR OFF indication lamp
E00615900033
In case there is a malfunction in the corner sensor system, the
SONAR OFF indication lamp will flash and the warning
buzzer will sound for approximately 5 seconds. Even after the
buzzer has stopped sounding, the indication lamp will continue
flashing until the system reverts to the normal state. We recom-
mend you to have your vehicle inspected.
Cargo loads
E00609900634
Cargo loads precautions
CAUTION
!●Do not load cargo or luggage higher than the top of
the seatback. Be sure that your cargo or luggage
cannot move once your vehicle is moving.
Having either the rear view blocked, or your cargo
being thrown inside the cabin if you suddenly have
to brake can cause a serious accident or injury.●Load heavy cargo or luggage in the front of the vehi-
cle. If the load in the back of the vehicle is too heavy,
steering may become unstable.
BK-XP08E1ENUK.en-uk.book Page 57 Monday, August 13, 2007 2:20 PM
Page 246 of 458
5-12 For pleasant driving
5
NOTE●If a problem is detected in the air conditioning system, the
air conditioning operation indication lamp (A) blinks.
Press the air conditioning switch once to turn it off, then
once more to turn it back on. If the air conditioning opera-
tion indication lamp (A) does not blink for a while, there
is nothing wrong. If it starts to blink again, we recommend
you to have it checked.
●Sometimes, for example after using a high-pressure car
wash, the condenser can get wet, and the operation indica-
tion lamp (A) blinks temporarily. In this case there is
nothing wrong. Wait for a while, press the air conditioning
switch once to turn the system off, then once more to turn
it back on. Once the water evaporates, the blinking will
stop.
Operating the system in automatic mode
E00704100557
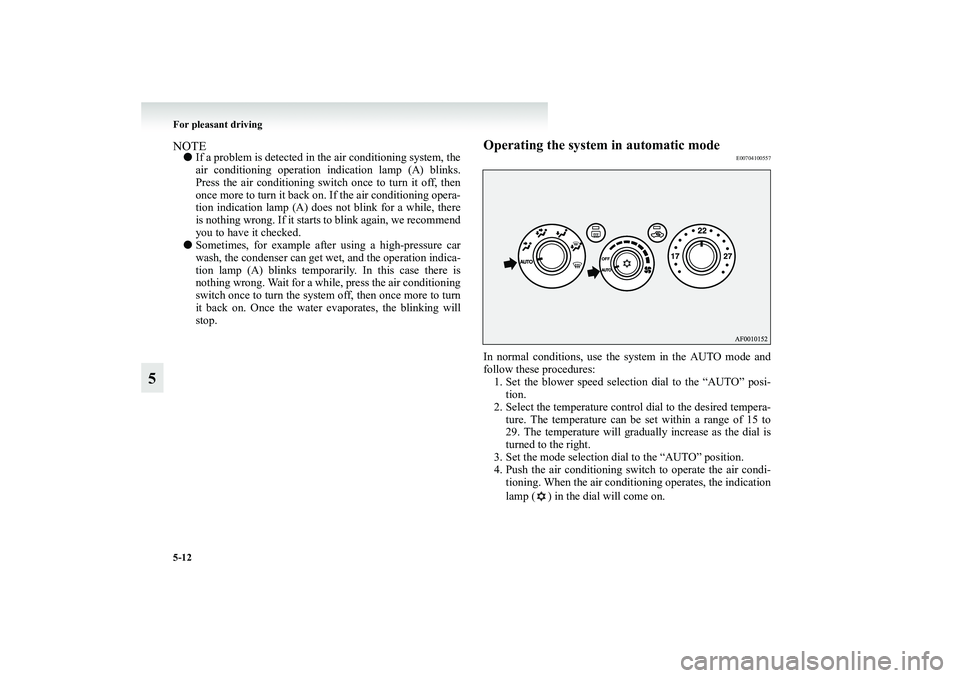
In normal conditions, use the system in the AUTO mode and
follow these procedures:
1. Set the blower speed selection dial to the “AUTO” posi-
tion.
2. Select the temperature control dial to the desired tempera-
ture. The temperature can be set within a range of 15 to
29. The temperature will gradually increase as the dial is
turned to the right.
3. Set the mode selection dial to the “AUTO” position.
4. Push the air conditioning switch to operate the air condi-
tioning. When the air conditioning operates, the indication
lamp ( ) in the dial will come on.
BK-XP08E1ENUK.en-uk.book Page 12 Monday, August 13, 2007 2:20 PM
Page 249 of 458
For pleasant driving
5-15
5 Rear heater*/Rear cooler*
E00719900016
The rear heater/rear cooler can only be used while the engine is
running.NOTE●Cooling with rear cooler is not possible when the front air
conditioning (cooling and dehumidifying functions) is not
operating. Be sure to activate the front air conditioning
(cooling and dehumidifying functions) before activating
the rear air conditioning.
When the front air conditioning is not operating, only fan
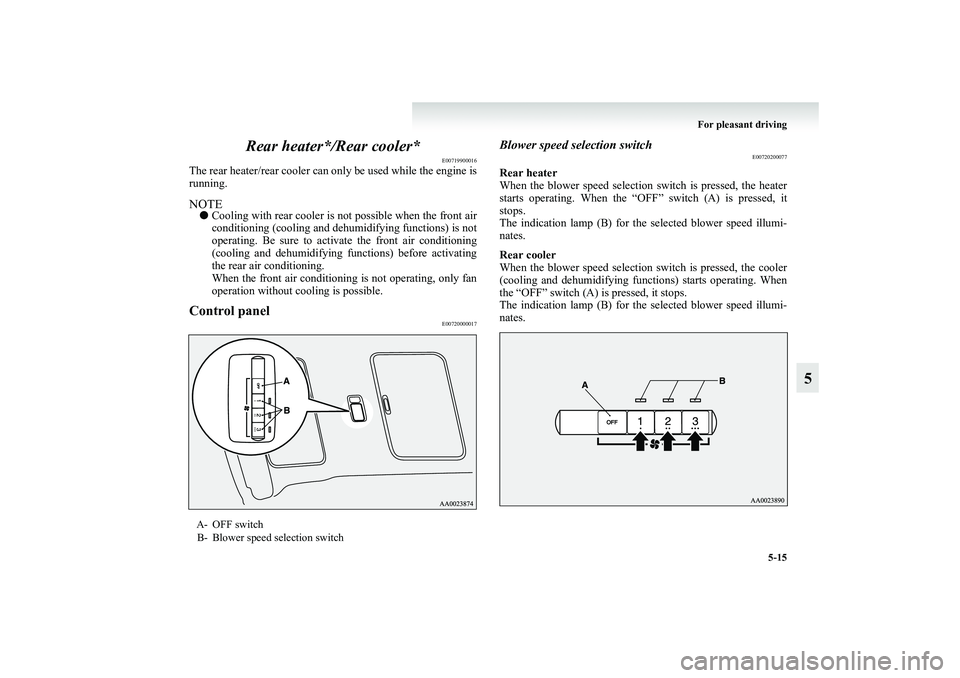
operation without cooling is possible.Control panel
E00720000017
Blower speed selection switch
E00720200077
Rear heater
When the blower speed selection switch is pressed, the heater
starts operating. When the “OFF” switch (A) is pressed, it
stops.
The indication lamp (B) for the selected blower speed illumi-
nates.
Rear cooler
When the blower speed selection switch is pressed, the cooler
(cooling and dehumidifying functions) starts operating. When
the “OFF” switch (A) is pressed, it stops.
The indication lamp (B) for the selected blower speed illumi-
nates.
A- OFF switch
B- Blower speed selection switch
BK-XP08E1ENUK.en-uk.book Page 15 Monday, August 13, 2007 2:20 PM
Page 251 of 458
For pleasant driving
5-17
5
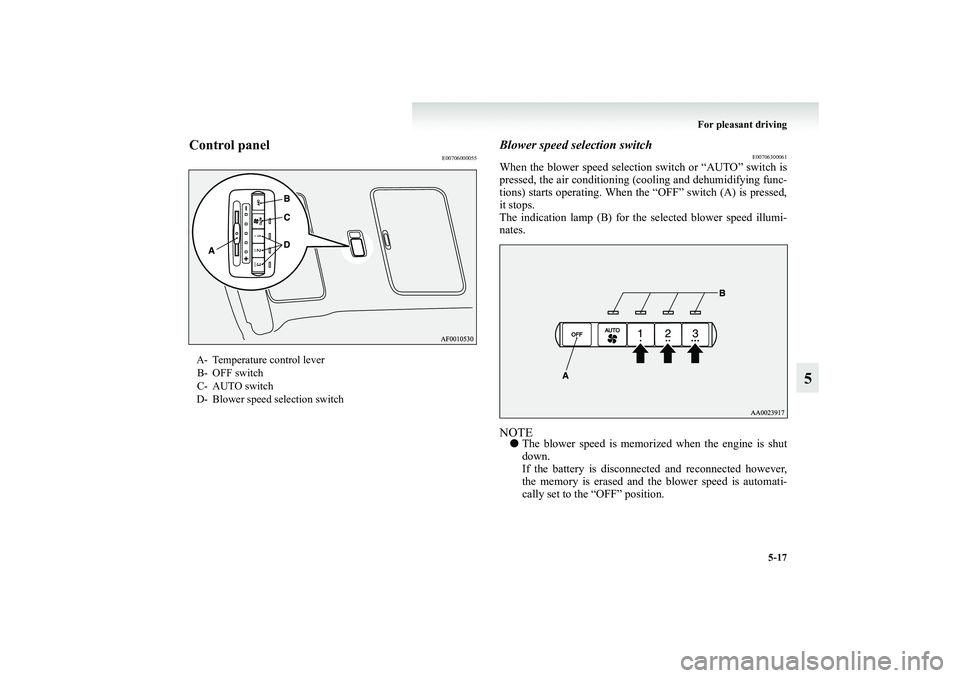
Control panel
E00706000055
Blower speed selection switch
E00706300061
When the blower speed selection switch or “AUTO” switch is
pressed, the air conditioning (cooling and dehumidifying func-
tions) starts operating. When the “OFF” switch (A) is pressed,
it stops.
The indication lamp (B) for the selected blower speed illumi-
nates.NOTE●The blower speed is memorized when the engine is shut
down.
If the battery is disconnected and reconnected however,
the memory is erased and the blower speed is automati-
cally set to the “OFF” position.
A- Temperature control lever
B- OFF switch
C- AUTO switch
D- Blower speed selection switch
BK-XP08E1ENUK.en-uk.book Page 17 Monday, August 13, 2007 2:20 PM
Page 278 of 458
5-44 For pleasant driving
5
To find the start of each track on a disc for playbackPress the SCAN button (6). “SCAN” will appear on the display
and the CD player will play back the first 10 seconds of each
track on the selected disc.
The track number will blink while the scan mode is selected.
To exit the scan mode, press the SCAN button again.NOTE●Once all tracks on the disc have been scanned, playback
of the disc will restart from the beginning of the track that
was playing when scanning started.
●The scan mode will be canceled by selecting radio or CD
operation and pressing the RPT/RDM button (14), the
TRACK button (5) or the CD eject button (1).
●With a disc that contains both CD-DA and MP3 files, the
scan mode causes only files of the same format (CD-DA
only or MP3 files only) to be played.To eject a discWhen the CD eject button (1) is pressed, the disc automatically
stops and is ejected. The system automatically switches to
radio mode.CD text and MP3 title display
E00725000298
This CD player can display CD text and MP3 titles including
ID3 tag information.
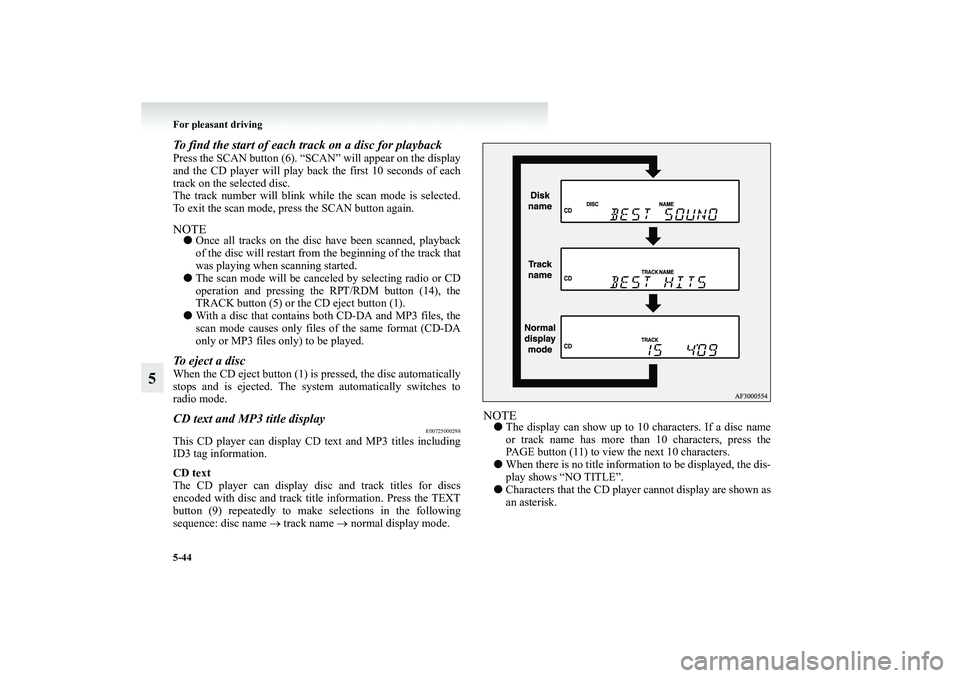
CD text
The CD player can display disc and track titles for discs
encoded with disc and track title information. Press the TEXT
button (9) repeatedly to make selections in the following
sequence: disc name → track name → normal display mode.
NOTE●The display can show up to 10 characters. If a disc name
or track name has more than 10 characters, press the
PAGE button (11) to view the next 10 characters.
●When there is no title information to be displayed, the dis-
play shows “NO TITLE”.
●Characters that the CD player cannot display are shown as
an asterisk.
BK-XP08E1ENUK.en-uk.book Page 44 Monday, August 13, 2007 2:20 PM
Page 280 of 458
5-46 For pleasant driving
5
With a CD autochanger
1. Press the CD button (11), and the CD autochanger mode
will be selected, starting playback.
2. To adjust the volume and tone, refer to “To adjust the vol-
ume” on page 5-24 and “To adjust the tone” on page 5-24.
3. To stop the CD player, turn off the power by pressing the
PWR switch (13) or switch to the radio mode by pressing
the AM/FM button (7).
4. For information concerning the handling of compact
discs, refer to “Handling of compact discs” on page 5-49.
To select a desired disc (CD autochanger only)
You can select by using the DISC button (10 or 12).
Disc up
Press the DISC button (12) until the desired disc is reached.
The disc indicator (16) will display the selected disc number.
Disc down
Press the DISC button (10) until the desired disc is reached.
The disc indicator (16) will display the selected disc number.BK-XP08E1ENUK.en-uk.book Page 46 Monday, August 13, 2007 2:20 PM
Page 285 of 458
For pleasant driving
5-51
5
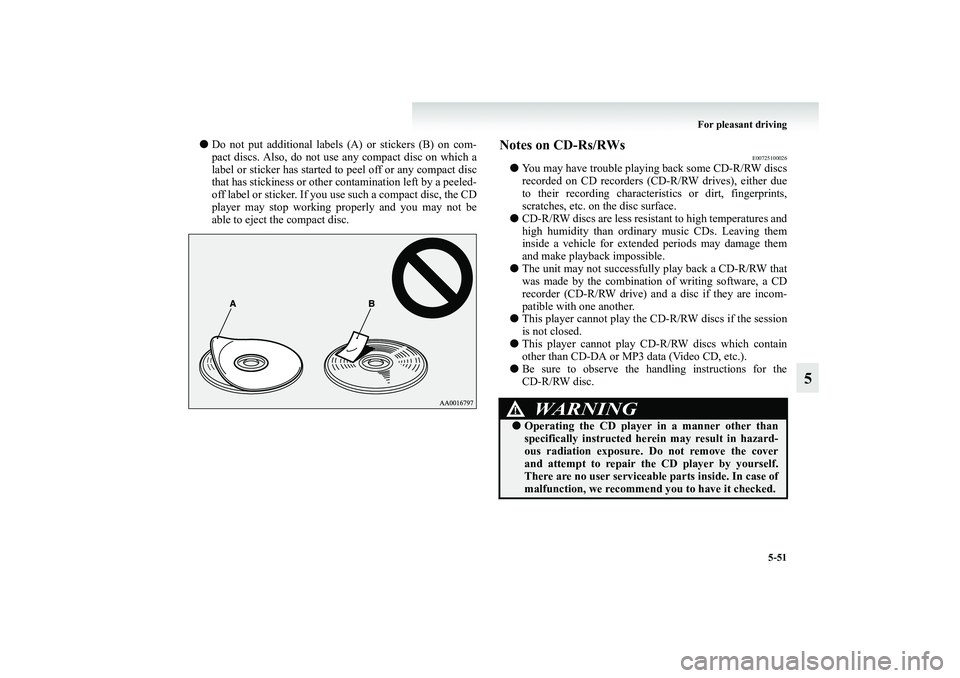
●Do not put additional labels (A) or stickers (B) on com-
pact discs. Also, do not use any compact disc on which a
label or sticker has started to peel off or any compact disc
that has stickiness or other contamination left by a peeled-
off label or sticker. If you use such a compact disc, the CD
player may stop working properly and you may not be
able to eject the compact disc.
Notes on CD-Rs/RWs
E00725100026
●You may have trouble playing back some CD-R/RW discs
recorded on CD recorders (CD-R/RW drives), either due
to their recording characteristics or dirt, fingerprints,
scratches, etc. on the disc surface.
●CD-R/RW discs are less resistant to high temperatures and
high humidity than ordinary music CDs. Leaving them
inside a vehicle for extended periods may damage them
and make playback impossible.
●The unit may not successfully play back a CD-R/RW that
was made by the combination of writing software, a CD
recorder (CD-R/RW drive) and a disc if they are incom-
patible with one another.
●This player cannot play the CD-R/RW discs if the session
is not closed.
●This player cannot play CD-R/RW discs which contain
other than CD-DA or MP3 data (Video CD, etc.).
●Be sure to observe the handling instructions for the
CD-R/RW disc.
WARNING
!●Operating the CD player in a manner other than
specifically instructed herein may result in hazard-
ous radiation exposure. Do not remove the cover
and attempt to repair the CD player by yourself.
There are no user serviceable parts inside. In case of
malfunction, we recommend you to have it checked.
BK-XP08E1ENUK.en-uk.book Page 51 Monday, August 13, 2007 2:20 PM
Page 314 of 458
6-2 For emergencies
6If the vehicle breaks down
E00800100606
If the vehicle breaks down on the road, move it to the shoulder
and use the hazard warning flashers.
Refer to “Hazard warning flasher switch” on page 3-38.If the engine stops/failsVehicle operation and control are affected if the engine stops.
Before moving the vehicle to a safe area be aware of the fol-
lowing:
●The brake booster becomes inoperative and the pedal
effort will increase. Press down the brake pedal harder
than usual.
●Since the power steering pump is no longer operative, the
steering wheel feels heavy when turning it. Turn the wheel
with more effort than usual.
Emergency starting
E00800501216
If the engine cannot be started because the battery is weak or
dead, the battery from another vehicle can be used with jumper
cables to start the engine.
1. Get the vehicles close enough so the jumper cables can
reach, but be sure the vehicles aren’t touching each other.
If they are, it could cause a ground connection you don’t
want. The vehicle will not start, and the bad grounding
could damage the electrical systems.
WARNING
!●To start the engine by use of jumper cables from
another vehicle, perform the correct procedures
according to the instruction manual. Incorrect pro-
cedures could result in a fire or explosion or damage
to the vehicles.
CAUTION
!●Check the other vehicle. It must have a 12-volt bat-
tery.
If the other system isn’t 12-volt, shorting can dam-
age both vehicles.
BK-XP08E1ENUK.en-uk.book Page 2 Monday, August 13, 2007 2:20 PM