ESP MITSUBISHI GRANDIS 2010 Owner's Manual (in English)
[x] Cancel search | Manufacturer: MITSUBISHI, Model Year: 2010, Model line: GRANDIS, Model: MITSUBISHI GRANDIS 2010Pages: 273, PDF Size: 21.01 MB
Page 18 of 273
Even when such parts are officially authorized, for
example
by a “general operators permit” (an ap-
praisal for the part) or through the execution of the
part in an officially approved manner of construc-
tion, or when a single operation permit following
the attachment or installation of such parts, it can-
not be deduced from that alone, that the driving safe-
ty of your vehicle has not been affected.
Consider also that there basically exists no liability
on the part of the appraiser or the official. Only in
the case of parts (MITSUBISHI MOTORS original
replacement or exchange parts as well as
MITSUBISHI MOTORS genuine accessories) that
are recommended and released by a MITSUBISHI
MOTORS Authorized Service Point and that are at-
tached or installed by a MITSUBISHI MOTORS
Authorized Service Point can you assume, that op-
timal safety has been provided. The same also per-
tains to modifications of MITSUBISHI vehicles
with respect to the production specifications. For
your own safety, in such cases as well, you should
only undertake modifications according to the rec-
ommendations of a MITSUBISHI MOTORS Au-
thorized Service Point. Modification/alterations to the
electrical or fuel systems E00200400238
MITSUBISHI MOTORS
has always manufactured
safe, high quality vehicles. In order to maintain this
safety and quality, it is important that any accesso-
ry that is to be fitted, or any modifications carried
out which involve the electrical or fuel systems,
should be carried out in accordance with
MITSUBISHI MOTORS guidelines. CAUTION
l
If
the wiring interferes with any part of
the vehicle bodywork or improper instal-
lation methods are used, i.e. protective
fuses not installed, etc.), electronic devi-
ces may be adversely affected, possibly re-
sulting in an electrical fire or other fail-
ures that may cause an accident. Genuine parts
E00200500590
MITSUBISHI MOTORS
has gone to great lengths
to bring you a superbly crafted automobile offering
the highest quality and dependability.
Use MITSUBISHI MOTORS genuine parts, de-
signed and manufactured to maintain your
MITSUBISHI MOTORS automobile at top per-
formance. MITSUBISHI MOTORS genuine parts
are identified by this mark and are available at all
MITSUBISHI MOTORS Authorized Service
Points. General information
05
Presented by http://mmc-manuals.ru/ \251
Page 23 of 273
Keyless entry system*
E00300302115
Press
the remote control switch, and all doors and
the tailgate will be locked or unlocked as desired. It
is also possible to operate the outside rear-view mir-
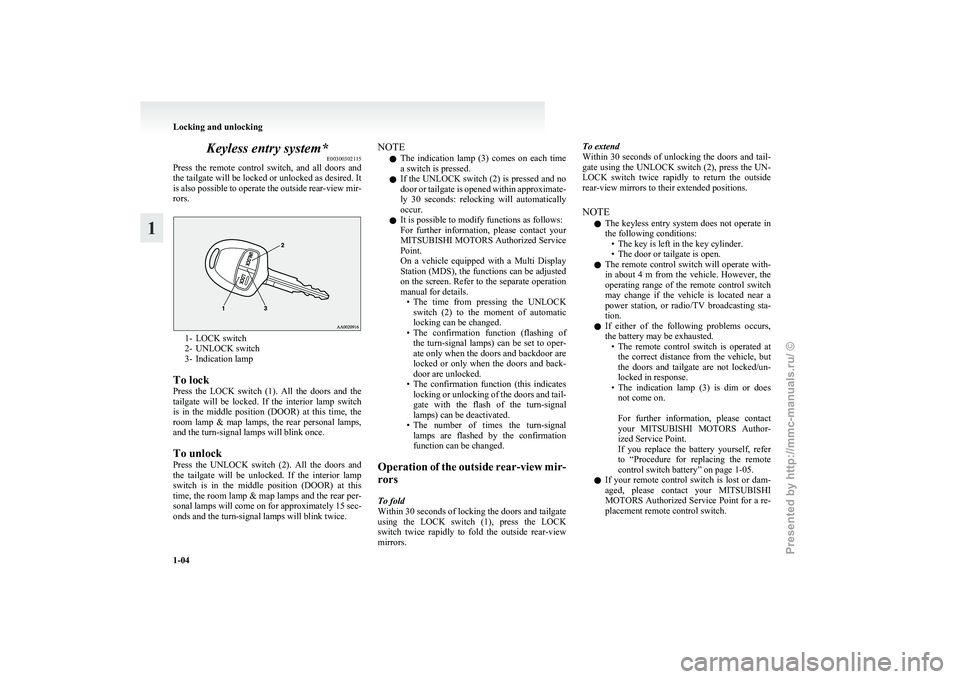
rors. 1- LOCK switch
2-
UNLOCK switch
3- Indication lamp
To lock
Press the LOCK switch (1). All the doors and the
tailgate will be locked. If the interior lamp switch
is in the middle position (DOOR) at this time, the
room lamp & map lamps, the rear personal lamps,
and the turn-signal lamps will blink once.
To unlock
Press the UNLOCK switch (2). All the doors and
the tailgate will be unlocked. If the interior lamp
switch is in the middle position (DOOR) at this
time, the room lamp & map lamps and the rear per-
sonal lamps will come on for approximately 15 sec-
onds and the turn-signal lamps will blink twice. NOTE
l The
indication lamp (3) comes on each time
a switch is pressed.
l If the UNLOCK switch (2) is pressed and no
door or tailgate is opened within approximate-
ly 30 seconds: relocking will automatically
occur.
l It is possible to modify functions as follows:
For further information, please contact your
MITSUBISHI MOTORS Authorized Service
Point.
On a vehicle equipped with a Multi Display
Station (MDS), the functions can be adjusted
on the screen. Refer to the separate operation
manual for details.
• The time from pressing the UNLOCKswitch (2) to the moment of automatic
locking can be changed.
• The confirmation function (flashing of the turn-signal lamps) can be set to oper-
ate only when the doors and backdoor are
locked or only when the doors and back-
door are unlocked.
• The confirmation function (this indicates locking or unlocking of the doors and tail-
gate with the flash of the turn-signal
lamps) can be deactivated.
• The number of times the turn-signal lamps are flashed by the confirmation
function can be changed.
Operation of the outside rear-view mir-
rors
To fold
Within 30 seconds of locking the doors and tailgate
using the LOCK switch (1), press the LOCK
switch twice rapidly to fold the outside rear-view
mirrors. To extend
Within
30 seconds of unlocking the doors and tail-
gate using the UNLOCK switch (2), press the UN-
LOCK switch twice rapidly to return the outside
rear-view mirrors to their extended positions.
NOTE
l The keyless entry system does not operate in
the following conditions:
• The key is left in the key cylinder.
• The door or tailgate is open.
l The remote control switch will operate with-
in about 4 m from the vehicle. However, the
operating range of the remote control switch
may change if the vehicle is located near a
power station, or radio/TV broadcasting sta-
tion.
l If either of the following problems occurs,
the battery may be exhausted.
• The remote control switch is operated atthe correct distance from the vehicle, but
the doors and tailgate are not locked/un-
locked in response.
• The indication lamp (3) is dim or does not come on.
For further information, please contact
your MITSUBISHI MOTORS Author-
ized Service Point.
If you replace the battery yourself, refer
to “Procedure for replacing the remote
control switch battery” on page 1-05.
l If your remote control switch is lost or dam-
aged, please contact your MITSUBISHI
MOTORS Authorized Service Point for a re-
placement remote control switch. Locking and unlocking
1-04
1
Presented by http://mmc-manuals.ru/ \251
Page 27 of 273
Child-protection rear doors
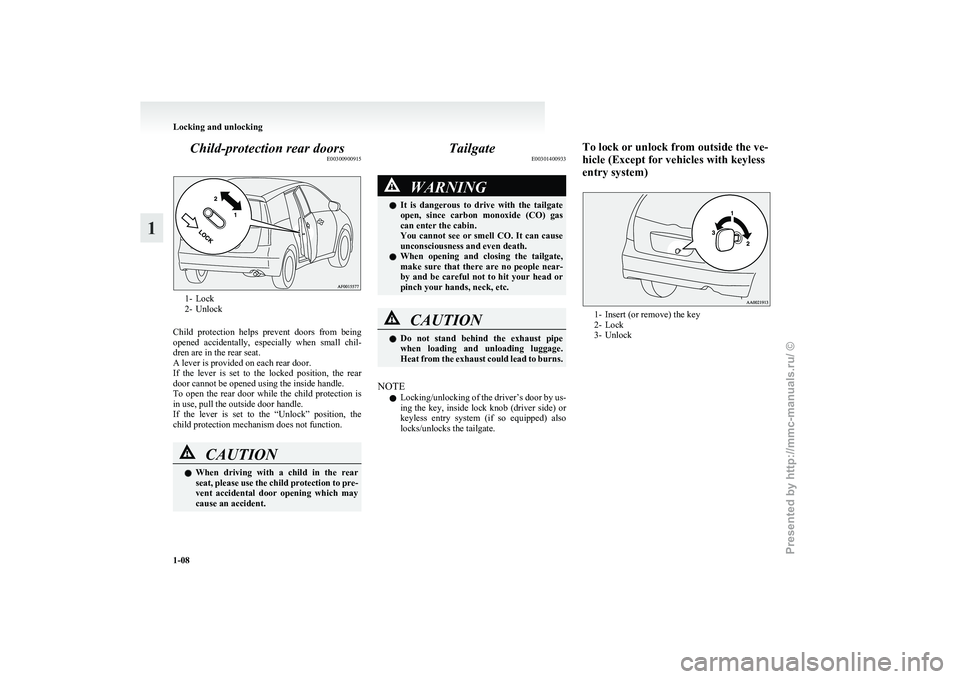
E003009009151- Lock
2-
Unlock
Child protection helps prevent doors from being
opened accidentally, especially when small chil-
dren are in the rear seat.
A lever is provided on each rear door.
If the lever is set to the locked position, the rear
door cannot be opened using the inside handle.
To open the rear door while the child protection is
in use, pull the outside door handle.
If the lever is set to the “Unlock” position, the
child protection mechanism does not function. CAUTION
l
When
driving with a child in the rear
seat, please use the child protection to pre-
vent accidental door opening which may
cause an accident. Tailgate
E00301400933 WARNING
l It
is dangerous to drive with the tailgate
open, since carbon monoxide (CO) gas
can enter the cabin.
You cannot see or smell CO. It can cause
unconsciousness and even death.
l When opening and closing the tailgate,
make sure that there are no people near-
by and be careful not to hit your head or
pinch your hands, neck, etc. CAUTION
l
Do
not stand behind the exhaust pipe
when loading and unloading luggage.
Heat from the exhaust could lead to burns.
NOTE l Locking/unlocking
of the driver’s door by us-
ing the key, inside lock knob (driver side) or
keyless entry system (if so equipped) also
locks/unlocks the tailgate. To lock or unlock from outside the ve-
hicle (Except for vehicles with keyless
entry system)
1- Insert (or remove) the key
2-
Lock
3- Unlock Locking and unlocking
1-08
1
Presented by http://mmc-manuals.ru/ \251
Page 30 of 273
CAUTION
l
Always keep the release lever lid on tail-
gate closed when driving so that your lug-
gage cannot accidentally bump against
the lever and open the tailgate. Electric window control
E00302200042
The electric windows can only be operated with the
ignition switch in the “ON” position.
Electric window control switch E00302300144
Each door window opens or closes while the corre-
sponding switch is operated.
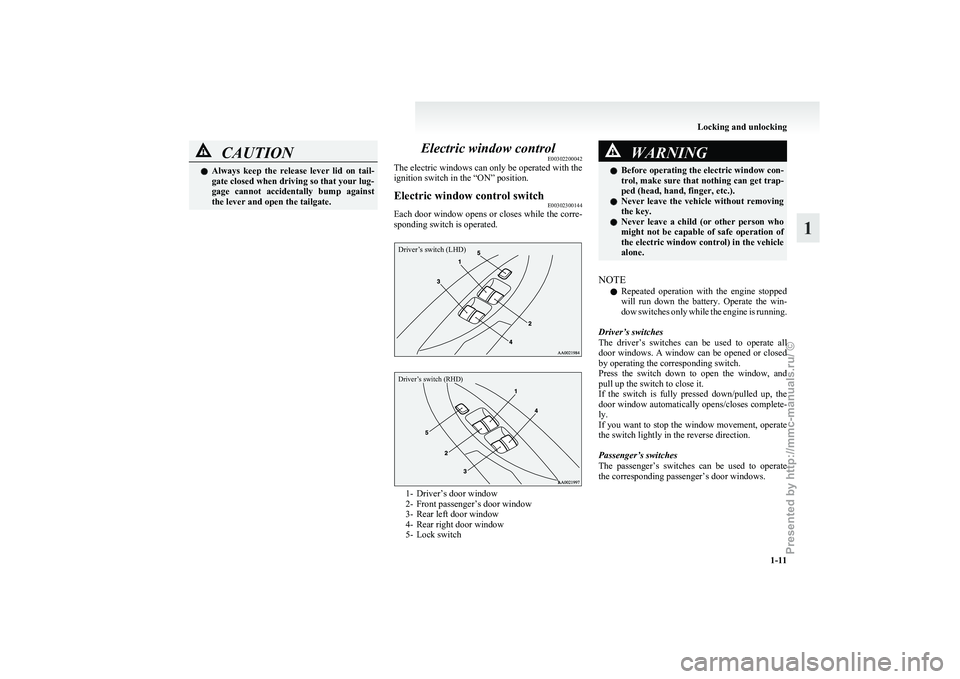
Driver’s switch (LHD)
Driver’s switch (RHD) 1- Driver’s door window
2-
Front passenger’s door window
3- Rear left door window
4- Rear right door window
5- Lock switch WARNING
l Before
operating the electric window con-
trol, make sure that nothing can get trap-
ped (head, hand, finger, etc.).
l Never leave the vehicle without removing
the key.
l Never leave a child (or other person who
might not be capable of safe operation of
the electric window control) in the vehicle
alone.
NOTE l Repeated
operation with the engine stopped
will run down the battery. Operate the win-
dow switches only while the engine is running.
Driver’s switches
The driver’s switches can be used to operate all
door windows. A window can be opened or closed
by operating the corresponding switch.
Press the switch down to open the window, and
pull up the switch to close it.
If the switch is fully pressed down/pulled up, the
door window automatically opens/closes complete-
ly.
If you want to stop the window movement, operate
the switch lightly in the reverse direction.
Passenger’s switches
The passenger’s switches can be used to operate
the corresponding passenger’s door windows. Locking and unlocking
1-11 1
Presented by http://mmc-manuals.ru/ \251
Page 32 of 273
CAUTION
l
The safety mechanism is cancelled just be-
fore the window is fully closed. This al-
lows the window to close completely.
Therefore be especially careful that no fin-
gers are trapped in the window.
NOTE l The
safety mechanism can be activated if the
driving conditions or other circumstances
cause the door windows to be subjected to a
physical shock similar to that caused by a trap-
ped hand or head.
l If the safety mechanism is activated three or
more times in a row, the safety mechanism
will be cancelled and the door window will
not close correctly.
In such a case, the following procedure
should be implemented to rectify this situa-
tion. If the window is open, repeatedly raise
the appropriate window switch until that win-
dow has been fully closed. Following this, re-
lease the switch, raise the switch once again
and hold it in this condition for at least 1 sec-
ond, then release it. You should now be able
to operate all windows in the normal fashion. Sunroof*
E00302700496
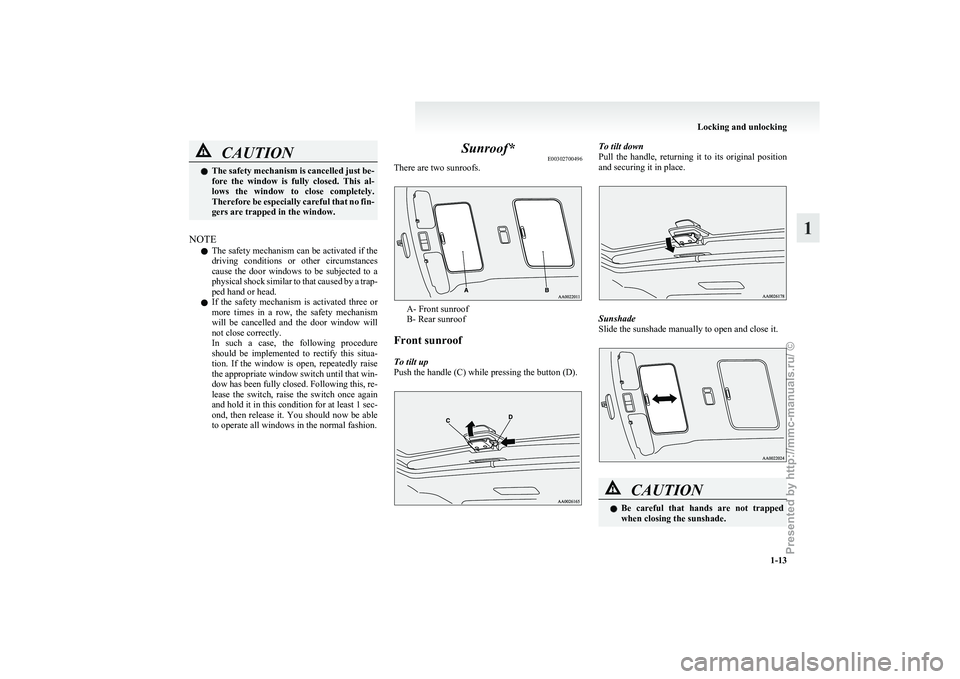
There are two sunroofs. A- Front sunroof
B- Rear sunroof
Front sunroof
To tilt up
Push the handle (C) while pressing the button (D). To tilt down
Pull
the handle, returning it to its original position
and securing it in place. Sunshade
Slide the sunshade manually to open and close it.
CAUTION
l
Be
careful that hands are not trapped
when closing the sunshade. Locking and unlocking
1-13 1
Presented by http://mmc-manuals.ru/ \251
Page 34 of 273
CAUTION
l
The safety mechanism is cancelled just be-
fore the sunroof is fully closed. This al-
lows the sunroof to close completely.
Therefore be especially careful that no fin-
gers are trapped in the sunroof.
NOTE l The
sunroof stops just before reaching the
fully open position.
If the vehicle is driven with the sunroof in
this position, wind throb is lower than with
the sunroof fully open.
l When leaving the vehicle unattended, make
sure you close the sunroof and remove the ig-
nition key.
l Do not try to operate the sunroof if it is fro-
zen closed (after snow fall or during extreme
cold).
l Do not sit or place heavy luggage on the sun-
roof or roof opening edge.
l Release the switch as soon as the sunroof rea-
ches the fully open or fully closed position.
l If the sunroof does not operate when the sun-
roof switch is operated, release the switch
and check whether something is trapped by
the sunroof. If nothing is trapped, we recom-
mend you to have the sunroof checked.
l Depending on the model of ski carriers or
roof carriers, the sunroof may make contact
with the carrier when the sunroof is tilted up.
Be careful when tilting up the sunroof if such
a ski carrier or a roof carrier is installed.
l Be sure to close the sunroof completely
when washing the vehicle or when leaving
the vehicle. l
Be
careful, not to put any wax on the weath-
erstrip (black rubber) around the sunroof
opening. If stained with wax, the weather-
strip cannot maintain a weatherproof seal
with the sunroof.
l After washing the vehicle or after it has
rained, wipe off any water that is on the sun-
roof before operating it.
l Operating the sunroof repeatedly with the en-
gine stationary will run down the battery. Op-
erate the sunroof while the engine is running.
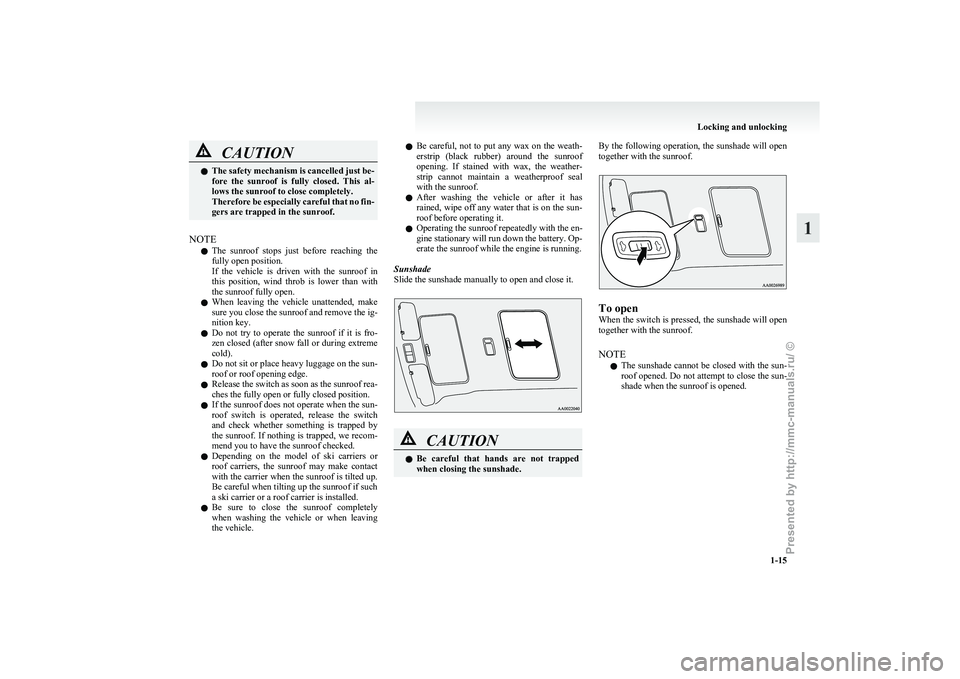
Sunshade
Slide the sunshade manually to open and close it. CAUTION
l
Be
careful that hands are not trapped
when closing the sunshade. By the following operation, the sunshade will open
together with the sunroof.
To open
When
the switch is pressed, the sunshade will open
together with the sunroof.
NOTE
l The sunshade cannot be closed with the sun-
roof opened. Do not attempt to close the sun-
shade when the sunroof is opened. Locking and unlocking
1-15 1
Presented by http://mmc-manuals.ru/ \251
Page 47 of 273
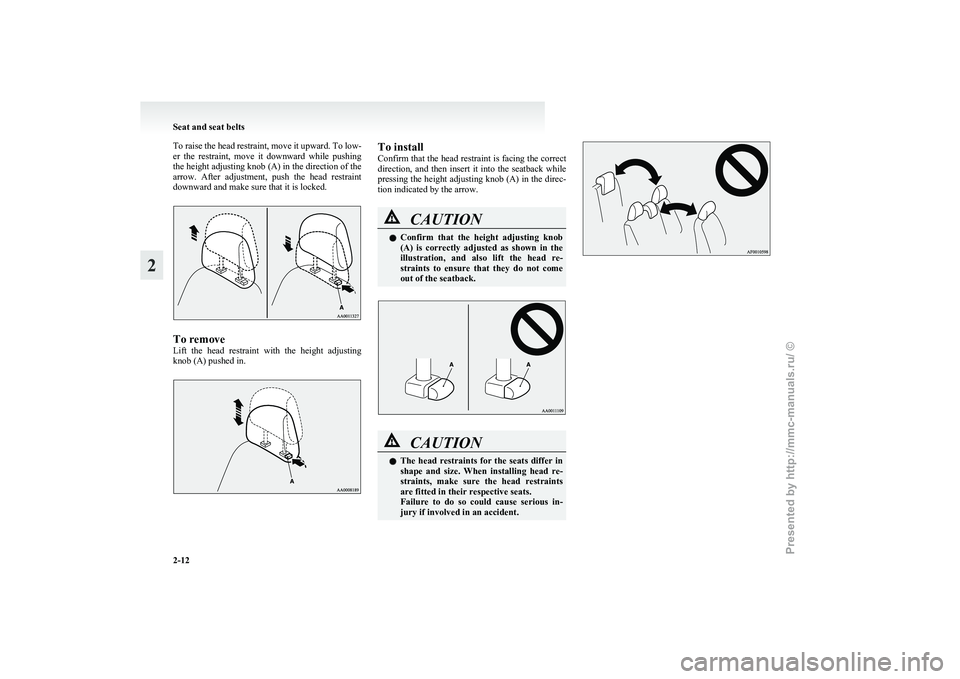
To raise the head restraint, move it upward. To low-
er
the restraint, move it downward while pushing
the height adjusting knob (A) in the direction of the
arrow. After adjustment, push the head restraint
downward and make sure that it is locked. To remove
Lift
the head restraint with the height adjusting
knob (A) pushed in. To install
Confirm
that the head restraint is facing the correct
direction, and then insert it into the seatback while
pressing the height adjusting knob (A) in the direc-
tion indicated by the arrow. CAUTION
l
Confirm
that the height adjusting knob
(A) is correctly adjusted as shown in the
illustration, and also lift the head re-
straints to ensure that they do not come
out of the seatback. CAUTION
l
The
head restraints for the seats differ in
shape and size. When installing head re-
straints, make sure the head restraints
are fitted in their respective seats.
Failure to do so could cause serious in-
jury if involved in an accident. Seat and seat belts
2-12
2
Presented by http://mmc-manuals.ru/ \251
Page 52 of 273
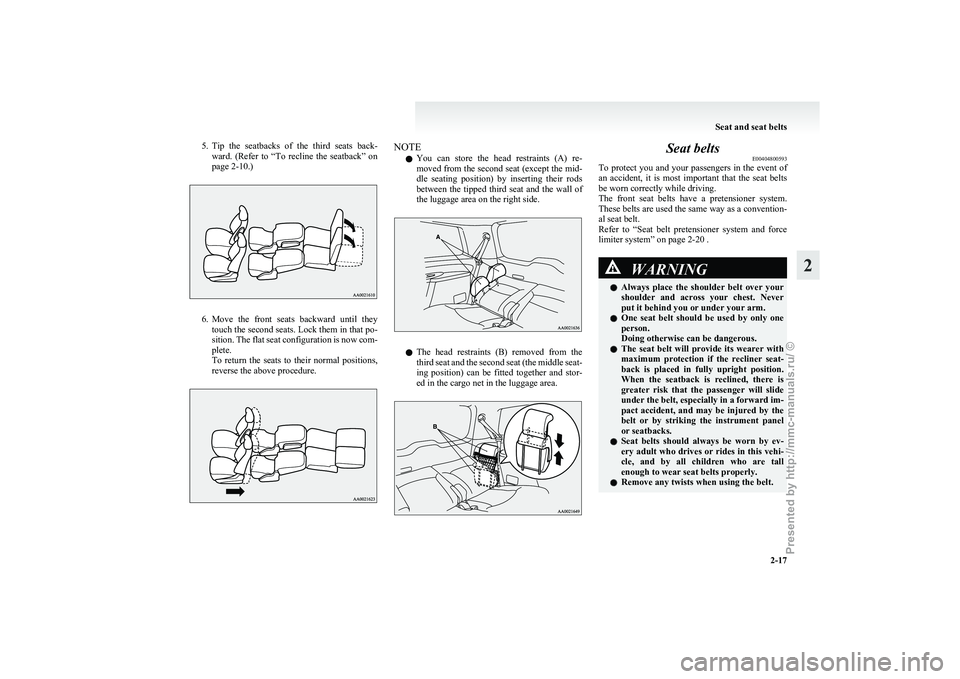
5. Tip the seatbacks of the third seats back-
ward. (Refer to “To recline the seatback” on
page 2-10.) 6. Move
the front seats backward until they
touch the second seats. Lock them in that po-
sition. The flat seat configuration is now com-
plete.
To return the seats to their normal positions,
reverse the above procedure. NOTE
l You
can store the head restraints (A) re-
moved from the second seat (except the mid-
dle seating position) by inserting their rods
between the tipped third seat and the wall of
the luggage area on the right side. l
The
head restraints (B) removed from the
third seat and the second seat (the middle seat-
ing position) can be fitted together and stor-
ed in the cargo net in the luggage area. Seat belts
E00404800593
To
protect you and your passengers in the event of
an accident, it is most important that the seat belts
be worn correctly while driving.
The front seat belts have a pretensioner system.
These belts are used the same way as a convention-
al seat belt.
Refer to “Seat belt pretensioner system and force
limiter system” on page 2-20 . WARNING
l Always
place the shoulder belt over your
shoulder and across your chest. Never
put it behind you or under your arm.
l One seat belt should be used by only one
person.
Doing otherwise can be dangerous.
l The seat belt will provide its wearer with
maximum protection if the recliner seat-
back is placed in fully upright position.
When the seatback is reclined, there is
greater risk that the passenger will slide
under the belt, especially in a forward im-
pact accident, and may be injured by the
belt or by striking the instrument panel
or seatbacks.
l Seat belts should always be worn by ev-
ery adult who drives or rides in this vehi-
cle, and by all children who are tall
enough to wear seat belts properly.
l Remove any twists when using the belt. Seat and seat belts
2-17 2
Presented by http://mmc-manuals.ru/ \251
Page 55 of 273
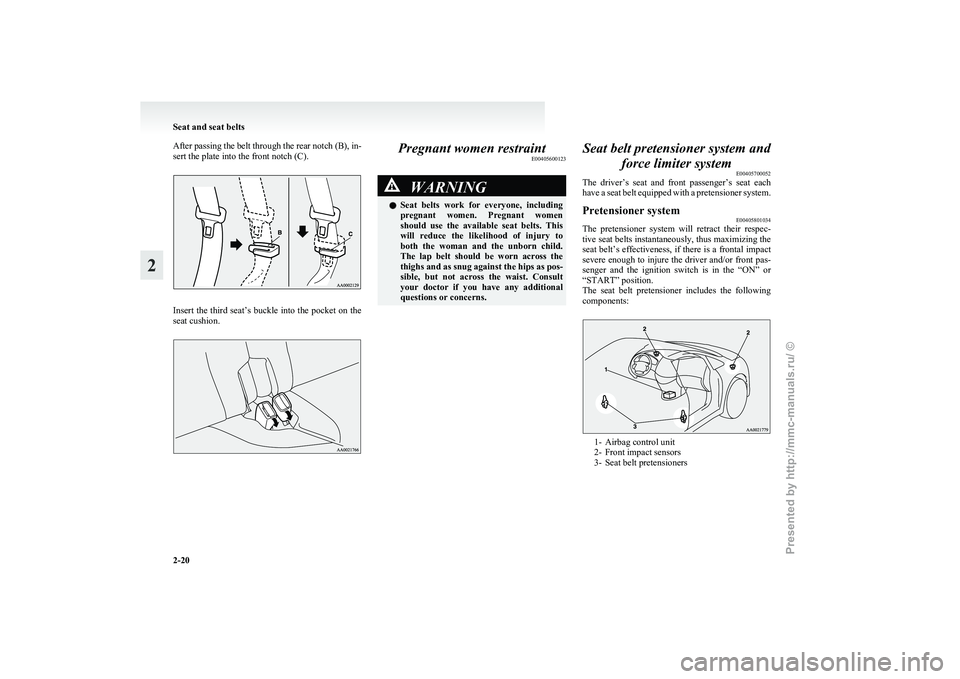
After passing the belt through the rear notch (B), in-
sert the plate into the front notch (C).
Insert the third seat’s buckle into the pocket on the
seat cushion. Pregnant women restraint
E00405600123 WARNING
l Seat belts work for everyone, including
pregnant women. Pregnant women
should use the available seat belts. This
will reduce the likelihood of injury to
both the woman and the unborn child.
The lap belt should be worn across the
thighs and as snug against the hips as pos-
sible, but not across the waist. Consult
your doctor if you have any additional
questions or concerns. Seat belt pretensioner system and
force limiter system E00405700052
The
driver’s seat and front passenger’s seat each
have a seat belt equipped with a pretensioner system.
Pretensioner system E00405801034
The pretensioner system will retract their respec-
tive
seat belts instantaneously, thus maximizing the
seat belt’s effectiveness, if there is a frontal impact
severe enough to injure the driver and/or front pas-
senger and the ignition switch is in the “ON” or
“START” position.
The seat belt pretensioner includes the following
components: 1- Airbag control unit
2-
Front impact sensors
3- Seat belt pretensioners Seat and seat belts
2-20
2
Presented by http://mmc-manuals.ru/ \251
Page 67 of 273
WARNING
l Extreme Hazard!
Do
not use a rearward facing child re-
straint on a seat protected by an airbag in
front of it! How the Supplemental Restraint Sys-
tem works
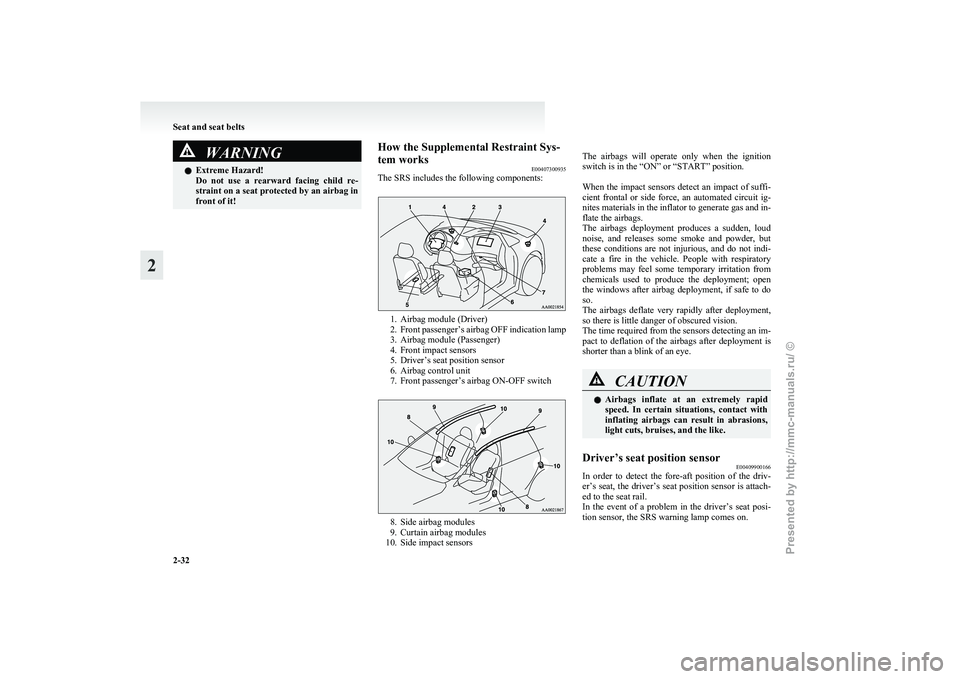
E00407300935
The SRS includes the following components: 1. Airbag module (Driver)
2. Front
passenger’s airbag OFF indication lamp
3. Airbag module (Passenger)
4. Front impact sensors
5. Driver’s seat position sensor
6. Airbag control unit
7. Front passenger’s airbag ON-OFF switch 8. Side airbag modules
9.
Curtain airbag modules
10. Side impact sensors
The
airbags will operate only when the ignition
switch is in the “ON” or “START” position.
When the impact sensors detect an impact of suffi-
cient frontal or side force, an automated circuit ig-
nites materials in the inflator to generate gas and in-
flate the airbags.
The airbags deployment produces a sudden, loud
noise, and releases some smoke and powder, but
these conditions are not injurious, and do not indi-
cate a fire in the vehicle. People with respiratory
problems may feel some temporary irritation from
chemicals used to produce the deployment; open
the windows after airbag deployment, if safe to do
so.
The airbags deflate very rapidly after deployment,
so there is little danger of obscured vision.
The time required from the sensors detecting an im-
pact to deflation of the airbags after deployment is
shorter than a blink of an eye. CAUTION
l
Airbags
inflate at an extremely rapid
speed. In certain situations, contact with
inflating airbags can result in abrasions,
light cuts, bruises, and the like.
Driver’s seat position sensor E00409900166
In order to detect the fore-aft position of the driv-
er’s
seat, the driver’s seat position sensor is attach-
ed to the seat rail.
In the event of a problem in the driver’s seat posi-
tion sensor, the SRS warning lamp comes on. Seat and seat belts
2-32
2
Presented by http://mmc-manuals.ru/ \251