clutch MITSUBISHI GRANDIS 2010 Owner's Manual (in English)
[x] Cancel search | Manufacturer: MITSUBISHI, Model Year: 2010, Model line: GRANDIS, Model: MITSUBISHI GRANDIS 2010Pages: 273, PDF Size: 21.01 MB
Page 113 of 273
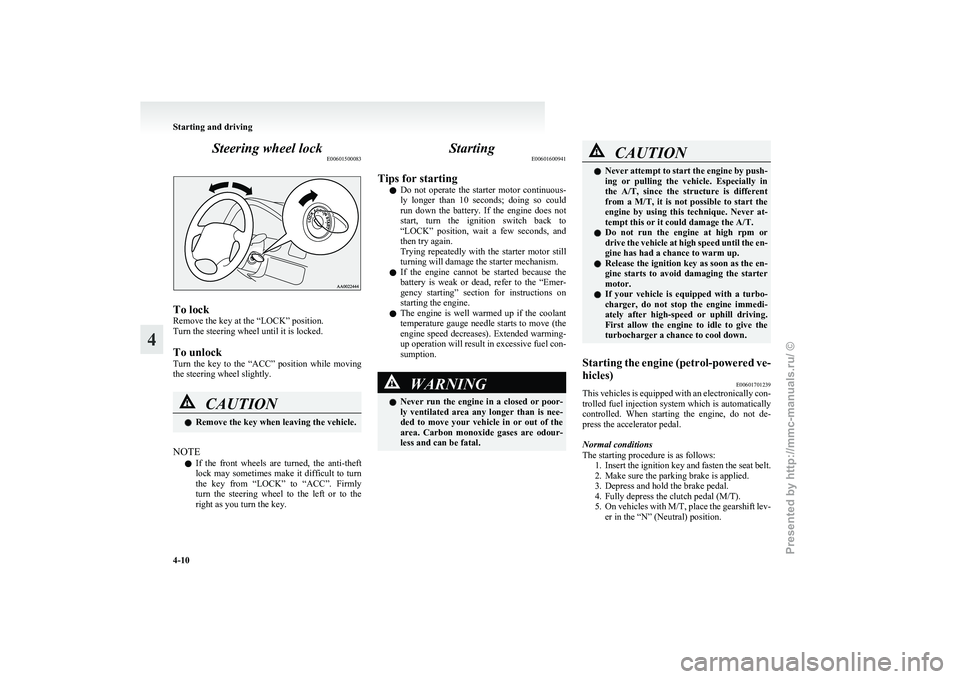
Steering wheel lock
E00601500083To lock
Remove the key at the “LOCK” position.
Turn the steering wheel until it is locked.
To unlock
Turn
the key to the “ACC” position while moving
the steering wheel slightly. CAUTION
l
Remove the key when leaving the vehicle.
NOTE l If
the front wheels are turned, the anti-theft
lock may sometimes make it difficult to turn
the key from “LOCK” to “ACC”. Firmly
turn the steering wheel to the left or to the
right as you turn the key. Starting
E00601600941
Tips for starting l Do
not operate the starter motor continuous-
ly longer than 10 seconds; doing so could
run down the battery. If the engine does not
start, turn the ignition switch back to
“LOCK” position, wait a few seconds, and
then try again.
Trying repeatedly with the starter motor still
turning will damage the starter mechanism.
l If the engine cannot be started because the
battery is weak or dead, refer to the “Emer-
gency starting” section for instructions on
starting the engine.
l The engine is well warmed up if the coolant
temperature gauge needle starts to move (the
engine speed decreases). Extended warming-
up operation will result in excessive fuel con-
sumption. WARNING
l Never
run the engine in a closed or poor-
ly ventilated area any longer than is nee-
ded to move your vehicle in or out of the
area. Carbon monoxide gases are odour-
less and can be fatal. CAUTION
l
Never
attempt to start the engine by push-
ing or pulling the vehicle. Especially in
the A/T, since the structure is different
from a M/T, it is not possible to start the
engine by using this technique. Never at-
tempt this or it could damage the A/T.
l Do not run the engine at high rpm or
drive the vehicle at high speed until the en-
gine has had a chance to warm up.
l Release the ignition key as soon as the en-
gine starts to avoid damaging the starter
motor.
l If your vehicle is equipped with a turbo-
charger, do not stop the engine immedi-
ately after high-speed or uphill driving.
First allow the engine to idle to give the
turbocharger a chance to cool down.
Starting the engine (petrol-powered ve-
hicles) E00601701239
This vehicles is equipped with an electronically con-
trolled
fuel injection system which is automatically
controlled. When starting the engine, do not de-
press the accelerator pedal.
Normal conditions
The starting procedure is as follows: 1. Insert the ignition key and fasten the seat belt.
2. Make sure the parking brake is applied.
3. Depress and hold the brake pedal.
4. Fully depress the clutch pedal (M/T).
5. On vehicles with M/T, place the gearshift lev-er in the “N” (Neutral) position. Starting and driving
4-10
4
Presented by http://mmc-manuals.ru/ \251
Page 114 of 273
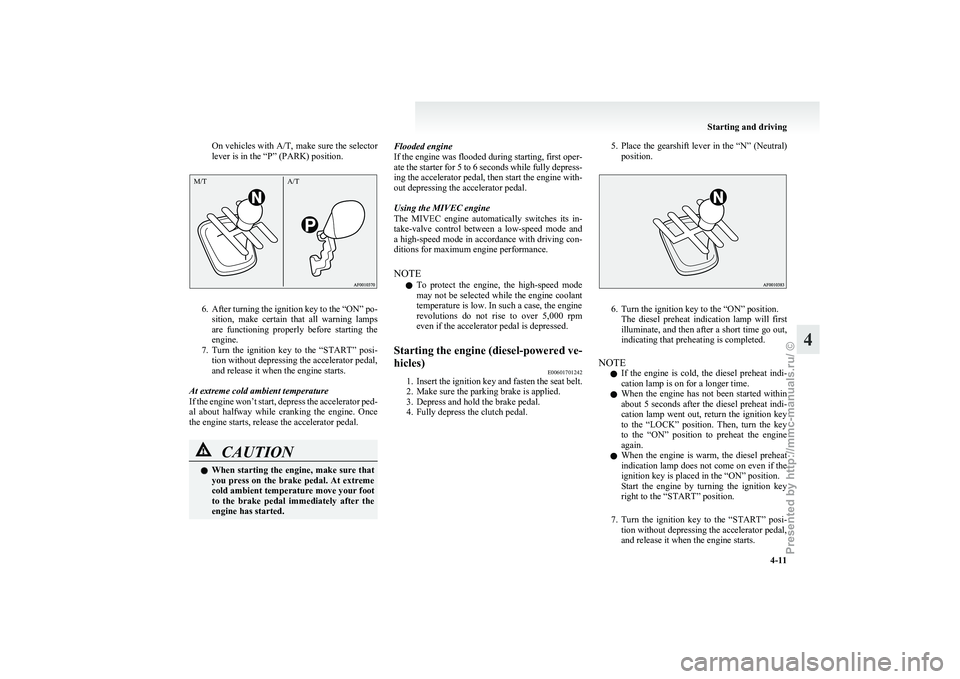
On vehicles with A/T,
make sure the selector
lever is in the “P” (PARK) position. 6. After
turning the ignition key to the “ON” po-
sition, make certain that all warning lamps
are functioning properly before starting the
engine.
7. Turn the ignition key to the “START” posi- tion without depressing the accelerator pedal,
and release it when the engine starts.
At extreme cold ambient temperature
If the engine won’t start, depress the accelerator ped-
al about halfway while cranking the engine. Once
the engine starts, release the accelerator pedal. CAUTION
l
When
starting the engine, make sure that
you press on the brake pedal. At extreme
cold ambient temperature move your foot
to the brake pedal immediately after the
engine has started. Flooded engine
If
the engine was flooded during starting, first oper-
ate the starter for 5 to 6 seconds while fully depress-
ing the accelerator pedal, then start the engine with-
out depressing the accelerator pedal.
Using the MIVEC engine
The MIVEC engine automatically switches its in-
take-valve control between a low-speed mode and
a high-speed mode in accordance with driving con-
ditions for maximum engine performance.
NOTE
l To protect the engine, the high-speed mode
may not be selected while the engine coolant
temperature is low. In such a case, the engine
revolutions do not rise to over 5,000 rpm
even if the accelerator pedal is depressed.
Starting the engine (diesel-powered ve-
hicles) E00601701242
1. Insert
the ignition key and fasten the seat belt.
2. Make sure the parking brake is applied.
3. Depress and hold the brake pedal.
4. Fully depress the clutch pedal. 5. Place
the gearshift lever in the “N” (Neutral)
position. 6. Turn the ignition key to the “ON” position.
The
diesel preheat indication lamp will first
illuminate, and then after a short time go out,
indicating that preheating is completed.
NOTE l If the engine is cold, the diesel preheat indi-
cation lamp is on for a longer time.
l When the engine has not been started within
about 5 seconds after the diesel preheat indi-
cation lamp went out, return the ignition key
to the “LOCK” position. Then, turn the key
to the “ON” position to preheat the engine
again.
l When the engine is warm, the diesel preheat
indication lamp does not come on even if the
ignition key is placed in the “ON” position.
Start the engine by turning the ignition key
right to the “START” position.
7. Turn the ignition key to the “START” posi- tion without depressing the accelerator pedal,
and release it when the engine starts. Starting and driving
4-11 4M/T
A/T
Presented by http://mmc-manuals.ru/ \251
Page 116 of 273
CAUTION
l
You do not have to continuously drive ex-
actly as indicated above. Always strive to
drive safely in accordance with road con-
ditions.
If the DPF warning lamp and check en-
gine warning lamp come on during ve-
hicle operation
When
the DPF warning lamp and check engine
warning lamp come on, this indicates an abnormal-
ity in the DPF system. Have the system inspected
by a MITSUBISHI MOTORS Authorized Service
Point. CAUTION
l
Continuing
to drive when the DPF warn-
ing lamp and check engine warning lamp
remain on could result in engine trouble
and DPF damage. Manual transmission*
E00602000492
The
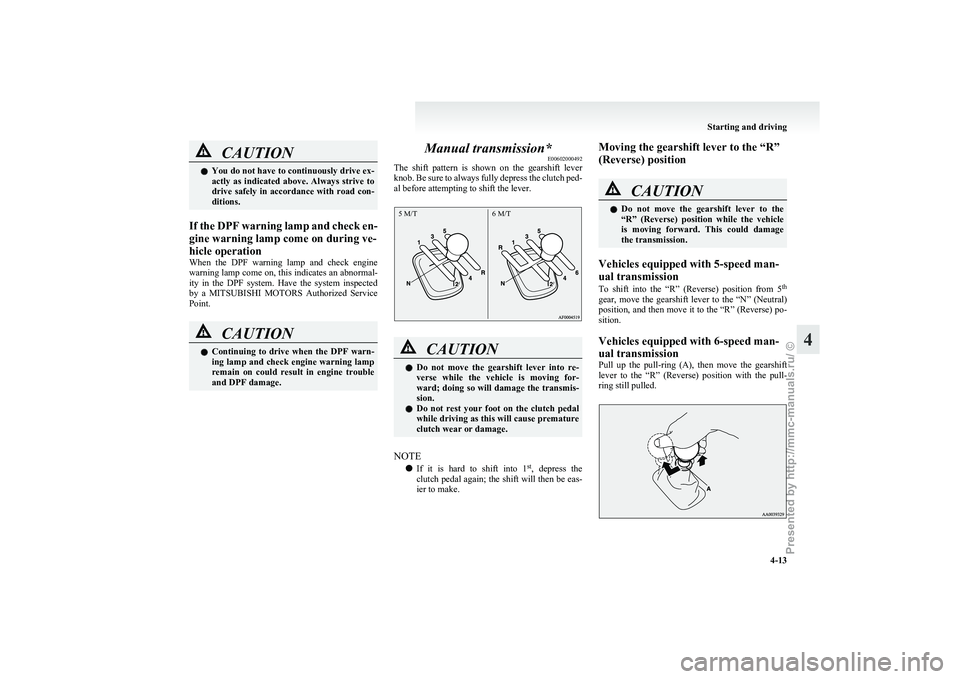
shift pattern is shown on the gearshift lever
knob. Be sure to always fully depress the clutch ped-
al before attempting to shift the lever. CAUTION
l
Do
not move the gearshift lever into re-
verse while the vehicle is moving for-
ward; doing so will damage the transmis-
sion.
l Do not rest your foot on the clutch pedal
while driving as this will cause premature
clutch wear or damage.
NOTE l If
it is hard to shift into 1 st
, depress the
clutch pedal again; the shift will then be eas-
ier to make. Moving the gearshift lever to the “R”
(Reverse) position CAUTION
l
Do
not move the gearshift lever to the
“R” (Reverse) position while the vehicle
is moving forward. This could damage
the transmission.
Vehicles equipped with 5-speed man-
ual transmission
To
shift into the “R” (Reverse) position from 5 th
gear, move the gearshift lever to the “N” (Neutral)
position, and then move it to the “R” (Reverse) po-
sition.
Vehicles equipped with 6-speed man-
ual transmission
Pull up the pull-ring (A), then move the gearshift
lever to the “R” (Reverse) position with the pull-
ring still pulled. Starting and driving
4-13 4 5 M/T
6 M/T
Presented by http://mmc-manuals.ru/ \251
Page 129 of 273
CAUTION
l
For vehicles with M/T, if you shift to “N”
(Neutral) position in auto-speed control
mode without pressing the clutch first,
the engine will run too fast and might be
damaged.
NOTE l Auto-speed
control may not be able to keep
your speed on uphills or downhills.
l Your speed may decrease on a steep uphill.
You must use the accelerator pedal if you
want to stay at your set speed.
l Your speed may increase to more than the
set speed on a steep downhill. You must use
the brake to control your speed. If your speed
increases too much, turn off the autospeed
control. (Refer to “To deactivate” on page
4-28.) CRUISE indication lamp
E00609200161
This
lamp comes on when auto-speed control is ac-
tivated by operation of the auto-speed control main
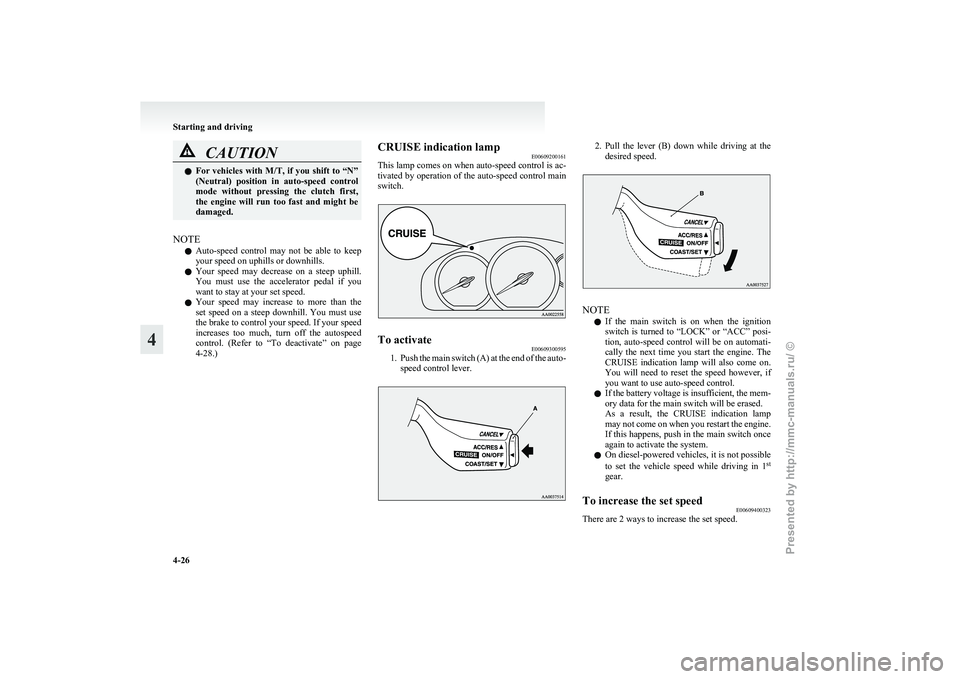
switch. To activate
E00609300595
1. Push
the main switch (A) at the end of the auto-
speed control lever. 2. Pull
the lever (B) down while driving at the
desired speed. NOTE
l If
the main switch is on when the ignition
switch is turned to “LOCK” or “ACC” posi-
tion, auto-speed control will be on automati-
cally the next time you start the engine. The
CRUISE indication lamp will also come on.
You will need to reset the speed however, if
you want to use auto-speed control.
l If the battery voltage is insufficient, the mem-
ory data for the main switch will be erased.
As a result, the CRUISE indication lamp
may not come on when you restart the engine.
If this happens, push in the main switch once
again to activate the system.
l On diesel-powered vehicles, it is not possible
to set the vehicle speed while driving in 1 st
gear.
To increase the set speed E00609400323
There are 2 ways to increase the set speed. Starting and driving
4-26
4
Presented by http://mmc-manuals.ru/ \251
Page 131 of 273
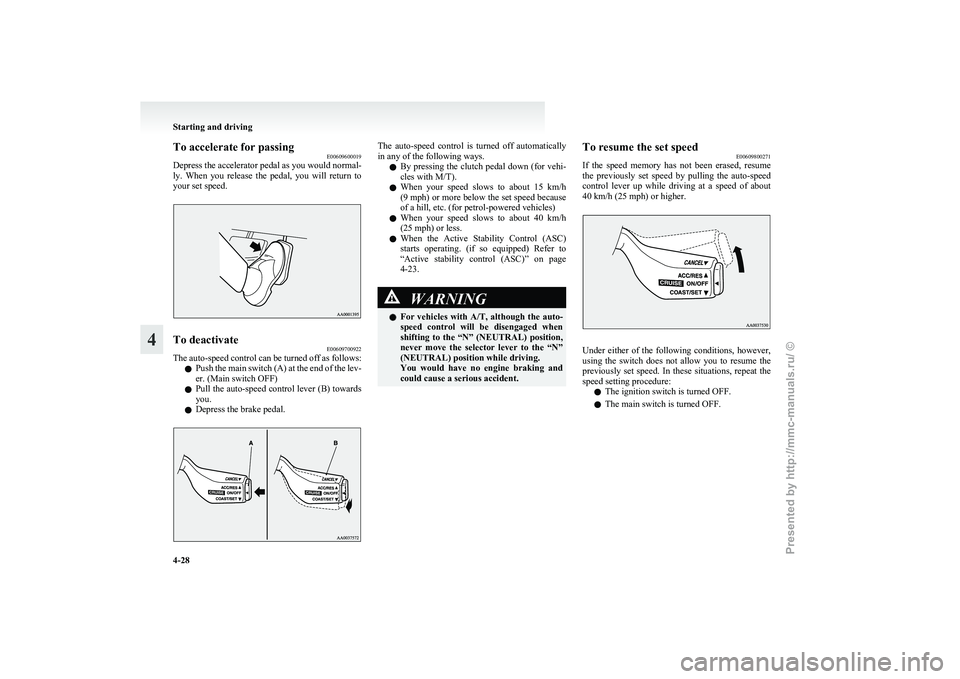
To accelerate for passing
E00609600019
Depress
the accelerator pedal as you would normal-
ly. When you release the pedal, you will return to
your set speed. To deactivate
E00609700922
The auto-speed control can be turned off as follows:
l Push
the main switch (A) at the end of the lev-
er. (Main switch OFF)
l Pull the auto-speed control lever (B) towards
you.
l Depress the brake pedal. The auto-speed control is turned off automatically
in any of the following ways.
l By
pressing the clutch pedal down (for vehi-
cles with M/T).
l When your speed slows to about 15 km/h
(9 mph) or more below the set speed because
of a hill, etc. (for petrol-powered vehicles)
l When your speed slows to about 40 km/h
(25 mph) or less.
l When the Active Stability Control (ASC)
starts operating. (if so equipped) Refer to
“Active stability control (ASC)” on page
4-23. WARNING
l For
vehicles with A/T, although the auto-
speed control will be disengaged when
shifting to the “N” (NEUTRAL) position,
never move the selector lever to the “N”
(NEUTRAL) position while driving.
You would have no engine braking and
could cause a serious accident. To resume the set speed
E00609800271
If
the speed memory has not been erased, resume
the previously set speed by pulling the auto-speed
control lever up while driving at a speed of about
40 km/h (25 mph) or higher. Under either of the following conditions, however,
using
the switch does not allow you to resume the
previously set speed. In these situations, repeat the
speed setting procedure:
l The ignition switch is turned OFF.
l The main switch is turned OFF. Starting and driving
4-28
4
Presented by http://mmc-manuals.ru/ \251
Page 137 of 273
Trailer towing
E00610000420
In
order to tow a trailer with your vehicle, have a
trailer towing device that meets all relevant regula-
tions in your area, mounted consult a
MITSUBISHI MOTORS Authorized Service Point.
The regulations concerning the towing of a trailer
may differ from country to country. You are ad-
vised to obey the regulations in each area. CAUTION
l
Danger of Accident!
A
towing bar should be fitted according
to MITSUBISHI MOTORS guidelines.
NOTE l If
you are going to tow a trailer, pay careful
attention to the following points.
Maximum towable weight with brake
and maximum trailer-nose weight
Never exceed the maximum towable weight with
brake and the maximum trailer-nose weight as lis-
ted in the specifications. (Refer to page 9-07.)
If you tow a trailer at an altitude of more than
1,000 m above sea-level, reduce your weight by
10 % of the gross combination weight for every in-
crease of 1,000 m above sea-level, as the engine out-
put is lowered owing to decrease in atmospheric
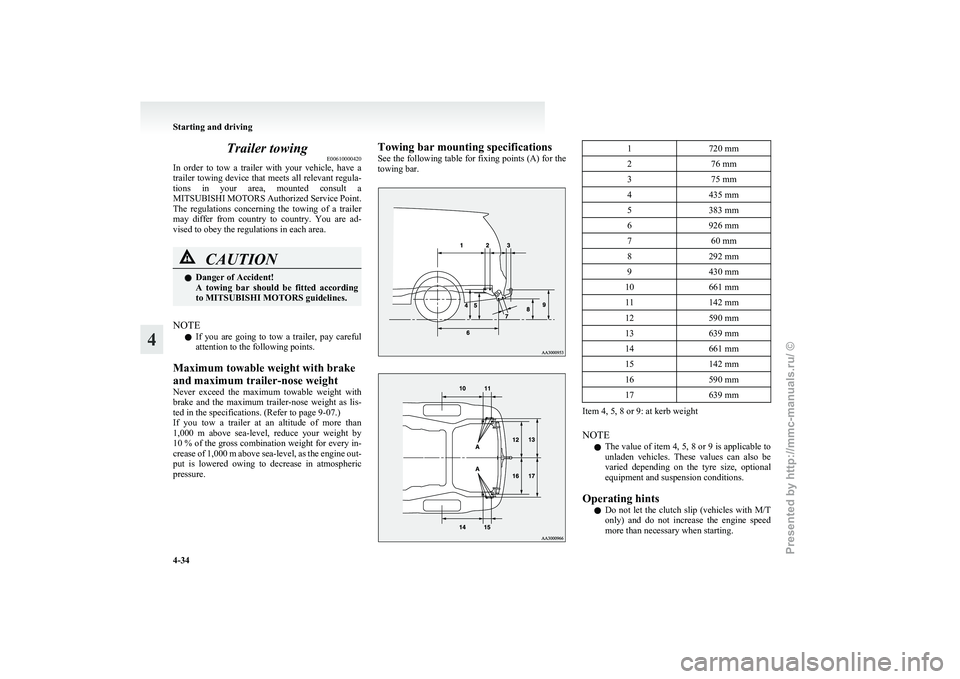
pressure. Towing bar mounting specifications
See
the following table for fixing points (A) for the
towing bar. 1
720 mm
2 76 mm
3 75 mm
4 435 mm
5 383 mm
6 926 mm
7 60 mm
8 292 mm
9 430 mm
10 661 mm
11 142 mm
12 590 mm
13 639 mm
14 661 mm
15 142 mm
16 590 mm
17 639 mm Item 4, 5, 8 or 9: at kerb weight
NOTE
l The
value of item 4, 5, 8 or 9 is applicable to
unladen vehicles. These values can also be
varied depending on the tyre size, optional
equipment and suspension conditions.
Operating hints l Do not let the clutch slip (vehicles with M/T
only) and do not increase the engine speed
more than necessary when starting. Starting and driving
4-34
4
Presented by http://mmc-manuals.ru/ \251
Page 138 of 273
l
Be sure that the driving speed does not ex-
ceed 100 km/h (62 mph) for trailer operation.
It is also recommended that you obey the lo-
cal regulations in case driving speed with a
trailer is limited to less than 100 km/h
(62 mph).
l To prevent shocks from the overrun brake, de-
press the brake pedal lightly at first and then
more strongly.
l To make full use of engine braking, change
to a lower gear before descending a slope.
l The body, brakes, clutch, and chassis will be
under additional strain when towing a trailer.
l The heavier weight and higher rolling and air
resistance will increase fuel consumption.
Additional precautions for vehicles equipped with
A/T
The 2 nd
gear (in “Sports mode”) is recommended
on slopes or at low speed. Use the 1 st
gear (in
“Sports mode”) in mountainous areas in order to
make better use of engine braking and to assist the
brake system. However, be sure that the speed does
not exceed the maximum speed limit for the selec-
ted gear. Starting and driving
4-35 4
Presented by http://mmc-manuals.ru/ \251
Page 210 of 273
Service precautions
....................................................................... 8-02
Catalytic converter ........................................................................ 8-02
Bonnet...........................................................................................8-03
Engine oil ......................................................................................8-04
Engine coolant .............................................................................. 8-06
Automatic transmission fluid*
......................................................8-08
Washer fluid ................................................................................. 8-08
Brake fluid/Clutch fluid* .............................................................. 8-09
Power steering fluid ...................................................................... 8-09
Battery .......................................................................................... 8-10
Tyres............................................................................................. 8-11
Clutch pedal free play* ................................................................. 8-15
Brake pedal free play .................................................................... 8-16
Parking brake lever stroke ............................................................ 8-16
Parking brake break-in..................................................................8-16
Wiper blades ................................................................................. 8-17
General maintenance .................................................................... 8-18
For cold and snowy weather......................................................... 8-19
Fusible links.................................................................................. 8-19
Fuses............................................................................................. 8-20
Replacement of lamp bulbs .......................................................... 8-25Maintenance
8
Presented by http://mmc-manuals.ru/ \251
Page 218 of 273
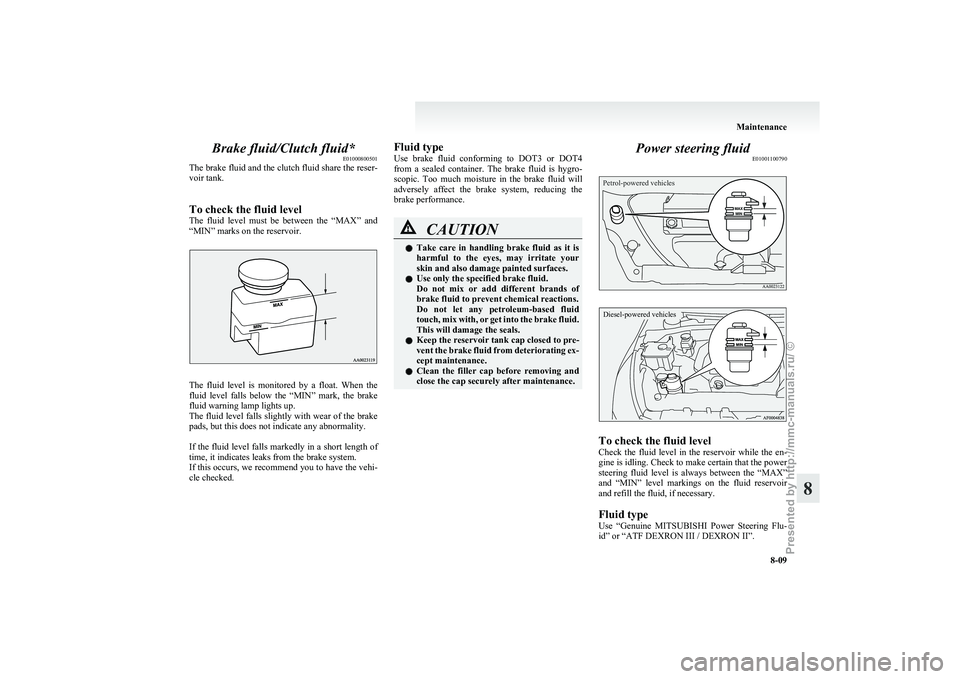
Brake fluid/Clutch fluid*
E01000800501
The
brake fluid and the clutch fluid share the reser-
voir tank.
To check the fluid level
The fluid level must be between the “MAX” and
“MIN” marks on the reservoir. The fluid level is monitored by a float. When the
fluid
level falls below the “MIN” mark, the brake
fluid warning lamp lights up.
The fluid level falls slightly with wear of the brake
pads, but this does not indicate any abnormality.
If the fluid level falls markedly in a short length of
time, it indicates leaks from the brake system.
If this occurs, we recommend you to have the vehi-
cle checked. Fluid type
Use
brake fluid conforming to DOT3 or DOT4
from a sealed container. The brake fluid is hygro-
scopic. Too much moisture in the brake fluid will
adversely affect the brake system, reducing the
brake performance. CAUTION
l
Take
care in handling brake fluid as it is
harmful to the eyes, may irritate your
skin and also damage painted surfaces.
l Use only the specified brake fluid.
Do not mix or add different brands of
brake fluid to prevent chemical reactions.
Do not let any petroleum-based fluid
touch, mix with, or get into the brake fluid.
This will damage the seals.
l Keep the reservoir tank cap closed to pre-
vent the brake fluid from deteriorating ex-
cept maintenance.
l Clean the filler cap before removing and
close the cap securely after maintenance. Power steering fluid
E01001100790
Petrol-powered vehicles
Diesel-powered vehicles To check the fluid level
Check
the fluid level in the reservoir while the en-
gine is idling. Check to make certain that the power
steering fluid level is always between the “MAX”
and “MIN” level markings on the fluid reservoir
and refill the fluid, if necessary.
Fluid type
Use “Genuine MITSUBISHI Power Steering Flu-
id” or “ATF DEXRON III / DEXRON II”. Maintenance
8-09 8
Presented by http://mmc-manuals.ru/ \251
Page 224 of 273
CAUTION
l
Drive carefully and do not exceed
50 km/h (30 mph). Remember, fitting
chains is not going to stop accidents from
happening.
l When tyre chains are installed, take care
that they do not damage the disc wheel or
body.
l Do not install a tyre chain on an emergen-
cy wheel which is compact in size. If one
of the front wheels has a puncture, re-
place it with one of the rear wheels and in-
stall the compact spare wheel in that
place before fitting a tyre chain.
l An aluminium wheel can be damaged by
a tyre chain while driving. When fitting a
tyre chain on an aluminium wheel, take
care that any part of the chain and fitting
cannot be brought into contact with the
wheel.
l Remove the wheel covers before instal-
ling a tyre chain, otherwise they may be
damaged by the tyre chain. (Refer to
“wheel covers” on page 6-13.)
l When installing or removing the tyre
chains, take care that hands and other
parts of your body are not injured by the
sharp edges of the vehicle body.
l Install the chains only on the front tyres
and tighten them as tightly as possible
with the ends securely fastened. NOTE
l The
laws and regulations concerning the use
of tyre chains vary. Find out and follow the
laws and regulations of the area you’re driv-
ing in.
In most countries, it is prohibited by law to
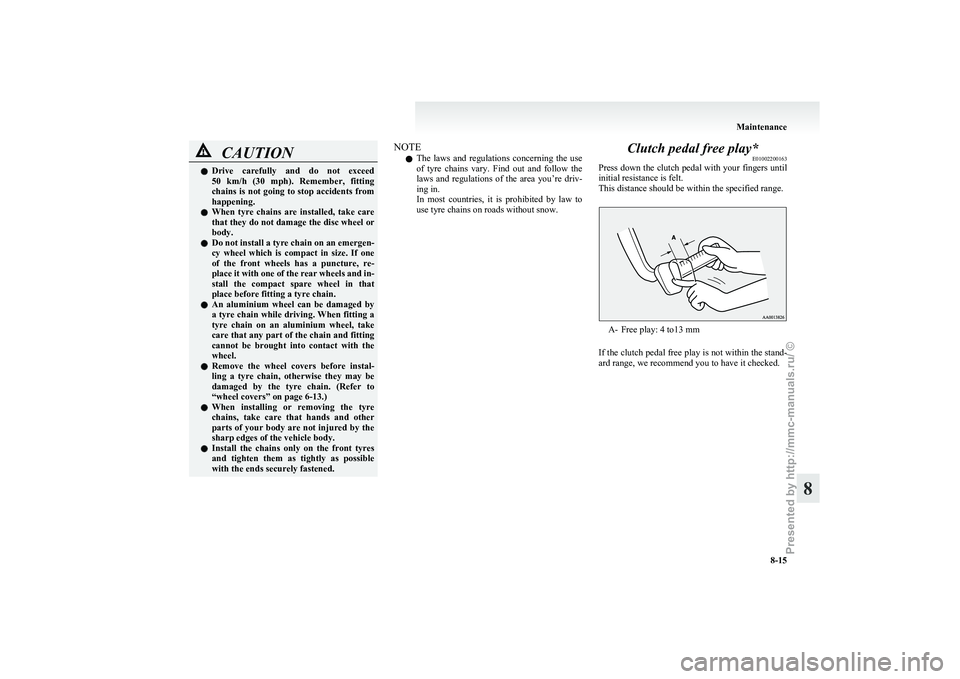
use tyre chains on roads without snow. Clutch pedal free play*
E01002200163
Press
down the clutch pedal with your fingers until
initial resistance is felt.
This distance should be within the specified range. A- Free play: 4 to13 mm
If
the clutch pedal free play is not within the stand-
ard range, we recommend you to have it checked. Maintenance
8-15 8
Presented by http://mmc-manuals.ru/ \251