towing MITSUBISHI GRANDIS 2010 Owner's Manual (in English)
[x] Cancel search | Manufacturer: MITSUBISHI, Model Year: 2010, Model line: GRANDIS, Model: MITSUBISHI GRANDIS 2010Pages: 273, PDF Size: 21.01 MB
Page 37 of 273
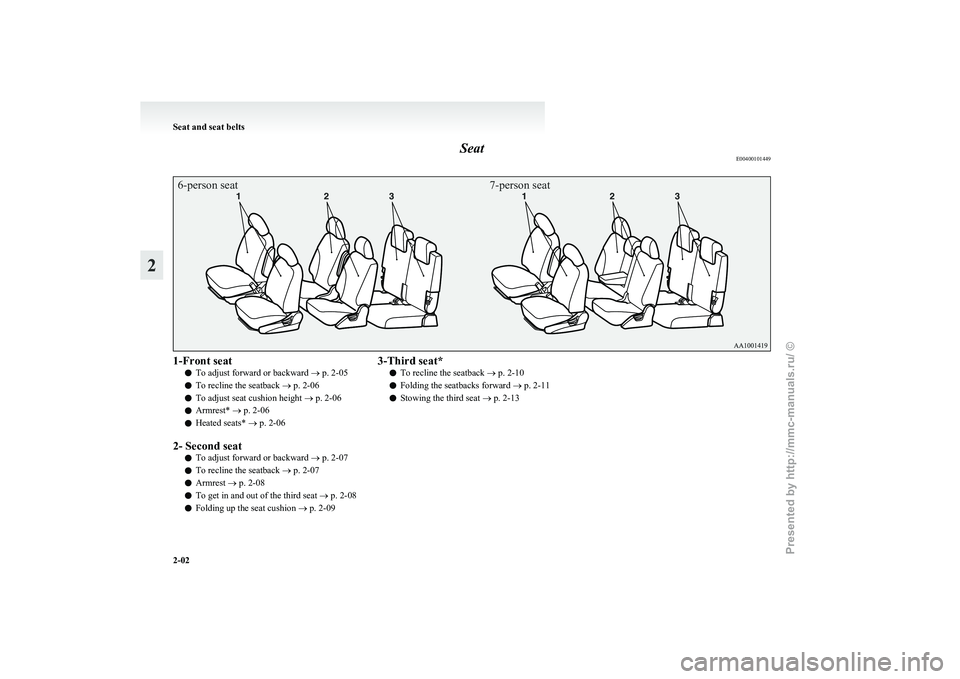
Seat
E004001014496-person seat7-person seat1-Front seat
l To adjust forward or backward
® p. 2-05
l To recline the seatback
® p. 2-06
l To adjust seat cushion height ® p. 2-06
l Armrest* ® p. 2-06
l Heated seats*
® p. 2-06
2- Second seat l To adjust forward or backward
® p. 2-07
l To recline the seatback
® p. 2-07
l Armrest ® p. 2-08
l To get in and out of the third seat
® p. 2-08
l Folding up the seat cushion
® p. 2-093-Third seat*
l To recline the seatback
® p. 2-10
l Folding the seatbacks forward
® p. 2-11
l Stowing the third seat
® p. 2-13Seat and seat belts
2-02
2
Presented by http://mmc-manuals.ru/ \251
Page 39 of 273
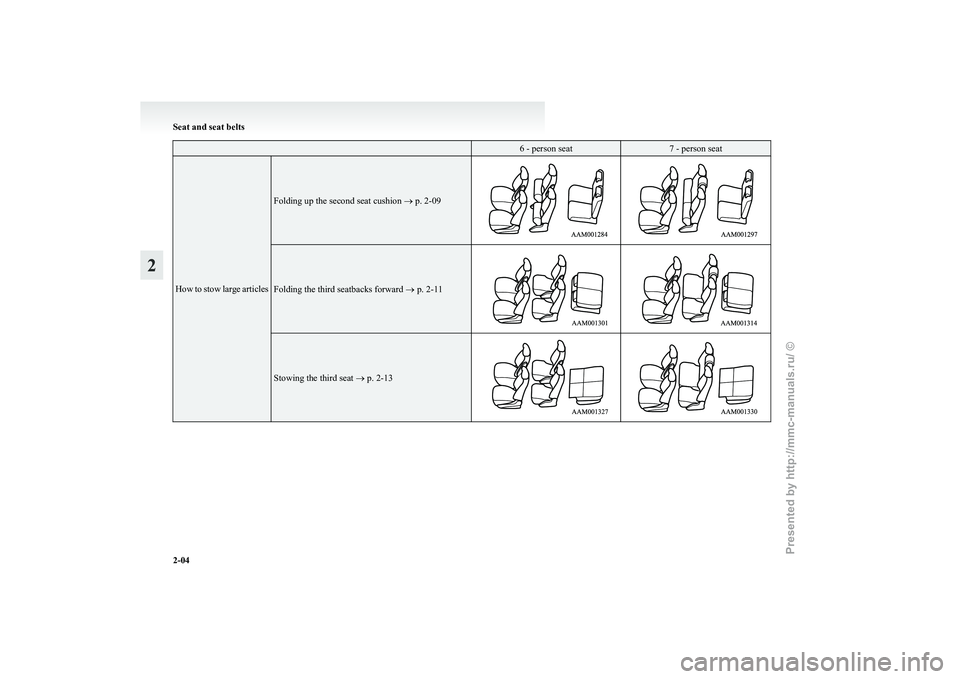
6 - person seat 7 - person seat
How to stow large articles Folding up the second seat cushion ® p. 2-09
Folding the third seatbacks forward ® p. 2-11
Stowing the third seat
® p. 2-13Seat and seat belts
2-04
2
Presented by http://mmc-manuals.ru/ \251
Page 48 of 273
Making a luggage area
E00403400039WARNING
l If required, always operate the seating be-
fore the vehicle is in motion.
l After seat operations are made, ensure
the seating is locked in position by attempt-
ing to move the seat and seatback for-
ward and rearward without using the ad-
justing mechanism.
l The luggage compartment in the rear of
the vehicle should never be used as a play
area by children. Children should be seat-
ed with seat belts fastened when the vehi-
cle is in motion. Be sure that the rear seat-
backs are returned to their fully upright
position and locked in place. CAUTION
l
Do
not stack luggage above the seatback
height.
Secure the luggage firmly.
Otherwise, serious accidents could result
due to restricted rear vision or unrestrain-
ed objects entering the passenger compart-
ment during sudden braking.
l Make sure that the seat is operated by an
adult. If it is operated by a child, an unex-
pected accident might occur.
l When folding or storing the seat, be sure
not to catch your hand or leg. Stowing the third seat
E00404100020
The
third seat can be stowed under the floor to cre-
ate a luggage area.
NOTE
l Each side of the third seats can be stowed in-
dependently of the other.
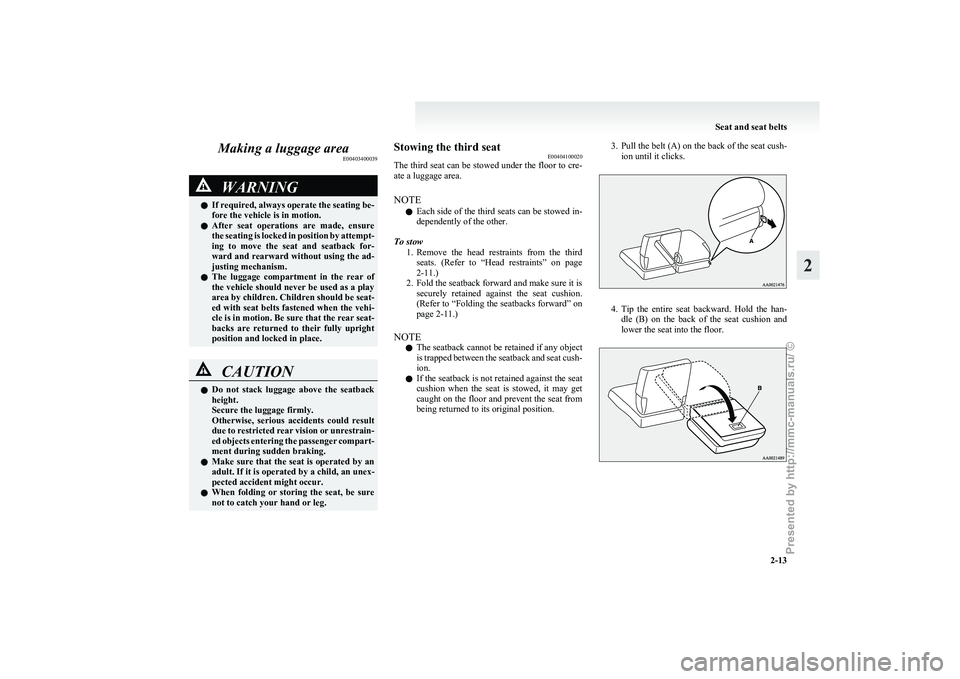
To stow 1. Remove the head restraints from the thirdseats. (Refer to “Head restraints” on page
2-11.)
2. Fold the seatback forward and make sure it is securely retained against the seat cushion.
(Refer to “Folding the seatbacks forward” on
page 2-11.)
NOTE l The seatback cannot be retained if any object
is trapped between the seatback and seat cush-
ion.
l If the seatback is not retained against the seat
cushion when the seat is stowed, it may get
caught on the floor and prevent the seat from
being returned to its original position. 3. Pull the belt (A) on the back of the seat cush-
ion until it clicks. 4. Tip
the entire seat backward. Hold the han-
dle (B) on the back of the seat cushion and
lower the seat into the floor. Seat and seat belts
2-13 2
Presented by http://mmc-manuals.ru/ \251
Page 49 of 273
CAUTION
l
When stowing the seat, hold it with your
hands and lower it slowly. Unless you
hold the seat securely, it may suddenly tip
under its own weight, trapping your
hands.
l Do not pull the belt while a person is sit-
ting on the seat. The seat could tip back-
ward, resulting in an accident.
NOTE l The
removed third seat head restraints (C)
can be fitted together and stored in the cargo
net in the luggage area. (Refer to “Cargo net”
on page 5-45.) To return
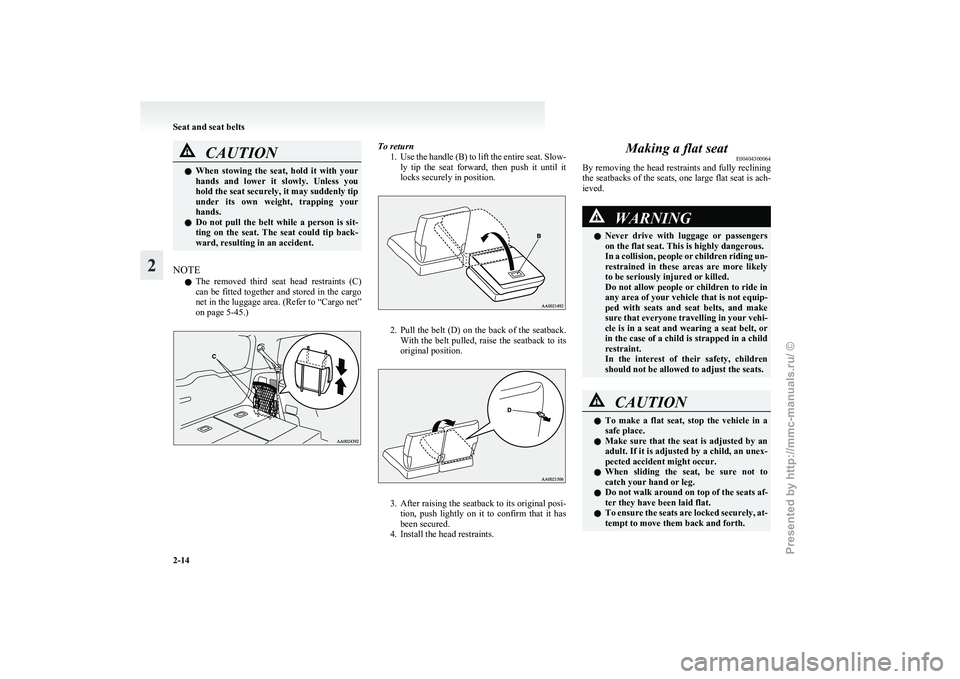
1. Use
the handle (B) to lift the entire seat. Slow-
ly tip the seat forward, then push it until it
locks securely in position. 2. Pull
the belt (D) on the back of the seatback.
With the belt pulled, raise the seatback to its
original position. 3. After
raising the seatback to its original posi-
tion, push lightly on it to confirm that it has
been secured.
4. Install the head restraints. Making a flat seat
E00404300064
By
removing the head restraints and fully reclining
the seatbacks of the seats, one large flat seat is ach-
ieved. WARNING
l Never
drive with luggage or passengers
on the flat seat. This is highly dangerous.
In a collision, people or children riding un-
restrained in these areas are more likely
to be seriously injured or killed.
Do not allow people or children to ride in
any area of your vehicle that is not equip-
ped with seats and seat belts, and make
sure that everyone travelling in your vehi-
cle is in a seat and wearing a seat belt, or
in the case of a child is strapped in a child
restraint.
In the interest of their safety, children
should not be allowed to adjust the seats. CAUTION
l
To
make a flat seat, stop the vehicle in a
safe place.
l Make sure that the seat is adjusted by an
adult. If it is adjusted by a child, an unex-
pected accident might occur.
l When sliding the seat, be sure not to
catch your hand or leg.
l Do not walk around on top of the seats af-
ter they have been laid flat.
l To ensure the seats are locked securely, at-
tempt to move them back and forth. Seat and seat belts
2-14
2
Presented by http://mmc-manuals.ru/ \251
Page 84 of 273
CAUTION
• The brake warning lamp
does not illuminate when
the parking brake is applied
or does not turn off when
the parking brake is re-
leased.
• The ABS warning lamp and brake warning lamp illumi-
nate at the same time.
For details, refer to “ABS
warning lamp” on page
4-21.
• The brake warning lamp re- mains illuminated during
driving.
l The vehicle should be brought
to a halt in the following man-
ner when brake performance
has deteriorated.
• Depress the brake pedalharder than usual.
Even if the brake pedal
moves down to the very end
of its possible stroke, keep it
pressed down hard.
• Should the brakes fail, use engine braking to reduce
your speed and carefully
pull the parking brake lever
to park your vehicle.
Depress the brake pedal to
operate the stop lamp
(brake lamp) to alert the ve-
hicles behind you. Check engine warning lamp
(petrol-powered vehicles)
E00502601351
This
lamp is a part of an onboard diag-
nostic system which monitors the emis-
sions, engine and automatic transmission
control systems.
If a problem is detected in one of these
systems, this lamp illuminates.
Although your vehicle will usually be
drivable and not need towing, we recom-
mend you to have the system checked as
soon as possible.
This lamp will also illuminate for a few
seconds when the ignition key is turned
to the “ON” position. If it does not go
off after a few seconds, we recommend
you to have the vehicle checked. CAUTION
l
Prolonged
driving with this
lamp on may cause further dam-
age to the emission control sys-
tem. It could also affect fuel
economy and drivability.
l If the lamp does not illuminate
when the ignition key is turned
to the “ON” position, we recom-
mend you to have the system
checked. CAUTION
l
If
the lamp illuminates while
the engine is running, avoid
driving at high speeds and we
recommend you to have the sys-
tem checked.
During vehicle operation with
the lamp illuminated, the vehi-
cle may not accelerate when
you depress the accelerator ped-
al.
When the vehicle is stationary
with the lamp illuminated, you
must depress the brake pedal
more firmly than usual since
the engine idling speed is high-
er than usual and the vehicle
with an A/T has a stronger ten-
dency to creep forward.
NOTE l The
engine electronic control mod-
ule accommodating the onboard di-
agnostic system has various fault
data (especially about the exhaust
emission) stored.
This data will be erased if a bat-
tery cable is disconnected which
will make a rapid diagnosis diffi-
cult. Do not disconnect a battery
cable when the check engine warn-
ing lamp is ON. Instruments and controls
3-07 3
Presented by http://mmc-manuals.ru/ \251
Page 85 of 273
Check engine warning lamp
(diesel-powered vehicles)
E00502600628
This
lamp is a part of an onboard diag-
nostic system which monitors the emis-
sions control systems.
If a problem is detected in one of these
systems, this lamp illuminates.
Although your vehicle will usually be
drivable and not need towing, we recom-
mend you to have the system checked as
soon as possible.
This lamp will also illuminate for a few
seconds when the ignition key is turned
to the “ON” position. If it does not go
off after a few seconds, we recommend
you to have the vehicle checked. CAUTION
l
Prolonged
driving with this
lamp on may cause further dam-
age to the emission control sys-
tem. It could also affect fuel
economy and drivability.
l If the lamp does not illuminate
when the ignition key is turned
to the “ON” position, we recom-
mend you to have the system
checked. CAUTION
l
If
the lamp illuminates while
the engine is running, avoid
driving at high speeds and we
recommend you to have the sys-
tem checked.
During vehicle operation with
the lamp illuminated, the vehi-
cle may not accelerate when
you depress the accelerator ped-
al.
When the vehicle is stationary
with the lamp illuminated, you
must depress the brake pedal
more firmly than usual since
the engine idling speed is high-
er than usual.
NOTE l The
engine electronic control mod-
ule accommodating the onboard di-
agnostic system has various fault
data (especially about the exhaust
emission) stored.
This data will be erased if a bat-
tery cable is disconnected which
will make a rapid diagnosis diffi-
cult. Do not disconnect a battery
cable when the check engine warn-
ing lamp is ON. Charge warning lamp
E00502700935
This
lamp illuminates when the ignition
key is turned to the “ON” position, and
goes off after the engine has started. CAUTION
l
If
it illuminates while the en-
gine is running, there is a prob-
lem in the charging system. In
this case, immediately park
your vehicle in a safe place and
we recommend you to have it
checked. Oil pressure warning lamp
E00502800659
This
lamp illuminates when the ignition
key is turned to the “ON” position, and
goes off after the engine has started. If it
illuminates while the engine is running,
the oil pressure is too low.
If the warning lamp illuminates while
the engine is running, turn the engine off
and have it inspected. CAUTION
l
If
this lamp illuminates when
the engine oil level is not low,
have it inspected.
l This warning lamp does not in-
dicate the amount of oil in the
crankcase.
This must be determined by
checking the oil level on the dip-
stick, while the engine is switch-
ed off. Instruments and controls
3-08
3
Presented by http://mmc-manuals.ru/ \251
Page 104 of 273
Economical driving.......................................................................4-02
Driving, alcohol and drugs
........................................................... 4-02
Safe driving techniques ................................................................ 4-03
Running-in recommendations
.......................................................4-03
Parking brake................................................................................ 4-04
Parking.......................................................................................... 4-05
Steering wheel height adjustment .................................................4-06
Inside rear-view mirror ................................................................. 4-06
Outside rear-view mirrors ............................................................. 4-07
Ignition switch .............................................................................. 4-08
Steering wheel lock ...................................................................... 4-10
Starting..........................................................................................4-10
Diesel particulate filter (DPF)* .................................................... 4-12
Manual transmission* ................................................................... 4-13
Automatic transmission INVECS-II Sports Mode 4A/T (Intelligent & Innovative Vehicle Electronic Control
System II)*............................................................................... 4-15
Braking......................................................................................... 4-20
Anti-lock brake system (ABS) ..................................................... 4-21
Power steering system.................................................................. 4-23
Active stability control (ASC)* .................................................... 4-23
Auto-speed (cruise) control* ........................................................ 4-25
Corner sensor system*.................................................................. 4-29
Cargo loads................................................................................... 4-32
Trailer towing ............................................................................... 4-34Starting and driving
4
Presented by http://mmc-manuals.ru/ \251
Page 106 of 273
Safe driving techniques
E00600300202
Driving
safety and protection against injury cannot
be fully ensured. However, we recommend that
you pay extra attention to the following:
Seat belts
Before starting the vehicle, make sure that you and
your passengers have fastened your seat belts.
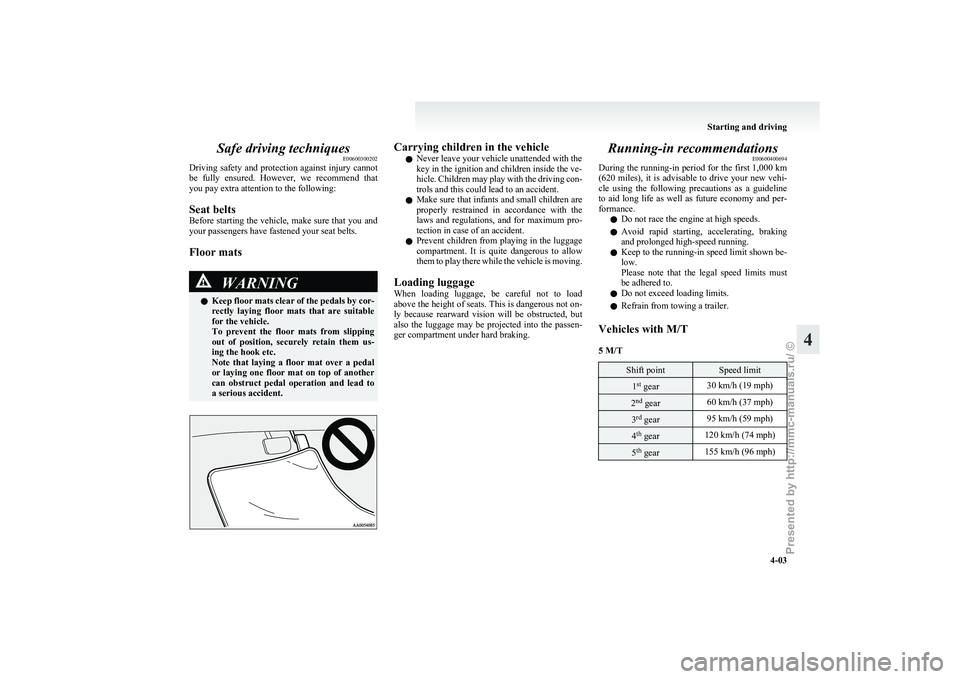
Floor mats WARNING
l Keep
floor mats clear of the pedals by cor-
rectly laying floor mats that are suitable
for the vehicle.
To prevent the floor mats from slipping
out of position, securely retain them us-
ing the hook etc.
Note that laying a floor mat over a pedal
or laying one floor mat on top of another
can obstruct pedal operation and lead to
a serious accident. Carrying children in the vehicle
l Never leave your vehicle unattended with the
key in the ignition and children inside the ve-
hicle.
Children may play with the driving con-
trols and this could lead to an accident.
l Make sure that infants and small children are
properly restrained in accordance with the
laws and regulations, and for maximum pro-
tection in case of an accident.
l Prevent children from playing in the luggage
compartment. It is quite dangerous to allow
them to play there while the vehicle is moving.
Loading luggage
When loading luggage, be careful not to load
above the height of seats. This is dangerous not on-
ly because rearward vision will be obstructed, but
also the luggage may be projected into the passen-
ger compartment under hard braking. Running-in recommendations
E00600400694
During
the running-in period for the first 1,000 km
(620 miles), it is advisable to drive your new vehi-
cle using the following precautions as a guideline
to aid long life as well as future economy and per-
formance.
l Do not race the engine at high speeds.
l Avoid rapid starting, accelerating, braking
and prolonged high-speed running.
l Keep to the running-in speed limit shown be-
low.
Please note that the legal speed limits must
be adhered to.
l Do not exceed loading limits.
l Refrain from towing a trailer.
Vehicles with M/T
5 M/T Shift point Speed limit
1
st
gear 30 km/h (19 mph) 2
nd
gear 60 km/h (37 mph) 3
rd
gear 95 km/h (59 mph) 4
th
gear 120 km/h (74 mph) 5
th
gear 155 km/h (96 mph) Starting and driving
4-03 4
Presented by http://mmc-manuals.ru/ \251
Page 126 of 273
Power steering system
E00607400127
When
the engine is stopped, the power steering sys-
tem will not function and it will require greater man-
ual effort to operate the steering wheel. Keep this
in mind in particular when towing the vehicle. Nev-
er turn off the engine while driving.
Periodically check the power steering fluid level. CAUTION
l
Do
not hold the steering wheel in the fully
turned position (either left or right), for
longer than 10 seconds.
This can cause damage to the power steer-
ing system. Active stability control (ASC)*
E00611700147
The
Active Stability Control (ASC) takes overall
control of the anti-lock brake system, traction con-
trol function and stability control function to help
maintain the vehicle’s control and traction. Please
read this section in conjunction with the page on
the anti-lock brake system, traction control func-
tion and stability control function.
Anti-lock brake system (ABS) ® p. 4-21
Traction control function ® p. 4-23
Stability control function ® p. 4-24 CAUTION
l
Do
not over-rely on the ASC. Even when
the ASC is operating, there are limits to
the system and its ability to maintain con-
trol and traction. Reckless driving may
lead to accidents. Always drive carefully,
taking account of the road conditions.
l Be sure to use the same specified type and
size of tyre on all 4 wheels. Otherwise,
there is a possibility that the ASC will not
work properly.
NOTE l In
the following situation, a click is heard
from the engine compartment; however, this
is only the sound of ASC being checked. • After turning the ignition switch to the“ON” position.
• After your vehicle is driven a short dis- tance after starting the engine. l
Some
vibration will be felt in the vehicle
body and a whining sound of a motor will be
heard from the engine compartment when
the ASC functions. This is a normal result of
the ASC operation, and does not indicate a
malfunction.
l The ASC does not operate while the ABS
warning lamp is illuminated.
Traction control function E00611800050
On slippery surfaces, traction control function pre-
vents
the drive wheels from excessive spinning,
thus helping the vehicle to start moving from a stop-
ped condition. It also provides sufficient driving
force and steering performance as the vehicle turns
at accelerated speeds. CAUTION
l
When
driving a vehicle on a snowy or icy
road, be sure to install snow tyres and
drive the vehicle at moderate speeds.
l When a tyre such as a compact spare
tyre, which is different in size from the
standard tyre, has been installed, make
sure that the traction control function is
turned off.
NOTE l When
moving out of mud, sand or fresh
snow, pressing the accelerator pedal may not
allow the engine speed to increase.
If this happens and the vehicle remains stuck
as a result, turn the TCL switch OFF. The ve-
hicle will then be easier to extricate. Starting and driving
4-23 4
Presented by http://mmc-manuals.ru/ \251
Page 128 of 273
CAUTION
l
If continuous brake control (on a slippery
surface, for example) causes the tempera-
ture of the braking system to increase ex-
cessively, the traction control function
(working by controlling the brake on
each wheel) will be suspended to protect
the braking system. [The traction control
function (working by controlling the en-
gine output) will operate. Normal opera-
tion of the vehicle will not be affected.] At
this time, the indication lamp will
blink
to inform the driver that the trac-
tion control function (working by control-
ling the brake on each wheel) is suspen-
ded. If the vehicle is stopped and the indication lamp goes off, the traction con-
trol
function (working by controlling the
brake on each wheel) will start operating
again.
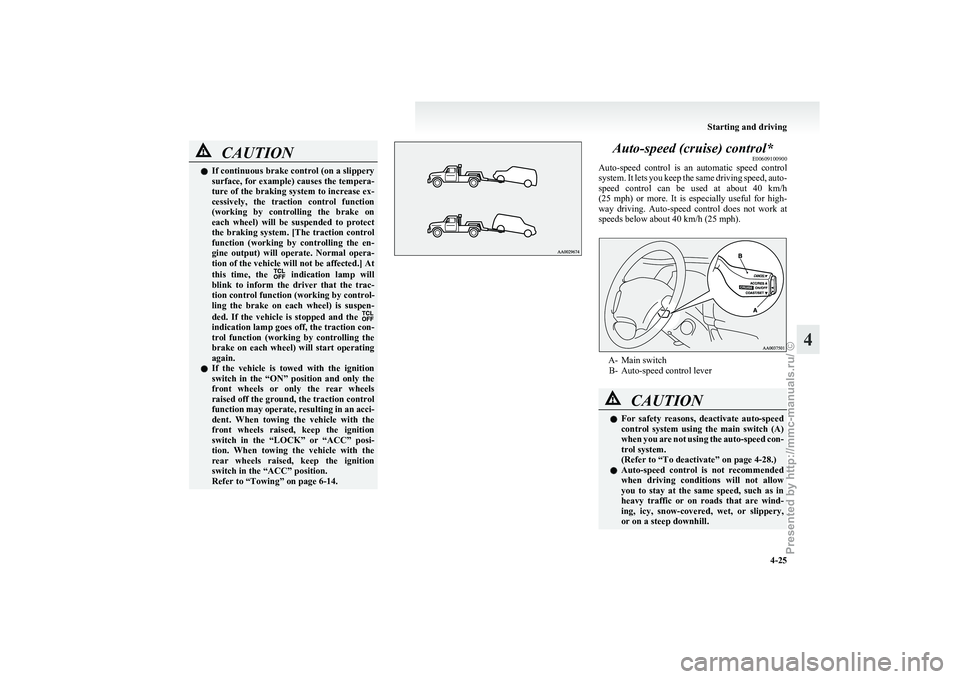
l If the vehicle is towed with the ignition
switch in the “ON” position and only the
front wheels or only the rear wheels
raised off the ground, the traction control
function may operate, resulting in an acci-
dent. When towing the vehicle with the
front wheels raised, keep the ignition
switch in the “LOCK” or “ACC” posi-
tion. When towing the vehicle with the
rear wheels raised, keep the ignition
switch in the “ACC” position.
Refer to “Towing” on page 6-14. Auto-speed (cruise) control*
E00609100900
Auto-speed
control is an automatic speed control
system. It lets you keep the same driving speed, auto-
speed control can be used at about 40 km/h
(25 mph) or more. It is especially useful for high-
way driving. Auto-speed control does not work at
speeds below about 40 km/h (25 mph). A- Main switch
B-
Auto-speed control lever CAUTION
l
For
safety reasons, deactivate auto-speed
control system using the main switch (A)
when you are not using the auto-speed con-
trol system.
(Refer to “To deactivate” on page 4-28.)
l Auto-speed control is not recommended
when driving conditions will not allow
you to stay at the same speed, such as in
heavy traffic or on roads that are wind-
ing, icy, snow-covered, wet, or slippery,
or on a steep downhill. Starting and driving
4-25 4
Presented by http://mmc-manuals.ru/ \251