auxiliary battery MITSUBISHI I-MIEV 2011 Owners Manual
[x] Cancel search | Manufacturer: MITSUBISHI, Model Year: 2011, Model line: I-MIEV, Model: MITSUBISHI I-MIEV 2011Pages: 193, PDF Size: 12.2 MB
Page 13 of 193
Familiarizing yourself with
i-MiEV E00202600016
This
section describes features that the i-MiEV has
as an electric vehicle and gives precautions that
you should observe. It is important. Please read it
carefully.
Main features E00202700017
l Energy
required for driving is only electrici-
ty and fuel supply is not required.
l The traction battery and electric motor unit
are mounted outside the passenger compart-
ment. In this way, passenger space is ob-
tained for riding of four adults.
l With the high performance motor, noise and
vibration during driving are greatly limited
and powerful acceleration can also be ob-
tained.
l With regenerative braking, the traction bat-
tery is automatically charged when the accel-
erator is released.
l The vehicle can be charged from general pow-
er outlets (rated AC 220-240 V).
l Charge with the quick charger for i-MiEV is
also available.
l The creeping behaviour occurs in i-MiEV
like a vehicle with automatic transmission.
Regenerative braking
It is equivalent to engine braking of an engine vehi-
cle. If you step off the accelerator pedal during driv-
ing, motion energy is converted into electric energy
using the motor as a power generator.
In this conversion, braking force is generated and
converted electric energy is charged in the traction
battery. Regenerative braking is stronger in the order of the
selector
lever position of “C” (COMFORT), “D”
(DRIVE), “B” (BRAKE).
Put the selector lever to the “B” (BRAKE) or “C”
(COMFORT) position according to the driving con-
dition.
“B”: Strong regenerative braking (For downhill)
“C”: Weak regenerative braking (For long cruising)
Traction battery E00202800018
l It
is the battery to operate the motor (electric
motor unit) and the air conditioning.
In addition to the traction battery, i-MiEV
has the auxiliary battery to operate lamps, wip-
ers, etc.
l Compact, light-weight lithium ion battery
with high energy density is used for the trac-
tion battery.
l The lithium ion battery has the following char-
acteristics. Please read this carefully and
treat the battery paying attention to the fol-
lowing:
Characteristics l It is not necessary to consume the battery com-
pletely before charging.
l The capacity is gradually degraded depend-
ing on time used and operating conditions.
l The performance may be changed due to the
outside temperature. At low temperature, in
particular, the cruising range is short and the
charging time is long, compared to operation
at normal temperature.
l If you store your vehicle at an extremely
high or low temperature, the battery capacity
may be lowered.
l The battery is gradually discharged without
use and the battery charge is lowered. Precautions for operation
l Do
not store your vehicle with the energy lev-
el gauge showing 0 bars.
Doing so could damage the traction battery.
The battery may have to be replaced depend-
ing on the low capacity.
l If you do not use your vehicle for a long
time, please charge the traction battery to the
full every 3 months so that the energy level
gauge may not be 0 bars.
l MITSUBISHI MOTORS collects traction bat-
teries. If you scrap your vehicle, please con-
sult a MITSUBISHI MOTORS Authorized
Service Point.
NOTE l The progress of the battery capacity loss de-
pends on the vehicle usage and the environ-
ment.
We recommend to do regular charging from
2 bars or less to charge completely at least
once in 3 months.
The procedure lets the battery remaining indi-
cator adjusted automatically.
Cruising range E00202900019
l Even
if the charge level is the same, the cruis-
ing range may vary depending on the driving
conditions. Since driving at high speed or
climbing on a hill requires higher consump-
tion of the traction battery than usual, the
cruising range is shortened.
l Since the air conditioning (cooling or heat-
ing) consumes power of the traction battery,
its operation results in a shorter cruising
range. Maintain an appropriate temperature. General information
02
Presented by http://mmc-manuals.ru/ \251
Page 21 of 193
Battery
E08300100014
There
are two types of batteries installed in your ve-
hicle: a traction battery for operating the motor (elec-
tric motor unit) and air conditioning as well as an
auxiliary battery for starting the electric motor unit
and operating the lamps, wipers, etc. This chapter
explains charging of the traction battery.
NOTE
l The auxiliary battery is automatically charg-
ed while the ready indicator is illuminated or
during charge for the traction battery. Refer
to “Ready indicator” on page 4-09.
l If the auxiliary battery is flat, the electric mo-
tor unit cannot be started. Refer to “Emergen-
cy starting” on page 7-02. Basic knowledge for charging
E08300200015
There
are two types of charging: regular charging
and quick charging.
Regular charging is performed through the on-
board charger using rated AC 220-240 V outlet as
the power source.
The rated AC voltage may differ from country to
country.
Quick charging is performed with the quick charg-
er compatible with i-MiEV.
NOTE
l Repeatedly performing only quick charging
may reduce the battery capacity. In usual
charge, regular charging is recommended.
l To maintain the capacity of the traction bat-
tery, the following is recommended:
• Fully charge the vehicle in regular charg-ing every two weeks.
• Do not repeat charging near the full charge level.
l The quick charging gives priority when the
regular charging and the quick charging are
performed at the same time.
At this time, the regular charging will be stop-
ped.
l The progress of the battery capacity loss de-
pends on the vehicle usage and the environ-
ment.
We recommend to perform normal charging
from 2 segments or less to charge completely
at least once in 3 months.
The procedure lets the battery remaining indi-
cator adjusted automatically. Guideline for charging time
E08300700010
The
regular charging time (from 1 bar of energy lev-
el gauge to full charge) is different according to the
current value.
l 230 V/16 A → about 6 hours
l 230 V/13 A → about 7 hours
l 230 V/10 A → about 8 hours
About 30 minutes with quick charger (About 80 %
of full charge)
NOTE l The charging time may vary depending on
the battery condition, operation environment
of the vehicle and specification of the quick
charger. Charging
1-02
1
Presented by http://mmc-manuals.ru/ \251
Page 24 of 193
WARNING
• Make sure to use the EV charging ca- ble that comes with the vehicle.
• Do not charge another vehicle using the attached EV charging cable.
Doing so the cable may be heated and
this might result in fire.
• Make sure to use an outlet that is pro- tected from water entering.
• Do not perform charging with the body cover.
• Do not remove and insert plugs with wet hands.
• Do not charge the battery if there is a risk of lightning.
l If abnormal smells are detected or the ve-
hicle produces smoke, quickly stop charg-
ing.
l Do not perform charging at a poorly ven-
tilated place with surroundings covered.
Keep sparks, cigarettes, and flames away
from the auxiliary battery.
Flammable gas generated from the auxili-
ary battery in charging may be filled in a
building, resulting in explosion.
If charging is inevitably required, venti-
late the area well.
l Grasp the regular charging plug when
connecting or disconnecting the EV charg-
ing cable.
Grasping the cable could cause an elec-
tric shock, short circuit, and/or fire. CAUTION
l
Do not perform charging from other pow-
er source like a generator. Doing so could
cause a malfunction.
l During charging, the cooling fans inside
the bonnet room may automatically be op-
erated even if the electric motor switch is
in the “LOCK” position.
Keep your hands away from the cooling
fan during charging.
NOTE l The
on board charger is only for rated AC
220-240 V outlets.
l When connecting or disconnecting the regu-
lar charging plug, insert/pull out the plug
straight.
Also, do not incline or twist the plug.
Doing so could cause a bad connection or mal-
function.
l Make sure to lock the doors to prevent theft,
etc. during charging.
Charging from rated AC 220-240 V
outlet E08301000023
1. Fully
apply the parking brake and place the
selector lever to the “P” (PARK) position.
2. Stop the electric devices such as lamps and turn the electric motor switch to the “LOCK”
position. 3. Pull
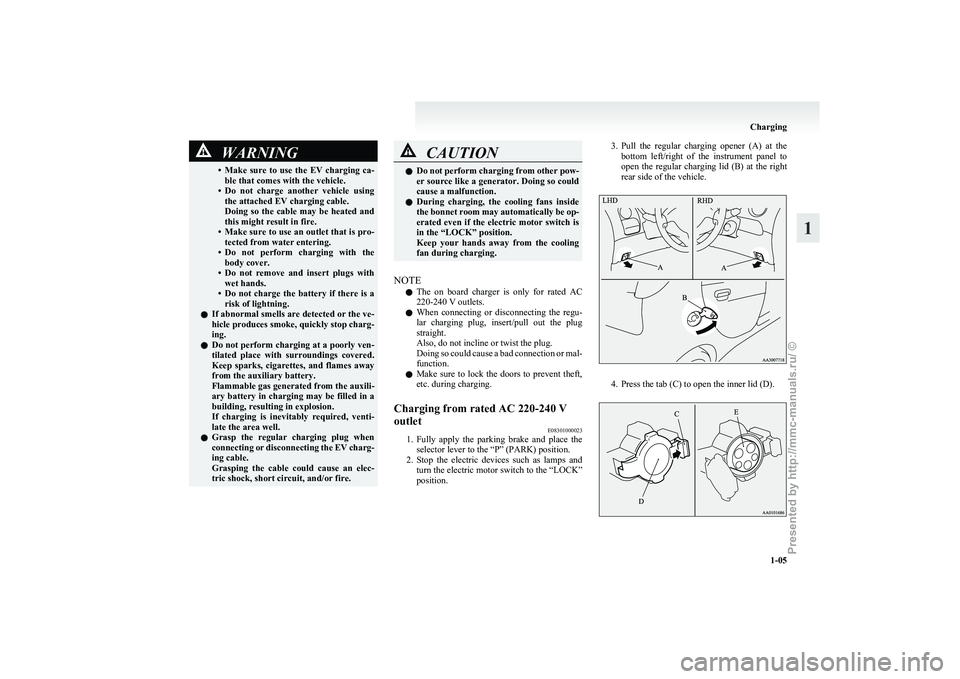
the regular charging opener (A) at the
bottom left/right of the instrument panel to
open the regular charging lid (B) at the right
rear side of the vehicle. 4. Press the tab (C) to open the inner lid (D). Charging
1-05 1
Presented by http://mmc-manuals.ru/ \251
Page 43 of 193
To recline the seatback
E00400601008
In
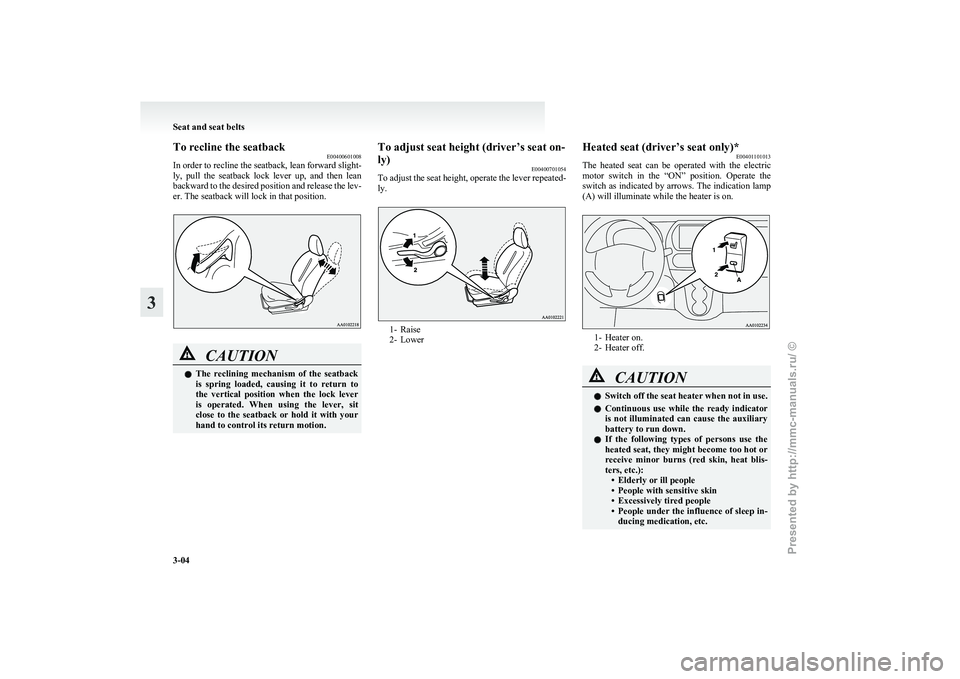
order to recline the seatback, lean forward slight-
ly, pull the seatback lock lever up, and then lean
backward to the desired position and release the lev-
er. The seatback will lock in that position. CAUTION
l
The
reclining mechanism of the seatback
is spring loaded, causing it to return to
the vertical position when the lock lever
is operated. When using the lever, sit
close to the seatback or hold it with your
hand to control its return motion. To adjust seat height (driver’s seat on-
ly)
E00400701054
To
adjust the seat height, operate the lever repeated-
ly. 1- Raise
2-
Lower Heated seat (driver’s seat only)*
E00401101013
The
heated seat can be operated with the electric
motor switch in the “ON” position. Operate the
switch as indicated by arrows. The indication lamp
(A) will illuminate while the heater is on. 1- Heater on.
2-
Heater off. CAUTION
l
Switch
off the seat heater when not in use.
l Continuous use while the ready indicator
is not illuminated can cause the auxiliary
battery to run down.
l If the following types of persons use the
heated seat, they might become too hot or
receive minor burns (red skin, heat blis-
ters, etc.):
• Elderly or ill people
• People with sensitive skin
• Excessively tired people
• People under the influence of sleep in-ducing medication, etc. Seat and seat belts
3-04
3
Presented by http://mmc-manuals.ru/ \251
Page 73 of 193
l
If there is no operation for about 10 seconds
when the meter illumination control or serv-
ice reminder is shown, the display returns to
the odometer.
Odometer E00530800016
The odometer indicates the total distance the vehi-
cle has travelled.
NOTE
l Even
if the electric motor switch is turned to
“ACC” or “LOCK”, the odometer will be dis-
played for about 30 seconds after the reset but-
ton is pressed.
Tripmeter E00530900017
The tripmeter indicates the distance travelled dur-
ing a particular trip or period.
There
are two tripmeter displays: Tripmeter and .
Tripmeter can be used to measure the distance
travelled
since the current trip began. At the same
time, Tripmeter can be used to measure the dis-
tance from an intermediate location.
NOTE
l Even
if the electric motor switch is turned to
the “ACC” or “LOCK” position, the tripme-
ter will be displayed for about 30 seconds af-
ter the reset button is pressed.
To reset the tripmeter
To return the display to “0”, press the reset button
(A) for more than 2 seconds. Only the currently dis-
played value will be reset. NOTE
l If
the auxiliary battery terminal is removed,
the memories for the tripmeter and
displays are erased and the displays return to
0.
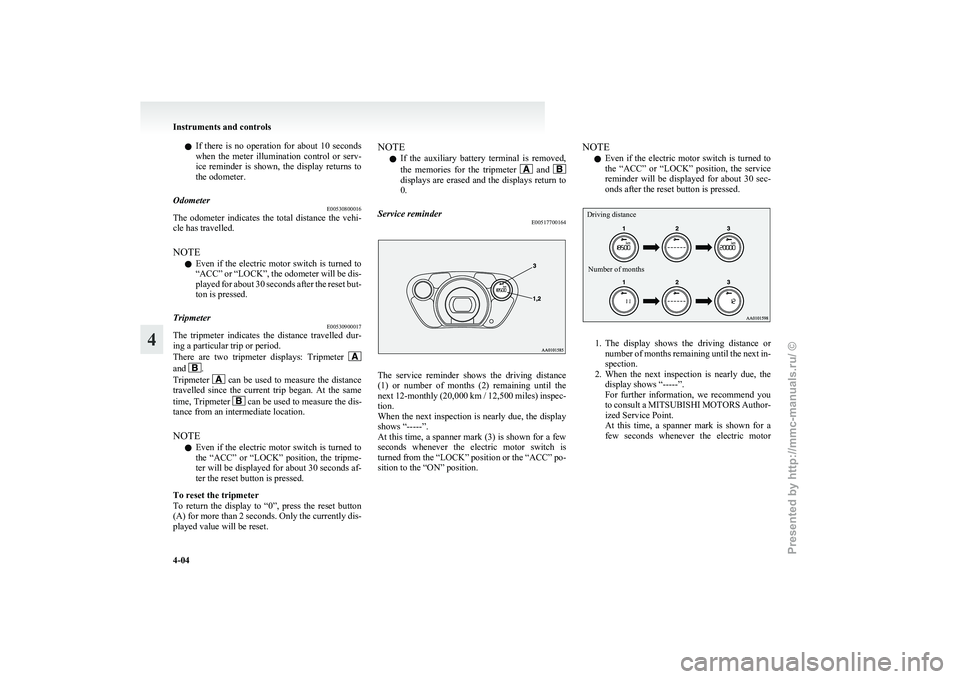
Service reminder E00517700164 The service reminder shows the driving distance
(1)
or number of months (2) remaining until the
next 12-monthly (20,000 km / 12,500 miles) inspec-
tion.
When the next inspection is nearly due, the display
shows “-----”.
At this time, a spanner mark (3) is shown for a few
seconds whenever the electric motor switch is
turned from the “LOCK” position or the “ACC” po-
sition to the “ON” position. NOTE
l Even
if the electric motor switch is turned to
the “ACC” or “LOCK” position, the service
reminder will be displayed for about 30 sec-
onds after the reset button is pressed.
Driving distance
Number of months 1. The
display shows the driving distance or
number of months remaining until the next in-
spection.
2. When the next inspection is nearly due, the display shows “-----”.
For further information, we recommend you
to consult a MITSUBISHI MOTORS Author-
ized Service Point.
At this time, a spanner mark is shown for a
few seconds whenever the electric motor Instruments and controls
4-04
4
Presented by http://mmc-manuals.ru/ \251
Page 75 of 193
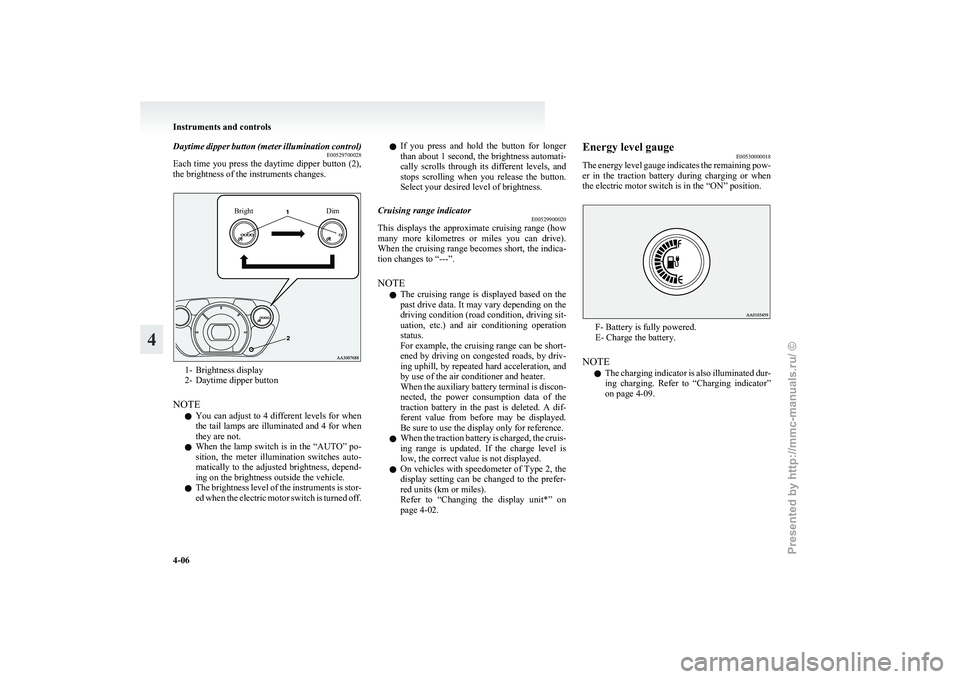
Daytime dipper button (meter illumination control)
E00529700028
Each
time you press the daytime dipper button (2),
the brightness of the instruments changes.
Bright Dim1- Brightness display
2-
Daytime dipper button
NOTE l You can adjust to 4 different levels for when
the tail lamps are illuminated and 4 for when
they are not.
l When the lamp switch is in the “AUTO” po-
sition, the meter illumination switches auto-
matically to the adjusted brightness, depend-
ing on the brightness outside the vehicle.
l The brightness level of the instruments is stor-
ed when the electric motor switch is turned off. l
If
you press and hold the button for longer
than about 1 second, the brightness automati-
cally scrolls through its different levels, and
stops scrolling when you release the button.
Select your desired level of brightness.
Cruising range indicator E00529900020
This displays the approximate cruising range (how
many
more kilometres or miles you can drive).
When the cruising range becomes short, the indica-
tion changes to “---”.
NOTE
l The cruising range is displayed based on the
past drive data. It may vary depending on the
driving condition (road condition, driving sit-
uation, etc.) and air conditioning operation
status.
For example, the cruising range can be short-
ened by driving on congested roads, by driv-
ing uphill, by repeated hard acceleration, and
by use of the air conditioner and heater.
When the auxiliary battery terminal is discon-
nected, the power consumption data of the
traction battery in the past is deleted. A dif-
ferent value from before may be displayed.
Be sure to use the display only for reference.
l When the traction battery is charged, the cruis-
ing range is updated. If the charge level is
low, the correct value is not displayed.
l On vehicles with speedometer of Type 2, the
display setting can be changed to the prefer-
red units (km or miles).
Refer to “Changing the display unit*” on
page 4-02. Energy level gauge
E00530000018
The
energy level gauge indicates the remaining pow-
er in the traction battery during charging or when
the electric motor switch is in the “ON” position. F- Battery is fully powered.
E- Charge the battery.
NOTE l The
charging indicator is also illuminated dur-
ing charging. Refer to “Charging indicator”
on page 4-09. Instruments and controls
4-06
4
Presented by http://mmc-manuals.ru/ \251
Page 77 of 193
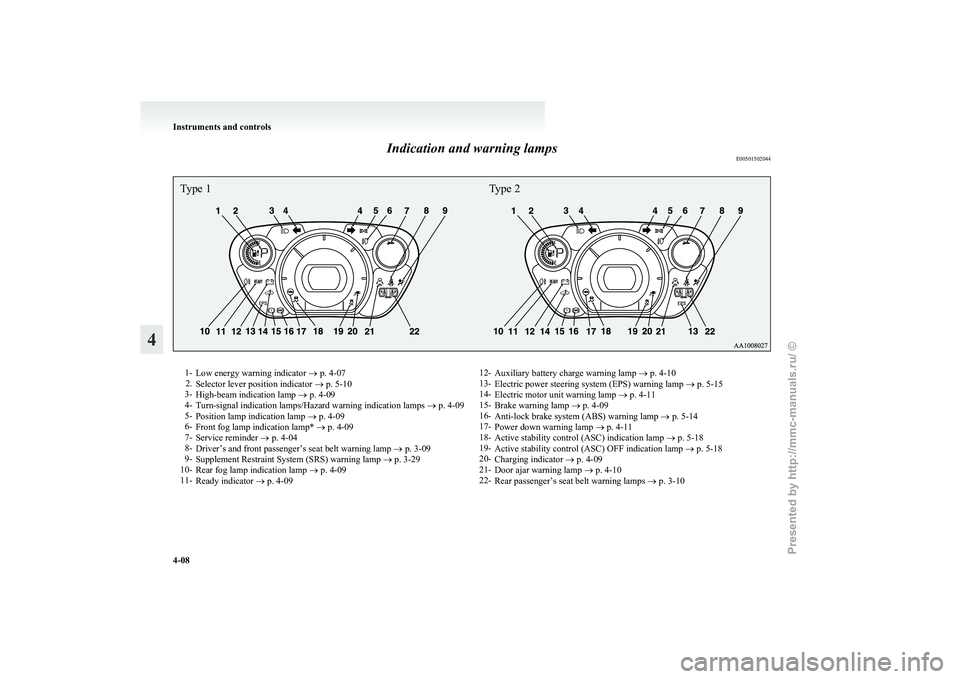
Indication and warning lamps
E00501502044Type 1Type 21-
Low energy warning indicator
® p. 4-07
2. Selector lever position indicator ® p. 5-10
3- High-beam indication lamp ® p. 4-09
4- Turn-signal indication lamps/Hazard warning indication lamps ® p. 4-09
5- Position lamp indication lamp ® p. 4-09
6- Front fog lamp indication lamp* ® p. 4-09
7- Service reminder ® p. 4-04
8- Driver’s and front passenger’s seat belt warning lamp ® p. 3-09
9- Supplement Restraint System (SRS) warning lamp ® p. 3-29
10- Rear fog lamp indication lamp ® p. 4-09
11- Ready indicator ® p. 4-09 12-
Auxiliary battery charge warning lamp ® p. 4-10
13- Electric power steering system (EPS) warning lamp ® p. 5-15
14- Electric motor unit warning lamp ® p. 4-11
15- Brake warning lamp ® p. 4-09
16- Anti-lock brake system (ABS) warning lamp ® p. 5-14
17- Power down warning lamp ® p. 4-11
18- Active stability control (ASC) indication lamp ® p. 5-18
19- Active stability control (ASC) OFF indication lamp ® p. 5-18
20- Charging indicator ® p. 4-09
21- Door ajar warning lamp ® p. 4-10
22- Rear passenger’s seat belt warning lamps ® p. 3-10Instruments and controls
4-08
4
Presented by http://mmc-manuals.ru/ \251
Page 79 of 193
NOTE
l Depressing
the brake pedal repeat-
edly may turn on the brake warn-
ing lamp and brake warning buz-
zer. It is normal if the lamp goes
out and the buzzer stops sounding
after a few seconds. CAUTION
l
In
the situations listed below,
brake performance may be com-
promised or the vehicle may be-
come unstable if brakes are ap-
plied suddenly; consequently,
avoid driving at high speeds or
applying the brakes suddenly.
Furthermore, the vehicle
should be brought to a stop in a
safe location and to have it
checked. • The brake warning lampdoes not illuminate when
the parking brake is applied
or does not turn off when
the parking brake is re-
leased.
• The brake warning lamp re- mains illuminated during
driving.
• The brake warning lamp and ABS warning lamp are
both illuminated at the
same time. Refer to “ABS
warning lamp” on page
5-14.
• The brake warning buzzer will not stop sounding. CAUTION
l
The
vehicle should be brought
to a halt in the following man-
ner when brake performance
has deteriorated. • Depress the brake pedalharder than usual.
Even if the brake pedal
moves down to the very end
of its possible stroke, keep it
pressed down hard.
• Should the brakes fail, use regenerative braking to re-
duce your speed and careful-
ly pull the parking brake lev-
er.
Depress the brake pedal to
operate the stop lamp to
alert the vehicles behind you.
NOTE l Operation
sounds of the brake elec-
tric vacuum pump may be heard
from the electric motor unit room
just after the electric motor switch
has been turned “ON” or when the
brake pedal is depressed.
This occurs when the brake elec-
tric vacuum pump is operating nor-
mally and does not indicate faulty
operation. Auxiliary battery charge warn-
ing lamp
E00502701219
This
warning lamp will illuminate when
there is a fault with the charging system
of the auxiliary battery.
Normally, when the electric motor
switch is turned to the “ON” position,
this warning lamp will illuminate. When
the electric motor unit is started, the
lamp goes out. CAUTION
l
If
it illuminates while the ready
indicator is illuminated, there is
a problem in the charging sys-
tem. In this case, immediately
park your vehicle in a safe
place and we recommend you
to have it checked. Door ajar warning lamp
E00503300840
This
lamp illuminates when either of the
doors (also, the tailgate) is not complete-
ly closed.
If the vehicle speed exceeds about
8 km/h (5 mph) with a door ajar, the warn-
ing lamp will flash 16 times and, at the
same time, the buzzer will sound 16
times to notify the driver that a door is
ajar. Instruments and controls
4-10
4
Presented by http://mmc-manuals.ru/ \251
Page 80 of 193
CAUTION
l
Before moving your vehicle,
check that the warning lamp is
OFF.
NOTE l The
flashing of the warning lamp
and the buzzer can be disabled.
For further information, we recom-
mend you to consult a
MITSUBISHI MOTORS Author-
ized Service Point.
l When the driver’s door is open,
the door ajar warning buzzer does
not sound because the electric mo-
tor reminder or selector lever re-
minder sounds. Electric motor unit warning
lamp
E00530400012
This
warning lamp will illuminate when
there is a fault at the high voltage area.
Refer to “Service precautions” on page
8-06. CAUTION
l
If
the lamp illuminates while
driving, immediately park your
vehicle in a safe place and we
recommend you to have it
checked. Power down warning lamp
E00530500013
This warning lamp illuminates at the fol-
lowing
cases, and activation of the safe-
ty mechanism will limit output.
l When the energy level gauge
shows 0 bars
l When the traction battery capacity
is not sufficient, the voltage is low
or the temperature of the motor
(electric motor unit) or traction bat-
tery is high or low
NOTE l When the power down warning
lamp illuminates, avoid sudden ac-
celeration and sudden starting.
When the remaining power in the
traction battery is low, recharge
the traction battery as soon as pos-
sible.
l Illumination of the power down
warning lamp does not indicate a
malfunction. Combination headlamps and
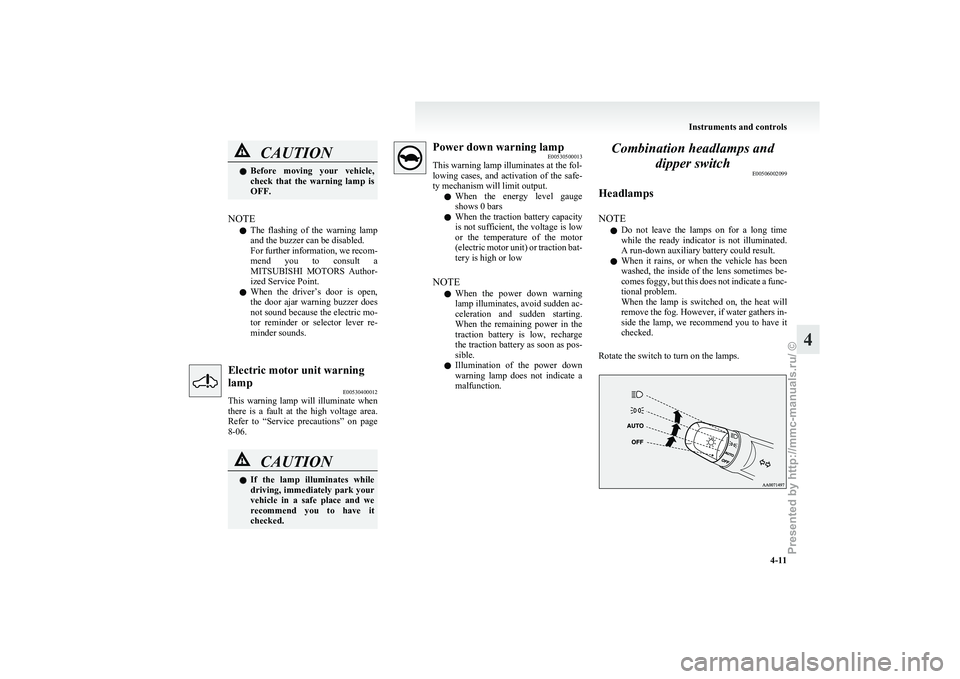
dipper switch E00506002099
Headlamps
NOTE l Do
not leave the lamps on for a long time
while the ready indicator is not illuminated.
A run-down auxiliary battery could result.
l When it rains, or when the vehicle has been
washed, the inside of the lens sometimes be-
comes foggy, but this does not indicate a func-
tional problem.
When the lamp is switched on, the heat will
remove the fog. However, if water gathers in-
side the lamp, we recommend you to have it
checked.
Rotate the switch to turn on the lamps. Instruments and controls
4-11 4
Presented by http://mmc-manuals.ru/ \251
Page 120 of 193
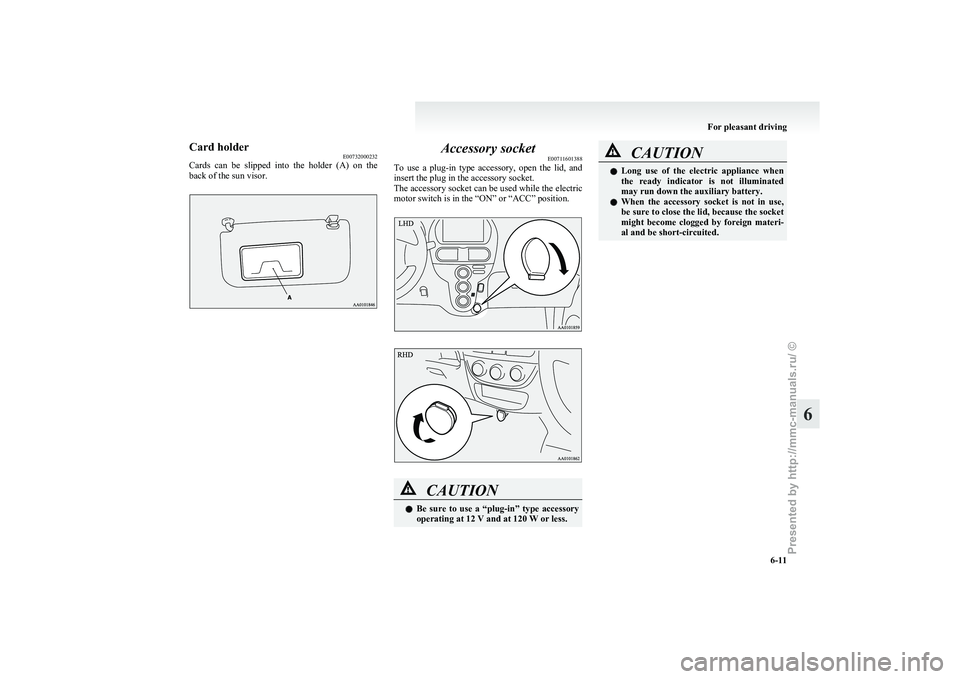
Card holder
E00732000232
Cards
can be slipped into the holder (A) on the
back of the sun visor. Accessory socket
E00711601388
To
use a plug-in type accessory, open the lid, and
insert the plug in the accessory socket.
The accessory socket can be used while the electric
motor switch is in the “ON” or “ACC” position. CAUTION
l
Be
sure to use a “plug-in” type accessory
operating at 12 V and at 120 W or less. CAUTION
l
Long
use of the electric appliance when
the ready indicator is not illuminated
may run down the auxiliary battery.
l When the accessory socket is not in use,
be sure to close the lid, because the socket
might become clogged by foreign materi-
al and be short-circuited. For pleasant driving
6-11 6
Presented by http://mmc-manuals.ru/ \251