change time MITSUBISHI I-MIEV 2011 Owners Manual
[x] Cancel search | Manufacturer: MITSUBISHI, Model Year: 2011, Model line: I-MIEV, Model: MITSUBISHI I-MIEV 2011Pages: 193, PDF Size: 12.2 MB
Page 13 of 193
Familiarizing yourself with
i-MiEV E00202600016
This
section describes features that the i-MiEV has
as an electric vehicle and gives precautions that
you should observe. It is important. Please read it
carefully.
Main features E00202700017
l Energy
required for driving is only electrici-
ty and fuel supply is not required.
l The traction battery and electric motor unit
are mounted outside the passenger compart-
ment. In this way, passenger space is ob-
tained for riding of four adults.
l With the high performance motor, noise and
vibration during driving are greatly limited
and powerful acceleration can also be ob-
tained.
l With regenerative braking, the traction bat-
tery is automatically charged when the accel-
erator is released.
l The vehicle can be charged from general pow-
er outlets (rated AC 220-240 V).
l Charge with the quick charger for i-MiEV is
also available.
l The creeping behaviour occurs in i-MiEV
like a vehicle with automatic transmission.
Regenerative braking
It is equivalent to engine braking of an engine vehi-
cle. If you step off the accelerator pedal during driv-
ing, motion energy is converted into electric energy
using the motor as a power generator.
In this conversion, braking force is generated and
converted electric energy is charged in the traction
battery. Regenerative braking is stronger in the order of the
selector
lever position of “C” (COMFORT), “D”
(DRIVE), “B” (BRAKE).
Put the selector lever to the “B” (BRAKE) or “C”
(COMFORT) position according to the driving con-
dition.
“B”: Strong regenerative braking (For downhill)
“C”: Weak regenerative braking (For long cruising)
Traction battery E00202800018
l It
is the battery to operate the motor (electric
motor unit) and the air conditioning.
In addition to the traction battery, i-MiEV
has the auxiliary battery to operate lamps, wip-
ers, etc.
l Compact, light-weight lithium ion battery
with high energy density is used for the trac-
tion battery.
l The lithium ion battery has the following char-
acteristics. Please read this carefully and
treat the battery paying attention to the fol-
lowing:
Characteristics l It is not necessary to consume the battery com-
pletely before charging.
l The capacity is gradually degraded depend-
ing on time used and operating conditions.
l The performance may be changed due to the
outside temperature. At low temperature, in
particular, the cruising range is short and the
charging time is long, compared to operation
at normal temperature.
l If you store your vehicle at an extremely
high or low temperature, the battery capacity
may be lowered.
l The battery is gradually discharged without
use and the battery charge is lowered. Precautions for operation
l Do
not store your vehicle with the energy lev-
el gauge showing 0 bars.
Doing so could damage the traction battery.
The battery may have to be replaced depend-
ing on the low capacity.
l If you do not use your vehicle for a long
time, please charge the traction battery to the
full every 3 months so that the energy level
gauge may not be 0 bars.
l MITSUBISHI MOTORS collects traction bat-
teries. If you scrap your vehicle, please con-
sult a MITSUBISHI MOTORS Authorized
Service Point.
NOTE l The progress of the battery capacity loss de-
pends on the vehicle usage and the environ-
ment.
We recommend to do regular charging from
2 bars or less to charge completely at least
once in 3 months.
The procedure lets the battery remaining indi-
cator adjusted automatically.
Cruising range E00202900019
l Even
if the charge level is the same, the cruis-
ing range may vary depending on the driving
conditions. Since driving at high speed or
climbing on a hill requires higher consump-
tion of the traction battery than usual, the
cruising range is shortened.
l Since the air conditioning (cooling or heat-
ing) consumes power of the traction battery,
its operation results in a shorter cruising
range. Maintain an appropriate temperature. General information
02
Presented by http://mmc-manuals.ru/ \251
Page 33 of 193
NOTE
l The
indication lamp (3) comes on each time
a switch is pressed.
l If the UNLOCK switch (2) is pressed and
any of the doors or the tailgate is not opened
within approximately 30 seconds, relocking
will automatically occur.
l It is possible to modify functions as follows:
For further information, please contact your
MITSUBISHI MOTORS Authorized Service
Point.
• The time for automatic relocking can bechanged.
• The confirmation function (flashing of the turn-signal lamps) can be set to oper-
ate only when the doors and the tailgate
are locked or only when the doors and
the tailgate are unlocked.
• The confirmation function (this indicates locking or unlocking of the doors and the
tailgate with the flash of the turn-signal
lamps) can be deactivated.
• The number of times the turn-signal lamps are flashed by the confirmation
function can be changed.
l The keyless entry system does not operate in
the following conditions:
• The key is left in the key cylinder.
• The door or the tailgate is open.
l The remote control switch will operate with-
in approximately 4 m from the vehicle. How-
ever, the operating range of the remote con-
trol switch may change if the vehicle is loca-
ted near a power station, or radio/TV broad-
casting station.
l If either of the following problems occurs,
the battery may be exhausted. • The remote control switch is operated at
the correct distance from the vehicle, but
the doors and the tailgate are not locked/
unlocked in response.
• The indication lamp (3) is dim or does not come on.
For further information, please contact
your MITSUBISHI MOTORS Author-
ized Service Point.
If you replace the battery yourself, refer
to “Procedure for replacing the remote
control switch battery” on page 2-04.
l If your remote control switch is lost or dam-
aged, please contact your MITSUBISHI
MOTORS Authorized Service Point for a re-
placement remote control switch.
l If you wish to add a remote control switch,
we recommend you to contact a
MITSUBISHI MOTORS Authorized Service
Point.
A maximum of 4 remote control switches are
available for your vehicle.
Operation of the outside rear-view mir-
rors E00310800119
To fold
Within
30 seconds of locking the doors and the tail-
gate using the LOCK switch (1), press the LOCK
switch twice rapidly to fold the outside rear-view
mirrors.
To extend
Within 30 seconds of unlocking the doors and the
tailgate using the UNLOCK switch (2), press the
UNLOCK switch twice rapidly to return the out-
side rear-view mirrors to their extended positions. Procedure for replacing the remote
control switch battery
E00309500129
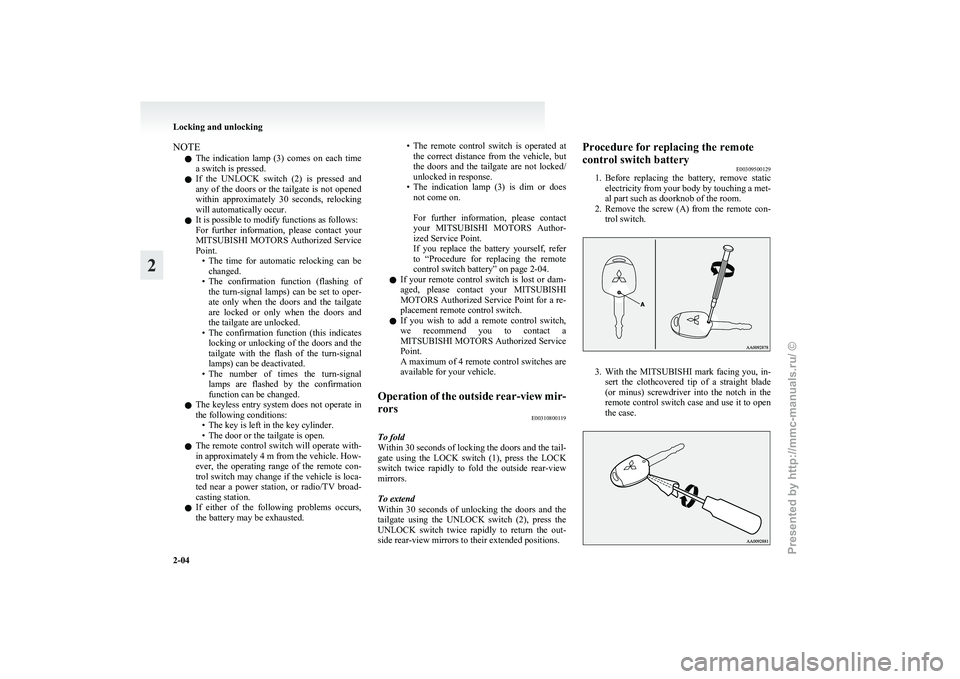
1. Before
replacing the battery, remove static
electricity from your body by touching a met-
al part such as doorknob of the room.
2. Remove the screw (A) from the remote con- trol switch. 3. With
the MITSUBISHI mark facing you, in-
sert the clothcovered tip of a straight blade
(or minus) screwdriver into the notch in the
remote control switch case and use it to open
the case. Locking and unlocking
2-04
2
Presented by http://mmc-manuals.ru/ \251
Page 71 of 193
Instruments
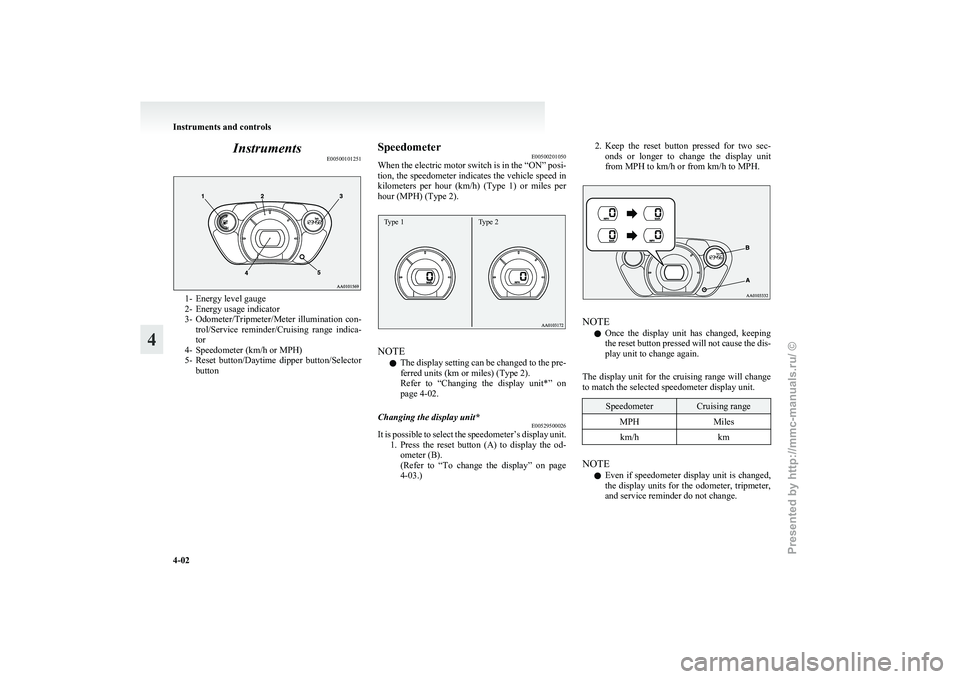
E005001012511- Energy level gauge
2-
Energy usage indicator
3- Odometer/Tripmeter/Meter illumination con- trol/Service reminder/Cruising range indica-
tor
4- Speedometer (km/h or MPH)
5- Reset button/Daytime dipper button/Selector button Speedometer
E00500201050
When
the electric motor switch is in the “ON” posi-
tion, the speedometer indicates the vehicle speed in
kilometers per hour (km/h) (Type 1) or miles per
hour (MPH) (Type 2).
Type 1 Type 2 NOTE
l The
display setting can be changed to the pre-
ferred units (km or miles) (Type 2).
Refer to “Changing the display unit*” on
page 4-02.
Changing the display unit* E00529500026
It is possible to select the speedometer’s display unit.
1. Press
the reset button (A) to display the od-
ometer (B).
(Refer to “To change the display” on page
4-03.) 2. Keep
the reset button pressed for two sec-
onds or longer to change the display unit
from MPH to km/h or from km/h to MPH. NOTE
l Once
the display unit has changed, keeping
the reset button pressed will not cause the dis-
play unit to change again.
The display unit for the cruising range will change
to match the selected speedometer display unit. Speedometer Cruising range
MPH Miles
km/h km NOTE
l Even
if speedometer display unit is changed,
the display units for the odometer, tripmeter,
and service reminder do not change. Instruments and controls
4-02
4
Presented by http://mmc-manuals.ru/ \251
Page 72 of 193
Energy usage indicator
E00529600014
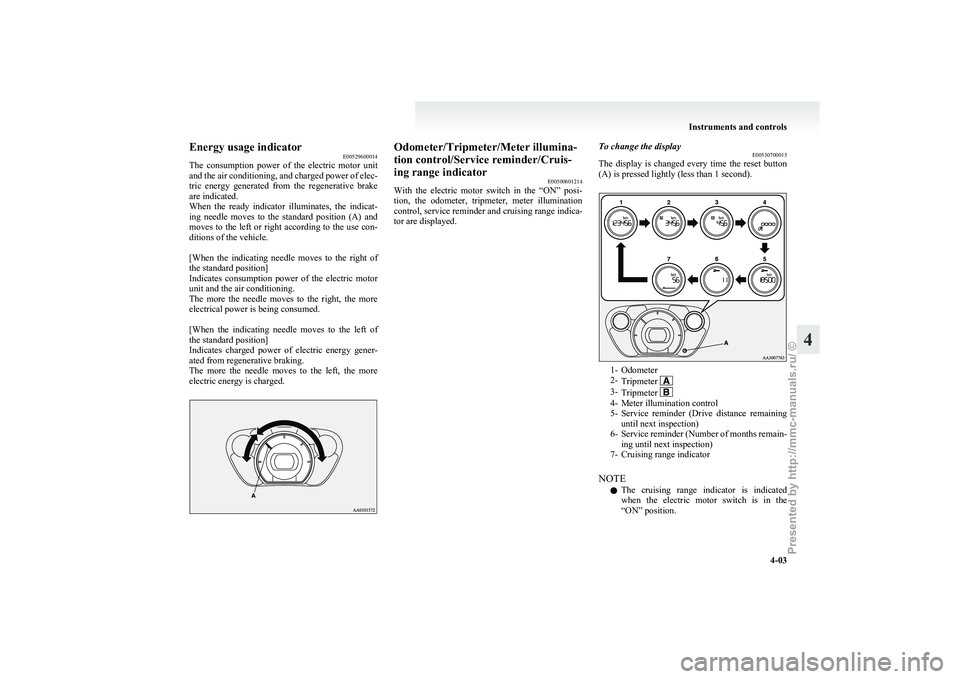
The
consumption power of the electric motor unit
and the air conditioning, and charged power of elec-
tric energy generated from the regenerative brake
are indicated.
When the ready indicator illuminates, the indicat-
ing needle moves to the standard position (A) and
moves to the left or right according to the use con-
ditions of the vehicle.
[When the indicating needle moves to the right of
the standard position]
Indicates consumption power of the electric motor
unit and the air conditioning.
The more the needle moves to the right, the more
electrical power is being consumed.
[When the indicating needle moves to the left of
the standard position]
Indicates charged power of electric energy gener-
ated from regenerative braking.
The more the needle moves to the left, the more
electric energy is charged. Odometer/Tripmeter/Meter illumina-
tion control/Service reminder/Cruis-
ing range indicator
E00500601214
With
the electric motor switch in the “ON” posi-
tion, the odometer, tripmeter, meter illumination
control, service reminder and cruising range indica-
tor are displayed. To change the display
E00530700015
The
display is changed every time the reset button
(A) is pressed lightly (less than 1 second). 1- Odometer
2-
Tripmeter 3-
Tripmeter 4- Meter illumination control
5- Service
reminder (Drive distance remaining
until next inspection)
6- Service reminder (Number of months remain- ing until next inspection)
7- Cruising range indicator
NOTE l The cruising range indicator is indicated
when the electric motor switch is in the
“ON” position. Instruments and controls
4-03 4
Presented by http://mmc-manuals.ru/ \251
Page 74 of 193
switch is turned from the “LOCK” position
or the “ACC” position to the “ON” position.
3. When the vehicle is inspected at a
MITSUBISHI MOTORS Authorized Service
Point, the driving distance or number of
months remaining until the next inspection
will be shown.
NOTE l The indicated distance decreases in steps of
100 km (62 miles). The indicated number of
months decreases in steps of one month.
l It is possible to change the settings for the
service reminder.
For further information, we recommend you
to consult a MITSUBISHI MOTORS Author-
ized Service Point.
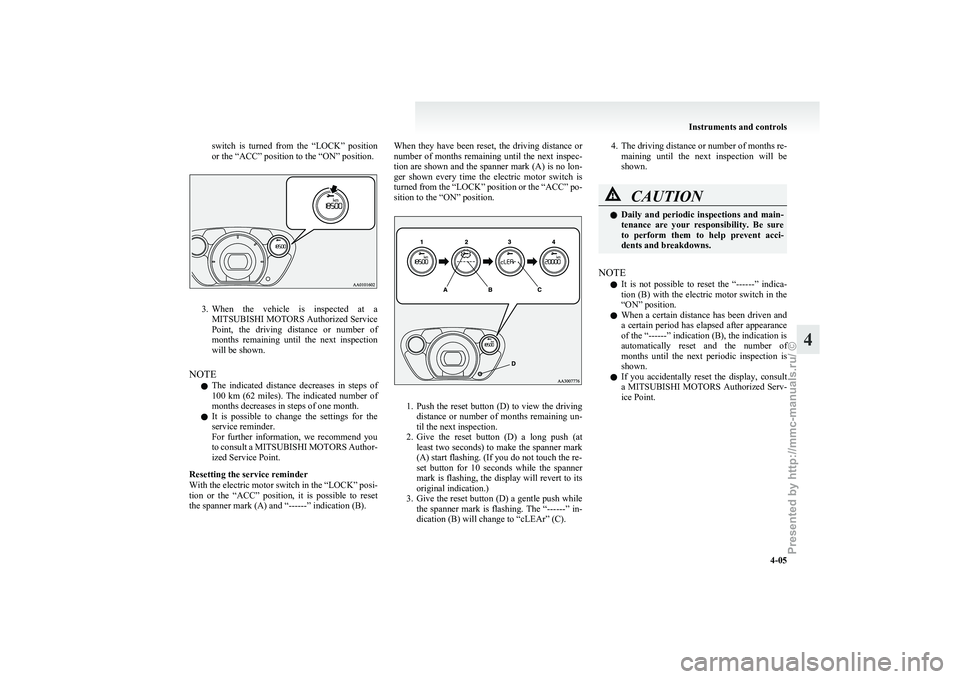
Resetting the service reminder
With the electric motor switch in the “LOCK” posi-
tion or the “ACC” position, it is possible to reset
the spanner mark (A) and “------” indication (B). When they have been reset, the driving distance or
number
of months remaining until the next inspec-
tion are shown and the spanner mark (A) is no lon-
ger shown every time the electric motor switch is
turned from the “LOCK” position or the “ACC” po-
sition to the “ON” position. 1. Push
the reset button (D) to view the driving
distance or number of months remaining un-
til the next inspection.
2. Give the reset button (D) a long push (at least two seconds) to make the spanner mark
(A) start flashing. (If you do not touch the re-
set button for 10 seconds while the spanner
mark is flashing, the display will revert to its
original indication.)
3. Give the reset button (D) a gentle push while the spanner mark is flashing. The “------” in-
dication (B) will change to “cLEAr” (C). 4. The
driving distance or number of months re-
maining until the next inspection will be
shown. CAUTION
l
Daily
and periodic inspections and main-
tenance are your responsibility. Be sure
to perform them to help prevent acci-
dents and breakdowns.
NOTE l It
is not possible to reset the “------” indica-
tion (B) with the electric motor switch in the
“ON” position.
l When a certain distance has been driven and
a certain period has elapsed after appearance
of the “------” indication (B), the indication is
automatically reset and the number of
months until the next periodic inspection is
shown.
l If you accidentally reset the display, consult
a MITSUBISHI MOTORS Authorized Serv-
ice Point. Instruments and controls
4-05 4
Presented by http://mmc-manuals.ru/ \251
Page 75 of 193
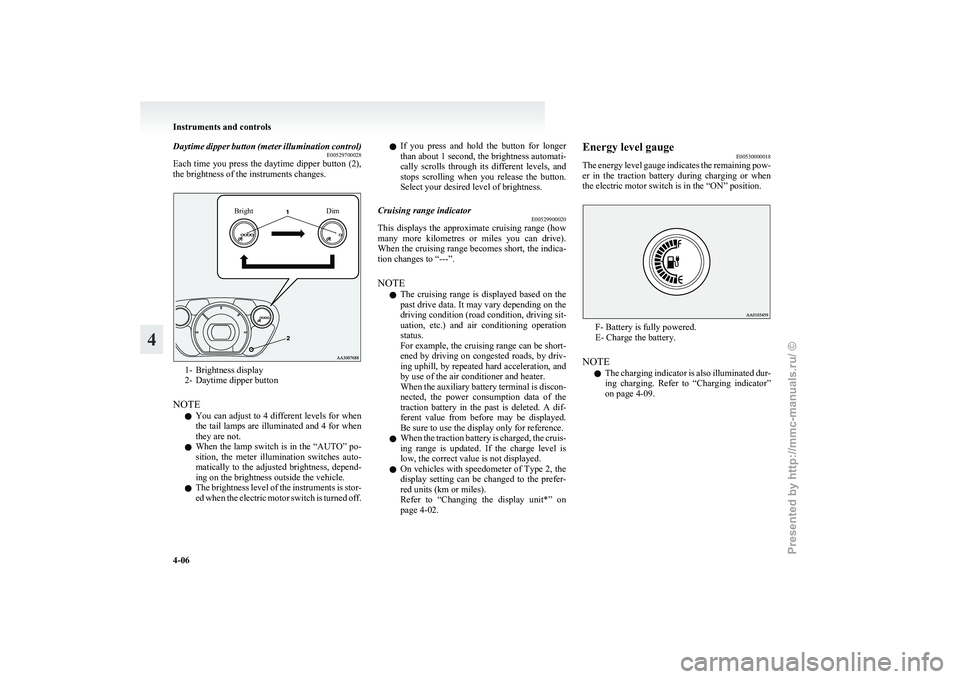
Daytime dipper button (meter illumination control)
E00529700028
Each
time you press the daytime dipper button (2),
the brightness of the instruments changes.
Bright Dim1- Brightness display
2-
Daytime dipper button
NOTE l You can adjust to 4 different levels for when
the tail lamps are illuminated and 4 for when
they are not.
l When the lamp switch is in the “AUTO” po-
sition, the meter illumination switches auto-
matically to the adjusted brightness, depend-
ing on the brightness outside the vehicle.
l The brightness level of the instruments is stor-
ed when the electric motor switch is turned off. l
If
you press and hold the button for longer
than about 1 second, the brightness automati-
cally scrolls through its different levels, and
stops scrolling when you release the button.
Select your desired level of brightness.
Cruising range indicator E00529900020
This displays the approximate cruising range (how
many
more kilometres or miles you can drive).
When the cruising range becomes short, the indica-
tion changes to “---”.
NOTE
l The cruising range is displayed based on the
past drive data. It may vary depending on the
driving condition (road condition, driving sit-
uation, etc.) and air conditioning operation
status.
For example, the cruising range can be short-
ened by driving on congested roads, by driv-
ing uphill, by repeated hard acceleration, and
by use of the air conditioner and heater.
When the auxiliary battery terminal is discon-
nected, the power consumption data of the
traction battery in the past is deleted. A dif-
ferent value from before may be displayed.
Be sure to use the display only for reference.
l When the traction battery is charged, the cruis-
ing range is updated. If the charge level is
low, the correct value is not displayed.
l On vehicles with speedometer of Type 2, the
display setting can be changed to the prefer-
red units (km or miles).
Refer to “Changing the display unit*” on
page 4-02. Energy level gauge
E00530000018
The
energy level gauge indicates the remaining pow-
er in the traction battery during charging or when
the electric motor switch is in the “ON” position. F- Battery is fully powered.
E- Charge the battery.
NOTE l The
charging indicator is also illuminated dur-
ing charging. Refer to “Charging indicator”
on page 4-09. Instruments and controls
4-06
4
Presented by http://mmc-manuals.ru/ \251
Page 82 of 193
Daytime running lamp*
E00530600014
The
daytime running lamps come on when the
ready indicator illuminates and the lamp switch is
in the “OFF” or “AUTO” position and the tail
lamps are off.
Dipper (High/Low beam change) E00506200329
When the lamp switch is in the “ ”
position, the
beam changes from high to low (or low to high)
each time the lever is pulled fully (1). While the high-
beam is on, the high-beam indication lamp in the in-
strument cluster will also illuminate. Headlamp flasher
E00506300199
The high-beams flash when the lever is pulled slight-
ly (2), and will go off when it is released.
When
the high-beam is on, the high-beam indica-
tion lamp in the instrument cluster will illuminate.
NOTE
l The high-beams can also flash when the
lamp switch is OFF. l
If
you turn the lamps off with the headlamps
set to high-beam, the headlamps are automat-
ically returned to their low-beam setting
when the lamp switch is next turned to the
“ ” position.
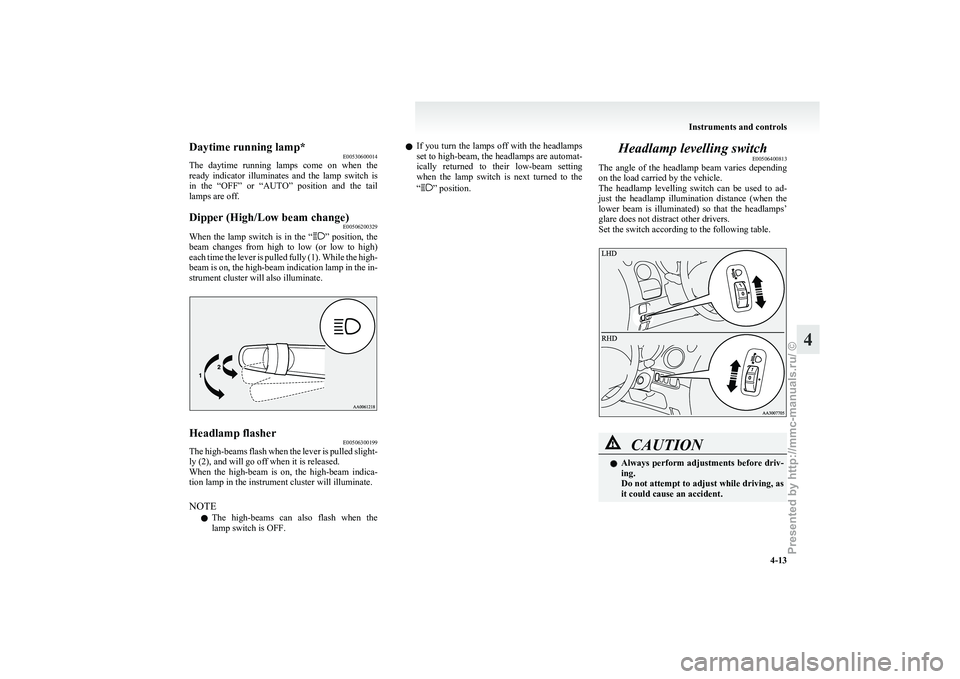
Headlamp levelling switch
E00506400813
The
angle of the headlamp beam varies depending
on the load carried by the vehicle.
The headlamp levelling switch can be used to ad-
just the headlamp illumination distance (when the
lower beam is illuminated) so that the headlamps’
glare does not distract other drivers.
Set the switch according to the following table. CAUTION
l
Always
perform adjustments before driv-
ing.
Do not attempt to adjust while driving, as
it could cause an accident. Instruments and controls
4-13 4
Presented by http://mmc-manuals.ru/ \251
Page 83 of 193
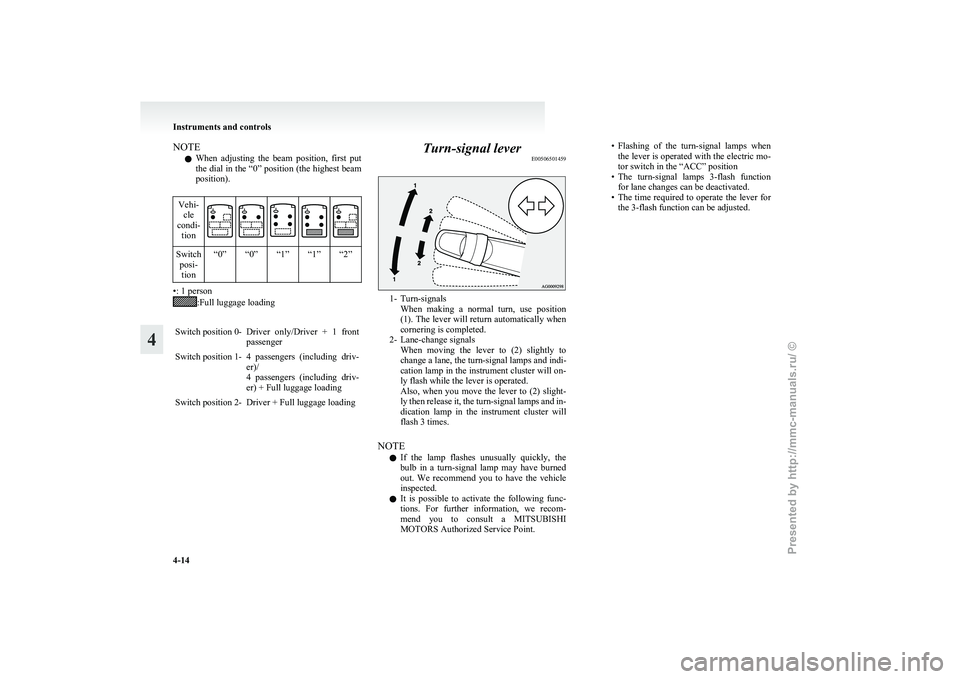
NOTE
l When
adjusting the beam position, first put
the dial in the “0” position (the highest beam
position).
Vehi- cle
condi- tion Switch
posi-tion “0” “0” “1” “1” “2” •: 1 person
:Full luggage loading
Switch position 0- Driver only/Driver + 1 front passenger
Switch position 1- 4 passengers (including driv- er)/
4
passengers (including driv-
er) + Full luggage loading
Switch position 2- Driver + Full luggage loading Turn-signal lever
E00506501459 1- Turn-signals
When
making a normal turn, use position
(1). The lever will return automatically when
cornering is completed.
2- Lane-change signals When moving the lever to (2) slightly to
change a lane, the turn-signal lamps and indi-
cation lamp in the instrument cluster will on-
ly flash while the lever is operated.
Also, when you move the lever to (2) slight-
ly then release it, the turn-signal lamps and in-
dication lamp in the instrument cluster will
flash 3 times.
NOTE l If the lamp flashes unusually quickly, the
bulb in a turn-signal lamp may have burned
out. We recommend you to have the vehicle
inspected.
l It is possible to activate the following func-
tions. For further information, we recom-
mend you to consult a MITSUBISHI
MOTORS Authorized Service Point. • Flashing
of the turn-signal lamps when
the lever is operated with the electric mo-
tor switch in the “ACC” position
• The turn-signal lamps 3-flash function for lane changes can be deactivated.
• The time required to operate the lever for the 3-flash function can be adjusted. Instruments and controls
4-14
4
Presented by http://mmc-manuals.ru/ \251
Page 114 of 193
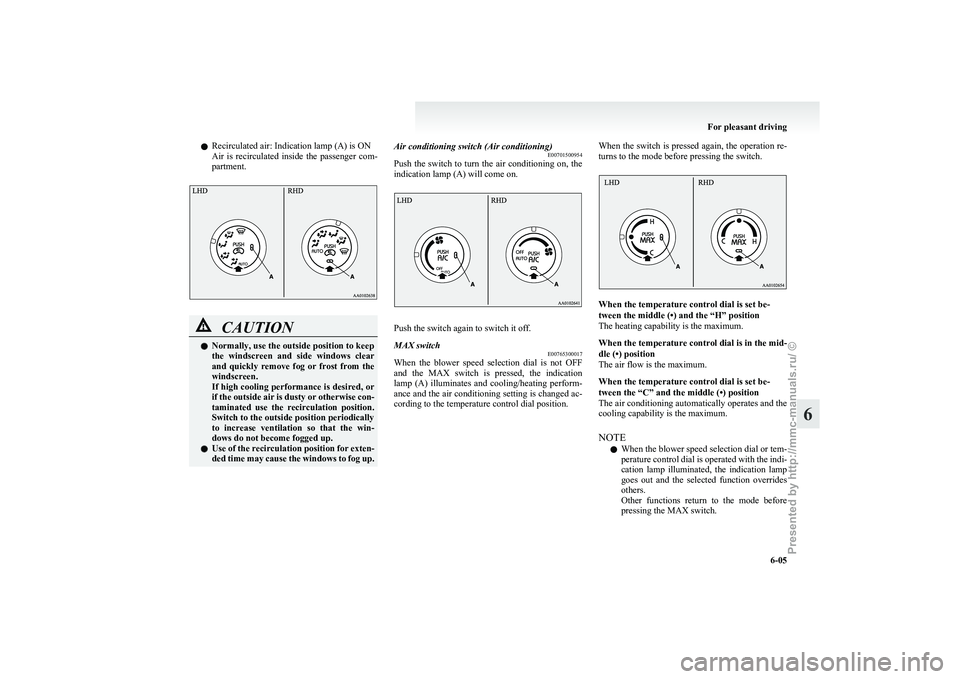
l
Recirculated air: Indication lamp (A) is ON
Air
is recirculated inside the passenger com-
partment. CAUTION
l
Normally, use the outside position to keep
the
windscreen and side windows clear
and quickly remove fog or frost from the
windscreen.
If high cooling performance is desired, or
if the outside air is dusty or otherwise con-
taminated use the recirculation position.
Switch to the outside position periodically
to increase ventilation so that the win-
dows do not become fogged up.
l Use of the recirculation position for exten-
ded time may cause the windows to fog up. Air conditioning switch (Air conditioning)
E00701500954
Push
the switch to turn the air conditioning on, the
indication lamp (A) will come on. Push the switch again to switch it off.
MAX switch
E00765300017
When the blower speed selection dial is not OFF
and
the MAX switch is pressed, the indication
lamp (A) illuminates and cooling/heating perform-
ance and the air conditioning setting is changed ac-
cording to the temperature control dial position. When the switch is pressed again, the operation re-
turns to the mode before pressing the switch. When the temperature control dial is set be-
tween the middle (•) and the “H” position
The heating capability is the maximum.
When
the temperature control dial is in the mid-
dle (•) position
The air flow is the maximum.
When the temperature control dial is set be-
tween the “C” and the middle (•) position
The air conditioning automatically operates and the
cooling capability is the maximum.
NOTE
l When the blower speed selection dial or tem-
perature control dial is operated with the indi-
cation lamp illuminated, the indication lamp
goes out and the selected function overrides
others.
Other functions return to the mode before
pressing the MAX switch. For pleasant driving
6-05 6
Presented by http://mmc-manuals.ru/ \251
Page 184 of 193
A
Accessory (Installation) 03
Accessory socket 6-11
Active stability control (ASC)
5-16
Additional equipment 8-20
Air conditioning Important operation tips for the air condition-
ing 6-09
Air purifier 6-09
Airbag 3-20
Antenna 6-10
Anti-lock brake system (ABS) 5-14 Warning lamp 5-14
Assist grips 6-16
Auxiliary battery 8-12 Specification 9-04
Auxiliary battery charge warning lamp 4-10
BBasic knowledge for charging 1-02
Battery
Auxiliary battery
8-12
Auxiliary battery charge warning lamp 4-10
Discharged battery (Emergency starting) 7-02
Disposal information for used batteries 04
Traction battery 02
Bonnet 8-07
Brake assist system 5-13
Brake Anti-lock brake 5-14
Braking 5-12
Fluid 8-11,9-07
Parking brake 5-03
Warning lamp 4-09
Bulb capacity 8-23 CCapacities 9-07
Card holder 6-11,6-14
Cargo loads 5-19
Central door locks 2-06
Charging indicator
4-09
Charging Guideline for charging time 1-02
Quick charging 1-08
Regular charging 1-04
Child restraint 3-11
Child-protection rear doors 2-07
Cleaning Exterior of your vehicle 8-03
Interior of your vehicle 8-02
Plastic, vinyl leather, etc. 8-02
Cold Cautions and actions to deal with intense
cold 06
Combination headlamps and dipper switch 4-11
Coolant 8-09,9-07
Cruising range 02,9-06
Cruising range indicator 4-03,4-06
Cup holder 6-15
D Daytime running lamps 4-13
Bulb capacity
8-24
Replacement 8-31
Demister (rear window) 4-18
Dimensions 9-03
Dipper (High/Low beam change) 4-13
Door ajar warning lamp 4-10
Doors Central door locks 2-06
Child-protection 2-07 Lock and unlock 2-05
Driving the vehicle
5-11
Driving, alcohol and drugs 5-02
E Economical driving 5-02
Electric motor switch
5-07
Electric motor unit Warning lamp 4-11
Electric motor Number 9-02
Specifications 9-04
Electric power steering system (EPS) 5-15
Electric window control 2-09 Driver’s switches 2-09
Lock switch 2-09
Passenger’s switches 2-09
Timer function 2-10
Electronic immobilizer (Anti-theft starting sys-
tem) 2-02
Emergency starting 7-02
Energy level gauge 4-06
Energy usage indicator 4-03
EV charging cable 1-03
Exterior and interior lamp operation 8-19
F Fluid capacities and lubricants 9-07
Fluid
Brake fluid 8-11,9-07
Coolant 8-09
Hot water heater fluid
8-09,9-07
Washer fluid 8-11,9-07
For cold and snowy weather 8-20
Front fog lamps Bulb capacity 8-24
Indication lamp 4-09 Alphabetical index
1
Presented by http://mmc-manuals.ru/ \251