cooling MITSUBISHI I-MIEV 2011 Owners Manual
[x] Cancel search | Manufacturer: MITSUBISHI, Model Year: 2011, Model line: I-MIEV, Model: MITSUBISHI I-MIEV 2011Pages: 193, PDF Size: 12.2 MB
Page 13 of 193
Familiarizing yourself with
i-MiEV E00202600016
This
section describes features that the i-MiEV has
as an electric vehicle and gives precautions that
you should observe. It is important. Please read it
carefully.
Main features E00202700017
l Energy
required for driving is only electrici-
ty and fuel supply is not required.
l The traction battery and electric motor unit
are mounted outside the passenger compart-
ment. In this way, passenger space is ob-
tained for riding of four adults.
l With the high performance motor, noise and
vibration during driving are greatly limited
and powerful acceleration can also be ob-
tained.
l With regenerative braking, the traction bat-
tery is automatically charged when the accel-
erator is released.
l The vehicle can be charged from general pow-
er outlets (rated AC 220-240 V).
l Charge with the quick charger for i-MiEV is
also available.
l The creeping behaviour occurs in i-MiEV
like a vehicle with automatic transmission.
Regenerative braking
It is equivalent to engine braking of an engine vehi-
cle. If you step off the accelerator pedal during driv-
ing, motion energy is converted into electric energy
using the motor as a power generator.
In this conversion, braking force is generated and
converted electric energy is charged in the traction
battery. Regenerative braking is stronger in the order of the
selector
lever position of “C” (COMFORT), “D”
(DRIVE), “B” (BRAKE).
Put the selector lever to the “B” (BRAKE) or “C”
(COMFORT) position according to the driving con-
dition.
“B”: Strong regenerative braking (For downhill)
“C”: Weak regenerative braking (For long cruising)
Traction battery E00202800018
l It
is the battery to operate the motor (electric
motor unit) and the air conditioning.
In addition to the traction battery, i-MiEV
has the auxiliary battery to operate lamps, wip-
ers, etc.
l Compact, light-weight lithium ion battery
with high energy density is used for the trac-
tion battery.
l The lithium ion battery has the following char-
acteristics. Please read this carefully and
treat the battery paying attention to the fol-
lowing:
Characteristics l It is not necessary to consume the battery com-
pletely before charging.
l The capacity is gradually degraded depend-
ing on time used and operating conditions.
l The performance may be changed due to the
outside temperature. At low temperature, in
particular, the cruising range is short and the
charging time is long, compared to operation
at normal temperature.
l If you store your vehicle at an extremely
high or low temperature, the battery capacity
may be lowered.
l The battery is gradually discharged without
use and the battery charge is lowered. Precautions for operation
l Do
not store your vehicle with the energy lev-
el gauge showing 0 bars.
Doing so could damage the traction battery.
The battery may have to be replaced depend-
ing on the low capacity.
l If you do not use your vehicle for a long
time, please charge the traction battery to the
full every 3 months so that the energy level
gauge may not be 0 bars.
l MITSUBISHI MOTORS collects traction bat-
teries. If you scrap your vehicle, please con-
sult a MITSUBISHI MOTORS Authorized
Service Point.
NOTE l The progress of the battery capacity loss de-
pends on the vehicle usage and the environ-
ment.
We recommend to do regular charging from
2 bars or less to charge completely at least
once in 3 months.
The procedure lets the battery remaining indi-
cator adjusted automatically.
Cruising range E00202900019
l Even
if the charge level is the same, the cruis-
ing range may vary depending on the driving
conditions. Since driving at high speed or
climbing on a hill requires higher consump-
tion of the traction battery than usual, the
cruising range is shortened.
l Since the air conditioning (cooling or heat-
ing) consumes power of the traction battery,
its operation results in a shorter cruising
range. Maintain an appropriate temperature. General information
02
Presented by http://mmc-manuals.ru/ \251
Page 24 of 193
WARNING
• Make sure to use the EV charging ca- ble that comes with the vehicle.
• Do not charge another vehicle using the attached EV charging cable.
Doing so the cable may be heated and
this might result in fire.
• Make sure to use an outlet that is pro- tected from water entering.
• Do not perform charging with the body cover.
• Do not remove and insert plugs with wet hands.
• Do not charge the battery if there is a risk of lightning.
l If abnormal smells are detected or the ve-
hicle produces smoke, quickly stop charg-
ing.
l Do not perform charging at a poorly ven-
tilated place with surroundings covered.
Keep sparks, cigarettes, and flames away
from the auxiliary battery.
Flammable gas generated from the auxili-
ary battery in charging may be filled in a
building, resulting in explosion.
If charging is inevitably required, venti-
late the area well.
l Grasp the regular charging plug when
connecting or disconnecting the EV charg-
ing cable.
Grasping the cable could cause an elec-
tric shock, short circuit, and/or fire. CAUTION
l
Do not perform charging from other pow-
er source like a generator. Doing so could
cause a malfunction.
l During charging, the cooling fans inside
the bonnet room may automatically be op-
erated even if the electric motor switch is
in the “LOCK” position.
Keep your hands away from the cooling
fan during charging.
NOTE l The
on board charger is only for rated AC
220-240 V outlets.
l When connecting or disconnecting the regu-
lar charging plug, insert/pull out the plug
straight.
Also, do not incline or twist the plug.
Doing so could cause a bad connection or mal-
function.
l Make sure to lock the doors to prevent theft,
etc. during charging.
Charging from rated AC 220-240 V
outlet E08301000023
1. Fully
apply the parking brake and place the
selector lever to the “P” (PARK) position.
2. Stop the electric devices such as lamps and turn the electric motor switch to the “LOCK”
position. 3. Pull
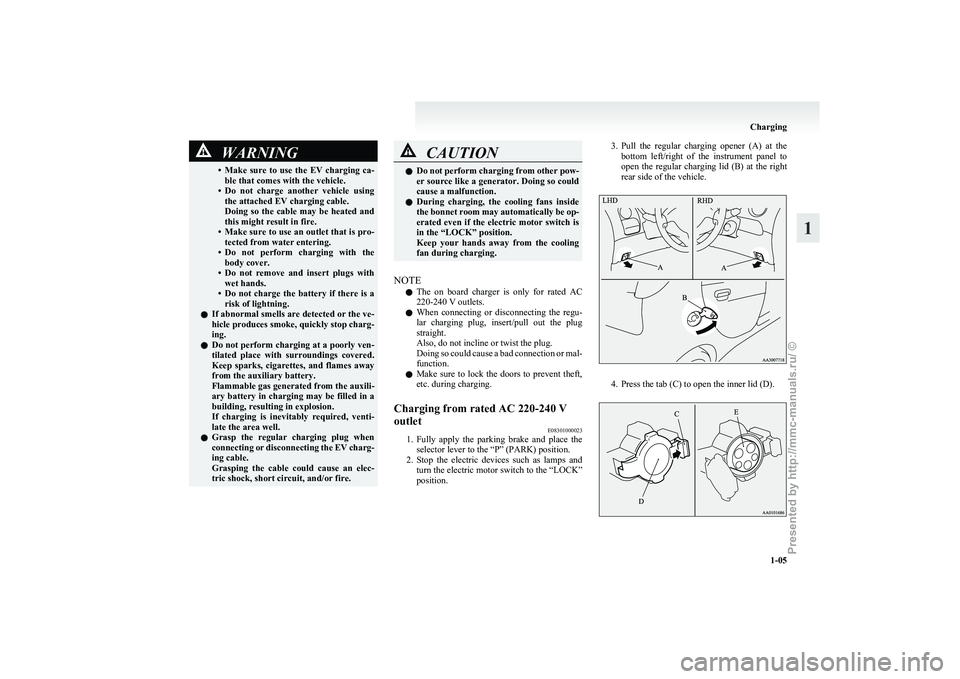
the regular charging opener (A) at the
bottom left/right of the instrument panel to
open the regular charging lid (B) at the right
rear side of the vehicle. 4. Press the tab (C) to open the inner lid (D). Charging
1-05 1
Presented by http://mmc-manuals.ru/ \251
Page 27 of 193
NOTE
l Make
sure that the inner lid is completely
closed.
If the regular charging lid is forcibly closed
without completely closing the inner lid, the
hinge on the inner lid may be broken.
11. Remove the charging cable plug from the out- let.
12. Install the cap on the regular charging plug. WARNING
l After
charging, be sure to close the inner
lid and the regular charging lid complete-
ly.
Be careful that water or dust does not en-
ter in the regular charging connection, in-
ner lid and regular charging plug.
Entry of water or dust could cause elec-
tric leakage, resulting in a fire or electric
shock.
l After charging, be sure to disconnect the
plug from the outlet.
If the plug is left connected to the outlet,
immersion in water or tampering may
cause leakage or an electric shock. Quick charging (charging
method with quick charger) E08301400027 WARNING
l Be
sure to use the quick charger compati-
ble with i-MiEV.
Use of a non-compatible quick charger
may cause fire or malfunction.
For the quick charger compatible with
i-MiEV, consult a MITSUBISHI
MOTORS Authorized Service Point.
l For operation of quick chargers, follow
the manual of each quick charger.
l Persons who use electro-medical appara-
tus such as implantable cardiac pacemak-
er or implantable cardioverter- defibrilla-
tor must check effect from charging with
the manufacturer of electro-medical appa-
ratus. Electro-medical apparatus opera-
tions could be affected by charging.
l Before charging, make sure that there is
no foreign matter such as dust at the
quick charging connection and the quick
charging plug.
At this time, do not touch the quick charg-
ing connection. WARNING
l When
the quick charging plug is connec-
ted to the quick charging connection, pre-
vent foreign matter such as water or dust
from entering in the connection.
Connection with foreign matter such as
water or dust may cause fire or an elec-
tric shock. Do not perform charging if
there might be strong exposure to water
at the connection. CAUTION
l
During
charging, the cooling fans inside
the bonnet room may automatically be op-
erated even if the electric motor switch is
in the “LOCK” position.
Keep your hands away from the cooling
fan during charging.
NOTE l Make
sure to lock the doors to prevent theft,
etc. during charging.
1. Fully apply the parking brake and move the selector lever to the “P” (PARK) position.
2. Stop the electric devices such as lamps, air conditioning, etc. and turn the electric motor
switch to the “LOCK” position. Charging
1-08
1
Presented by http://mmc-manuals.ru/ \251
Page 28 of 193
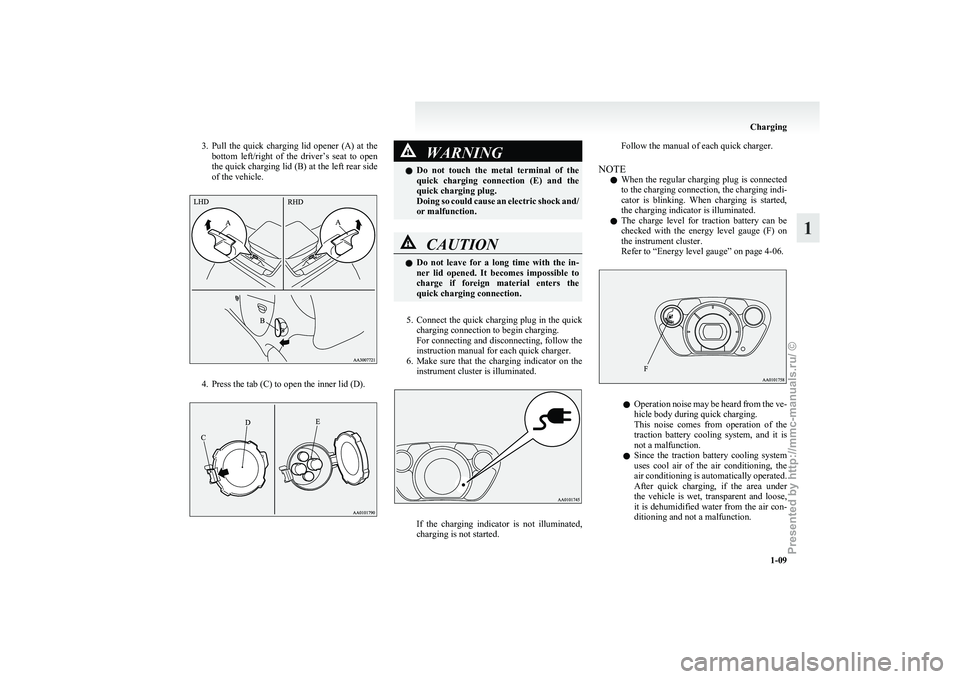
3. Pull the quick charging lid opener (A) at the
bottom left/right of the driver’s seat to open
the quick charging lid (B) at the left rear side
of the vehicle. 4. Press the tab (C) to open the inner lid (D). WARNING
l Do
not touch the metal terminal of the
quick charging connection (E) and the
quick charging plug.
Doing so could cause an electric shock and/
or malfunction. CAUTION
l
Do
not leave for a long time with the in-
ner lid opened. It becomes impossible to
charge if foreign material enters the
quick charging connection.
5. Connect
the quick charging plug in the quick charging connection to begin charging.
For connecting and disconnecting, follow the
instruction manual for each quick charger.
6. Make sure that the charging indicator on the instrument cluster is illuminated. If the charging indicator is not illuminated,
charging is not started.Follow the manual of each quick charger.
NOTE l When
the regular charging plug is connected
to the charging connection, the charging indi-
cator is blinking. When charging is started,
the charging indicator is illuminated.
l The charge level for traction battery can be
checked with the energy level gauge (F) on
the instrument cluster.
Refer to “Energy level gauge” on page 4-06. l
Operation
noise may be heard from the ve-
hicle body during quick charging.
This noise comes from operation of the
traction battery cooling system, and it is
not a malfunction.
l Since the traction battery cooling system
uses cool air of the air conditioning, the
air conditioning is automatically operated.
After quick charging, if the area under
the vehicle is wet, transparent and loose,
it is dehumidified water from the air con-
ditioning and not a malfunction. Charging
1-09 1
Presented by http://mmc-manuals.ru/ \251
Page 76 of 193
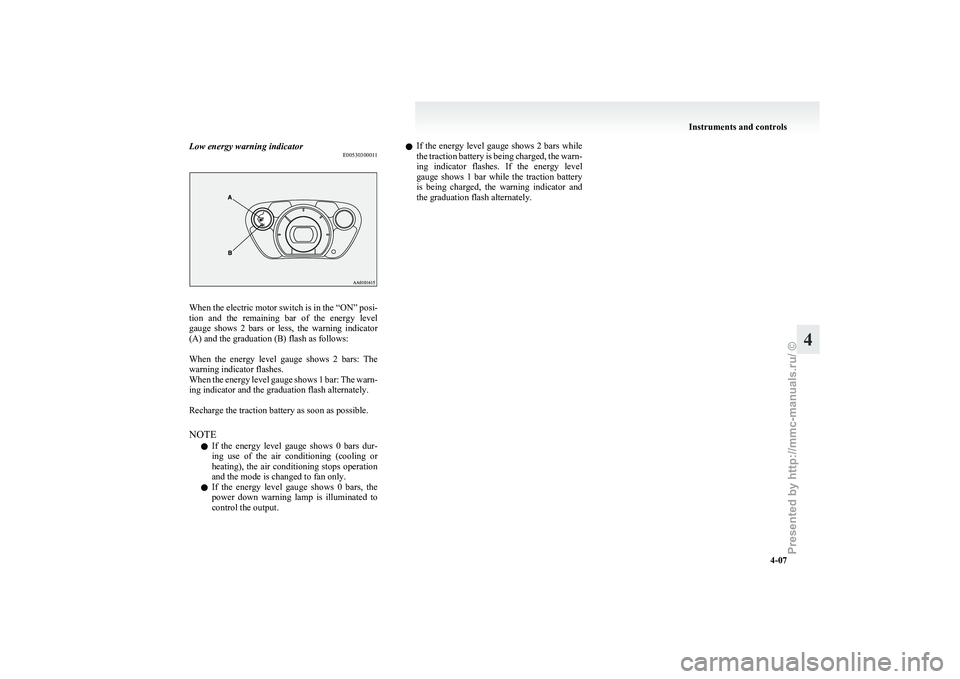
Low energy warning indicator
E00530300011When the electric motor switch is in the “ON” posi-
tion
and the remaining bar of the energy level
gauge shows 2 bars or less, the warning indicator
(A) and the graduation (B) flash as follows:
When the energy level gauge shows 2 bars: The
warning indicator flashes.
When the energy level gauge shows 1 bar: The warn-
ing indicator and the graduation flash alternately.
Recharge the traction battery as soon as possible.
NOTE
l If the energy level gauge shows 0 bars dur-
ing use of the air conditioning (cooling or
heating), the air conditioning stops operation
and the mode is changed to fan only.
l If the energy level gauge shows 0 bars, the
power down warning lamp is illuminated to
control the output. l
If
the energy level gauge shows 2 bars while
the traction battery is being charged, the warn-
ing indicator flashes. If the energy level
gauge shows 1 bar while the traction battery
is being charged, the warning indicator and
the graduation flash alternately. Instruments and controls
4-07 4
Presented by http://mmc-manuals.ru/ \251
Page 91 of 193
Economical driving
E00600101092
For
economical driving, there are some technical re-
quirements that have to be met. In order to achieve
longer life of the vehicle and the most economical
operation, we recommend you to have the vehicle
checked at regular intervals in accordance with the
service standards.
Starting and acceleration
Avoid driving with the accelerator pedal is pushed
way down, such as for unnecessarily sudden starts,
acceleration and deceleration. Smoothly depress
the accelerator pedal.
Observe the speed limit and keep the speed as con-
stant as possible while driving.
Idling
Parking for a long period with the ready indicator
illuminated will shorten the cruising range.
Speed
At higher vehicle speed, more traction battery is con-
sumed. Avoid driving at full speed. Even a slight re-
lease of the accelerator pedal will save a significant
amount of traction battery.
Tyre inflation pressure
Check the tyre inflation pressures at regular inter-
vals. Low tyre inflation pressure increases road re-
sistance. In addition, low tyre pressures adversely
affect tyre wear and driving stability.
Cargo loads
Do not drive with unnecessary articles in the lug-
gage compartment. Air conditioning
Too
much cooling/heating can affect the cruising
range, so maintain an appropriate temperature to ex-
tend the cruising range. Driving, alcohol and drugs
E00600200070
Driving
after drinking alcohol is one of the most fre-
quent causes of accidents.
Your driving ability can be seriously impaired even
with blood alcohol levels far below the legal mini-
mum. If you have been drinking, don’t drive. Ride
with a designated non-drinking driver, call a cab or
a friend, or use public transportation. Drinking cof-
fee or taking a cold shower will not make you sober.
Similarly, prescription and nonprescription drugs af-
fect your alertness, perception and reaction time.
Consult with your doctor or pharmacist before driv-
ing while under the influence of any of these medi-
cations. WARNING
l NEVER DRINK AND DRIVE.
Your
perceptions are less accurate, your
reflexes are slower and your judgment is
impaired. Starting and driving
5-02
5
Presented by http://mmc-manuals.ru/ \251
Page 113 of 193
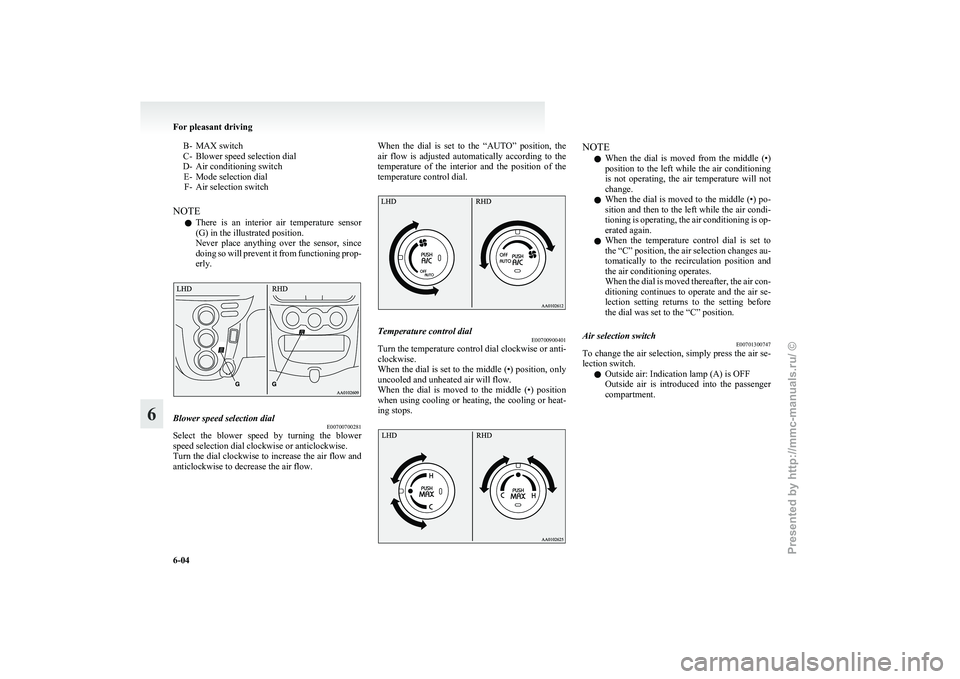
B- MAX switch
C-
Blower speed selection dial
D- Air conditioning switch E- Mode selection dialF- Air selection switch
NOTE l There is an interior air temperature sensor
(G) in the illustrated position.
Never place anything over the sensor, since
doing so will prevent it from functioning prop-
erly. Blower speed selection dial
E00700700281
Select the blower speed by turning the blower
speed selection dial clockwise or anticlockwise.
Turn
the dial clockwise to increase the air flow and
anticlockwise to decrease the air flow. When the dial is set to the “AUTO” position, the
air
flow is adjusted automatically according to the
temperature of the interior and the position of the
temperature control dial. Temperature control dial
E00700900401
Turn the temperature control dial clockwise or anti-
clockwise.
When
the dial is set to the middle (•) position, only
uncooled and unheated air will flow.
When the dial is moved to the middle (•) position
when using cooling or heating, the cooling or heat-
ing stops. NOTE
l When
the dial is moved from the middle (•)
position to the left while the air conditioning
is not operating, the air temperature will not
change.
l When the dial is moved to the middle (•) po-
sition and then to the left while the air condi-
tioning is operating, the air conditioning is op-
erated again.
l When the temperature control dial is set to
the “C” position, the air selection changes au-
tomatically to the recirculation position and
the air conditioning operates.
When the dial is moved thereafter, the air con-
ditioning continues to operate and the air se-
lection setting returns to the setting before
the dial was set to the “C” position.
Air selection switch E00701300747
To change the air selection, simply press the air se-
lection switch.
l Outside air: Indication lamp (A) is OFF
Outside
air is introduced into the passenger
compartment. For pleasant driving
6-04
6
Presented by http://mmc-manuals.ru/ \251
Page 114 of 193
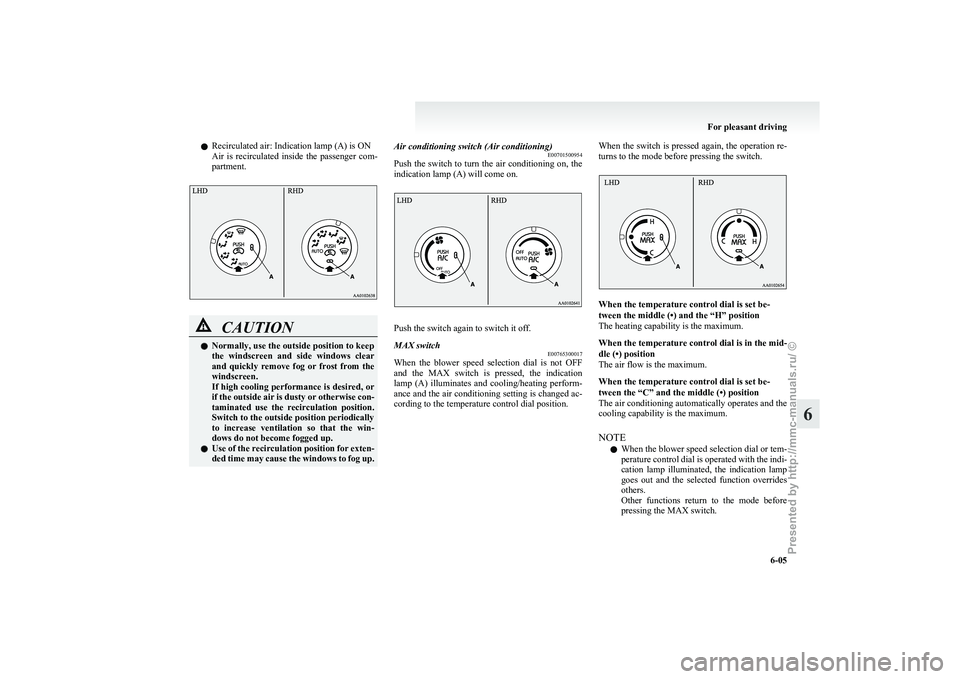
l
Recirculated air: Indication lamp (A) is ON
Air
is recirculated inside the passenger com-
partment. CAUTION
l
Normally, use the outside position to keep
the
windscreen and side windows clear
and quickly remove fog or frost from the
windscreen.
If high cooling performance is desired, or
if the outside air is dusty or otherwise con-
taminated use the recirculation position.
Switch to the outside position periodically
to increase ventilation so that the win-
dows do not become fogged up.
l Use of the recirculation position for exten-
ded time may cause the windows to fog up. Air conditioning switch (Air conditioning)
E00701500954
Push
the switch to turn the air conditioning on, the
indication lamp (A) will come on. Push the switch again to switch it off.
MAX switch
E00765300017
When the blower speed selection dial is not OFF
and
the MAX switch is pressed, the indication
lamp (A) illuminates and cooling/heating perform-
ance and the air conditioning setting is changed ac-
cording to the temperature control dial position. When the switch is pressed again, the operation re-
turns to the mode before pressing the switch. When the temperature control dial is set be-
tween the middle (•) and the “H” position
The heating capability is the maximum.
When
the temperature control dial is in the mid-
dle (•) position
The air flow is the maximum.
When the temperature control dial is set be-
tween the “C” and the middle (•) position
The air conditioning automatically operates and the
cooling capability is the maximum.
NOTE
l When the blower speed selection dial or tem-
perature control dial is operated with the indi-
cation lamp illuminated, the indication lamp
goes out and the selected function overrides
others.
Other functions return to the mode before
pressing the MAX switch. For pleasant driving
6-05 6
Presented by http://mmc-manuals.ru/ \251
Page 115 of 193
l
When the air conditioning is operated with
the MAX switch, the air conditioning does
not stop if the function is cancelled.
l Do not use the cooling/heating function with
the MAX switch for a long time. Since the
power consumption is larger than cooling/
heating not using the MAX switch, the cruis-
ing range is shortened.
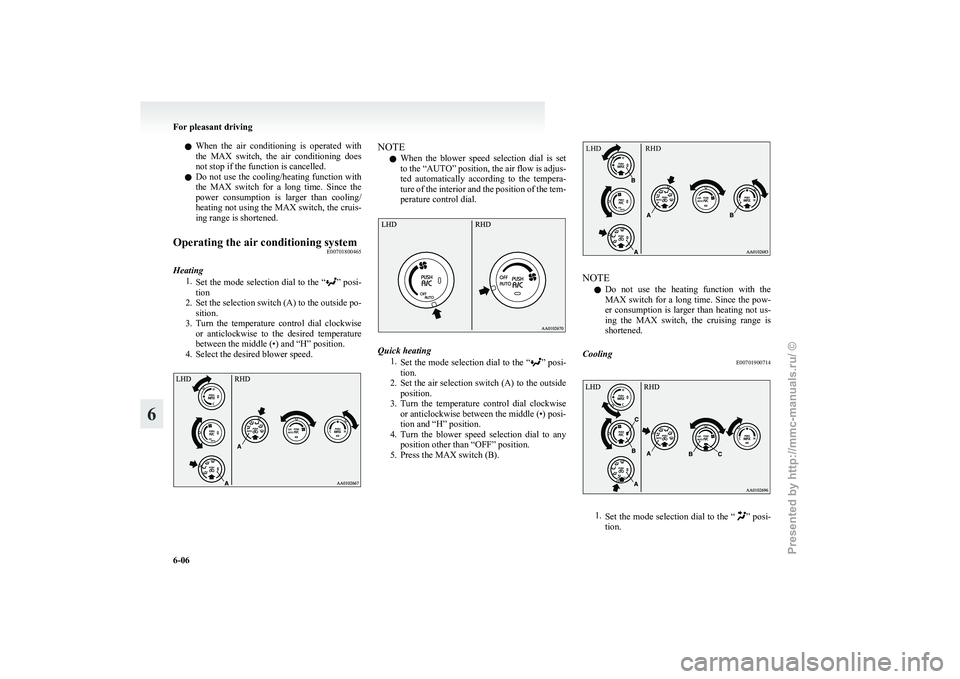
Operating the air conditioning system E00701800465
Heating 1.Set
the mode selection dial to the “ ”
posi-
tion
2. Set the selection switch (A) to the outside po- sition.
3. Turn the temperature control dial clockwise or anticlockwise to the desired temperature
between the middle (•) and “H” position.
4. Select the desired blower speed. NOTE
l When
the blower speed selection dial is set
to the “AUTO” position, the air flow is adjus-
ted automatically according to the tempera-
ture of the interior and the position of the tem-
perature control dial. Quick heating
1.Set
the mode selection dial to the “ ”
posi-
tion.
2. Set the air selection switch (A) to the outside position.
3. Turn the temperature control dial clockwise or anticlockwise between the middle (•) posi-
tion and “H” position.
4. Turn the blower speed selection dial to any position other than “OFF” position.
5. Press the MAX switch (B). NOTE
l Do
not use the heating function with the
MAX switch for a long time. Since the pow-
er consumption is larger than heating not us-
ing the MAX switch, the cruising range is
shortened.
Cooling E00701900714 1.
Set
the mode selection dial to the “ ” posi-
tion. For pleasant driving
6-06
6 LHD
RH D
Presented by http://mmc-manuals.ru/ \251
Page 116 of 193
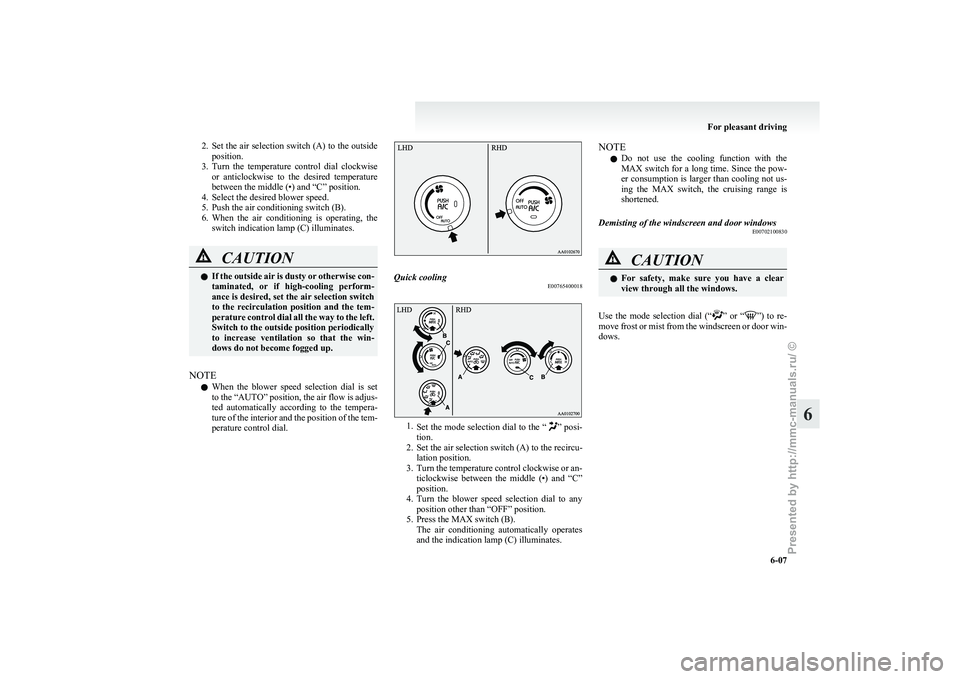
2. Set the air selection switch (A) to the outside
position.
3. Turn the temperature control dial clockwise or anticlockwise to the desired temperature
between the middle (•) and “C” position.
4. Select the desired blower speed.
5. Push the air conditioning switch (B).
6. When the air conditioning is operating, the switch indication lamp (C) illuminates. CAUTION
l
If
the outside air is dusty or otherwise con-
taminated, or if high-cooling perform-
ance is desired, set the air selection switch
to the recirculation position and the tem-
perature control dial all the way to the left.
Switch to the outside position periodically
to increase ventilation so that the win-
dows do not become fogged up.
NOTE l When
the blower speed selection dial is set
to the “AUTO” position, the air flow is adjus-
ted automatically according to the tempera-
ture of the interior and the position of the tem-
perature control dial. Quick cooling
E00765400018 1.
Set
the mode selection dial to the “ ” posi-
tion.
2. Set the air selection switch (A) to the recircu- lation position.
3. Turn the temperature control clockwise or an- ticlockwise between the middle (•) and “C”
position.
4. Turn the blower speed selection dial to any position other than “OFF” position.
5. Press the MAX switch (B). The air conditioning automatically operates
and the indication lamp (C) illuminates. NOTE
l Do
not use the cooling function with the
MAX switch for a long time. Since the pow-
er consumption is larger than cooling not us-
ing the MAX switch, the cruising range is
shortened.
Demisting of the windscreen and door windows E00702100830 CAUTION
l
For
safety, make sure you have a clear
view through all the windows.
Use the mode selection dial (“ ”
or “ ”) to re-
move frost or mist from the windscreen or door win-
dows. For pleasant driving
6-07 6
Presented by http://mmc-manuals.ru/ \251