seats MITSUBISHI I-MIEV 2011 Owners Manual
[x] Cancel search | Manufacturer: MITSUBISHI, Model Year: 2011, Model line: I-MIEV, Model: MITSUBISHI I-MIEV 2011Pages: 193, PDF Size: 12.2 MB
Page 7 of 193
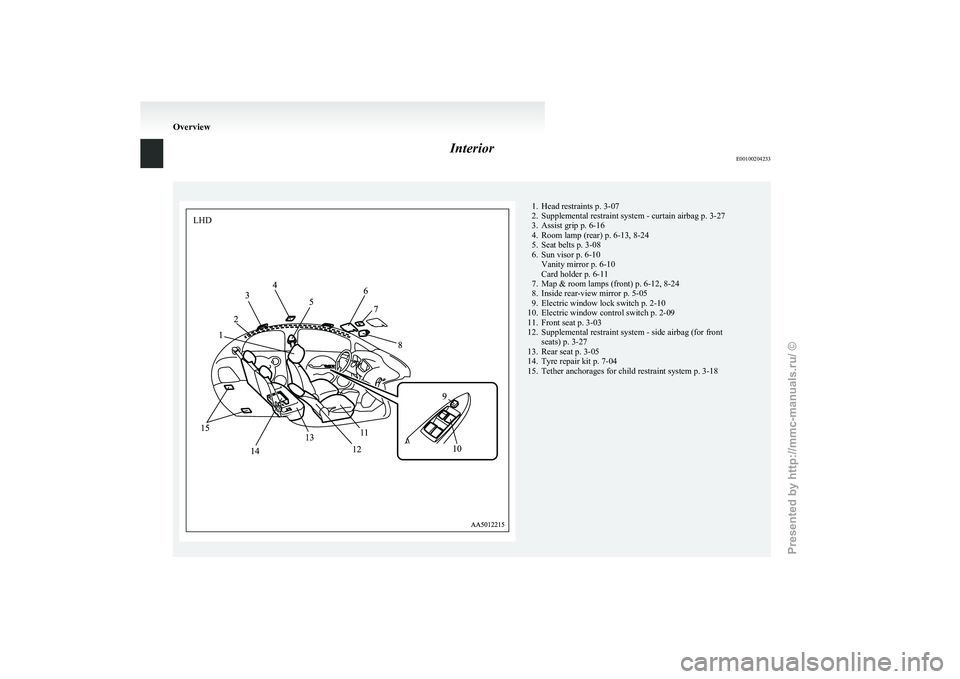
Interior
E00100204233 1. Head restraints p. 3-07
2.
Supplemental restraint system - curtain airbag p. 3-27
3. Assist grip p. 6-16
4. Room lamp (rear) p. 6-13, 8-24
5. Seat belts p. 3-08
6. Sun visor p. 6-10 Vanity mirror p. 6-10
Card holder p. 6-11
7. Map & room lamps (front) p. 6-12, 8-24
8. Inside rear-view mirror p. 5-05
9. Electric window lock switch p. 2-10
10. Electric window control switch p. 2-09
11. Front seat p. 3-03
12. Supplemental restraint system - side airbag (for front seats) p. 3-27
13. Rear seat p. 3-05
14. Tyre repair kit p. 7-04
15. Tether anchorages for child restraint system p. 3-18 OverviewLHD
Presented by http://mmc-manuals.ru/ \251
Page 8 of 193
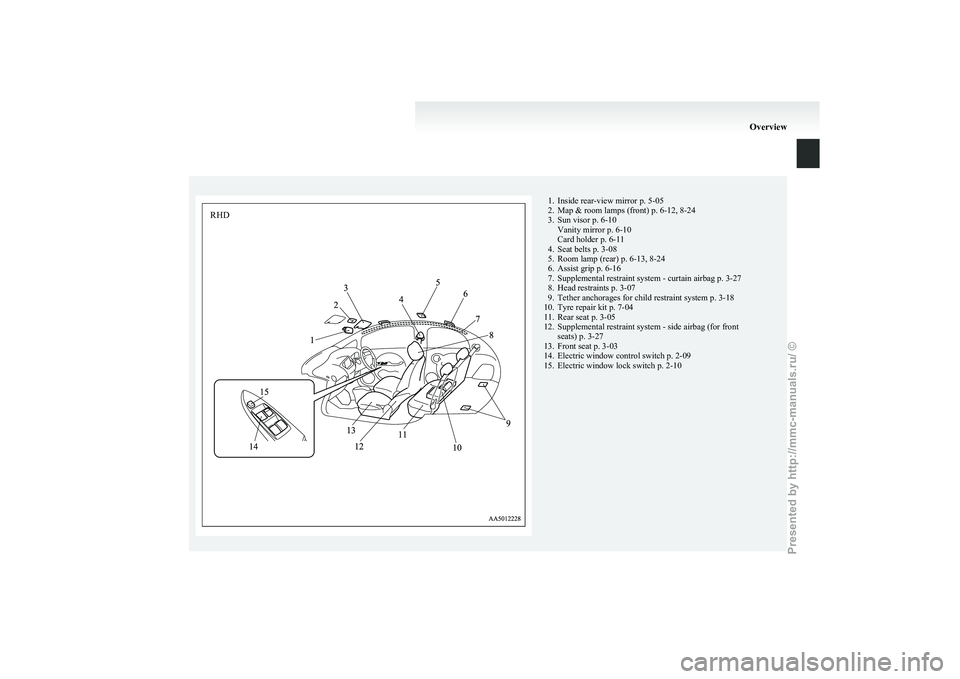
1. Inside rear-view mirror p. 5-05
2.
Map & room lamps (front) p. 6-12, 8-24
3. Sun visor p. 6-10 Vanity mirror p. 6-10
Card holder p. 6-11
4. Seat belts p. 3-08
5. Room lamp (rear) p. 6-13, 8-24
6. Assist grip p. 6-16
7. Supplemental restraint system - curtain airbag p. 3-27
8. Head restraints p. 3-07
9. Tether anchorages for child restraint system p. 3-18
10. Tyre repair kit p. 7-04
11. Rear seat p. 3-05
12. Supplemental restraint system - side airbag (for front seats) p. 3-27
13. Front seat p. 3-03
14. Electric window control switch p. 2-09
15. Electric window lock switch p. 2-10 OverviewRHD
Presented by http://mmc-manuals.ru/ \251
Page 42 of 193
Seat adjustment
E00400300633
Adjust
the driver’s seat so that you are comfortable
and that you can reach the pedals, steering wheel,
switches etc. while retaining a clear field of vision. WARNING
l Do
not attempt to adjust the seat while
driving. This can cause loss of vehicle con-
trol and result in an accident. After ad-
justments are made, ensure the seating is
locked in position by attempting to move
the seat forward and rearward without us-
ing the adjusting mechanism.
l Do not allow people or children to ride in
any area of your vehicle that is not equip-
ped with seats and seat belts, and make
sure that everyone travelling in your vehi-
cle is in a seat and wearing a seat belt, or
in the case of a child is strapped in a child
restraint.
l To minimize the risk of personal injury
in the event of a collision or sudden brak-
ing, the seatbacks should always be in the
almost upright position while the vehicle
is in motion. The protection provided by
the seat belts may be reduced significant-
ly when the seatback is reclined. There is
greater risk that the passenger will slide
under the seat belt, resulting in serious in-
jury, when the seatback is reclined. CAUTION
l
Make
sure the seat is adjusted by an
adult or with adult supervision for cor-
rect and safe operation.
l Do not place a cushion or the like be-
tween your back and the seatback while
driving. The effectiveness of the head re-
straints will be reduced in the event of an
accident.
l When sliding the seats, be careful not to
catch your hand or foot. Front seat
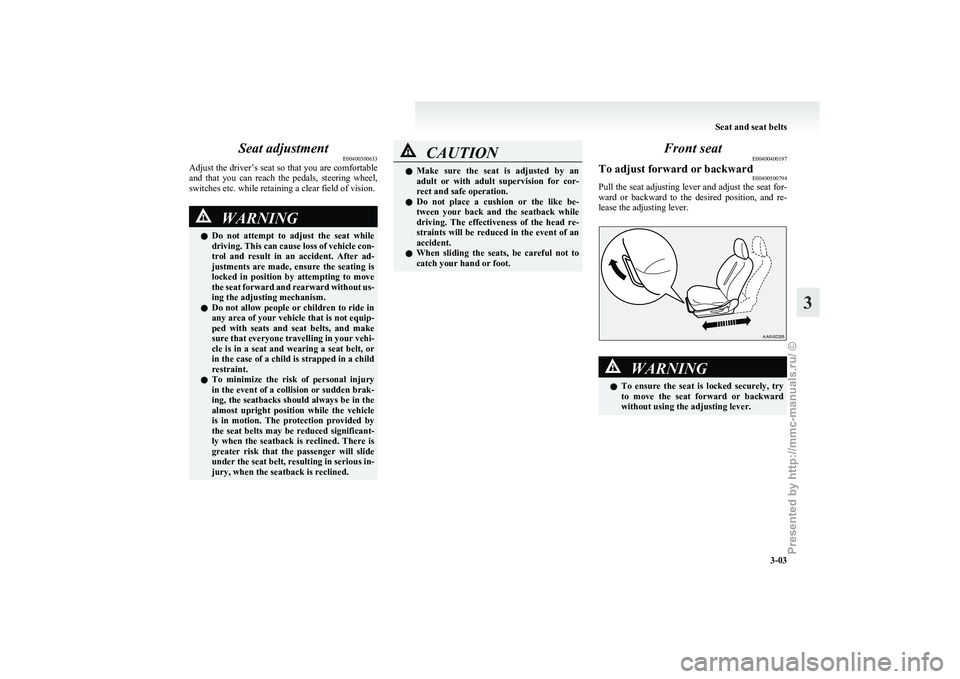
E00400400197
To adjust forward or backward E00400500794
Pull the seat adjusting lever and adjust the seat for-
ward
or backward to the desired position, and re-
lease the adjusting lever. WARNING
l To
ensure the seat is locked securely, try
to move the seat forward or backward
without using the adjusting lever. Seat and seat belts
3-03 3
Presented by http://mmc-manuals.ru/ \251
Page 46 of 193
Head restraints
E00403301497WARNING
l Driving without the head restraints in
place can cause you and your passengers
serious injury or death in an accident. To
reduce the risk of injury in an accident, al-
ways make sure the head restraints are in-
stalled and properly positioned when the
seat is occupied.
l Never place a cushion or similar device
on the seatback. This can adversely affect
head restraint performance by increasing
the distance between your head and the
restraint.
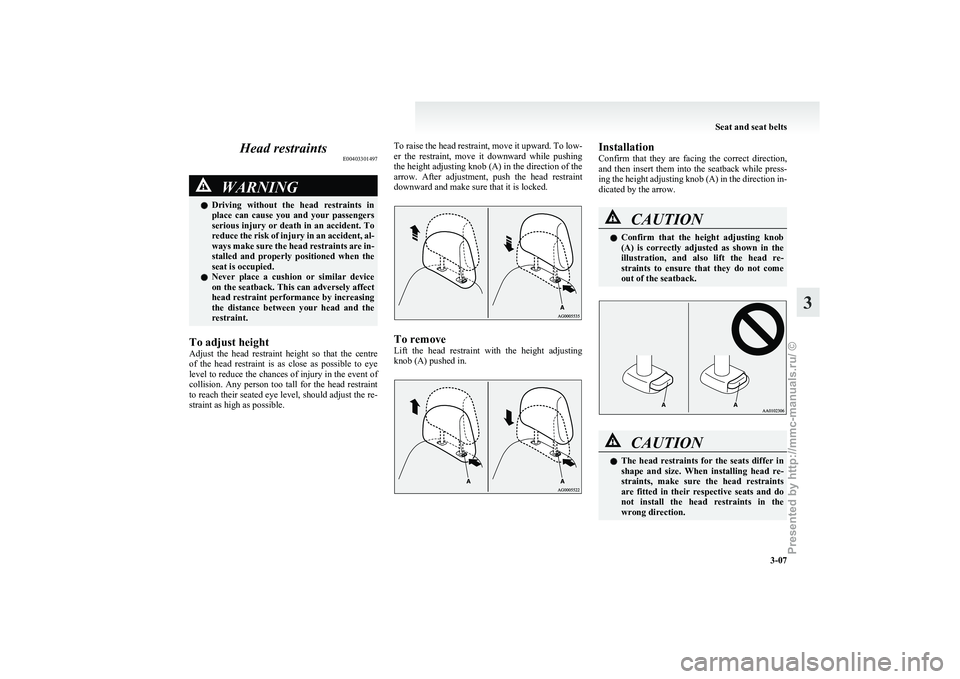
To adjust height
Adjust
the head restraint height so that the centre
of the head restraint is as close as possible to eye
level to reduce the chances of injury in the event of
collision. Any person too tall for the head restraint
to reach their seated eye level, should adjust the re-
straint as high as possible. To raise the head restraint, move it upward. To low-
er
the restraint, move it downward while pushing
the height adjusting knob (A) in the direction of the
arrow. After adjustment, push the head restraint
downward and make sure that it is locked. To remove
Lift
the head restraint with the height adjusting
knob (A) pushed in. Installation
Confirm
that they are facing the correct direction,
and then insert them into the seatback while press-
ing the height adjusting knob (A) in the direction in-
dicated by the arrow. CAUTION
l
Confirm
that the height adjusting knob
(A) is correctly adjusted as shown in the
illustration, and also lift the head re-
straints to ensure that they do not come
out of the seatback. CAUTION
l
The
head restraints for the seats differ in
shape and size. When installing head re-
straints, make sure the head restraints
are fitted in their respective seats and do
not install the head restraints in the
wrong direction. Seat and seat belts
3-07 3
Presented by http://mmc-manuals.ru/ \251
Page 53 of 193
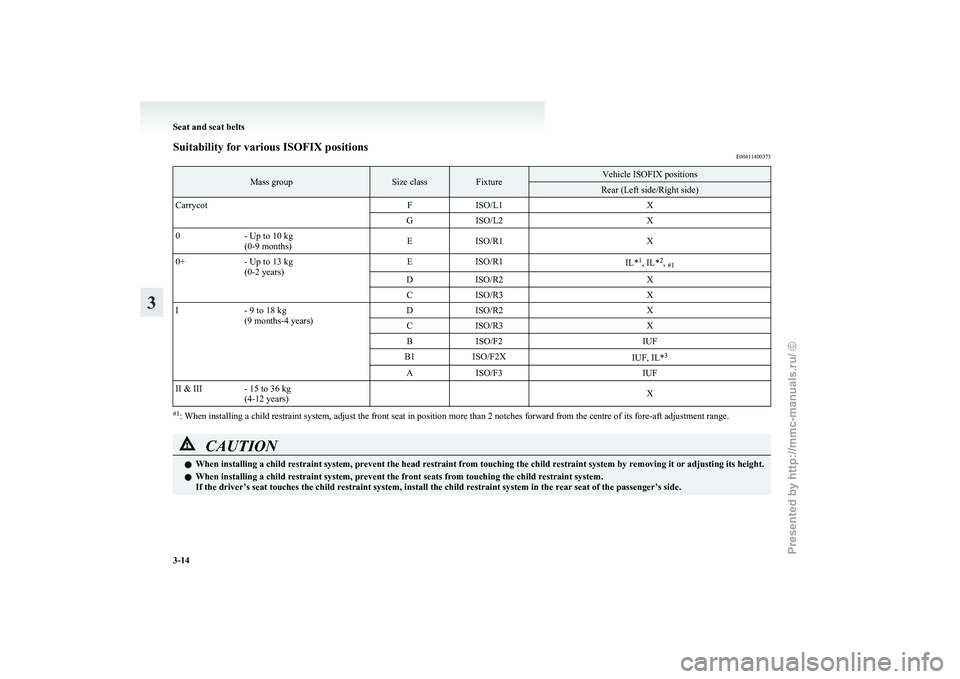
Suitability for various ISOFIX positions
E00411400373Mass group Size class Fixture Vehicle ISOFIX positions
Rear (Left side/Right side)
Carrycot FISO/L1 X
G ISO/L2 X
0 - Up to 10 kg
(0-9 months) E
ISO/R1 X
0+ - Up to 13 kg
(0-2 years) E
ISO/R1
IL*1
, IL* 2
, #1
D ISO/R2 X
C ISO/R3 X
I - 9 to 18 kg
(9 months-4 years) D
ISO/R2 X
C ISO/R3 X
B ISO/F2 IUF
B1 ISO/F2X
IUF, IL*3
A ISO/F3 IUF
II & III - 15 to 36 kg (4-12 years)
X#1
: When installing a child restraint system, adjust the front seat in position more than 2 notches forward from the centre of its fore-aft adjustment range. CAUTION
l
When installing a child restraint system, prevent the head restraint from touching the child restraint system by removing it or adjusting its height.
l When installing a child restraint system, prevent the front seats from touching the child restraint system.
If the driver’s seat touches the child restraint system, install the child restraint system in the rear seat of the passenger’s side. Seat and seat belts
3-14
3
Presented by http://mmc-manuals.ru/ \251
Page 55 of 193
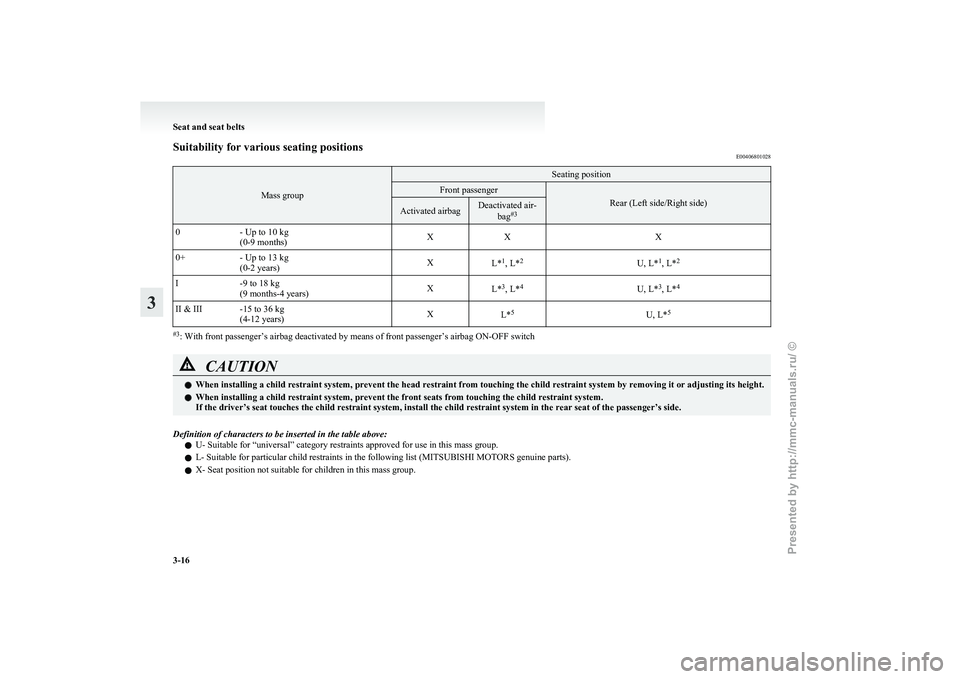
Suitability for various seating positions
E00406801028Mass group Seating position
Front passenger
Rear (Left side/Right side)
Activated airbag Deactivated air-
bag#3
0 - Up to 10 kg
(0-9 months) X
X X
0+ - Up to 13 kg
(0-2 years) X
L*1
, L* 2
U, L*1
, L* 2
I -9 to 18 kg
(9 months-4 years) X
L*3
, L* 4
U, L*3
, L* 4
II & III -15 to 36 kg (4-12 years) X
L*5
U, L*5 #3
: With front passenger’s airbag deactivated by means of front passenger’s airbag ON-OFF switch CAUTION
l
When installing a child restraint system, prevent the head restraint from touching the child restraint system by removing it or adjusting its height.
l When installing a child restraint system, prevent the front seats from touching the child restraint system.
If the driver’s seat touches the child restraint system, install the child restraint system in the rear seat of the passenger’s side.
Definition of characters to be inserted in the table above: l U- Suitable for “universal” category restraints approved for use in this mass group.
l L- Suitable for particular child restraints in the following list (
MITSUBISHI MOTORS genuine parts).
l X- Seat position not suitable for children in this mass group. Seat and seat belts
3-16
3
Presented by http://mmc-manuals.ru/ \251
Page 57 of 193
Installing a child restraint system to
the lower anchorage (ISOFIX child re-
straint mountings) and tether anchor-
age
E00406900703
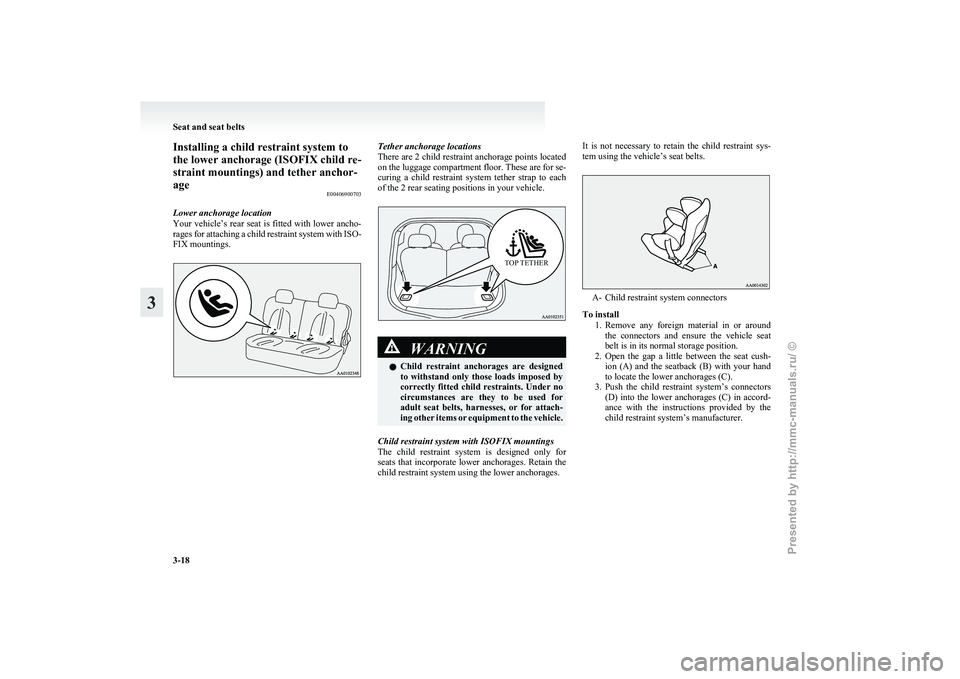
Lower anchorage location
Your
vehicle’s rear seat is fitted with lower ancho-
rages for attaching a child restraint system with ISO-
FIX mountings. Tether anchorage locations
There
are 2 child restraint anchorage points located
on the luggage compartment floor. These are for se-
curing a child restraint system tether strap to each
of the 2 rear seating positions in your vehicle.
TOP TETHER WARNING
l Child
restraint anchorages are designed
to withstand only those loads imposed by
correctly fitted child restraints. Under no
circumstances are they to be used for
adult seat belts, harnesses, or for attach-
ing other items or equipment to the vehicle.
Child restraint system with ISOFIX mountings
The
child restraint system is designed only for
seats that incorporate lower anchorages. Retain the
child restraint system using the lower anchorages. It is not necessary to retain the child restraint sys-
tem using the vehicle’s seat belts.
A- Child restraint system connectors
To install 1. Remove
any foreign material in or around
the connectors and ensure the vehicle seat
belt is in its normal storage position.
2. Open the gap a little between the seat cush- ion (A) and the seatback (B) with your hand
to locate the lower anchorages (C).
3. Push the child restraint system’s connectors (D) into the lower anchorages (C) in accord-
ance with the instructions provided by the
child restraint system’s manufacturer. Seat and seat belts
3-18
3
Presented by http://mmc-manuals.ru/ \251
Page 68 of 193
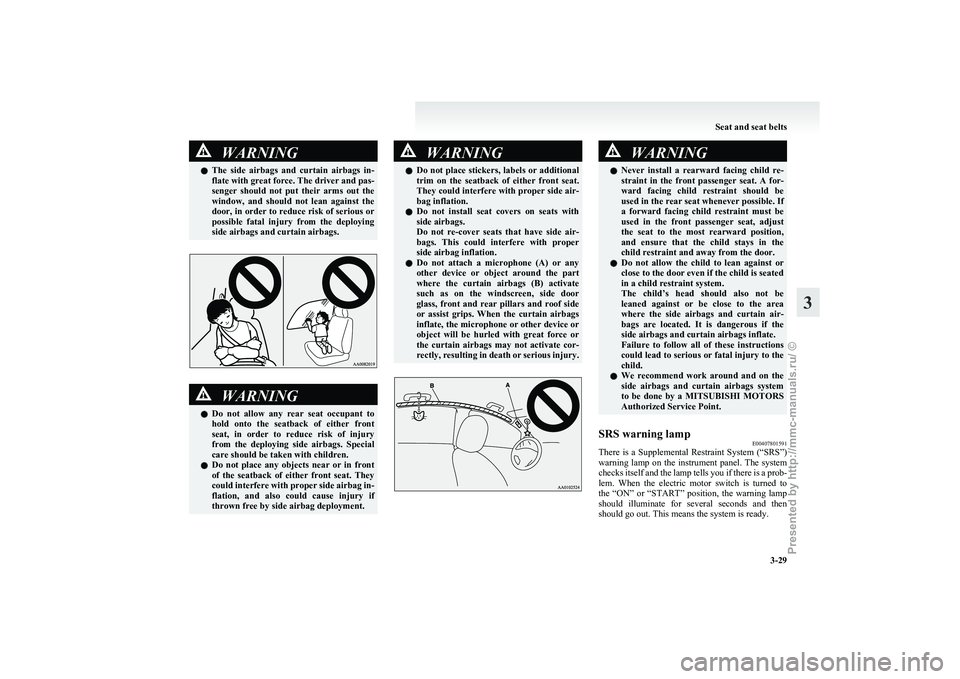
WARNING
l The side airbags and curtain airbags in-
flate with great force. The driver and pas-
senger should not put their arms out the
window, and should not lean against the
door, in order to reduce risk of serious or
possible fatal injury from the deploying
side airbags and curtain airbags. WARNING
l Do
not allow any rear seat occupant to
hold onto the seatback of either front
seat, in order to reduce risk of injury
from the deploying side airbags. Special
care should be taken with children.
l Do not place any objects near or in front
of the seatback of either front seat. They
could interfere with proper side airbag in-
flation, and also could cause injury if
thrown free by side airbag deployment. WARNING
l Do
not place stickers, labels or additional
trim on the seatback of either front seat.
They could interfere with proper side air-
bag inflation.
l Do not install seat covers on seats with
side airbags.
Do not re-cover seats that have side air-
bags. This could interfere with proper
side airbag inflation.
l Do not attach a microphone (A) or any
other device or object around the part
where the curtain airbags (B) activate
such as on the windscreen, side door
glass, front and rear pillars and roof side
or assist grips. When the curtain airbags
inflate, the microphone or other device or
object will be hurled with great force or
the curtain airbags may not activate cor-
rectly, resulting in death or serious injury. WARNING
l Never install a rearward facing child re-
straint in the front passenger seat. A for-
ward facing child restraint should be
used in the rear seat whenever possible. If
a forward facing child restraint must be
used in the front passenger seat, adjust
the seat to the most rearward position,
and ensure that the child stays in the
child restraint and away from the door.
l Do not allow the child to lean against or
close to the door even if the child is seated
in a child restraint system.
The child’s head should also not be
leaned against or be close to the area
where the side airbags and curtain air-
bags are located. It is dangerous if the
side airbags and curtain airbags inflate.
Failure to follow all of these instructions
could lead to serious or fatal injury to the
child.
l We recommend work around and on the
side airbags and curtain airbags system
to be done by a MITSUBISHI MOTORS
Authorized Service Point.
SRS warning lamp E00407801591
There is a Supplemental Restraint System (“SRS”)
warning
lamp on the instrument panel. The system
checks itself and the lamp tells you if there is a prob-
lem. When the electric motor switch is turned to
the “ON” or “START” position, the warning lamp
should illuminate for several seconds and then
should go out. This means the system is ready. Seat and seat belts
3-29 3
Presented by http://mmc-manuals.ru/ \251
Page 69 of 193
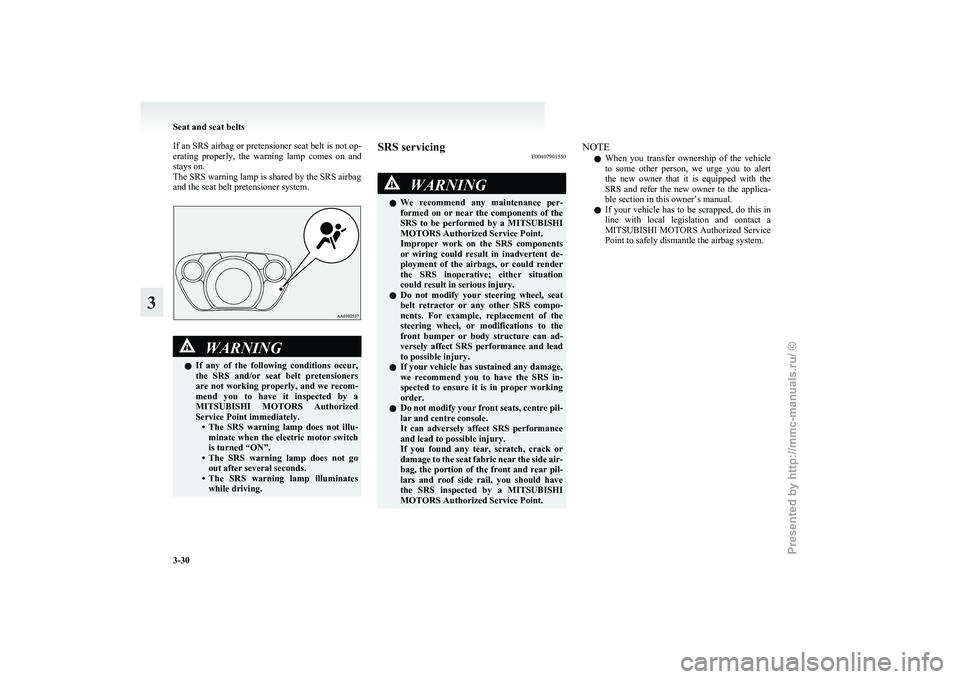
If an SRS airbag or pretensioner seat belt is not op-
erating
properly, the warning lamp comes on and
stays on.
The SRS warning lamp is shared by the SRS airbag
and the seat belt pretensioner system. WARNING
l If
any of the following conditions occur,
the SRS and/or seat belt pretensioners
are not working properly, and we recom-
mend you to have it inspected by a
MITSUBISHI MOTORS Authorized
Service Point immediately. • The SRS warning lamp does not illu-minate when the electric motor switch
is turned “ON”.
• The SRS warning lamp does not go out after several seconds.
• The SRS warning lamp illuminates while driving. SRS servicing
E00407901550 WARNING
l We
recommend any maintenance per-
formed on or near the components of the
SRS to be performed by a MITSUBISHI
MOTORS Authorized Service Point.
Improper work on the SRS components
or wiring could result in inadvertent de-
ployment of the airbags, or could render
the SRS inoperative; either situation
could result in serious injury.
l Do not modify your steering wheel, seat
belt retractor or any other SRS compo-
nents. For example, replacement of the
steering wheel, or modifications to the
front bumper or body structure can ad-
versely affect SRS performance and lead
to possible injury.
l If your vehicle has sustained any damage,
we recommend you to have the SRS in-
spected to ensure it is in proper working
order.
l Do not modify your front seats, centre pil-
lar and centre console.
It can adversely affect SRS performance
and lead to possible injury.
If you found any tear, scratch, crack or
damage to the seat fabric near the side air-
bag, the portion of the front and rear pil-
lars and roof side rail, you should have
the SRS inspected by a MITSUBISHI
MOTORS Authorized Service Point. NOTE
l When
you transfer ownership of the vehicle
to some other person, we urge you to alert
the new owner that it is equipped with the
SRS and refer the new owner to the applica-
ble section in this owner’s manual.
l If your vehicle has to be scrapped, do this in
line with local legislation and contact a
MITSUBISHI MOTORS Authorized Service
Point to safely dismantle the airbag system. Seat and seat belts
3-30
3
Presented by http://mmc-manuals.ru/ \251
Page 92 of 193
Safe driving techniques
E00600300635
Driving
safety and protection against injury cannot
be fully ensured. However, we recommend that
you pay extra attention to the following:
Seat belts
Before starting the vehicle, make sure that you and
your passengers have fastened your seat belts.
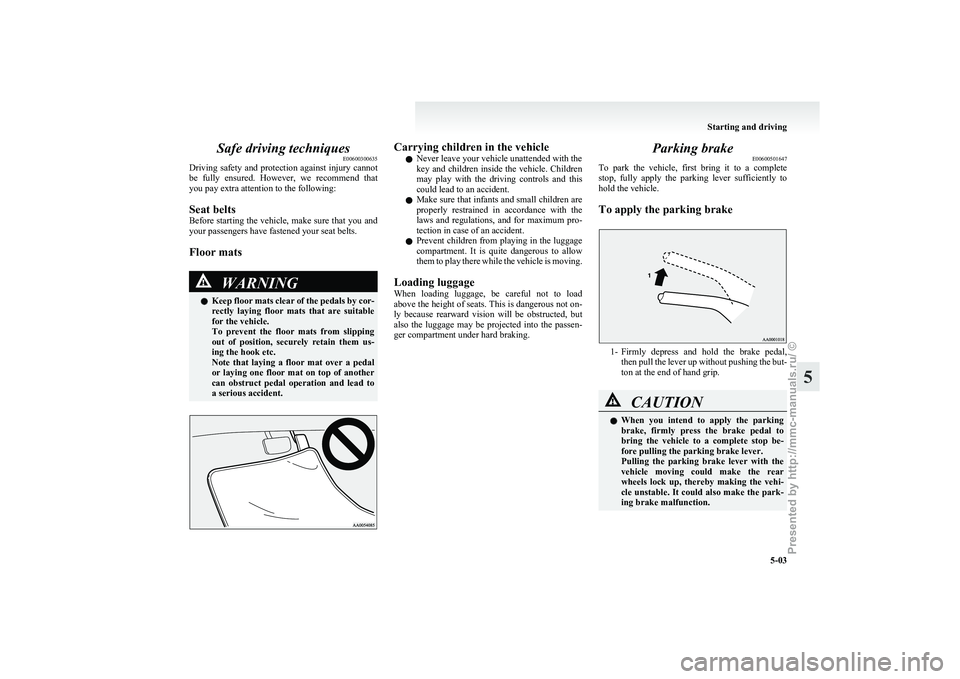
Floor mats WARNING
l Keep
floor mats clear of the pedals by cor-
rectly laying floor mats that are suitable
for the vehicle.
To prevent the floor mats from slipping
out of position, securely retain them us-
ing the hook etc.
Note that laying a floor mat over a pedal
or laying one floor mat on top of another
can obstruct pedal operation and lead to
a serious accident. Carrying children in the vehicle
l Never leave your vehicle unattended with the
key
and children inside the vehicle. Children
may play with the driving controls and this
could lead to an accident.
l Make sure that infants and small children are
properly restrained in accordance with the
laws and regulations, and for maximum pro-
tection in case of an accident.
l Prevent children from playing in the luggage
compartment. It is quite dangerous to allow
them to play there while the vehicle is moving.
Loading luggage
When loading luggage, be careful not to load
above the height of seats. This is dangerous not on-
ly because rearward vision will be obstructed, but
also the luggage may be projected into the passen-
ger compartment under hard braking. Parking brake
E00600501647
To
park the vehicle, first bring it to a complete
stop, fully apply the parking lever sufficiently to
hold the vehicle.
To apply the parking brake 1- Firmly
depress and hold the brake pedal,
then pull the lever up without pushing the but-
ton at the end of hand grip. CAUTION
l
When
you intend to apply the parking
brake, firmly press the brake pedal to
bring the vehicle to a complete stop be-
fore pulling the parking brake lever.
Pulling the parking brake lever with the
vehicle moving could make the rear
wheels lock up, thereby making the vehi-
cle unstable. It could also make the park-
ing brake malfunction. Starting and driving
5-03 5
Presented by http://mmc-manuals.ru/ \251