turn signal bulb MITSUBISHI I-MIEV 2011 Owners Manual
[x] Cancel search | Manufacturer: MITSUBISHI, Model Year: 2011, Model line: I-MIEV, Model: MITSUBISHI I-MIEV 2011Pages: 193, PDF Size: 12.2 MB
Page 78 of 193
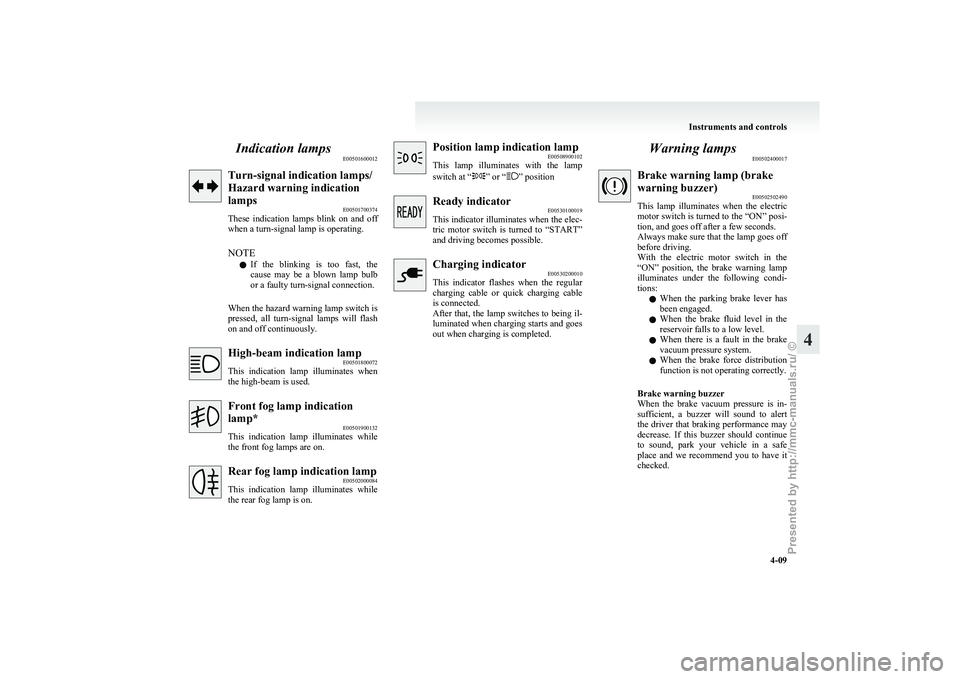
Indication lamps
E00501600012Turn-signal indication lamps/
Hazard warning indication
lamps
E00501700374
These
indication lamps blink on and off
when a turn-signal lamp is operating.
NOTE
l If the blinking is too fast, the
cause may be a blown lamp bulb
or a faulty turn-signal connection.
When the hazard warning lamp switch is
pressed, all turn-signal lamps will flash
on and off continuously. High-beam indication lamp
E00501800072
This
indication lamp illuminates when
the high-beam is used. Front fog lamp indication
lamp*
E00501900132
This
indication lamp illuminates while
the front fog lamps are on. Rear fog lamp indication lamp
E00502000084
This
indication lamp illuminates while
the rear fog lamp is on. Position lamp indication lamp
E00508900102
This
lamp illuminates with the lamp
switch at “ ” or “ ” position
Ready indicator
E00530100019
This
indicator illuminates when the elec-
tric motor switch is turned to “START”
and driving becomes possible. Charging indicator
E00530200010
This
indicator flashes when the regular
charging cable or quick charging cable
is connected.
After that, the lamp switches to being il-
luminated when charging starts and goes
out when charging is completed. Warning lamps
E00502400017 Brake warning lamp (brake
warning buzzer)
E00502502490
This
lamp illuminates when the electric
motor switch is turned to the “ON” posi-
tion, and goes off after a few seconds.
Always make sure that the lamp goes off
before driving.
With the electric motor switch in the
“ON” position, the brake warning lamp
illuminates under the following condi-
tions:
l When the parking brake lever has
been engaged.
l When the brake fluid level in the
reservoir falls to a low level.
l When there is a fault in the brake
vacuum pressure system.
l When the brake force distribution
function is not operating correctly.
Brake warning buzzer
When the brake vacuum pressure is in-
sufficient, a buzzer will sound to alert
the driver that braking performance may
decrease. If this buzzer should continue
to sound, park your vehicle in a safe
place and we recommend you to have it
checked. Instruments and controls
4-09 4
Presented by http://mmc-manuals.ru/ \251
Page 83 of 193
NOTE
l When
adjusting the beam position, first put
the dial in the “0” position (the highest beam
position).
Vehi- cle
condi- tion Switch
posi-tion “0” “0” “1” “1” “2” •: 1 person
:Full luggage loading
Switch position 0- Driver only/Driver + 1 front passenger
Switch position 1- 4 passengers (including driv- er)/
4
passengers (including driv-
er) + Full luggage loading
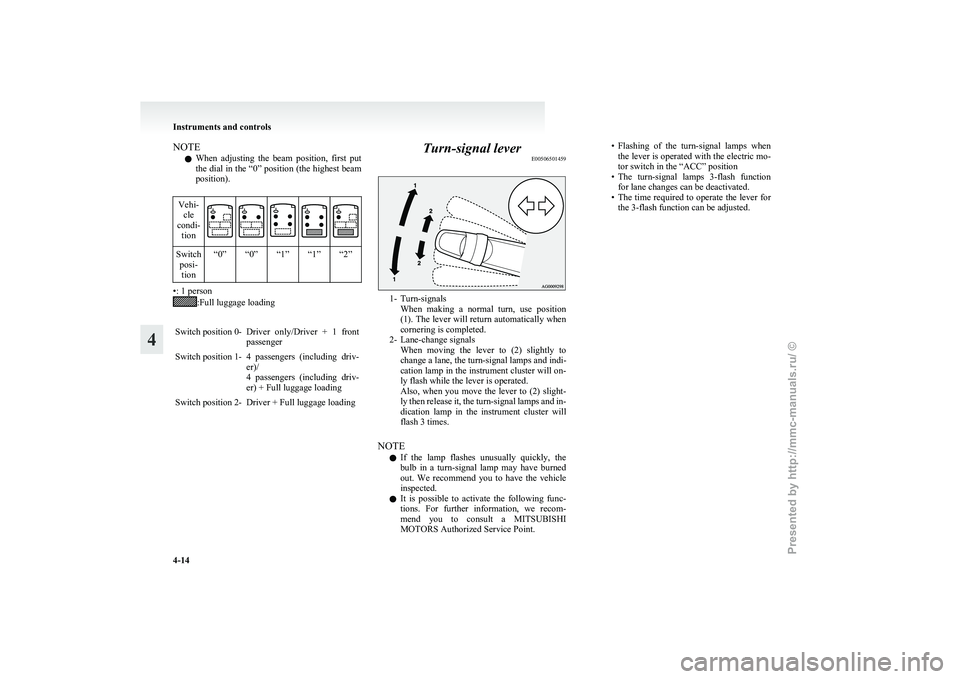
Switch position 2- Driver + Full luggage loading Turn-signal lever
E00506501459 1- Turn-signals
When
making a normal turn, use position
(1). The lever will return automatically when
cornering is completed.
2- Lane-change signals When moving the lever to (2) slightly to
change a lane, the turn-signal lamps and indi-
cation lamp in the instrument cluster will on-
ly flash while the lever is operated.
Also, when you move the lever to (2) slight-
ly then release it, the turn-signal lamps and in-
dication lamp in the instrument cluster will
flash 3 times.
NOTE l If the lamp flashes unusually quickly, the
bulb in a turn-signal lamp may have burned
out. We recommend you to have the vehicle
inspected.
l It is possible to activate the following func-
tions. For further information, we recom-
mend you to consult a MITSUBISHI
MOTORS Authorized Service Point. • Flashing
of the turn-signal lamps when
the lever is operated with the electric mo-
tor switch in the “ACC” position
• The turn-signal lamps 3-flash function for lane changes can be deactivated.
• The time required to operate the lever for the 3-flash function can be adjusted. Instruments and controls
4-14
4
Presented by http://mmc-manuals.ru/ \251
Page 163 of 193
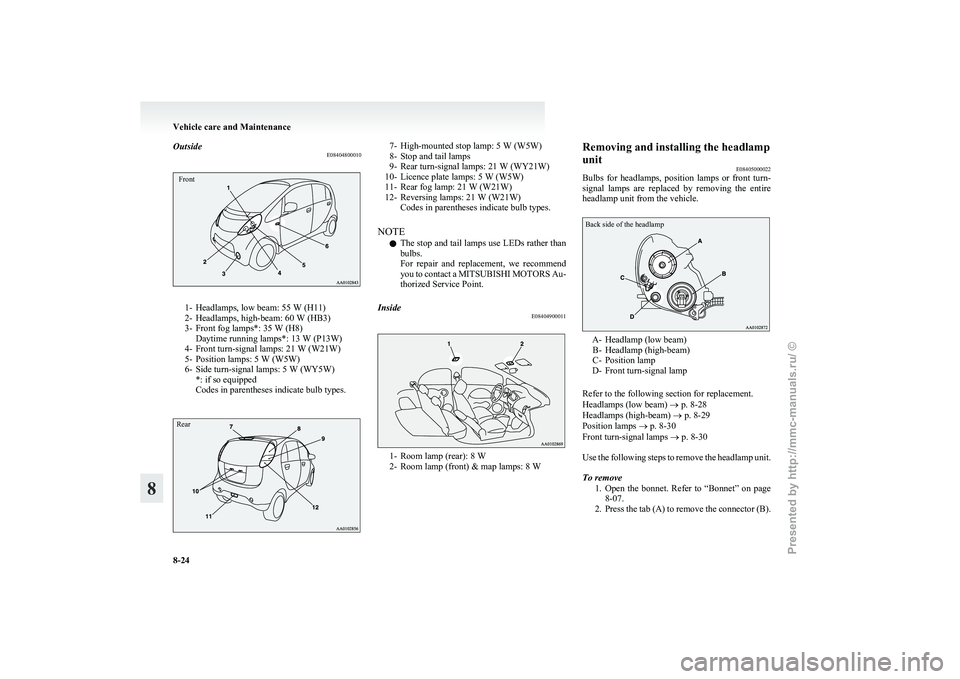
Outside
E08404800010Front1- Headlamps, low beam: 55 W (H11)
2-
Headlamps, high-beam: 60 W (HB3)
3- Front fog lamps*: 35 W (H8) Daytime running lamps*: 13 W (P13W)
4- Front turn-signal lamps: 21 W (W21W)
5- Position lamps: 5 W (W5W)
6- Side turn-signal lamps: 5 W (WY5W) *: if so equipped
Codes in parentheses indicate bulb types.
Rear 7- High-mounted stop lamp: 5 W (W5W)
8-
Stop and tail lamps
9- Rear turn-signal lamps: 21 W (WY21W)
10- Licence plate lamps: 5 W (W5W)
11- Rear fog lamp: 21 W (W21W)
12- Reversing lamps: 21 W (W21W) Codes in parentheses indicate bulb types.
NOTE l The stop and tail lamps use LEDs rather than
bulbs.
For repair and replacement, we recommend
you to contact a MITSUBISHI MOTORS Au-
thorized Service Point.
Inside E08404900011 1- Room lamp (rear): 8 W
2-
Room lamp (front) & map lamps: 8 W Removing and installing the headlamp
unit
E08405000022
Bulbs
for headlamps, position lamps or front turn-
signal lamps are replaced by removing the entire
headlamp unit from the vehicle.
Back side of the headlamp A- Headlamp (low beam)
B-
Headlamp (high-beam)
C- Position lamp
D- Front turn-signal lamp
Refer to the following section for replacement.
Headlamps (low beam) ® p. 8-28
Headlamps (high-beam) ® p. 8-29
Position lamps ® p. 8-30
Front turn-signal lamps ® p. 8-30
Use the following steps to remove the headlamp unit.
To remove
1. Open the bonnet. Refer to “Bonnet” on page8-07.
2. Press the tab (A) to remove the connector (B). Vehicle care and Maintenance
8-24
8
Presented by http://mmc-manuals.ru/ \251
Page 169 of 193
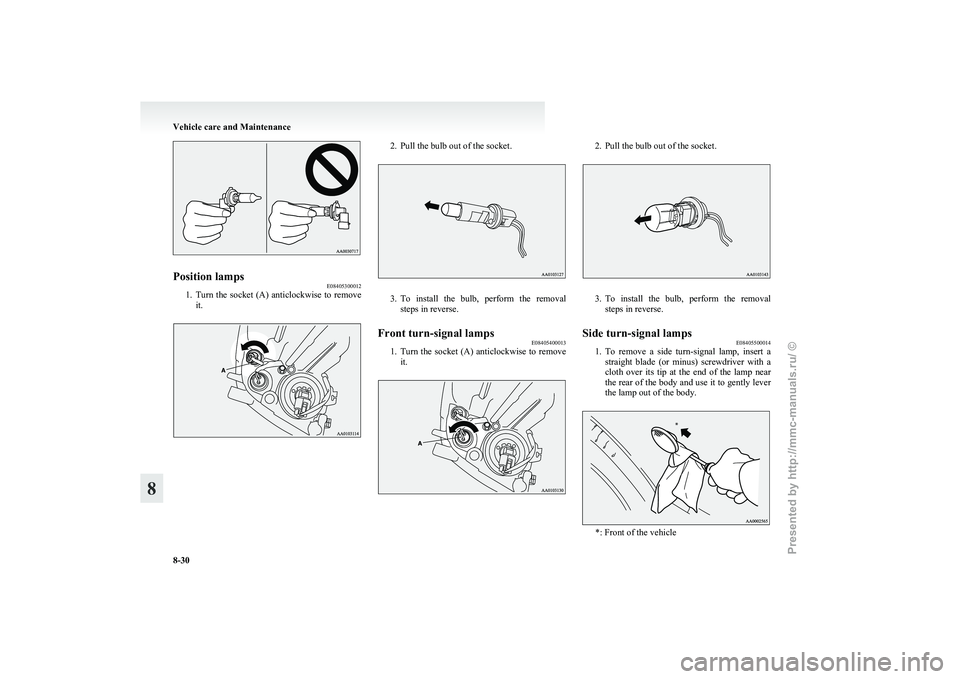
Position lamps
E08405300012
1. Turn the socket (A) anticlockwise to remove
it. 2. Pull the bulb out of the socket.
3. To install the bulb, perform the removal
steps in reverse.
Front turn-signal lamps E08405400013
1. Turn
the socket (A) anticlockwise to remove
it. 2. Pull the bulb out of the socket.
3. To
install the bulb, perform the removal
steps in reverse.
Side turn-signal lamps E08405500014
1. To
remove a side turn-signal lamp, insert a
straight blade (or minus) screwdriver with a
cloth over its tip at the end of the lamp near
the rear of the body and use it to gently lever
the lamp out of the body. *: Front of the vehicleVehicle care and Maintenance
8-30
8 *
Presented by http://mmc-manuals.ru/ \251
Page 172 of 193
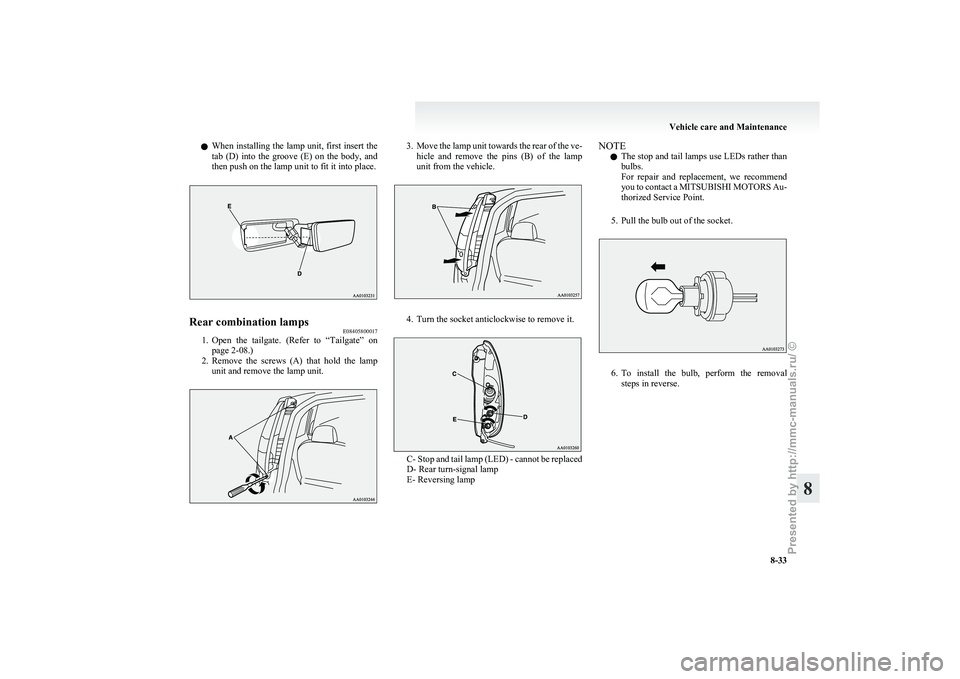
l
When installing the lamp unit, first insert the
tab (D) into the groove (E) on the body, and
then push on the lamp unit to fit it into place. Rear combination lamps
E08405800017
1. Open
the tailgate. (Refer to “Tailgate” on
page 2-08.)
2. Remove the screws (A) that hold the lamp unit and remove the lamp unit. 3. Move
the lamp unit towards the rear of the ve-
hicle and remove the pins (B) of the lamp
unit from the vehicle. 4. Turn the socket anticlockwise to remove it.
C- Stop and tail lamp (LED) - cannot be replaced
D- Rear turn-signal lamp
E- Reversing lampNOTE
l The
stop and tail lamps use LEDs rather than
bulbs.
For repair and replacement, we recommend
you to contact a MITSUBISHI MOTORS Au-
thorized Service Point.
5. Pull the bulb out of the socket. 6. To
install the bulb, perform the removal
steps in reverse. Vehicle care and Maintenance
8-33 8
Presented by http://mmc-manuals.ru/ \251
Page 185 of 193

Replacement 8-31
Switch 4-15
Front room lamp Bulb capacity
8-24
Front seat 3-03
Front turn-signal lamps Bulb capacity 8-24
Replacement 8-30
Fuel Modification/alterations to the electrical sys-
tems 04
Fuses 8-20
Fusible links 8-20
GGauges 4-02,4-08
General maintenance
8-19
General vehicle data 9-03
Genuine parts 04
Glove box 6-14
HHazard warning flasher switch 4-15
Hazard warning indication lamps
4-09
Head restraints 3-07
Headlamp levelling switch 4-13
Headlamps Bulb capacity 8-24
Headlamp flasher 4-13
Replacement 8-24,8-28,8-29
Switch 4-11
Heat Cautions and actions to deal with intense
heat 05
Heated mirror 5-07
Heated seat 3-04
High-beam indication lamp 4-09 High-mounted stop lamp
Bulb capacity
8-24
Replacement 8-34
Hinges and latches lubrication 8-19
Horn switch 4-19
Hot water heater fluid 8-09,9-07
I i-MiEV 02
Cruising range 02
Main features 02
Traction battery
02
If the vehicle breaks down 7-02
Indication and warning lamps 4-08
Indication lamps 4-09
Inside rear-view mirror 5-05
Inspection and maintenance following rough road
operation 5-12
Instruments 4-02
Intense cold Cautions and actions 06
Intense heat Cautions and actions 05
Interior lamps 6-12
J Jump starting (Emergency starting) 7-02
K Keyless entry system 2-03
Keys 2-02
L Labeling 9-02
Lamp monitor buzzer
4-12 Lamps (headlamps, fog lamp, etc.) auto-cutout func-
tion 4-12
Licence plate lamps
Bulb capacity
8-24
Replacement 8-34
Low voltage electrical system 9-04
Lubricants 9-07
M Map lamps 6-12,6-13
Bulb capacity
8-24
Meter illumination control 4-03,4-06
Mirror Inside rear-view mirror 5-05
Outside rear-view mirrors 5-05
Modification/alterations to the electrical sys-
tems 04
O Odometer 4-03,4-04
Oil
Transmission oil 9-07
Operation under adverse driving conditions
7-12
Outside rear-view mirrors 5-05
P Parking 5-04
Parking brake 5-03
Position lamps Bulb capacity
8-24
Indication lamp 4-09
Replacement 8-30
Power down warning lamp 4-11
Precautions to observe when using wipers and wash-
ers 4-18
Pregnant women restraint 3-10 Alphabetical index
2
Presented by http://mmc-manuals.ru/ \251
Page 186 of 193
Puncture
Tyre repair kit 7-04
Q Quick charging 1-08
RReady indicator 4-09
Rear combination lamps
Bulb capacity
8-24
Replacement 8-33
Rear fog lamp Bulb capacity 8-24
Indication lamp 4-09
Replacement 8-32
Switch 4-15
Rear room lamp Bulb capacity 8-24
Rear seat 3-05
Rear turn-signal lamps Bulb capacity 8-24
Replacement 8-30,8-33
Rear window demister switch 4-18
Rear-view mirror Inside 5-05
Outside 5-05
Refill capacities 9-07
Regenerative braking 02
Regular charging 1-04
Replacement of lamp bulbs 8-23
Reversing lamps Bulb capacity 8-24
Replacement 8-33
Roof carrier precaution 5-19
Room lamp (front) 6-12
Room lamp (rear) 6-13 SSafe driving techniques 5-03
Seat belt 3-08
Child restraint 3-11
Force limiter
3-11
Inspection 3-20
Pregnant women restraint 3-10
Pretensioner 3-11
Seat belt reminder/warning lamp (for driver and
front passenger) 3-09
Warning lamp (for rear passenger) 3-10
Seats Adjustment 3-03
Front seat 3-03
Head restraints 3-07
Heated seat 3-04
Rear seat 3-05
Secret box 6-14
Selector lever 5-09
Service precaution 8-06
Service reminder 4-03,4-04
Side turn-signal lamps Bulb capacity 8-24
Replacement 8-30,8-33
Snow tyres 8-16
Specifications 9-02
Speedometer 4-02
Starting the electric motor unit 5-08
Steering wheel lock 5-08
Stop lamps Bulb capacity 8-24
Replacement 8-33
Storage spaces 6-14 Glove box 6-14
Secret box 6-14
Sun visors 6-10
Supplemental restraint system 3-20 Servicing 3-30
Warning lamp 3-29
T Tail lamps
Bulb capacity
8-24
Replacement 8-33
Tailgate 2-08
Towing 7-10
Traction battery 02
Transmission 5-09 Driving the vehicle 5-11
Selector lever 5-09
Selector lever position indicator 5-10
Tripmeter 4-03,4-04
Turn-signal indication lamps 4-09
Turn-signal lever 4-14
Tyre repair kit 7-04
Tyres 8-14 Inflation pressures 8-15
Size (tyre and wheel) 9-05
Snow tyres 8-16
Tread wear indicators 8-16
Tyre chains 8-17
Tyre repair kit 7-04
Tyre rotation 8-16
V Vanity mirror 6-10
Vehicle care precautions
8-02
Vehicle dimensions 9-03
Vehicle identification number 9-02
Vehicle information code plate 9-02
Vehicle labeling 9-02
Ventilators 6-02 Alphabetical index
3
Presented by http://mmc-manuals.ru/ \251