weight MITSUBISHI iMiEV 2012 1.G Owners Handbook
[x] Cancel search | Manufacturer: MITSUBISHI, Model Year: 2012, Model line: iMiEV, Model: MITSUBISHI iMiEV 2012 1.GPages: 20, PDF Size: 5.2 MB
Page 10 of 20

8
Charge Overview
CHARGING YOUR MITSUBISHI i
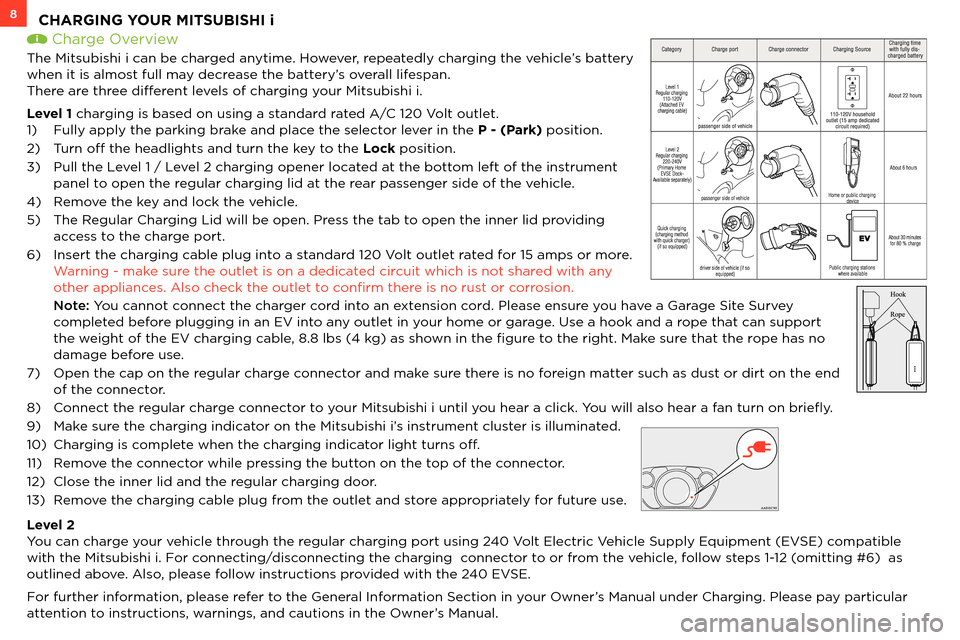
The Mitsubishi i can be charged anytime. However, repeatedly charging the vehicle’s battery
when it is almost full may decrease the battery’s overall lifespan.
There are three different levels of charging your Mitsubishi i.
Level 1 charging is based on using a standard rated A/C 120 Volt outlet.
1) Fully apply the parking brake and place the selector lever in the P - (Park) position.
2) Turn off the headlights and turn the key to the Lock position.
3) Pull the Level 1 / Level 2 charging opener located at the bottom left of the instrument
panel to open the regular charging lid at the rear passenger side of the vehicle.
4) Remove the key and lock the vehicle.
5) The Regular Charging Lid will be open. Press the tab to open the inner lid providing
access to the charge port.
6) Insert the charging cable plug into a standard 120 Volt outlet rated for 15 amps or more.
Warning - make sure the outlet is on a dedicated circuit which is not shared with any
other appliances. Also check the outlet to confirm there is no rust or corrosion.
Note: You cannot connect the charger cord into an extension cord. Please ensure you have a Garage Site Survey
completed before plugging in an EV into any outlet in your home or garage. Use a hook and a rope that can support
the weight of the EV charging cable, 8.8 lbs (4 kg) as shown in the figure to the right. Make sure that the rope has no
damage before use.
7) Open the cap on the regular charge connector and make sure there is no foreign matter such as dust or dirt on the end
of the connector.
8) Connect the regular charge connector to your Mitsubishi i until you hear a click. You will also hear a fan turn on briefly.
9) Make sure the charging indicator on the Mitsubishi i’s instrument cluster is illuminated.
10) Charging is complete when the charging indicator light turns off.
11) Remove the connector while pressing the button on the top of the connector.
12) Close the inner lid and the regular charging door.
13) Remove the charging cable plug from the outlet and store appropriately for future use.
Level 2
You can charge your vehicle through the regular charging port using 240 Volt Electric Vehicle Supply Equipment (EVSE) compatible
with the Mitsubishi i. For connecting/disconnecting the charging connector to or from the vehicle, follow steps 1-12 (omitting #6) as
outlined above. Also, please follow instructions provided with the 240 EVSE.
For further information, please refer to the General Information Section in your Owner’s Manual under Charging. Please pay particular
attention to instructions, warnings, and cautions in the Owner’s Manual.
CategorCategoryyCharCharge portge portCharCharge connectoge connectorrCharCharging Sourging SourceceCharCharging ging titime me with fully dis-with fully dis-charged battercharged batteryy
Level Level 11Regular Regular charcharging ging 11110-0-120120VV(Attached EV(Attached EVcharchargigingng cable) cable)
passenpassenger side ger side of vehiclof vehiclee11110-120-120V 0V hohousehusehololddoutlet (15 amp dedicatedoutlet (15 amp dedicatedcircuit required)circuit required)
About 22 hourAbout 22 hourss
LeLevevel l 22Regular Regular charcharging ging 22220-0-24240V0V(P(Pririmamaryry Home HomeEVSEVSE E Dock-Dock-AvAvailable separately)ailable separately)
passepassengnger sideer sideof of vevehiclehicleHome or public Home or public chcharargigingngdevdeviceice
AbAbouout 6 hourt 6 hourss
Quick charQuick chargigingng(c(chahargrging ing methmethododwith quick charger) with quick charger) (if so equipped(if so equipped))
drdriver iver siside de of of vehvehicleicle(if (if sosoequippedequipped))Public charPublic chargigingngststatationsionswhere availwhere availabablele
AbouAbout t 30 30 miminutesnutesfor 80 % charfor 80 % chargege