stop start MITSUBISHI iMiEV 2013 (in English) Owner's Guide
[x] Cancel search | Manufacturer: MITSUBISHI, Model Year: 2013, Model line: iMiEV, Model: MITSUBISHI iMiEV 2013Pages: 258, PDF Size: 13 MB
Page 137 of 258
After driving on icy roads
E00618800176
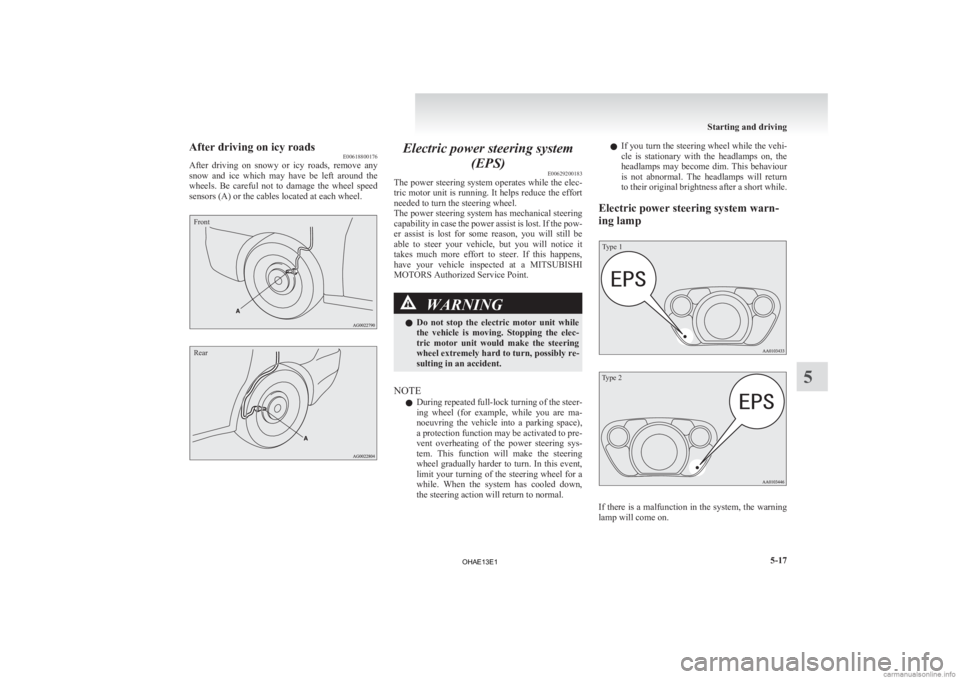
After
driving on snowy or icy roads, remove any
snow and ice which may have be left around the
wheels. Be careful not to damage the wheel speed
sensors (A) or the cables located at each wheel.
Front
Rear Electric power steering system
(EPS) E00629200183
The
power steering system operates while the elec-
tric motor unit is running. It helps reduce the effort
needed to turn the steering wheel.
The power steering system has mechanical steering
capability in case the power assist is lost. If the pow-
er assist is lost for some reason, you will still be
able to steer your vehicle, but you will notice it
takes much more effort to steer. If this happens,
have your vehicle inspected at a MITSUBISHI
MOTORS Authorized Service Point. WARNING
l Do
not stop the electric motor unit while
the vehicle is moving. Stopping the elec-
tric motor unit would make the steering
wheel extremely hard to turn, possibly re-
sulting in an accident.
NOTE l During
repeated full-lock turning of the steer-
ing wheel (for example, while you are ma-
noeuvring the vehicle into a parking space),
a protection function may be activated to pre-
vent overheating of the power steering sys-
tem. This function will make the steering
wheel gradually harder to turn. In this event,
limit your turning of the steering wheel for a
while. When the system has cooled down,
the steering action will return to normal. l
If
you turn the steering wheel while the vehi-
cle is stationary with the headlamps on, the
headlamps may become dim. This behaviour
is not abnormal. The headlamps will return
to their original brightness after a short while.
Electric power steering system warn-
ing lamp
Type 1
Type 2 If there is a malfunction in the system, the warning
lamp will come on. Starting and driving
5-17 5
OHAE13E1
Page 138 of 258
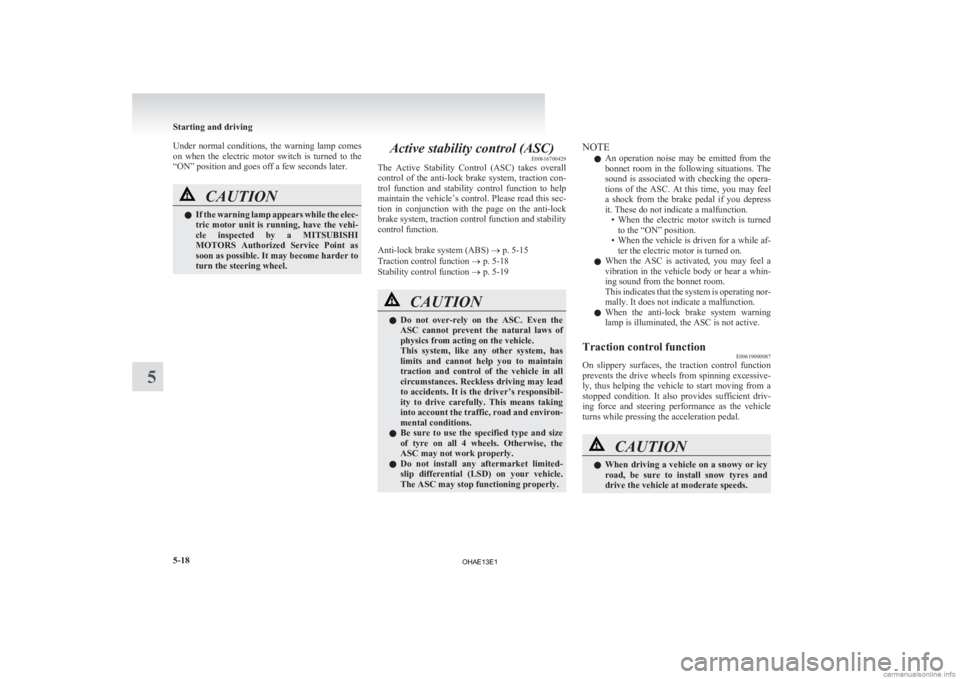
Under normal conditions, the warning lamp comes
on
when the electric motor switch is turned to the
“ON” position and goes off a few seconds later. CAUTION
l
If
the warning lamp appears while the elec-
tric motor unit is running, have the vehi-
cle inspected by a MITSUBISHI
MOTORS Authorized Service Point as
soon as possible. It may become harder to
turn the steering wheel. Active stability control (ASC)
E00616700429
The
Active Stability Control (ASC) takes overall
control of the anti-lock brake system, traction con-
trol function and stability control function to help
maintain the vehicle’s control. Please read this sec-
tion in conjunction with the page on the anti-lock
brake system, traction control function and stability
control function.
Anti-lock brake system (ABS) ® p. 5-15
Traction control function ® p. 5-18
Stability control function ® p. 5-19 CAUTION
l
Do
not over-rely on the ASC. Even the
ASC cannot prevent the natural laws of
physics from acting on the vehicle.
This system, like any other system, has
limits and cannot help you to maintain
traction and control of the vehicle in all
circumstances. Reckless driving may lead
to accidents. It is the driver’s responsibil-
ity to drive carefully. This means taking
into account the traffic, road and environ-
mental conditions.
l Be sure to use the specified type and size
of tyre on all 4 wheels. Otherwise, the
ASC may not work properly.
l Do not install any aftermarket limited-
slip differential (LSD) on your vehicle.
The ASC may stop functioning properly. NOTE
l An
operation noise may be emitted from the
bonnet room in the following situations. The
sound is associated with checking the opera-
tions of the ASC. At this time, you may feel
a shock from the brake pedal if you depress
it. These do not indicate a malfunction. • When the electric motor switch is turnedto the “ON” position.
• When the vehicle is driven for a while af- ter the electric motor is turned on.
l When the ASC is activated, you may feel a
vibration in the vehicle body or hear a whin-
ing sound from the bonnet room.
This indicates that the system is operating nor-
mally. It does not indicate a malfunction.
l When the anti-lock brake system warning
lamp is illuminated, the ASC is not active.
Traction control function E00619000087
On slippery surfaces, the traction control function
prevents
the drive wheels from spinning excessive-
ly, thus helping the vehicle to start moving from a
stopped condition. It also provides sufficient driv-
ing force and steering performance as the vehicle
turns while pressing the acceleration pedal. CAUTION
l
When
driving a vehicle on a snowy or icy
road, be sure to install snow tyres and
drive the vehicle at moderate speeds. Starting and driving
5-18
5
OHAE13E1
Page 139 of 258
Stability control function
E00619100088
The
stability control function is designed to help
the driver maintain control of the vehicle on slip-
pery roads or during rapid steering manoeuvres. It
works by controlling the electric motor unit output
and the brake on each wheel.
NOTE
l The stability control function operates at
speeds of about 15 km/h (9 mph) or higher.
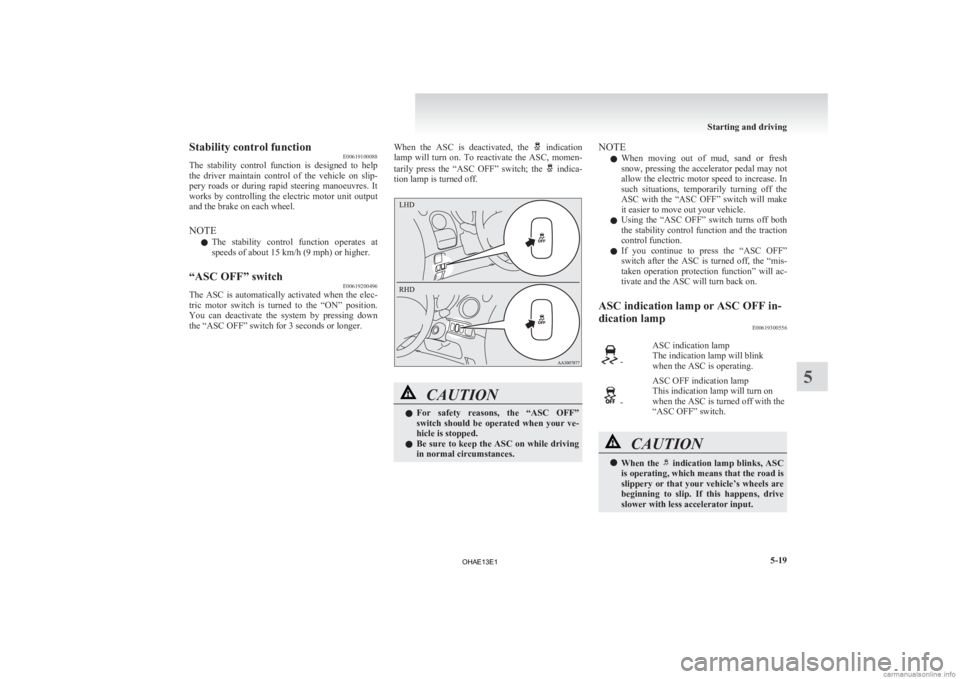
“ASC OFF” switch E00619200496
The ASC is automatically activated when the elec-
tric
motor switch is turned to the “ON” position.
You can deactivate the system by pressing down
the “ASC OFF” switch for 3 seconds or longer. When the ASC is deactivated, the indication
lamp
will turn on. To reactivate the ASC, momen-
tarily press the “ASC OFF” switch; the indica-
tion lamp is turned off. CAUTION
l
For
safety reasons, the “ASC OFF”
switch should be operated when your ve-
hicle is stopped.
l Be sure to keep the ASC on while driving
in normal circumstances. NOTE
l When
moving out of mud, sand or fresh
snow, pressing the accelerator pedal may not
allow the electric motor speed to increase. In
such situations, temporarily turning off the
ASC with the “ASC OFF” switch will make
it easier to move out your vehicle.
l Using the “ASC OFF” switch turns off both
the stability control function and the traction
control function.
l If you continue to press the “ASC OFF”
switch after the ASC is turned off, the “mis-
taken operation protection function” will ac-
tivate and the ASC will turn back on.
ASC indication lamp or ASC OFF in-
dication lamp E00619300556 -
ASC indication lamp
The indication lamp will blink
when the ASC is operating. -
ASC OFF indication lamp
This indication lamp will turn on
when the ASC is turned off with the
“ASC OFF” switch. CAUTION
l
When
the indication lamp blinks, ASC
is
operating, which means that the road is
slippery or that your vehicle’s wheels are
beginning to slip. If this happens, drive
slower with less accelerator input. Starting and driving
5-19 5
OHAE13E1
Page 140 of 258
If the indication lamp illuminates
while driving
E00631100017
If
an abnormal condition occurs in the system, the indication lamp and indication lamp will turn
on. CAUTION
l
The system may be malfunctioning.
Stop
the vehicle in a safe place, put the se-
lector lever to the “P” (PARK) position
and turn off the electric motor unit.
Restart the electric motor unit and check
whether the indication lamp goes out. If
they go out, there is no abnormal condi-
tion. If they do not go out or appear fre-
quently, it is not necessary to stop the ve-
hicle immediately, but we recommend
you to have your vehicle inspected.
Towing E00624400106CAUTION
l
When
towing the vehicle with only the
front wheels raised off the ground, do not
place the electric motor switch in the
“ON” position. Placing the electric motor
switch in the “ON” position could cause
the ASC to operate, resulting in an acci-
dent.
For details, refer to “Towing” on page
7-10. Cargo loads
E00609901413
Cargo load precautions CAUTION
l
Do
not load cargo or luggage higher than
the top of the seatback. Be sure that your
cargo or luggage cannot move once your
vehicle is moving. Having the driver’s vi-
sion blocked, and your cargo being
thrown inside the cabin if you suddenly
have to brake can cause a serious acci-
dent or injury.
l Load heavy cargo or luggage in the front
of the vehicle. If the load in the back of
the vehicle is too heavy, steering may be-
come unstable.
Loading a roof carrier CAUTION
l
Use
a roof carrier that properly fits your
vehicle. Do not load luggage directly onto
the roof.
For installation, refer to the instruction
manual accompanying the roof carrier.
l When attaching/removing the roof carri-
er and loading/removing luggage, do not
apply excessive pressure on a single point.
Depending on how and where the force is
applied, this may cause dents on the vehi-
cle roof. NOTE
l We
recommend you to use a genuine
MITSUBISHI roof carrier.
Roof carrier precautions CAUTION
l
Make
sure that the weight of the luggage
does not exceed the allowable roof load
(43 kg).
If the allowable roof load is exceeded, this
may cause damage to the vehicle.
The roof load is the total allowable load
on the roof (the weight of the roof carrier
plus the weight of luggage placed on the
roof carrier).
l When luggage is loaded onto the vehicle,
please make sure to drive slowly and
avoid excessive manoeuvres such as sud-
den braking or quick turning.
In addition, place the luggage on the car-
rier so that its weight is distributed even-
ly with the heaviest items on the bottom.
Do not load items that are wider than the
roof carrier.
The additional weight on the roof could
raise the vehicle’s centre of gravity and af-
fect vehicle handling characteristics.
As a result, driving errors or emergency
manoeuvres could lead to a loss of control
and result in an accident. Starting and driving
5-20
5
OHAE13E1
Page 163 of 258
To play from an iPod
E00756300385
1. Press
the POWER button to turn on the au-
dio system. The system turns on in the last
mode used.
2. Connect your iPod to the USB input terminal. Refer to “How to connect an iPod” on page
6-34.
3. Press the CD button to switch to the iPod mode. The mode changes every time the CD
button is pressed.
CD mode → iPod mode → CD mode
The iPod indicator is illuminated and then
the iPod mode will be activated.
4. Once the device is selected, playback starts
and indicator appears on the display.
NOTE l Depending
on the condition of your iPod, it
may take a longer time before the playback
starts.
5. To stop the playback, change over to a differ- ent mode.
NOTE l Buttons on the iPod are disabled while the
iPod is connected to the audio system.
l To adjust the volume and tone, refer to “To
adjust the volume” and “To adjust the tone”.
To fast-forward/reverse the track E00756400126
Fast-forward
To
fast-forward the current track, press the
TRACK button. While the button is pressed,
the track will be fast-forwarded. Fast-reverse
To
fast-reverse the current track, press the TRACK button. While the button is pressed, the track
will be fast-reversed.
To select a desired track E00756500101
Track up
Press
the TRACK button repeatedly until the de-
sired track number appears on the display.
Track down
Press
the TRACK button repeatedly until the de-
sired track number appears on the display.
NOTE
l Pressing
the TRACK button once during
the
song will cause the audio system to re-
start playback from the beginning of the song.
To find a track from the iPod menu E00756600199
You can select desired tracks from the “Playlists”,
“Artists”,
“Albums” or “Songs” menus on your iPod.
Operate the following buttons or knob to select de-
sired tracks.
When this mode is activated by pressing the but-
ton,
the SEL indicator will be displayed in the dis-
play. button
: Press the button to start this
mode or cancel the selection.
SELECT knob : Turn the knob to show the menu or category or track. button
: Press the button to select the
menu or category or track. NOTE
l If
no operation is performed for 10 seconds
or more or other button is operated after the
SELECT knob has been pressed, searching
of the desired tracks is cancelled.
l If no operation is performed for 5 seconds or
more after the track is displayed, playback
starts.
l If the button is pressed when the category
is
delected, playback of the first tracks in the
selected category starts.
l When the SEL indicator is not shown on the
display and the SELECT knob is operated,
the volume adjustment is effective.
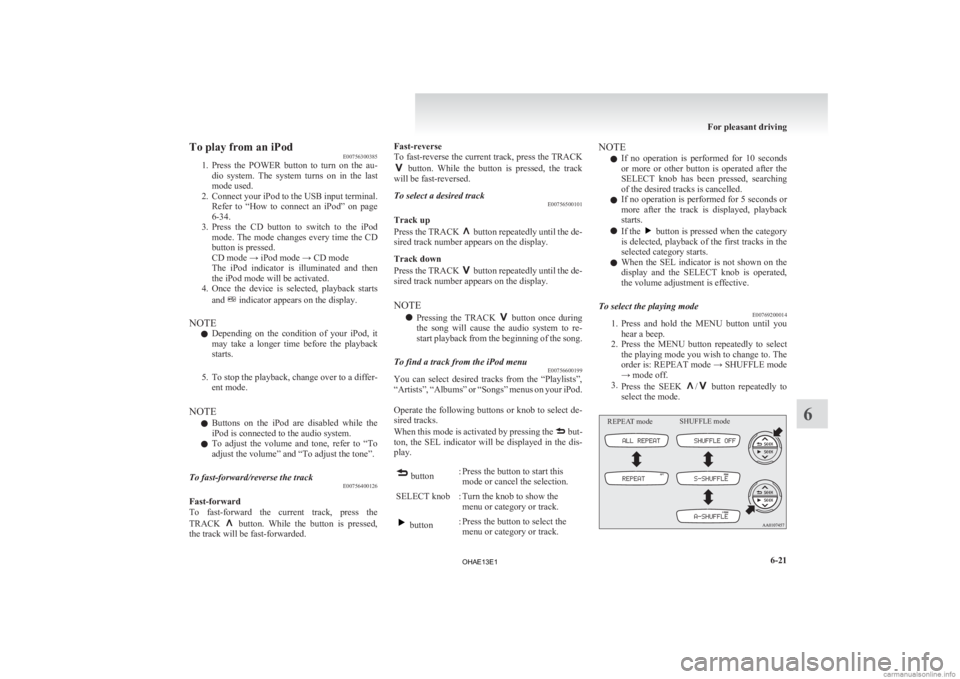
To select the playing mode E00769200014
1. Press
and hold the MENU button until you
hear a beep.
2. Press the MENU button repeatedly to select the playing mode you wish to change to. The
order is: REPEAT mode → SHUFFLE mode
→ mode off.
3. Press the SEEK / button repeatedly to
select the mode.
REPEAT mode SHUFFLE mode For pleasant driving
6-21 6
OHAE13E1
Page 165 of 258
To play from a USB memory device
E00762500379
1. Press
the POWER button to turn on the au-
dio system. The system turns on in the last
mode used.
2. Connect your USB memory device to the USB input terminal.
Refer to “How to connect a USB memory de-
vice” on page 6-33.
3. Press the CD button to switch to the USB mode. The mode changes as follows every
time the CD button is pressed.
CD mode → USB mode → CD mode
The USB indicator is illuminated and then
the USB mode will be activated.
4. Once the device is selected, playback starts and the indicator appears on the display.
NOTE l Depending on the condition of your USB de-
vice, it may take a longer time before the play-
back starts.
5. To stop the playback, change over to a differ- ent mode.
NOTE l To adjust the volume and tone, refer to “To
adjust the volume” and “To adjust the tone”.
Supported compressed music files E00758300376
This audio can play MP3, WMA, AAC and WAV
files
recorded in a USB memory device. This audio
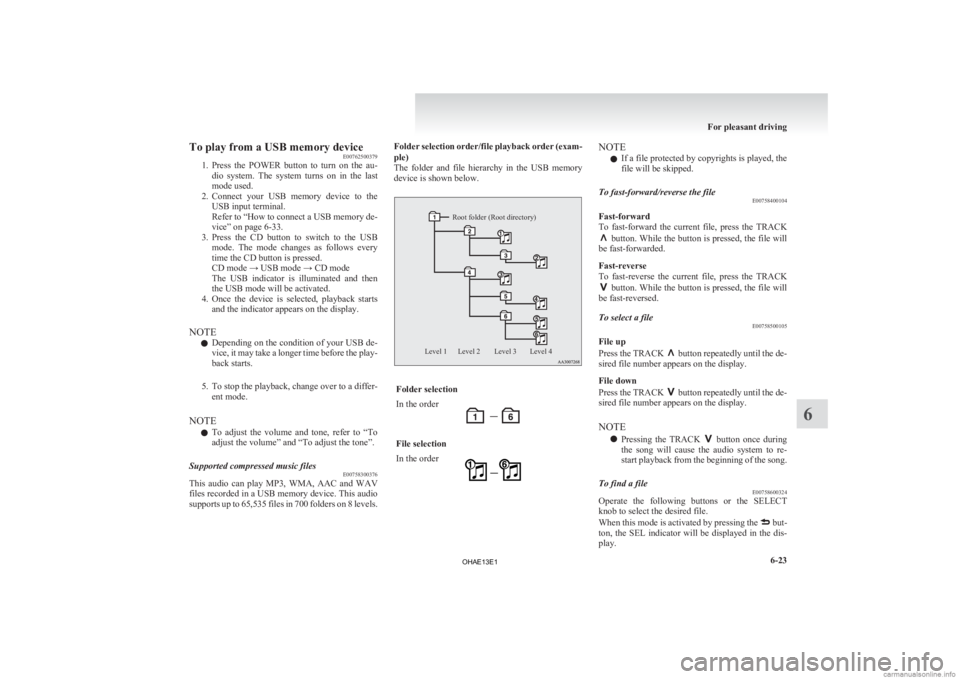
supports up to 65,535 files in 700 folders on 8 levels. Folder selection order/file playback order (exam-
ple)
The
folder and file hierarchy in the USB memory
device is shown below.
Root folder (Root directory)
Level 4
Level 3
Level 2
Level 1 Folder selection
In the order
File selection
In the order NOTE
l If a file protected by copyrights is played, the
file will be skipped.
To fast-forward/reverse the file E00758400104
Fast-forward
To fast-forward the current file, press the TRACK button. While the button is pressed, the file will
be fast-forwarded.
Fast-reverse
To
fast-reverse the current file, press the TRACK button. While the button is pressed, the file will
be fast-reversed.
To select a file E00758500105
File up
Press
the TRACK button repeatedly until the de-
sired file number appears on the display.
File down
Press
the TRACK button repeatedly until the de-
sired file number appears on the display.
NOTE
l Pressing
the TRACK button once during
the
song will cause the audio system to re-
start playback from the beginning of the song.
To find a file E00758600324
Operate the following buttons or the SELECT
knob to select the desired file.
When
this mode is activated by pressing the but-
ton,
the SEL indicator will be displayed in the dis-
play. For pleasant driving
6-23 6
OHAE13E1
Page 171 of 258
Handling of compact discs
E00723000441
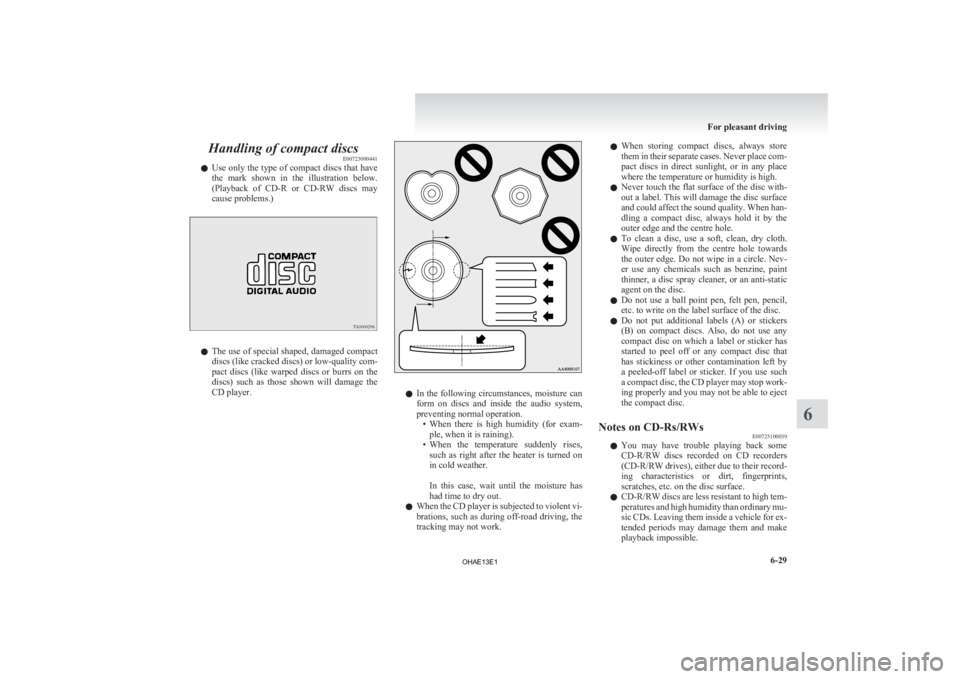
l Use
only the type of compact discs that have
the mark shown in the illustration below.
(Playback of CD-R or CD-RW discs may
cause problems.) l
The
use of special shaped, damaged compact
discs (like cracked discs) or low-quality com-
pact discs (like warped discs or burrs on the
discs) such as those shown will damage the
CD player. l
In
the following circumstances, moisture can
form on discs and inside the audio system,
preventing normal operation. • When there is high humidity (for exam-ple, when it is raining).
• When the temperature suddenly rises, such as right after the heater is turned on
in cold weather.
In this case, wait until the moisture has
had time to dry out.
l When the CD player is subjected to violent vi-
brations, such as during off-road driving, the
tracking may not work. l
When
storing compact discs, always store
them in their separate cases. Never place com-
pact discs in direct sunlight, or in any place
where the temperature or humidity is high.
l Never touch the flat surface of the disc with-
out a label. This will damage the disc surface
and could affect the sound quality. When han-
dling a compact disc, always hold it by the
outer edge and the centre hole.
l To clean a disc, use a soft, clean, dry cloth.
Wipe directly from the centre hole towards
the outer edge. Do not wipe in a circle. Nev-
er use any chemicals such as benzine, paint
thinner, a disc spray cleaner, or an anti-static
agent on the disc.
l Do not use a ball point pen, felt pen, pencil,
etc. to write on the label surface of the disc.
l Do not put additional labels (A) or stickers
(B) on compact discs. Also, do not use any
compact disc on which a label or sticker has
started to peel off or any compact disc that
has stickiness or other contamination left by
a peeled-off label or sticker. If you use such
a compact disc, the CD player may stop work-
ing properly and you may not be able to eject
the compact disc.
Notes on CD-Rs/RWs E00725100039
l You
may have trouble playing back some
CD-R/RW discs recorded on CD recorders
(CD-R/RW drives), either due to their record-
ing characteristics or dirt, fingerprints,
scratches, etc. on the disc surface.
l CD-R/RW discs are less resistant to high tem-
peratures and high humidity than ordinary mu-
sic CDs. Leaving them inside a vehicle for ex-
tended periods may damage them and make
playback impossible. For pleasant driving
6-29 6
OHAE13E1
Page 187 of 258
WARNING
l If electrolyte fluid is not visible, or ap-
pears to be frozen, Do Not Attempt Jump
Starting!
A battery might rupture or explode if the
temperature is below the freezing point
or if it is not filled to the proper level.
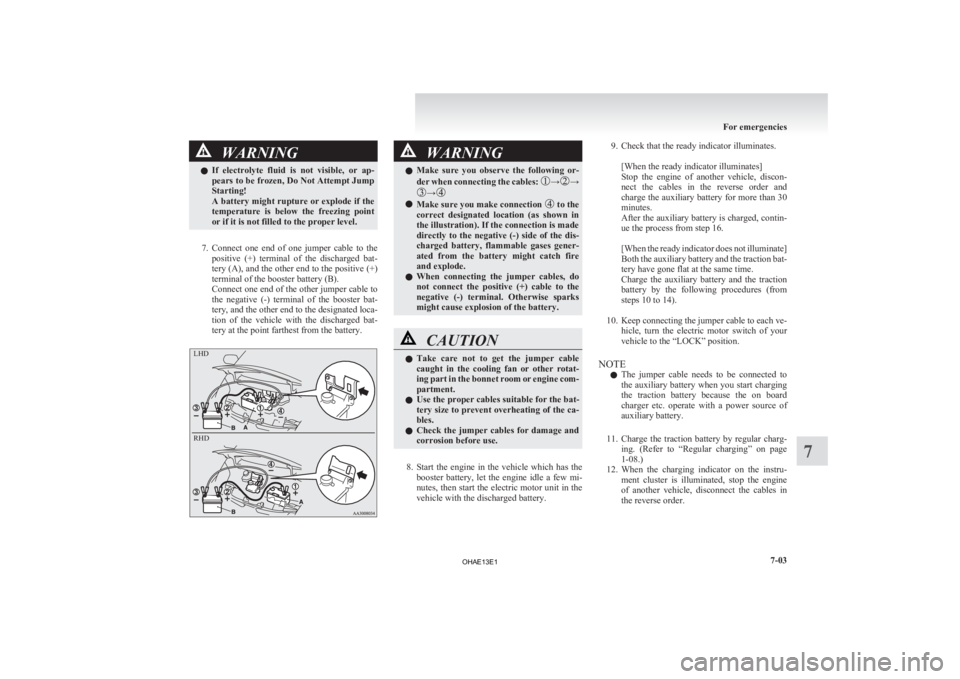
7. Connect
one end of one jumper cable to the positive (+) terminal of the discharged bat-
tery (A), and the other end to the positive (+)
terminal of the booster battery (B).
Connect one end of the other jumper cable to
the negative (-) terminal of the booster bat-
tery, and the other end to the designated loca-
tion of the vehicle with the discharged bat-
tery at the point farthest from the battery. WARNING
l Make
sure you observe the following or-
der when connecting the cables: → →
→
l
Make sure you make connection to the
correct
designated location (as shown in
the illustration). If the connection is made
directly to the negative (-) side of the dis-
charged battery, flammable gases gener-
ated from the battery might catch fire
and explode.
l When connecting the jumper cables, do
not connect the positive (+) cable to the
negative (-) terminal. Otherwise sparks
might cause explosion of the battery. CAUTION
l
Take
care not to get the jumper cable
caught in the cooling fan or other rotat-
ing part in the bonnet room or engine com-
partment.
l Use the proper cables suitable for the bat-
tery size to prevent overheating of the ca-
bles.
l Check the jumper cables for damage and
corrosion before use.
8. Start
the engine in the vehicle which has the booster battery, let the engine idle a few mi-
nutes, then start the electric motor unit in the
vehicle with the discharged battery.
9. Check that the ready indicator illuminates.
[When the ready indicator illuminates]
Stop
the engine of another vehicle, discon-
nect the cables in the reverse order and
charge the auxiliary battery for more than 30
minutes.
After the auxiliary battery is charged, contin-
ue the process from step 16.
[When the ready indicator does not illuminate]
Both the auxiliary battery and the traction bat-
tery have gone flat at the same time.
Charge the auxiliary battery and the traction
battery by the following procedures (from
steps 10 to 14).
10. Keep connecting the jumper cable to each ve- hicle, turn the electric motor switch of your
vehicle to the “LOCK” position.
NOTE l The jumper cable needs to be connected to
the auxiliary battery when you start charging
the traction battery because the on board
charger etc. operate with a power source of
auxiliary battery.
11. Charge the traction battery by regular charg- ing. (Refer to “Regular charging” on page
1-08.)
12. When the charging indicator on the instru- ment cluster is illuminated, stop the engine
of another vehicle, disconnect the cables in
the reverse order. For emergencies
7-03 7 LHD
RHD
OHAE13E1
Page 193 of 258
CAUTION
l
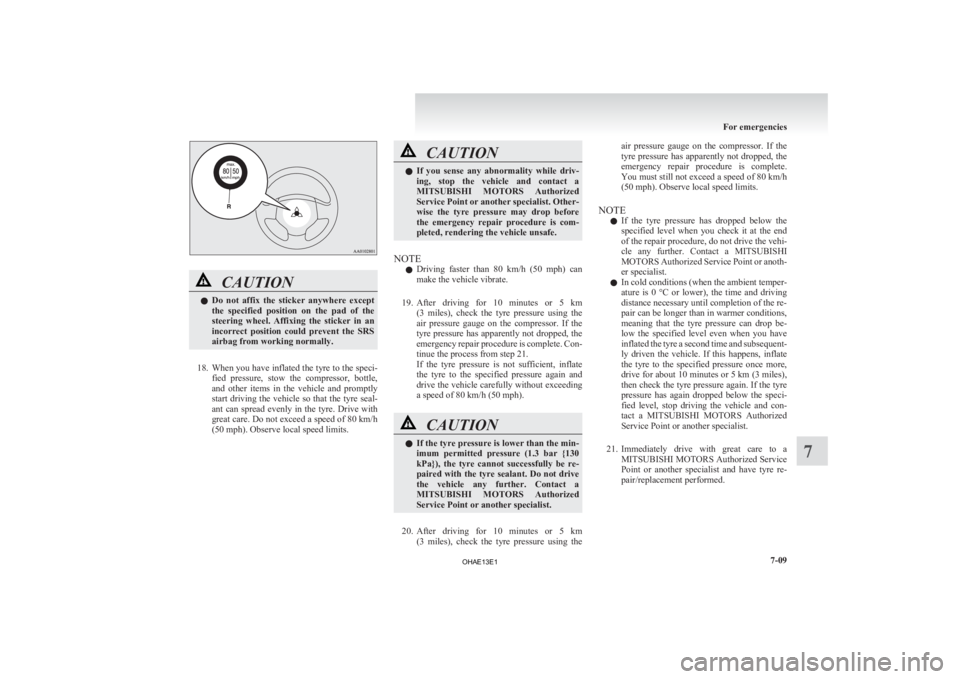
Do not affix the sticker anywhere except
the specified position on the pad of the
steering wheel. Affixing the sticker in an
incorrect position could prevent the SRS
airbag from working normally.
18. When
you have inflated the tyre to the speci- fied pressure, stow the compressor, bottle,
and other items in the vehicle and promptly
start driving the vehicle so that the tyre seal-
ant can spread evenly in the tyre. Drive with
great care. Do not exceed a speed of 80 km/h
(50 mph). Observe local speed limits. CAUTION
l
If
you sense any abnormality while driv-
ing, stop the vehicle and contact a
MITSUBISHI MOTORS Authorized
Service Point or another specialist. Other-
wise the tyre pressure may drop before
the emergency repair procedure is com-
pleted, rendering the vehicle unsafe.
NOTE l Driving
faster than 80 km/h (50 mph) can
make the vehicle vibrate.
19. After driving for 10 minutes or 5 km (3 miles), check the tyre pressure using the
air pressure gauge on the compressor. If the
tyre pressure has apparently not dropped, the
emergency repair procedure is complete. Con-
tinue the process from step 21.
If the tyre pressure is not sufficient, inflate
the tyre to the specified pressure again and
drive the vehicle carefully without exceeding
a speed of 80 km/h (50 mph). CAUTION
l
If
the tyre pressure is lower than the min-
imum permitted pressure (1.3 bar {130
kPa}), the tyre cannot successfully be re-
paired with the tyre sealant. Do not drive
the vehicle any further. Contact a
MITSUBISHI MOTORS Authorized
Service Point or another specialist.
20. After
driving for 10 minutes or 5 km (3 miles), check the tyre pressure using the air pressure gauge on the compressor. If the
tyre
pressure has apparently not dropped, the
emergency repair procedure is complete.
You must still not exceed a speed of 80 km/h
(50 mph). Observe local speed limits.
NOTE l If the tyre pressure has dropped below the
specified level when you check it at the end
of the repair procedure, do not drive the vehi-
cle any further. Contact a MITSUBISHI
MOTORS Authorized Service Point or anoth-
er specialist.
l In cold conditions (when the ambient temper-
ature is 0 °C or lower), the time and driving
distance necessary until completion of the re-
pair can be longer than in warmer conditions,
meaning that the tyre pressure can drop be-
low the specified level even when you have
inflated the tyre a second time and subsequent-
ly driven the vehicle. If this happens, inflate
the tyre to the specified pressure once more,
drive for about 10 minutes or 5 km (3 miles),
then check the tyre pressure again. If the tyre
pressure has again dropped below the speci-
fied level, stop driving the vehicle and con-
tact a MITSUBISHI MOTORS Authorized
Service Point or another specialist.
21. Immediately drive with great care to a MITSUBISHI MOTORS Authorized Service
Point or another specialist and have tyre re-
pair/replacement performed. For emergencies
7-09 7
OHAE13E1
Page 196 of 258
NOTE
l Using
any part other than the designated tow-
ing hook (A) could result in damage to the ve-
hicle body.
l Using a wire rope or metal chain can result
in damage to the vehicle body. It is best to
use a non-metallic rope. If you use a wire
rope or metal chain, wrap it with cloth at any
point where it touches the vehicle body.
l Take care that the tow rope is kept as horizon-
tal as possible. An angled tow rope can dam-
age the vehicle body.
2. Start the electric motor unit. CAUTION
l
If
the vehicle is towed with the electric mo-
tor switch in the “ON” position without
starting the electric motor unit, the auxili-
ary battery may be flat during towing. In
this case, the brake performance may be
very poor. Steering is also very heavy.
l Do not leave the electric motor switch in
the “LOCK” position. The steering wheel
will lock, causing loss of control.
3. Place
the selector lever in the “N” (NEU- TRAL) position.
4. Turn on the hazard warning lamps if required by law. (Follow the local driving laws and
regulations.)
5. During towing make sure that close contact is maintained between the drivers of both ve-
hicles, and that the vehicles travel at low
speed. CAUTION
l
The
person in the vehicle being towed
must pay attention to the brake lamps of
the towing vehicle and make sure the
rope never becomes slack.
l Avoid sudden braking, sudden accelera-
tion and sharp turning; such operation
could cause damage to the towing hooks
or the tow rope.
People in the vicinity could be injured as
a result.
l When towing or being towed down a long
slope, the brakes may overheat reducing
the effectiveness. In this situation, have
your vehicle transported by a tow truck.
l When the vehicle is to be towed by anoth-
er vehicle with all wheels on the ground,
make sure that the towing speed and dis-
tance given below are never exceeded,
causing damage to the transmission.
Towing speed: 30 km/h (19 mph)
Towing distance: 30 km (19 miles)
For the towing speed and the towing dis-
tance, follow the local driving laws and
regulations.
Towing another vehicle
Your
vehicle cannot be used to tow another vehicle. Operation under adverse driving
conditions E00801702717
On a flooded road l Do
not drive on a flooded road. If you drive
on a flooded road, not only the electric motor
unit stops but also a failure like electric leak-
age or short circuit may occur.
If you inevitably had to run on a flooded
road and the vehicle was exposed to water,
be sure to have your vehicle inspected by a
MITSUBISHI MOTORS Authorized Service
Point.
l If there is water on the brakes after driving
through puddles or washing the vehicle, re-
sulting in temporarily ineffective brakes. In
such cases, lightly depress the brake pedal to
see if the brakes operate properly. If they do
not, lightly depress the pedal several times
while driving in order to dry the brake pads.
l When driving in rain or on a road with many
puddles a layer of water may form between
the tyres and the road surface.
This reduces a tyre’s frictional resistance on
the road, resulting in loss of steering stability
and braking capability.
To cope with this, observe the following items:
(a) Drive your vehicle at slow speed.
(b) Do not drive on worn tyres.
(c) Always maintain the specified tyre inflation pressures.For emergencies
7-12
7
OHAE13E1