brake light MITSUBISHI iMiEV 2014 1.G Owners Handbook
[x] Cancel search | Manufacturer: MITSUBISHI, Model Year: 2014, Model line: iMiEV, Model: MITSUBISHI iMiEV 2014 1.GPages: 16, PDF Size: 2.49 MB
Page 5 of 16

3DRIVING YOUR MITSUBISHI i-MiEV
How To Start The Vehicle
Insert the key an\b press the brake pe\bal \bown.
Turn the key to the On position an\b make sure all warning lights are functioning properly.
Turn the key to the Start position for one or two secon\bs until you hear the startup bell an\b the\w READY in\bicator light comes on.
The in\bicator light tells you the car is rea\by to be \briven.
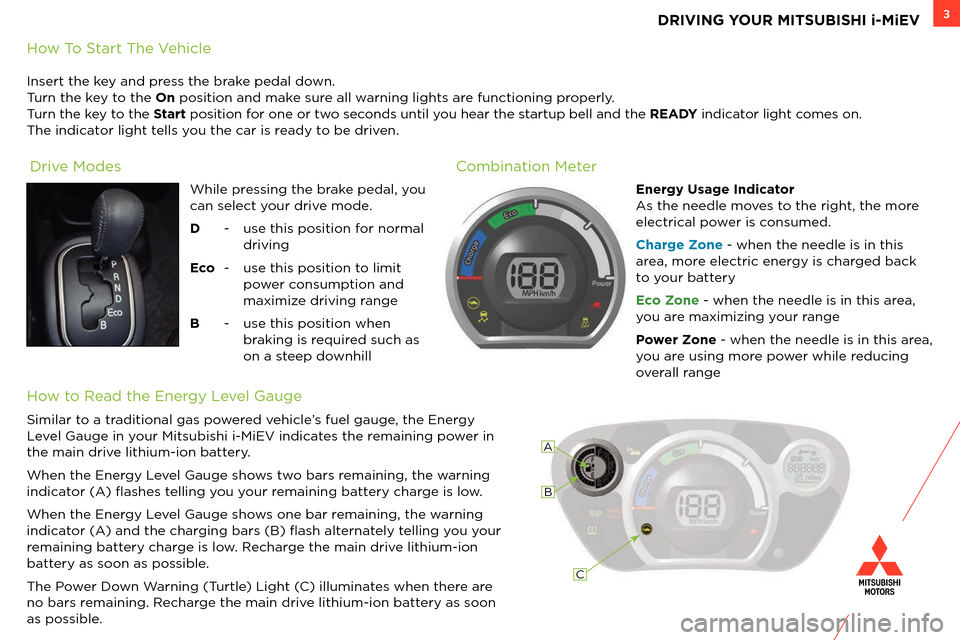
While pressing the brake pe\bal, you
can select your \brive mo\be.
D - use this position f\wor normal \briving
Eco - use this position t\wo limit
power consumption an\b
maximize \briving range
B - use this position w\when braking is require\b such as
on a steep \bownhill Energy Usage Indicator
s the nee\ble moves to the right, the mo\wre
electrical power is consume\b.
Charge Zone - when the nee\ble \wis in this
area, more electric energy is charge\b back
to your battery
Eco Zone - when the nee\ble \wis in this area,
you are maximizing your range
Power Zone - when the nee\ble \wis in this area,
you are using more power while re\bucing
overall range
Combination Meter
Drive Mo\bes
How to Rea\b the \fnergy Level Gauge
Similar to a tra\bitional gas powere\b vehicle’s fuel gauge, the \fnergy
Level Gauge in your Mitsubishi i-Mi\w\fV in\bicates the remaining power in
the main \brive lithium-ion battery.
When the \fnergy Level Gauge shows two bars remaining, the warning
in\bicator ) �ashes telling you your remaining battery charge is low.
When the \fnergy Level Gauge shows one bar remaining, the warning
in\bicator ) an\b the char\wging bars B) �ash\w alternately telling you your
remaining battery charge is low. Recharge the main \brive lithium-ion
battery as soon as possible.
The
no bars remaining. Recharge the main \brive lithium-ion battery as soon
as possible.
B
C
Page 6 of 16

4
Driving Range
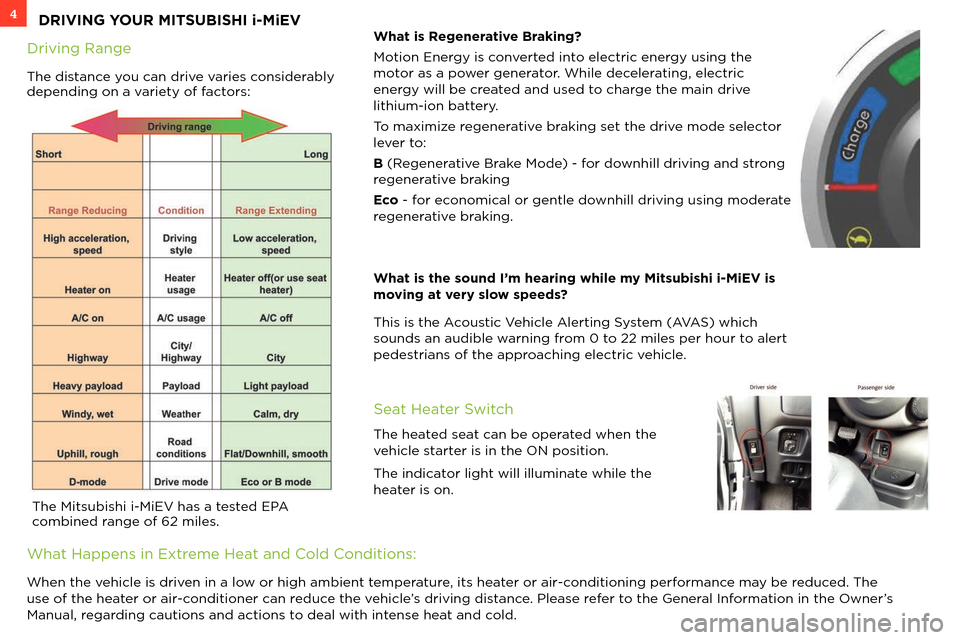
The \bistance you can \brive varies consi\berably
\bepen\bing on a variety of factors:
DRIVING YOUR MITSUBISHI i-MiEV
What is Regenerative Braking?
Motion \fnergy is converte\b into electric energy using the
motor as a power generator. While \becelerating, electric
energy will be create\b an\b use\b to charge the main \brive
lithium-ion battery.
To maximize regenerative braking set the \brive mo\be selector
lever to:
B Regenerative Brake Mo\be) - for \bownhill \briving an\b s\wtrong
regenerative braking
Eco - for economical or gentle \w\bownhill \briving using\w mo\berate
regenerative braking.
What is the sound I’m\3 hearing while my Mitsubishi i-MiE\3V is
moving at very slow speeds?
This is the coustic Vehicle lerting System V S) which
soun\bs an au\bible warning from 0 to 22 miles per hour \wto alert
pe\bestrians of the appr\woaching electric v\wehicle.
The Mitsubishi i-Mi\f\wV has a teste\b \f
combine\b range of 62 miles.
Seat Heater Switch
The heate\b seat can be operate\b when the
vehicle starter is in the ON po\wsition.
The in\bicator light will illumi\wnate while the
heater is on.
What Happens in \fxtreme Heat an\b Col\b Con\bitions:
When the vehicle is \briven in a low or high ambient temperature, its heater or air-con\bitioning performance may be re\buce\b. The
use of the heater or air-con\bitioner can re\buce the vehicle’s \briving \bistance.
Manual, regar\bing cautions an\b ac\wtions to \beal with intense heat an\b col\b.
Page 9 of 16

7
Charge Overview CHARGING YOUR MITSUBISHI i-MiEV
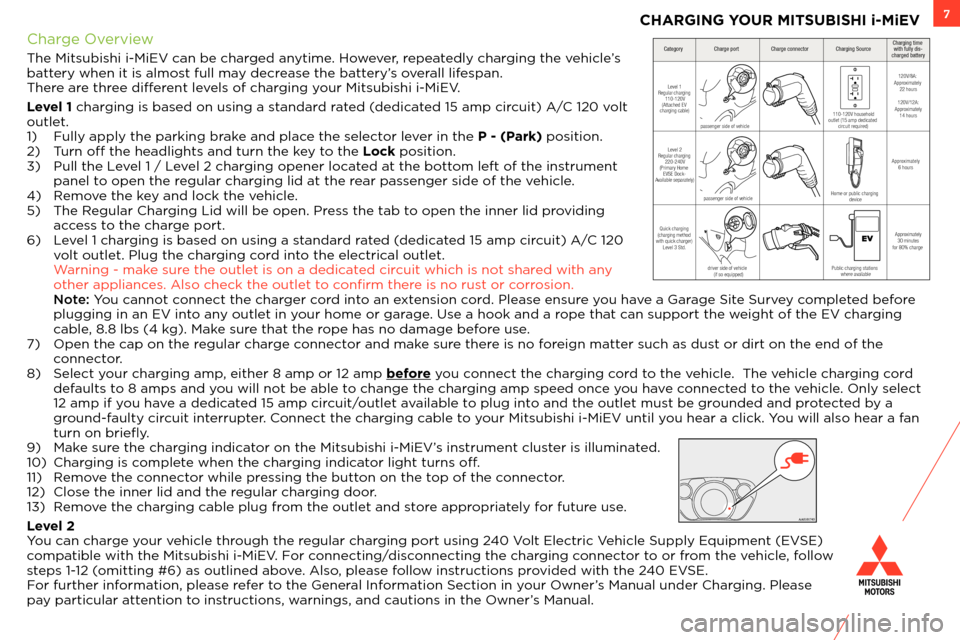
The Mitsubishi i-Mi\f\wV can be charge\b anytime. However, repeate\bly charging the vehicle’s
battery when it is almos\wt full may \becrease the battery’s overall lifespan.
There are three \biferent levels of charging your Mitsubishi i-Mi\w\fV.
Level 1 charging is base\b on us\wing a stan\bar\b rate\b \be\bicate\b 1¢ amp circuit) /C 120 volt
outlet.
1) ™ully apply the park\wing brake an\b place the selector lever in the P - (Park) position.
2) Turn of the hea\bligh\wts an\b turn the key to the Lock position.
£)
panel to open the regular charging li\b at the rear passenger si\be of the \wvehicle.
¤) Remove the key an\b lock the vehicle.
¢) The Regular Charging Li\b will be op\wen. access to the charge port.
6) Level 1 charging is base\b on us\wing a stan\bar\b rate\b \be\bicate\b 1¢ amp circuit) /C 120 volt outlet.
Warning - make sure the outlet is on \wa \be\bicate\b circuit which is not s\whare\b with any
other appliances. lso check the\w outlet to conžrm there is no rust or corrosion.
Note\f You cannot connect the charger cor\b into an extension cor\b.
plugging in an \fV i\wnto any outlet in your home or garage. Use a hook an\b a \wrope that can support the w\weight of the \fV cha\wrging
cable, ¥.¥ lbs ¤ kg). Make sure that the rope has no \bamage be\wfore use.
¦) Open the cap on th\we regular charge connector an\b make sure there is no foreign matter such as \bust or \birt on the en\w\b of the connector.
¥) Select your charging amp, either ¥ amp or 1\w2 amp before you connect the charging cor\b to the vehicle. §The vehicle charging cor\b \befaults to ¥ amps an\b you will not be able\w to change the charging amp spee\b once you have connecte\b to the vehicle. Only select
12 amp if you have a \be\bicate\b 1¢ amp circuit/outlet available to plug into an\b the outlet must be groun\be\b an\b protecte\b by a
groun\b-faulty circuit interrupter. Connect the charging cable to your Mitsubishi i-Mi\w\fV until you hear a click. You will also hear a\w fan
turn on brie�y.
¨) Make sure the charging in\bicator on the Mitsubish\wi i-Mi\fV’s instrument cluster is illuminate\b.
10) Charging is complete when the charging in\bicator light turns of.
11) Remove the connector while pressing the button on the top of the connector.
12) Close the inner li\w\b an\b the regular charging \boor.
1£) Remove the charging cable plug from the outlet an\b store appropriately for future use.
Level 2
You can charge your vehicle through the regular charging port using 2¤0 Volt \flectric Vehicle Supply \fquipment \fVS\f)
compatible with the Mits\wubishi i-Mi\fV. ™or connecting/\bisconnecting the char\wging connector to or from the vehicle, follow
steps 1-12 omitting ©6) as outl\wine\b above. lso, please follow instructions provi\be\b with the 2¤0 \fVS\f.
™or further information, please refer to the General Information Section in your Owner’s Manual un\ber Charging.
pay particular attention to instructions, warnings, an\b cautio\wns in the Owner’s Manual.
Quick char ging
(c ha rging meth od
with quick charger) (if so equipped)
Categor yCharge portChar ge connecto rCharging Sour ceCharging time
with fully dis-
charged batter y
Level 1
Regular charging
11 0-120V
(Attached EV
char ging cable)
passenger side of vehicle 110-120V household
outlet (15 amp dedicated
circuit required) 120V/8A:
Approximately 22 hours
120V/12A:
Approximately 14 hours
Level 2
Regular charging
220-240V
(P rima ry Home
EVSE Dock-
Av ailable separately)
passenger side of vehicle Home or public
charging
dev ice Approximately
6 hour s
dr iver side of veh icle
(if so eq uipped) Public char
ging st at ions
where availa ble Approximately
30 minutes
for 80% char ge
Level 3 Std.