change time MITSUBISHI iMiEV 2015 Owner's Manual (in English)
[x] Cancel search | Manufacturer: MITSUBISHI, Model Year: 2015, Model line: iMiEV, Model: MITSUBISHI iMiEV 2015Pages: 262, PDF Size: 26.84 MB
Page 1 of 262
N09200102068
Thank you for buying a Mitsubishi i-MiEV powered by MiEV (Mitsubishi innovative Elec
tric Vehicle) technology.
We are confident you will enjoy your
vehicle. It has
been engineered
for optimum performance, durability and comfort. By thoroughly reading this Owner’s Manual, you w
ill gain an understanding of the
many features that are included in the i-MiEV. The Owner’s Manualcontains descriptions a
nd illustrations that will
assist in the operation
and maintenance of your vehicle. A Certified i-MiEV
Dealer will be happy to a
ssist you with any further
questions you may have regardin
g the operation of your vehicle.
Please note that this manual applies to all i-MiEV models and explains all features including options. Some
features explained in this manual
may not be installed on your vehicle. Please leave this Owner’s Manual in the vehicle at the time of resale. The next owner will appreciate ha
ving access to the information con-
tained here. This manual includes instructions fo
r standard and optional equipment
available at the time of printing. Mitsubishi Motors Corporation reserves the right to make changes
in design and specifications and to
make additions or improvements in
its product without assuming any
obligation to install these on pr
eviously manufac
tured products.
Introduction
Throughout this manual the words
WARNING
and
CAUTION
appear. These are reminders to be especially careful. Failure to follow the instructions could result in persona
l injury or damage to your vehi-
cle. Indicates a strong possibility of se
vere personal injury or death if
instructions are not followed. Points out hazards or unsafe practices that could cause minor personal injury
or damage to your vehicle.
You will see another important symbol: NOTE Gives helpful information.
WA R N I N G Certain fluids contained in vehicl
es and certain pr
oducts of compo-
nent wear contain or emit chemic
als known to the State of Califor-
nia to cause cancer and birth defects or other reproductive harm.
©2014 Mitsubishi Motors Corporatio
n Printed in Japan
BK0209800US.book 1 ページ 2014年1月14日 火曜日 午前9時26分
Page 48 of 262
MiEV Remote System
General information/Charging 3-33
3
N01203501044
NOTE
The MiEV Remote system uses radio waves. The MiEV Remote can operate withinapproximately 328 feet (100 m) from thevehicle. In the following environments or situations, the MiEV Remote may not transmit andreceive radio waves correctly. As a result, the remote may not
operate properly.
• When the vehicle a
nd the MiEV Remote
are separated by a
concrete wall.
• When there is a metal wall between the vehicle and the MiEV Remote. • When the vehicle is surrounded by other tall vehicles. • When the vehicle and/or the MiEV Remote is near a facility
emitting strong radio
waves, such as a television tower, a trans-former substation, a
broadcasting station or
an airport. • When other electrical equipment such as computers or cell-phones are placed near the MiEV Remote. • When the MiEV Remote touches some- thing metallic, or is
covered by a metal
object. • When batteries for the MiEV Remote are weak.
Melody and buzzer from the MiEV Remote can be turned on or off. Refer to “To turn on/
off melody and buzzer”
on page 3-45.
The transmitter signal will reach further when the antenna of the MiEV Remote isfully extended and held upright. The onboard antenna is printed on the right side delta glass
of the vehicle.
When the MiEV Remote is not used for more than 30 seconds, the MiEV Remote willautomatically turn off. Some charge facilities
have a timer function
which turns the power supply on and off automatically. When using a charge facility with this timer function, please adjust thecharging time set by the MiEV Remote to be consistent with the timer used by the charg- ing facility. When you need additional MiEV Remotes, please contact a certif
ied i-MiEV dealer. Up
to four MiEV Remotes
can be used per vehi-
cle.NOTE
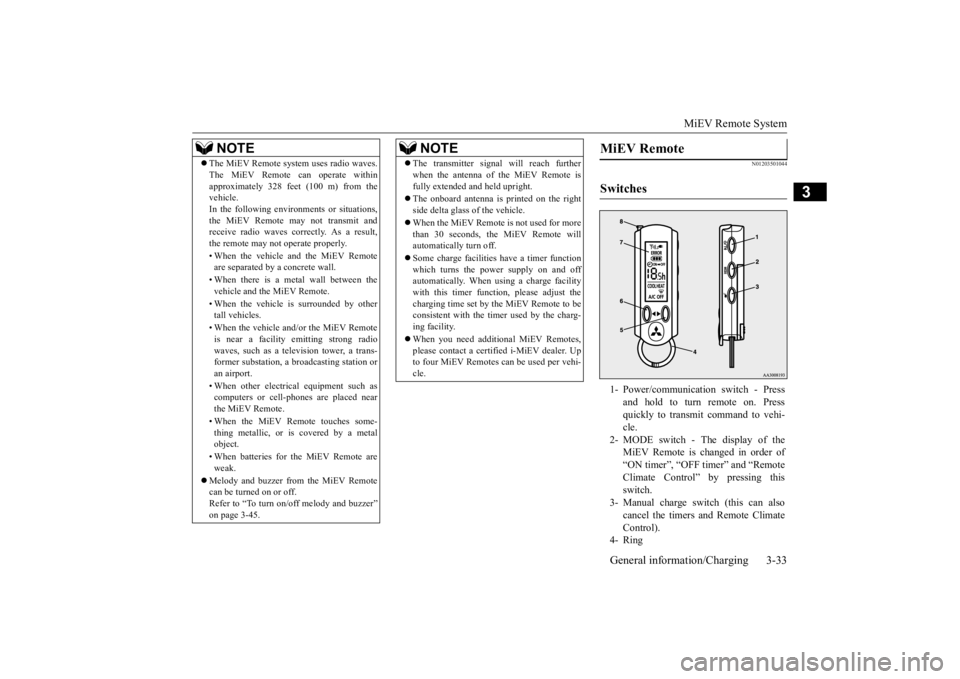
MiEV Remote Switches 1- Power/communication switch - Press
and hold to turn remote on. Pressquickly to transmit command to vehi- cle.
2- MODE switch - The display of the
MiEV Remote is changed in order of “ON timer”, “OFF timer” and “Remote Climate Control” by pressing thisswitch.
3- Manual charge switch (this can also
cancel the timers and Remote Climate Control).
4- Ring
BK0209800US.book 33 ページ 2014年1月14日 火曜日 午前9時26分
Page 53 of 262
MiEV Remote System 3-38 General information/Charging
3
N01205100018
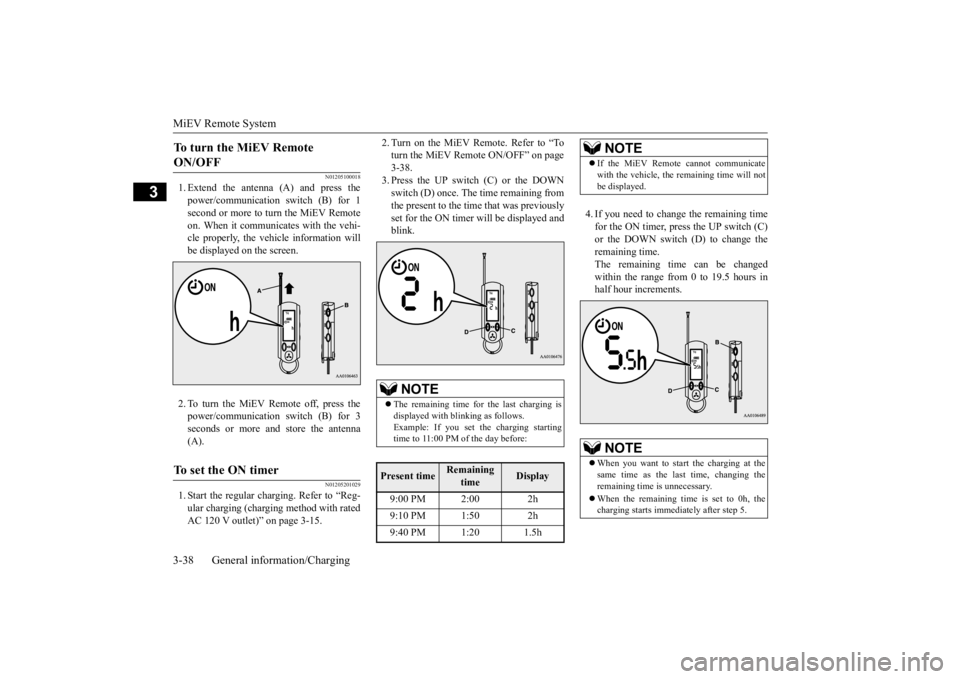
1. Extend the antenna (A) and press the power/communication switch (B) for 1 second or more to turn the MiEV Remote on. When it communicates with the vehi-cle properly, the vehicle information will be displayed on the screen. 2. To turn the MiEV Remote off, press the power/communication switch (B) for 3 seconds or more and store the antenna (A).
N01205201029
1. Start the regular charging. Refer to “Reg-ular charging (chargi
ng method with rated
AC 120 V outlet)” on page 3-15.
2. Turn on the MiEV Remote. Refer to “To turn the MiEV Remote ON/OFF” on page3-38. 3. Press the UP switch (C) or the DOWN switch (D) once. The time remaining fromthe present to the time that was previously set for the ON timer will be displayed and blink.
4. If you need to change the remaining time for the ON timer, press the UP switch (C) or the DOWN switch (D) to change the remaining time.The remaining time can be changed within the range from 0 to 19.5 hours in half hour increments.
To turn the MiEV Remote ON/OFF To set the ON timer
NOTE
The remaining time for the last charging is displayed with blinking as follows. Example: If you set the charging starting time to 11:00 PM of the day before:
Present time
Remaining
time
Display
9:00 PM 2:00 2h 9:10 PM 1:50 2h 9:40 PM 1:20 1.5h
NOTE
If the MiEV Remote
cannot communicate
with the vehicle, the remaining time will notbe displayed.NOTE
When you want to start the charging at the same time as the last time, changing the remaining time is unnecessary. When the remaining time is set to 0h, the charging starts immediately after step 5.
BK0209800US.book 38 ページ 2014年1月14日 火曜日 午前9時26分
Page 54 of 262
MiEV Remote System
General information/Charging 3-39
3
5. Press the power/c
ommunication switch
(B) for less than 1 second to send the set-ting data to the vehicle. The MiEV Remote will sound melodies on transmission and reception.
6. To turn off the MiEV Remote, refer to “To turn the MiEV Remote ON/OFF” onpage 3-38.
N01206000014
1. Turn on the MiEV Remote. Refer to “To turn the MiEV Remote ON/OFF” on page 3-38.
NOTE
The melodies can be turned off. Refer to “To turn on/off melody and buzzer” on page 3-45. If a communication error occurs or the MiEV Remote System is not functioning properly,the buzzer will sound. Refer to “Display of MiEV Remote during communicating with vehicle” on page 3-41. If the OFF Timer is unset when setting the ON timer, the OFF timer will be automati-cally set with “fully charged”. To set OFF Timer, refer to “To set OFF Timer” on page 3-40.
NOTE
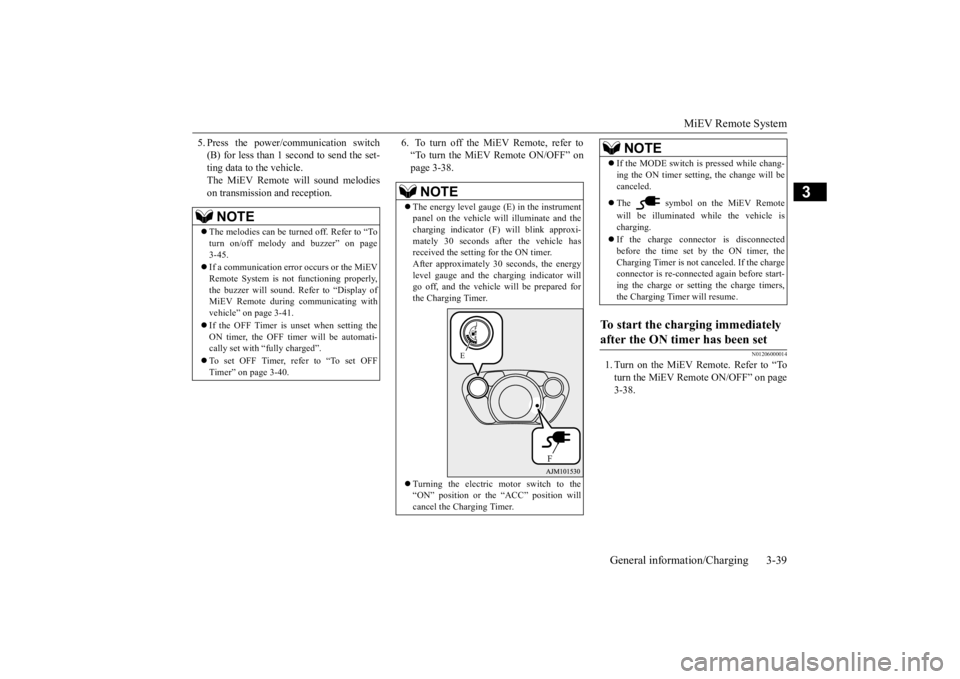
The energy level gauge (E) in the instrument panel on the vehicle will
illuminate and the
charging indicator (F)
will blink approxi-
mately 30 seconds af
ter the vehicle has
received the setting for the ON timer. After approximately 30 seconds, the energy level gauge and the ch
arging indicator will
go off, and the vehicle will be prepared for the Charging Timer. Turning the electric motor switch to the “ON” position or th
e “ACC” position will
cancel the Charging Timer.
E
F
If the MODE switch is pressed while chang- ing the ON timer setting,
the change will be
canceled. The symbol on the MiEV Remote will be illuminated while the vehicle is charging. If the charge connector is disconnected before the time set by the ON timer, the Charging Timer is not canceled. If the charge connector is re-connected
again before start-
ing the charge or setting the charge timers,the Charging Timer will resume.
To start the charging immediately after the ON timer has been set
NOTE
BK0209800US.book 39 ページ 2014年1月14日 火曜日 午前9時26分
Page 55 of 262
MiEV Remote System 3-40 General information/Charging
3
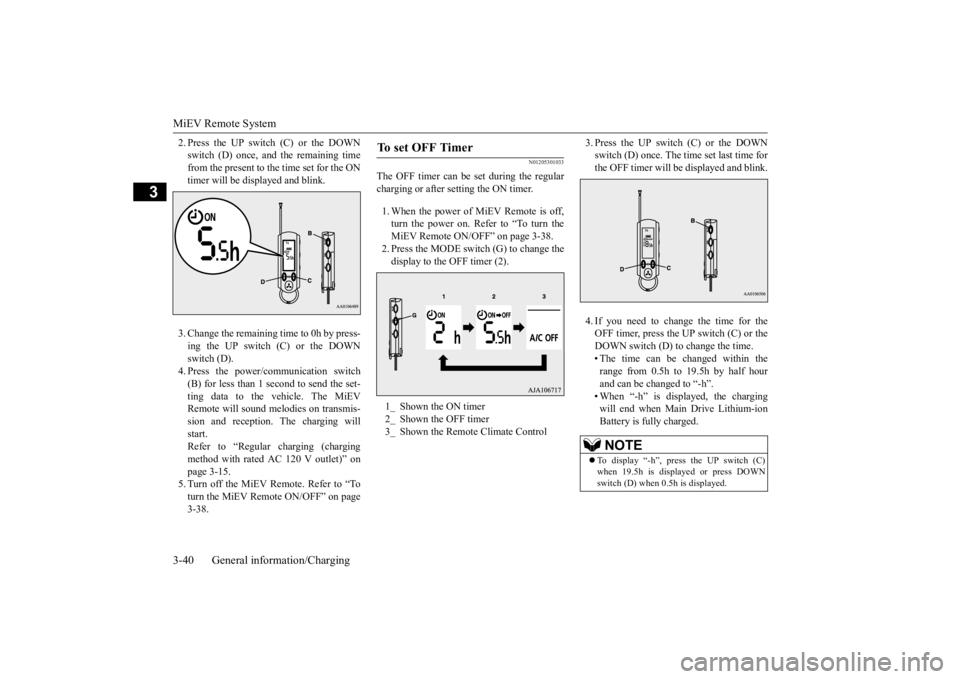
2. Press the UP switch (C) or the DOWN switch (D) once, and the remaining timefrom the present to the time set for the ON timer will be disp
layed and blink.
3. Change the remaining time to 0h by press- ing the UP switch (C) or the DOWN switch (D). 4. Press the power/communication switch(B) for less than 1 second to send the set- ting data to the vehicle. The MiEV Remote will sound mel
odies on transmis-
sion and reception. The charging will start. Refer to “Regular charging (chargingmethod with rated AC 120 V outlet)” on page 3-15. 5. Turn off the MiEV Remote. Refer to “Toturn the MiEV Remote ON/OFF” on page 3-38.
N01205301033
The OFF timer can be
set during the regular
charging or after setting the ON timer. 1. When the power of MiEV Remote is off, turn the power on. Refer to “To turn theMiEV Remote ON/OFF” on page 3-38. 2. Press the MODE switc
h (G) to change the
display to the OFF timer (2).
3. Press the UP switch (C) or the DOWN switch (D) once. The time set last time forthe OFF timer will be
displayed and blink.
4. If you need to change the time for the OFF timer, press the UP switch (C) or theDOWN switch (D) to change the time. • The time can be changed within the range from 0.5h to 19.5h by half hourand can be changed to “-h”. • When “-h” is displayed, the charging will end when Main Drive Lithium-ionBattery is fully charged.
To set OFF Timer 1_ Shown the ON timer2_ Shown the OFF timer3_ Shown the Remote Climate Control
NOTE
To display “-h”, press the UP switch (C) when 19.5h is displayed or press DOWN switch (D) when 0.5h is displayed.
BK0209800US.book 40 ページ 2014年1月14日 火曜日 午前9時26分
Page 59 of 262
MiEV Remote System 3-44 General information/Charging
3
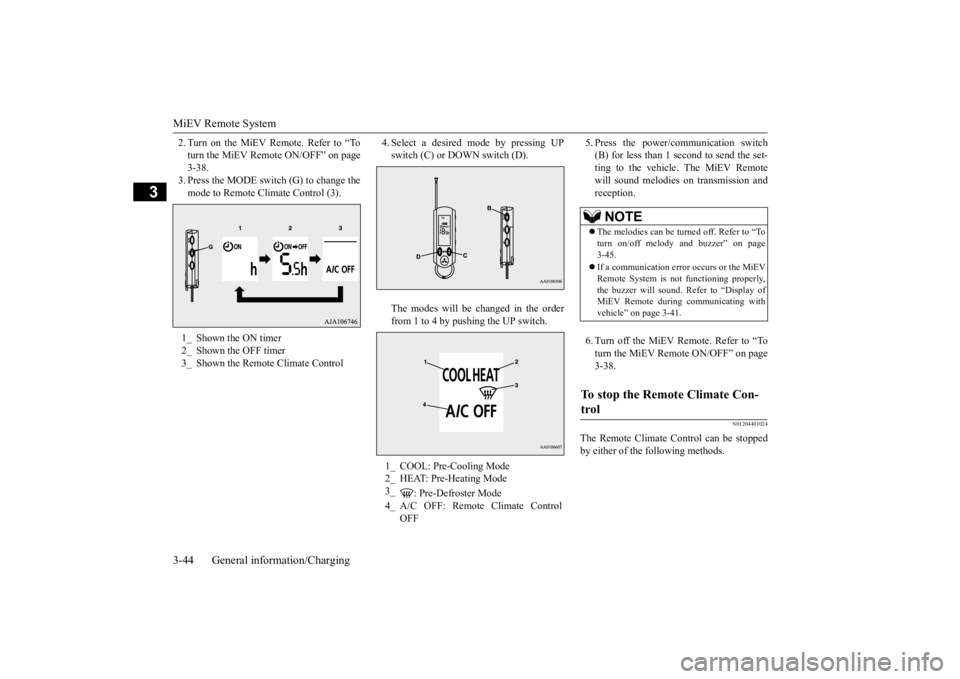
2. Turn on the MiEV Remote. Refer to “To turn the MiEV Remote ON/OFF” on page3-38. 3. Press the MODE switch (G) to change the mode to Remote Climate Control (3).
4. Select a desired
mode by pressing UP
switch (C) or DOWN switch (D). The modes will be changed in the order from 1 to 4 by pushing the UP switch.
5. Press the power/c
ommunication switch
(B) for less than 1 second to send the set-ting to the vehicle. The MiEV Remote will sound melodies on transmission and reception. 6. Turn off the MiEV Remote. Refer to “To turn the MiEV Remote ON/OFF” on page 3-38.
N01204401024
The Remote Climate C
ontrol can be stopped
by either of the following methods.
1_ Shown the ON timer 2_ Shown the OFF timer3_ Shown the Remote Climate Control
1_ COOL: Pre-Cooling Mode2_ HEAT: Pre-Heating Mode 3_
: Pre-Defroster Mode
4_ A/C OFF: Remote Climate Control
OFF
NOTE
The melodies can be turned off. Refer to “To turn on/off melody
and buzzer” on page
3-45. If a communication error occurs or the MiEV Remote System is not
functioning properly,
the buzzer will sound. Refer to “Display of MiEV Remote during communicating with vehicle” on page 3-41.
To stop the Remote Climate Con- trol
BK0209800US.book 44 ページ 2014年1月14日 火曜日 午前9時26分
Page 66 of 262
MiEV Remote System
General information/Charging 3-51
3
Charging Timer is not possible.
The system is charged although the ON timer is being set.
Backup charging for the Main Drive Lith- ium-ion Battery Wa
rming System has
been operated.
This is not a malfunction.Charging will be termi- nated when the system has been charged enough for the Main Drive Lithium-ion Battery Warming Sys- tem.
Charging is preset, but the specified charging level is not satisfied. The charging level is not expected amount. Is not charged. Is not charged at the preset time.
The timer is cancelled or the preset time is changed by using anot
her MiEV Remote.
Check whether another person has operated his or her MiEV Remote.
The electric motor switch has been oper- ated before the system is charged.
Check whether the electric motor switch has been operated before the system is charged.
The temperature of the Main Drive Lith- ium-ion Battery has exceeded about 140 °F (60 °C).
Allow the temperature of the Main Drive Lithium- ion Battery to reach norm
al operating temperature.
Refer to “Cautions and acti
on to deal with intense
heat” on page 3-7.
Charging Timer is not preset correct
ly. Preset the timed charging again.
Although the charging is preset, too much time is needed to charge the sys- tem fully.
The Remote Climate Control has been activated.
Check whether the Remote Climate Control has been activated.
The Main Drive Lithium-ion Battery Warming System ha
s been operated.
Move the vehicle to a warmer location.
Temperature of the Main Drive Lithium- ion Battery is low.
Refer to “Cautions and acti
on to deal with intense
cold” on page 3-9.
Charging Timer is not possible.
It is not fully charged. If the charging unit is equipped with the
timer function, the power supply to the unit has been cut off.
Preset the Charging Timer while the charging unit with timer function is powered on.
Phenomena
Cause
Remedy
BK0209800US.book 51 ページ 2014年1月14日 火曜日 午前9時26分
Page 110 of 262
Keyless entry system
Features and controls 5-5
5
Rules. Operation is subject to the following two conditions. This device may not
cause harmful inter-
ference. This device must ac
cept any interference
received, including interference that maycause undesired operation.
This digital apparatu
s does not exceed the
Class A limits for radi
o noise emissions from
digital apparatus set out in the Radio Interfer- ence Regulations of th
e Canadian Department
of Communications.
N00509000910
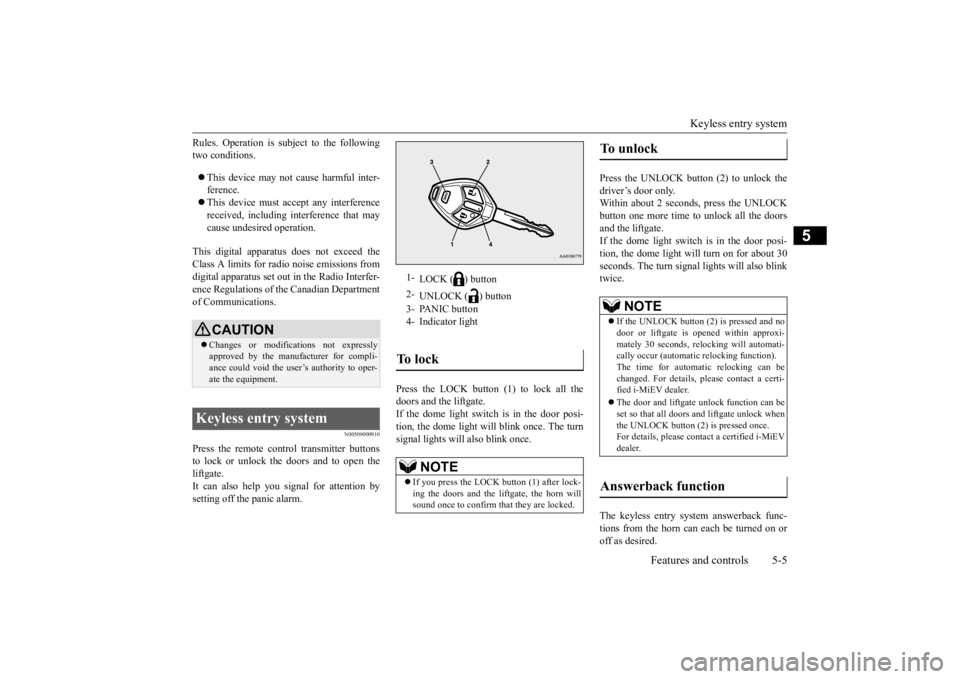
Press the remote control transmitter buttonsto lock or unlock the doors and to open the liftgate. It can also help you
signal for attention by
setting off the panic alarm.
Press the LOCK button (1) to lock all the doors and the liftgate. If the dome light switch is in the door posi- tion, the dome light w
ill blink once. The turn
signal lights will also blink once.
Press the UNLOCK button (2) to unlock the driver’s door only. Within about 2 seconds, press the UNLOCKbutton one more time to unlock all the doors and the liftgate. If the dome light switch is in the door posi-tion, the dome light will turn on for about 30 seconds. The turn signal
lights will also blink
twice. The keyless entry system answerback func- tions from the horn can each be turned on or off as desired.
CAUTION Changes or modifica
tions not expressly
approved by the manufacturer for compli- ance could void the user’s authority to oper-ate the equipment.
Keyless entry system
1-
LOCK ( ) button
2-
UNLOCK ( ) button
3- PANIC button 4- Indicator lightTo l o c k
NOTE
If you press the LOCK button (1) after lock- ing the doors and the liftgate, the horn will sound once to confirm that they are locked.
To unlock
NOTE
If the UNLOCK button (2) is pressed and no door or liftgate is opened within approxi- mately 30 seconds, relocking will automati- cally occur (automatic
relocking function).
The time for automatic relocking can be changed. For details,
please contact a certi-
fied i-MiEV dealer. The door and liftgate unlock function can be set so that all doors and liftgate unlock whenthe UNLOCK button (2) is pressed once. For details, please c
ontact a certified i-MiEV
dealer.
Answerback function
BK0209800US.book 5 ページ 2014年1月14日 火曜日 午前9時26分
Page 111 of 262
Keyless entry system 5-6 Features and controls
5
The horn answerback function can be set to the following three conditions. Each time the horn answerback function isset, a chime will sound to tell you the condi- tion of the answerback function. 1. Remove the key from the electric motor switch.2. Open the driver’s door and turn the com- bination headlights and dimmer switch to the “OFF” position.3. Press the LOCK button (1) for 4 to 10 sec- onds and press the UNLOCK button (2) during this time.4. Release in sequence the UNLOCK and LOCK buttons within 10 seconds of pressing the UNLOCK button in step 3.
The turn signal lights answerback function can be changed. If you want to change the answerback func- tion, please contact a
certified i-MiEV dealer
for details.
N00543600105
The door and liftgate unlock function can be set so that all doors and liftgate unlock when the UNLOCK button (2) is pressed once.For details, please contact a certified i-MiEV dealer.
N00543700050
If you are near your vehicle and feel threat-ened, you may activate th
e alarm to call atten-
tion as follows: 1. Press the PANIC button (3) for more than 1 second. 2. The headlights will blink on and off and the horn will sound intermittently forabout 3 minutes. 3. To turn off the alarm, press any button on the remote control transmitter.
N00543800077
Only remote control transmitters pro-grammed with the vehicle’s electronics canlock or unlock all doors. If you lose the remote control transmitter, you can order a remote cont
rol transmitter from a
certified i-MiEV deal
er by referring to the
key number. To prevent vehicle theft, the ID codes for allthe remote control transmitters except the one for the lost key must be programmed again. Take your vehicle and all the remainingremote control transmitters to a certified i- MiEV dealer to have your ID codes pro- grammed again.
N00543900065
To add a remote control transmitter, you mustalready have one registered remote control transmitter. Registering the ID code can be done by your-self or by a certified i-MiEV dealer. For you to register the ID code yourself, follow the “Customer remote control transmitter pro-gramming” procedure below.
Horn deactivation/reactivation Number of chimes
Condition
One chime The horn will not sound. Two chimes The horn will sound. Three chimes
The horn will sound if the auto light switch is ON (if so equipped).
Four chimes
The horn will sound if the LOCK button is pressed twice quickly.
Changing the setting of the turn signal lights answerback function Setting of door unlock function Using the panic alarm
Replacement remote control transmitters Additional remote control transmitters
BK0209800US.book 6 ページ 2014年1月14日 火曜日 午前9時26分
Page 140 of 262
Instrument cluster
Features and controls 5-35
5
N00572101037
The power consumption of the electric motor, the air conditioning, and power generation by the regenerative brake are indicated. When the ready indicator comes on, the redneedle will move to th
e neutral point (A) and
then move to the right or left according to the amount of power consumption or power gen-eration. [When the red needle moves to the right of the neutral point] This indicates that the electric motor unitand/or the air conditioning are consuming electric energy from the main drive lithium- ion battery.The more the needle moves to the right, the more electrical energy
is being consumed.
[When the red needle moves to the left of the neutral point]This indicates that electric energy is being generated by the regenerative brake and charged to the main dr
ive lithium-ion battery.
The more the needle moves to the left, the more electric energy is being generated.
N00519501449
Odometer, trip odometer
, dash lights bright-
ness indicator, serv
ice reminder, cruising
range indicator, and outside temperature are displayed.
N00572201025
The display is changed every time the reset button (A) is briefly pressed.
NOTE
Even if speedometer
’s display unit is
changed, the display units for the odometer,trip odometer, and service reminder do notchange.
Energy usage indicator
NOTE
When the main drive lithium-ion battery is at or near full charge, or
the main drive lithium-
ion battery temperature is too high or too low, the needle in the energy usage indicatormay not move to the left of the neutral point, since the main drive lithium-ion battery can- not receive charge.
Odometer/Trip
odometer/Dash
lights brightness indicator/Ser-vice reminder/Cruising range indicator/Outside temperature display To change the display
BK0209800US.book 35 ページ 2014年1月14日 火曜日 午前9時26分