driver MITSUBISHI iMiEV 2016 1.G Owner's Manual
[x] Cancel search | Manufacturer: MITSUBISHI, Model Year: 2016, Model line: iMiEV, Model: MITSUBISHI iMiEV 2016 1.GPages: 296, PDF Size: 7.79 MB
Page 99 of 296

Supplemental Restraint System (SRS) - airbag
Seat and restraint systems 4-27
4
N00408000589
Driver Front passenger
Deployment of front airbags The front airbags ARE DESIGNED TO DEPLOY when… approx. 15 mph (25 km/h) or higher
Moderate to severe frontal im
pact within the shaded area
between the arrows
BK0220401US.book 27 ページ 2015年6月3日 水曜日 午前7時42分
Page 102 of 296

Supplemental Restraint System (SRS) - airbag 4-30 Seat and restraint systems
4
N00408100418
The side airbags (A) are contained in the driver and front passenger seatbacks. The side airbag is de
signed to inflate only on
the side of the vehicle that is impacted, even with no passenger in the front seat. A label is attached to the seatbacks in vehi- cles with side airbags.
WA R N I N G Do not attach anything to the steering wheel’s padded cover, such as trim mate-rial, badges, etc. These could strike andinjure an occupant if the airbag inflates. Do not set anything on, or attach anything to, the instrument
panel above the glove
compartment. Such items could strike and injure an occupant if the airbag inflates. WA R N I N G Do not attach accessories to, or put them in front of, the windshield. They could restrict the airbag inflation, or strike andinjure an occupant
, when the airbag
inflates. Do not attempt to remove, install, disas- semble or repair the SRS airbags.
Do not place objects,
such as packages or
pets, between the airbags and the driveror the front passenger. Such objects canadversely affect ai
rbag performance, or
cause serious injury or death when the airbag deploys. Immediately after airbag inflation, some parts of the airbag syst
em will be hot. Do
not touch them. You could be burned. The airbag system is designed to work only once. After the
airbags deploy, they
will not work again. They must promptly be replaced and the
entire airbag system
must be inspected by a certified i-MiEV dealer.WA R N I N G
Side airbag system
BK0220401US.book 30 ページ 2015年6月3日 水曜日 午前7時42分
Page 106 of 296

Supplemental Restraint System (SRS) - airbag 4-34 Seat and restraint systems
4
N00408500715
N00408600370
Occupant restraint warn
ing labels for the SRS
are located in the vehicle as shown in the illustration.
SRS servicing
WA R N I N G Any maintenance performed on or near the components of the SRS should be per-formed only by a certified i-MiEV dealer. Do not permit anyone else to do any ser- vice, inspection, main
tenance or repair on
any SRS components or
wiring. Similarly,
no part of the SRS should ever be handled, removed or disposed
by anyone except a
certified i-MiEV dealer. Improper work methods on the SRS com- ponents or wiring could result in an acci-dental airbag deploym
ent or could make
the SRS inoperable. Ei
ther of these situa-
tions could result in serious injury ordeath. Do not modify your steering wheel or any other SRS component
or related vehicle
part. For example, replacement of the steering wheel, or modifications to thefront bumper or body structure can adversely affect SR
S performance and
may lead to injury. If your vehicle has re
ceived any damage,
you should have the
SRS inspected by a
certified i-MiEV dealer to make sure it is in proper working order.
Do not modify your front seats, center pil- lar or center console. Such modificationscan adversely affect
SRS performance and
may lead to injury. Also, if you discove
r any tear or open
seam in the seat fabr
ic near the side air-
bag, have the seat in
spected by a certified
i-MiEV dealer. If you find a crack in
or damage to the
front pillar, rear pillar, or roof side rail where the curtain airbag is located, havethe SRS inspected by a certified i-MiEV dealer.NOTE
When you transfer ownership of the vehicle to another person, we
urge you to alert the
new owner that it is
equipped with the SRS
and refer that owner to
the applicable sec-
tions in this owner’s manual. If you decide to junk or scrap your vehicle, we urge you to first take it to a certified i- MiEV dealer so that the SRS can be madesafe for disposal. If any of the following parts needs to be modified for use by
a handicapped person,
the advanced airbag sy
stem will be greatly
affected. Please consult a certified i-MiEV dealer for assistance. •Driver’s seat • Front passenger seat • Front seat beltWA R N I N G
• Steering wheel • Instrument panel[For vehicles sold in U.S.A.] To contact Mitsubishi Motors North America, Inc.call 1-888-648-7820 or write to: Mitsubishi Motors North America, Inc.Customer Relations Department P. O. Box 6400 Cypress, CA 90630-0064 [For vehicles sold in Canada] To contact Mitsubishi Motor Sales ofCanada, Inc. call 1-888-576-4878 or write to: Mitsubishi Motor Sales of Canada,Inc. Customer Relations Department P.O. Box 410094141 Dixie Road Mississauga, ON L4W 5C9
Warning labels
NOTE
BK0220401US.book 34 ページ 2015年6月3日 水曜日 午前7時42分
Page 113 of 296
Keyless entry system
Features and controls 5-5
5
Rules. Operation is subject to the following two conditions. This device may not
cause harmful inter-
ference. This device must ac
cept any interference
received, including interference that maycause undesired operation.
This digital apparatu
s does not exceed the
Class A limits for radi
o noise emissions from
digital apparatus set out in the Radio Interfer- ence Regulations of th
e Canadian Department
of Communications.
N00509000910
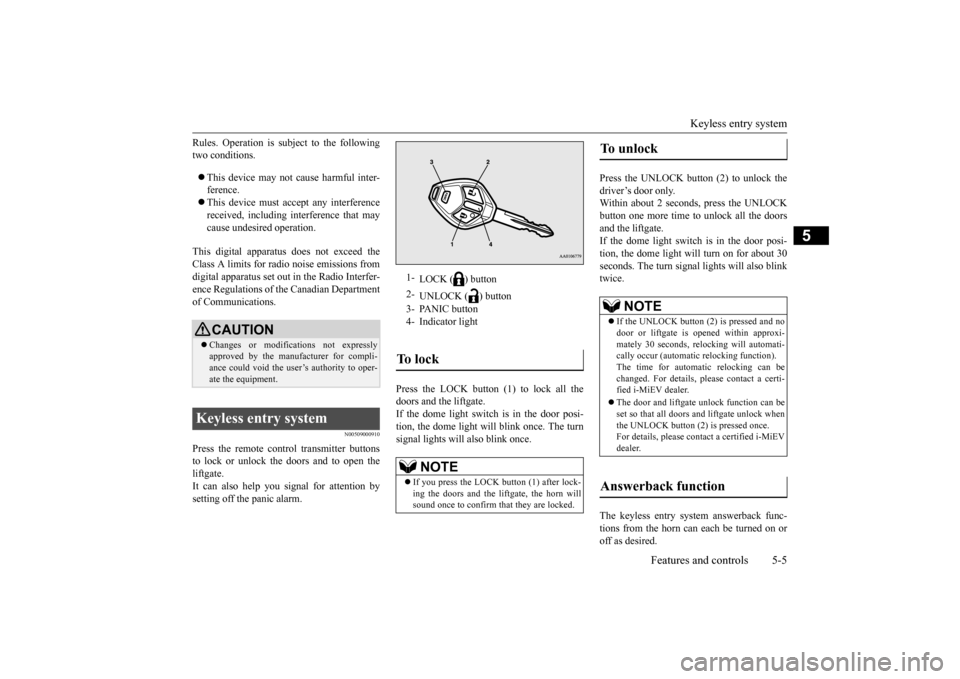
Press the remote control transmitter buttonsto lock or unlock the doors and to open the liftgate. It can also help you
signal for attention by
setting off the panic alarm.
Press the LOCK button (1) to lock all the doors and the liftgate. If the dome light switch is in the door posi- tion, the dome light w
ill blink once. The turn
signal lights will also blink once.
Press the UNLOCK button (2) to unlock the driver’s door only. Within about 2 seconds, press the UNLOCKbutton one more time to unlock all the doors and the liftgate. If the dome light switch is in the door posi-tion, the dome light will turn on for about 30 seconds. The turn signal
lights will also blink
twice. The keyless entry system answerback func- tions from the horn can each be turned on or off as desired.
CAUTION Changes or modifica
tions not expressly
approved by the manufacturer for compli- ance could void the user’s authority to oper-ate the equipment.
Keyless entry system
1-
LOCK ( ) button
2-
UNLOCK ( ) button
3- PANIC button 4- Indicator lightTo l o c k
NOTE
If you press the LOCK button (1) after lock- ing the doors and the liftgate, the horn will sound once to confirm that they are locked.
To unlock
NOTE
If the UNLOCK button (2) is pressed and no door or liftgate is opened within approxi- mately 30 seconds, relocking will automati- cally occur (automatic
relocking function).
The time for automatic relocking can be changed. For details,
please contact a certi-
fied i-MiEV dealer. The door and liftgate unlock function can be set so that all doors and liftgate unlock whenthe UNLOCK button (2) is pressed once. For details, please c
ontact a certified i-MiEV
dealer.
Answerback function
BK0220401US.book 5 ページ 2015年6月3日 水曜日 午前7時42分
Page 114 of 296
Keyless entry system 5-6 Features and controls
5
The horn answerback function can be set to the following three conditions. Each time the horn answerback function isset, a chime will sound to tell you the condi- tion of the answerback function. 1. Remove the key from the electric motor switch.2. Open the driver’s door and turn the com- bination headlights and dimmer switch to the “OFF” position.3. Press the LOCK button (1) for 4 to 10 sec- onds and press the UNLOCK button (2) during this time.4. Release in sequence the UNLOCK and LOCK buttons within 10 seconds of pressing the UNLOCK button in step 3.
The turn signal lights answerback function can be changed. If you want to change the answerback func- tion, please contact a
certified i-MiEV dealer
for details.
N00543600105
The door and liftgate unlock function can be set so that all doors and liftgate unlock when the UNLOCK button (2) is pressed once.For details, please contact a certified i-MiEV dealer.
N00543700050
If you are near your vehicle and feel threat-ened, you may activate th
e alarm to call atten-
tion as follows: 1. Press the PANIC button (3) for more than 1 second. 2. The headlights will blink on and off and the horn will sound intermittently forabout 3 minutes. 3. To turn off the alarm, press any button on the remote control transmitter.
N00543800077
Only remote control transmitters pro-grammed with the vehicle’s electronics canlock or unlock all doors. If you lose the remote control transmitter, you can order a remote cont
rol transmitter from a
certified i-MiEV deal
er by referring to the
key number. To prevent vehicle theft, the ID codes for allthe remote control transmitters except the one for the lost key must be programmed again. Take your vehicle and all the remainingremote control transmitters to a certified i- MiEV dealer to have your ID codes pro- grammed again.
N00543900065
To add a remote control transmitter, you mustalready have one registered remote control transmitter. Registering the ID code can be done by your-self or by a certified i-MiEV dealer. For you to register the ID code yourself, follow the “Customer remote control transmitter pro-gramming” procedure below.
Horn deactivation/reactivation Number of chimes
Condition
One chime The horn will not sound. Two chimes The horn will sound. Three chimes
The horn will sound if the auto light switch is ON (if so equipped).
Four chimes
The horn will sound if the LOCK button is pressed twice quickly.
Changing the setting of the turn signal lights answerback function Setting of door unlock function Using the panic alarm
Replacement remote control transmitters Additional remote control transmitters
BK0220401US.book 6 ページ 2015年6月3日 水曜日 午前7時42分
Page 115 of 296
Keyless entry system
Features and controls 5-7
5
If you choose to have a certified i-MiEV dealer register the ID
code, take your vehicle
and all remaining keys to a certified i-MiEV dealer.
N00546100101
Your keyless entry system operates on a radiofrequency subject to
Federal Communica-
tions Commission (FCC)
Rules (For vehicles
sold in U.S.A.) and Industry Canada Rules (For vehicles sold in Canada). This device complies with Part 15 of the FCC Rules andRSS-Gen of the Industry Canada Rules. Operation is subject to the following two con- ditions. This device may not
cause harmful inter-
ference. This device must ac
cept any interference
received, including interference that maycause undesired operation.
N00544101133
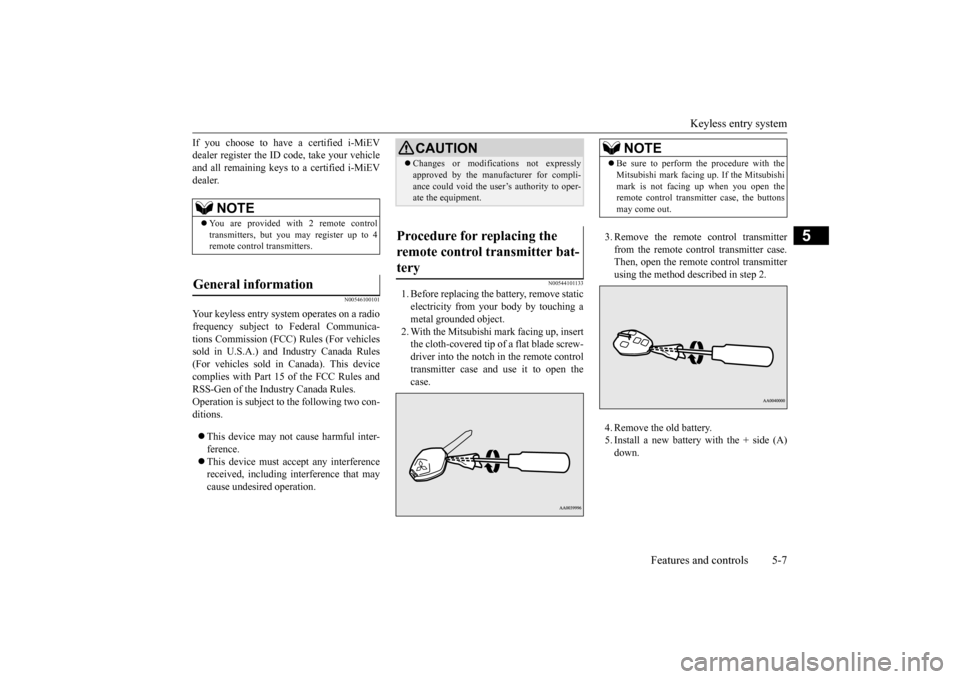
1. Before replacing the
battery, remove static
electricity from your body by touching ametal grounded object. 2. With the Mitsubishi mark facing up, insert the cloth-covered tip of
a flat blade screw-
driver into the notch in the remote control transmitter case and
use it to open the
case.
3. Remove the remote control transmitter from the remote control transmitter case. Then, open the remote control transmitterusing the method described in step 2. 4. Remove the old battery. 5. Install a new battery with the + side (A)down.
NOTE
You are provided with 2 remote control transmitters, but you may register up to 4 remote control transmitters.
General information
CAUTION Changes or modifica
tions not expressly
approved by the manufacturer for compli-ance could void the user’s authority to oper-ate the equipment.
Procedure for replacing the remote control transmitter bat- tery
NOTE
Be sure to perform the procedure with the Mitsubishi mark facing up. If the Mitsubishimark is not facing up when you open theremote control transmitter case, the buttons may come out.
BK0220401US.book 7 ページ 2015年6月3日 水曜日 午前7時42分
Page 117 of 296
Power door locks
Features and controls 5-9
5
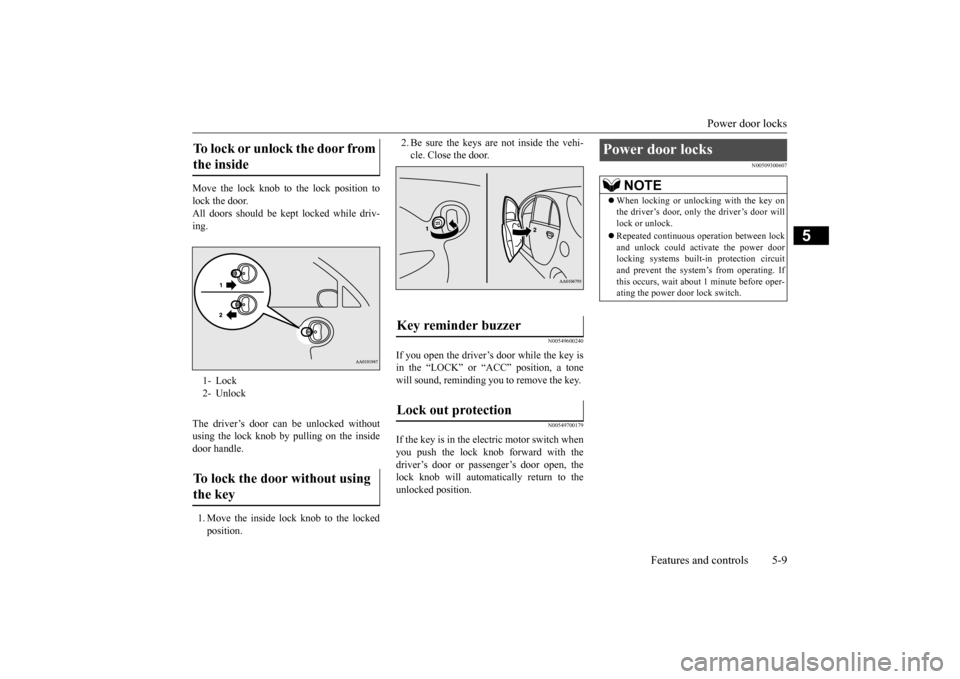
Move the lock knob to the lock position to lock the door. All doors should be kept locked while driv-ing. The driver’s door can be unlocked without using the lock knob by pulling on the insidedoor handle. 1. Move the inside lock knob to the locked position.
2. Be sure the keys are not inside the vehi- cle. Close the door.
N00549600240
If you open the driver’s door while the key isin the “LOCK” or “ACC” position, a tonewill sound, reminding you
to remove the key.
N00549700179
If the key is in the electric motor switch when you push the lock knob forward with the driver’s door or passenger’s door open, the lock knob will automatically return to theunlocked position.
N00509300607
To lock or unlock the door from the inside 1- Lock 2- Unlock To lock the door without using the key
Key reminder buzzer Lock out protection
Power door locks
NOTE
When locking or unlocking with the key on the driver’s door, only the driver’s door willlock or unlock. Repeated continuous
operation between lock
and unlock could acti
vate the power door
locking systems built-i
n protection circuit
and prevent the system’s from operating. Ifthis occurs, wait about
1 minute before oper-
ating the power door lock switch.
BK0220401US.book 9 ページ 2015年6月3日 水曜日 午前7時42分
Page 118 of 296
Child safety locks for rear door 5-10 Features and controls
5
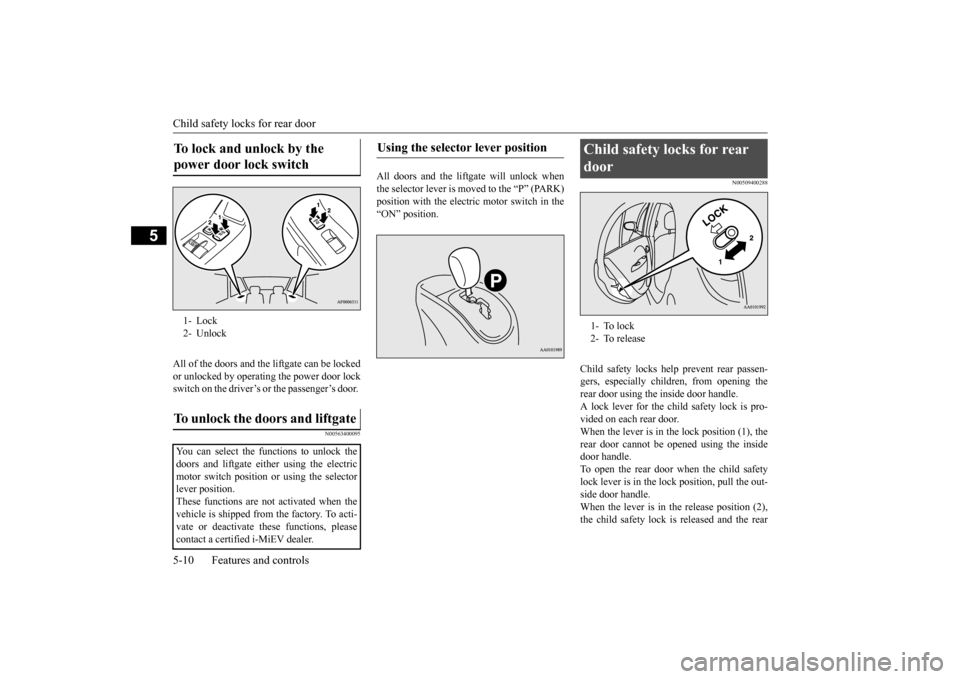
All of the doors and the liftgate can be locked or unlocked by operating the power door lock switch on the driver’s or the passenger’s door.
N00563400095
All doors and the liftgate will unlock when the selector lever is moved to the “P” (PARK) position with the electric motor switch in the“ON” position.
N00509400288
Child safety locks help prevent rear passen-gers, especially child
ren, from opening the
rear door using the inside door handle. A lock lever for the child safety lock is pro- vided on each rear door.When the lever is in the lock position (1), the rear door cannot be opened using the inside door handle.To open the rear door when the child safety lock lever is in the lock position, pull the out- side door handle.When the lever is in the release position (2), the child safety lock is released and the rear
To lock and unlock by the power door lock switch 1- Lock 2- Unlock To unlock the doors and liftgate You can select the functions to unlock the doors and liftgate either using the electric motor switch position or using the selector lever position.These functions are not
activated when the
vehicle is shipped from the factory. To acti- vate or deactivate
these functions, please
contact a certified i-MiEV dealer.
Using the selector lever position
Child safety locks for rear door 1- To lock 2- To release
BK0220401US.book 10 ページ 2015年6月3日 水曜日 午前7時42分
Page 122 of 296
Power window control 5-14 Features and controls
5
Use the following proce
dure to test the sys-
tem: 1. Lower the driver’s window. 2. Arm the system as explained in “Armedstage”. 3. Make sure that the theft-alarm indicator comes on and flashes for approximately20 seconds. 4. Wait a few seconds and then unlock the driver’s side door by using the inside doorlock knob. Open the door. 5. Make sure that the horn sounds intermit- tently and the headlights blink when adoor is opened. 6. Disarm the system
by unlocking all doors
and the liftgate by using the keyless entrysystem.
N00510801410
The amount of time afte
r unlocking until the
vehicle relocks automatically can beadjusted. See a certified i-MiEV dealer fordetails. Once the system has been disarmed, it can- not be rearmed except
by repeating the arm-
ing procedure.
Testing the theft-alarm system
NOTE
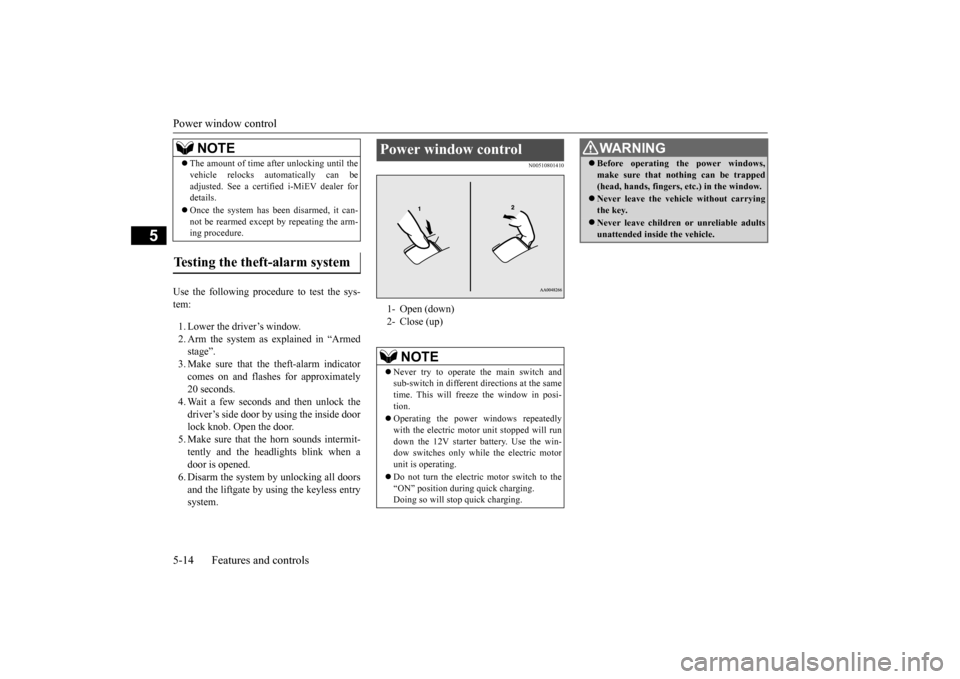
Power window control 1- Open (down) 2- Close (up)
NOTE
Never try to operate the main switch and sub-switch in different directions at the same time. This will free
ze the window in posi-
tion. Operating the power
windows repeatedly
with the electric moto
r unit stopped will run
down the 12V starter battery. Use the win- dow switches only while the electric motor unit is operating. Do not turn the electric motor switch to the “ON” position during quick charging.Doing so will stop quick charging.
WA R N I N G Before operating the power windows, make sure that nothing can be trapped(head, hands, fingers, etc.) in the window. Never leave the vehi
cle without carrying
the key. Never leave children
or unreliable adults
unattended inside the vehicle.
BK0220401US.book 14 ページ 2015年6月3日 水曜日 午前7時42分
Page 123 of 296

Power window control
Features and controls 5-15
5
N00548700127
The main switch located on the driver’s door can be used to opera
te all the windows.
A window can be opened
or closed by operat-
ing the corresponding switch. Press the switch down to open the window,and pull up the switch to close it. If the driver’s door window switch is fully pressed down, the driver’s door window auto- matically opens completely. If you want to stop the window movement,operate the switch lightly in the reverse direc- tion.
N00548800115
Each sub-switch can be
used for it’s own pas-
senger door window, unless the driver’s win-dow lock switch is activated.
N00548900145
The power windows can be run up or downwhen the electric motor switch is in the “ON” The door windows can be opened or closedfor a 30-second period after the electric motor switch is turned to the “ACC” or “LOCK” position. However, once the driver’s door orthe front passenger’s door is opened, the power windows cannot be operated.
N00549000156
When this switch is in the lock mode, the pas-senger door switches cannot be used to open or close the door windows, and the mainswitch will open or close only the driver’s door window. To unlock the switch, press it again.
Main switch 1- Driver’s door window switch2- Front passenger door window switch3- Left rear door window switch 4- Right rear door window switch 5- Lock switch
Sub switch 1- Close2- OpenPower window timer function
Lock switch 1- Lock 2- UnlockWA R N I N G Before driving with a child in the vehicle, be sure to lock the window switch to make it inoperative. Children tampering withthe switch could easily trap their hands or heads in the window.
BK0220401US.book 15 ページ 2015年6月3日 水曜日 午前7時42分