page 100 MITSUBISHI L200 2004 Owner's Manual (in English)
[x] Cancel search | Manufacturer: MITSUBISHI, Model Year: 2004, Model line: L200, Model: MITSUBISHI L200 2004Pages: 264, PDF Size: 4.14 MB
Page 22 of 264
LOCKING AND UNLOCKING
DoorsEF12AAEd
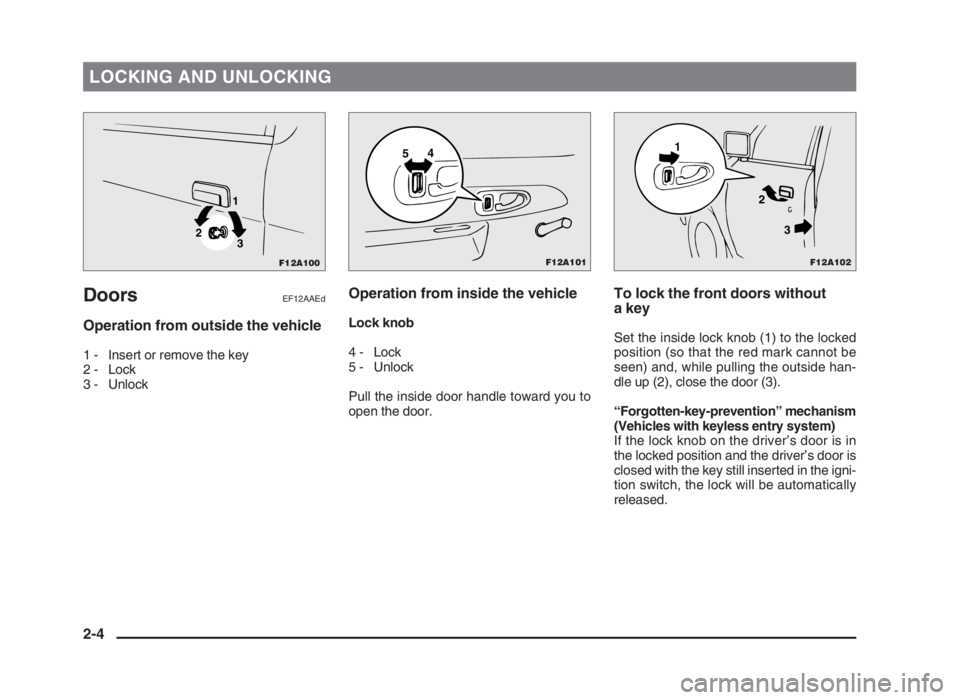
Operation from outside the vehicle
1 - Insert or remove the key
2 - Lock
3 - Unlock
Operation from inside the vehicle
Lock knob
4 - Lock
5 - Unlock
Pull the inside door handle toward you to
open the door.
To lock the front doors without
a key
Set the inside lock knob (1) to the locked
position (so that the red mark cannot be
seen) and, while pulling the outside han-
dle up (2), close the door (3).
“Forgotten-key-prevention” mechanism
(Vehicles with keyless entry system)
If the lock knob on the driver’s door is in
the locked position and the driver’s door is
closed with the key still inserted in the igni-
tion switch, the lock will be automatically
released.
2-4
F12A102
1
2
3
F12A100
1
3 2
F12A101
54
02engL2_240082_4 22-01-2004 12:59 Page 2-4
Page 88 of 264
Vehicles with automatic transmission
2WD
*1with overdrive switched OFF
*2with overdrive switched ON
4WD
*1with overdrive switched OFF
*2with overdrive switched ON
STARTING AND DRIVING
Running-in
recommendations
EA01APD
During the running-in period for the first
1,000 km, it is advisable to drive your new
vehicle using the following precautions as
a guideline to aid long life as well as future
economy and performance.
(1) Do not race the engine at high speeds.
(2) Avoid rapid starting, accelerating,
braking and prolonged high-speed
running.
(3) Keep to the running-in speed limit
shown below.
Please note that the legal speed limits
displayed must be adhered to.
(4) Do not exceed loading capacity.
(5) Refrain from towing a trailer.
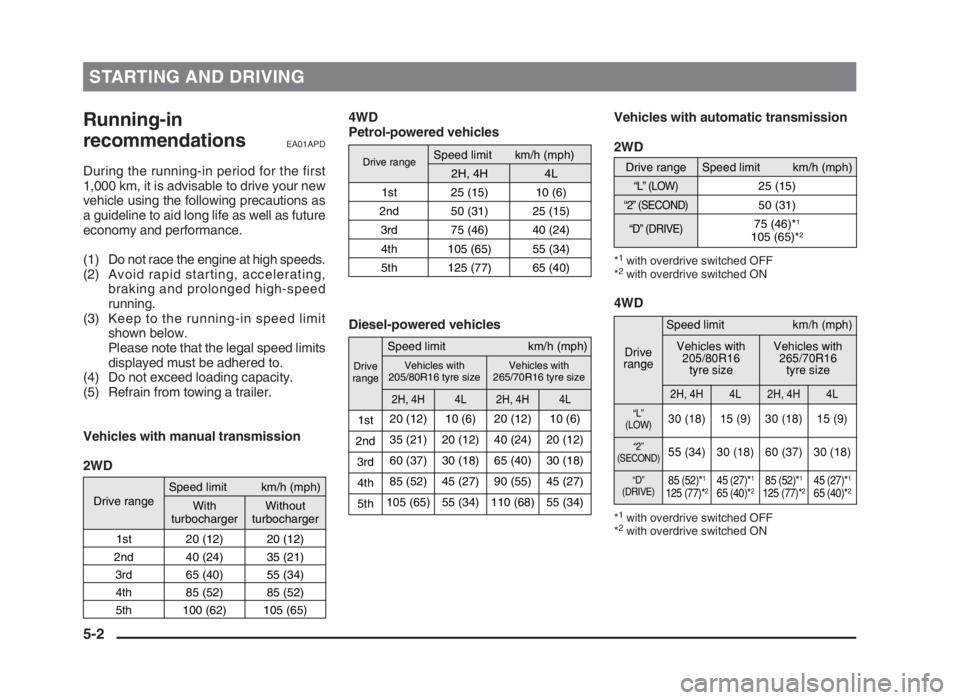
Vehicles with manual transmission
2WD4WD
Petrol-powered vehicles
Diesel-powered vehicles
5-2
Drive rangeSpeed limit km/h (mph)
With
turbochargerWithout
turbocharger
1st 20 (12) 20 (12)
2nd 40 (24) 35 (21)
3rd 65 (40) 55 (34)
4th 85 (52) 85 (52)
5th 100 (62) 105 (65)
Drive range
Speed limit km/h (mph)
2H, 4H4L
1st 25 (15) 10 (6)
2nd 50 (31) 25 (15)
3rd 75 (46) 40 (24)
4th 105 (65) 55 (34)
5th 125 (77) 65 (40)
Drive range
Speed limit km/h (mph)
“L” (LOW)
25 (15)
“2” (SECOND)
50 (31)
“D” (DRIVE)
75 (46)*
1
105 (65)*
2
Drive
range
Speed limit km/h (mph)
Vehicles with
205/80R16
tyre sizeVehicles with
265/70R16
tyre size
2H, 4H4L2H, 4H4L
“L”
(LOW)30 (18) 15 (9) 30 (18) 15 (9)
“2”
(SECOND)55 (34) 30 (18) 60 (37) 30 (18)
“D”
(DRIVE)85 (52)*1
125 (77)*245 (27)*1
65 (40)*285 (52)*1
125 (77)*245 (27)*1
65 (40)*2
Drive
range
Speed limit km/h (mph)
Vehicles with
205/80R16 tyre size
Vehicles with
265/70R16 tyre size
2H, 4H4L2H, 4H4L
1st20 (12) 10 (6) 20 (12) 10 (6)
2nd35 (21) 20 (12) 40 (24) 20 (12)
3rd60 (37) 30 (18) 65 (40) 30 (18)
4th85 (52) 45 (27) 90 (55) 45 (27)
5th105 (65) 55 (34) 110 (68) 55 (34)
05engL2_240082_4 22-01-2004 13:04 Page 5-2
Page 94 of 264
STARTING AND DRIVING
5-8 Maximum towable weight with brake
and maximum trailer-nose weight
Never exceed the maximum towable
weight with brake and the maximum trailer-
nose weight as listed in the specifications.
(Refer to page 10-6, 10-12, 10-19.)
If you tow a trailer at an altitude of more
than 1000 m above sea-level, reduce your
weight by 10% of the gross combination
weight for every increase of 1000 m above
sea-level, as the engine output is lowered
owing to decrease in atmospheric pres-
sure.
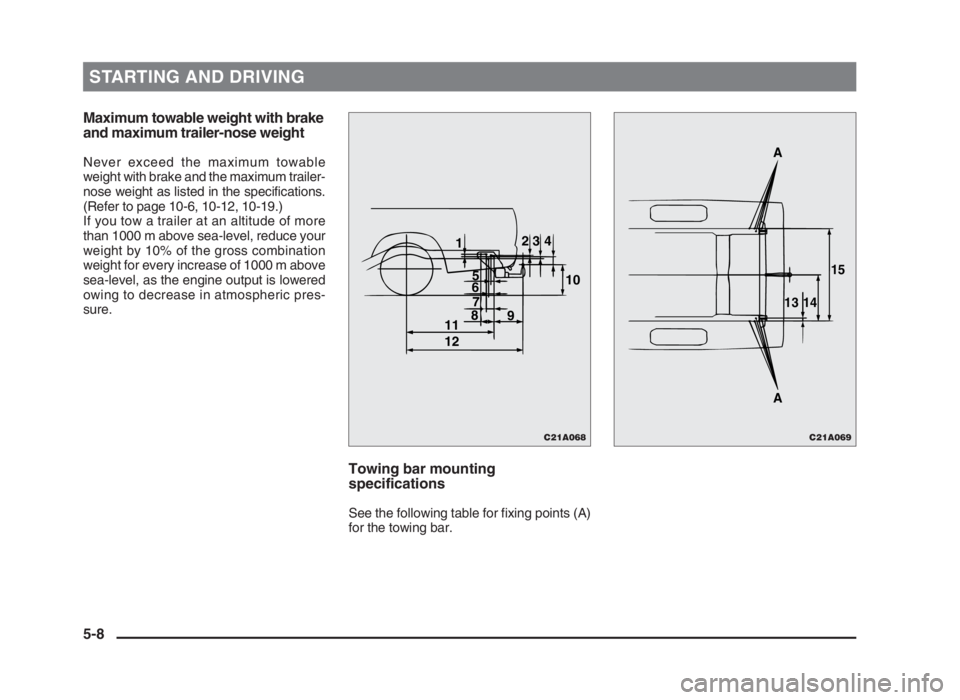
Towing bar mounting
specifications
See the following table for fixing points (A)
for the towing bar.
12
5
6
7
8
9
11
1210 34
C21A068C21A069
A
A131415
05engL2_240082_4 22-01-2004 13:04 Page 5-8
Page 107 of 264
STARTING AND DRIVING
EI31D-Nb
5-21
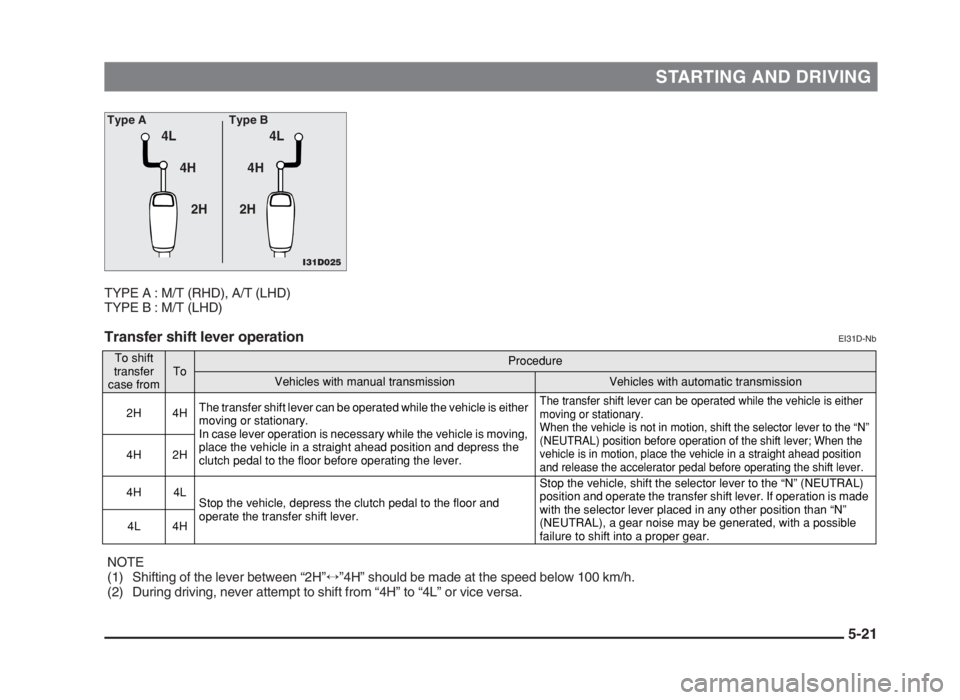
TYPE A : M/T (RHD), A/T (LHD)
TYPE B : M/T (LHD)
Transfer shift lever operation
I31D025
4L 4L
4H 4H
2H 2H
Type A Type B
To shift
transfer
case fromToProcedure
Vehicles with manual transmissionVehicles with automatic transmission
2H 4HThe transfer shift lever can be operated while the vehicle is either
moving or stationary.
In case lever operation is necessary while the vehicle is moving,
place the vehicle in a straight ahead position and depress the
clutch pedal to the floor before operating the lever.
The transfer shift lever can be operated while the vehicle is either
moving or stationary.
When the vehicle is not in motion, shift the selector lever to the “N”
(NEUTRAL) position before operation of the shift lever; When the
vehicle is in motion, place the vehicle in a straight ahead position
and release the accelerator pedal before operating the shift lever.
4H 2H
4H 4L
Stop the vehicle, depress the clutch pedal to the floor and
operate the transfer shift lever.Stop the vehicle, shift the selector lever to the “N” (NEUTRAL)
position and operate the transfer shift lever. If operation is made
with the selector lever placed in any other position than “N”
(NEUTRAL), a gear noise may be generated, with a possible
failure to shift into a proper gear. 4L 4H
NOTE
(1) Shifting of the lever between “2H”↔”4H” should be made at the speed below 100 km/h.
(2) During driving, never attempt to shift from “4H” to “4L” or vice versa.
05engL2_240082_4 22-01-2004 13:05 Page 5-21
Page 157 of 264
FOR PLEASANT DRIVING
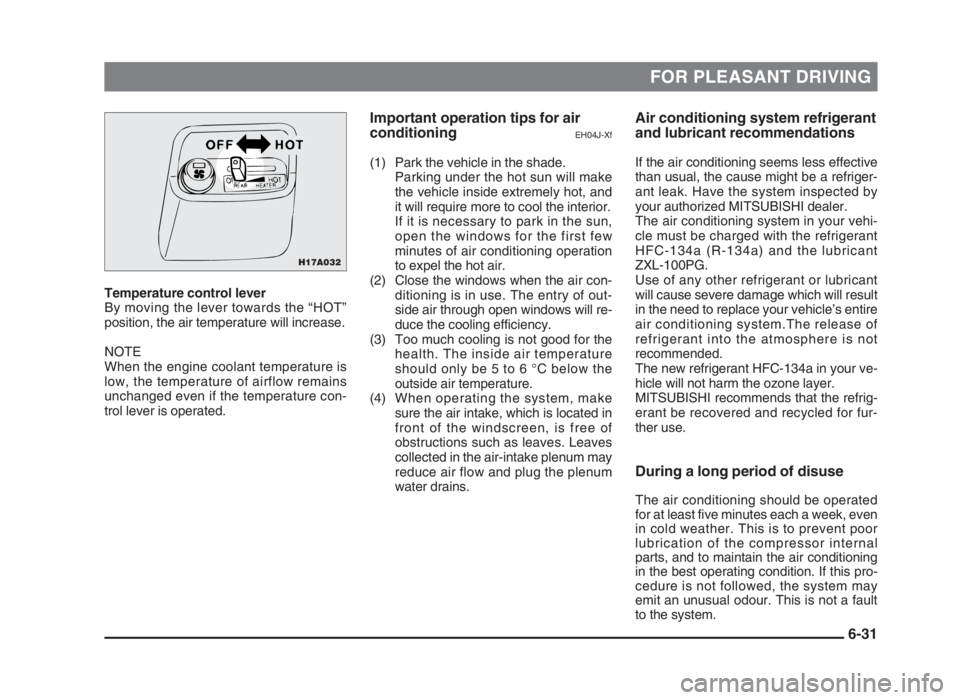
Temperature control lever
By moving the lever towards the “HOT”
position, the air temperature will increase.
NOTE
When the engine coolant temperature is
low, the temperature of airflow remains
unchanged even if the temperature con-
trol lever is operated.
Air conditioning system refrigerant
and lubricant recommendations
If the air conditioning seems less effective
than usual, the cause might be a refriger-
ant leak. Have the system inspected by
your authorized MITSUBISHI dealer.
The air conditioning system in your vehi-
cle must be charged with the refrigerant
HFC-134a (R-134a) and the lubricant
ZXL-100PG.
Use of any other refrigerant or lubricant
will cause severe damage which will result
in the need to replace your vehicle’s entire
air conditioning system.The release of
refrigerant into the atmosphere is not
recommended.
The new refrigerant HFC-134a in your ve-
hicle will not harm the ozone layer.
MITSUBISHI recommends that the refrig-
erant be recovered and recycled for fur-
ther use.
During a long period of disuse
The air conditioning should be operated
for at least five minutes each a week, even
in cold weather. This is to prevent poor
lubrication of the compressor internal
parts, and to maintain the air conditioning
in the best operating condition. If this pro-
cedure is not followed, the system may
emit an unusual odour. This is not a fault
to the system.
Important operation tips for air
conditioning
EH04J-Xf
(1) Park the vehicle in the shade.
Parking under the hot sun will make
the vehicle inside extremely hot, and
it will require more to cool the interior.
If it is necessary to park in the sun,
open the windows for the first few
minutes of air conditioning operation
to expel the hot air.
(2) Close the windows when the air con-
ditioning is in use. The entry of out-
side air through open windows will re-
duce the cooling efficiency.
(3) Too much cooling is not good for the
health. The inside air temperature
should only be 5 to 6 °C below the
outside air temperature.
(4) When operating the system, make
sure the air intake, which is located in
front of the windscreen, is free of
obstructions such as leaves. Leaves
collected in the air-intake plenum may
reduce air flow and plug the plenum
water drains.
6-31
H17A032
06engL2_240082_4 22-01-2004 13:08 Page 6-31
Page 225 of 264
MAINTENANCE
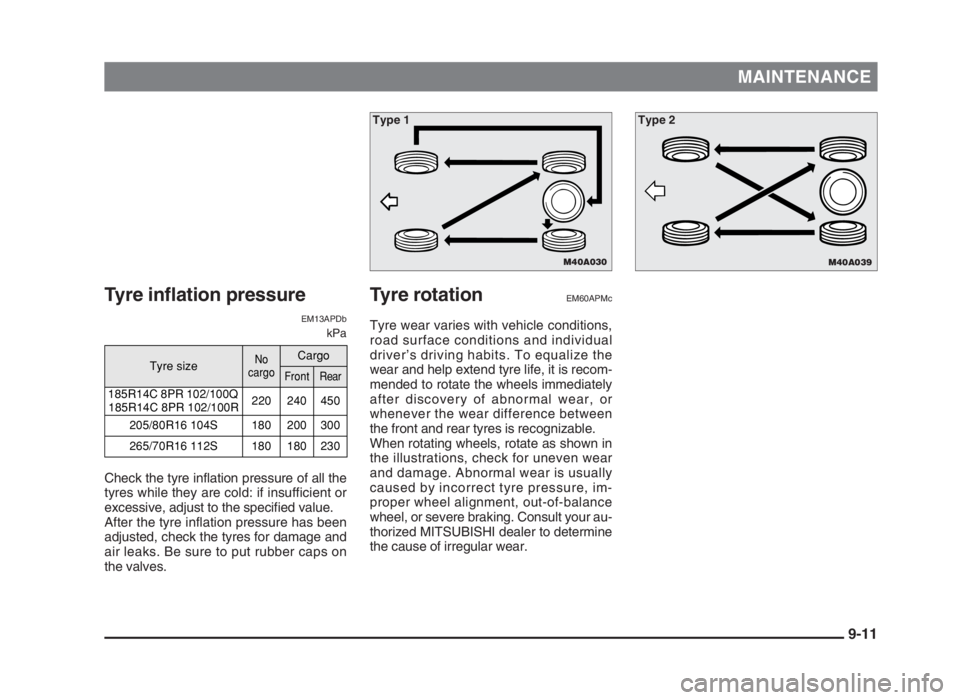
Tyre inflation pressure
EM13APDb
kPa
Check the tyre inflation pressure of all the
tyres while they are cold: if insufficient or
excessive, adjust to the specified value.
After the tyre inflation pressure has been
adjusted, check the tyres for damage and
air leaks. Be sure to put rubber caps on
the valves.
Tyre rotationEM60APMc
Tyre wear varies with vehicle conditions,
road surface conditions and individual
driver’s driving habits. To equalize the
wear and help extend tyre life, it is recom-
mended to rotate the wheels immediately
after discovery of abnormal wear, or
whenever the wear difference between
the front and rear tyres is recognizable.
When rotating wheels, rotate as shown in
the illustrations, check for uneven wear
and damage. Abnormal wear is usually
caused by incorrect tyre pressure, im-
proper wheel alignment, out-of-balance
wheel, or severe braking. Consult your au-
thorized MITSUBISHI dealer to determine
the cause of irregular wear.
9-11
M40A030
Type 1
M40A039
Type 2
Tyre sizeNo
cargoCargo
FrontRear
185R14C 8PR 102/100Q
185R14C 8PR 102/100R220 240 450
205/80R16 104S 180 200 300
265/70R16 112S 180 180 230
09engL2_240082_4 22-01-2004 13:13 Page 9-11
Page 227 of 264
MAINTENANCE
Tyre chainsEL23APDb
It is recommended that snow chains are
carried in snow regions and fitted when re-
quired to the rear wheels.
On 4WD vehicles, the driving power is dis-
tributed preferentially to the rear wheels. If
tyre chains have to be used, ensure that
they are fitted on the rear.
The tyres fitted to your vehicle as original
equipment allow you to fit tyre chains if
they are required. When replacing your
tyres, check with the tyre distributor or
manufacturer if the fitting of tyre chains will
be detrimental to the tyres being pur-
chased.
Always follow the chain manufacturer’s in-
structions when fitting the chains.
WARNINGDO NOT use a jack when fitting the
chains, as in the conditions, the
tyres may slip on the icy road caus-
ing the vehicle to slip off the jack.
(8) An aluminium wheel can be
damaged by a tyre chain while
driving. When fitting a tyre chain
on an aluminium wheel, take
care that any part of the chain
and fitting cannot be brought
into contact with the wheel disc.
(9) When installing or removing a
tyre chain, take care that hands
and other parts of your body are
not injured by the sharp edges
of the vehicle body.
(10) Install the chains only on the
rear tyres and tighten them as
tightly as possible with the ends
securely fastened.
NOTE
The laws and regulations concerning the
use of tyre chains vary. Find out and follow
the laws and regulations in the driving
area. In most countries, it is prohibited by
the law to use tyre chains on roads without
snow.CAUTION(1) Practice fitting the chains before
you need them. Don’t expect
help from other people in the
cold.
(2) Choose a clear straight stretch
of road where you can pull off
and still be seen while you are
fitting the chains.
(3) Do not fit chains before you
need them. This will wear out
your tyres and the road surface.
(4) After driving around 100-300
meters, stop and retighten the
chains.
(5) Care should be taken with ex-
tremes of steering lock to pre-
vent possible contact between
the chains and the vehicle body.
(6) Drive carefully and do not ex-
ceed 50 km/h. Remember, fitting
chains is not going to stop acci-
dents from happening.
(7) When tyre chains are installed,
take care that they do not dam-
age the wheel disc or body.
9-13
09engL2_240082_4 22-01-2004 13:13 Page 9-13
Page 238 of 264
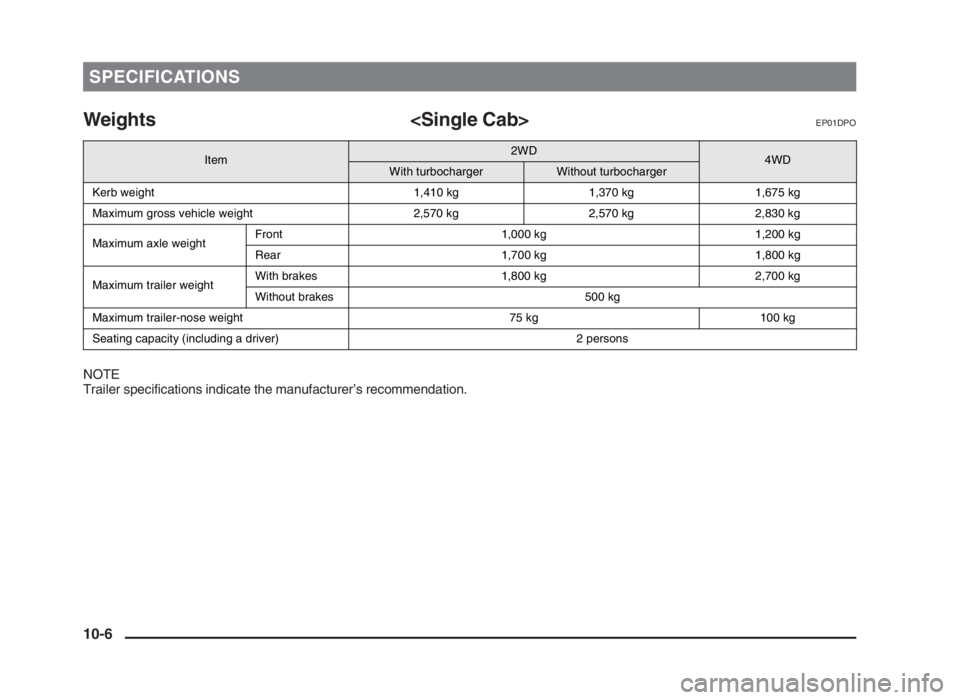
Weights
NOTE
Trailer specifications indicate the manufacturer’s recommendation.
SPECIFICATIONS
10-6
Item
2WD4WDWith turbochargerWithout turbocharger
Kerb weight 1,410 kg 1,370 kg 1,675 kg
Maximum gross vehicle weight 2,570 kg 2,570 kg 2,830 kg
Maximum axle weightFront 1,000 kg 1,200 kg
Rear 1,700 kg 1,800 kg
Maximum trailer weightWith brakes 1,800 kg 2,700 kg
Without brakes 500 kg
Maximum trailer-nose weight 75 kg 100 kg
Seating capacity (including a driver) 2 persons
10engL2_240082_4 22-01-2004 13:14 Page 10-6
Page 240 of 264
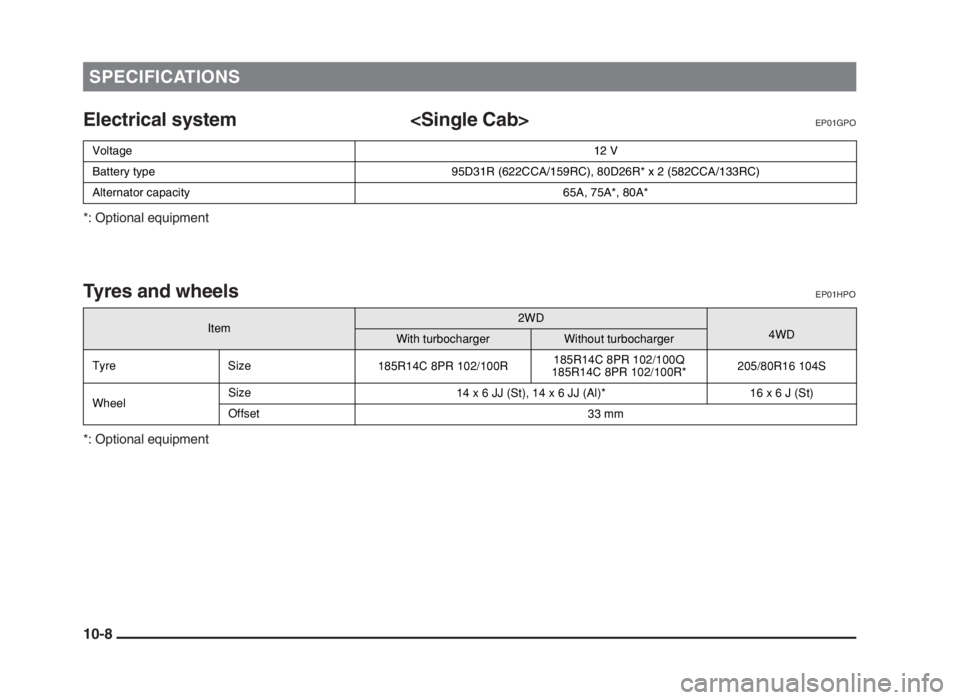
Electrical system
*: Optional equipment
Tyres and wheelsEP01HPO
*: Optional equipment
SPECIFICATIONS
10-8
Voltage12 V
Battery type 95D31R (622CCA/159RC), 80D26R* x 2 (582CCA/133RC)
Alternator capacity 65A, 75A*, 80A*
Item2WD
4WDWith turbochargerWithout turbocharger
Tyre Size
185R14C 8PR 102/100R185R14C 8PR 102/100Q
185R14C 8PR 102/100R*205/80R16 104S
WheelSize
14 x 6 JJ (St), 14 x 6 JJ (Al)* 16 x 6 J (St)
Offset
33 mm
10engL2_240082_4 22-01-2004 13:14 Page 10-8
Page 244 of 264
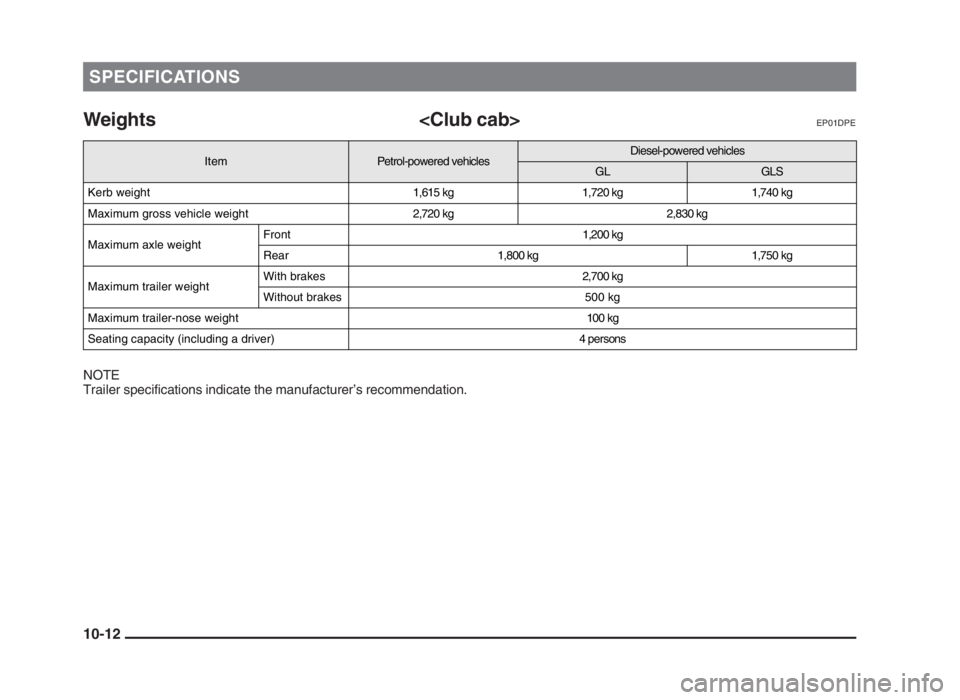
Weights
NOTE
Trailer specifications indicate the manufacturer’s recommendation.
SPECIFICATIONS
10-12
Item
Petrol-powered vehiclesDiesel-powered vehicles
GLGLS
Kerb weight1,615 kg 1,720 kg 1,740 kg
Maximum gross vehicle weight2,720 kg 2,830 kg
Maximum axle weightFront1,200 kg
Rear1,800 kg 1,750 kg
Maximum trailer weightWith brakes2,700 kg
Without brakes 500 kg
Maximum trailer-nose weight100 kg
Seating capacity (including a driver) 4 persons
10engL2_240082_4 22-01-2004 13:14 Page 10-12