radio MITSUBISHI L200 2004 Owner's Manual (in English)
[x] Cancel search | Manufacturer: MITSUBISHI, Model Year: 2004, Model line: L200, Model: MITSUBISHI L200 2004Pages: 264, PDF Size: 4.14 MB
Page 14 of 264
GENERAL INFORMATION
Installation of accessories
EB24A-E
Before fitting any accessories, please con-
sult your authorized MITSUBISHI dealer.
(1) The installation of accessories, op-
tional parts, etc., should only be car-
ried out within the limits prescribed by
law in your country, and in accord-
ance with the guidelines and warn-
ings contained within the documents
accompanying this vehicle.
Only MITSUBISHI approved acces-
sories should be fitted to your vehicle.
(2) Improper installation of electrical
parts could cause fire, please refer to
the Modification/Alteration to the elec-
trical or fuel systems section within
this manual.
(3) When using a communication system
such as a cellular phone or a radio set
inside the vehicle, a separate external
antenna must be fitted. When a
cellular phone or a radio set is used
by using an internal antenna alone, it
may interfere with the vehicle’s elec-
trical system and adversely affect
safe operation of the vehicle.
(4) Tyres and wheels which do not meet
specifications must not be used.
Refer to the “Specification” section for
information regarding wheel and tyre
sizes.Consider also that there basically exists
no liability on the part of the appraiser
or the official. Only in the case of parts
(MITSUBISHI original replacement or ex-
change parts as well as MITSUBISHI
accessories) that are recommended and
released by an authorized MITSUBISHI
dealer and that are attached or installed
by an authorized MITSUBISHI dealer can
you assume, that optimal safety has been
provided. The same also pertains to modi-
fications of MITSUBISHI vehicles with re-
spect to the production specifications. For
your own safety, in such cases as well,
you should only undertake modifications
according to the recommendations of an
authorized MITSUBISHI dealer. (5) Do not fail to read all relative instruc-
tions before first putting into service
the attachment or installation of
accessories, parts or other modifica-
tions to the vehicle!
Important points!
Due to the large number of accessory and
replacement parts of different manufac-
turers in the market, it is not possible, not
only for MITSUBISHI, but also for an au-
thorized MITSUBISHI dealer, to check
whether the attachment or installation of
such parts affects the driving safety of
your MITSUBISHI-vehicle.
Even when such parts are officially au-
thorized, for example by a general opera-
tors “permit” (an appraisal for the part) or
through the execution of the part in an offi-
cially approved manner of construction, or
when a single operation permit following
the attachment or installation of such
parts, it cannot be deduced from that
alone, that the driving safety of your vehi-
cles has not been affected.
1-14
01engL2_240082_4 22-01-2004 12:58 Page 1-14
Page 23 of 264
LOCKING AND UNLOCKING
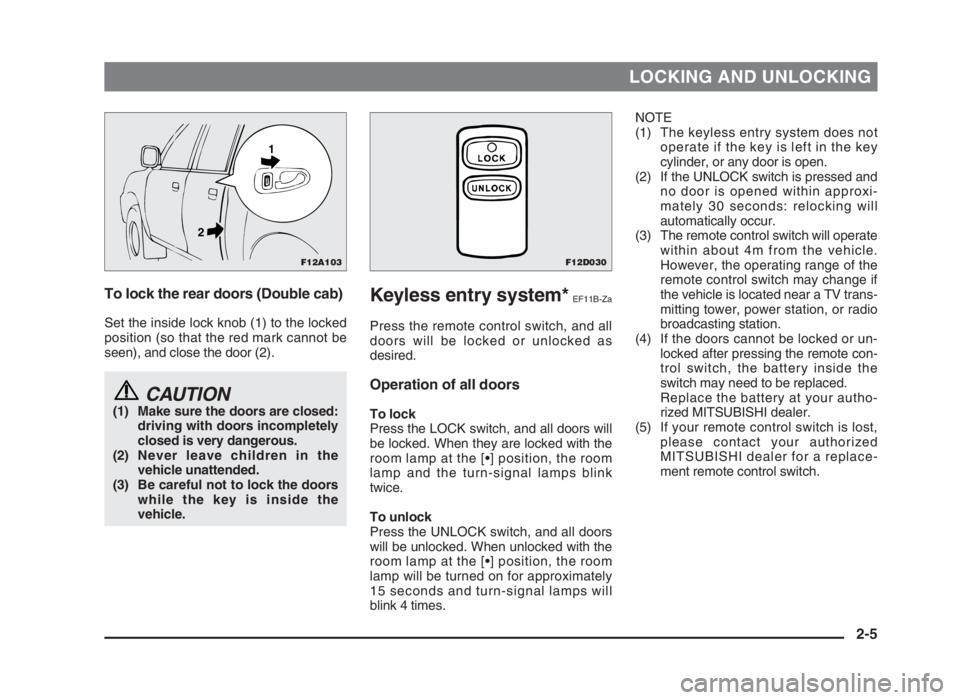
To lock the rear doors (Double cab)
Set the inside lock knob (1) to the locked
position (so that the red mark cannot be
seen), and close the door (2).
CAUTION(1) Make sure the doors are closed:
driving with doors incompletely
closed is very dangerous.
(2) Never leave children in the
vehicle unattended.
(3) Be careful not to lock the doors
while the key is inside the
vehicle.
NOTE
(1) The keyless entry system does not
operate if the key is left in the key
cylinder, or any door is open.
(2) If the UNLOCK switch is pressed and
no door is opened within approxi-
mately 30 seconds: relocking will
automatically occur.
(3) The remote control switch will operate
within about 4m from the vehicle.
However, the operating range of the
remote control switch may change if
the vehicle is located near a TV trans-
mitting tower, power station, or radio
broadcasting station.
(4) If the doors cannot be locked or un-
locked after pressing the remote con-
trol switch, the battery inside the
switch may need to be replaced.
Replace the battery at your autho-
rized MITSUBISHI dealer.
(5) If your remote control switch is lost,
please contact your authorized
MITSUBISHI dealer for a replace-
ment remote control switch.
Keyless entry system*EF11B-Za
Press the remote control switch, and all
doors will be locked or unlocked as
desired.
Operation of all doors
To lock
Press the LOCK switch, and all doors will
be locked. When they are locked with the
room lamp at the [•] position, the room
lamp and the turn-signal lamps blink
twice.
To unlock
Press the UNLOCK switch, and all doors
will be unlocked. When unlocked with the
room lamp at the [•] position, the room
lamp will be turned on for approximately
15 seconds and turn-signal lamps will
blink 4 times.
2-5
F12A103
1
2
F12D030
02engL2_240082_4 22-01-2004 12:59 Page 2-5
Page 95 of 264
STARTING AND DRIVING
5-9
mm
*
1: Single cab, double cab
*2: Club cab
NOTE
The values under item 10 are applicable
to unladen vehicles. These values can
also be varied depending on the tyre size,
optional equipment and suspension con-
ditions.
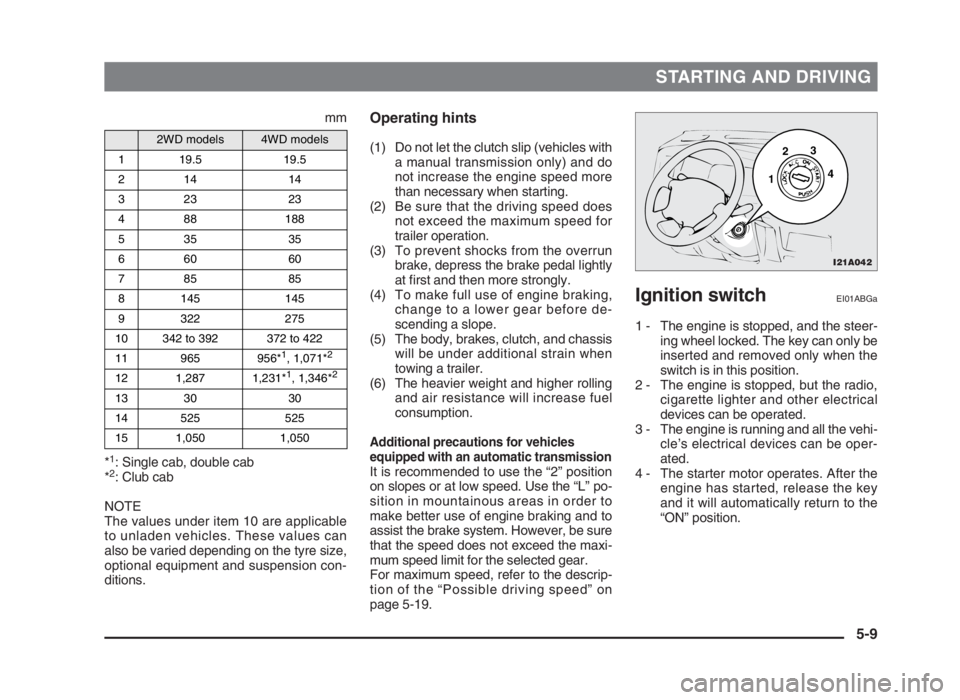
Ignition switchEI01ABGa
1 - The engine is stopped, and the steer-
ing wheel locked. The key can only be
inserted and removed only when the
switch is in this position.
2 - The engine is stopped, but the radio,
cigarette lighter and other electrical
devices can be operated.
3 - The engine is running and all the vehi-
cle’s electrical devices can be oper-
ated.
4 - The starter motor operates. After the
engine has started, release the key
and it will automatically return to the
“ON” position.
Operating hints
(1) Do not let the clutch slip (vehicles with
a manual transmission only) and do
not increase the engine speed more
than necessary when starting.
(2) Be sure that the driving speed does
not exceed the maximum speed for
trailer operation.
(3) To prevent shocks from the overrun
brake, depress the brake pedal lightly
at first and then more strongly.
(4) To make full use of engine braking,
change to a lower gear before de-
scending a slope.
(5) The body, brakes, clutch, and chassis
will be under additional strain when
towing a trailer.
(6) The heavier weight and higher rolling
and air resistance will increase fuel
consumption.
Additional precautions for vehicles
equipped with an automatic transmission
It is recommended to use the “2” position
on slopes or at low speed. Use the “L” po-
sition in mountainous areas in order to
make better use of engine braking and to
assist the brake system. However, be sure
that the speed does not exceed the maxi-
mum speed limit for the selected gear.
For maximum speed, refer to the descrip-
tion of the “Possible driving speed” on
page 5-19.
2WD models4WD models
1 19.5 19.5
214 14
323 23
4 88 188
535 35
660 60
785 85
8 145 145
9 322 275
10 342 to 392 372 to 422
11 965 956*
1, 1,071*2
12 1,287 1,231*1, 1,346*2
13 30 30
14 525 525
15 1,050 1,050
I21A042
2
13
4
05engL2_240082_4 22-01-2004 13:04 Page 5-9
Page 127 of 264
UKW/MW/LW electronic tuning radio
with tape player* .................................... 6-2
Procedure for input of security code to
audio system with anti-theft system .... 6-15
Pillar antenna ............................................... 6-18
Ventilators .................................................... 6-18
Heater/Air conditioning* .............................. 6-19
Automatic air conditioning* ........................ 6-25
Rear heater* .................................................. 6-30
Sun visors..................................................... 6-32
Vanity mirror* ............................................... 6-32
Cigarette lighter ........................................... 6-33
Ashtray.......................................................... 6-34
Digital clock .................................................. 6-34
Accessory boxes ......................................... 6-35
Glove box...................................................... 6-35
Centre console box* .................................... 6-36
Cup tray ........................................................ 6-37
Secret box (Club cab) .................................. 6-37
First-aid kit and warning triangle
securing band ........................................ 6-38
Tray under seat
(under front passenger’s seat)* ............ 6-39
For pleasant driving
6
06engL2_240082_4 22-01-2004 13:07 Page 6-1
Page 128 of 264
FOR PLEASANT DRIVING
UKW/MW/LW electronic tuning radio with
tape player*
EH30E-E
The audio system can be used when the ignition key is in the “ON”
or “ACC” position.
NOTE
(1) To listen to the audio system while the engine is stopped, turn
the ignition key to the “ACC” position.
(2) When a cellular phone is used inside the vehicle, noise may
be produced from the audio equipment. This does not mean
that something is wrong with the audio equipment. In such a
case, use the cellular phone at a place as far as possible from
the audio equipment.(3) A CD player or a CD autochanger can be connected to this
audio system.
The CD player or the CD autochanger can be operated by
the switch of the audio body. Refer to “To listen to a CD” on
page 6-14.
(4) In case of misuse (entry of a foreign object or water, smoke or
odor, etc.), immediately turn off the audio system and have it
checked at an authorized MITSUBISHI dealer. Never try to
repair it by yourself. Avoid continuous usage without inspec-
tion by a qualified person.
6-2
06engL2_240082_4 22-01-2004 13:07 Page 6-2
Page 129 of 264
FOR PLEASANT DRIVING
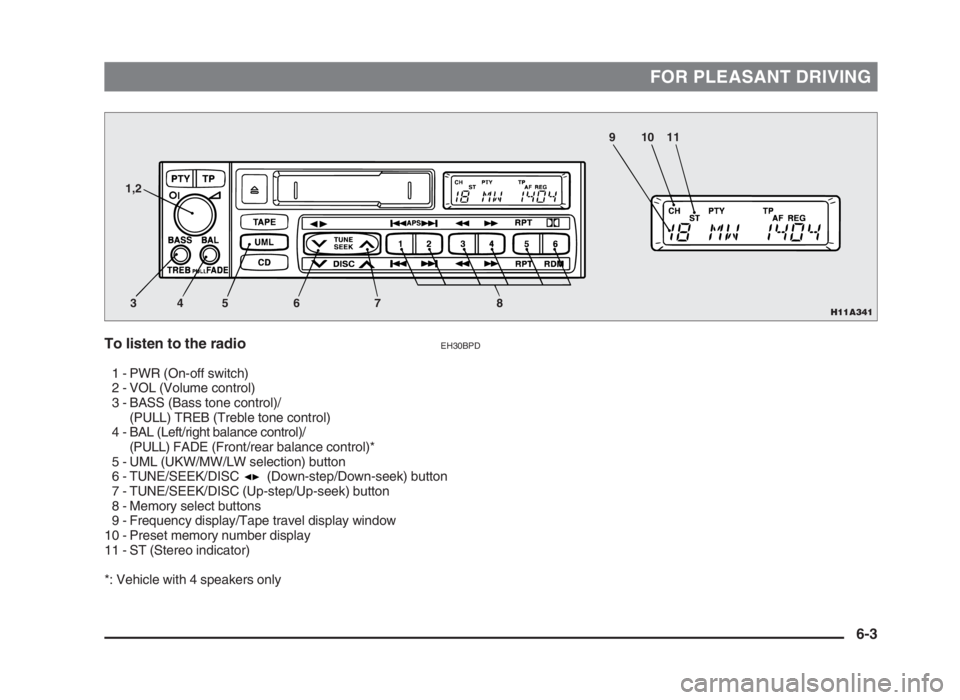
To listen to the radioEH30BPD
1 - PWR (On-off switch)
2 - VOL (Volume control)
3 - BASS (Bass tone control)/
(PULL) TREB (Treble tone control)
4 - BAL (Left/right balance control)/
(PULL)FADE (Front/rear balance control)*
5 - UML (UKW/MW/LW selection) button
6 - TUNE/SEEK/DISC (Down-step/Down-seek) button
7 - TUNE/SEEK/DISC (Up-step/Up-seek) button
8 - Memory select buttons
9 - Frequency display/Tape travel display window
10 - Preset memory number display
11 - ST (Stereo indicator)
*: Vehicle with 4 speakers only
6-3
H11A341
1,2
3456 7 891011
06engL2_240082_4 22-01-2004 13:07 Page 6-3
Page 130 of 264
FOR PLEASANT DRIVING
1. Press the PWR switch (1) to turn on
the radio.
Press the PWR switch again to switch
it off.
2. Press the UML button (5) to select the
desired band (UKW/MW/LW).
3. Press the TUNE/SEEK button (6 or 7)
or one of the Memory select buttons
(8) to tune to a station.
Refer to “How to adjust the tune” or
“How to enter frequencies in the
memory”.
How to adjust the volume and tone
VOL (Volume control) - 2
Turn the knob clockwise to increase the
volume.
BASS (Bass tone control) - 3
Press the button, and it will pop-up. Rotate
the knob clockwise or counterclockwise to
select the desired bass tone quality.
TREB (Treble tone control) - 3
Press the button, and it will pop-up. Pull
and rotate the knob clockwise or counter-
clockwise to select the desired treble tone
quality.BAL (Left/right balance control) - 4
Press the button, and it will pop-up. Rotate
the knob in either direction to balance the
volume of sound from the left and right
speakers.
FADE (Front/rear balance control)* - 4
Press the button, and it will pop-up. Pull
and turn the knob to the left or right to bal-
ance the volume of the front and rear
speakers.
NOTE
(1) The BASS (3), TREB (3), BAL (4),
and FADE (4) buttons should be ad-
justed after they have been popped
out. After adjusting, keep them
pressed in.
(2) In a two-speaker vehicle, keep the
FADE (front/rear balance control) set-
ting in the middle position. Since no
rear speakers are connected, adjust-
ing the FADE setting towards the “R”
(rear) side could result in a loss of
sound output.
How to adjust the tune
Automatic tuning
After keeping the TUNE/SEEK button
(6 or 7) depressed for more than 1 sec-
ond, remove your fingers from the button,
and reception of a receivable station will
start.
Manual tuning
The frequency changes every time the
TUNE/SEEK button (6 or 7) is pressed.
Press the button to select the desired sta-
tion.
6-4
06engL2_240082_4 22-01-2004 13:07 Page 6-4
Page 132 of 264
FOR PLEASANT DRIVING
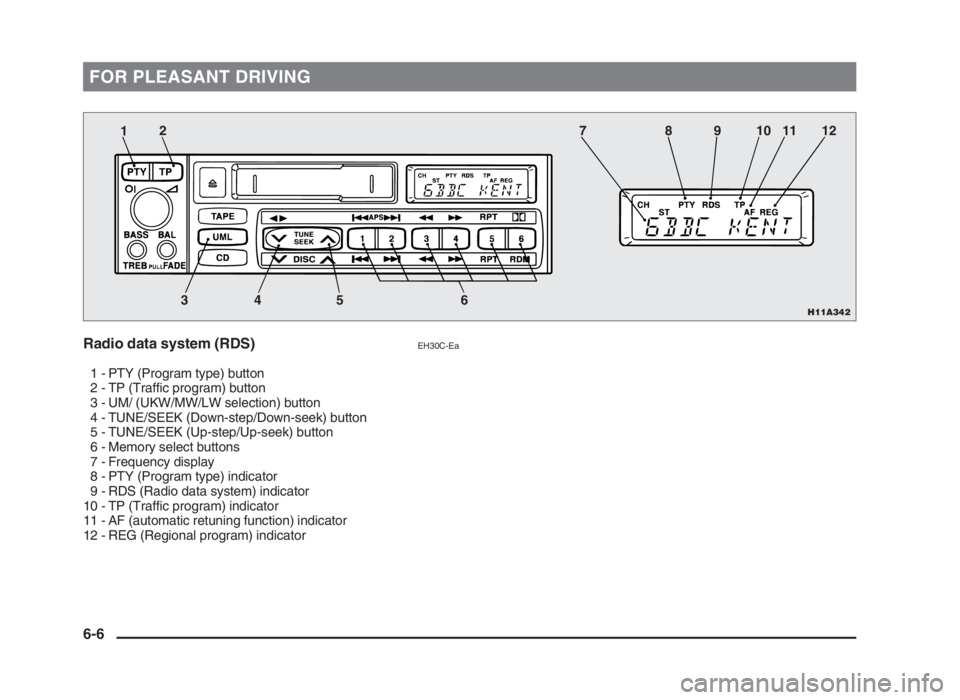
Radio data system (RDS)EH30C-Ea
1 - PTY (Program type) button
2 - TP (Traffic program) button
3 - UM/ (UKW/MW/LW selection) button
4 - TUNE/SEEK (Down-step/Down-seek) button
5 - TUNE/SEEK (Up-step/Up-seek) button
6 - Memory select buttons
7 - Frequency display
8 - PTY (Program type) indicator
9 - RDS (Radio data system) indicator
10 - TP (Traffic program) indicator
11 - AF (automatic retuning function) indicator
12 - REG (Regional program) indicator
6-6
H11A342
12
34 5 6789101112
06engL2_240082_4 22-01-2004 13:07 Page 6-6
Page 133 of 264
FOR PLEASANT DRIVING
RDS uses PI (program identification) sig-
nal and AF(alternative frequency) list
transmitted in addition to the normal UKW
broadcasting programs, and pick up the
UKW stations that are transmitting the
same program from the EON (enhanced
other network) and automatically tunes
to the station with the strongest signal
intensity.
Therefore, you can continue listening to
one program in, for example, a long dis-
tance driving without returning to other
station transmitting the same program
when you are leaving the service area of
the currently receiving station.
The RDS radio also features the limited
reception of the program types, the break-
in reception of the traffic announcement
and emergency broadcast, and the lim-
ited/unlimited reception of the regional
programs.PTY (Program type)
RDS broadcasts are classified according
to program type (PTY) as follows. Use the
TUNE/SEEK button (4 or 5) to select your
desired PTY.
1. SPEECH
2. NEWS
3. AFFAIRS
4. INFO (Information)
5. SPORT
6. EDUCATE (Education)
7. DRAMA
8. CULTURE
9. SCIENCE
10. VARIED
11. MUSIC
12. POP M
13. ROCK M
14. M.O.R.M. (Middle of road music)
15. LIGHT M (Light/classic)
16. CLASSIC
17. OTHER M (Other music)
NOTE
If “1” or “11” is selected, the program
search is made widely under the category
of speech or music.Automatic retuning function
The automatic retuning function finds sta-
tions that are broadcasting the same pro-
gram and automatically tunes to the sta-
tion with the strongest signal.
Press the UML button (3) for more than 2
seconds, and the AF indicator (11) will illu-
minate in display (7). Press the UML but-
ton for more than 2 seconds again to re-
set.
PI (Program identification)
When listening to stations programmed
into the Memory select buttons (6), you
may listen to broadcasts with the same PI.
If the very same station as memorized
cannot be received, a station broadcast-
ing the same program in the same net-
work is automatically selected. The dis-
play (7) will then show the REG indicator
(12).
6-7
06engL2_240082_4 22-01-2004 13:07 Page 6-7
Page 134 of 264
FOR PLEASANT DRIVING
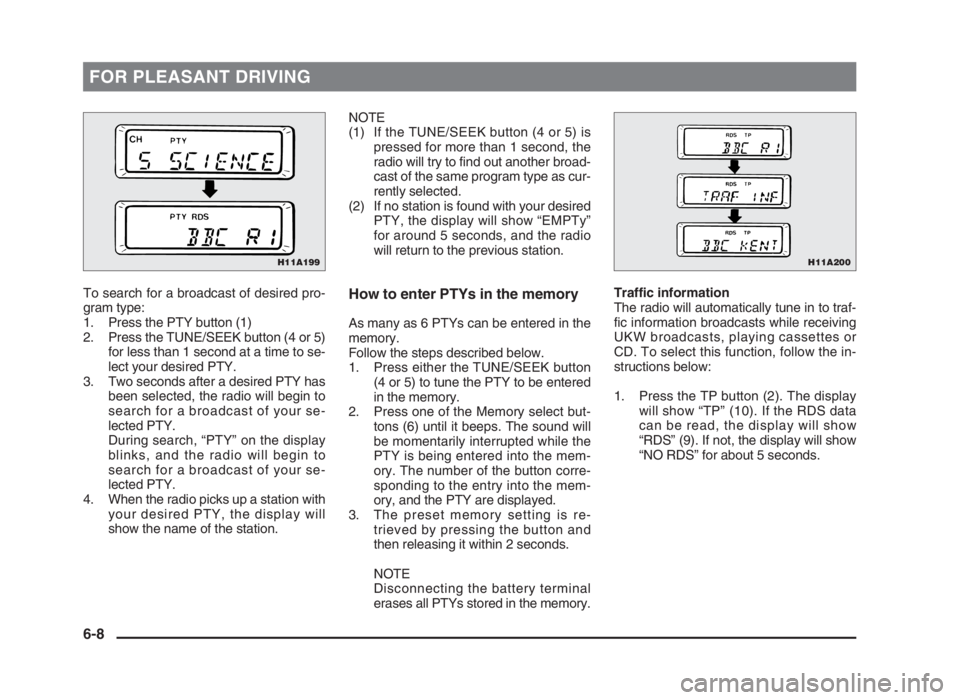
To search for a broadcast of desired pro-
gram type:
1. Press the PTY button (1)
2. Press the TUNE/SEEK button (4 or 5)
for less than 1 second at a time to se-
lect your desired PTY.
3. Two seconds after a desired PTY has
been selected, the radio will begin to
search for a broadcast of your se-
lected PTY.
During search, “PTY” on the display
blinks, and the radio will begin to
search for a broadcast of your se-
lected PTY.
4. When the radio picks up a station with
your desired PTY, the display will
show the name of the station.NOTE
(1) If the TUNE/SEEK button (4 or 5) is
pressed for more than 1 second, the
radio will try to find out another broad-
cast of the same program type as cur-
rently selected.
(2) If no station is found with your desired
PTY, the display will show “EMPTy”
for around 5 seconds, and the radio
will return to the previous station.How to enter PTYs in the memory
As many as 6 PTYs can be entered in the
memory.
Follow the steps described below.
1. Press either the TUNE/SEEK button
(4 or 5) to tune the PTY to be entered
in the memory.
2. Press one of the Memory select but-
tons (6) until it beeps. The sound will
be momentarily interrupted while the
PTY is being entered into the mem-
ory. The number of the button corre-
sponding to the entry into the mem-
ory, and the PTY are displayed.
3. The preset memory setting is re-
trieved by pressing the button and
then releasing it within 2 seconds.
NOTE
Disconnecting the battery terminal
erases all PTYs stored in the memory.Traffic information
The radio will automatically tune in to traf-
fic information broadcasts while receiving
UKW broadcasts, playing cassettes or
CD. To select this function, follow the in-
structions below:
1. Press the TP button (2). The display
will show “TP” (10). If the RDS data
can be read, the display will show
“RDS” (9). If not, the display will show
“NO RDS” for about 5 seconds.
6-8
H11A200H11A199
06engL2_240082_4 22-01-2004 13:07 Page 6-8