4llc MITSUBISHI L200 2011 Owner's Manual (in English)
[x] Cancel search | Manufacturer: MITSUBISHI, Model Year: 2011, Model line: L200, Model: MITSUBISHI L200 2011Pages: 330, PDF Size: 22.34 MB
Page 130 of 330
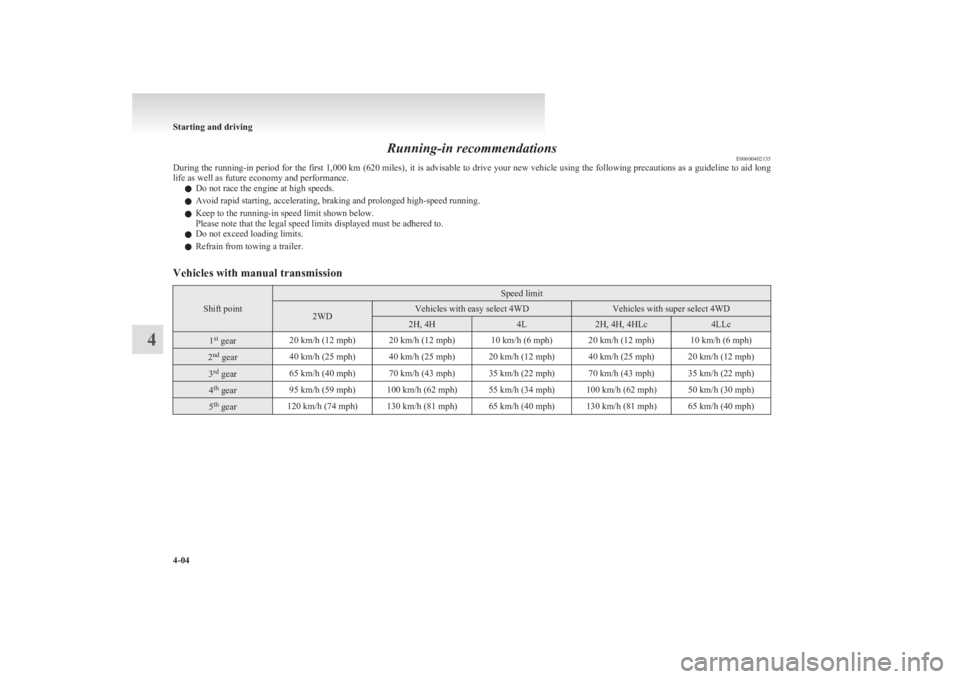
Running-in recommendationsE00600402135
During the running-in period for the first 1,000 km (620 miles), it is advisable to drive your new vehicle using the following precautions as a guideline to aid long
life as well as future economy and performance.
l Do not race the engine at high speeds.
l Avoid rapid starting, accelerating, braking and prolonged high-speed running.
l Keep to the running-in speed limit shown below.
Please note that the legal speed limits displayed must be adhered to.
l Do not exceed loading limits.
l Refrain from towing a trailer.Vehicles with manual transmission
Shift point
Speed limit2WDVehicles with easy select 4WDVehicles with super select 4WD2H, 4H4L2H, 4H, 4HLc4LLc1st
gear20 km/h (12 mph)20 km/h (12 mph)10 km/h (6 mph)20 km/h (12 mph)10 km/h (6 mph)2nd
gear40 km/h (25 mph)40 km/h (25 mph)20 km/h (12 mph)40 km/h (25 mph)20 km/h (12 mph)3rd
gear65 km/h (40 mph)70 km/h (43 mph)35 km/h (22 mph)70 km/h (43 mph)35 km/h (22 mph)4th
gear95 km/h (59 mph)100 km/h (62 mph)55 km/h (34 mph)100 km/h (62 mph)50 km/h (30 mph)5th
gear120 km/h (74 mph)130 km/h (81 mph)65 km/h (40 mph)130 km/h (81 mph)65 km/h (40 mph)
Starting and driving
4-04
4
Page 131 of 330
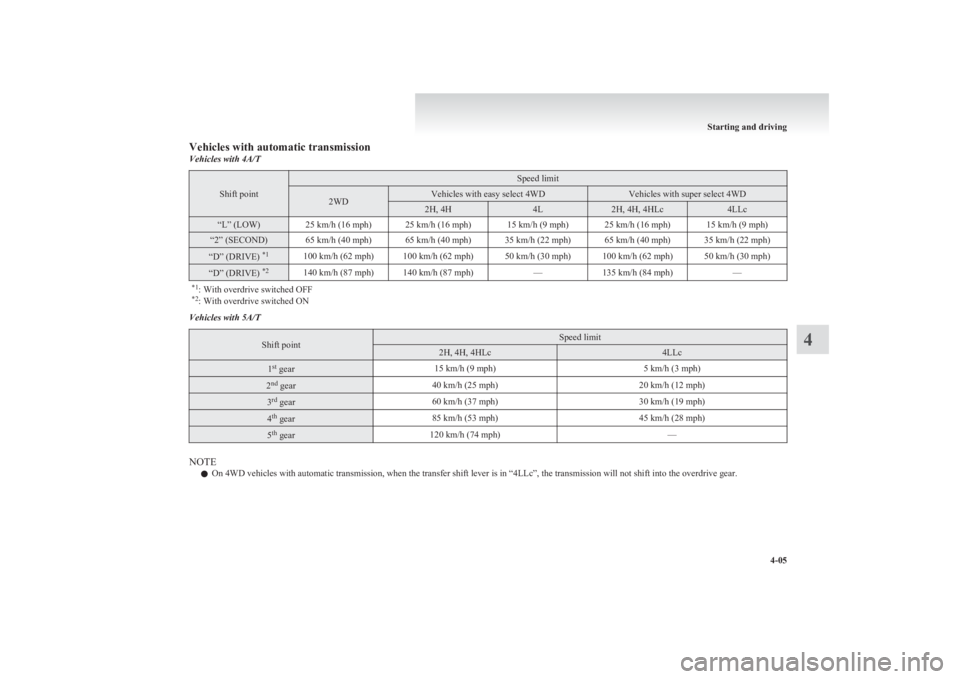
Vehicles with automatic transmissionVehicles with 4A/T
Shift point
Speed limit2WDVehicles with easy select 4WDVehicles with super select 4WD2H, 4H4L2H, 4H, 4HLc4LLc“L” (LOW)25 km/h (16 mph)25 km/h (16 mph)15 km/h (9 mph)25 km/h (16 mph)15 km/h (9 mph)“2” (SECOND)65 km/h (40 mph)65 km/h (40 mph)35 km/h (22 mph)65 km/h (40 mph)35 km/h (22 mph)“D” (DRIVE) *1100 km/h (62 mph)100 km/h (62 mph)50 km/h (30 mph)100 km/h (62 mph)50 km/h (30 mph)“D” (DRIVE) *2140 km/h (87 mph)140 km/h (87 mph)—135 km/h (84 mph)—*1
: With overdrive switched OFF
*2 : With overdrive switched ONVehicles with 5A/TShift pointSpeed limit2H, 4H, 4HLc4LLc1st
gear15 km/h (9 mph)5 km/h (3 mph)2nd
gear40 km/h (25 mph)20 km/h (12 mph)3rd
gear60 km/h (37 mph)30 km/h (19 mph)4th
gear85 km/h (53 mph)45 km/h (28 mph)5th
gear120 km/h (74 mph)—
NOTE
l On 4WD vehicles with automatic transmission, when the transfer shift lever is in “4LLc”, the transmission will not shift into the overdrive gear.
Starting and driving
4-05
4
Page 132 of 330
CAUTIONlOn 4WD vehicles, the “4LLc” range gives maximum torque for low-speed driving on steep slopes, as well as sandy, muddy, and other difficult
surfaces. On vehicles with A/T, do not exceed speeds of approximately 70 km/h (43 mph) in “4LLc” range.
Starting and driving
4-06
4
Page 141 of 330
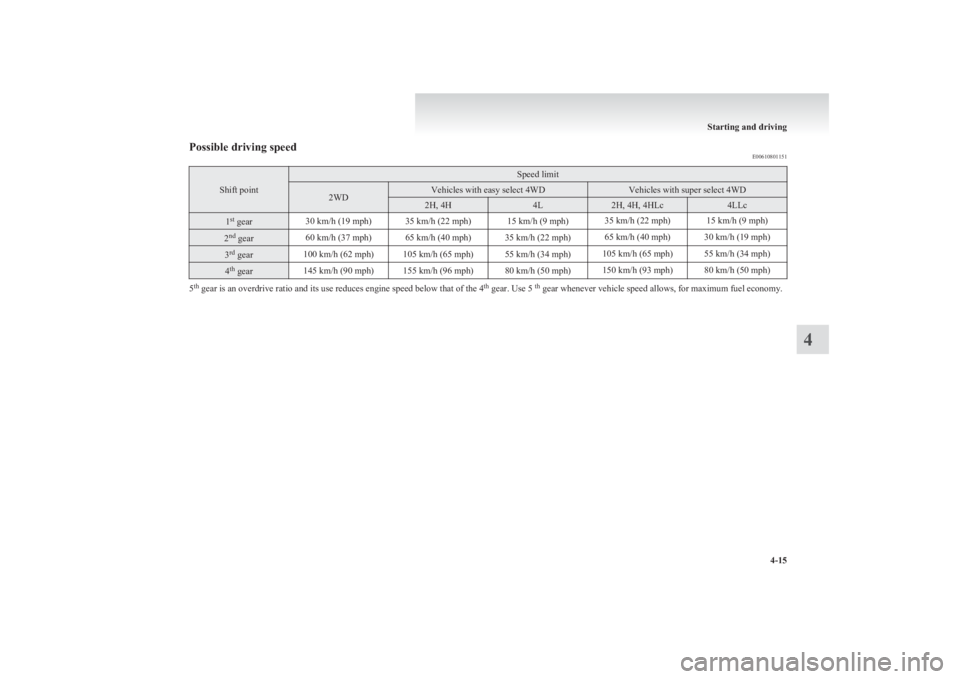
Possible driving speedE00610801151
Shift point
Speed limit2WDVehicles with easy select 4WDVehicles with super select 4WD2H, 4H4L2H, 4H, 4HLc4LLc1st
gear30 km/h (19 mph)35 km/h (22 mph)15 km/h (9 mph)35 km/h (22 mph)15 km/h (9 mph)2nd
gear60 km/h (37 mph)65 km/h (40 mph)35 km/h (22 mph)65 km/h (40 mph)30 km/h (19 mph)3rd
gear100 km/h (62 mph)105 km/h (65 mph)55 km/h (34 mph)105 km/h (65 mph)55 km/h (34 mph)4th
gear145 km/h (90 mph)155 km/h (96 mph)80 km/h (50 mph)150 km/h (93 mph)80 km/h (50 mph)
5th
gear is an overdrive ratio and its use reduces engine speed below that of the 4 th
gear. Use 5 th
gear whenever vehicle speed allows, for maximum fuel economy.
Starting and driving
4-15
4
Page 156 of 330
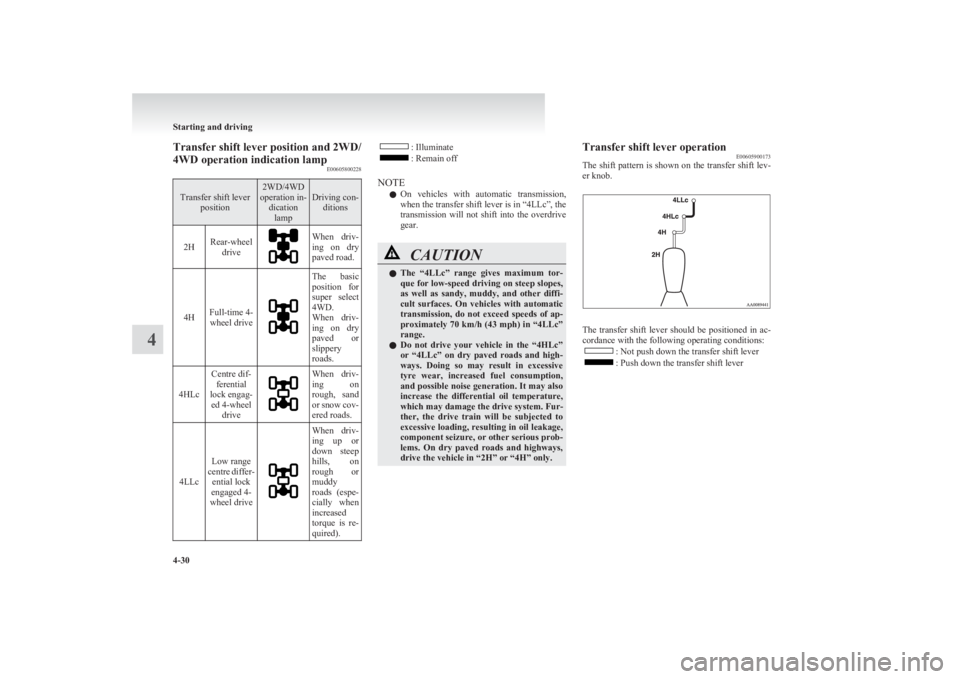
Transfer shift lever position and 2WD/
4WD operation indication lamp E00605800228Transfer shift lever
position2WD/4WD
operation in- dicationlampDriving con- ditions2HRear-wheel driveWhen driv-
ing on dry
paved road.
4HFull-time 4- wheel drive
The basic
position for
super select
4WD.
When driv-
ing on dry
paved or
slippery
roads.
4HLc
Centre dif- ferential
lock engag- ed 4-wheel driveWhen driv-
ing on
rough, sand
or snow cov-
ered roads.
4LLc
Low range
centre differ- ential lock
engaged 4-
wheel drive
When driv-
ing up or
down steep
hills, on
rough or
muddy
roads (espe-
cially when
increased
torque is re-
quired).: Illuminate: Remain off
NOTE l On vehicles with automatic transmission,
when the transfer shift lever is in “4LLc”, the
transmission will not shift into the overdrive
gear.CAUTIONl The “4LLc” range gives maximum tor-
que for low-speed driving on steep slopes,
as well as sandy, muddy, and other diffi-
cult surfaces. On vehicles with automatic
transmission, do not exceed speeds of ap-
proximately 70 km/h (43 mph) in “4LLc”
range.
l Do not drive your vehicle in the “4HLc”
or “4LLc” on dry paved roads and high-
ways. Doing so may result in excessive
tyre wear, increased fuel consumption,
and possible noise generation. It may also
increase the differential oil temperature,
which may damage the drive system. Fur-
ther, the drive train will be subjected to
excessive loading, resulting in oil leakage,
component seizure, or other serious prob-
lems. On dry paved roads and highways,
drive the vehicle in “2H” or “4H” only.Transfer shift lever operation E00605900173
The shift pattern is shown on the transfer shift lev-
er knob.
The transfer shift lever should be positioned in ac-
cordance with the following operating conditions:
: Not push down the transfer shift lever: Push down the transfer shift lever
Starting and driving
4-30
4
Page 157 of 330
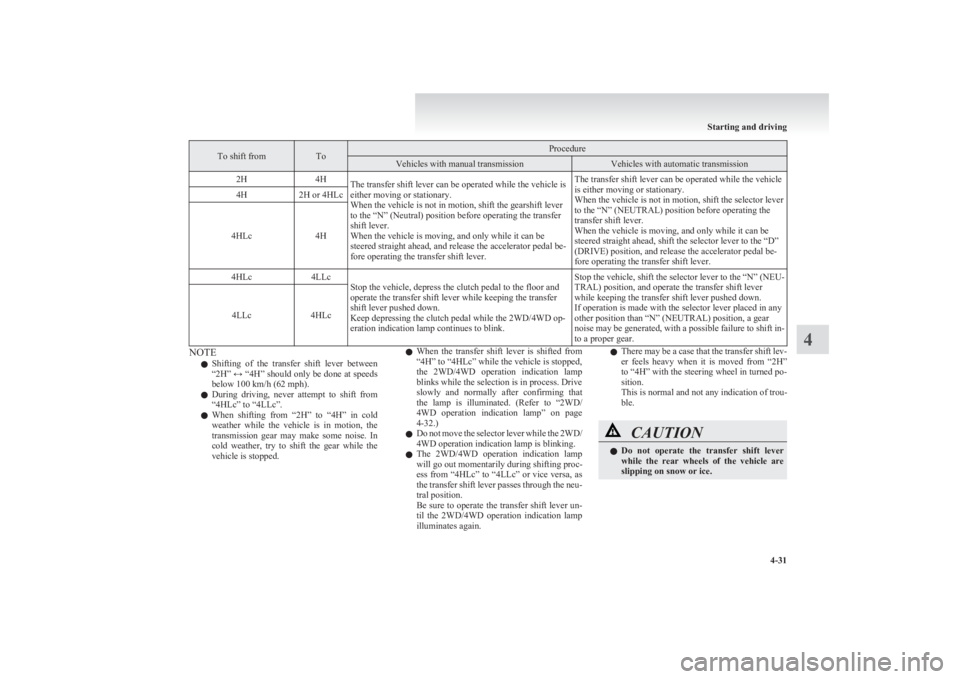
To shift fromToProcedureVehicles with manual transmissionVehicles with automatic transmission2H4HThe transfer shift lever can be operated while the vehicle is
either moving or stationary.
When the vehicle is not in motion, shift the gearshift lever
to the “N” (Neutral) position before operating the transfer
shift lever.
When the vehicle is moving, and only while it can be
steered straight ahead, and release the accelerator pedal be-
fore operating the transfer shift lever.The transfer shift lever can be operated while the vehicle
is either moving or stationary.
When the vehicle is not in motion, shift the selector lever
to the “N” (NEUTRAL) position before operating the
transfer shift lever.
When the vehicle is moving, and only while it can be
steered straight ahead, shift the selector lever to the “D”
(DRIVE) position, and release the accelerator pedal be-
fore operating the transfer shift lever.4H2H or 4HLc
4HLc4H
4HLc4LLcStop the vehicle, depress the clutch pedal to the floor and
operate the transfer shift lever while keeping the transfer
shift lever pushed down.
Keep depressing the clutch pedal while the 2WD/4WD op-
eration indication lamp continues to blink.Stop the vehicle, shift the selector lever to the “N” (NEU-
TRAL) position, and operate the transfer shift lever
while keeping the transfer shift lever pushed down.
If operation is made with the selector lever placed in any
other position than “N” (NEUTRAL) position, a gear
noise may be generated, with a possible failure to shift in-
to a proper gear.
4LLc4HLc
NOTE
l Shifting of the transfer shift lever between
“2H” ↔ “4H” should only be done at speeds
below 100 km/h (62 mph).
l During driving, never attempt to shift from
“4HLc” to “4LLc”.
l When shifting from “2H” to “4H” in cold
weather while the vehicle is in motion, the
transmission gear may make some noise. In
cold weather, try to shift the gear while the
vehicle is stopped.l When the transfer shift lever is shifted from
“4H” to “4HLc” while the vehicle is stopped,
the 2WD/4WD operation indication lamp
blinks while the selection is in process. Drive
slowly and normally after confirming that
the lamp is illuminated. (Refer to “2WD/
4WD operation indication lamp” on page
4-32.)
l Do not move the selector lever while the 2WD/
4WD operation indication lamp is blinking.
l The 2WD/4WD operation indication lamp
will go out momentarily during shifting proc-
ess from “4HLc” to “4LLc” or vice versa, as
the transfer shift lever passes through the neu-
tral position.
Be sure to operate the transfer shift lever un-
til the 2WD/4WD operation indication lamp
illuminates again.l There may be a case that the transfer shift lev-
er feels heavy when it is moved from “2H”
to “4H” with the steering wheel in turned po-
sition.
This is normal and not any indication of trou-
ble.CAUTIONl Do not operate the transfer shift lever
while the rear wheels of the vehicle are
slipping on snow or ice.
Starting and driving
4-31
4
Page 159 of 330
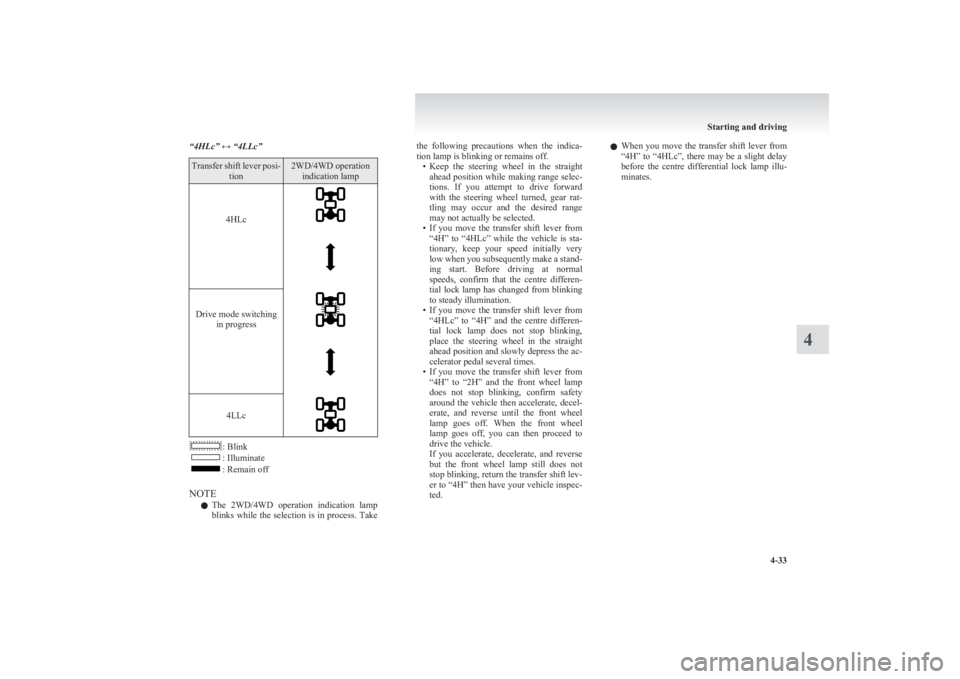
“4HLc” ↔ “4LLc”Transfer shift lever posi-tion2WD/4WD operationindication lamp
4HLc
Drive mode switching in progress
4LLc
: Blink: Illuminate: Remain off
NOTE l The 2WD/4WD operation indication lamp
blinks while the selection is in process. Take
the following precautions when the indica-
tion lamp is blinking or remains off. •Keep the steering wheel in the straight
ahead position while making range selec-
tions. If you attempt to drive forward
with the steering wheel turned, gear rat-
tling may occur and the desired range
may not actually be selected.
• If you move the transfer shift lever from
“4H” to “4HLc” while the vehicle is sta-
tionary, keep your speed initially very
low when you subsequently make a stand-
ing start. Before driving at normal
speeds, confirm that the centre differen-
tial lock lamp has changed from blinking
to steady illumination.
• If you move the transfer shift lever from
“4HLc” to “4H” and the centre differen-
tial lock lamp does not stop blinking,
place the steering wheel in the straight
ahead position and slowly depress the ac-
celerator pedal several times.
• If you move the transfer shift lever from
“4H” to “2H” and the front wheel lamp
does not stop blinking, confirm safety
around the vehicle then accelerate, decel-
erate, and reverse until the front wheel
lamp goes off. When the front wheel
lamp goes off, you can then proceed to
drive the vehicle.
If you accelerate, decelerate, and reverse
but the front wheel lamp still does not
stop blinking, return the transfer shift lev-
er to “4H” then have your vehicle inspec-
ted.l When you move the transfer shift lever from
“4H” to “4HLc”, there may be a slight delay
before the centre differential lock lamp illu-
minates.
Starting and driving
4-33
4
Page 160 of 330
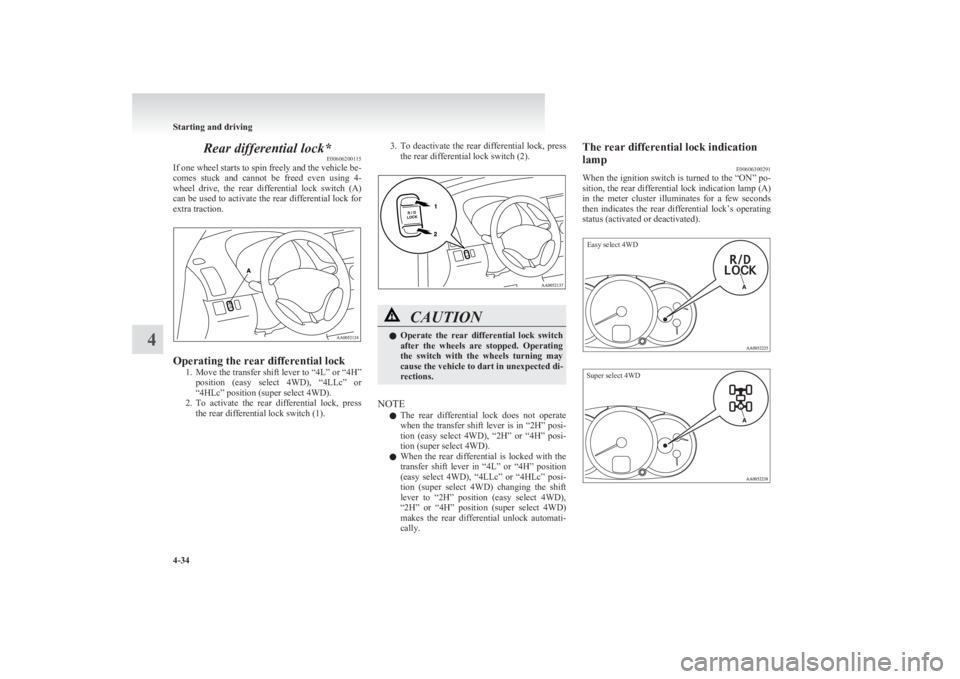
Rear differential lock*E00606200115
If one wheel starts to spin freely and the vehicle be-
comes stuck and cannot be freed even using 4-
wheel drive, the rear differential lock switch (A)
can be used to activate the rear differential lock for
extra traction.
Operating the rear differential lock
1.Move the transfer shift lever to “4L” or “4H”
position (easy select 4WD), “4LLc” or
“4HLc” position (super select 4WD).
2. To activate the rear differential lock, press
the rear differential lock switch (1).
3. To deactivate the rear differential lock, press
the rear differential lock switch (2).CAUTIONl Operate the rear differential lock switch
after the wheels are stopped. Operating
the switch with the wheels turning may
cause the vehicle to dart in unexpected di-
rections.
NOTE
l The rear differential lock does not operate
when the transfer shift lever is in “2H” posi-
tion (easy select 4WD), “2H” or “4H” posi-
tion (super select 4WD).
l When the rear differential is locked with the
transfer shift lever in “4L” or “4H” position
(easy select 4WD), “4LLc” or “4HLc” posi-
tion (super select 4WD) changing the shift
lever to “2H” position (easy select 4WD),
“2H” or “4H” position (super select 4WD)
makes the rear differential unlock automati-
cally.
The rear differential lock indication
lamp E00606300291
When the ignition switch is turned to the “ON” po-
sition, the rear differential lock indication lamp (A)
in the meter cluster illuminates for a few seconds
then indicates the rear differential lock’s operating
status (activated or deactivated).Easy select 4WDSuper select 4WD
Starting and driving
4-34
4
Page 162 of 330
•If the vehicle speed is 12 km/h (7 mph)
or higher, decelerate to a speed of 6 km/h
( 4 mph) or lower. The indication lamp
will illuminate steadily and the rear differ-
ential lock will be activated.
• If the vehicle speed is 12 km/h (7 mph)
or lower, turn the steering wheel from
side to side until the indication lamp illu-
minates steadily. If the vehicle is stuck in
soft ground, make sure the area around
the vehicle is clear then repeatedly at-
tempt to drive forward and backward.
The indication lamp will illuminate stead-
ily and the rear differential lock will be ac-
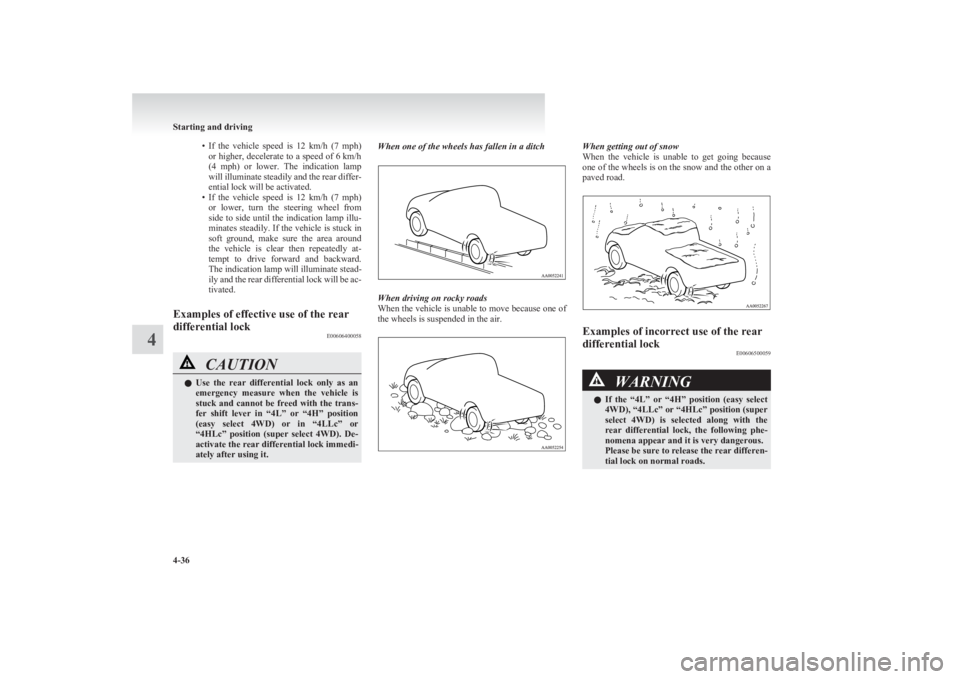
tivated.Examples of effective use of the rear
differential lock E00606400058CAUTIONlUse the rear differential lock only as an
emergency measure when the vehicle is
stuck and cannot be freed with the trans-
fer shift lever in “4L” or “4H” position
(easy select 4WD) or in “4LLc” or
“4HLc” position (super select 4WD). De-
activate the rear differential lock immedi-
ately after using it.When one of the wheels has fallen in a ditch
When driving on rocky roads
When the vehicle is unable to move because one of
the wheels is suspended in the air.
When getting out of snow
When the vehicle is unable to get going because
one of the wheels is on the snow and the other on a
paved road.Examples of incorrect use of the rear
differential lock E00606500059WARNINGlIf the “4L” or “4H” position (easy select
4WD), “4LLc” or “4HLc” position (super
select 4WD) is selected along with the
rear differential lock, the following phe-
nomena appear and it is very dangerous.
Please be sure to release the rear differen-
tial lock on normal roads.
Starting and driving
4-36
4
Page 164 of 330
4-wheel drive operationE00606600920
By selecting 4-wheel drive, both axles of the vehi-
cle are rigidly connected with each other. This im-
proves the traction characteristics. When turning
sharp corners or moving forward and backward re-
peatedly, however, the drive line is stressed, which
is felt as a braking effect. A 4-wheel drive vehicle
can accelerate more quickly and smoothly.
However, note that the braking distance is not short-
er than that of a rear-wheel drive vehicle.
When using 4-wheel drive on rough roads (snow,
mud, sand, etc.), it is important to operate the vehi-
cle correctly.
NOTE l The driving posture should be more upright
and closer to the wheel than usual; adjust the
seat to a good position for easy steering and
pedal operation. Be sure to wear the seat belt.
l After driving on rough roads, check each
part of the vehicle and wash it thoroughly
with water. Refer to the “Vehicle care” sec-
tion and “Inspection and maintenance follow-
ing rough road operation” on page 4-40.
Driving on dry paved road and highway
Select “2H” position (easy select 4WD), “2H” or
“4H” position (super select 4WD) to drive on the
dry paved road. Especially on dry highway, never
select the “4H” or “4L” position (easy select
4WD), “4HLc” or “4LLc” position (super select
4WD).CAUTIONl Selecting “4H” or “4L” position (easy se-
lect 4WD), “4HLc” or “4LLc” position (su-
per select 4WD) to drive on dry paved
road will increase the fuel consumption
with possible noise generation and early
tyre wear.
It may also increase the differential oil
temperature, resulting in possible dam-
age to the driving system.
Further, the drive train will be subjected
to excessive loading, possibly leading to
oil leakage, component seizure, or other
serious faults.
Driving on snowy or icy roads
Set the transfer shift lever to “4H” or “4L” position
(easy select 4WD), “4H” or “4HLc” position (su-
per select 4WD) in accordance with the road condi-
tions, and then gradually depress the accelerator ped-
al for a smooth start.
NOTE l The use of snow tyres and/or tyre chains is
recommended.
l Maintain a safe distance between vehicles,
avoid sudden braking, and use engine brak-
ing (downshifting).
CAUTIONl Avoid sudden braking, sudden accelera-
tion, and sharp turning; such operations
could cause skidding and spinouts.Driving on sandy or muddy roads
Set the transfer shift lever to “4H” or “4L” position
(easy select 4WD), “4HLc” or “4LLc” position (su-
per select 4WD) and then gradually depress the ac-
celerator pedal for a smooth start. Keep the pres-
sure on the accelerator pedal as constant as possi-
ble, and drive at low speed.CAUTIONl Do not force the vehicle or drive reckless-
ly on sandy surfaces. In comparison with
normal road surfaces, the engine and oth-
er drive-system components are put un-
der excessive strain when driving on such
a surface, and this could lead to accidents.
l If any of following conditions occur while
the vehicle is being driven, immediately
park your vehicle in a safe place and fol-
low these procedures: •The needle in the temperature gauge
approaches the overheating zone.
Refer to “Engine overheating” on
page 6-04.
• Automatic transmission fluid temper-
ature warning lamp comes on.
Refer to “When the A/T (automatic
transmission) fluid temperature warn-
ing lamp comes on” on pages 4-18,
4-23.
Starting and driving
4-38
4