towing MITSUBISHI L200 2011 Owner's Manual (in English)
[x] Cancel search | Manufacturer: MITSUBISHI, Model Year: 2011, Model line: L200, Model: MITSUBISHI L200 2011Pages: 330, PDF Size: 22.34 MB
Page 94 of 330
Warning lampsE00502400017Brake warning lamp E00502501637
This lamp illuminates when the ignition
switch is turned to the “ON” position,
and goes off after a few seconds.
Always make sure that the lamp goes off
before driving.
With the ignition switch in the “ON” po-
sition, the brake warning lamp illumi-
nates under the following conditions:
l When the parking brake lever has
been engaged.
l When the brake fluid level in the
reservoir falls to a low level.
l When the brake force distribution
function is not operating correctly.
(vehicles with anti-lock brake sys-
tem)CAUTIONl In the situations listed below,
brake performance may be com-
promised or the vehicle may be-
come unstable if brakes are ap-
plied suddenly; consequently,
avoid driving at high speeds or
applying the brakes suddenly.
Furthermore, immediately the
vehicle should be brought to a
stop in a safe location and to
have it checked.CAUTION• The brake warning lamp
does not illuminate when
the parking brake is applied
or does not turn off when
the parking brake is re-
leased.
• The ABS warning lamp and
brake warning lamp illumi-
nate at the same time.
For details, refer to “ABS
warning lamp” on page
4-44. (vehicles with anti-lock
brake system)
• The brake warning lamp re-
mains illuminated during
driving.
l The vehicle should be brought
to a halt in the following man-
ner when brake performance
has deteriorated. •Depress the brake pedal
harder than usual.
Even if the brake pedal
moves down to the very end
of its possible stroke, keep it
pressed down hard.
• Should the brakes fail, use
engine braking to reduce
your speed and carefully
pull the parking brake lever
to park your vehicle.
Depress the brake pedal to
operate the stop lamp to
alert the vehicles behind you.Check engine warning lamp E00502600657
This lamp is a part of an onboard diag-
nostic system which monitors the emis-
sions, engine and automatic transmission
control systems.
If a problem is detected in one of these
systems, this lamp illuminates.
Although your vehicle will usually be
drivable and not need towing, we recom-
mend you to have the system checked as
soon as possible.
This lamp will also illuminate for a few
seconds when the ignition switch is
turned to the “ON” position. If it does
not go off after a few seconds, we recom-
mend you to have the vehicle checked.CAUTIONl Prolonged driving with this
lamp on may cause further dam-
age to the emission control sys-
tem. It could also affect fuel
economy and drivability.
l If the lamp does not illuminate
when the ignition switch is
turned to the “ON” position,
we recommend you to have the
system checked.
Instruments and controls
3-08
3
Page 127 of 330
Economical driving.......................................................................4-02
Driving, alcohol and drugs ........................................................... 4-02
Safe driving techniques ................................................................ 4-03
Running-in recommendations.......................................................4-04
Parking brake ................................................................................ 4-07
Parking .......................................................................................... 4-08
Steering wheel height adjustment .................................................4-09
Inside rear-view mirror ................................................................. 4-09
Outside rear-view mirrors ............................................................. 4-10
Ignition switch .............................................................................. 4-11
Steering wheel lock ...................................................................... 4-12
Starting..........................................................................................4-13
Manual transmission ..................................................................... 4-14
Automatic transmission 4A/T ....................................................... 4-16
Automatic transmission Sports Mode 5A/T .................................4-20
Easy select 4WD* ......................................................................... 4-25
Super select 4WD* ....................................................................... 4-29
Rear differential lock* .................................................................. 4-34
4-wheel drive operation ................................................................ 4-38
Inspection and maintenance following rough road oper- ation .......................................................................................... 4-40
Cautions on handling of 4-wheel drive vehicles ..........................4-40
Limited-slip differential* .............................................................. 4-42
Braking ......................................................................................... 4-42
Anti-lock brake system (ABS)* ................................................... 4-43
Power steering system .................................................................. 4-45
Active Stability & Traction Control (ASTC)* .............................4-46
Cruise control* ............................................................................. 4-48
Cargo loads ................................................................................... 4-52
Trailer towing ............................................................................... 4-53Starting and driving4
Page 130 of 330
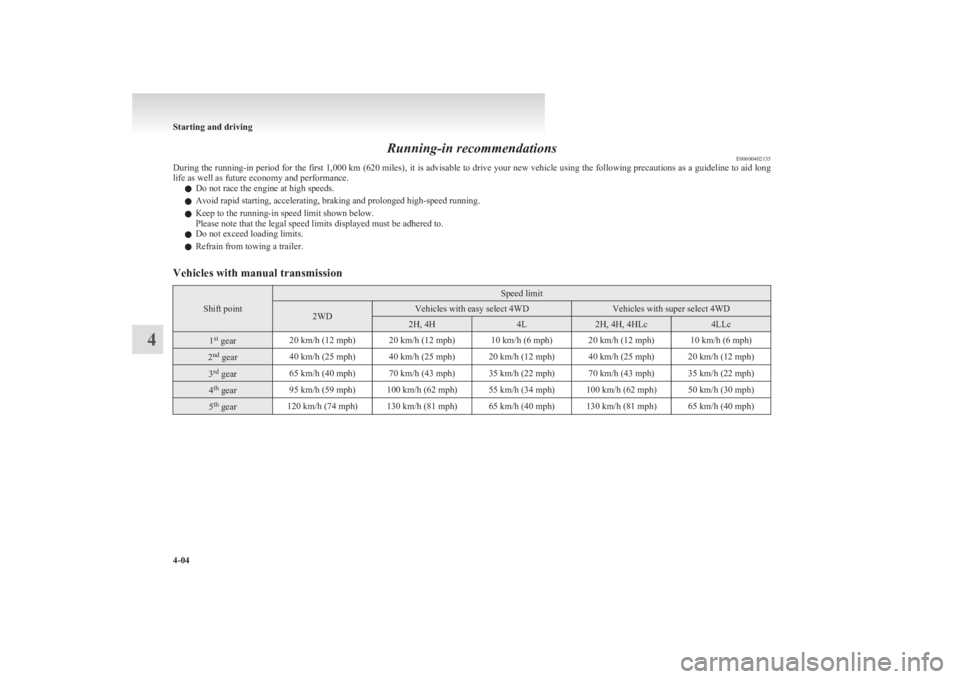
Running-in recommendationsE00600402135
During the running-in period for the first 1,000 km (620 miles), it is advisable to drive your new vehicle using the following precautions as a guideline to aid long
life as well as future economy and performance.
l Do not race the engine at high speeds.
l Avoid rapid starting, accelerating, braking and prolonged high-speed running.
l Keep to the running-in speed limit shown below.
Please note that the legal speed limits displayed must be adhered to.
l Do not exceed loading limits.
l Refrain from towing a trailer.Vehicles with manual transmission
Shift point
Speed limit2WDVehicles with easy select 4WDVehicles with super select 4WD2H, 4H4L2H, 4H, 4HLc4LLc1st
gear20 km/h (12 mph)20 km/h (12 mph)10 km/h (6 mph)20 km/h (12 mph)10 km/h (6 mph)2nd
gear40 km/h (25 mph)40 km/h (25 mph)20 km/h (12 mph)40 km/h (25 mph)20 km/h (12 mph)3rd
gear65 km/h (40 mph)70 km/h (43 mph)35 km/h (22 mph)70 km/h (43 mph)35 km/h (22 mph)4th
gear95 km/h (59 mph)100 km/h (62 mph)55 km/h (34 mph)100 km/h (62 mph)50 km/h (30 mph)5th
gear120 km/h (74 mph)130 km/h (81 mph)65 km/h (40 mph)130 km/h (81 mph)65 km/h (40 mph)
Starting and driving
4-04
4
Page 167 of 330
CAUTIONlAlways use tyres of the same size, same
type, and same brand, and which have no
wear differences. Using tyres of different
size, type, brands or degree of wear, will
increase the differential oil temperature,
resulting in possible damage to the driv-
ing system. Further, the drive train will
be subjected to excessive loading, possibly
leading to oil leakage, component seizure,
or other serious faults.
Towing
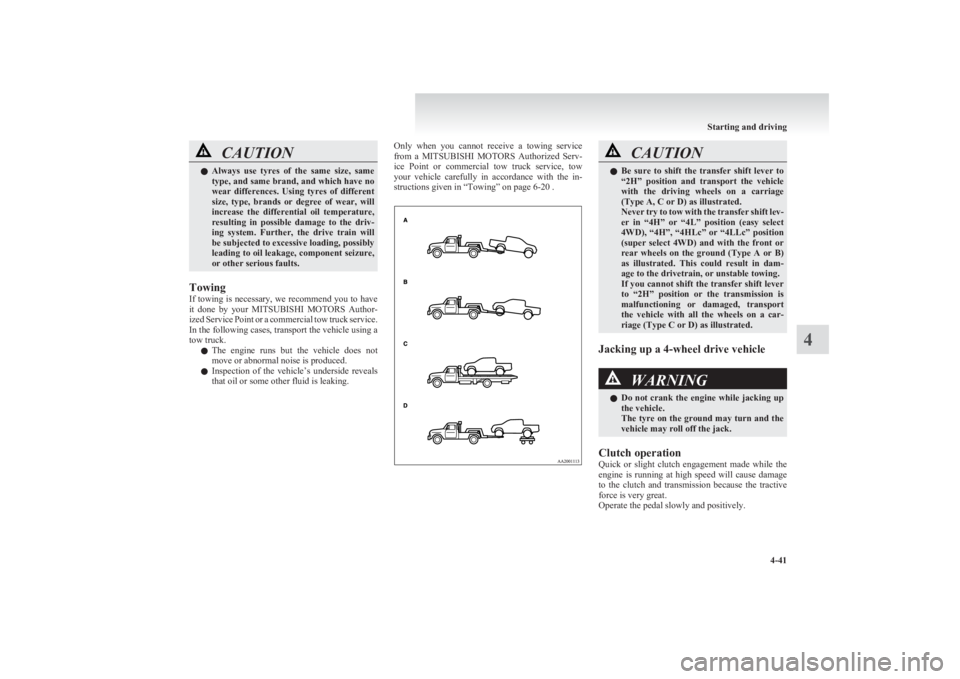
If towing is necessary, we recommend you to have
it done by your MITSUBISHI MOTORS Author-
ized Service Point or a commercial tow truck service.
In the following cases, transport the vehicle using a
tow truck.
l The engine runs but the vehicle does not
move or abnormal noise is produced.
l Inspection of the vehicle’s underside reveals
that oil or some other fluid is leaking.
Only when you cannot receive a towing service
from a MITSUBISHI MOTORS Authorized Serv-
ice Point or commercial tow truck service, tow
your vehicle carefully in accordance with the in-
structions given in “Towing” on page 6-20 .CAUTIONl Be sure to shift the transfer shift lever to
“2H” position and transport the vehicle
with the driving wheels on a carriage
(Type A, C or D) as illustrated.
Never try to tow with the transfer shift lev-
er in “4H” or “4L” position (easy select
4WD), “4H”, “4HLc” or “4LLc” position
(super select 4WD) and with the front or
rear wheels on the ground (Type A or B)
as illustrated. This could result in dam-
age to the drivetrain, or unstable towing.
If you cannot shift the transfer shift lever
to “2H” position or the transmission is
malfunctioning or damaged, transport
the vehicle with all the wheels on a car-
riage (Type C or D) as illustrated.
Jacking up a 4-wheel drive vehicle
WARNINGl Do not crank the engine while jacking up
the vehicle.
The tyre on the ground may turn and the
vehicle may roll off the jack.
Clutch operation
Quick or slight clutch engagement made while the
engine is running at high speed will cause damage
to the clutch and transmission because the tractive
force is very great.
Operate the pedal slowly and positively.
Starting and driving
4-41
4
Page 171 of 330
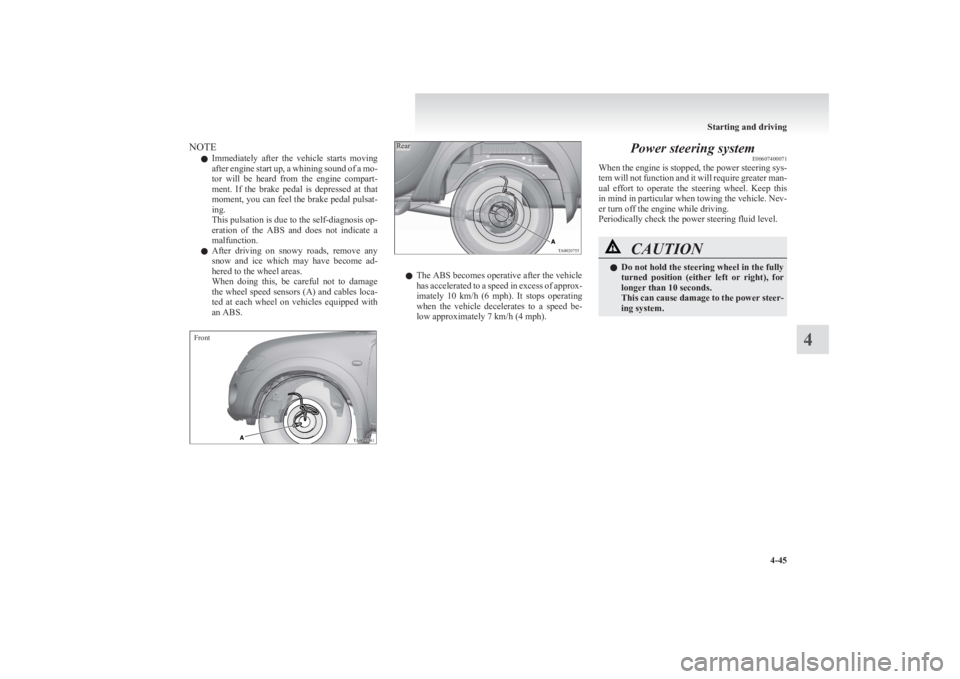
NOTEl Immediately after the vehicle starts moving
after engine start up, a whining sound of a mo-
tor will be heard from the engine compart-
ment. If the brake pedal is depressed at that
moment, you can feel the brake pedal pulsat-
ing.
This pulsation is due to the self-diagnosis op-
eration of the ABS and does not indicate a
malfunction.
l After driving on snowy roads, remove any
snow and ice which may have become ad-
hered to the wheel areas.
When doing this, be careful not to damage
the wheel speed sensors (A) and cables loca-
ted at each wheel on vehicles equipped with
an ABS.FrontRear
l The ABS becomes operative after the vehicle
has accelerated to a speed in excess of approx-
imately 10 km/h (6 mph). It stops operating
when the vehicle decelerates to a speed be-
low approximately 7 km/h (4 mph).
Power steering system E00607400071
When the engine is stopped, the power steering sys-
tem will not function and it will require greater man-
ual effort to operate the steering wheel. Keep this
in mind in particular when towing the vehicle. Nev-
er turn off the engine while driving.
Periodically check the power steering fluid level.CAUTIONl Do not hold the steering wheel in the fully
turned position (either left or right), for
longer than 10 seconds.
This can cause damage to the power steer-
ing system.
Starting and driving
4-45
4
Page 174 of 330
CAUTION•If the temperature in the braking sys-
tem continues to increase due to con-
tinuous brake control on a slippery
road surface, the
indication lamp
will illuminate, and operation of the
Active Stability Control function and
active traction control function will be
suspended to protect the brake sys-
tem. (Normal operation of the vehicle
will not be affected.) Park your vehi-
cle in a safe place. When the tempera-
ture in the braking system has come
down, the
indication lamp will go
off and the Active Stability Control
function and active traction control
function will start operating again.
• If the
indication lamp does not go
out even though the above procedure
is followed, there could be a problem
in the system.
Stop the engine and start the engine
again and check whether the
indi-
cation lamp goes out. If the indication
lamp goes out, there is no abnormal
condition.
If the
indication lamp illuminates
even after your vehicle is driven a
short distance after restarting the en-
gine, we recommend you to have your
vehicle checked as soon as possible.
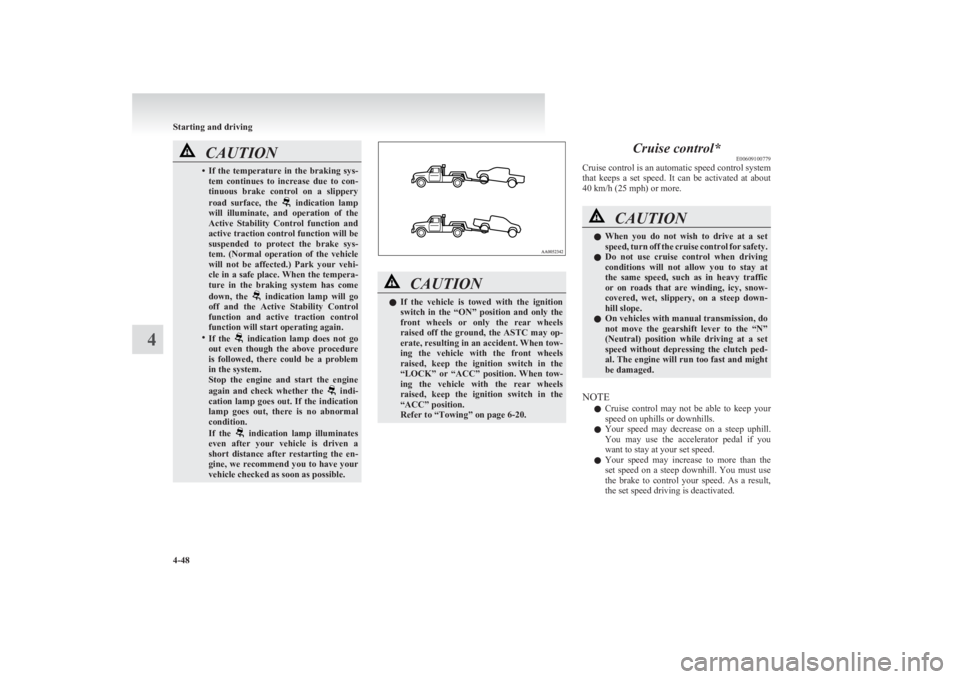
CAUTIONl If the vehicle is towed with the ignition
switch in the “ON” position and only the
front wheels or only the rear wheels
raised off the ground, the ASTC may op-
erate, resulting in an accident. When tow-
ing the vehicle with the front wheels
raised, keep the ignition switch in the
“LOCK” or “ACC” position. When tow-
ing the vehicle with the rear wheels
raised, keep the ignition switch in the
“ACC” position.
Refer to “Towing” on page 6-20.Cruise control* E00609100779
Cruise control is an automatic speed control system
that keeps a set speed. It can be activated at about
40 km/h (25 mph) or more.CAUTIONl When you do not wish to drive at a set
speed, turn off the cruise control for safety.
l Do not use cruise control when driving
conditions will not allow you to stay at
the same speed, such as in heavy traffic
or on roads that are winding, icy, snow-
covered, wet, slippery, on a steep down-
hill slope.
l On vehicles with manual transmission, do
not move the gearshift lever to the “N”
(Neutral) position while driving at a set
speed without depressing the clutch ped-
al. The engine will run too fast and might
be damaged.
NOTE
l Cruise control may not be able to keep your
speed on uphills or downhills.
l Your speed may decrease on a steep uphill.
You may use the accelerator pedal if you
want to stay at your set speed.
l Your speed may increase to more than the
set speed on a steep downhill. You must use
the brake to control your speed. As a result,
the set speed driving is deactivated.
Starting and driving
4-48
4
Page 179 of 330
Trailer towingE00610000462
In order to tow a trailer with your vehicle, when hav-
ing a trailer towing device mounted that meets all
relevant regulations in your area, consult a
MITSUBISHI MOTORS Authorized Service Point.
The regulations concerning the towing of a trailer
may differ from country to country. You are ad-
vised to obey the regulations in each area.CAUTIONl Danger of Accident!
A towing bar should be fitted according
to MITSUBISHI MOTORS guidelines.
NOTE
l If you are going to tow a trailer, pay careful
attention to the following points.
Maximum towable weight with brake
and maximum trailer-nose weight
Never exceed the maximum towable weight with
brake and the maximum trailer-nose weight as lis-
ted in the specifications.
(Refer to “Vehicle weight” on page 9-10.)
If you tow a trailer at an altitude of more than
1,000 m above sea-level, reduce your weight by
10 % of the gross combination weight for every in-
crease of 1,000 m above sea-level, as the engine out-
put is lowered owing to decrease in atmospheric
pressure.
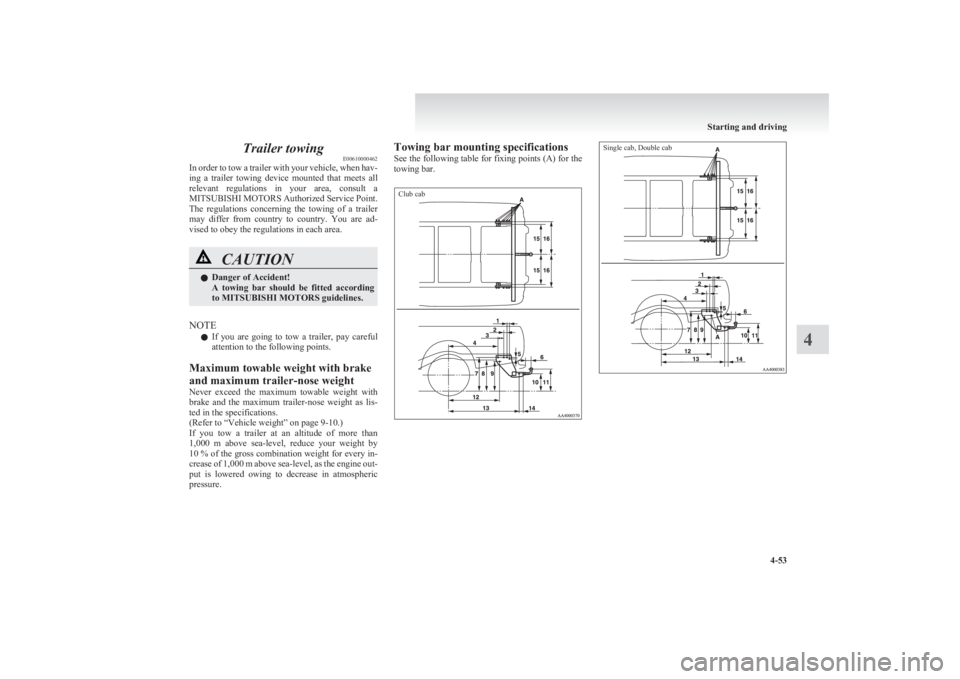
Towing bar mounting specifications
See the following table for fixing points (A) for the
towing bar.Club cabSingle cab, Double cab
Starting and driving
4-53
4
Page 180 of 330
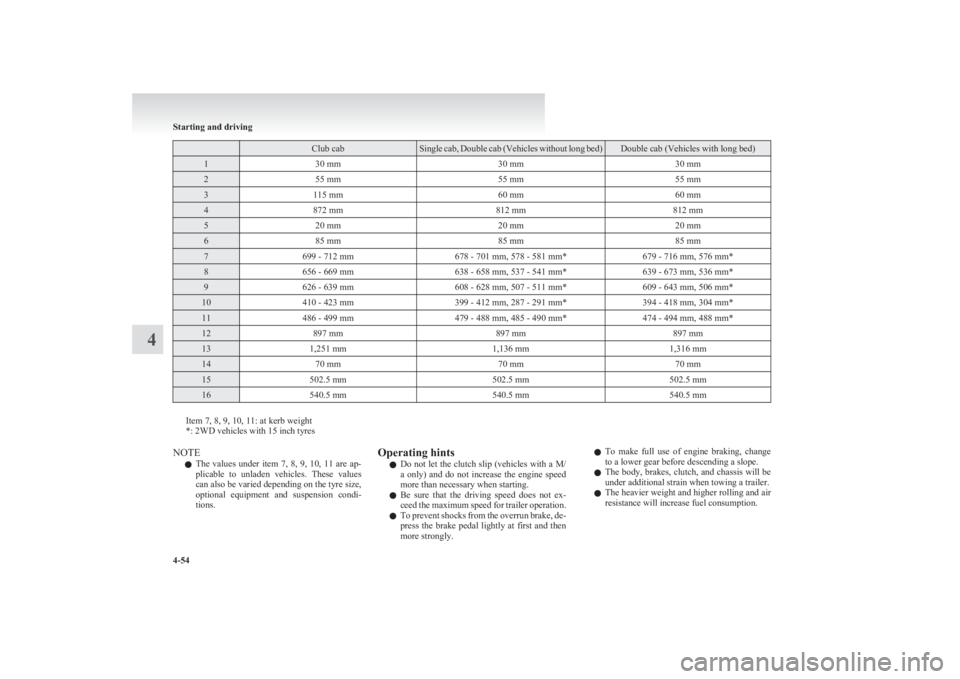
Club cabSingle cab, Double cab (Vehicles without long bed)Double cab (Vehicles with long bed)130 mm30 mm30 mm255 mm55 mm55 mm3115 mm60 mm60 mm4872 mm812 mm812 mm520 mm20 mm20 mm685 mm85 mm85 mm7699 - 712 mm678 - 701 mm, 578 - 581 mm*679 - 716 mm, 576 mm*8656 - 669 mm638 - 658 mm, 537 - 541 mm*639 - 673 mm, 536 mm*9626 - 639 mm608 - 628 mm, 507 - 511 mm*609 - 643 mm, 506 mm*10410 - 423 mm399 - 412 mm, 287 - 291 mm*394 - 418 mm, 304 mm*11486 - 499 mm479 - 488 mm, 485 - 490 mm*474 - 494 mm, 488 mm*12897 mm897 mm897 mm131,251 mm1,136 mm1,316 mm1470 mm70 mm70 mm15502.5 mm502.5 mm502.5 mm16540.5 mm540.5 mm540.5 mm
Item 7, 8, 9, 10, 11: at kerb weight
*: 2WD vehicles with 15 inch tyres
NOTE
l The values under item 7, 8, 9, 10, 11 are ap-
plicable to unladen vehicles. These values
can also be varied depending on the tyre size,
optional equipment and suspension condi-
tions.Operating hints
l Do not let the clutch slip (vehicles with a M/
a only) and do not increase the engine speed
more than necessary when starting.
l Be sure that the driving speed does not ex-
ceed the maximum speed for trailer operation.
l To prevent shocks from the overrun brake, de-
press the brake pedal lightly at first and then
more strongly.l To make full use of engine braking, change
to a lower gear before descending a slope.
l The body, brakes, clutch, and chassis will be
under additional strain when towing a trailer.
l The heavier weight and higher rolling and air
resistance will increase fuel consumption.
Starting and driving
4-54
4
Page 231 of 330
If the vehicle breaks down............................................................ 6-02
Emergency starting ....................................................................... 6-02
Engine overheating ....................................................................... 6-04
Bleeding the fuel system...............................................................6-05
Removal of water from the fuel filter ...........................................6-06
Tools, jack and jack handle .......................................................... 6-07
Jacking up the vehicle...................................................................6-13
Spare wheel...................................................................................6-16
How to change a tyre .................................................................... 6-17
Towing .......................................................................................... 6-20
Operation under adverse driving conditions .................................6-24For emergencies6
Page 240 of 330
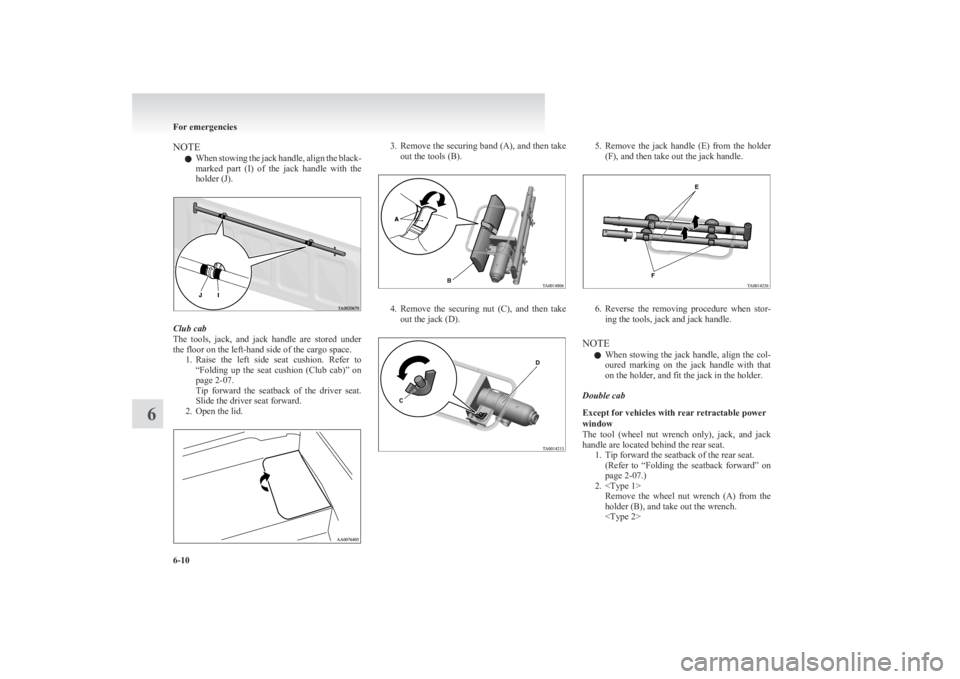
NOTEl When stowing the jack handle, align the black-
marked part (I) of the jack handle with the
holder (J).
Club cab
The tools, jack, and jack handle are stored under
the floor on the left-hand side of the cargo space. 1.Raise the left side seat cushion. Refer to
“ Folding up the seat cushion (Club cab)” on
page 2-07.
Tip forward the seatback of the driver seat.
Slide the driver seat forward.
2. Open the lid.
3. Remove the securing band (A), and then take
out the tools (B).
4. Remove the securing nut (C), and then take
out the jack (D).
5. Remove the jack handle (E) from the holder
(F), and then take out the jack handle.
6. Reverse the removing procedure when stor-
ing the tools, jack and jack handle.
NOTE l When stowing the jack handle, align the col-
oured marking on the jack handle with that
on the holder, and fit the jack in the holder.
Double cab
Except for vehicles with rear retractable power
window
The tool (wheel nut wrench only), jack, and jack
handle are located behind the rear seat. 1. Tip forward the seatback of the rear seat.(Refer to “Folding the seatback forward” on
page 2-07.)
2.
holder (B), and take out the wrench.
For emergencies
6-10
6