window MITSUBISHI L200 2012 (in English) User Guide
[x] Cancel search | Manufacturer: MITSUBISHI, Model Year: 2012, Model line: L200, Model: MITSUBISHI L200 2012Pages: 370, PDF Size: 23.14 MB
Page 31 of 370
Keys..............................................................................................
1-02
Electronic immobilizer (Anti-theft starting system) .....................1-03
Keyless entry system*.................................................................. 1-04
Doors............................................................................................ 1-06
Central door locks* ....................................................................... 1-07
“Child-protection” rear doors
(Double cab)................................. 1-08
Manual window control* .............................................................. 1-08
Electric window control*..............................................................1-08
Quarter window (Club cab) .......................................................... 1-12
Rear gate ....................................................................................... 1-13
Sunroof*....................................................................................... 1-13Locking and unlocking
1
OCRE12E1
Page 38 of 370
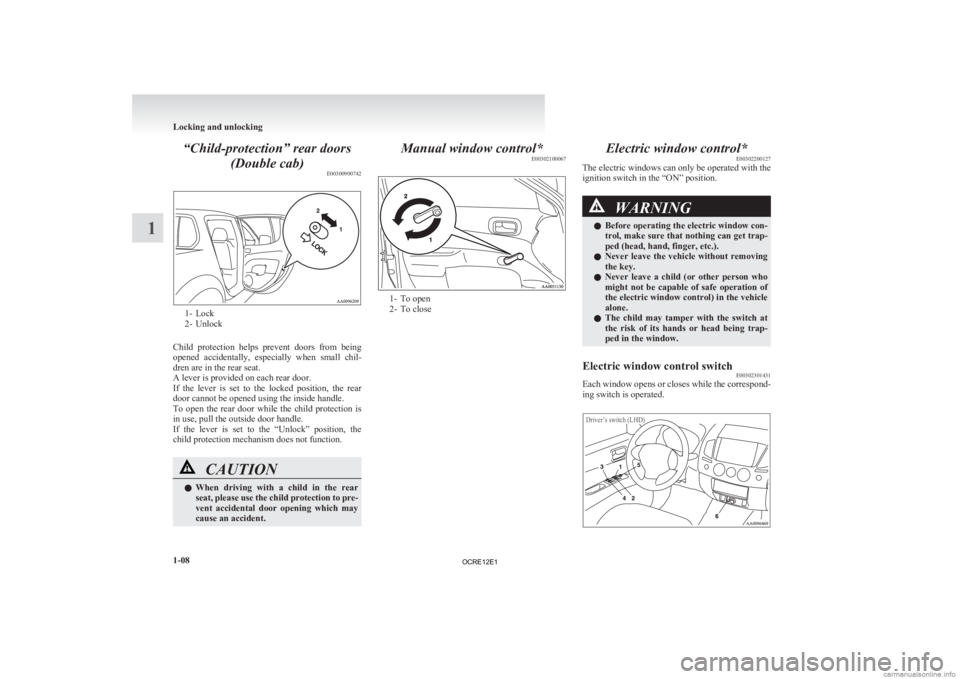
“Child-protection” rear doors
(Double cab) E003009007421- Lock
2-
Unlock
Child protection helps prevent doors from being
opened accidentally, especially when small chil-
dren are in the rear seat.
A lever is provided on each rear door.
If the lever is set to the locked position, the rear
door cannot be opened using the inside handle.
To open the rear door while the child protection is
in use, pull the outside door handle.
If the lever is set to the “Unlock” position, the
child protection mechanism does not function. CAUTION
l
When
driving with a child in the rear
seat, please use the child protection to pre-
vent accidental door opening which may
cause an accident. Manual window control*
E00302100067 1- To open
2-
To close Electric window control*
E00302200127
The electric windows can only be operated with the
ignition switch in the “ON” position. WARNING
l Before
operating the electric window con-
trol, make sure that nothing can get trap-
ped (head, hand, finger, etc.).
l Never leave the vehicle without removing
the key.
l Never leave a child (or other person who
might not be capable of safe operation of
the electric window control) in the vehicle
alone.
l The child may tamper with the switch at
the risk of its hands or head being trap-
ped in the window.
Electric window control switch E00302301431
Each window opens or closes while the correspond-
ing switch is operated.
Driver’s switch (LHD) Locking and unlocking
1-08
1
OCRE12E1
Page 39 of 370
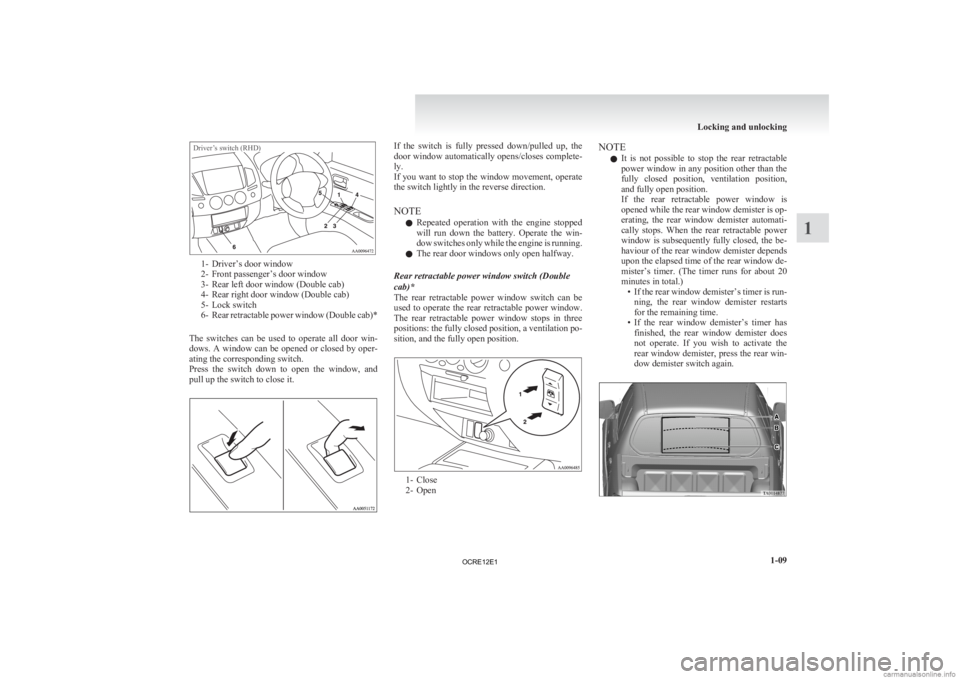
Driver’s switch (RHD)1- Driver’s door window
2-
Front passenger’s door window
3- Rear left door window (Double cab)
4- Rear right door window (Double cab)
5- Lock switch
6- Rear retractable power window (Double cab)*
The switches can be used to operate all door win-
dows. A window can be opened or closed by oper-
ating the corresponding switch.
Press the switch down to open the window, and
pull up the switch to close it. If the switch is fully pressed down/pulled up, the
door
window automatically opens/closes complete-
ly.
If you want to stop the window movement, operate
the switch lightly in the reverse direction.
NOTE
l Repeated operation with the engine stopped
will run down the battery. Operate the win-
dow switches only while the engine is running.
l The rear door windows only open halfway.
Rear retractable power window switch (Double
cab)*
The rear retractable power window switch can be
used to operate the rear retractable power window.
The rear retractable power window stops in three
positions: the fully closed position, a ventilation po-
sition, and the fully open position. 1- Close
2-
Open NOTE
l It
is not possible to stop the rear retractable
power window in any position other than the
fully closed position, ventilation position,
and fully open position.
If the rear retractable power window is
opened while the rear window demister is op-
erating, the rear window demister automati-
cally stops. When the rear retractable power
window is subsequently fully closed, the be-
haviour of the rear window demister depends
upon the elapsed time of the rear window de-
mister’s timer. (The timer runs for about 20
minutes in total.) • If the rear window demister’s timer is run-ning, the rear window demister restarts
for the remaining time.
• If the rear window demister’s timer has finished, the rear window demister does
not operate. If you wish to activate the
rear window demister, press the rear win-
dow demister switch again. Locking and unlocking
1-09 1
OCRE12E1
Page 40 of 370
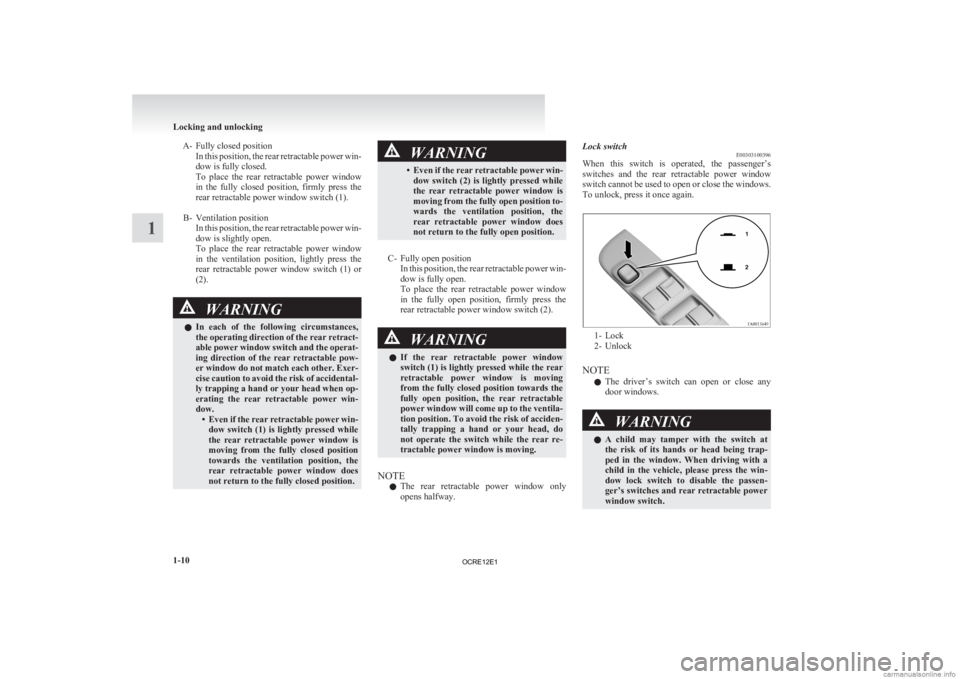
A- Fully closed position
In this position, the rear retractable power win-
dow is fully closed.
To place the rear retractable power window
in the fully closed position, firmly press the
rear retractable power window switch (1).
B- Ventilation position In this position, the rear retractable power win-
dow is slightly open.
To place the rear retractable power window
in the ventilation position, lightly press the
rear retractable power window switch (1) or
(2). WARNING
l In
each of the following circumstances,
the operating direction of the rear retract-
able power window switch and the operat-
ing direction of the rear retractable pow-
er window do not match each other. Exer-
cise caution to avoid the risk of accidental-
ly trapping a hand or your head when op-
erating the rear retractable power win-
dow. • Even if the rear retractable power win-dow switch (1) is lightly pressed while
the rear retractable power window is
moving from the fully closed position
towards the ventilation position, the
rear retractable power window does
not return to the fully closed position. WARNING
• Even
if the rear retractable power win- dow switch (2) is lightly pressed while
the rear retractable power window is
moving from the fully open position to-
wards the ventilation position, the
rear retractable power window does
not return to the fully open position.
C- Fully open position In
this position, the rear retractable power win-
dow is fully open.
To place the rear retractable power window
in the fully open position, firmly press the
rear retractable power window switch (2). WARNING
l If
the rear retractable power window
switch (1) is lightly pressed while the rear
retractable power window is moving
from the fully closed position towards the
fully open position, the rear retractable
power window will come up to the ventila-
tion position. To avoid the risk of acciden-
tally trapping a hand or your head, do
not operate the switch while the rear re-
tractable power window is moving.
NOTE l The
rear retractable power window only
opens halfway. Lock switch
E00303100396
When
this switch is operated, the passenger’s
switches and the rear retractable power window
switch cannot be used to open or close the windows.
To unlock, press it once again. 1- Lock
2-
Unlock
NOTE l The driver’s switch can open or close any
door windows. WARNING
l A
child may tamper with the switch at
the risk of its hands or head being trap-
ped in the window. When driving with a
child in the vehicle, please press the win-
dow lock switch to disable the passen-
ger’s switches and rear retractable power
window switch. Locking and unlocking
1-10
1
OCRE12E1
Page 41 of 370
Timer function
E00302400709
Door’s window
The
door windows can be opened or closed for 30
seconds after the ignition switch is turned from the
“ON” position to the “ACC” or “LOCK” position.
If the driver’s door is opened during this period,
the door window can be opened or closed for anoth-
er 30 seconds.
However, once the driver’s door is closed, the win-
dows cannot be operated.
Rear retractable power window
The rear retractable power window can be opened
or closed for 30 seconds after the ignition switch is
turned from the “ON” position to the “ACC” or
“LOCK” position.
If the driver’s door is opened during this period,
the rear retractable power window can be opened
or closed for another 30 seconds.
However, once the driver’s door is closed, the rear
retractable power window cannot be operated.
Safety mechanism E00302500537
Door’s window
If
a hand or head is trapped in the closing power
window, it will lower automatically.
Nonetheless, make sure that nobody puts their head
or hand out of the power window when closing a
power window.
The lowered window will become operational after
a few seconds. WARNING
l If
the safety mechanism is activated three
or more times successively, the safety
mechanism will be temporarily cancelled.
If a hand or head got trapped, a serious
injury could result. CAUTION
l
The
safety mechanism is cancelled just be-
fore the power window is fully closed.
This allows the power window to close
completely. Therefore be especially care-
ful that no fingers are trapped in the pow-
er window.
NOTE l The
safety mechanism can be activated if the
driving conditions or other circumstances
cause the power window to be subjected to a
physical shock similar to that caused by a trap-
ped hand or head.
l If the safety mechanism is activated three or
more times in a row, the safety mechanism
will be cancelled and the power window will
not close correctly.
In such a case, the following procedure
should be implemented to rectify this situa-
tion. Repeatedly raise the appropriate power
window switch until that power window has
been fully closed. Following this, release the
switch, raise the switch once again and hold
it in this condition for at least one second,
then release it. You should now be able to op-
erate the power window in the normal fashion.
Rear retractable power window
If
a hand or head is trapped in the closing rear re-
tractable power window, it will lower automatically.
Nonetheless, make sure that nobody puts their head
or hand out of the rear retractable power window
when closing a rear retractable power window.
The lowered window will become operational after
a few seconds. WARNING
l If
the safety mechanism is activated three
or more times successively, the safety
mechanism will be temporarily cancelled.
If a hand or head got trapped, a serious
injury could result. CAUTION
l
The
safety mechanism is cancelled just be-
fore the rear retractable power window is
fully closed. This allows the rear retracta-
ble power window to close completely.
Therefore be especially careful that no fin-
gers are trapped in the rear retractable
power window.
NOTE l The
safety mechanism can be activated if the
driving conditions or other circumstances
cause the rear retractable power window to
be subjected to a physical shock similar to
that caused by a trapped hand or head. Locking and unlocking
1-11 1
OCRE12E1
Page 42 of 370
l
If the safety mechanism is activated three or
more times in a row, the safety mechanism
will be cancelled and the rear retractable pow-
er window will not close correctly.
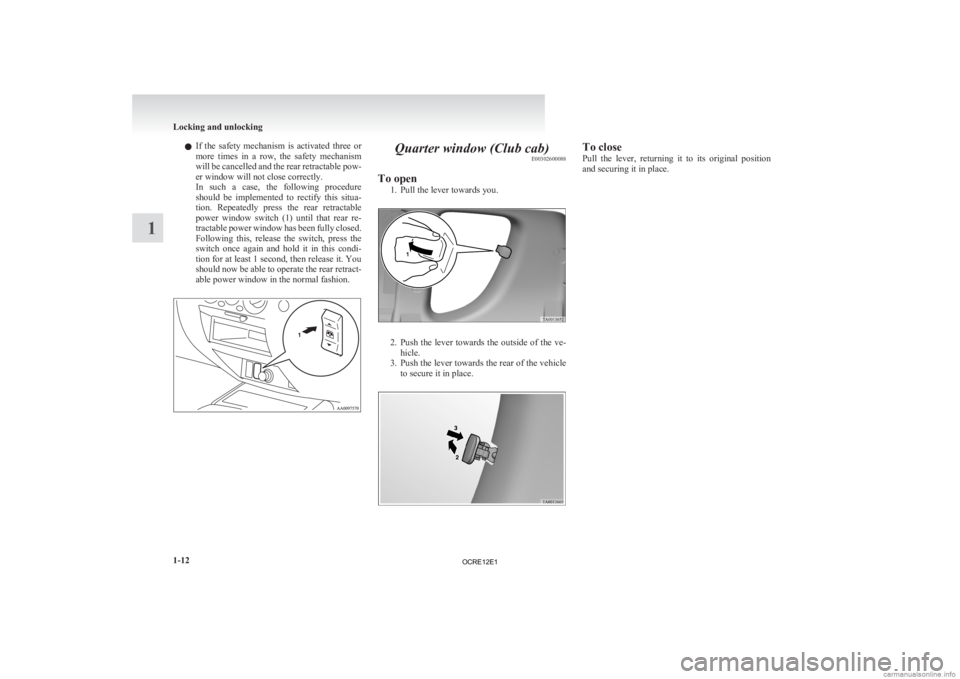
In such a case, the following procedure
should be implemented to rectify this situa-
tion. Repeatedly press the rear retractable
power window switch (1) until that rear re-
tractable power window has been fully closed.
Following this, release the switch, press the
switch once again and hold it in this condi-
tion for at least 1 second, then release it. You
should now be able to operate the rear retract-
able power window in the normal fashion. Quarter window (Club cab)
E00302600088
To open 1.
Pull the lever towards you. 2. Push
the lever towards the outside of the ve-
hicle.
3. Push the lever towards the rear of the vehicle to secure it in place. To close
Pull
the lever, returning it to its original position
and securing it in place. Locking and unlocking
1-12
1
OCRE12E1
Page 74 of 370
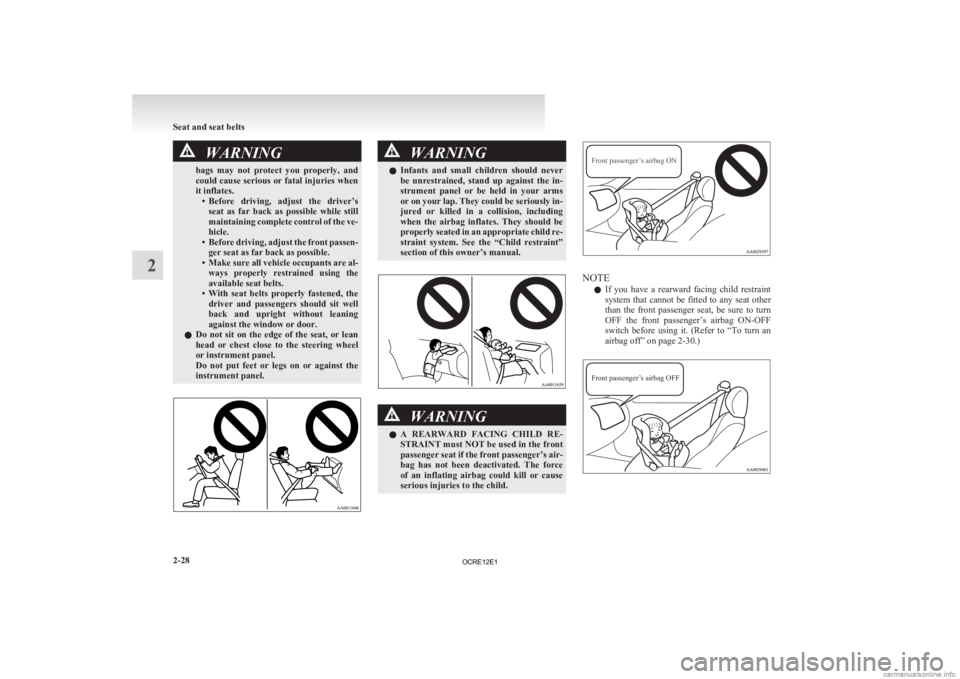
WARNING
bags may not protect you properly, and
could cause serious or fatal injuries when
it inflates. • Before driving, adjust the driver’sseat as far back as possible while still
maintaining complete control of the ve-
hicle.
• Before driving, adjust the front passen- ger seat as far back as possible.
• Make sure all vehicle occupants are al- ways properly restrained using the
available seat belts.
• With seat belts properly fastened, the driver and passengers should sit well
back and upright without leaning
against the window or door.
l Do not sit on the edge of the seat, or lean
head or chest close to the steering wheel
or instrument panel.
Do not put feet or legs on or against the
instrument panel. WARNING
l Infants and small children should never
be unrestrained, stand up against the in-
strument panel or be held in your arms
or on your lap. They could be seriously in-
jured or killed in a collision, including
when the airbag inflates. They should be
properly seated in an appropriate child re-
straint system. See the “Child restraint”
section of this owner’s manual. WARNING
l A
REARWARD FACING CHILD RE-
STRAINT must NOT be used in the front
passenger seat if the front passenger’s air-
bag has not been deactivated. The force
of an inflating airbag could kill or cause
serious injuries to the child.
Front passenger’s airbag ON NOTE
l If
you have a rearward facing child restraint
system that cannot be fitted to any seat other
than the front passenger seat, be sure to turn
OFF the front passenger’s airbag ON-OFF
switch before using it. (Refer to “To turn an
airbag off” on page 2-30.)
Front passenger’s airbag OFF Seat and seat belts
2-28
2
OCRE12E1
Page 76 of 370
The airbags will operate only when the ignition
switch is in the “ON” or “START” position.
When
the airbag control unit detect an impact of suf-
ficient frontal or side force, it sends an ignition sig-
nal to the airbag modules to ignite materials in the
inflator and generate gas and inflate the airbags.
The airbags deployment produces a sudden, loud
noise, and releases some smoke and powder, but
these conditions are not injurious, and do not indi-
cate a fire in the vehicle. People with respiratory
problems may feel some temporary irritation from
chemicals used to produce the deployment; open
the windows after airbag deployment, if safe to do
so.
The airbags deflate very rapidly after deployment,
so there is little danger of obscured vision.
The time required from the sensors detecting an im-
pact to deflation of the airbags after deployment is
shorter than a blink of an eye. CAUTION
l
Airbags
inflate at an extremely rapid
speed. In certain situations, contact with
inflating airbags can result in abrasions,
light cuts, bruises, and the like.
Front passenger’s airbag ON-OFF
switch E00410100184
The front passenger’s airbag ON-OFF switch can
be
used to disable the front passenger’s airbag. If
you have a rearward facing child restraint system
that cannot be fitted to any seat other than the front
passenger seat, be sure to turn OFF the front passen-
ger’s airbag ON-OFF switch before using it. (Refer
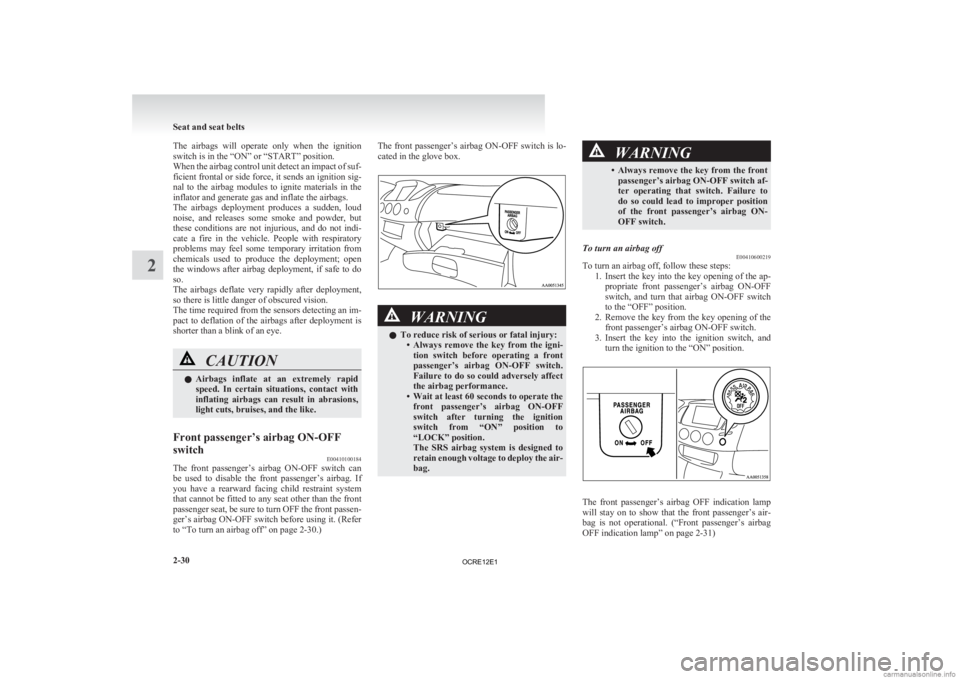
to “To turn an airbag off” on page 2-30.) The front passenger’s airbag ON-OFF switch is lo-
cated in the glove box.
WARNING
l To reduce risk of serious or fatal injury:
• Always
remove the key from the igni-
tion switch before operating a front
passenger’s airbag ON-OFF switch.
Failure to do so could adversely affect
the airbag performance.
• Wait at least 60 seconds to operate the front passenger’s airbag ON-OFF
switch after turning the ignition
switch from “ON” position to
“LOCK” position.
The SRS airbag system is designed to
retain enough voltage to deploy the air-
bag. WARNING
• Always
remove the key from the front passenger’s airbag ON-OFF switch af-
ter operating that switch. Failure to
do so could lead to improper position
of the front passenger’s airbag ON-
OFF switch.
To turn an airbag off E00410600219
To turn an airbag off, follow these steps:
1. Insert
the key into the key opening of the ap-
propriate front passenger’s airbag ON-OFF
switch, and turn that airbag ON-OFF switch
to the “OFF” position.
2. Remove the key from the key opening of the front passenger’s airbag ON-OFF switch.
3. Insert the key into the ignition switch, and turn the ignition to the “ON” position. The front passenger’s airbag OFF indication lamp
will
stay on to show that the front passenger’s air-
bag is not operational. (“Front passenger’s airbag
OFF indication lamp” on page 2-31) Seat and seat belts
2-30
2
OCRE12E1
Page 83 of 370
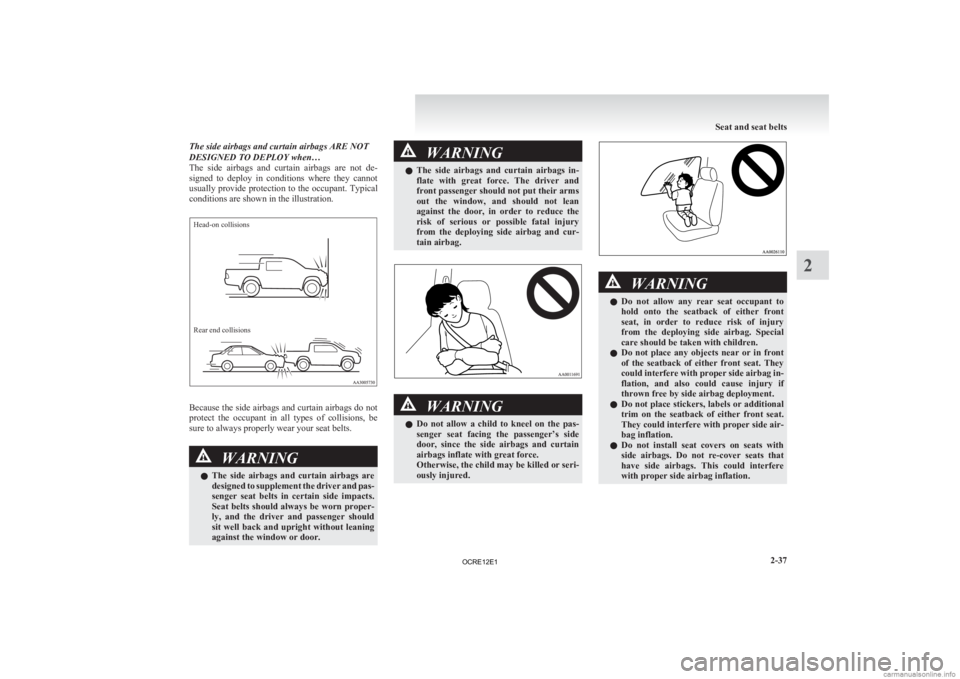
The side airbags and curtain airbags ARE NOT
DESIGNED TO DEPLOY when…
The
side airbags and curtain airbags are not de-
signed to deploy in conditions where they cannot
usually provide protection to the occupant. Typical
conditions are shown in the illustration.
Head-on collisions
Rear end collisions Because the side airbags and curtain airbags do not
protect
the occupant in all types of collisions, be
sure to always properly wear your seat belts. WARNING
l The
side airbags and curtain airbags are
designed to supplement the driver and pas-
senger seat belts in certain side impacts.
Seat belts should always be worn proper-
ly, and the driver and passenger should
sit well back and upright without leaning
against the window or door. WARNING
l The
side airbags and curtain airbags in-
flate with great force. The driver and
front passenger should not put their arms
out the window, and should not lean
against the door, in order to reduce the
risk of serious or possible fatal injury
from the deploying side airbag and cur-
tain airbag. WARNING
l Do
not allow a child to kneel on the pas-
senger seat facing the passenger’s side
door, since the side airbags and curtain
airbags inflate with great force.
Otherwise, the child may be killed or seri-
ously injured. WARNING
l Do
not allow any rear seat occupant to
hold onto the seatback of either front
seat, in order to reduce risk of injury
from the deploying side airbag. Special
care should be taken with children.
l Do not place any objects near or in front
of the seatback of either front seat. They
could interfere with proper side airbag in-
flation, and also could cause injury if
thrown free by side airbag deployment.
l Do not place stickers, labels or additional
trim on the seatback of either front seat.
They could interfere with proper side air-
bag inflation.
l Do not install seat covers on seats with
side airbags. Do not re-cover seats that
have side airbags. This could interfere
with proper side airbag inflation. Seat and seat belts
2-37 2
OCRE12E1
Page 87 of 370
Instruments...................................................................................
3-02
Indication and warning lamps .......................................................3-06
Indication lamps ........................................................................... 3-07
Warning lamps .............................................................................. 3-08
Centre information display* ......................................................... 3-10
Combination headlamps and dipper switch ..................................3-30
Headlamp levelling switch* ......................................................... 3-32
Turn-signals lever ......................................................................... 3-33
Hazard warning flasher switch ..................................................... 3-34
Front fog lamp switch* ................................................................. 3-34
Rear fog lamp switch* .................................................................. 3-35
Wiper and washer switch .............................................................. 3-36
Rear window demister switch.......................................................3-40
Horn switch...................................................................................3-40 Instruments and controls
3
OCRE12E1