window MITSUBISHI L200 2012 (in English) Owner's Guide
[x] Cancel search | Manufacturer: MITSUBISHI, Model Year: 2012, Model line: L200, Model: MITSUBISHI L200 2012Pages: 370, PDF Size: 23.14 MB
Page 116 of 370
Combination headlamps and
dipper switch E00506002129
Headlamps
NOTE l Do
not leave the headlamps and other lamps
on for a long time while the engine is station-
ary (not running). A run-down battery could
result.
l When it rains or when the vehicle has been
washed, the inside of the lens sometimes be-
comes foggy. This is the same phenomenon
as when window glass mists up on a humid
day, and does not indicate a functional prob-
lem. When the lamp is switched on, the heat
will remove the fog. However, if water gath-
ers inside the lamp, we recommend you to
have it checked. Type 1
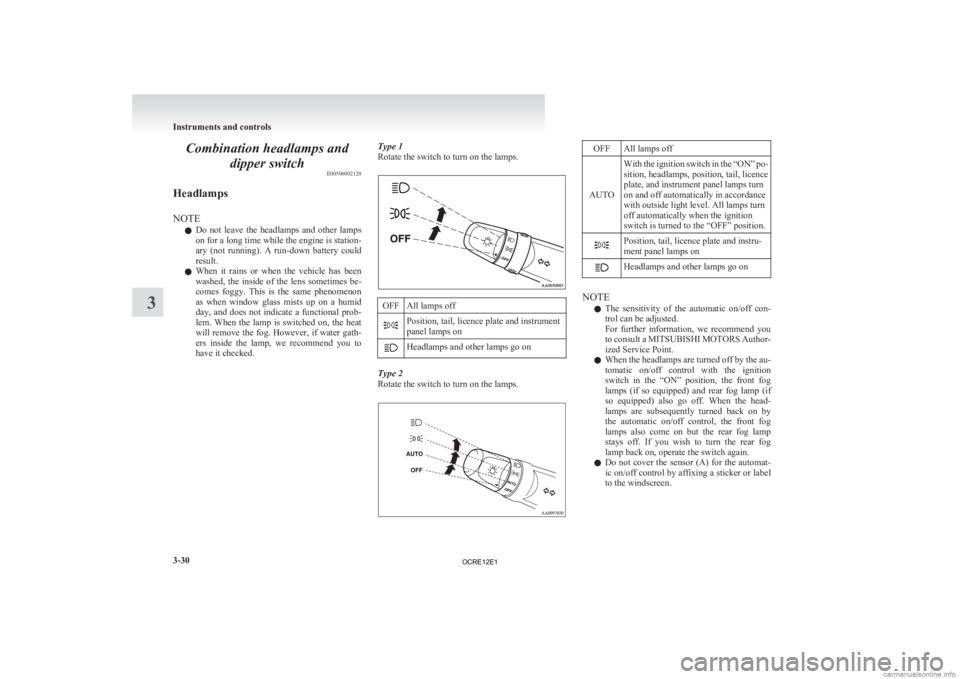
Rotate the switch to turn on the lamps. OFF All lamps off
Position, tail, licence plate and instrument
panel lamps on
Headlamps and other lamps go on
Type 2
Rotate the switch to turn on the lamps. OFF All lamps off
AUTO With the ignition switch in the “ON” po-
sition, headlamps, position, tail, licence
plate, and instrument panel lamps turn
on and off automatically in accordance
with outside light level. All lamps turn
off automatically when the ignition
switch is turned to the “OFF” position. Position, tail, licence plate and instru-
ment panel lamps on
Headlamps and other lamps go on
NOTE
l The
sensitivity of the automatic on/off con-
trol can be adjusted.
For further information, we recommend you
to consult a MITSUBISHI MOTORS Author-
ized Service Point.
l When the headlamps are turned off by the au-
tomatic on/off control with the ignition
switch in the “ON” position, the front fog
lamps (if so equipped) and rear fog lamp (if
so equipped) also go off. When the head-
lamps are subsequently turned back on by
the automatic on/off control, the front fog
lamps also come on but the rear fog lamp
stays off. If you wish to turn the rear fog
lamp back on, operate the switch again.
l Do not cover the sensor (A) for the automat-
ic on/off control by affixing a sticker or label
to the windscreen. Instruments and controls
3-30
3
OCRE12E1
Page 122 of 370
Wiper and washer switch
E00507101191CAUTION
l
If the washer is used in cold weather, the
washer fluid sprayed against the glass
may freeze, which may hinder visibility.
Warm the glass with the defroster or rear
window demister before using the washer.
Windscreen wipers E00516900303
Except for vehicles equipped with rain sensor
The windscreen wipers can be operated with the ig-
nition switch in the “ON” or “ACC” position.
If
the blades are frozen to the windscreen, do not
operate the wipers until the ice has melted and the
blades are freed, otherwise the wiper motor may be
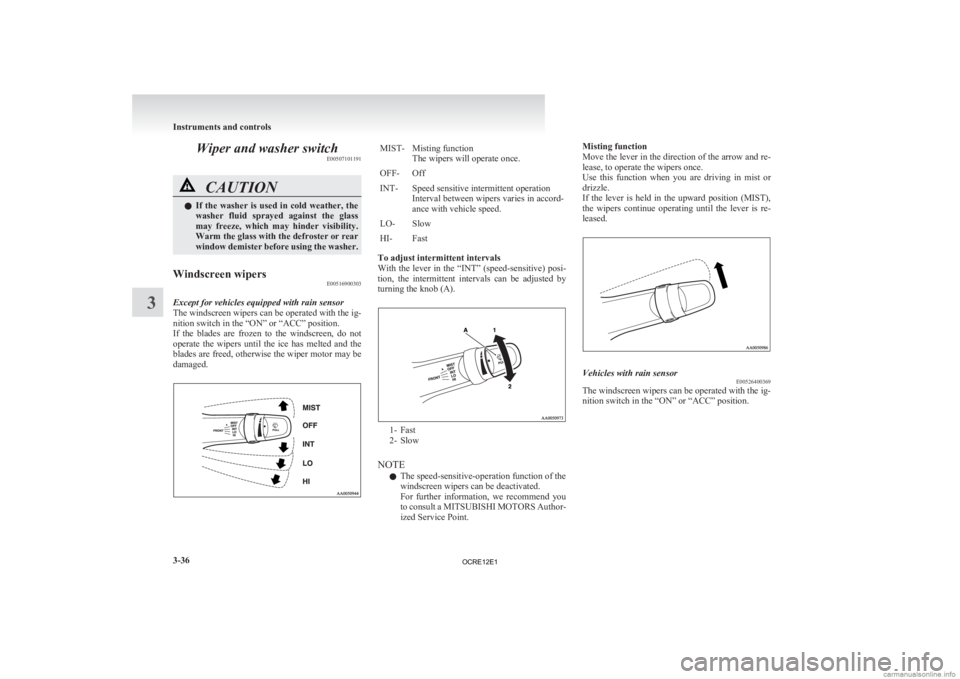
damaged. MIST- Misting function
The wipers will operate once.
OFF- Off
INT- Speed sensitive intermittent operation Interval
between wipers varies in accord-
ance with vehicle speed.
LO- Slow
HI- Fast
To adjust intermittent intervals
With
the lever in the “INT” (speed-sensitive) posi-
tion, the intermittent intervals can be adjusted by
turning the knob (A). 1- Fast
2-
Slow
NOTE l The speed-sensitive-operation function of the
windscreen wipers can be deactivated.
For further information, we recommend you
to consult a MITSUBISHI MOTORS Author-
ized Service Point. Misting function
Move
the lever in the direction of the arrow and re-
lease, to operate the wipers once.
Use this function when you are driving in mist or
drizzle.
If the lever is held in the upward position (MIST),
the wipers continue operating until the lever is re-
leased. Vehicles with rain sensor
E00526400369
The windscreen wipers can be operated with the ig-
nition switch in the “ON” or “ACC” position. Instruments and controls
3-36
3
OCRE12E1
Page 126 of 370
Rear window demister switch
E00507900961
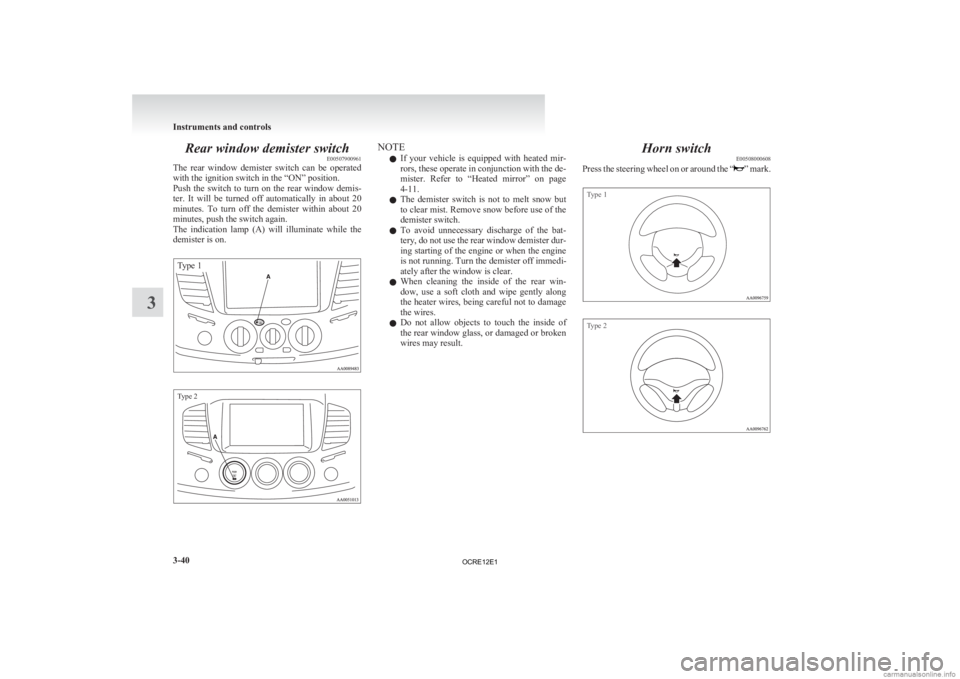
The
rear window demister switch can be operated
with the ignition switch in the “ON” position.
Push the switch to turn on the rear window demis-
ter. It will be turned off automatically in about 20
minutes. To turn off the demister within about 20
minutes, push the switch again.
The indication lamp (A) will illuminate while the
demister is on.
Type 1
Type 2 NOTE
l If
your vehicle is equipped with heated mir-
rors, these operate in conjunction with the de-
mister. Refer to “Heated mirror” on page
4-11.
l The demister switch is not to melt snow but
to clear mist. Remove snow before use of the
demister switch.
l To avoid unnecessary discharge of the bat-
tery, do not use the rear window demister dur-
ing starting of the engine or when the engine
is not running. Turn the demister off immedi-
ately after the window is clear.
l When cleaning the inside of the rear win-
dow, use a soft cloth and wipe gently along
the heater wires, being careful not to damage
the wires.
l Do not allow objects to touch the inside of
the rear window glass, or damaged or broken
wires may result. Horn switch
E00508000608
Press
the steering wheel on or around the “ ”
mark.
Type 1
Type 2Instruments and controls
3-40
3
OCRE12E1
Page 135 of 370
Steering wheel height adjustment
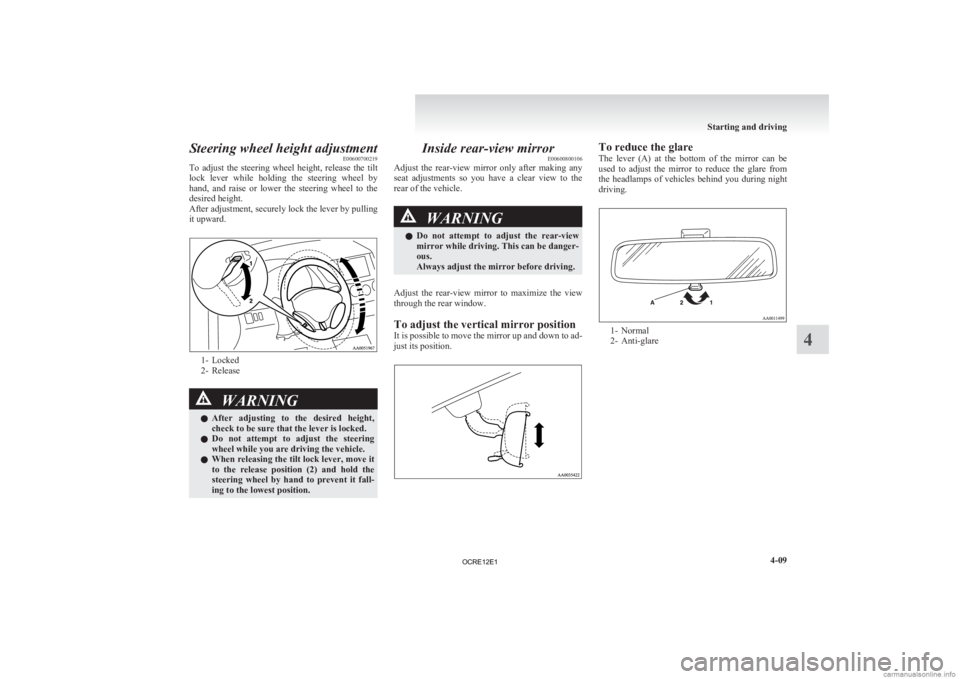
E00600700219
To
adjust the steering wheel height, release the tilt
lock lever while holding the steering wheel by
hand, and raise or lower the steering wheel to the
desired height.
After adjustment, securely lock the lever by pulling
it upward. 1- Locked
2-
Release WARNING
l After
adjusting to the desired height,
check to be sure that the lever is locked.
l Do not attempt to adjust the steering
wheel while you are driving the vehicle.
l When releasing the tilt lock lever, move it
to the release position (2) and hold the
steering wheel by hand to prevent it fall-
ing to the lowest position. Inside rear-view mirror
E00600800106
Adjust
the rear-view mirror only after making any
seat adjustments so you have a clear view to the
rear of the vehicle. WARNING
l Do
not attempt to adjust the rear-view
mirror while driving. This can be danger-
ous.
Always adjust the mirror before driving.
Adjust the rear-view mirror to maximize the view
through the rear window.
To adjust the vertical mirror position
It
is possible to move the mirror up and down to ad-
just its position. To reduce the glare
The
lever (A) at the bottom of the mirror can be
used to adjust the mirror to reduce the glare from
the headlamps of vehicles behind you during night
driving. 1- Normal
2-
Anti-glare Starting and driving
4-09 4
OCRE12E1
Page 136 of 370
Outside rear-view mirrors
E00600900149
To adjust the mirror position E00601000482WARNING
l Do not attempt to adjust the rear-view
mirrors while driving. This can be danger-
ous.
Always adjust the mirrors before driving.
l Your vehicle is equipped with convex
type mirrors.
Please take into consideration, that ob-
jects you see in the mirror will look small-
er and farther away compared to a nor-
mal flat mirror.
Do not use this mirror to estimate dis-
tance of following vehicles when changing
lanes.
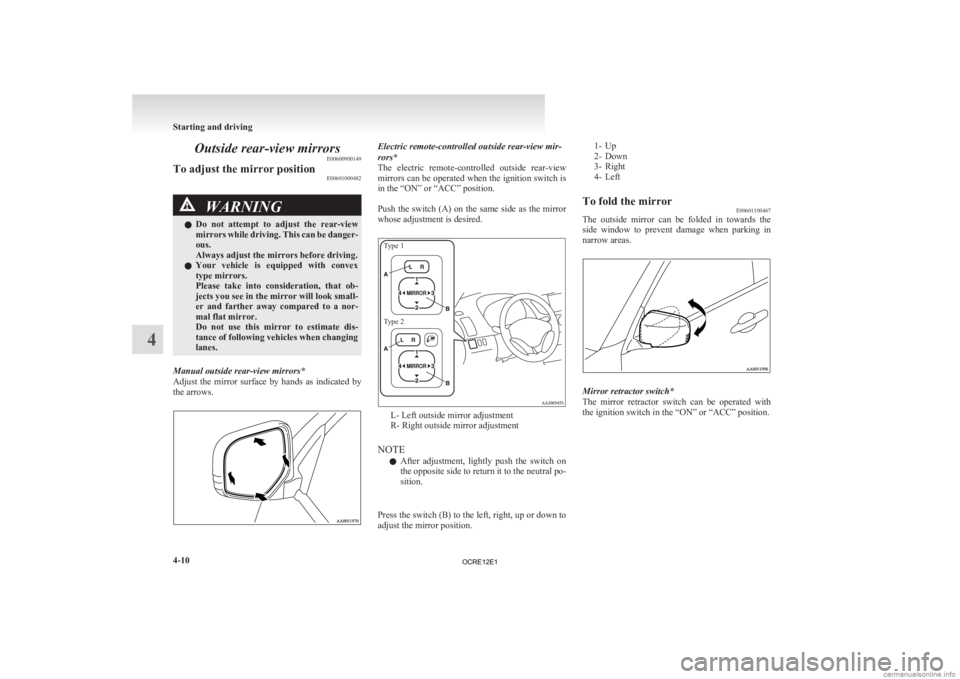
Manual outside rear-view mirrors*
Adjust
the mirror surface by hands as indicated by
the arrows. Electric remote-controlled outside rear-view mir-
rors*
The
electric remote-controlled outside rear-view
mirrors can be operated when the ignition switch is
in the “ON” or “ACC” position.
Push the switch (A) on the same side as the mirror
whose adjustment is desired.
Type 1
Type 2 L- Left outside mirror adjustment
R- Right outside mirror adjustment
NOTE l After
adjustment, lightly push the switch on
the opposite side to return it to the neutral po-
sition.
Press the switch (B) to the left, right, up or down to
adjust the mirror position.
1- Up
2-
Down
3- Right
4- Left
To fold the mirror E00601100467
The outside mirror can be folded in towards the
side
window to prevent damage when parking in
narrow areas. Mirror retractor switch*
The
mirror retractor switch can be operated with
the ignition switch in the “ON” or “ACC” position. Starting and driving
4-10
4
OCRE12E1
Page 137 of 370
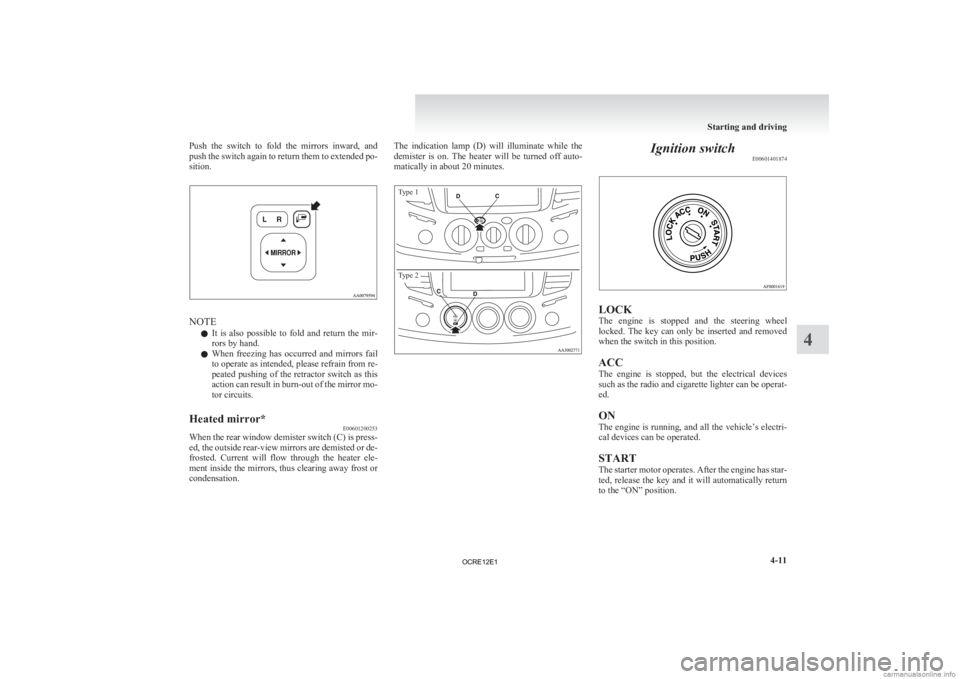
Push the switch to fold the mirrors inward, and
push
the switch again to return them to extended po-
sition. NOTE
l It
is also possible to fold and return the mir-
rors by hand.
l When freezing has occurred and mirrors fail
to operate as intended, please refrain from re-
peated pushing of the retractor switch as this
action can result in burn-out of the mirror mo-
tor circuits.
Heated mirror* E00601200253
When the rear window demister switch (C) is press-
ed,
the outside rear-view mirrors are demisted or de-
frosted. Current will flow through the heater ele-
ment inside the mirrors, thus clearing away frost or
condensation. The indication lamp (D) will illuminate while the
demister
is on. The heater will be turned off auto-
matically in about 20 minutes.
Type 1
Type 2 Ignition switch
E00601401874 LOCK
The
engine is stopped and the steering wheel
locked. The key can only be inserted and removed
when the switch in this position.
ACC
The engine is stopped, but the electrical devices
such as the radio and cigarette lighter can be operat-
ed.
ON
The engine is running, and all the vehicle’s electri-
cal devices can be operated.
START
The starter motor operates. After the engine has star-
ted, release the key and it will automatically return
to the “ON” position. Starting and driving
4-11 4
OCRE12E1
Page 187 of 370
NOTE
l With
the mode selection dial between the
“ ”
and “ ” positions, air flows mainly to
the upper part of the passenger compartment.
With the mode selection dial between the
“ ”
and “ ” positions, air flows mainly to
the leg area.
Foot position
Air flows mainly to the leg area.
: Optional equipment Foot/Demister position
Air
flows to the leg area, the windscreen and the
door windows.
: Optional equipment NOTE
l With
the mode selection dial between the
“ ”
and “ ” positions, air flows mainly to
the leg area. With the mode selection dial be-
tween the “ ”
and “ ” positions, air
flows mainly to the windscreen and door win-
dows.
Demister position
Air flows mainly to the windscreen and the door
windows. Heater/Manual air conditioning*
E00700500410
The
heater/air conditioning can only be used while
the engine is running.
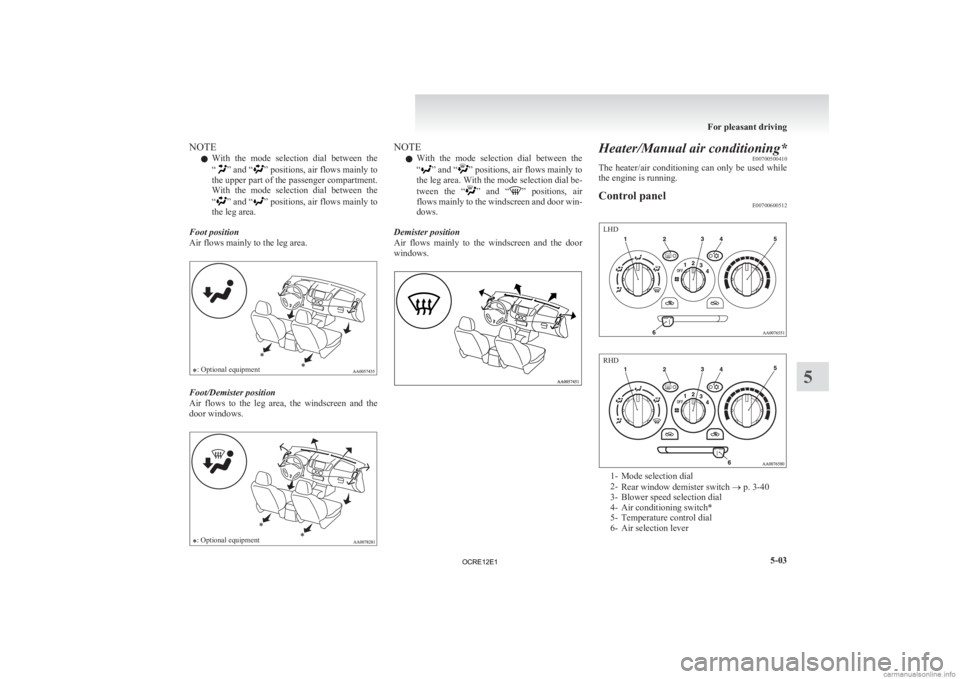
Control panel E00700600512 1- Mode selection dial
2-
Rear window demister switch ® p. 3-40
3-
Blower speed selection dial
4- Air conditioning switch*
5- Temperature control dial
6- Air selection lever For pleasant driving
5-03 5 LHD RHD
OCRE12E1
Page 189 of 370
CAUTION
l
Normally, use the “ ” (outside) posi-
tion to keep the windscreen and side win-
dows clear and quickly remove fog or
frost from the windscreen.
If high cooling performance is desired, or
if the outside air is dusty or otherwise con-
taminated, use the “ ”
(recirculation)
position. Set the air selection lever to the
“ ”
(outside) position periodically to in-
crease ventilation so that the windows do
not become fogged up.
l Use of the “ ”
(recirculation) position
for extended time may cause the windows
to fog up.
Air conditioning switch* E00701500781
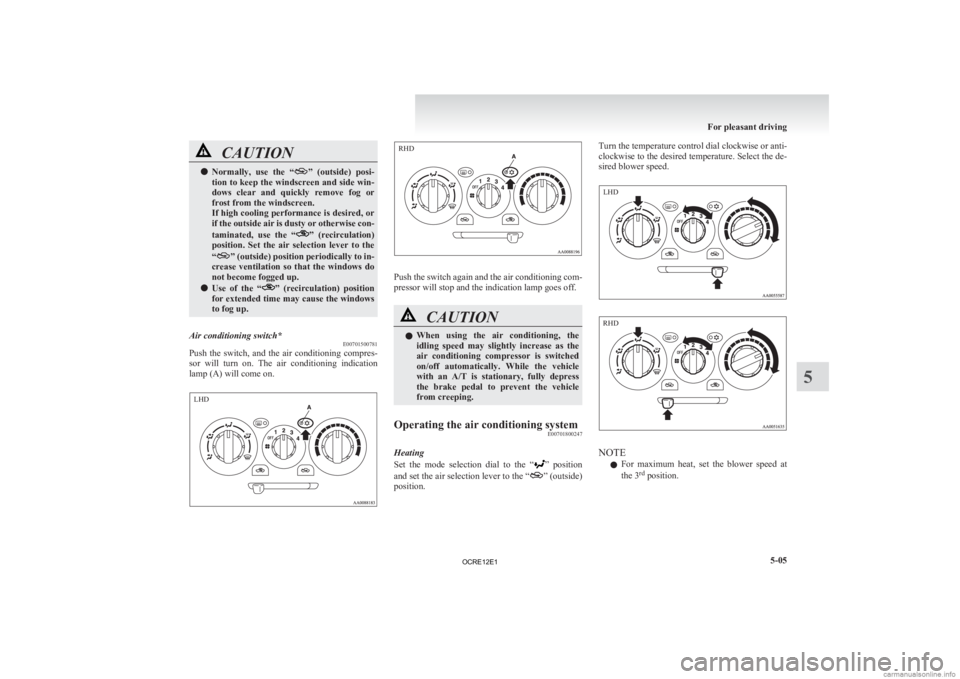
Push the switch, and the air conditioning compres-
sor
will turn on. The air conditioning indication
lamp (A) will come on. Push the switch again and the air conditioning com-
pressor will stop and the indication lamp goes off.
CAUTION
l
When
using the air conditioning, the
idling speed may slightly increase as the
air conditioning compressor is switched
on/off automatically. While the vehicle
with an A/T is stationary, fully depress
the brake pedal to prevent the vehicle
from creeping.
Operating the air conditioning system E00701800247
Heating
Set
the mode selection dial to the “ ”
position
and set the air selection lever to the “ ” (outside)
position. Turn the temperature control dial clockwise or anti-
clockwise
to the desired temperature. Select the de-
sired blower speed. NOTE
l For
maximum heat, set the blower speed at
the 3 rd
position. For pleasant driving
5-05 5 LHD RHD LHD RHD
OCRE12E1
Page 190 of 370
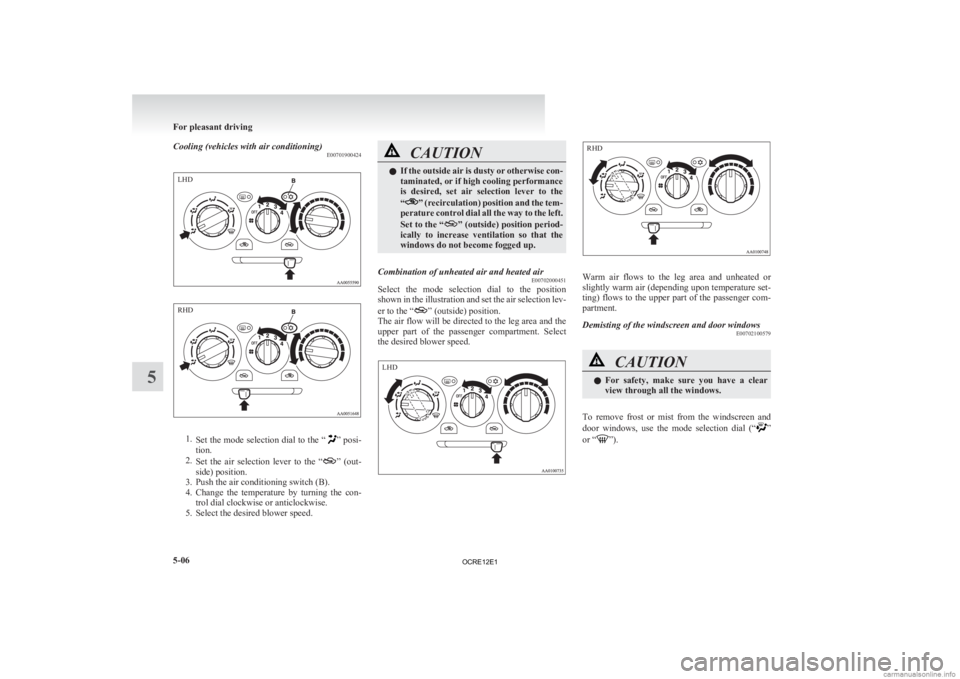
Cooling (vehicles with air conditioning)
E007019004241.
Set the mode selection dial to the “ ” posi-
tion.
2. Set the air selection lever to the “ ”
(out-
side) position.
3. Push the air conditioning switch (B).
4. Change the temperature by turning the con- trol dial clockwise or anticlockwise.
5. Select the desired blower speed. CAUTION
l
If
the outside air is dusty or otherwise con-
taminated, or if high cooling performance
is desired, set air selection lever to the
“ ”
(recirculation) position and the tem-
perature control dial all the way to the left.
Set to the “ ”
(outside) position period-
ically to increase ventilation so that the
windows do not become fogged up.
Combination of unheated air and heated air E00702000451
Select the mode selection dial to the position
shown
in the illustration and set the air selection lev-
er to the “ ” (outside) position.
The
air flow will be directed to the leg area and the
upper part of the passenger compartment. Select
the desired blower speed. Warm air flows to the leg area and unheated or
slightly
warm air (depending upon temperature set-
ting) flows to the upper part of the passenger com-
partment.
Demisting of the windscreen and door windows E00702100579 CAUTION
l
For
safety, make sure you have a clear
view through all the windows.
To remove frost or mist from the windscreen and
door
windows, use the mode selection dial (“ ”
or “ ”).For pleasant driving
5-06
5LHD RHD LHD RHD
OCRE12E1
Page 191 of 370

For ordinary demisting
Use
this setting to keep the windscreen and door
windows clear of mist, and to keep the leg area heat-
ed (when driving in rain or snow). 1.
Set
the air selection lever to the “ ” (out-
side) position.
2. Set the mode selection dial to the “ ”
posi-
tion.
3. Select your desired blower speed by turning the blower speed selection dial.
4. Select your desired temperature by turning the temperature control dial.
5. Push the air conditioning switch (B). (vehicles with air conditioning)
For quick demisting 1.
Set
the air selection lever to the “ ” (out-
side) position.
2. Set the mode selection dial to the “ ” posi-
tion.
3.
Set the blower to the maximum speed.
4. Set the temperature to the maximum temper- ature position.
5. Push the air conditioning switch (B). (vehicles with air conditioning)
NOTE l To demist effectively, direct the air flow
from the side ventilators towards the door win-
dows.
l Do not set the temperature control dial to the
max. cool position. Cool air will blow
against the window glasses and form mist on
them. For pleasant driving
5-07 5LHD RHD LHD RHD
OCRE12E1