door lock MITSUBISHI L200 2015 Owner's Manual (in English)
[x] Cancel search | Manufacturer: MITSUBISHI, Model Year: 2015, Model line: L200, Model: MITSUBISHI L200 2015Pages: 418, PDF Size: 25.8 MB
Page 4 of 418
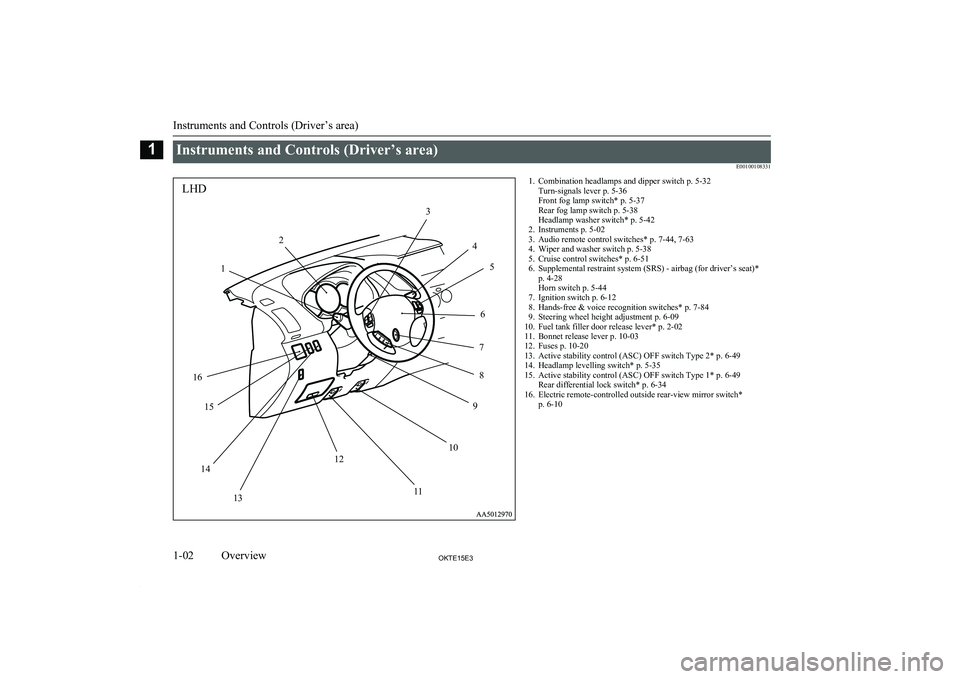
Instruments and Controls (Driver’s area)E00100108331
1LHD23456789101112131415161. Combination headlamps and dipper switch p. 5-32Turn-signals lever p. 5-36
Front fog lamp switch* p. 5-37
Rear fog lamp switch p. 5-38
Headlamp washer switch* p. 5-42
2. Instruments p. 5-02
3. Audio remote control switches* p. 7-44, 7-63
4. Wiper and washer switch p. 5-38
5. Cruise control switches* p. 6-51
6. Supplemental restraint system (SRS) - airbag (for driver’s seat)* p. 4-28
Horn switch p. 5-44
7. Ignition switch p. 6-12
8. Hands-free & voice recognition switches* p. 7-84
9. Steering wheel height adjustment p. 6-09
10. Fuel tank filler door release lever* p. 2-02
11. Bonnet release lever p. 10-03
12. Fuses p. 10-20
13. Active stability control (ASC) OFF switch Type 2* p. 6-49
14. Headlamp levelling switch* p. 5-35
15. Active stability control (ASC) OFF switch Type 1* p. 6-49 Rear differential lock switch* p. 6-34
16. Electric remote-controlled outside rear-view mirror switch* p. 6-10
Instruments and Controls (Driver’s area)
1-02OKTE15E3Overview1
Page 5 of 418
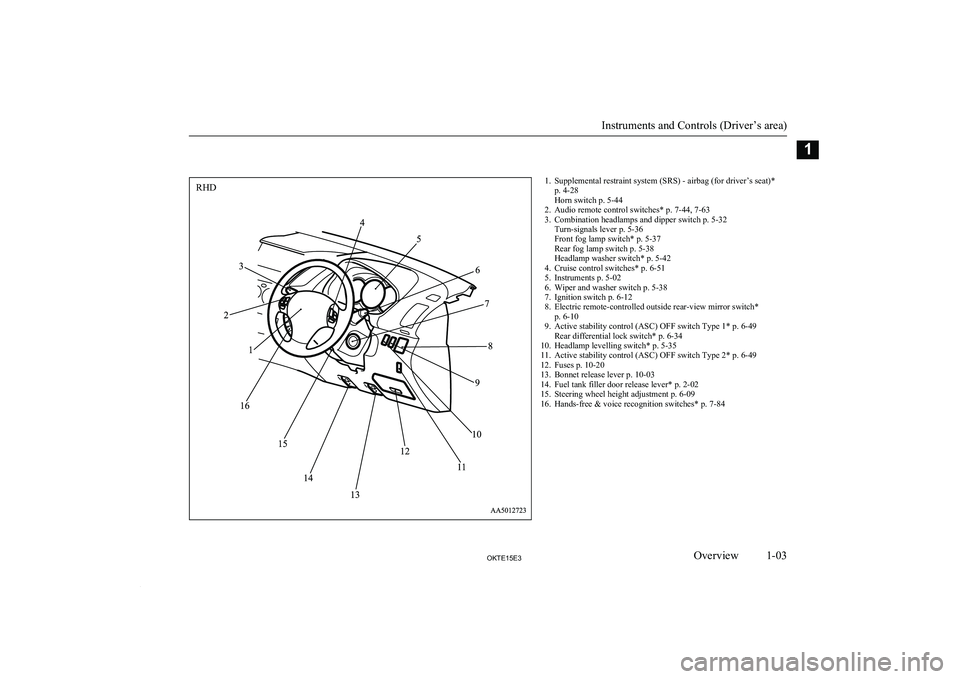
1. Supplemental restraint system (SRS) - airbag (for driver’s seat)*p. 4-28
Horn switch p. 5-44
2. Audio remote control switches* p. 7-44, 7-63
3. Combination headlamps and dipper switch p. 5-32 Turn-signals lever p. 5-36
Front fog lamp switch* p. 5-37
Rear fog lamp switch p. 5-38
Headlamp washer switch* p. 5-42
4. Cruise control switches* p. 6-51
5. Instruments p. 5-02
6. Wiper and washer switch p. 5-38
7. Ignition switch p. 6-12
8. Electric remote-controlled outside rear-view mirror switch* p. 6-10
9. Active stability control (ASC) OFF switch Type 1* p. 6-49 Rear differential lock switch* p. 6-34
10. Headlamp levelling switch* p. 5-35
11. Active stability control (ASC) OFF switch Type 2* p. 6-49
12. Fuses p. 10-20
13. Bonnet release lever p. 10-03
14. Fuel tank filler door release lever* p. 2-02
15. Steering wheel height adjustment p. 6-09
16. Hands-free & voice recognition switches* p. 7-84
Instruments and Controls (Driver’s area)
1-03OKTE15E3Overview1RHD
Page 18 of 418
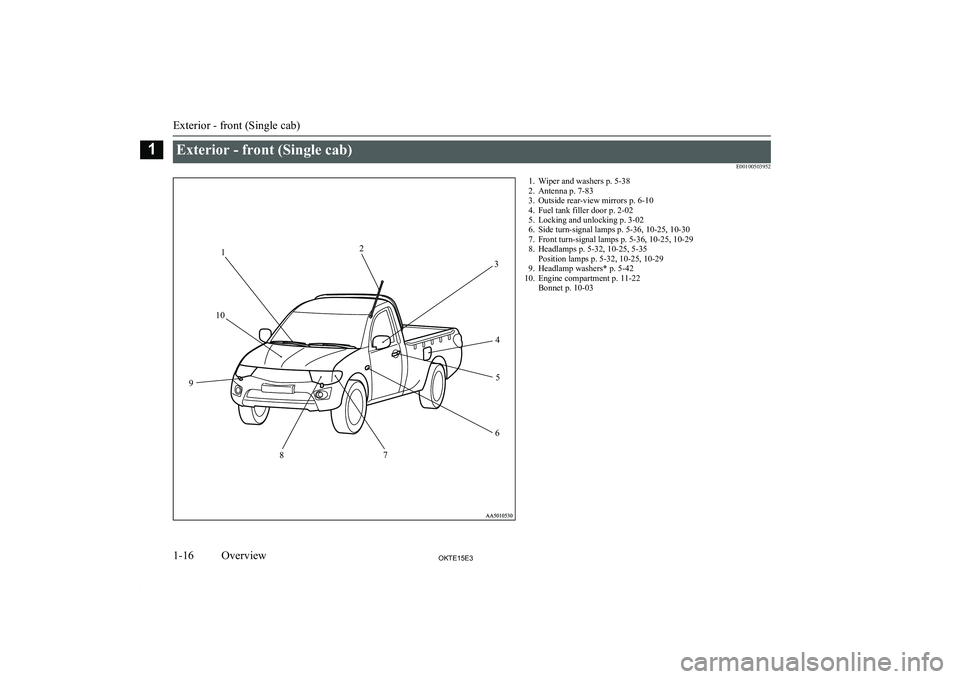
Exterior - front (Single cab)E001005039521. Wiper and washers p. 5-38
2. Antenna p. 7-83
3. Outside rear-view mirrors p. 6-10
4. Fuel tank filler door p. 2-02
5. Locking and unlocking p. 3-02
6. Side turn-signal lamps p. 5-36, 10-25, 10-30
7. Front turn-signal lamps p. 5-36, 10-25, 10-29
8. Headlamps p. 5-32, 10-25, 5-35 Position lamps p. 5-32, 10-25, 10-29
9. Headlamp washers* p. 5-42
10. Engine compartment p. 11-22 Bonnet p. 10-03
Exterior - front (Single cab)
1-16OKTE15E3Overview112
3
45
6
7
8
9
10
Page 20 of 418
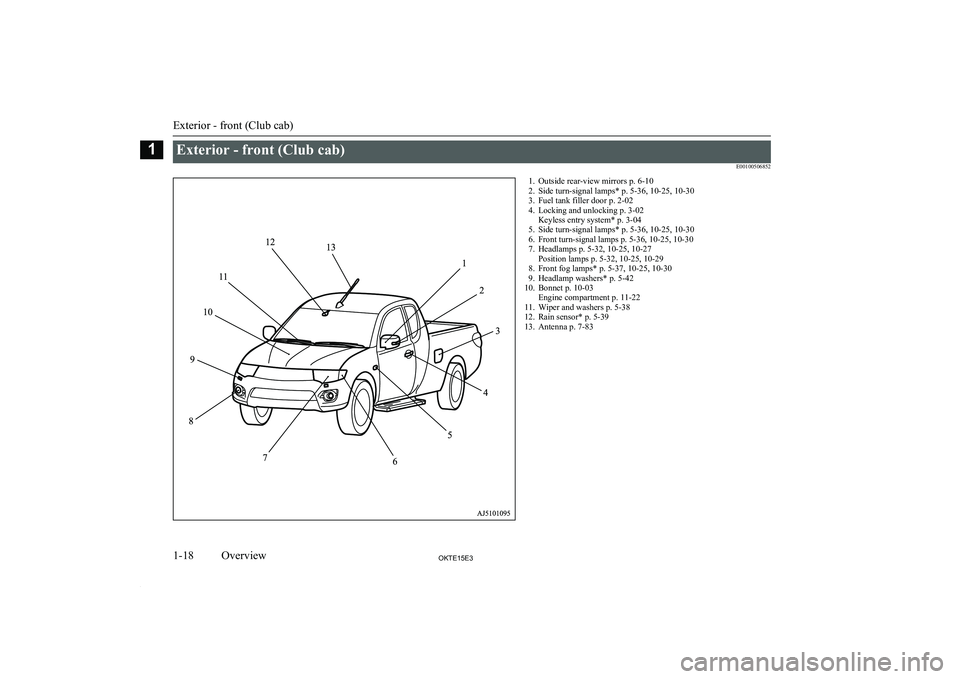
Exterior - front (Club cab)E001005068521. Outside rear-view mirrors p. 6-10
2. Side turn-signal lamps* p. 5-36, 10-25, 10-30
3. Fuel tank filler door p. 2-02
4. Locking and unlocking p. 3-02 Keyless entry system* p. 3-04
5. Side turn-signal lamps* p. 5-36, 10-25, 10-30
6. Front turn-signal lamps p. 5-36, 10-25, 10-30
7. Headlamps p. 5-32, 10-25, 10-27 Position lamps p. 5-32, 10-25, 10-29
8. Front fog lamps* p. 5-37, 10-25, 10-30
9. Headlamp washers* p. 5-42
10. Bonnet p. 10-03 Engine compartment p. 11-22
11. Wiper and washers p. 5-38
12. Rain sensor* p. 5-39
13. Antenna p. 7-83
Exterior - front (Club cab)
1-18OKTE15E3Overview1
Page 22 of 418
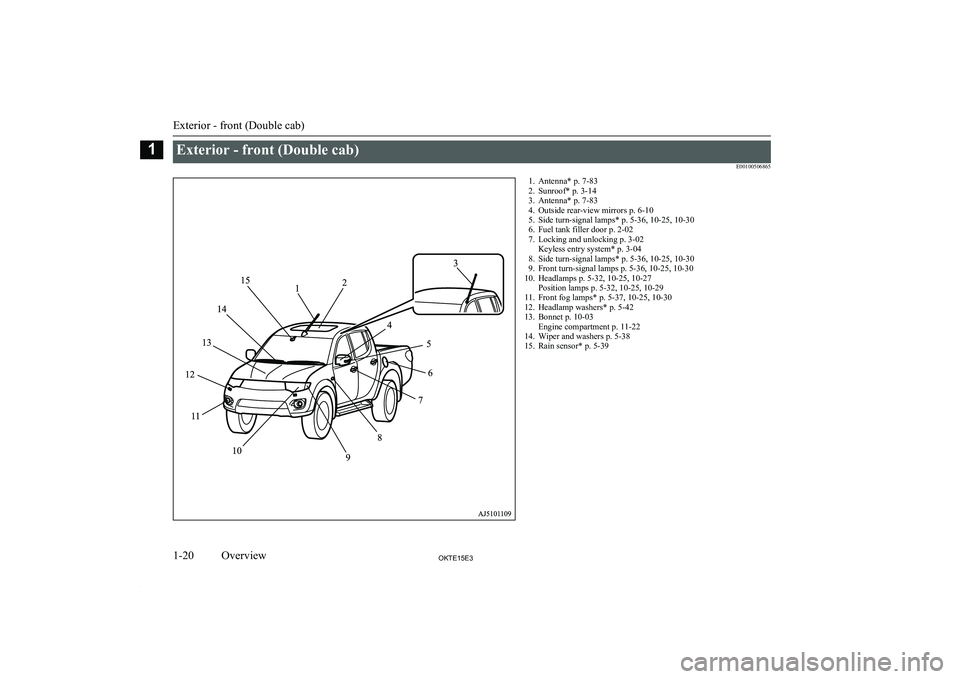
Exterior - front (Double cab)E001005068651. Antenna* p. 7-832. Sunroof* p. 3-14
3. Antenna* p. 7-83
4. Outside rear-view mirrors p. 6-10
5. Side turn-signal lamps* p. 5-36, 10-25, 10-30
6. Fuel tank filler door p. 2-02
7. Locking and unlocking p. 3-02 Keyless entry system* p. 3-04
8. Side turn-signal lamps* p. 5-36, 10-25, 10-30
9. Front turn-signal lamps p. 5-36, 10-25, 10-30
10. Headlamps p. 5-32, 10-25, 10-27 Position lamps p. 5-32, 10-25, 10-29
11. Front fog lamps* p. 5-37, 10-25, 10-30
12. Headlamp washers* p. 5-42
13. Bonnet p. 10-03 Engine compartment p. 11-22
14. Wiper and washers p. 5-38
15. Rain sensor* p. 5-39
Exterior - front (Double cab)
1-20OKTE15E3Overview1
Page 27 of 418
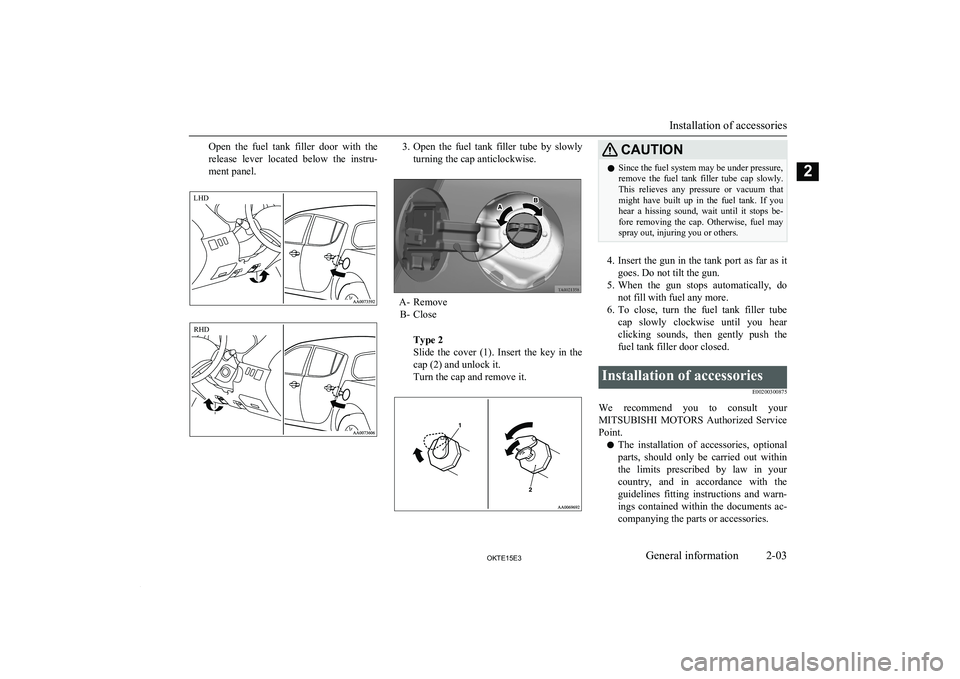
Open the fuel tank filler door with the
release lever located below the instru-
ment panel.3. Open the fuel tank filler tube by slowly
turning the cap anticlockwise.
A- Remove B- Close
Type 2
Slide the cover (1). Insert the key in the
cap (2) and unlock it.
Turn the cap and remove it.
CAUTIONl Since the fuel system may be under pressure,
remove the fuel tank filler tube cap slowly. This relieves any pressure or vacuum that
might have built up in the fuel tank. If you
hear a hissing sound, wait until it stops be- fore removing the cap. Otherwise, fuel may
spray out, injuring you or others.
4. Insert the gun in the tank port as far as it
goes. Do not tilt the gun.
5. When the gun stops automatically, do
not fill with fuel any more.
6. To close, turn the fuel tank filler tube
cap slowly clockwise until you hear clicking sounds, then gently push the
fuel tank filler door closed.
Installation of accessories
E00200300875
We recommend you to consult yourMITSUBISHI MOTORS Authorized Service
Point.
l The installation of accessories, optional
parts, should only be carried out within
the limits prescribed by law in your
country, and in accordance with the
guidelines fitting instructions and warn- ings contained within the documents ac-
companying the parts or accessories.
Installation of accessories
2-03OKTE15E3General information2LHD RHD
Page 31 of 418
Keys.................................................................................................... 3-02Electronic immobilizer (Anti-theft starting system)........................... 3-02
Keyless entry system*.........................................................................3-04
Doors................................................................................................... 3-06
Central door locks*............................................................................. 3-07
“Child-protection” rear doors (Double cab)........................................3-08
Manual window control*.................................................................... 3-08
Electric window control*.................................................................... 3-08
Quarter window (Club cab).................................................................3-13
Rear gate............................................................................................. 3-14
Sunroof*.............................................................................................. 3-14Locking and unlocking
OKTE15E33
Page 34 of 418
Keyless entry system*E00300301860
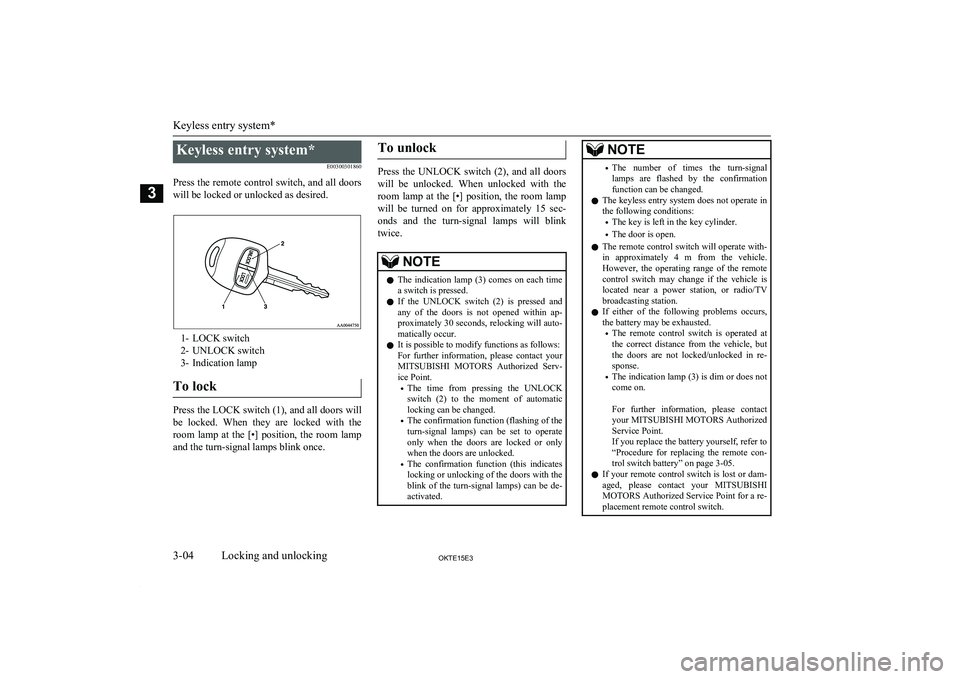
Press the remote control switch, and all doors will be locked or unlocked as desired.
1- LOCK switch
2- UNLOCK switch
3- Indication lamp
To lock
Press the LOCK switch (1), and all doors will
be locked. When they are locked with the room lamp at the [•] position, the room lampand the turn-signal lamps blink once.
To unlock
Press the UNLOCK switch (2), and all doors
will be unlocked. When unlocked with the
room lamp at the [•] position, the room lamp will be turned on for approximately 15 sec-
onds and the turn-signal lamps will blink twice.
NOTEl The indication lamp (3) comes on each time
a switch is pressed.
l If the UNLOCK switch (2) is pressed and
any of the doors is not opened within ap- proximately 30 seconds, relocking will auto-matically occur.
l It is possible to modify functions as follows:
For further information, please contact your MITSUBISHI MOTORS Authorized Serv-
ice Point.
• The time from pressing the UNLOCK
switch (2) to the moment of automatic locking can be changed.
• The confirmation function (flashing of the
turn-signal lamps) can be set to operate
only when the doors are locked or only when the doors are unlocked.
• The confirmation function (this indicates
locking or unlocking of the doors with the
blink of the turn-signal lamps) can be de- activated.NOTE• The number of times the turn-signal
lamps are flashed by the confirmation function can be changed.
l The keyless entry system does not operate in
the following conditions:
• The key is left in the key cylinder.
• The door is open.
l The remote control switch will operate with-
in approximately 4 m from the vehicle.
However, the operating range of the remote control switch may change if the vehicle is
located near a power station, or radio/TV broadcasting station.
l If either of the following problems occurs,
the battery may be exhausted.
• The remote control switch is operated at
the correct distance from the vehicle, but
the doors are not locked/unlocked in re- sponse.
• The indication lamp (3) is dim or does not
come on.
For further information, please contact
your MITSUBISHI MOTORS Authorized
Service Point.
If you replace the battery yourself, refer to
“Procedure for replacing the remote con- trol switch battery” on page 3-05.
l If your remote control switch is lost or dam-
aged, please contact your MITSUBISHI
MOTORS Authorized Service Point for a re-
placement remote control switch.
Keyless entry system*
3-04OKTE15E3Locking and unlocking3
Page 36 of 418
8.Place the remote control transmitter in
the remote control switch case, then se- curely close the remote control switch
case.
9. Attach the screw (A) removed in step 2.
10. Check the keyless entry system to see
that it works.NOTEl You may purchase a replacement battery at
an electric appliance store.
l A
MITSUBISHI MOTORS Authorized
Service Point can replace the battery for you
if you prefer.CAUTIONl When the remote control switch case is
opened, be careful to keep water, dust, etc. out. Also, do not touch the internal compo-
nents.Doors
E00300401584CAUTIONlMake sure the doors are closed: driving with
doors not completely closed is dangerous.
l Never leave children in the vehicle unatten-
ded.CAUTIONl Be careful not to lock the doors while the
key is inside the vehicle.NOTEl To prevent the key from being locked inside
the vehicle, neither the lock knob on the
driver’s door nor the key can be used to lock the driver’s door when it is open.
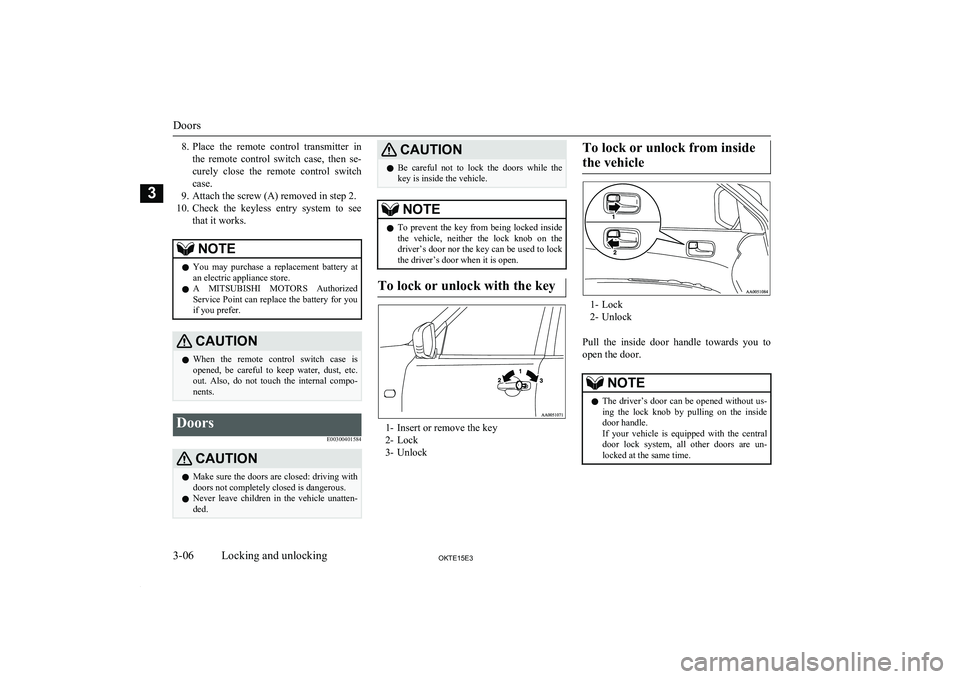
To lock or unlock with the key
1- Insert or remove the key
2- Lock
3- Unlock
To lock or unlock from inside
the vehicle
1- Lock
2- Unlock
Pull the inside door handle towards you to open the door.
NOTEl The driver’s door can be opened without us-
ing the lock knob by pulling on the inside
door handle.
If your vehicle is equipped with the central door lock system, all other doors are un-
locked at the same time.
Doors
3-06OKTE15E3Locking and unlocking3
Page 37 of 418
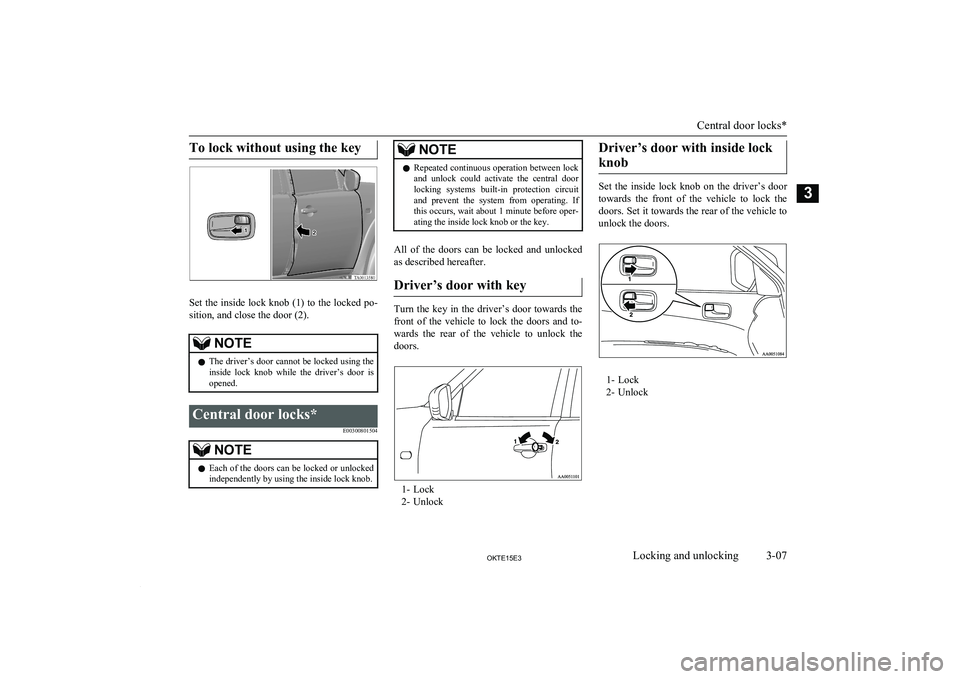
To lock without using the key
Set the inside lock knob (1) to the locked po-
sition, and close the door (2).
NOTEl The driver’s door cannot be locked using the
inside lock knob while the driver’s door is
opened.Central door locks*
E00300801504NOTElEach of the doors can be locked or unlocked
independently by using the inside lock knob.NOTEl Repeated continuous operation between lock
and unlock could activate the central door
locking systems built-in protection circuit
and prevent the system from operating. If
this occurs, wait about 1 minute before oper- ating the inside lock knob or the key.
All of the doors can be locked and unlocked
as described hereafter.
Driver’s door with key
Turn the key in the driver’s door towards the front of the vehicle to lock the doors and to-
wards the rear of the vehicle to unlock the doors.
1- Lock
2- Unlock
Driver’s door with inside lock
knob
Set the inside lock knob on the driver’s door towards the front of the vehicle to lock thedoors. Set it towards the rear of the vehicle to
unlock the doors.
1- Lock
2- Unlock
Central door locks*
3-07OKTE15E3Locking and unlocking3