fog light MITSUBISHI L200 2015 Owner's Manual (in English)
[x] Cancel search | Manufacturer: MITSUBISHI, Model Year: 2015, Model line: L200, Model: MITSUBISHI L200 2015Pages: 418, PDF Size: 25.8 MB
Page 121 of 418
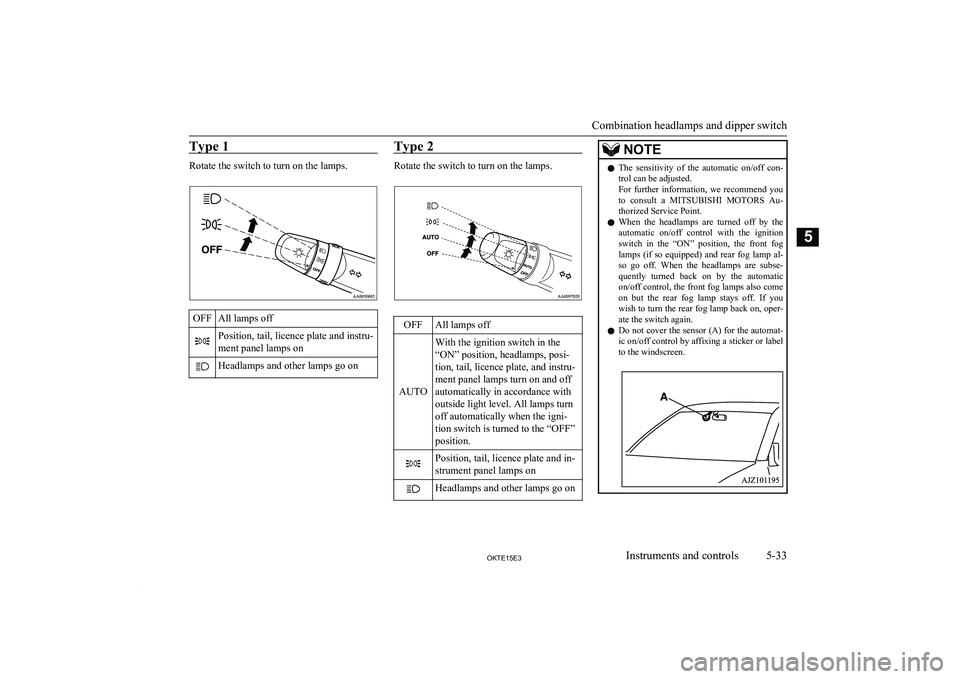
Type 1
Rotate the switch to turn on the lamps.
OFFAll lamps offPosition, tail, licence plate and instru-
ment panel lamps onHeadlamps and other lamps go onType 2
Rotate the switch to turn on the lamps.
OFFAll lamps off
AUTO
With the ignition switch in the
“ON” position, headlamps, posi-
tion, tail, licence plate, and instru-
ment panel lamps turn on and off
automatically in accordance with
outside light level. All lamps turn
off automatically when the igni-
tion switch is turned to the “OFF”
position.Position, tail, licence plate and in-
strument panel lamps onHeadlamps and other lamps go onNOTEl The sensitivity of the automatic on/off con-
trol can be adjusted.
For further information, we recommend you
to consult a MITSUBISHI MOTORS Au-
thorized Service Point.
l When the headlamps are turned off by the
automatic on/off control with the ignition
switch in the “ON” position, the front fog lamps (if so equipped) and rear fog lamp al-
so go off. When the headlamps are subse- quently turned back on by the automatic
on/off control, the front fog lamps also come on but the rear fog lamp stays off. If you wish to turn the rear fog lamp back on, oper-
ate the switch again.
l Do not cover the sensor (A) for the automat-
ic on/off control by affixing a sticker or label
to the windscreen.
Combination headlamps and dipper switch
5-33OKTE15E3Instruments and controls5
Page 125 of 418
NOTElIf the lamp flashes unusually quickly, the
bulb in a turn-signal lamp may have burned out. We recommend you to have the vehicle
inspected.
l It is possible to activate the following func-
tions. For further information, we recom-
mend you to consult a MITSUBISHI
MOTORS Authorized Service Point.
• Flashing of the turn-signal lamps and the
indication lamp in the instrument clusterwhen the lever is operated with the igni-
tion switch in the “ACC” position
• Flashing of the turn-signal lamps and the
indication lamp in the instrument cluster three times when you move the lever to (2) slightly then release it
• The time required to operate the lever for
the 3-flash function can be adjusted.Hazard warning flasher
switch E00506602066
Use the hazard warning flasher switch when
the vehicle has to be parked on the road for
any emergency.
The hazard warning flashers can always be operated, regardless of the position of the ig-
nition key.
Push the switch to turn on the hazard warning
flashers; push the switch again to turn them off.
When this switch is operated, all turn-signal
lamps flash continuously, as do the turn-sig- nal indication lamps in the instrument cluster.NOTEl If the lamps are kept flashing for a long
time, the battery will be discharged, result-
ing in hard engine starting or no start condi- tion.
l If the lamp flashes unusually quickly, the
bulb in a turn-signal lamp may have burned
out.
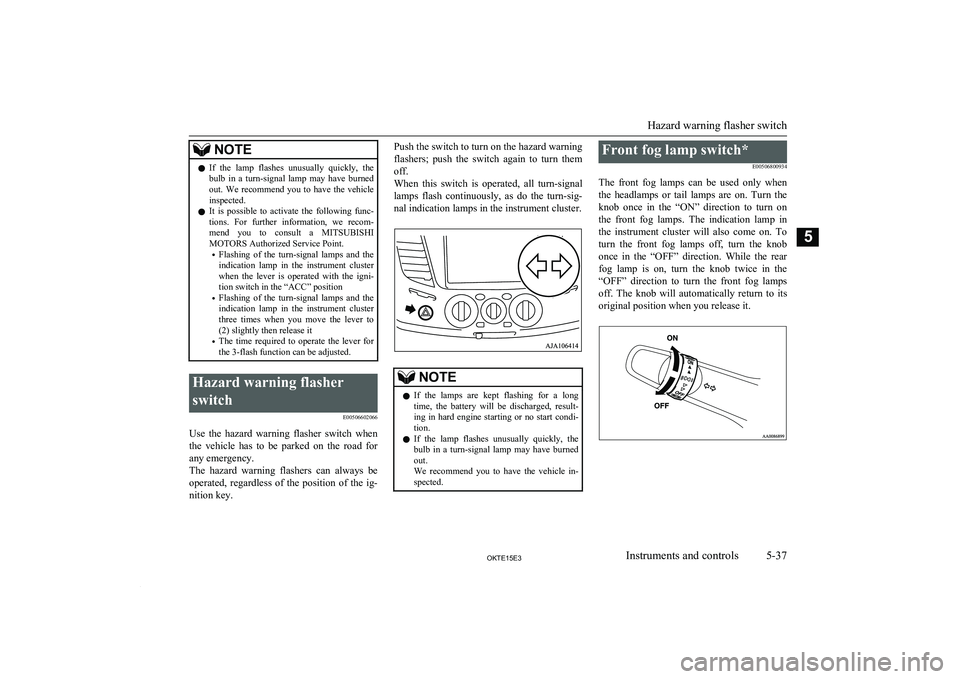
We recommend you to have the vehicle in- spected.Front fog lamp switch*
E00506800934
The front fog lamps can be used only when the headlamps or tail lamps are on. Turn the knob once in the “ON” direction to turn on
the front fog lamps. The indication lamp in
the instrument cluster will also come on. To turn the front fog lamps off, turn the knobonce in the “OFF” direction. While the rear fog lamp is on, turn the knob twice in the
“OFF” direction to turn the front fog lamps off. The knob will automatically return to its
original position when you release it.
Hazard warning flasher switch
5-37OKTE15E3Instruments and controls5
Page 196 of 418
CAUTIONlNormally, use the “” (outside) position
to keep the windscreen and side windows clear and quickly remove fog or frost from
the windscreen.
If high cooling performance is desired, or if
the outside air is dusty or otherwise contami-
nated, use the “
” (recirculation) position.
Set the air selection lever to the “
” (out-
side) position periodically to increase venti-
lation so that the windows do not become fogged up.
l Use of the “
” (recirculation) position for
extended time may cause the windows to fog up.
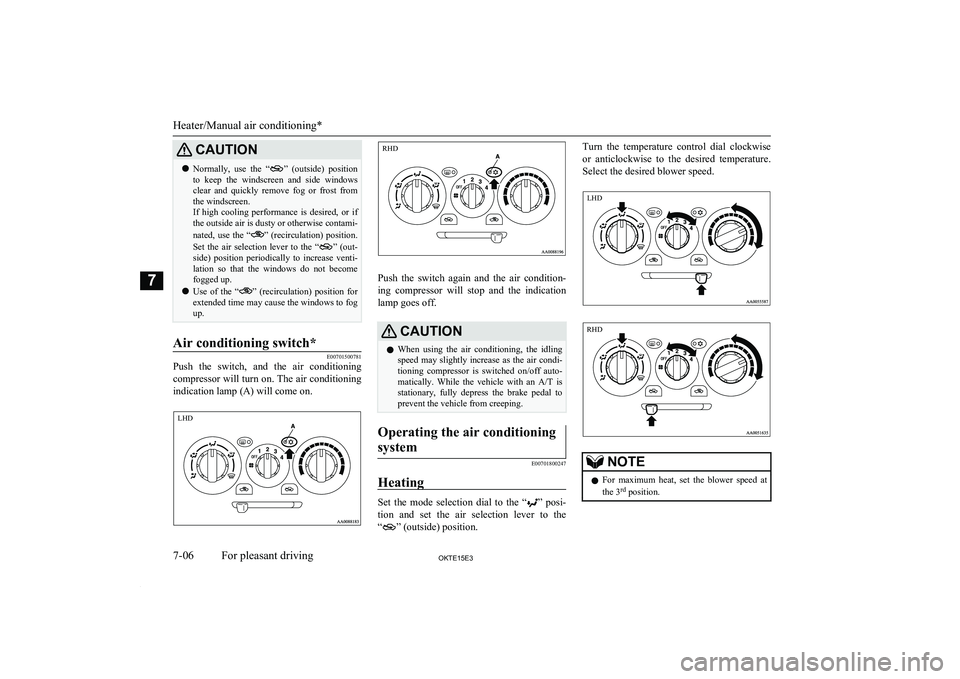
Air conditioning switch*
E00701500781
Push the switch, and the air conditioning
compressor will turn on. The air conditioning
indication lamp (A) will come on.
Push the switch again and the air condition-
ing compressor will stop and the indication
lamp goes off.
CAUTIONl When using the air conditioning, the idling
speed may slightly increase as the air condi- tioning compressor is switched on/off auto-
matically. While the vehicle with an A/T is
stationary, fully depress the brake pedal to
prevent the vehicle from creeping.Operating the air conditioning
system
E00701800247
Heating
Set the mode selection dial to the “” posi-
tion and set the air selection lever to the
“
” (outside) position.
Turn the temperature control dial clockwise
or anticlockwise to the desired temperature. Select the desired blower speed.NOTEl For maximum heat, set the blower speed at
the 3 rd
position.
Heater/Manual air conditioning*
7-06OKTE15E3For pleasant driving7 LHD RHD LHD RHD
Page 197 of 418
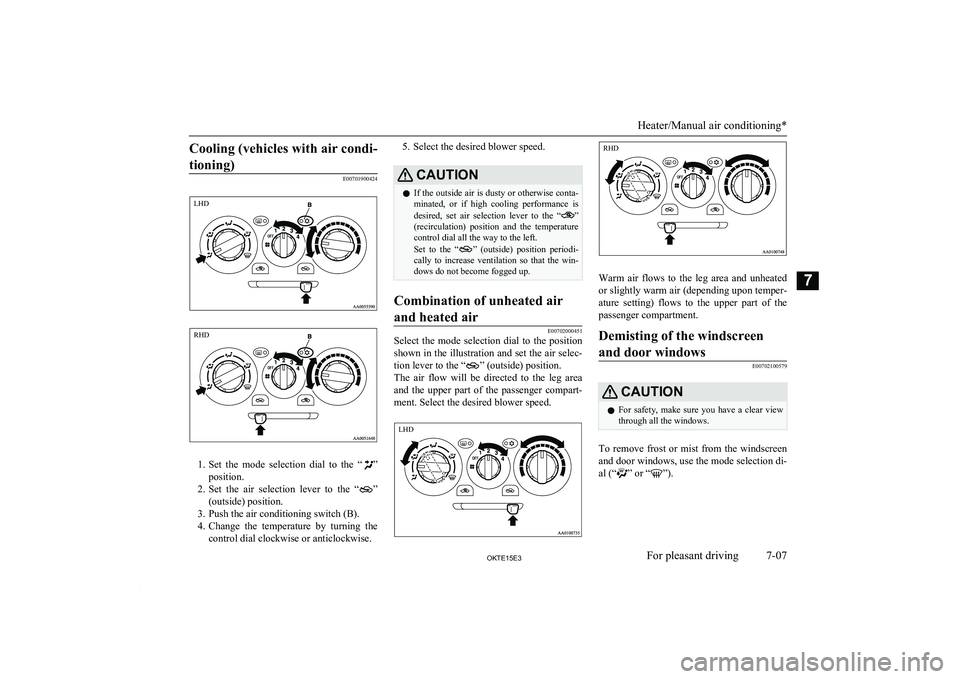
Cooling (vehicles with air condi-tioning)
E00701900424
1. Set the mode selection dial to the “”
position.
2. Set the air selection lever to the “
”
(outside) position.
3. Push the air conditioning switch (B).
4. Change the temperature by turning the
control dial clockwise or anticlockwise.
5. Select the desired blower speed.CAUTIONl If the outside air is dusty or otherwise conta-
minated, or if high cooling performance is
desired, set air selection lever to the “
”
(recirculation) position and the temperature control dial all the way to the left.
Set to the “
” (outside) position periodi-
cally to increase ventilation so that the win- dows do not become fogged up.
Combination of unheated air
and heated air
E00702000451
Select the mode selection dial to the position shown in the illustration and set the air selec- tion lever to the “
” (outside) position.
The air flow will be directed to the leg area
and the upper part of the passenger compart-
ment. Select the desired blower speed.
Warm air flows to the leg area and unheated
or slightly warm air (depending upon temper-
ature setting) flows to the upper part of the
passenger compartment.
Demisting of the windscreen
and door windows
E00702100579
CAUTIONl For safety, make sure you have a clear view
through all the windows.
To remove frost or mist from the windscreen
and door windows, use the mode selection di-
al (“
” or “”).
Heater/Manual air conditioning*
7-07OKTE15E3For pleasant driving7LHD RHD LHD RHD
Page 364 of 418
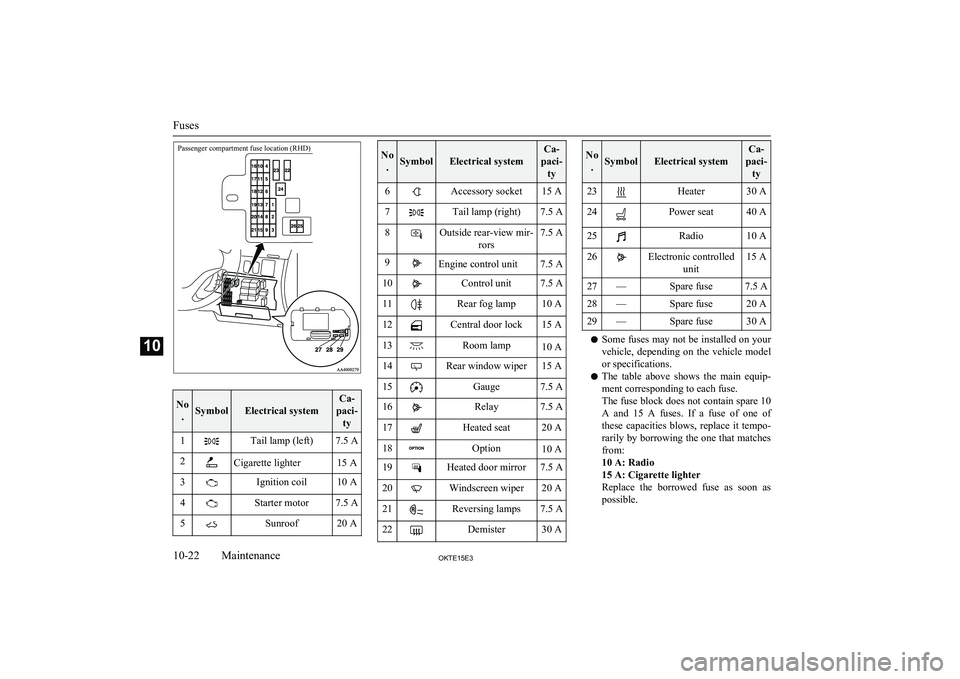
Passenger compartment fuse location (RHD)
No.SymbolElectrical system
Ca-
paci- ty1Tail lamp (left)7.5 A2Cigarette lighter15 A3Ignition coil10 A4Starter motor7.5 A5Sunroof20 ANo.SymbolElectrical system
Ca-
paci- ty6Accessory socket15 A7Tail lamp (right)7.5 A8Outside rear-view mir- rors7.5 A9Engine control unit7.5 A10Control unit7.5 A11Rear fog lamp10 A12Central door lock15 A13Room lamp10 A14Rear window wiper15 A15Gauge7.5 A16Relay7.5 A17Heated seat20 A18Option10 A19Heated door mirror7.5 A20Windscreen wiper20 A21Reversing lamps7.5 A22Demister30 ANo.SymbolElectrical system
Ca-
paci- ty23Heater30 A24Power seat40 A25Radio10 A26Electronic controlled unit15 A27—Spare fuse7.5 A28—Spare fuse20 A29—Spare fuse30 A
lSome fuses may not be installed on your
vehicle, depending on the vehicle model
or specifications.
l The table above shows the main equip-
ment corresponding to each fuse.
The fuse block does not contain spare 10
A and 15 A fuses. If a fuse of one of these capacities blows, replace it tempo-
rarily by borrowing the one that matches
from:
10 A: Radio
15 A: Cigarette lighter
Replace the borrowed fuse as soon as
possible.
Fuses
10-22OKTE15E3Maintenance10
Page 368 of 418
NOTElThe side turn-signal lamp (on outside rear-
view mirror) uses an LED instead of a bulb. For repair and replacement, contact a
MITSUBISHI MOTORS Authorized Serv-
ice Point.
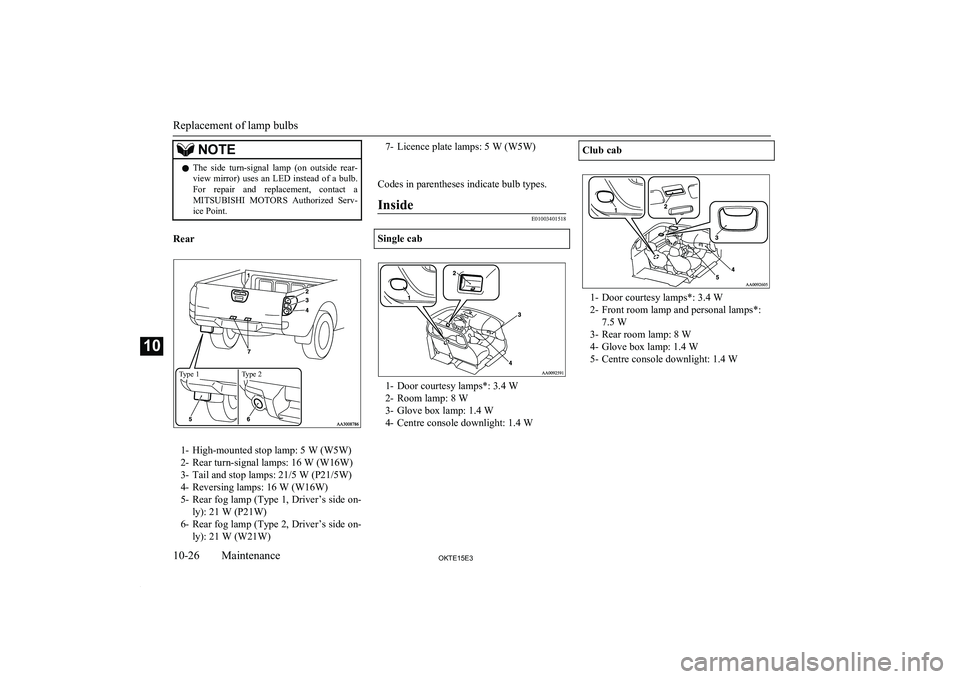
Rear
Type 1Type 2
1- High-mounted stop lamp: 5 W (W5W)
2- Rear turn-signal lamps: 16 W (W16W)3- Tail and stop lamps: 21/5 W (P21/5W)
4- Reversing lamps: 16 W (W16W)
5- Rear fog lamp (Type 1, Driver’s side on-
ly): 21 W (P21W)
6- Rear fog lamp (Type 2, Driver’s side on-
ly): 21 W (W21W)
7- Licence plate lamps: 5 W (W5W)
Codes in parentheses indicate bulb types.Inside
E01003401518
Single cab
1- Door courtesy lamps*: 3.4 W
2- Room lamp: 8 W
3- Glove box lamp: 1.4 W
4- Centre console downlight: 1.4 W
Club cab
1- Door courtesy lamps*: 3.4 W
2- Front room lamp and personal lamps*: 7.5 W
3- Rear room lamp: 8 W
4- Glove box lamp: 1.4 W
5- Centre console downlight: 1.4 W
Replacement of lamp bulbs
10-26OKTE15E3Maintenance10