headlamp MITSUBISHI L200 2015 Owner's Manual (in English)
[x] Cancel search | Manufacturer: MITSUBISHI, Model Year: 2015, Model line: L200, Model: MITSUBISHI L200 2015Pages: 418, PDF Size: 25.8 MB
Page 4 of 418
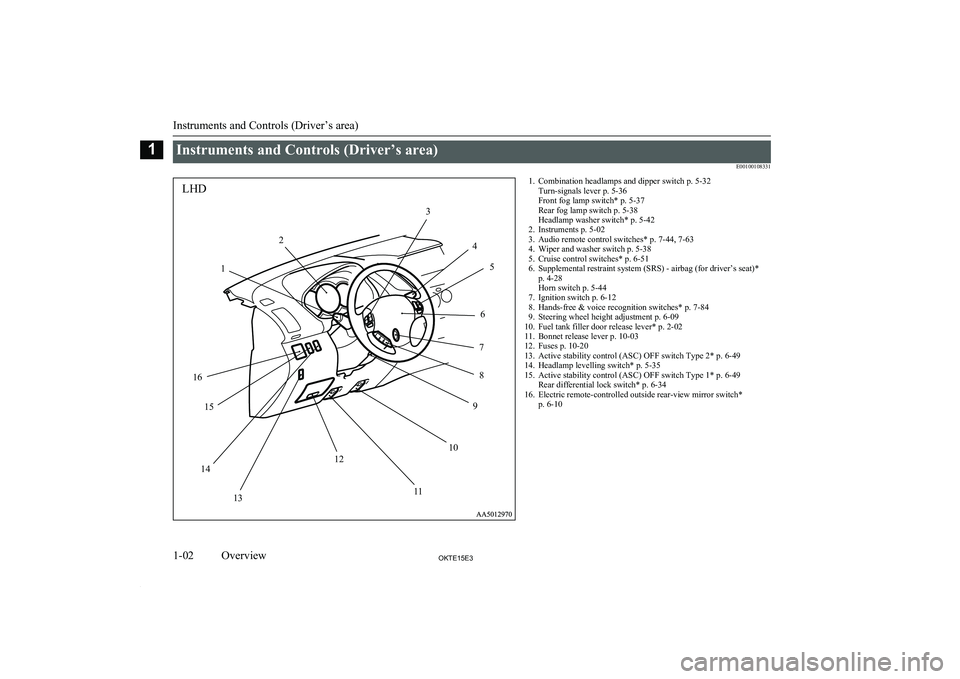
Instruments and Controls (Driver’s area)E00100108331
1LHD23456789101112131415161. Combination headlamps and dipper switch p. 5-32Turn-signals lever p. 5-36
Front fog lamp switch* p. 5-37
Rear fog lamp switch p. 5-38
Headlamp washer switch* p. 5-42
2. Instruments p. 5-02
3. Audio remote control switches* p. 7-44, 7-63
4. Wiper and washer switch p. 5-38
5. Cruise control switches* p. 6-51
6. Supplemental restraint system (SRS) - airbag (for driver’s seat)* p. 4-28
Horn switch p. 5-44
7. Ignition switch p. 6-12
8. Hands-free & voice recognition switches* p. 7-84
9. Steering wheel height adjustment p. 6-09
10. Fuel tank filler door release lever* p. 2-02
11. Bonnet release lever p. 10-03
12. Fuses p. 10-20
13. Active stability control (ASC) OFF switch Type 2* p. 6-49
14. Headlamp levelling switch* p. 5-35
15. Active stability control (ASC) OFF switch Type 1* p. 6-49 Rear differential lock switch* p. 6-34
16. Electric remote-controlled outside rear-view mirror switch* p. 6-10
Instruments and Controls (Driver’s area)
1-02OKTE15E3Overview1
Page 5 of 418
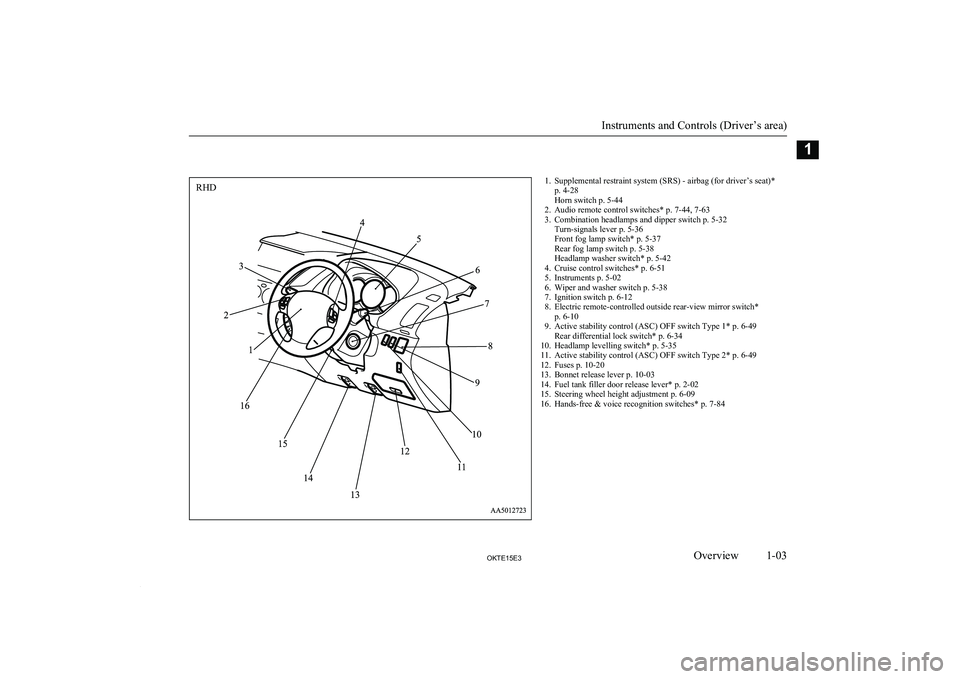
1. Supplemental restraint system (SRS) - airbag (for driver’s seat)*p. 4-28
Horn switch p. 5-44
2. Audio remote control switches* p. 7-44, 7-63
3. Combination headlamps and dipper switch p. 5-32 Turn-signals lever p. 5-36
Front fog lamp switch* p. 5-37
Rear fog lamp switch p. 5-38
Headlamp washer switch* p. 5-42
4. Cruise control switches* p. 6-51
5. Instruments p. 5-02
6. Wiper and washer switch p. 5-38
7. Ignition switch p. 6-12
8. Electric remote-controlled outside rear-view mirror switch* p. 6-10
9. Active stability control (ASC) OFF switch Type 1* p. 6-49 Rear differential lock switch* p. 6-34
10. Headlamp levelling switch* p. 5-35
11. Active stability control (ASC) OFF switch Type 2* p. 6-49
12. Fuses p. 10-20
13. Bonnet release lever p. 10-03
14. Fuel tank filler door release lever* p. 2-02
15. Steering wheel height adjustment p. 6-09
16. Hands-free & voice recognition switches* p. 7-84
Instruments and Controls (Driver’s area)
1-03OKTE15E3Overview1RHD
Page 18 of 418
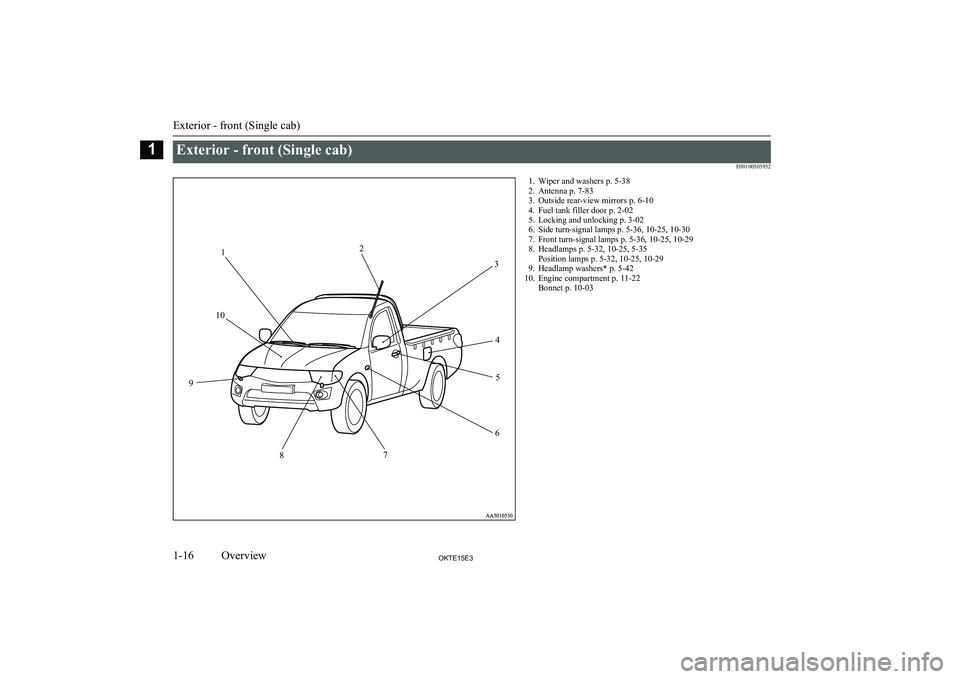
Exterior - front (Single cab)E001005039521. Wiper and washers p. 5-38
2. Antenna p. 7-83
3. Outside rear-view mirrors p. 6-10
4. Fuel tank filler door p. 2-02
5. Locking and unlocking p. 3-02
6. Side turn-signal lamps p. 5-36, 10-25, 10-30
7. Front turn-signal lamps p. 5-36, 10-25, 10-29
8. Headlamps p. 5-32, 10-25, 5-35 Position lamps p. 5-32, 10-25, 10-29
9. Headlamp washers* p. 5-42
10. Engine compartment p. 11-22 Bonnet p. 10-03
Exterior - front (Single cab)
1-16OKTE15E3Overview112
3
45
6
7
8
9
10
Page 20 of 418
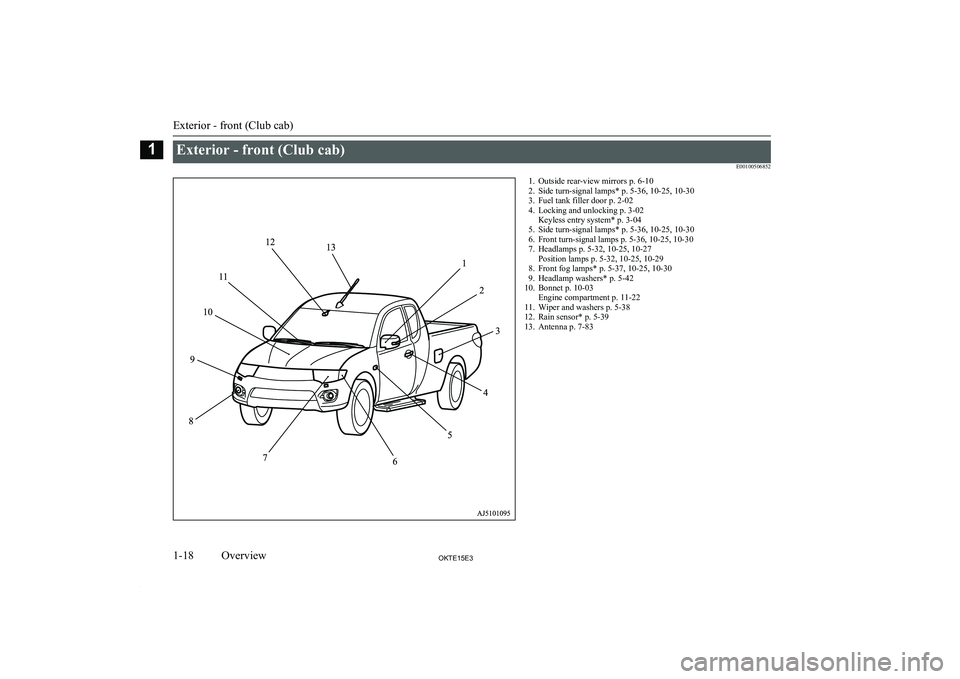
Exterior - front (Club cab)E001005068521. Outside rear-view mirrors p. 6-10
2. Side turn-signal lamps* p. 5-36, 10-25, 10-30
3. Fuel tank filler door p. 2-02
4. Locking and unlocking p. 3-02 Keyless entry system* p. 3-04
5. Side turn-signal lamps* p. 5-36, 10-25, 10-30
6. Front turn-signal lamps p. 5-36, 10-25, 10-30
7. Headlamps p. 5-32, 10-25, 10-27 Position lamps p. 5-32, 10-25, 10-29
8. Front fog lamps* p. 5-37, 10-25, 10-30
9. Headlamp washers* p. 5-42
10. Bonnet p. 10-03 Engine compartment p. 11-22
11. Wiper and washers p. 5-38
12. Rain sensor* p. 5-39
13. Antenna p. 7-83
Exterior - front (Club cab)
1-18OKTE15E3Overview1
Page 22 of 418
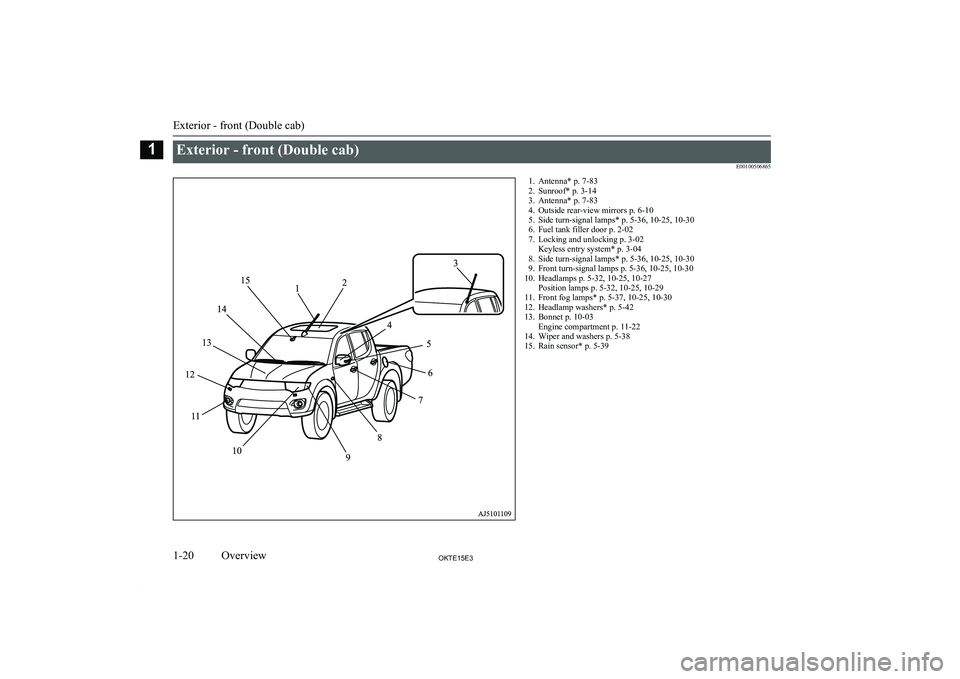
Exterior - front (Double cab)E001005068651. Antenna* p. 7-832. Sunroof* p. 3-14
3. Antenna* p. 7-83
4. Outside rear-view mirrors p. 6-10
5. Side turn-signal lamps* p. 5-36, 10-25, 10-30
6. Fuel tank filler door p. 2-02
7. Locking and unlocking p. 3-02 Keyless entry system* p. 3-04
8. Side turn-signal lamps* p. 5-36, 10-25, 10-30
9. Front turn-signal lamps p. 5-36, 10-25, 10-30
10. Headlamps p. 5-32, 10-25, 10-27 Position lamps p. 5-32, 10-25, 10-29
11. Front fog lamps* p. 5-37, 10-25, 10-30
12. Headlamp washers* p. 5-42
13. Bonnet p. 10-03 Engine compartment p. 11-22
14. Wiper and washers p. 5-38
15. Rain sensor* p. 5-39
Exterior - front (Double cab)
1-20OKTE15E3Overview1
Page 89 of 418

Instruments.......................................................................................... 5-02
Indication and warning lamps............................................................. 5-06
Indication lamps.................................................................................. 5-07
Warning lamps.................................................................................... 5-08
Centre information display*................................................................5-10
Combination headlamps and dipper switch........................................ 5-32
Headlamp levelling switch*................................................................ 5-35
Turn-signals lever............................................................................... 5-36
Hazard warning flasher switch............................................................5-37 Front fog lamp switch*....................................................................... 5-37Rear fog lamp switch.......................................................................... 5-38
Wiper and washer switch.................................................................... 5-38
Rear window demister switch............................................................. 5-43
Horn switch......................................................................................... 5-44Instruments and controls
OKTE15E35
Page 120 of 418
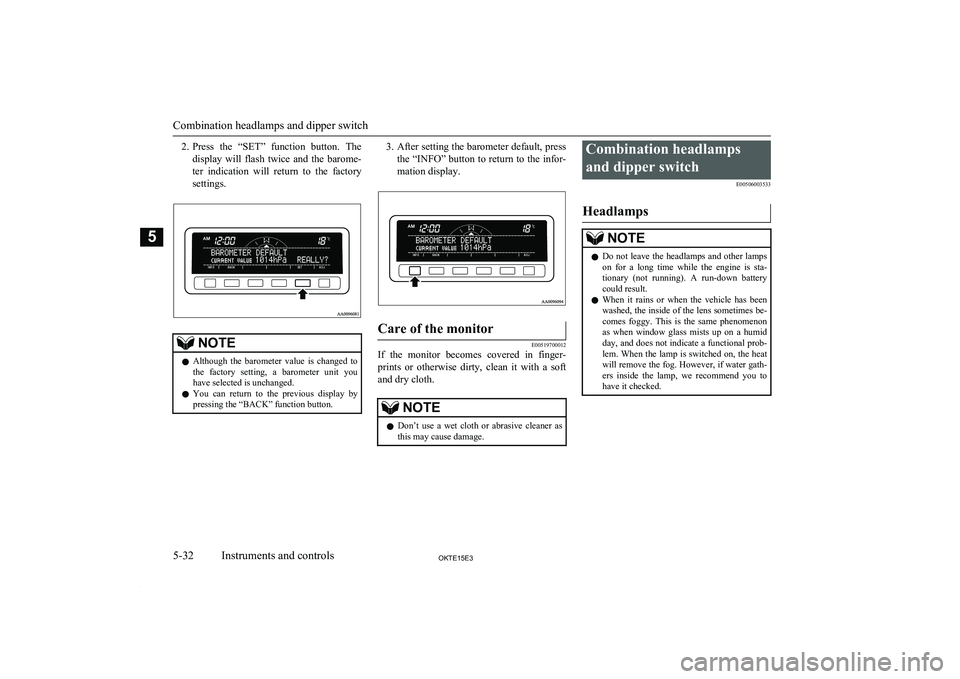
2.Press the “SET” function button. The
display will flash twice and the barome- ter indication will return to the factory
settings.NOTEl Although the barometer value is changed to
the factory setting, a barometer unit you have selected is unchanged.
l You can return to the previous display by
pressing the “BACK” function button.3. After setting the barometer default, press
the “INFO” button to return to the infor-
mation display.Care of the monitor
E00519700012
If the monitor becomes covered in finger-
prints or otherwise dirty, clean it with a soft and dry cloth.
NOTEl Don’t use a wet cloth or abrasive cleaner as
this may cause damage.Combination headlamps
and dipper switch E00506003533
HeadlampsNOTEl Do not leave the headlamps and other lamps
on for a long time while the engine is sta-tionary (not running). A run-down batterycould result.
l When it rains or when the vehicle has been
washed, the inside of the lens sometimes be-
comes foggy. This is the same phenomenon as when window glass mists up on a humid
day, and does not indicate a functional prob- lem. When the lamp is switched on, the heat
will remove the fog. However, if water gath-
ers inside the lamp, we recommend you to have it checked.
Combination headlamps and dipper switch
5-32OKTE15E3Instruments and controls5
Page 121 of 418
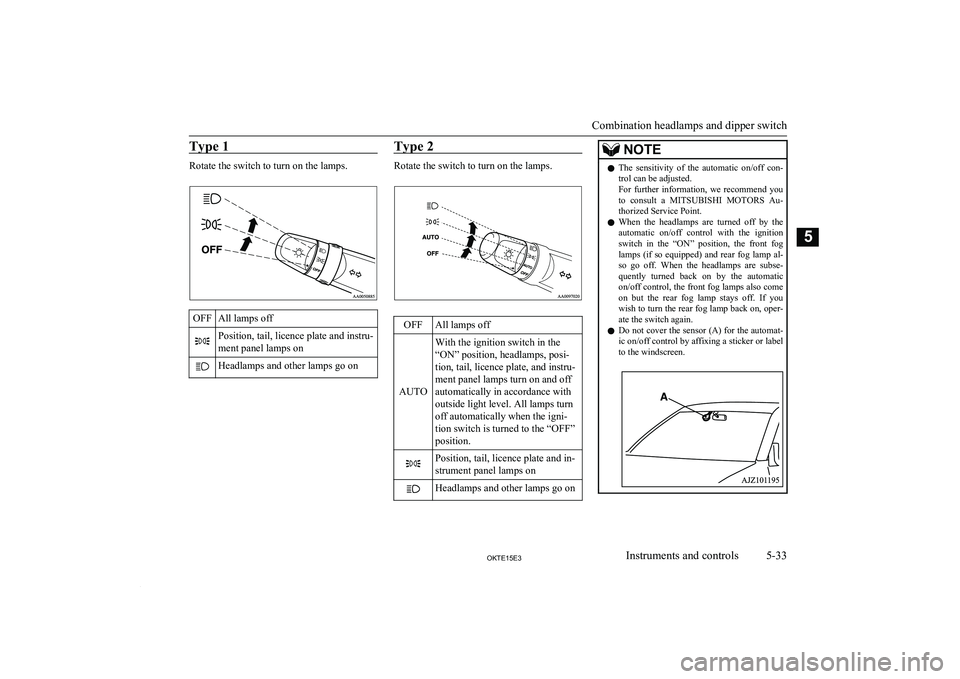
Type 1
Rotate the switch to turn on the lamps.
OFFAll lamps offPosition, tail, licence plate and instru-
ment panel lamps onHeadlamps and other lamps go onType 2
Rotate the switch to turn on the lamps.
OFFAll lamps off
AUTO
With the ignition switch in the
“ON” position, headlamps, posi-
tion, tail, licence plate, and instru-
ment panel lamps turn on and off
automatically in accordance with
outside light level. All lamps turn
off automatically when the igni-
tion switch is turned to the “OFF”
position.Position, tail, licence plate and in-
strument panel lamps onHeadlamps and other lamps go onNOTEl The sensitivity of the automatic on/off con-
trol can be adjusted.
For further information, we recommend you
to consult a MITSUBISHI MOTORS Au-
thorized Service Point.
l When the headlamps are turned off by the
automatic on/off control with the ignition
switch in the “ON” position, the front fog lamps (if so equipped) and rear fog lamp al-
so go off. When the headlamps are subse- quently turned back on by the automatic
on/off control, the front fog lamps also come on but the rear fog lamp stays off. If you wish to turn the rear fog lamp back on, oper-
ate the switch again.
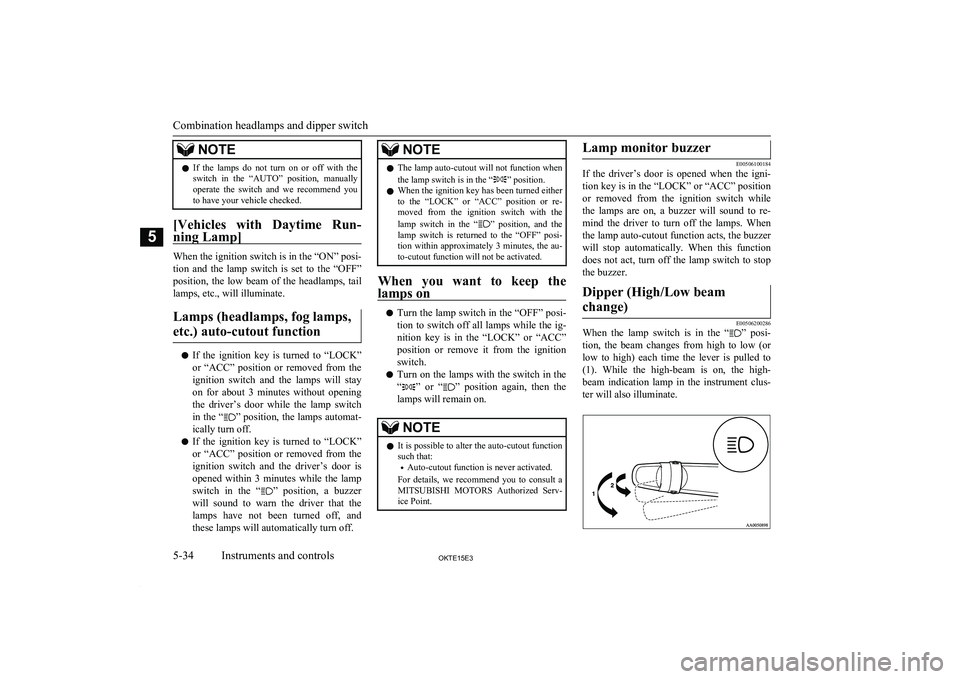
l Do not cover the sensor (A) for the automat-
ic on/off control by affixing a sticker or label
to the windscreen.
Combination headlamps and dipper switch
5-33OKTE15E3Instruments and controls5
Page 122 of 418
NOTElIf the lamps do not turn on or off with the
switch in the “AUTO” position, manually
operate the switch and we recommend you
to have your vehicle checked.
[Vehicles with Daytime Run-
ning Lamp]
When the ignition switch is in the “ON” posi- tion and the lamp switch is set to the “OFF”
position, the low beam of the headlamps, tail lamps, etc., will illuminate.
Lamps (headlamps, fog lamps, etc.) auto-cutout function
l If the ignition key is turned to “LOCK”
or “ACC” position or removed from the
ignition switch and the lamps will stay on for about 3 minutes without opening the driver’s door while the lamp switch
in the “
” position, the lamps automat-
ically turn off.
l If the ignition key is turned to “LOCK”
or “ACC” position or removed from the ignition switch and the driver’s door is opened within 3 minutes while the lamp
switch in the “
” position, a buzzer
will sound to warn the driver that the
lamps have not been turned off, and
these lamps will automatically turn off.
NOTEl The lamp auto-cutout will not function when
the lamp switch is in the “” position.
l When the ignition key has been turned either
to the “LOCK” or “ACC” position or re- moved from the ignition switch with the
lamp switch in the “
” position, and the
lamp switch is returned to the “OFF” posi- tion within approximately 3 minutes, the au-
to-cutout function will not be activated.
When you want to keep the
lamps on
l Turn the lamp switch in the “OFF” posi-
tion to switch off all lamps while the ig-
nition key is in the “LOCK” or “ACC” position or remove it from the ignitionswitch.
l Turn on the lamps with the switch in the
“
” or “” position again, then the
lamps will remain on.
NOTEl It is possible to alter the auto-cutout function
such that:
• Auto-cutout function is never activated.
For details, we recommend you to consult a
MITSUBISHI MOTORS Authorized Serv-
ice Point.Lamp monitor buzzer
E00506100184
If the driver’s door is opened when the igni-
tion key is in the “LOCK” or “ACC” position or removed from the ignition switch while
the lamps are on, a buzzer will sound to re-
mind the driver to turn off the lamps. When
the lamp auto-cutout function acts, the buzzer
will stop automatically. When this function does not act, turn off the lamp switch to stop
the buzzer.
Dipper (High/Low beam
change)
E00506200286
When the lamp switch is in the “” posi-
tion, the beam changes from high to low (or
low to high) each time the lever is pulled to (1). While the high-beam is on, the high-
beam indication lamp in the instrument clus-
ter will also illuminate.
Combination headlamps and dipper switch
5-34OKTE15E3Instruments and controls5
Page 123 of 418

Headlamp flasher
E00506300157
The high-beams flash when the lever is
pulled slightly (2), and will go off when it is released.
When the high-beam is on, the high-beam in-
dication lamp in the instrument cluster will
also illuminate.NOTEl The high-beams can also flash when the
lamp switch is in the “OFF” position.
l If you turn the lamps off with the headlamps
set to high-beam illumination, the headlamps
are automatically returned to their low-beam setting when the lamp switch is next turned
to the “
” position.
Headlamp levelling switch*
E00506400826
The angle of the headlamp beam varies de-pending on the load carried by the vehicle.
The headlamp levelling switch can be used to
adjust the headlamp illumination distance (when the lower beam is illuminated) so that the headlamps’ glare does not distract otherdrivers.
Set the switch (referring to the following ta-
ble) to the appropriate position according to
the number of people and the load in the ve- hicle.CAUTIONl Always perform adjustments before driving.
Do not attempt to adjust while driving, as it could cause an accident.NOTEl When adjusting the beam position, first put
the dial in the “0” position (the highest beamposition).Single cabVehicle con-
ditionSwitch posi- tion“0”“2”●:1 person:Full luggage loadingSwitch position 0-Driver onlySwitch position 2-Driver + Full luggageloading
Club cab
Vehicle con- ditionSwitch posi- tion“0”“3” or“4”●:1 person:Full luggage loadingSwitch position 0-Driver only
Headlamp levelling switch*
5-35OKTE15E3Instruments and controls5