start stop button MITSUBISHI L200 2015 Owner's Manual (in English)
[x] Cancel search | Manufacturer: MITSUBISHI, Model Year: 2015, Model line: L200, Model: MITSUBISHI L200 2015Pages: 418, PDF Size: 25.8 MB
Page 57 of 418
WARNINGlNever wear the lap portion of the belt
across your abdomen. During accidents it
can press sharply against the abdomen and increase the risk of injury.
l The seat belts must not be twisted when
worn.
3. Pull the belt slightly to adjust slackness
as desired.
To unfasten
Hold the latch plate and push the button on
the buckle.
NOTEl As the belt retracts automatically, keep hold-
ing the latch plate while retracting so that the
belt stows slowly. Failure to do this could damage the vehicle.Seat belt reminder/warning
lamp
E00409802026
A tone and warning lamp are used to remind the driver and front passenger (if so equip-ped) to fasten the seat belt.
NOTEl For the front passenger seat, the warning
function works only while a person is sitting on the seat.
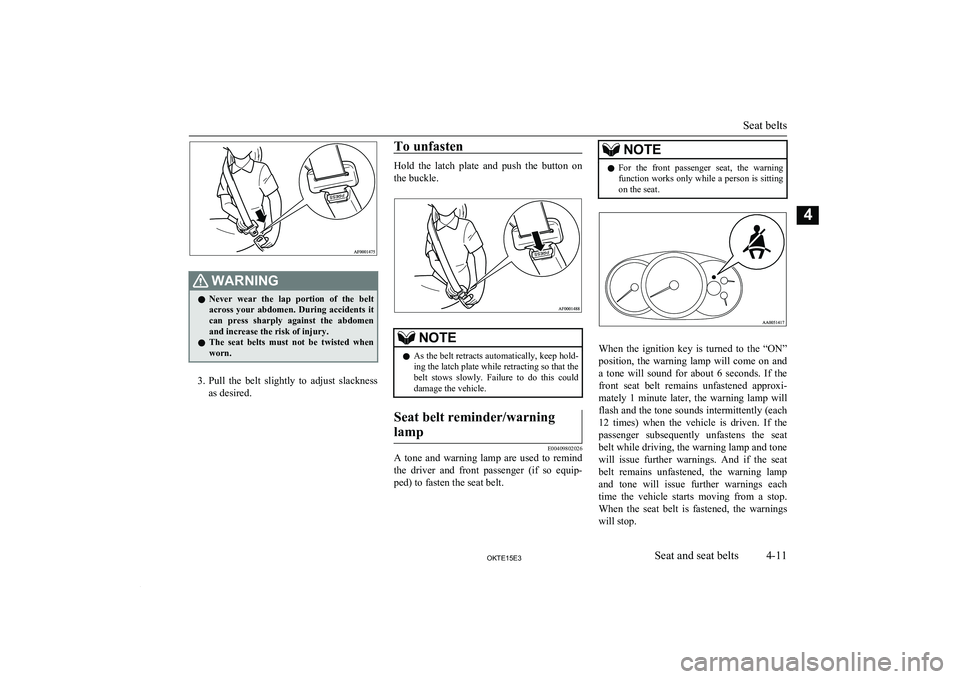
When the ignition key is turned to the “ON”
position, the warning lamp will come on and
a tone will sound for about 6 seconds. If the
front seat belt remains unfastened approxi-
mately 1 minute later, the warning lamp will flash and the tone sounds intermittently (each 12 times) when the vehicle is driven. If the
passenger subsequently unfastens the seat
belt while driving, the warning lamp and tone will issue further warnings. And if the seat
belt remains unfastened, the warning lamp and tone will issue further warnings each
time the vehicle starts moving from a stop. When the seat belt is fastened, the warnings
will stop.
Seat belts
4-11OKTE15E3Seat and seat belts4
Page 139 of 418
Parking brakeE00600501562
To park the vehicle, first bring it to a com- plete stop, fully engage the parking brake,
and then move the gearshift lever to 1 st
(on
an uphill) or Reverse (on a downhill) position for vehicles with manual transmission or set
the selector lever to “P” (PARK) position on automatic transmission vehicles.CAUTIONl Before driving, be sure that the parking
brake is fully released and brake warning
lamp is off.
If a vehicle is driven without releasing the
parking brake, the brake will be overheated, resulting in ineffective braking and possiblebrake failure.
l When you intend to apply the parking brake,
firmly press the brake pedal to bring the ve- hicle to a complete stop before pulling theparking brake lever. Pulling the parking brake lever with the vehicle moving could make the rear wheels lock up, thereby mak-
ing the vehicle unstable. It could also make
the parking brake malfunction.
l If the brake warning lamp does not extin-
guish when the parking brake is fully re-
leased, the brake system may be abnormal.
Have your vehicle checked immediately.
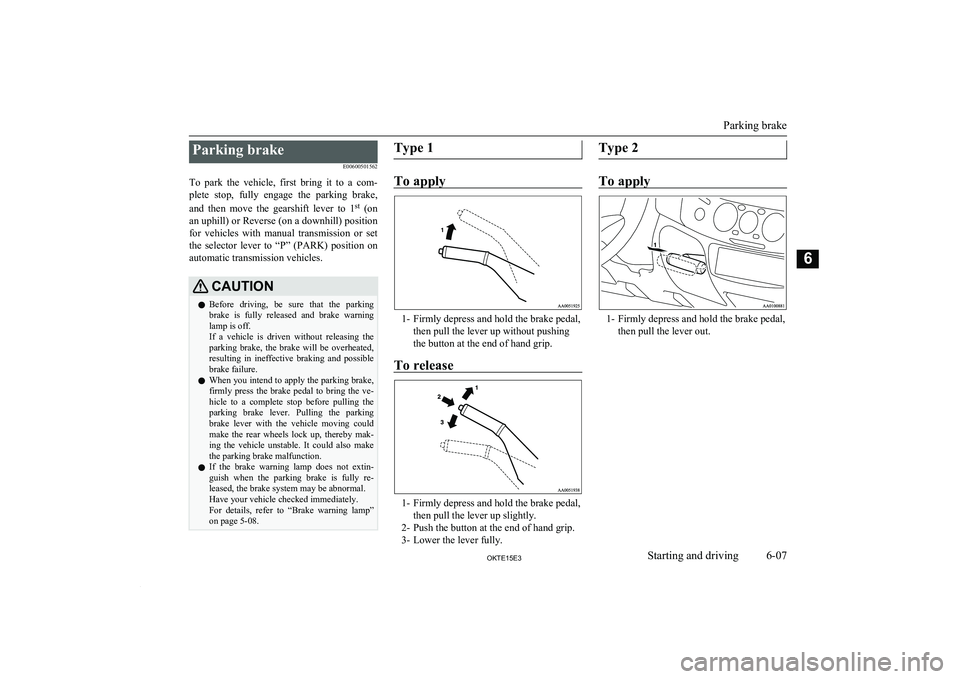
For details, refer to “Brake warning lamp” on page 5-08.Type 1
To apply
1- Firmly depress and hold the brake pedal,
then pull the lever up without pushing
the button at the end of hand grip.
To release
1- Firmly depress and hold the brake pedal, then pull the lever up slightly.
2- Push the button at the end of hand grip.
3- Lower the lever fully.
Type 2
To apply
1- Firmly depress and hold the brake pedal, then pull the lever out.
Parking brake
6-07OKTE15E3Starting and driving6
Page 145 of 418
CAUTIONlDo not remove the ignition key from the ig-
nition switch while driving. The steeringwheel will lock, causing loss of control.
l If the engine is stopped while driving, the
brake servomechanism will cease to function and braking efficiency will deteriorate. Also,
the power steering system will not function
and it will require greater manual effort to
operate the steering.
l Do not leave the key in the “ON” position
for a long time when the engine is not run- ning, doing so will cause the battery to be
discharged.
l Do not turn the key to the “START” position
when the engine is running, doing so could damage the starter motor.NOTEl For vehicles with an
A/T, when the selector
lever is in the “P” (PARK) position, do not operate the lock button of selector lever re-
peatedly for more than 30 seconds. You may
not be able to remove the key from the igni-
tion switch, because the protection circuit is
activated. If this occurs, wait a few moments before removing the key.
Refer to “Selector lever operation” on page
6-19.Steering wheel lock
E00601500227
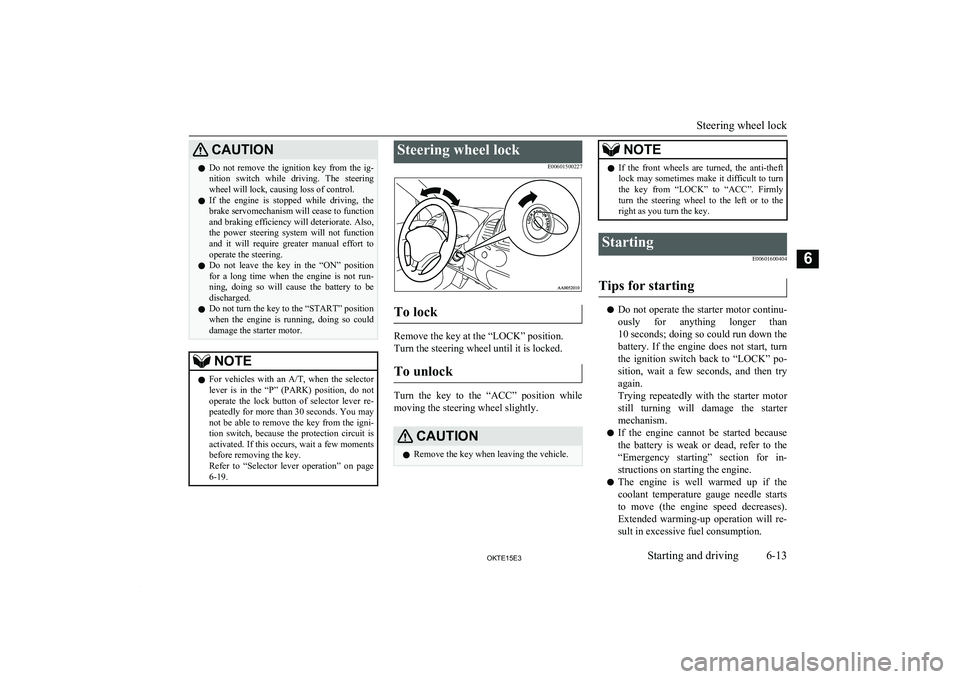
To lock
Remove the key at the “LOCK” position.
Turn the steering wheel until it is locked.
To unlock
Turn the key to the “ACC” position while
moving the steering wheel slightly.
CAUTIONl Remove the key when leaving the vehicle.NOTElIf the front wheels are turned, the anti-theft
lock may sometimes make it difficult to turnthe key from “LOCK” to “ACC”. Firmly
turn the steering wheel to the left or to the right as you turn the key.Starting
E00601600404
Tips for starting
lDo not operate the starter motor continu-
ously for anything longer than10 seconds ; doing so could run down the
battery. If the engine does not start, turn
the ignition switch back to “LOCK” po-
sition, wait a few seconds, and then try again.
Trying repeatedly with the starter motor still turning will damage the starter
mechanism.
l If the engine cannot be started because
the battery is weak or dead, refer to the“Emergency starting” section for in- structions on starting the engine.
l The engine is well warmed up if the
coolant temperature gauge needle starts
to move (the engine speed decreases).
Extended warming-up operation will re-
sult in excessive fuel consumption.
Steering wheel lock
6-13OKTE15E3Starting and driving6
Page 152 of 418
The lock button need not be pushed to
move the selector lever.WARNINGl If the lock button is always pushed to op-
erate the selector lever, the lever may beaccidentally shifted into the “P” (PARK)
or “R” (REVERSE) position. Be sure not to push the lock button when performing
the operations indicated by
in the illus-
tration.
l Always depress the brake pedal when
shifting the selector lever into a gear from the “P” (PARK) or “N” (NEUTRAL) po-sition.
When beginning to drive, do not shift the
selector lever from the “P” (PARK) or
“N” (NEUTRAL) position while depress-
ing the accelerator pedal, doing so is dan- gerous because the vehicle will “jump”
forward or backward.
When the selector lever cannot
be shifted from the “P” (PARK)
position
When the selector lever cannot be shifted from the “P” (PARK) position to another po-
sition while the brake pedal is pressed and
held down with the ignition switch at the
“ON” position, the battery may be flat or the shift-lock mechanism may be malfunction- ing.
Immediately have your vehicle checked by
an authorized MITSUBISHI MOTORS deal-
er.
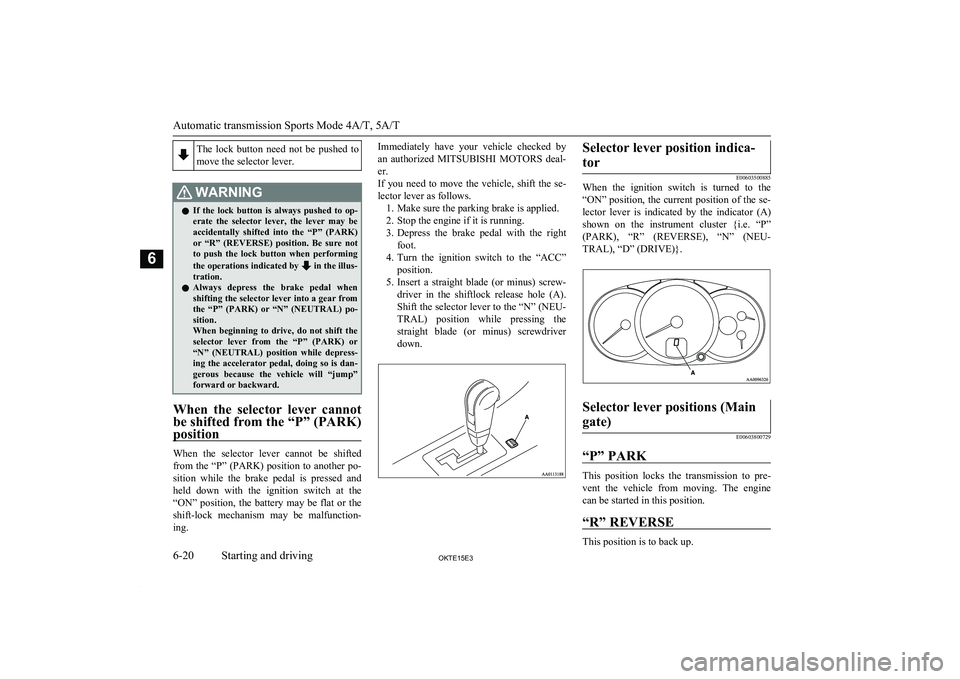
If you need to move the vehicle, shift the se- lector lever as follows. 1. Make sure the parking brake is applied.
2. Stop the engine if it is running.
3. Depress the brake pedal with the right
foot.
4. Turn the ignition switch to the “ACC”
position.
5. Insert a straight blade (or minus) screw-
driver in the shiftlock release hole (A).
Shift the selector lever to the “N” (NEU-
TRAL) position while pressing the straight blade (or minus) screwdriver down.Selector lever position indica-
tor
E00603500885
When the ignition switch is turned to the
“ON” position, the current position of the se- lector lever is indicated by the indicator (A)
shown on the instrument cluster {i.e. “P” (PARK), “R” (REVERSE), “N” (NEU-
TRAL), “D” (DRIVE)}.
Selector lever positions (Main
gate)
E00603800729
“P” PARK
This position locks the transmission to pre- vent the vehicle from moving. The engine
can be started in this position.
“R” REVERSE
This position is to back up.
Automatic transmission Sports Mode 4A/T, 5A/T
6-20OKTE15E3Starting and driving6
Page 217 of 418
To listen to a CD
E00709602290
1. Insert a disc with the label facing up, and
the CD player will begin playing even ifanother mode is being used. The CD in- dicator (18), the track number (16), the
playing time (17) will appear on the dis-
play.
2. When the CD mode is selected by press-
ing the CD (12) button several times with the disc in the player, the CD player
will start playback.
3. To stop the CD, turn off the power by
pressing the PWR switch (11) or change
over to the another mode by pressing the
RADIO button or CD button, or eject the disc by pressing the eject button (1).
NOTEl To adjust the volume and tone, refer to
“To
adjust the volume” on page 7-17 and “To ad- just the tone” on page 7-17.
l An 8 cm compact disc cannot be played on
this CD player.
l For information concerning the handling of
compact discs, refer to “Handling of com-
pact discs (audio system type 1)” on page 7-49.To fast-forward/fast-reverse the
disc
Fast-forward
You can fast-forward the disc by pressing the
button (9). While the button is kept press-
ed, the disc will be fast-forwarded.
Fast-reverse
You can fast-reverse the disc by pressing the
button (10). While the button is kept
pressed, the disc will be fast-reversed.
NOTEl When you have fast-forwarded/fast-reversed
the disc, the playing-time may be shownwith deviation.To listen to an MP3 CD
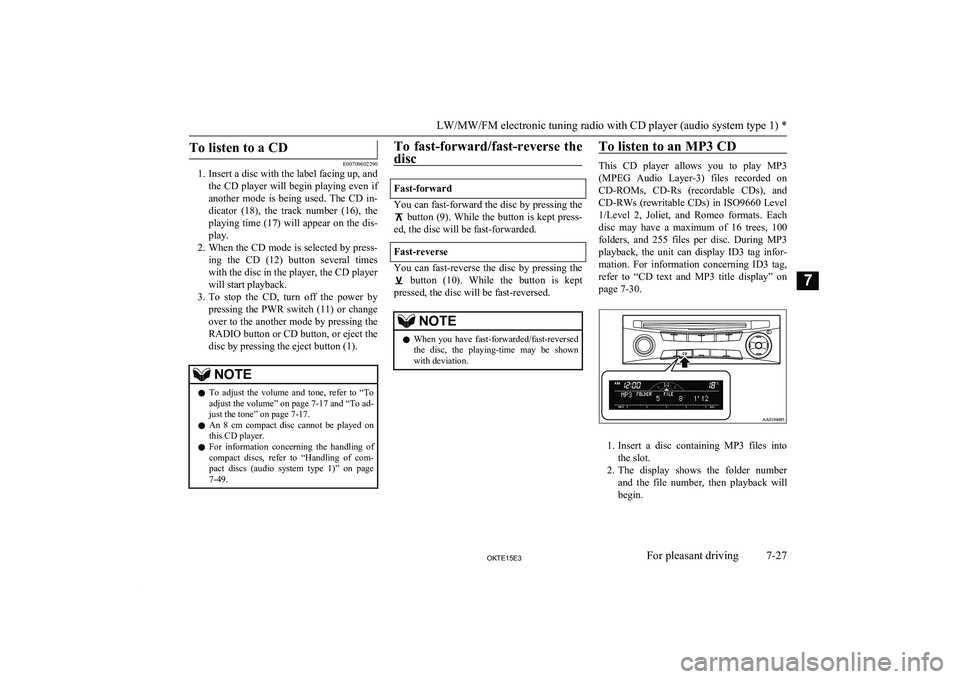
This CD player allows you to play MP3
(MPEG Audio Layer-3) files recorded on CD-ROMs, CD-Rs (recordable CDs), andCD-RWs (rewritable CDs) in ISO9660 Level
1/Level 2, Joliet, and Romeo formats. Each disc may have a maximum of 16 trees, 100
folders, and 255 files per disc. During MP3 playback, the unit can display ID3 tag infor-
mation. For information concerning ID3 tag,
refer to “CD text and MP3 title display” on
page 7-30.
1. Insert a disc containing MP3 files into
the slot.
2. The display shows the folder number
and the file number, then playback will begin.
LW/MW/FM electronic tuning radio with CD player (audio system type 1) *
7-27OKTE15E3For pleasant driving7
Page 219 of 418
To find a file (MP3 CDs only)
Press the following buttons to select desiredfile.
The selected folder or file is shown in the dis-
play.
button (14): To start this mode
or cancel the selec-
tion. button (9) or
button (10)
: To show the folder or file. button (15): To select the folderor file.NOTEl If no operation is performed for 10 seconds
or more or another button is operated after
the
button or button has been pressed,
searching of the desired file is cancelled.
l If no operation is performed for
5 seconds or
more after the file is displayed, playback starts.
To repeat a track
Press the RPT button (7) briefly while the
track is playing. “RPT” will appear on thedisplay.
To exit the repeat mode, press the RPT but-
ton.
To repeat a folder (MP3 CDs
only)
Press the RPT button (7) for 1 second or lon-
ger (until you hear a beep). “F-RPT” will ap- pear on the display. You can listen to all the
files in the currently selected folder repeated-
ly.
NOTEl With a disc that contains both
CD-DA and
MP3 files, the repeat mode causes only files
of the same format ( CD-DA only or MP3
files only) to be repeated.
To play tracks in random order
Random playback for a disc (music CDs
only)
Press the RDM button (8) briefly. “RDM” will appear on the display. Tracks on the cur-
rently selected disc will be played in a ran- dom sequence.
To exit the random mode, press the RDM button again.
Random playback for a folder (MP3 CDs
only)
Press the RDM button (8) briefly. “F-RDM”
will appear on the display. Files on the cur-
rently selected folder will be played in a ran- dom sequence.
To exit the random mode, press the RDM
button again.
Random playback for all folders on a disc
(MP3 CDs only)
Press the RDM button (8) for 1 second or
longer (until you hear a beep). “RDM” will appear on the display. Files from all the fold-ers on the currently selected disc will be
played in a random sequence.
To exit the random mode, briefly press the RDM button again.
NOTEl With a disc that contains both
CD-DA and
MP3 files, the random mode causes only files of the same format ( CD-DA only or
MP3 files only) to be played in a random se-
quence.
To eject a disc
When the CD eject button (1) is pressed, the
disc automatically stops and is ejected.
NOTEl If you do not remove the disc before
15 seconds have elapsed, the CD player will
automatically reload the disc and stop.
LW/MW/FM electronic tuning radio with CD player (audio system type 1) *
7-29OKTE15E3For pleasant driving7
Page 222 of 418
To play from an iPod
E00756300372
1. Press the PWR button (1) to turn on the
audio system. The system turns on in the last mode used.
2. Connect your iPod to the USB input ter-
minal.
Refer to “How to connect an iPod” on page 7-104.
3. Press the CD button (11) several times to switch to the iPod mode. The modechanges every time the CD button is
pressed.
CD mode → iPod mode → Bluetooth ®
mode*
NOTEl If your vehicle is equipped with Auxiliary
Audio connector (RCA), pressing and hold-
ing the CD button for 2 seconds or more
switches the system to the AUX mode.
4. Once the device is selected, playback
starts and “iPod” appears on the display.
NOTEl Depending on the condition of your iPod, it
may take a longer time before the playbackstarts.5. To stop the playback, change over to a
different mode.NOTEl Buttons on the iPod are disabled while the
iPod is connected to the audio system.
l To adjust the volume and tone, refer to “To
adjust the volume” and “To adjust the tone”.To fast-forward/reverse the
track
E00756400113
Fast-forward
To fast-forward the current track, press the
button (8). While the button is pressed, the
track will be fast-forwarded.
Fast-reverse
To fast-reverse the current track, press the
button (9). While the button is pressed, the
track will be fast-reversed.
To select a desired track
E00756500097
Track up
Press the button (8) repeatedly until the
desired track number appears on the display.
Track down
Press the button (9) repeatedly until the
desired track number appears on the display.
NOTEl Pressing the button (9) once during the
song will cause the audio system to restart
playback from the beginning of the song.To find a track from the iPod
menu
E00756600186
You can select desired tracks from the “Play- lists”, “Artists”,“Albums”, “Songs” or
“Genre” (vehicles with Bluetooth ®
2.0 inter-
face) menus on your iPod.
Press the following buttons to select desired tracks.
The selected menu or category or track is
shown in the display.
button
(12):To start this mode or cancel
the selection. button (8)
or
button
(9)
:To show the menu or cate-
gory or track.
To play tracks from USB device (audio system type 1) *
7-32OKTE15E3For pleasant driving7
Page 228 of 418
NOTElIf your vehicle is equipped with Auxiliary
Audio connector (RCA), pressing and hold-
ing the CD button for 2 seconds or more
switches the system to the AUX mode.
4. Once the device is selected, playback
starts and “USB” appears on the display.
NOTEl Depending on the condition of your USB de-
vice, it may take a longer time before the playback starts.
5. To stop the playback, change over to a
different mode.
NOTEl To adjust the volume and tone, refer to “To
adjust the volume” and “To adjust the tone”.Supported compressed music
files
E00758300305
This audio can play MP3, WMA, AAC and WAV files recorded in a USB memory de-
vice. This audio supports up to 65,535 files in 700 folders on 8 levels.
Folder selection order/file playback order
(example)
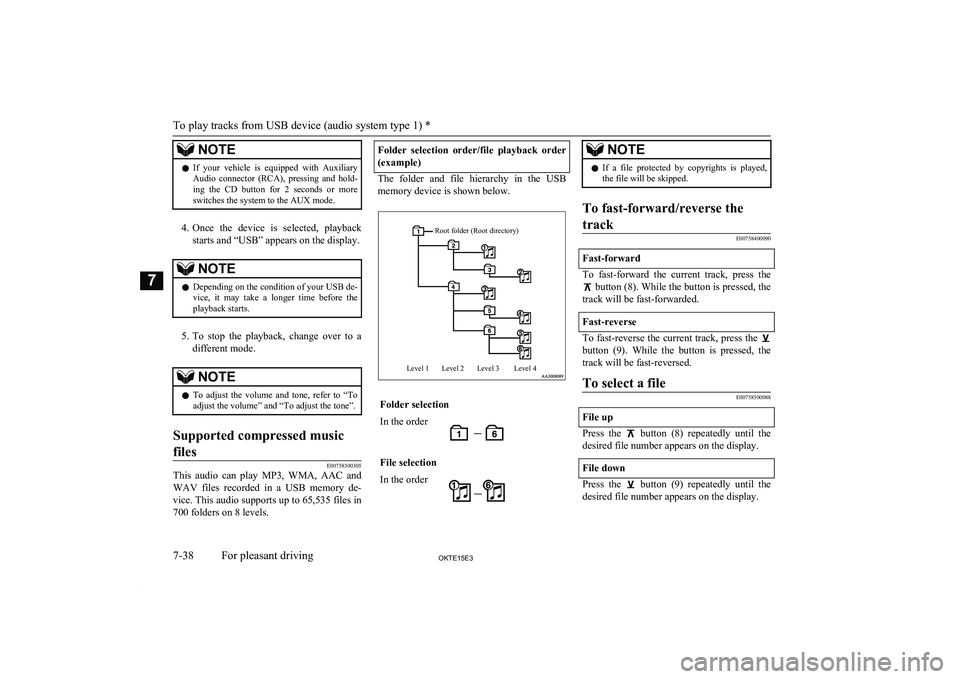
The folder and file hierarchy in the USB memory device is shown below.
Root folder (Root directory)Level 1Level 2Level 3Level 4Folder selectionIn the orderFile selectionIn the orderNOTEl If a file protected by copyrights is played,
the file will be skipped.To fast-forward/reverse the
track
E00758400090
Fast-forward
To fast-forward the current track, press the
button (8). While the button is pressed, the
track will be fast-forwarded.
Fast-reverse
To fast-reverse the current track, press the
button (9). While the button is pressed, the
track will be fast-reversed.
To select a file
E00758500088
File up
Press the button (8) repeatedly until the
desired file number appears on the display.
File down
Press the button (9) repeatedly until the
desired file number appears on the display.
To play tracks from USB device (audio system type 1) *
7-38OKTE15E3For pleasant driving7
Page 231 of 418
NOTElAccording to the connected device, it is not
to operate correctly or the limitation might
be provided in available function.
l The protected file by copyright might not be
able to start playback.NOTEl It is recommended to adjust the equalizer of
the connected device is flat.NOTEl The voice operation is not available to ac-
cess music files on the connected Blue-
tooth ®
device.Bluetooth ®
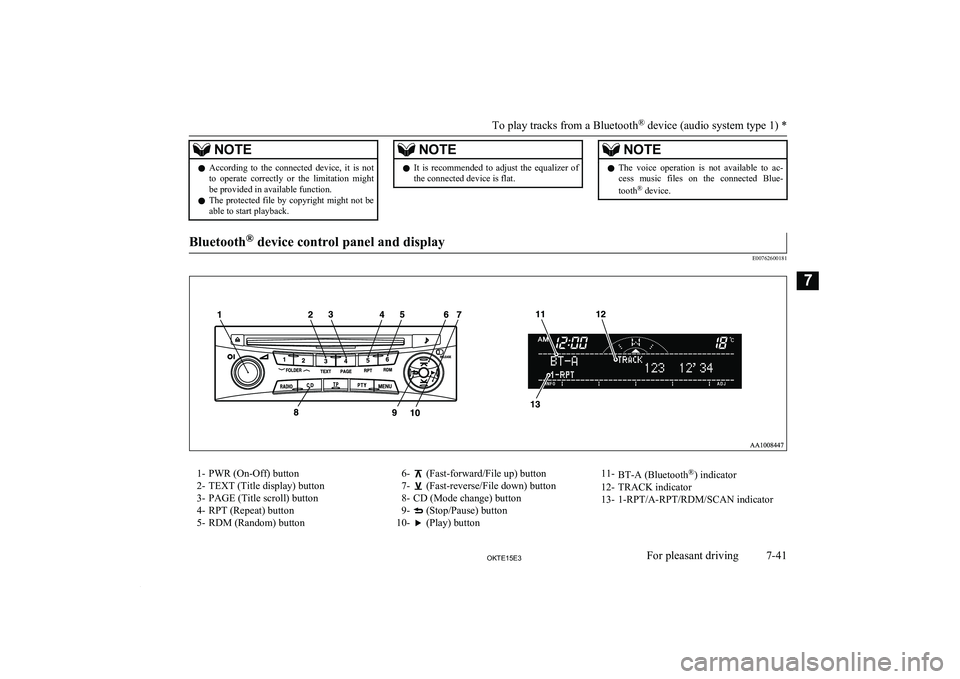
device control panel and display
E00762600181
1- PWR (On-Off) button
2- TEXT (Title display) button
3- PAGE (Title scroll) button
4- RPT (Repeat) button
5- RDM (Random) button6- (Fast-forward/File up) button
7-
(Fast-reverse/File down) button
8- CD (Mode change) button
9-
(Stop/Pause) button
10-
(Play) button
11- BT-A (Bluetooth ®
) indicator
12- TRACK indicator
13- 1-RPT/A-RPT/RDM/SCAN indicator
To play tracks from a Bluetooth ®
device (audio system type 1) *
7-41OKTE15E3For pleasant driving7
Page 232 of 418
To listen to tracks from a de-
vice connected via Bluetooth ®
E00762700225
1. Press the PWR button (1) to turn on the
audio system. The system turns on in the last mode used.
2. Press the CD button (8) several times to
switch to the BT-A (Bluetooth ®
) mode.
The mode changes as follows every time the CD button is pressed.
CD mode → USB (iPod) mode → Blue-
tooth ®
mode
NOTEl For vehicles equipped with Auxiliary Audio
connector (RCA), pressing and holding theCD button for 2 seconds or more switches
the system to the AUX mode.
3. Connect your Bluetooth ®
device.
Refer to “Connecting the Bluetooth® 2.0
interface and Bluetooth® device” on page 7-90.
4. Playback starts automatically.
NOTEl Depending on the connected device, the
playback may not start automatically.
In this case, operate the connected device to
start the playback.To stop the playback (if suppor-
ted by the device)
E00762800079
To stop the playback, press and hold the
button (9) until you hear a beep.
To restart the playback, press the
button
(10).
To pause the playback (if sup-
ported by the device)
E00762900083
To pause the playback, press the button
(9).
To restart the playback, press the
button
(10).
To fast-forward/reverse the
track (if supported by the de- vice)
E00765600010
Fast-forward
To fast-forward the current track, press the
button (6). While the button is pressed, the
track will be fast-forwarded.
Fast-reverse
To fast-reverse the current track, press the
button (7). While the button is pressed, the
track will be fast-reversed.
To select a track (if supported
by the device)
E00763000094
Track up
Press the button (6) repeatedly until the
desired track number appears on the display.
Track down
Press the button (7) repeatedly until the
desired track number appears on the display.
NOTEl Pressing the button (7) once during the
song will cause the audio system to restart
playback from the beginning of the song.
To play tracks from a Bluetooth ®
device (audio system type 1) *
7-42OKTE15E3For pleasant driving7