clock MITSUBISHI L200 2017 (in English) Owner's Guide
[x] Cancel search | Manufacturer: MITSUBISHI, Model Year: 2017, Model line: L200, Model: MITSUBISHI L200 2017Pages: 426, PDF Size: 14.12 MB
Page 335 of 426
CAUTIONlIf the release valve is loosened too much (2
or more turns) in the anticlockwise direction, the jack’s oil will leak and the jack cannot
be used.
l Close the release valve slowly when lower-
ing the vehicle, or the valve may be dam-
aged.NOTEl Occasionally when the vehicle is jacked up,
the grooved portion of the designated pointwill not come off. When this happens, rock
the vehicle to lower the ram.
l If the jack is difficult to remove by hand, in-
sert the jack handle (M) into the bracket (N).
Then using the handle, remove the jack.
12. Press the piston down all the way, and
turn the release valve clockwise as far as possible.
13. Check your tyre inflation pressure. The
correct pressures are shown on the door
label. See the illustration.CAUTIONl The tyre pressure should be periodically
checked and maintained at the specified pressure while the tyre is stowed.
l After changing the tyre and driving the vehi-
cle about 1,000 km (620 miles), retighten the
wheel nuts to make sure that they have not come loose.
l If the steering wheel vibrates when driving
after changing the tyre, we recommend you to have the tyres checked for balance.
l Do not mix one type of tyre with another or
use a different size from the one listed. This
would cause early wear and poor handling.To store the spare wheel
E00803701512
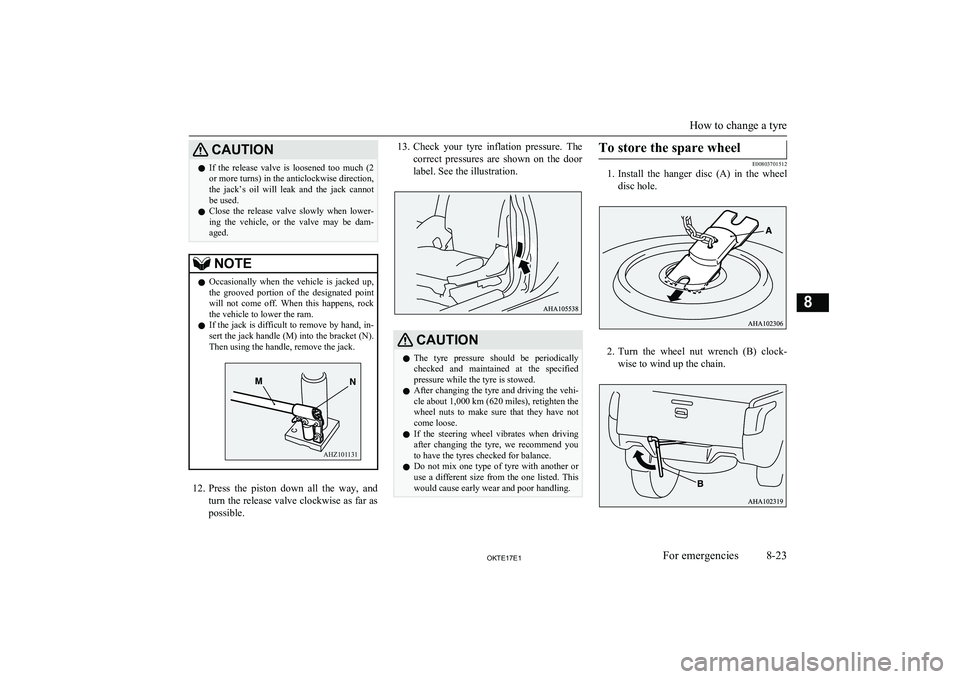
1. Install the hanger disc (A) in the wheel
disc hole.
2. Turn the wheel nut wrench (B) clock-
wise to wind up the chain.
How to change a tyre
8-23OKTE17E1For emergencies8 AHZ101131
Page 373 of 426
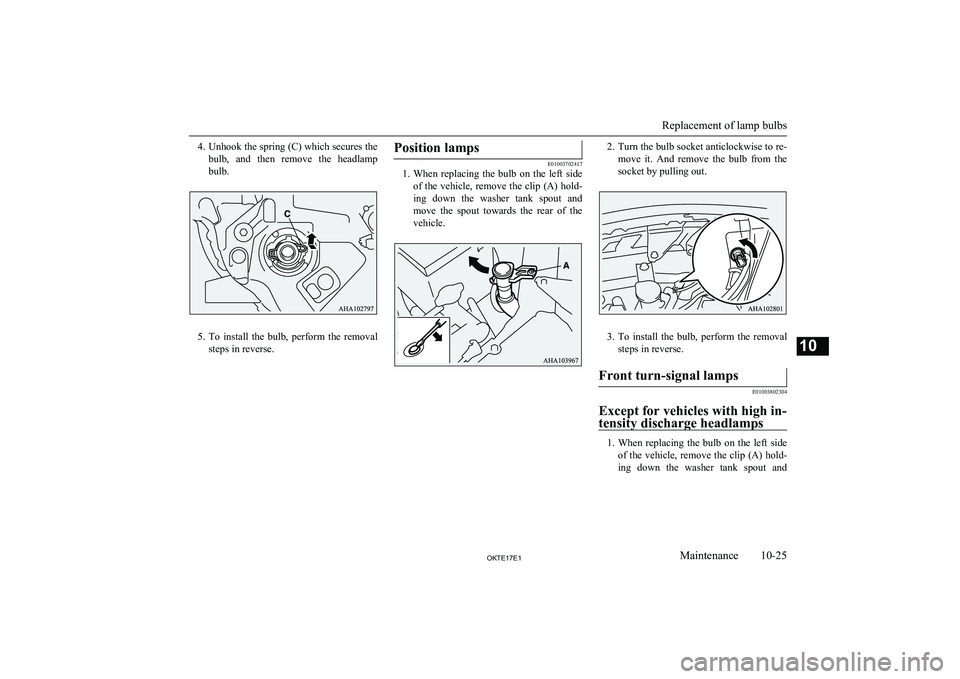
4.Unhook the spring (C) which secures the
bulb, and then remove the headlamp bulb.
5. To install the bulb, perform the removal
steps in reverse.
Position lamps
E01003702417
1. When replacing the bulb on the left side
of the vehicle, remove the clip (A) hold-
ing down the washer tank spout and
move the spout towards the rear of the vehicle.
2. Turn the bulb socket anticlockwise to re-
move it. And remove the bulb from the
socket by pulling out.
3. To install the bulb, perform the removal
steps in reverse.
Front turn-signal lamps
E01003802304
Except for vehicles with high in- tensity discharge headlamps
1. When replacing the bulb on the left side
of the vehicle, remove the clip (A) hold- ing down the washer tank spout and
Replacement of lamp bulbs
10-25OKTE17E1Maintenance10
Page 374 of 426
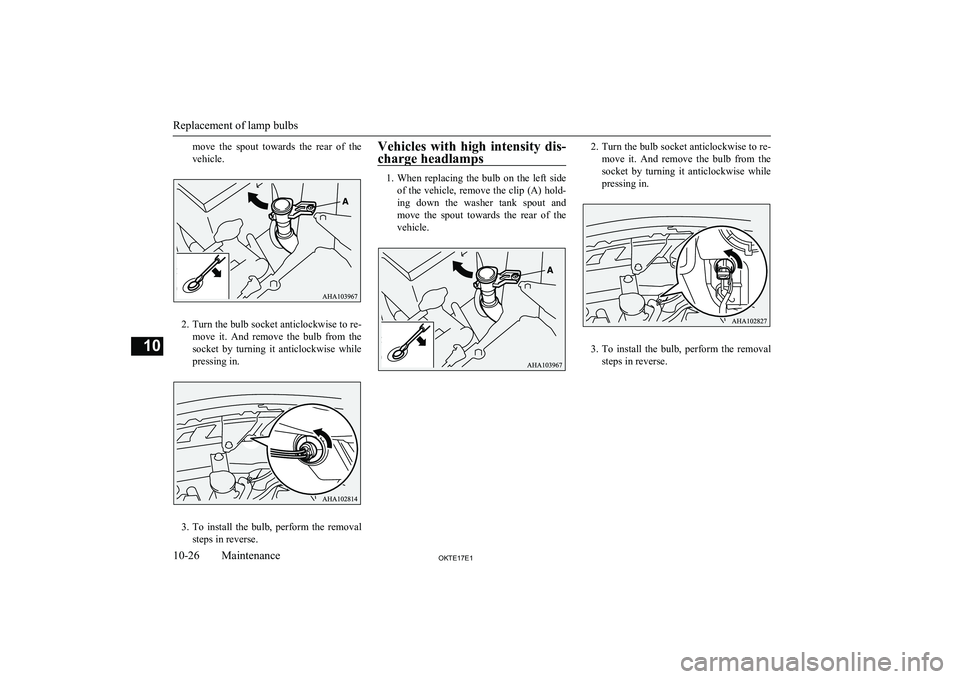
move the spout towards the rear of the
vehicle.
2. Turn the bulb socket anticlockwise to re-
move it. And remove the bulb from the
socket by turning it anticlockwise while pressing in.
3. To install the bulb, perform the removal
steps in reverse.
Vehicles with high intensity dis-
charge headlamps
1. When replacing the bulb on the left side
of the vehicle, remove the clip (A) hold- ing down the washer tank spout and
move the spout towards the rear of the vehicle.
2. Turn the bulb socket anticlockwise to re-
move it. And remove the bulb from the
socket by turning it anticlockwise while pressing in.
3. To install the bulb, perform the removal
steps in reverse.
Replacement of lamp bulbs
10-26OKTE17E1Maintenance10
Page 375 of 426
Front fog lamps* / Daytimerunning lamps*
E01004003469
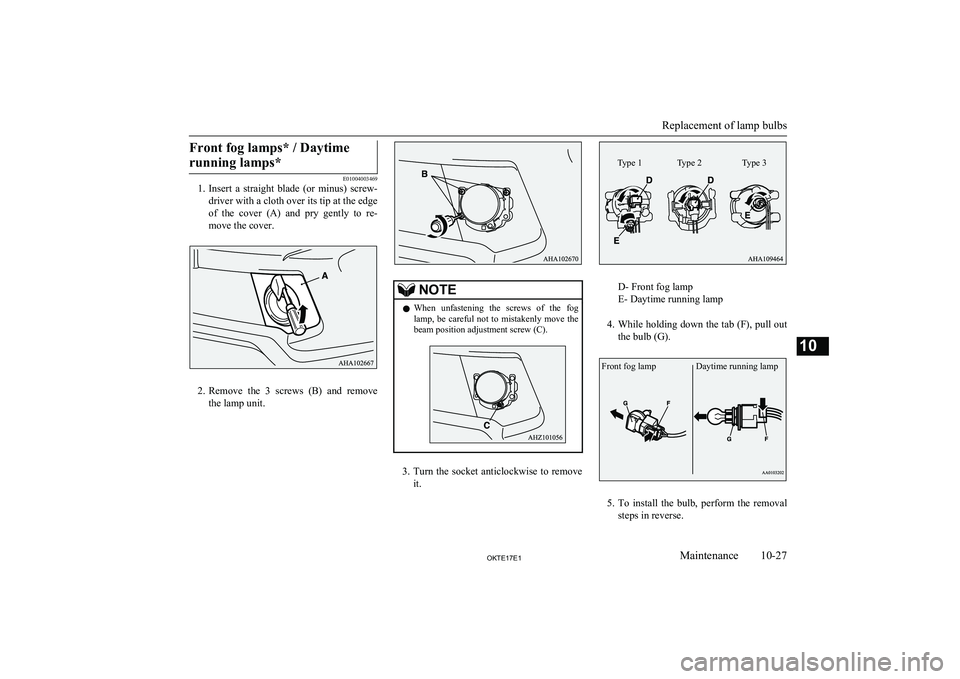
1. Insert a straight blade (or minus) screw-
driver with a cloth over its tip at the edge
of the cover (A) and pry gently to re-
move the cover.
2. Remove the 3 screws (B) and remove
the lamp unit.
NOTEl When unfastening the screws of the fog
lamp, be careful not to mistakenly move thebeam position adjustment screw (C).
3. Turn the socket anticlockwise to remove
it.
D- Front fog lamp
E- Daytime running lamp
4. While holding down the tab (F), pull out
the bulb (G).
5. To install the bulb, perform the removal
steps in reverse.
Replacement of lamp bulbs
10-27OKTE17E1Maintenance10 Type 1 Type 2 Type 3 Front fog lamp Daytime running lamp
Page 376 of 426
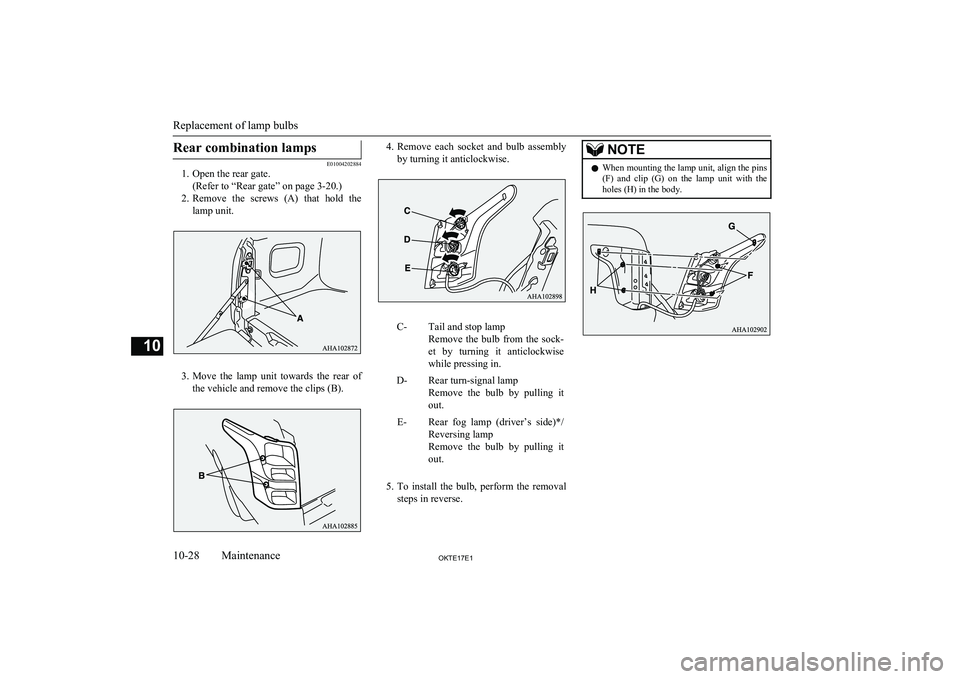
Rear combination lamps
E01004202884
1. Open the rear gate.
(Refer to “Rear gate” on page 3-20.)
2. Remove the screws (A) that hold the
lamp unit.
3. Move the lamp unit towards the rear of
the vehicle and remove the clips (B).
4. Remove each socket and bulb assembly
by turning it anticlockwise.C-Tail and stop lamp
Remove the bulb from the sock- et by turning it anticlockwise
while pressing in.D-Rear turn-signal lamp
Remove the bulb by pulling it
out.E-Rear fog lamp (driver’s side)*/ Reversing lamp
Remove the bulb by pulling it out.
5. To install the bulb, perform the removal
steps in reverse.
NOTEl When mounting the lamp unit, align the pins
(F) and clip (G) on the lamp unit with the
holes (H) in the body.
Replacement of lamp bulbs
10-28OKTE17E1Maintenance10
Page 377 of 426
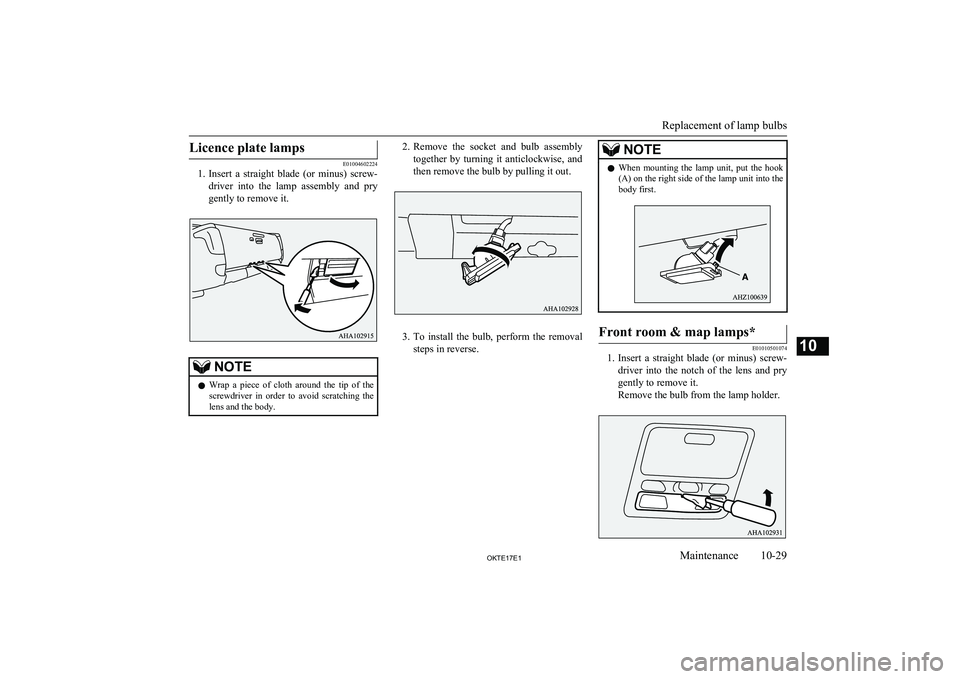
Licence plate lamps
E01004602224
1. Insert a straight blade (or minus) screw-
driver into the lamp assembly and pry
gently to remove it.
NOTEl Wrap a piece of cloth around the tip of the
screwdriver in order to avoid scratching the
lens and the body.2. Remove the socket and bulb assembly
together by turning it anticlockwise, and then remove the bulb by pulling it out.
3. To install the bulb, perform the removal
steps in reverse.
NOTEl When mounting the lamp unit, put the hook
(A) on the right side of the lamp unit into thebody first.Front room & map lamps*
E01010501074
1. Insert a straight blade (or minus) screw-
driver into the notch of the lens and pry
gently to remove it.
Remove the bulb from the lamp holder.
Replacement of lamp bulbs
10-29OKTE17E1Maintenance10
Page 402 of 426
Bulb location and capacity.............................. 10-22C
Capacities........................................................ 11-18
Card holder...................................................... 7-100
Cargo loads........................................................6-83
Catalytic converter.......................................... 10-03
Cautions on handling of 4-wheel drive vehicles................................................... 6-52
CD player.................................................. 7-18,7-39
Central door locks............................................. 3-17
Centre console under tray................................7-106
Charge warning lamp........................................ 5-16 Check engine warning lamp.............................. 5-15
Child restraint.................................................... 4-11 Caution for installing the child re-straint on vehicles with a front
passenger airbag.................................. 4-11,4-26
Child restraint system with ISOFIX mountings.................................................... 4-21
i-Size child restraint system.......................... 4-15
Installing a child restraint system to the lower anchorage (ISOFIX
child restraint mountings) and
tether anchorage...........................................4-21
Suitability for various ISOFIX positions...... 4-14
Suitability for various seating positions........ 4-16
Child-protection rear doors............................... 3-20
Cigarette lighter............................................... 7-101
Cleaning Chrome parts................................................. 9-05
Exterior of your vehicle................................ 9-03
Genuine leather............................................. 9-03
Interior of your vehicle................................. 9-02
Plastic parts................................................... 9-04
Plastic, fabric and flocked parts.................... 9-02
Polishing....................................................... 9-04 Washing........................................................ 9-03
Waxing.......................................................... 9-04
Clock............................................................... 7-102
Clutch Fluid.................................................. 10-09,11-18
Coat hook........................................................ 7-109
Combination headlamps and dipper switch...... 5-17
Convenient hook............................................. 7-108
Coolant (engine)....................................10-06,11-18
Cruise control.................................................... 6-63 Indication lamp............................................. 6-64
Switch........................................................... 6-64
Cup holder....................................................... 7-107
D
Daytime running lamps..................................... 5-19Bulb capacity.............................................. 10-22
Replacement................................................ 10-27
Demister (rear window).................................... 5-27
Diesel particulate filter (DPF)........................... 6-21 Warning lamp................................................6-21
Diesel preheat indication lamp.......................... 5-14
Differential oil................................................. 11-18
Digital clock.................................................... 7-102 Time Setting......................................... 7-37,7-70
Dimensions...................................................... 11-04
Dipper (High/Low beam change)......................5-19
Display Indicator............................................... 7-35
Disposal information for used batteries............ 2-06
Doors Central door locks......................................... 3-17
Child-protection rear doors........................... 3-20
Dead Lock System........................................ 3-18
Door ajar warning lamp................................ 5-16
Locking and unlocking................................. 3-15
To open or close the rear door (Club cab).... 3-16
Driving, alcohol and drugs................................ 6-02
E
Easy select 4WD............................................... 6-352WD/4WD operation indication lamp.. 6-36,6-38
Low-range indication lamp........................... 6-38
Economical driving........................................... 6-02
Electric window control.................................... 3-21 Safety mechanism......................................... 3-23
Switch........................................................... 3-21
Timer function.............................................. 3-23
Electrical system............................................. 11-16
Electronic immobilizer (Anti-theft starting system)................................................ 3-03
Emergency key.................................................. 3-11
Emergency starting............................................8-08
Emergency stop signal system.......................... 6-56
Engine specifications.......................................11-15
Engine switch.................................................... 6-14
Engine Check engine warning lamp..........................5-15
Coolant..............................................10-06,11-18 Diesel preheat indication lamp......................5-14Engine coolant temperature display.............. 5-06
Model.......................................................... 11-03
Number....................................................... 11-03
Oil..................................................... 10-05,11-18
Alphabetical index
12- 2 OKTE17E1Alphabetical index