check engine light MITSUBISHI L200 2017 Owner's Manual (in English)
[x] Cancel search | Manufacturer: MITSUBISHI, Model Year: 2017, Model line: L200, Model: MITSUBISHI L200 2017Pages: 426, PDF Size: 14.12 MB
Page 105 of 426
refer to “Refill capacities” on page 11-18.Combination headlampsand dipper switch E00506004080
Headlamps
NOTElDo not leave the lamps on for a long time
while the engine is stationary (not running).A run-down battery could result.
l When it rains, or when the vehicle has been
washed, the inside of the lens sometimes be-
comes foggy, but this does not indicate a
functional problem.
When the lamp is switched on, the heat will remove the fog. However, if water gathers
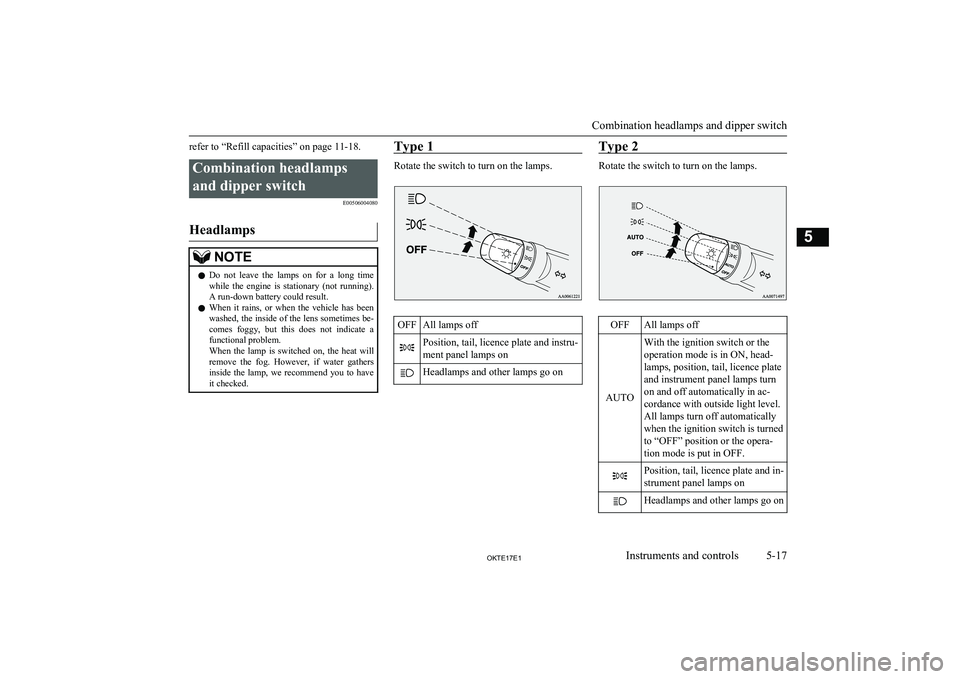
inside the lamp, we recommend you to have it checked.Type 1
Rotate the switch to turn on the lamps.
OFFAll lamps offPosition, tail, licence plate and instru-
ment panel lamps onHeadlamps and other lamps go onType 2
Rotate the switch to turn on the lamps.
OFFAll lamps off
AUTO
With the ignition switch or the
operation mode is in ON, head-
lamps, position, tail, licence plate
and instrument panel lamps turn
on and off automatically in ac-
cordance with outside light level.
All lamps turn off automatically
when the ignition switch is turned
to “OFF” position or the opera-
tion mode is put in OFF.Position, tail, licence plate and in-
strument panel lamps onHeadlamps and other lamps go on
Combination headlamps and dipper switch
5-17OKTE17E1Instruments and controls5
Page 118 of 426
Economical drivingE00600102318
For economical driving, there are some tech- nical requirements that have to be met. Theprerequisite for low fuel consumption is a
properly adjusted engine. In order to achieve longer life of the vehicle and the most eco- nomical operation, we recommend you tohave the vehicle checked at regular intervals in accordance with the service standards.
Fuel economy and generation of exhaust gas
and noise are highly influenced by personal
driving habits as well as the particular operat- ing conditions. The following points shouldbe observed in order to minimize wear of
brakes, tyres and engine as well as to reduce
environmental pollution.
Starting the engine
Avoid sudden acceleration and sudden starts,
as they will increase fuel consumption.
Shifting
Shift only at an appropriate speed and engine speed. Always use the highest shift position
possible.
The transfer shift lever or the drive mode-se-
lector should be set to “2H” when driving 4WD vehicles on normal roads and express
ways to obtain best possible fuel economy.
City traffic
Frequent starting and stopping increases the
average fuel consumption. Use roads with smooth traffic flow whenever possible. When driving on congested roads, avoid use of a
low shift position at high engine speeds.
Idling
The vehicle consumes fuel even during idling. Avoid extended idling whenever pos-
sible.
Speed
At higher vehicle speed, more fuel is con-
sumed. Avoid driving at full speed. Even a slight release of the accelerator pedal willsave a significant amount of fuel.
Tyre inflation pressure
Check the tyre inflation pressures at regularintervals. Low tyre inflation pressure increa-ses road resistance and fuel consumption. In
addition, low tyre pressures adversely affect tyre wear and driving stability.
Cargo loads
Do not drive with unnecessary articles in the
luggage compartment. Especially during city
driving where frequent starting and stopping is necessary, the increased weight of the ve-
hicle will greatly affect fuel consumption. Al- so avoid driving with unnecessary luggage or carriers, etc., on the roof; the increased air re- sistance will increase fuel consumption.
Cold engine starting
Starting of a cold engine consumes more fuel. Unnecessary fuel consumption is alsocaused by keeping a hot engine running. Af-
ter the engine is started, commence driving as soon as possible.
Cooler or air conditioning
The use of the air conditioner will increase the fuel consumption.
Driving, alcohol and drugs
E00600200070
Driving after drinking alcohol is one of the
most frequent causes of accidents.
Economical driving
6-02OKTE17E1Starting and driving6
Page 166 of 426
NOTElThe use of snow tyres and/or tyre chains is
recommended.
l Maintain a safe distance between vehicles,
avoid sudden braking, and use engine brak-
ing (downshifting).CAUTIONl Avoid sudden braking, sudden acceleration,
and sharp turning; such operations could
cause skidding and spinouts.
Driving on sandy or muddy
roads
Set the drive mode-selector to “4H” or “4L”
position (Easy select 4WD), “4HLc” or “4LLc” position (Super select 4WD II) and then gradually depress the accelerator pedal
for a smooth start. Keep the pressure on the accelerator pedal as constant as possible, and drive at low speed.
CAUTIONl Do not force the vehicle or drive recklessly
on sandy surfaces. In comparison with nor- mal road surfaces, the engine and other
drive-system components are put under ex-
cessive strain when driving on such a sur-
face, and this could lead to accidents.CAUTIONl If any of following conditions occur while
the vehicle is being driven, immediately
park your vehicle in a safe place and follow these procedures:
• The needle in the temperature gauge ap-
proaches the overheating zone.
Refer to “Engine overheating” on page 8-09.
• Automatic transmission fluid temperature
warning lamp comes on.
Refer to “When the A/T (automatic trans-
mission) fluid temperature warning lamp comes on” on page 6-34.WARNINGl When attempting to rock your vehicle out
of a stuck position, be sure that the area
around the vehicle is clear of people and physical objects. The rocking motion may
cause the vehicle to suddenly launch for- ward or backward, causing injury or damage to nearby people or objects.NOTEl Avoid sudden braking, acceleration, and
turning; such operations could result in thevehicle becoming stuck.NOTEl If the vehicle becomes stuck in sandy or
muddy roads, it can often be moved a rock-
ing motion. Move the selector lever rhythmi-
cally between the “D” (DRIVE) and “R”
(REVERSE) position (with M/T, between 1 st
and Reverse), while applying slight pressure to the accelerator pedal.
l It is recommended to start the vehicle with
parking brake partially, but not completely, applied by slightly pulling the parking brake
lever.
After the vehicle has become free, do not forget to release the parking brake.
l If it is necessary to drive in extremely mud-
dy conditions, the use of tyre chains is rec-
ommended. Because the extent of muddy conditions is difficult to judge and the vehi-
cle could become bogged down very deeply,
operation should be at a low speed. If possi- ble, get out of the vehicle and check the con-
ditions ahead before proceeding.
l Driving over roads in coastal areas or roads
on which anti-skid preparations have been
spread can cause rust on the vehicle; wash
the vehicle thoroughly as soon as possible after such use.
Climbing sharp grades
Set the drive mode-selector to “4L” position
(Easy select 4WD), “4LLc” position (Super
select 4WD II) to maximize the engine tor-
que.
4-wheel drive operation*
6-50OKTE17E1Starting and driving6
Page 167 of 426
WARNINGlGo straight up. Do not try to traverse
across a steep slope.
l If you begin to lose traction, ease off the
accelerator pedal and gently turn the
steering wheel alternatively left and right to regain adequate traction again.NOTEl Choose as smooth a slope as possible with
few stones or other obstacles.
l Before attempting to drive up the slope,
walk up it to confirm that the vehicle canhandle the grade.
Descending sharp grades
Set the drive mode-selector to “4L” position
(Easy select 4WD), “4LLc” position (Super
select 4WD II), use the engine brake (down- shifting) and descend slowly.
WARNINGl Avoid snaking down a sharp grade. De-
scend the grade as straight as possible.NOTEl When descending a sharp grade, if the
brakes are applied suddenly because of an
obstacle encountered, control of the vehicle
could be lost. Before descending the slope,
walk down it and confirm the path.
l Before descending a grade, it is necessary to
choose the appropriate gear. Avoid changing
gears or depressing the clutch while de- scending the grade.
l MITSUBISHI
MOTORS is not responsible
to the operator for any damage or injury caused or liability incurred by improper and
negligent operation of a vehicle. All techni- ques of vehicle operation described herein depend on the skill and experience of the op-
erator and other participating parties and any
deviation from the recommended operation instructions above is at their own risk.
Turning sharp corners
When turning a sharp corner in “4H” or “4L”
position (Easy select 4WD), “4HLc” or “4LLc” position (Super select 4WD II) at low
speed, a slight difference in steering may be experienced similar to as if the brakes wereapplied. This is called tight corner braking
and results from each of the 4 tyres being at a different distance from the corner.
Crossing a stream
4-wheel drive vehicles are not necessarily
waterproof. If the electrical circuits become
wet, further operation of the vehicle will be impossible; therefore, avoid crossing streams
unless absolutely necessary. If crossing a
stream is unavoidable, use the following pro- cedure: 1. Check depths of a stream and geographi-
cal features before attempting to cross a
stream and ford the stream where the water is as shallow as practicable.
2. Set the drive mode-selector to “4L” po-
sition (Easy select 4WD), “4LLc” posi-
tion (Super select 4WD II).
3. Drive slowly at a speed of approximate-
ly 5 km/h (3 mph) to avoid splashing too
much water.
CAUTIONl Never cross a stream where the water is
deep.
Do not change gears while crossing the stream.
Frequent crossing of streams can adversely affect the life span of the vehicle; we recom-mend you to take the necessary measures toprepare, inspect, and repair the vehicle.
4-wheel drive operation*
6-51OKTE17E1Starting and driving6
Page 168 of 426
CAUTIONlAfter crossing a stream, apply the brakes to
be sure they are functioning properly. If the
brakes are wet and not functioning properly,
dry them out by driving slowly while lightly
depressing the brake pedal.
Inspect each part of the vehicle carefully.Inspection and maintenance
following rough roadoperation E00606701566
After operating the vehicle in rough road
conditions, be sure to perform the following inspection and maintenance procedures:
l Check that the vehicle has not been dam-
aged by rocks, gravel, etc.
l Carefully wash the vehicle with water.
Drive the vehicle slowly while lightly
depressing the brake pedal in order to dry out the brakes. If the brakes still do
not function properly, we recommend you to have the brakes checked as soon
as possible.
l Remove the insects, dried grass, etc.
clogging the radiator core and A/T oil
cooler.
l After crossing a stream, be sure to have
the following items inspected at aMITSUBISHI MOTORS Authorized
Service Point and take the necessary
measures. • Check the brake system and, if neces-
sary, have it serviced.
• Check the engine, transmission, trans-
fer, and differential oil or grease level
and turbidity. If the oil or grease is milky, it indicates water contamina-
tion. Replace it with new oil or grease.
• Grease the propeller shaft.
• Check the inside of the vehicle. If in-
gress of water is found, dry the carpet etc.
• Inspect the headlamps. If the head-
lamp bulb is flooded with water, have the headlamp drained off.Cautions on handling of 4-
wheel drive vehicles E00606802102
Tyres and wheels
Since the driving torque can be applied to the
4 wheels, the performance of the vehicle when operating in 4-wheel drive is greatly af- fected by the condition of the tyres.
Pay close attention to the tyres.
l Install specified tyres on all wheels. Re-
fer to “Tyres and wheels” on page
11-16.
l Be sure to the appropriate tyre inflation
pressure according to no cargo or cargo.
Refer to “Tyre inflation pressures” on
page 10-12.
l Be sure to fit all 4 tyres and wheels of
the same size and type.
When replacement of any of the tyres or wheels is necessary, replace all of them.
l All tyres should be rotated whenever the
wear difference between the front and
rear tyres is recognizable.
Good vehicle performance cannot be expec- ted if there is a difference in wear between tyres. Refer to “Tyre rotation” on page 10-13.
l Check the tyre inflation pressure regular-
ly.CAUTIONl Always use tyres of the same size, same
type, and same brand, and which have no wear differences. Using the tyres which dif-fer in size, type, brands or the degree of
wear or the inappropriate tyre inflation pres-
sure, will increase the differential oil tem- perature and may be impossible to shift the transfer, resulting in possible damage to thedriving system. Further, the drive train willbe subjected to excessive loading, possibly
leading to oil leakage, component seizure, or
other serious faults.
Inspection and maintenance following rough road operation
6-52OKTE17E1Starting and driving6
Page 170 of 426
CAUTIONlAvoid driving habits that cause heavy brak-
ing and never “ride” the brakes by resting
your foot on the brake pedal while driving.
It causes brake overheating and fade.
Brake system
The service brake is divided into two brake
circuits. And your vehicle is equipped with
power brakes. If one brake circuit fails, the other is available to stop the vehicle. If you
should lose the power assist for some reason, the brakes will still work. In these situations,
even if the brake pedal moves down to the very end of its possible stroke or resists being
depressed, keep depressing the brake pedal
down harder and further than usual; stop
driving as soon as possible and have the brake system repaired.
WARNINGl Do not turn off the engine while your ve-
hicle is in motion. If you turn off the engine while driving,
the power assistance for the braking sys-
tem will stop working and your brakes will not work effectively.
l If the power assist is lost or if either brake
hydraulic system stops working properly,
have your vehicle checked immediately.Warning lamp
The brake warning lamp illuminates to indi-
cate a fault in the braking system. Refer to “Brake warning lamp” on page 5-15.
When brakes are wet
Check the brake system while driving at a
low speed immediately after starting, espe-
cially when the brakes are wet, to confirm they work normally.
A film of water can be formed on the brake discs or brake drums and prevent normalbraking after driving in heavy rain or through
large puddles, or after the vehicle is washed.
If this occurs, dry the brakes out by driving
slowly while lightly depressing the brake
pedal.
When driving downhill
It is important to take advantage of the en- gine braking by shifting to a lower shift posi-
tion while driving on steep downhill roads in order to prevent the brakes from overheating.
WARNINGl Do not leave any objects near the brake
pedal or let a floor mat slide under it; do- ing so could prevent the full pedal stroke
that would be necessary in an emergency. Make sure that the pedal can be operated freely at all times. Make sure the floor mat is securely held in place.
Brake pads and linings
l Avoid hard braking situations.
New brakes need to be broken-in by
moderate use for the first 200 km (124 mph).
l The disc brakes are provided with a
warning device which emits a shrieking metallic sound while braking if the brake
pads have reached their wear limit. If you hear this sound, have the brake padsreplaced.
WARNINGl Driving with worn brake pads will make
it harder to stop, and can cause an acci-
dent.
Braking
6-54OKTE17E1Starting and driving6
Page 172 of 426
CAUTIONlIf the warning is turn on, the hill start assist
will not operate. Start off carefully.
l Park your vehicle in a safe place and stop
the engine.
Restart the engine and check whether the warning indicator went out, in which case
the hill start assist is again working normal- ly. If the warning remains displayed or reap-
pears frequently, it is not necessary to stop
the vehicle immediately, but the vehicle
should be inspected by a MITSUBISHI
MOTORS Authorized Service Point.Brake assist system
E00627001780
The brake assist system is a device assistingdrivers who cannot depress the brake pedalfirmly when it is necessary to do so (such as
in emergency stop situations) and provides
greater braking force.
If the brake pedal is depressed suddenly, the brakes will be applied with more force thanusual.
CAUTIONl The brake assist system is not a device de-
signed to exercise braking force greater than its capacity. Make sure to always keep a suf-
ficient distance between your vehicle and a
vehicle in front of you without relying too much on the brake assist system.NOTEl Once the brake assist system is operational,
it maintains great braking force even if the
brake pedal is lightly released.
To stop its operation, completely remove
your foot from the brake pedal.
l When the brake assist system is in use while
driving, you may feel the brake pedal at-
tempt to resist, the pedal moves in small mo- tions in conjunction with the operation
noise, or the vehicle body and the steering wheel vibrate. This occurs when the brake
assist system is operating normally and does not indicate faulty operation. Continue to
firmly depress the brake pedal.
l When the active stability & traction control
(ASTC) indication lamp is illuminated, the
brake assist system may not function.Emergency stop signal
system* E00626001129
This is a device that reduces the possibility of rear end collisions by the rapid and automatic blinking of the hazard warning lamps to alert
vehicles approaching from behind during sudden braking. When the emergency stop
signal system operates, the hazard warning indication lamp in the instrument cluster
blinks rapidly at the same time.CAUTIONl If the ABS warning lamp or ASTC indica-
tion lamp illuminates, the emergency stopsignal system may not operate. Refer to“ABS warning lamp” on page 6-57.
Refer to “ASTC indication lamp” on page
6-62.NOTEl [Activating condition for the emergency stop
signal system]
It activates when all of the following condi-
tions are met.
• The vehicle speed is approximately
55 km/h (34 mph) or higher.
Brake assist system
6-56OKTE17E1Starting and driving6
Page 201 of 426
Single cabClub cabDoublecab8184 mm148 mm *1
184 mm *2148 mm *1
184 mm *2
9494 mm
494 - 544
mm,
546 mm *3494 - 534
mm,
505 - 536
mm *410895 mm1,010 mm1,010 mm111,367 mm1,482 mm1,482 mm12502.5 mm502.5 mm502.5 mm13541 mm541 mm541 mm*1
: Vehicles without heavy duty suspension
*2 : Vehicles with heavy duty suspension
*3 : Vehicles equipped with 17 inch tyres
*4 : 2WD vehicles equipped with 245/70R16
tyres, 4WD vehicles equipped with 17 inch
tyres
Item 9: at kerb weight
NOTEl The value under item 9 is applicable to unla-
den vehicles. This value can also be varied depending on the tyre size, optional equip-
ment and suspension conditions.Operating hints
l Have your vehicle serviced prior to tow-
ing a heavy trailer, taking particular care
of the state of engine tune, the condition of brakes, steering and tyres.
Adjust tyre pressures to those specifica- tions at trailer towing.
(Refer to “tyre inflation pressures” on
page 10-12.)
Check the tyres, wiring and brakes (if fitted) on the trailer.
l Leave plenty of room between the front
of your vehicle and the preceding vehi- cle.
If the trailer begins to sway or becomes difficult to handle, gently slow down or
apply the independent trailer brakes (if fitted) NOT the vehicle brakes. Stop the
vehicle and trailer in a safe location.
One cause of swaying is poor trailer bal-
ance and until this has been overcome the swaying will recur. Relocated the load in your trailer and re-assess the
problem.
l Be sure that the driving speed does not
exceed 100 km/h (62 mph) for trailer op-
eration.
It is also recommended that you obey the
local regulations in case driving speed with a trailer is limited to less than
100 km/h (62 mph).
l To prevent the clutch from slipping (ve-
hicle with a M/T only), do not rev the
engine more than is required when start-
ing off.
l To prevent shocks from the overrun
brake, depress the brake pedal lightly at
first and then more strongly.
l To make full use of engine braking,
change to a lower gear before descend-
ing a slope.
l The body, brakes, clutch, and chassis
will be under additional strain when
towing a trailer.
l The heavier weight and higher rolling
and air resistance will increase fuel con- sumption.
Additional precautions for vehi-
cles equipped with A/T
It is recommended to use a lower gear in
sports mode on slopes or at low speed, taking care to keep the engine speed below the red
zone.
Trailer towing
6-85OKTE17E1Starting and driving6
Page 346 of 426
CAUTION•Maintain a distance of approx. 70 cm
or
more between the vehicle body and the washing nozzle.
• When washing around the door glass,
hold the nozzle at a distance of more than
70 cm and at right angles to the glass sur- face.
l After washing the vehicle, drive the vehicle
slowly while lightly depressing the brake
pedal several times in order to dry out the
brakes.
Leaving the brakes wet could result in re- duced braking performance. Also, there is a
possibility that they could freeze up or be- come inoperative due to rust, rendering the vehicle unable to move.
l When using an automatic car wash, pay at-
tention to the following items, referring to the operation manual or consulting a car
wash operator. If the following procedure is not followed, it could result in damage to
your vehicle.
• The outside mirrors are retracted.
• If your vehicle is equipped with the pillar
antenna, it can be retracted.
• If your vehicle is equipped with the roof
antenna, it can be removed.
• The wiper arms are secured in place with
tape.
• If your vehicle has rain sensor wipers,
place the wiper switch lever in the “OFF” position to deactivate the rain sensor.During cold weather
Salt and other chemicals spread on the roads
in some areas in winter can have a harmful effect on the vehicle body. You should there-
fore wash the vehicle as often as possible in accordance with our care-instructions. It is
recommended to have a preservative applied
and the underfloor protection checked before and after the cold weather season.
After washing your vehicle, wipe off all wa- terdrops from the rubber parts around the
doors to prevent the doors from freezing.
Waxing
E00901001974
Waxing the vehicle will help prevent the ad-
herence of dust and road chemicals to the paintwork. Apply a wax solution after wash- ing the vehicle, or at least once every three
months to assist displacing of water.
Do not wax your vehicle in direct sunlight.
You should wax after the surfaces have
cooled.
For information on how to use wax refer to the instruction manual of the wax.
CAUTIONl Waxes containing high abrasive compounds
should not be used.Polishing
E00901101151
The vehicle should only be polished if the
paintwork has become stained or lost its lus- tre. Do not polish parts with a mat coating
and the plastic bumpers. Doing so could cause stains or damage the finish.
Cleaning plastic parts
E00901301876
Use a sponge or chamois leather.
If a car wax adheres on a grey or black rough surface of the bumper, moulding or lamps, the surface becomes white. In such a case,
wipe it off using lukewarm water and soft cloth or chamois leather.
CAUTIONl Do not use a scrubbing brush or other hard
tools as they may damage the plastic part surface.
l Do not bring the plastic parts into contact
with petrol, light oil, brake fluids, engine oils, greases, paint thinners and sulphuric
acid (battery electrolyte) which may crack, stain or discolour the plastic parts.
If they touch the plastic parts, wipe them off with soft cloth, chamois or the like and anaqueous solution of neutral detergent then
immediately rinse the affected parts with
water.
Cleaning the exterior of your vehicle
9-04OKTE17E1Vehicle care9
Page 353 of 426
CAUTIONlBe careful that hands or fingers are not trap-
ped when closing the bonnet.
l Before driving, make sure that the bonnet is
securely locked. An incompletely locked bonnet can suddenly open while driving.
This can be extremely dangerous.NOTEl If this does not close the bonnet, release it
from a slightly higher position.
l Do not press down firmly on the bonnet as
doing so could damage it.Engine oil
E01000404693
To check and refill engine oil
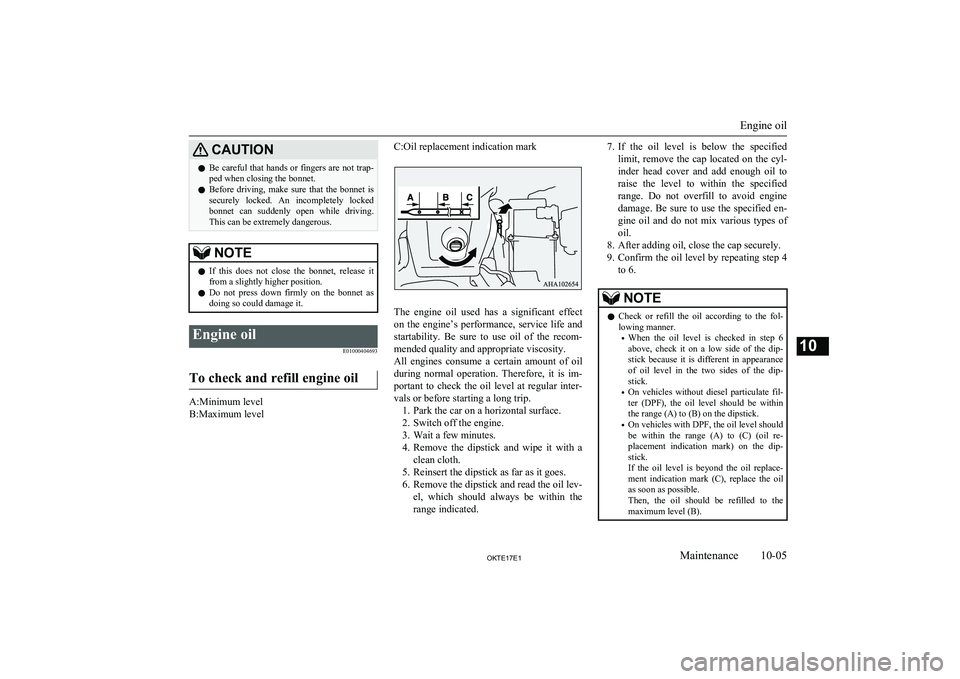
A:Minimum level
B:Maximum level
C:Oil replacement indication mark
The engine oil used has a significant effect on the engine’s performance, service life and
startability. Be sure to use oil of the recom- mended quality and appropriate viscosity.
All engines consume a certain amount of oil during normal operation. Therefore, it is im-portant to check the oil level at regular inter-
vals or before starting a long trip. 1. Park the car on a horizontal surface.
2. Switch off the engine.
3. Wait a few minutes.
4. Remove the dipstick and wipe it with a
clean cloth.
5. Reinsert the dipstick as far as it goes.
6. Remove the dipstick and read the oil lev- el, which should always be within therange indicated.
7. If the oil level is below the specified
limit, remove the cap located on the cyl- inder head cover and add enough oil to
raise the level to within the specified
range. Do not overfill to avoid engine damage. Be sure to use the specified en-
gine oil and do not mix various types of
oil.
8. After adding oil, close the cap securely.
9. Confirm the oil level by repeating step 4
to 6.NOTEl Check or refill the oil according to the fol-
lowing manner.
• When the oil level is checked in step 6
above, check it on a low side of the dip-
stick because it is different in appearance
of oil level in the two sides of the dip-
stick.
• On vehicles without diesel particulate fil-
ter (DPF), the oil level should be within the range (A) to (B) on the dipstick.
• On vehicles with DPF, the oil level should
be within the range (A) to (C) (oil re-
placement indication mark) on the dip-
stick.
If the oil level is beyond the oil replace-
ment indication mark (C), replace the oil as soon as possible.
Then, the oil should be refilled to the maximum level (B).
Engine oil
10-05OKTE17E1Maintenance10