service MITSUBISHI LANCER 2005 Workshop Manual
[x] Cancel search | Manufacturer: MITSUBISHI, Model Year: 2005, Model line: LANCER, Model: MITSUBISHI LANCER 2005Pages: 788, PDF Size: 45.98 MB
Page 295 of 788
Page 298 of 788
Page 299 of 788
WINDOW GLASS
BODY42-21
INSTALLATION SERVICE POINTS
>>A<< GASKET/CLIP/DUAL LOCK
FASTENER INSTALLATION
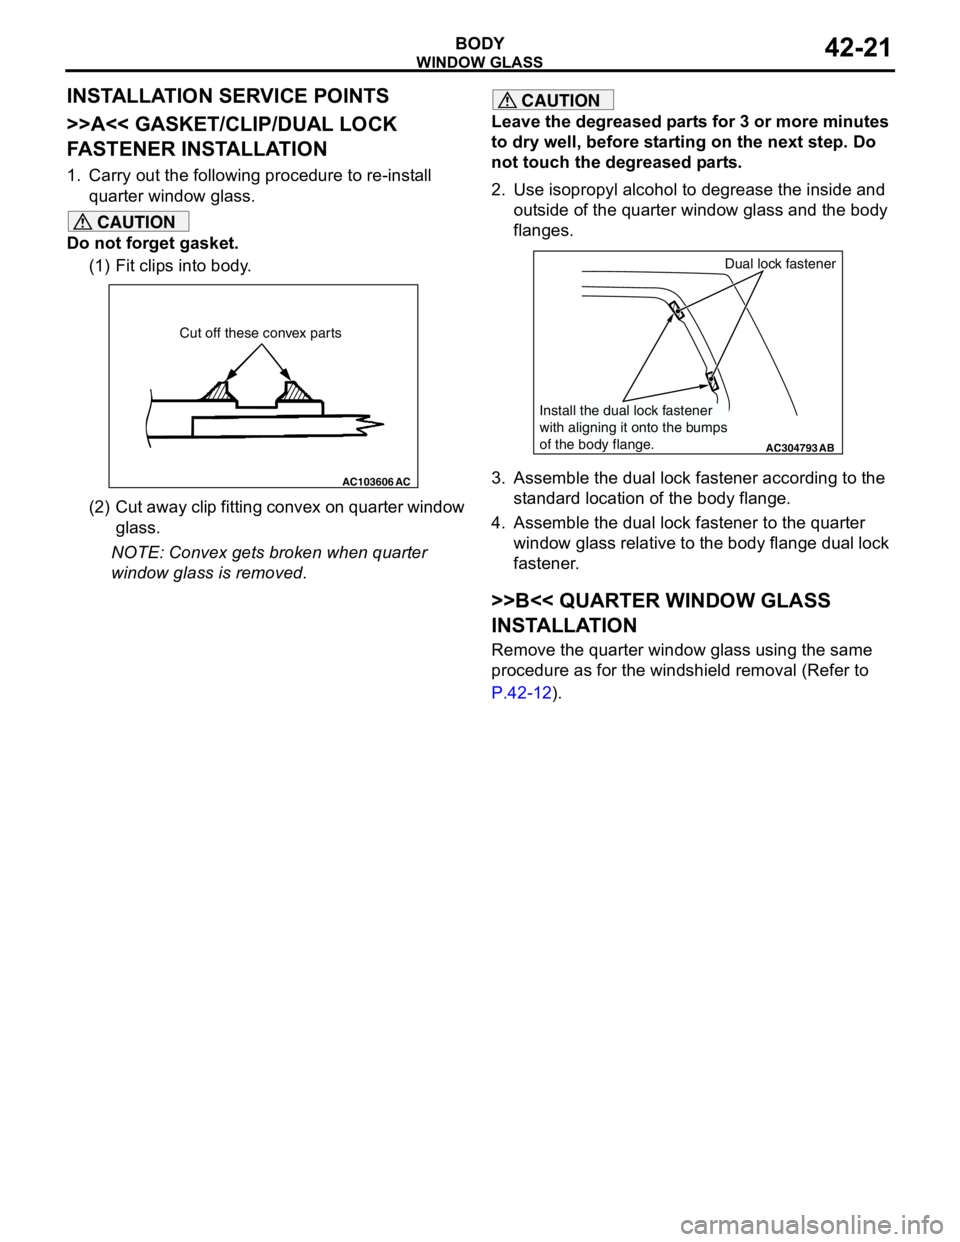
1. Carry out the following procedure to re-install
quarter window glass.
CAUTION
Do not forget gasket.
(1) Fit clips into body.
(2) Cut away clip fitting convex on quarter window
glass.
NOTE: Convex gets broken when quarter
window glass is removed.
CAUTION
Leave the degreased parts for 3 or more minutes
to dry well, before starting on the next step. Do
not touch the degreased parts.
2. Use isopropyl alcohol to degrease the inside and
outside of the quarter window glass and the body
flanges.
3. Assemble the dual lock fastener according to the
standard location of the body flange.
4. Assemble the dual lock fastener to the quarter
window glass relative to the body flange dual lock
fastener.
>>B<< QUARTER WINDOW GLASS
INSTALLATION
Remove the quarter window glass using the same
procedure as for the windshield removal (Refer to
P.42-12).
AC103606
AC
Cut off these convex parts
AC304793AB
Dual lock fastener
Install the dual lock fastener
with aligning it onto the bumps
of the body flange.
Page 301 of 788

WINDOW GLASS
BODY42-23
REMOVAL SERVICE POINT
<> TAILGATE WINDOW GLASS
REMOVAL
Remove the tailgate window glass using the same
procedure as for the windshield (Refer to P.42-12).
INSTALLATION SERVICE POINTS
>>A<< WINDOW SPACER/GLASS
STOPPER/DUAL LOCK
FASTENER/WINDOW DAM
INSTALLATION
CAUTION
Leave the degreased parts for 3 or more minutes
to dry well, before starting on the next step. Do
not touch the degreased parts.
1. Use isopropyl alcohol to degrease the inside and
outside edges of the tailgate window glass and
the surface of the tailgate flange.
Removal steps
1. Connecting the harness connector
<> >>B<<2. Tailgate window glass
>>A<<3. Window lower dam
>>A<<4. Window side dam
>>A<<5. Dual lock fastener
>>A<<6. Glass stopper
>>A<<7. Window spacerRemoval steps (Continued)
Page 303 of 788
DOOR
BODY42-25
DOOR
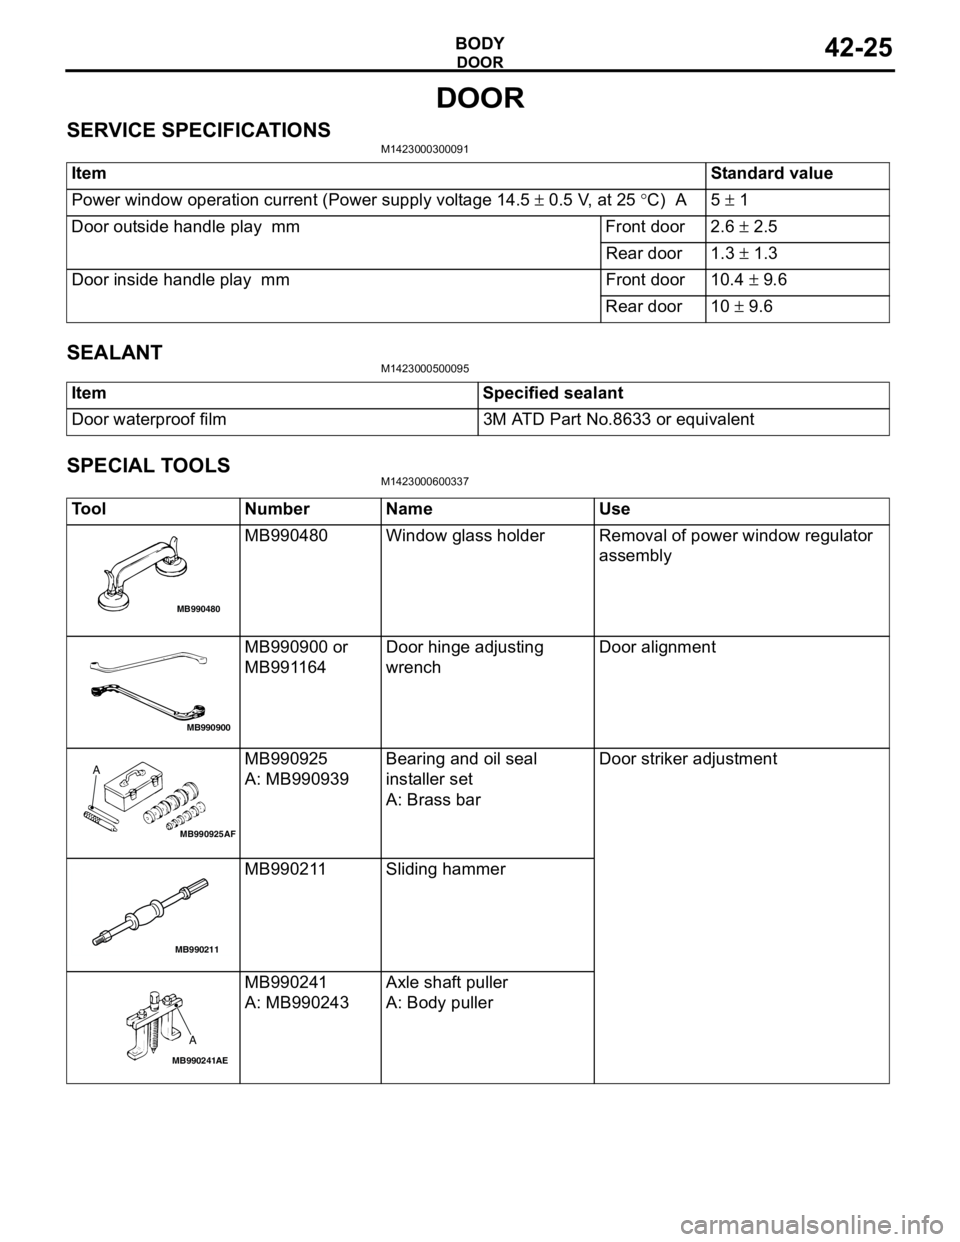
SERVICE SPECIFICATIONSM1423000300091
SEALANTM1423000500095
SPECIAL TOOLSM1423000600337
ItemStandard value
Power window operation current (Power supply voltage 14.5 ± 0.5 V, at 25 °C) A 5 ± 1
Door outside handle play mm Front door 2.6 ± 2.5
Rear door 1.3 ± 1.3
Door inside handle play mm Front door 10.4 ± 9.6
Rear door 10 ± 9.6
Item Specified sealant
Door waterproof film 3M ATD Part No.8633 or equivalent
Tool Number Name Use
MB990480 Window glass holder Removal of power window regulator
assembly
MB990900 or
MB991164Door hinge adjusting
wrenchDoor alignment
MB990925
A: MB990939Bearing and oil seal
installer set
A: Brass barDoor striker adjustment
MB990211 Sliding hammer
MB990241
A: MB990243Axle shaft puller
A: Body puller
MB990480
MB990900
MB990925AF
A
MB990211
MB990241
A
AE
Page 305 of 788
DOOR
BODY42-27
ON-VEHICLE SERVICE
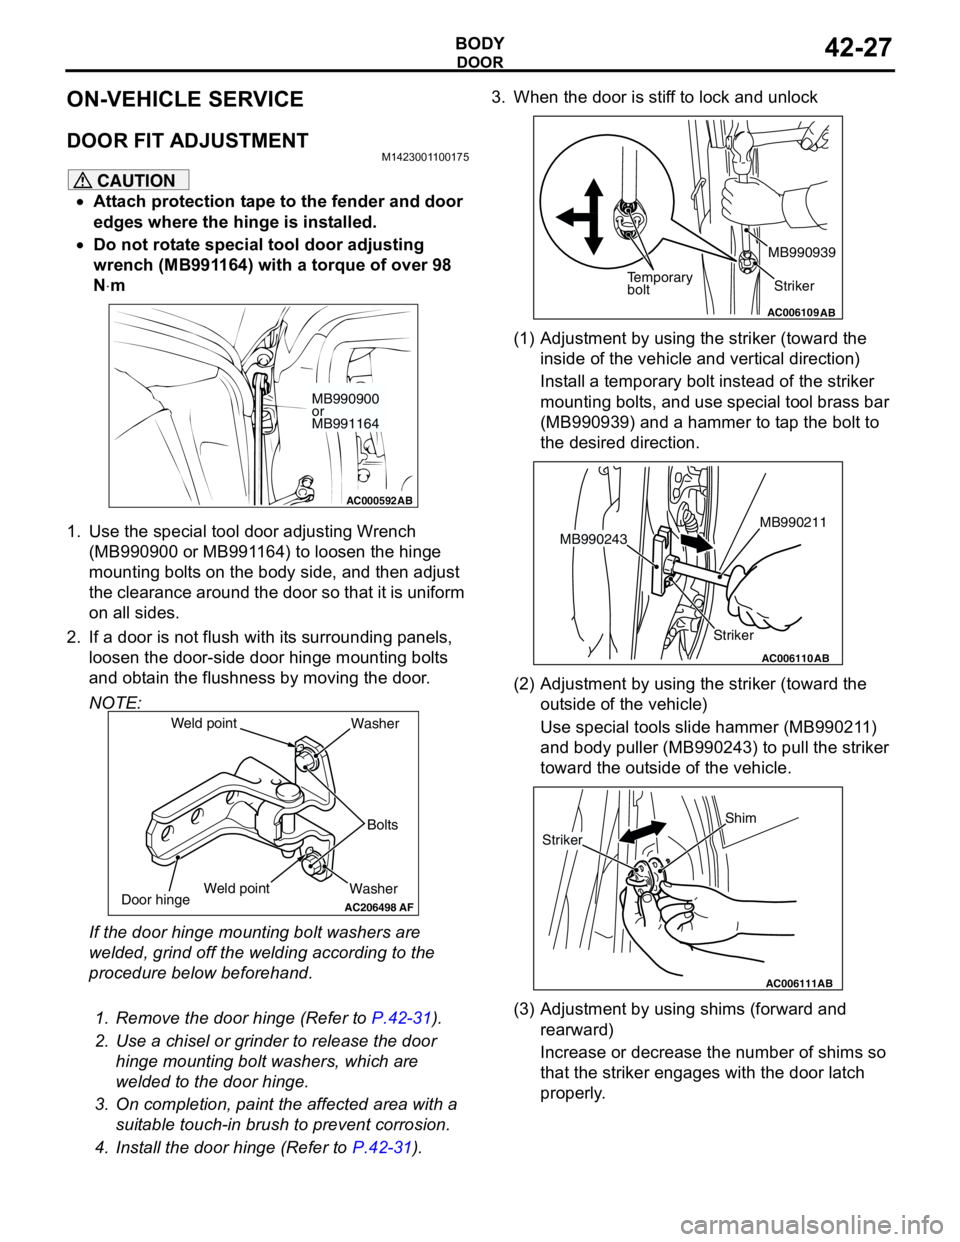
DOOR FIT ADJUSTMENTM1423001100175
CAUTION
•Attach protection tape to the fender and door
edges where the hinge is installed.
•Do not rotate special tool door adjusting
wrench (MB991164) with a torque of over 98
N⋅m
1. Use the special tool door adjusting Wrench
(MB990900 or MB991164) to loosen the hinge
mounting bolts on the body side, and then adjust
the clearance around the door so that it is uniform
on all sides.
2. If a door is not flush with its surrounding panels,
loosen the door-side door hinge mounting bolts
and obtain the flushness by moving the door.
NOTE:
If the door hinge mounting bolt washers are
welded, grind off the welding according to the
procedure below beforehand.
.
1. Remove the door hinge (Refer to P.42-31).
2. Use a chisel or grinder to release the door
hinge mounting bolt washers, which are
welded to the door hinge.
3. On completion, paint the affected area with a
suitable touch-in brush to prevent corrosion.
4. Install the door hinge (Refer to P.42-31).3. When the door is stiff to lock and unlock
(1) Adjustment by using the striker (toward the
inside of the vehicle and vertical direction)
Install a temporary bolt instead of the striker
mounting bolts, and use special tool brass bar
(MB990939) and a hammer to tap the bolt to
the desired direction.
(2) Adjustment by using the striker (toward the
outside of the vehicle)
Use special tools slide hammer (MB990211)
and body puller (MB990243) to pull the striker
toward the outside of the vehicle.
(3) Adjustment by using shims (forward and
rearward)
Increase or decrease the number of shims so
that the striker engages with the door latch
properly.
AC000592
MB990900
or
MB991164
AB
AC206498
WasherBolts Washer
Door hinge
AF
Weld point Weld point
AC006109AB
Temporary
boltStriker MB990939
AC006110
StrikerMB990211
MB990243
AB
AC006111AB
Shim
Striker
Page 310 of 788
DOOR
BODY42-32
INSTALLATION SERVICE POINT
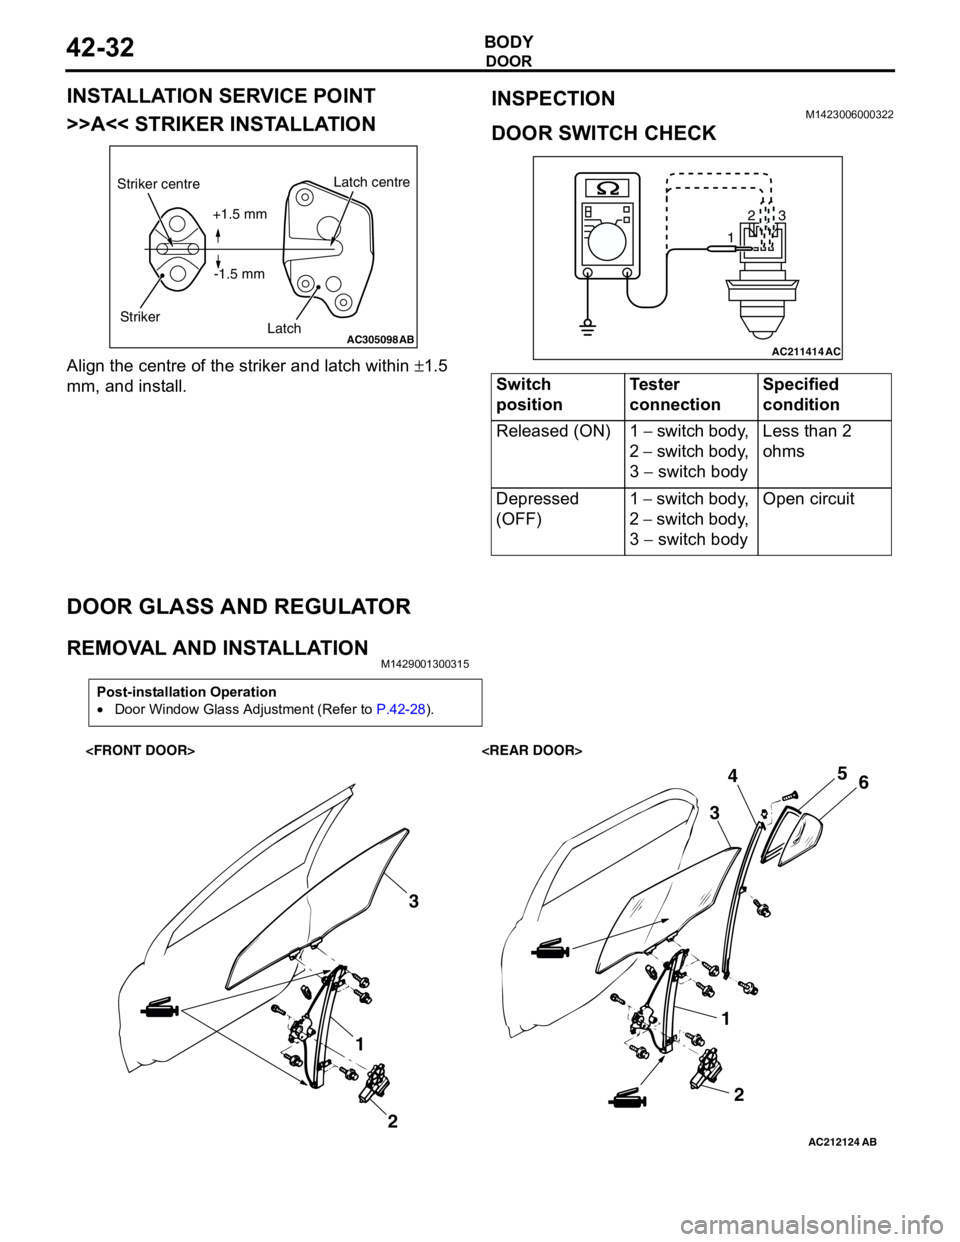
>>A<< STRIKER INSTALLATION
Align the centre of the striker and latch within ±1.5
mm, and install.
INSPECTIONM1423006000322
DOOR SWITCH CHECK
DOOR GLASS AND REGULATOR
REMOVAL AND INSTALLATIONM1429001300315
AC305098AB
Striker centre
StrikerLatch centre
Latch +1.5 mm
-1.5 mm
Switch
positionTester
connectionSpecified
condition
Released (ON) 1 − switch body,
2 − switch body,
3 − switch body Less than 2
ohms
Depressed
(OFF)1 − switch body,
2 − switch body,
3 − switch body Open circuit
AC211414
123
AC
Post-installation Operation
•Door Window Glass Adjustment (Refer to P.42-28).
AC212124AB
1
23
1
2 345
6
Page 312 of 788
Page 315 of 788
DOOR
BODY42-37
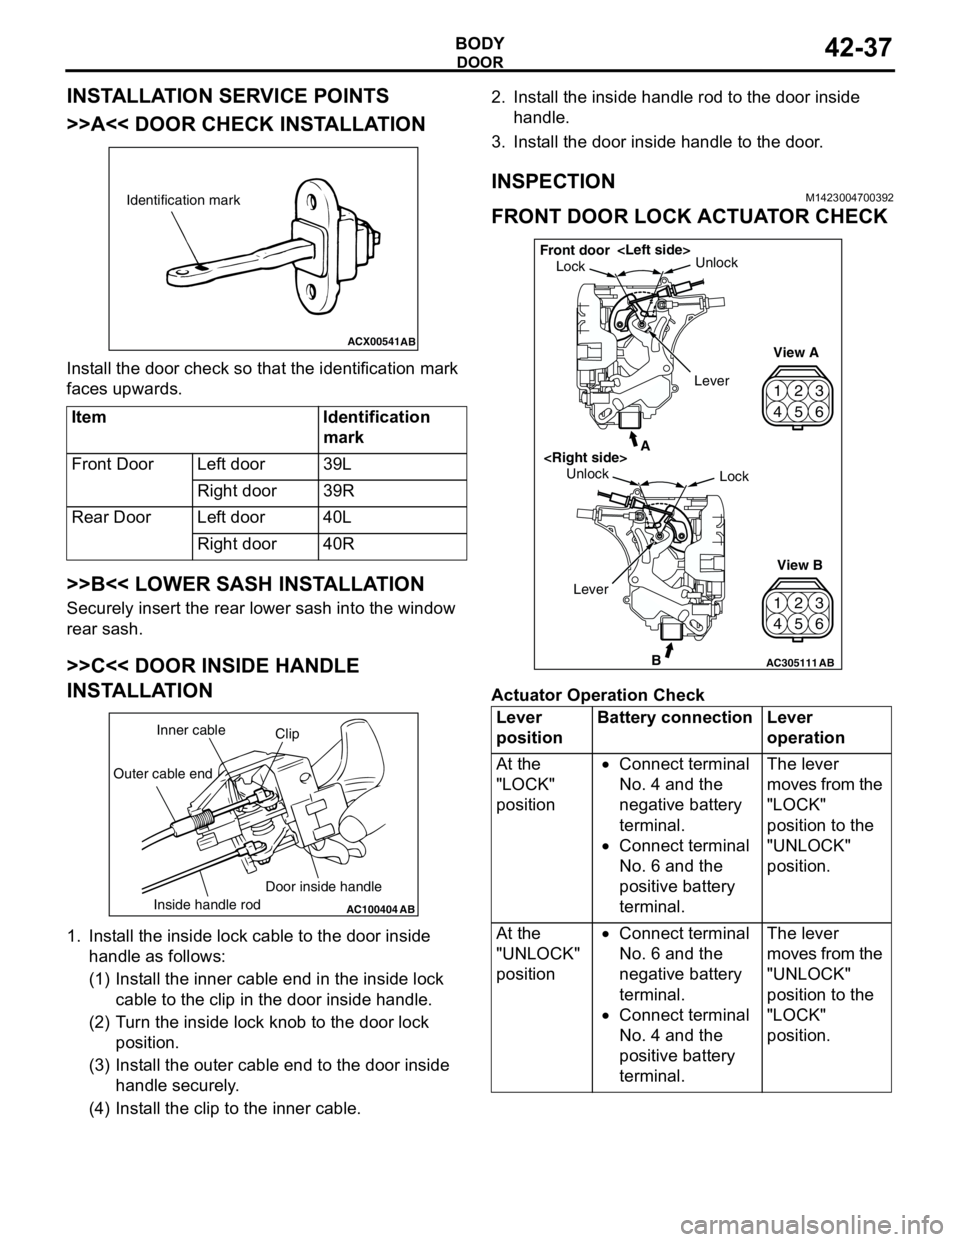
INSTALLATION SERVICE POINTS
>>A<< DOOR CHECK INSTALLATION
Install the door check so that the identification mark
faces upwards.
>>B<< LOWER SASH INSTALLATION
Securely insert the rear lower sash into the window
rear sash.
>>C<< DOOR INSIDE HANDLE
INSTALLATION
1. Install the inside lock cable to the door inside
handle as follows:
(1) Install the inner cable end in the inside lock
cable to the clip in the door inside handle.
(2) Turn the inside lock knob to the door lock
position.
(3) Install the outer cable end to the door inside
handle securely.
(4) Install the clip to the inner cable.2. Install the inside handle rod to the door inside
handle.
3. Install the door inside handle to the door.
INSPECTIONM1423004700392
FRONT DOOR LOCK ACTUATOR CHECK
Actuator Operation Check Item Identification
mark
Front Door Left door 39L
Right door 39R
Rear Door Left door 40L
Right door 40R
ACX00541
Identification mark
AB
AC100404
AB
Clip Inner cable
Outer cable end
Inside handle rodDoor inside handleLever
positionBattery connection Lever
operation
At the
"LOCK"
position•Connect terminal
No. 4 and the
negative battery
terminal.
•Connect terminal
No. 6 and the
positive battery
terminal.The lever
moves from the
"LOCK"
position to the
"UNLOCK"
position.
At the
"UNLOCK"
position•Connect terminal
No. 6 and the
negative battery
terminal.
•Connect terminal
No. 4 and the
positive battery
terminal.The lever
moves from the
"UNLOCK"
position to the
"LOCK"
position.
42
53
6 1
42
53
6 1
AC305111B
A
AB
LockUnlock
View A
View B Unlock
Lock Front door
Lever
Page 319 of 788
