timing MITSUBISHI LANCER 2005 Workshop Manual
[x] Cancel search | Manufacturer: MITSUBISHI, Model Year: 2005, Model line: LANCER, Model: MITSUBISHI LANCER 2005Pages: 788, PDF Size: 45.98 MB
Page 8 of 788

GENERAL INFORMATION
ENGINE LUBRICATION12-2
GENERAL INFORMATION
M1121000100357
The lubrication method is a fully force-fed, full-flow
filtration type. The engine oil pump is a trochoid type
which is driven by the crankshaft <4G1>.The engine
oil pump is a gear type which is driven by the
crankshaft via the balancer timing belt <4G6>.
ENGINE OILS
Health Warning
Prolonged and repeated contact with mineral oil will
result in the removal of natural fats from the skin,
leading to dryness, irritation and dermatitis. In
addition, used engine oil contains potentially harmful
contaminants which may cause skin cancer.
Adequate means of skin protection and washing
facilities must be provided.
Recommended Precautions
The most effective precaution is to adapt working
practices which prevent, as far as practicable, the
risk of skin contact with mineral oils, for example by
using enclosed systems for handling used engine oil
and by degreasing components, where practicable,
before handling them. Other precautions:
•Avoid prolonged and repeated contact with oils,
particularly used engine oils.
•Wear protective clothing, including impervious
gloves where practicable.•Avoid contaminating clothes, particularly
underpants, with oil.
•Do not put oily rags in pockets, the use of overalls
without pockets will avoid this.
•Do not wear heavily soiled clothing and
oil-impregnated foot-wear. Overalls must be
cleaned regularly and kept separate from
personal clothing.
•Where there is a risk of eye contact, eye
protection should be worn, for example, chemical
goggles or face shields; in addition an eye wash
facility should be provided.
•Obtain first aid treatment immediately for open
cuts and wounds.
•Wash regularly with soap and water to ensure all
oil is removed, especially before meals (skin
cleansers and nail brushes will help). After
cleaning, the application of preparations
containing lanolin to replace the natural skin oils
is advised.
•Do not use petrol, kerosine, diesel fuel, gas oil,
thinners or solvents for cleaning skin.
•Use barrier creams, applying them before each
work period, to help the removal of oil from the
skin after work.
•If skin disorders develop, obtain medical advice
without delay.
SERVICE SPECIFICATION
M1121000300232
LUBRICANT
M1121000400433
Item Standard value
Oil pressure kPa at idle 29 or more
at 3,500 r/min 294 − 686
Item Specification
Engine oil ACEA classification A1, A2 or A3
Engine oil API classification SG or higher
Engine oil quantity L 4G1 Oil filter 0.3
To t a l 3 . 3
4G6 Oil filter 0.3
To t a l 4 . 3
Page 43 of 788
WAT ER P U M P
ENGINE COOLING14-29
WAT E R P U M P
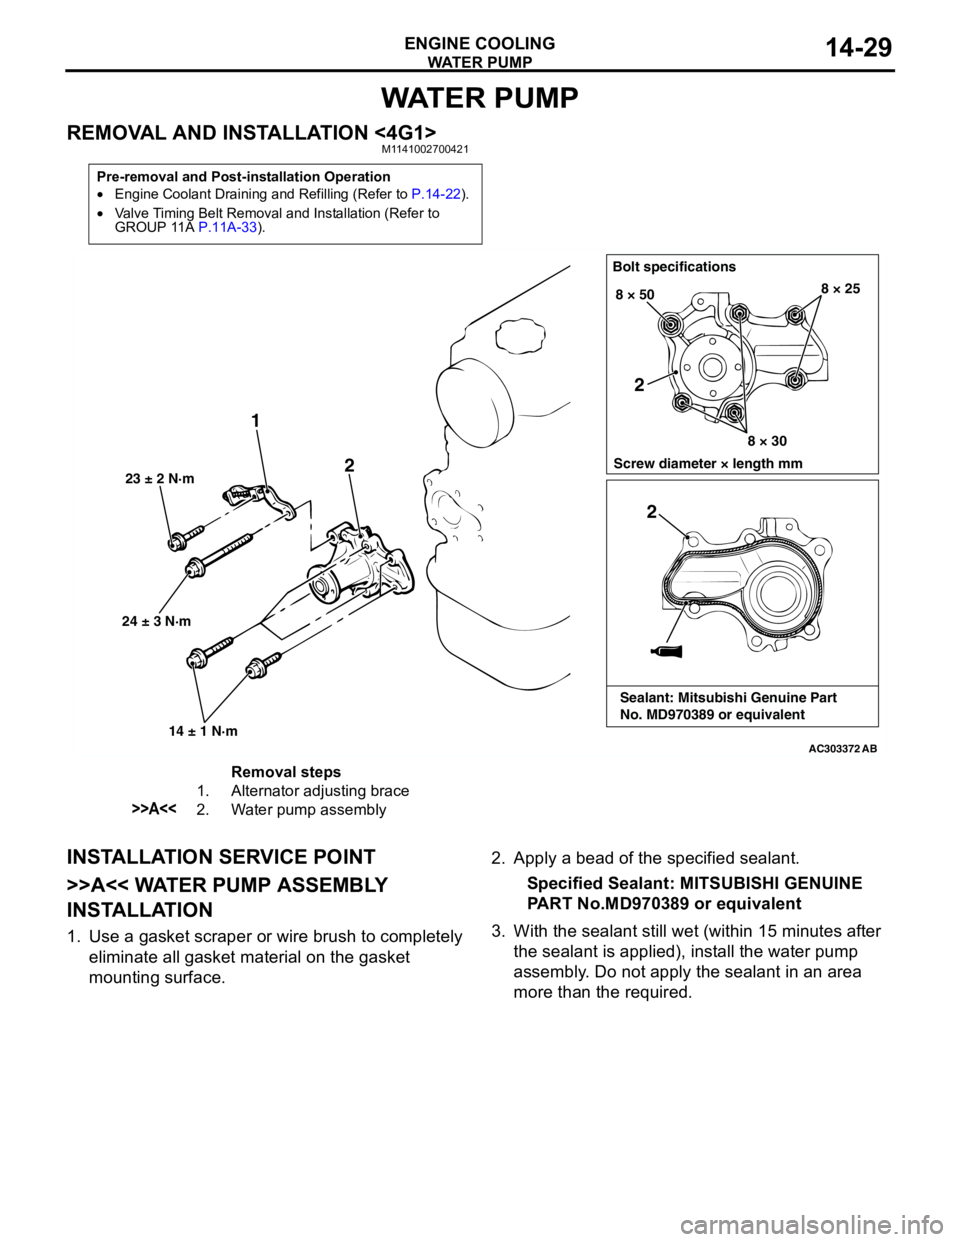
REMOVAL AND INSTALLATION <4G1>M1141002700421
INSTALLATION SERVICE POINT
>>A<< WATER PUMP ASSEMBLY
INSTALLATION
1. Use a gasket scraper or wire brush to completely
eliminate all gasket material on the gasket
mounting surface.2. Apply a bead of the specified sealant.
Specified Sealant: MITSUBISHI GENUINE
PART No.MD970389 or equivalent
3. With the sealant still wet (within 15 minutes after
the sealant is applied), install the water pump
assembly. Do not apply the sealant in an area
more than the required.
Pre-removal and Post-installation Operation
•Engine Coolant Draining and Refilling (Refer to P.14-22).
•Valve Timing Belt Removal and Installation (Refer to
GROUP 11A P.11A-33).
AC303372
24 ± 3 N·m 23 ± 2 N·m
14 ± 1 N·m
1
2
Bolt specifications
Screw diameter × length mm 8 × 50
8 × 308 × 25
AB
2
2
Sealant: Mitsubishi Genuine Part
No. MD970389 or equivalent
Removal steps
1. Alternator adjusting brace
>>A<<2. Water pump assembly
Page 44 of 788
WAT E R P U M P
ENGINE COOLING14-30
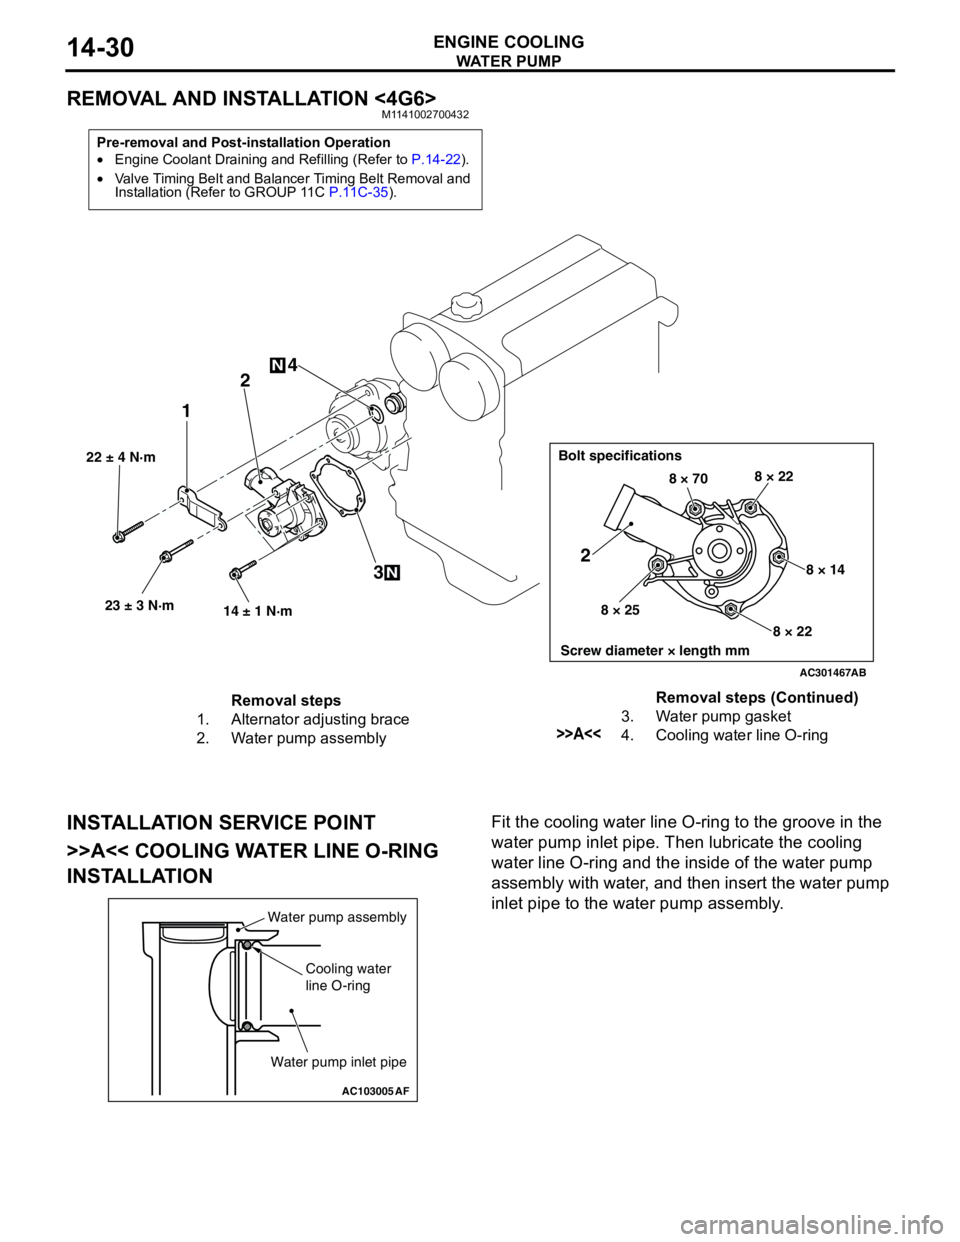
REMOVAL AND INSTALLATION <4G6>M1141002700432
INSTALLATION SERVICE POINT
>>A<< COOLING WATER LINE O-RING
INSTALLATIONFit the cooling water line O-ring to the groove in the
water pump inlet pipe. Then lubricate the cooling
water line O-ring and the inside of the water pump
assembly with water, and then insert the water pump
inlet pipe to the water pump assembly.
Pre-removal and Post-installation Operation
•Engine Coolant Draining and Refilling (Refer to P.14-22).
•Valve Timing Belt and Balancer Timing Belt Removal and
Installation (Refer to GROUP 11C P.11C-35).
AC301467
22 ± 4 N·m
23 ± 3 N·m
14 ± 1 N·m
12
3 4
N
N
Bolt specifications
Screw diameter × length mm
8 × 708 × 22
8 × 14
8 × 22 8 × 25
2
AB
Removal steps
1. Alternator adjusting brace
2. Water pump assembly3. Water pump gasket
>>A<<4. Cooling water line O-ringRemoval steps (Continued)
AC103005
Water pump assembly
Cooling water
line O-ring
Water pump inlet pipe
AF
Page 94 of 788
IGNITION SYSTEM
ENGINE ELECTRICAL16-30
IGNITION SYSTEM
GENERAL INFORMATIONM1163000100294
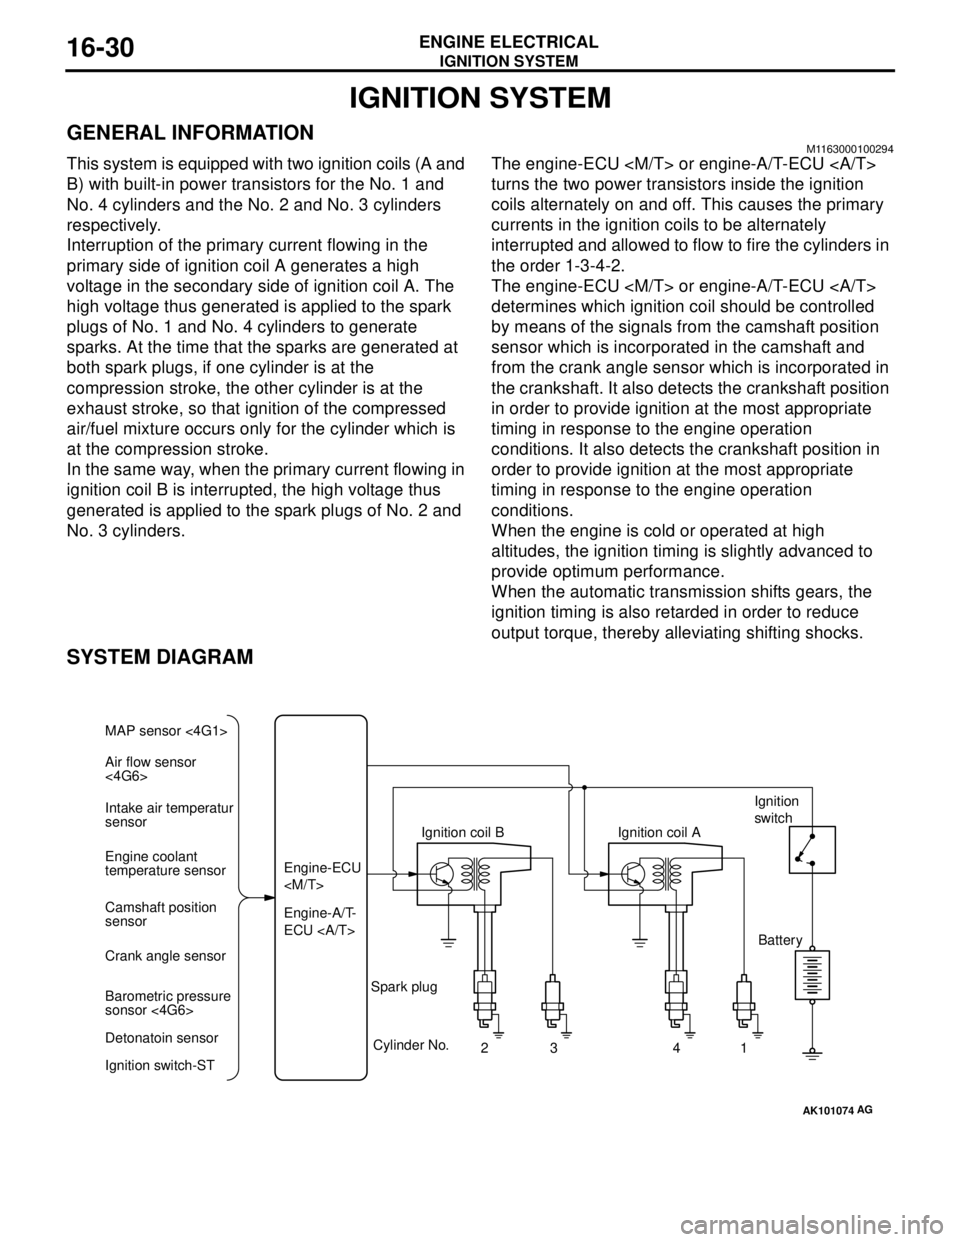
This system is equipped with two ignition coils (A and
B) with built-in power transistors for the No. 1 and
No. 4 cylinders and the No. 2 and No. 3 cylinders
respectively.
Interruption of the primary current flowing in the
primary side of ignition coil A generates a high
voltage in the secondary side of ignition coil A. The
high voltage thus generated is applied to the spark
plugs of No. 1 and No. 4 cylinders to generate
sparks. At the time that the sparks are generated at
both spark plugs, if one cylinder is at the
compression stroke, the other cylinder is at the
exhaust stroke, so that ignition of the compressed
air/fuel mixture occurs only for the cylinder which is
at the compression stroke.
In the same way, when the primary current flowing in
ignition coil B is interrupted, the high voltage thus
generated is applied to the spark plugs of No. 2 and
No. 3 cylinders.The engine-ECU
turns the two power transistors inside the ignition
coils alternately on and off. This causes the primary
currents in the ignition coils to be alternately
interrupted and allowed to flow to fire the cylinders in
the order 1-3-4-2.
The engine-ECU
determines which ignition coil should be controlled
by means of the signals from the camshaft position
sensor which is incorporated in the camshaft and
from the crank angle sensor which is incorporated in
the crankshaft. It also detects the crankshaft position
in order to provide ignition at the most appropriate
timing in response to the engine operation
conditions. It also detects the crankshaft position in
order to provide ignition at the most appropriate
timing in response to the engine operation
conditions.
When the engine is cold or operated at high
altitudes, the ignition timing is slightly advanced to
provide optimum performance.
When the automatic transmission shifts gears, the
ignition timing is also retarded in order to reduce
output torque, thereby alleviating shifting shocks.
SYSTEM DIAGRAM
AK101074
Air flow sensor
<4G6> MAP sensor <4G1>
Intake air temperatur
sensor
Engine coolant
temperature sensor
Camshaft position
sensor
Crank angle sensor
Barometric pressure
sonsor <4G6>
Detonatoin sensor
Ignition switch-STEngine-A/T-
ECU Engine-ECU
Cylinder No.
23 4
AG
1 Spark plugIgnition coil AIgnition
switch
Battery
Page 99 of 788
IGNITION SYSTEM
ENGINE ELECTRICAL16-35
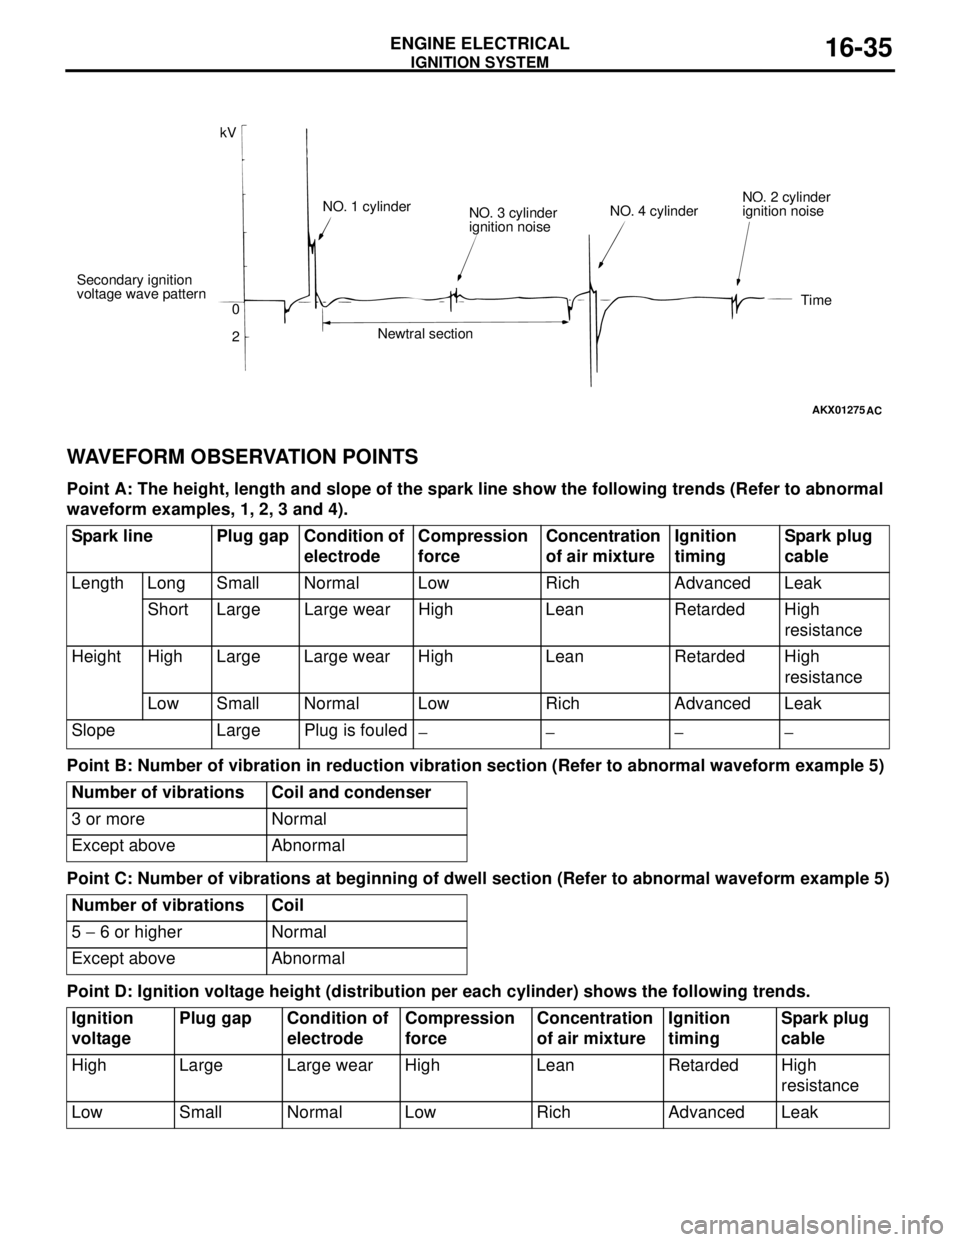
WAVEFORM OBSERVATION POINTS
Point A: The height, length and slope of the spark line show the following trends (Refer to abnormal
waveform examples, 1, 2, 3 and 4).
Point B: Number of vibration in reduction vibration section (Refer to abnormal waveform example 5)
Point C: Number of vibrations at beginning of dwell section (Refer to abnormal waveform example 5)
Point D: Ignition voltage height (distribution per each cylinder) shows the following trends.
AKX01275
kV
Secondary ignition
voltage wave pattern
0
2NO. 1 cylinder
NO. 3 cylinder
ignition noise
Newtral sectionNO. 4 cylinderNO. 2 cylinder
ignition noise
Time
AC
Spark line Plug gap Condition of
electrodeCompression
force Concentration
of air mixtureIgnition
timingSpark plug
cable
Length Long Small Normal Low Rich Advanced Leak
Short Large Large wear High Lean Retarded High
resistance
Height High Large Large wear High Lean Retarded High
resistance
Low Small Normal Low Rich Advanced Leak
Slope Large Plug is fouled
−− −−
Number of vibrations Coil and condenser
3 or more Normal
Except above Abnormal
Number of vibrations Coil
5 − 6 or higher Normal
Except above Abnormal
Ignition
voltagePlug gap Condition of
electrodeCompression
forceConcentration
of air mixtureIgnition
timingSpark plug
cable
High Large Large wear High Lean Retarded High
resistance
Low Small Normal Low Rich Advanced Leak
Page 105 of 788
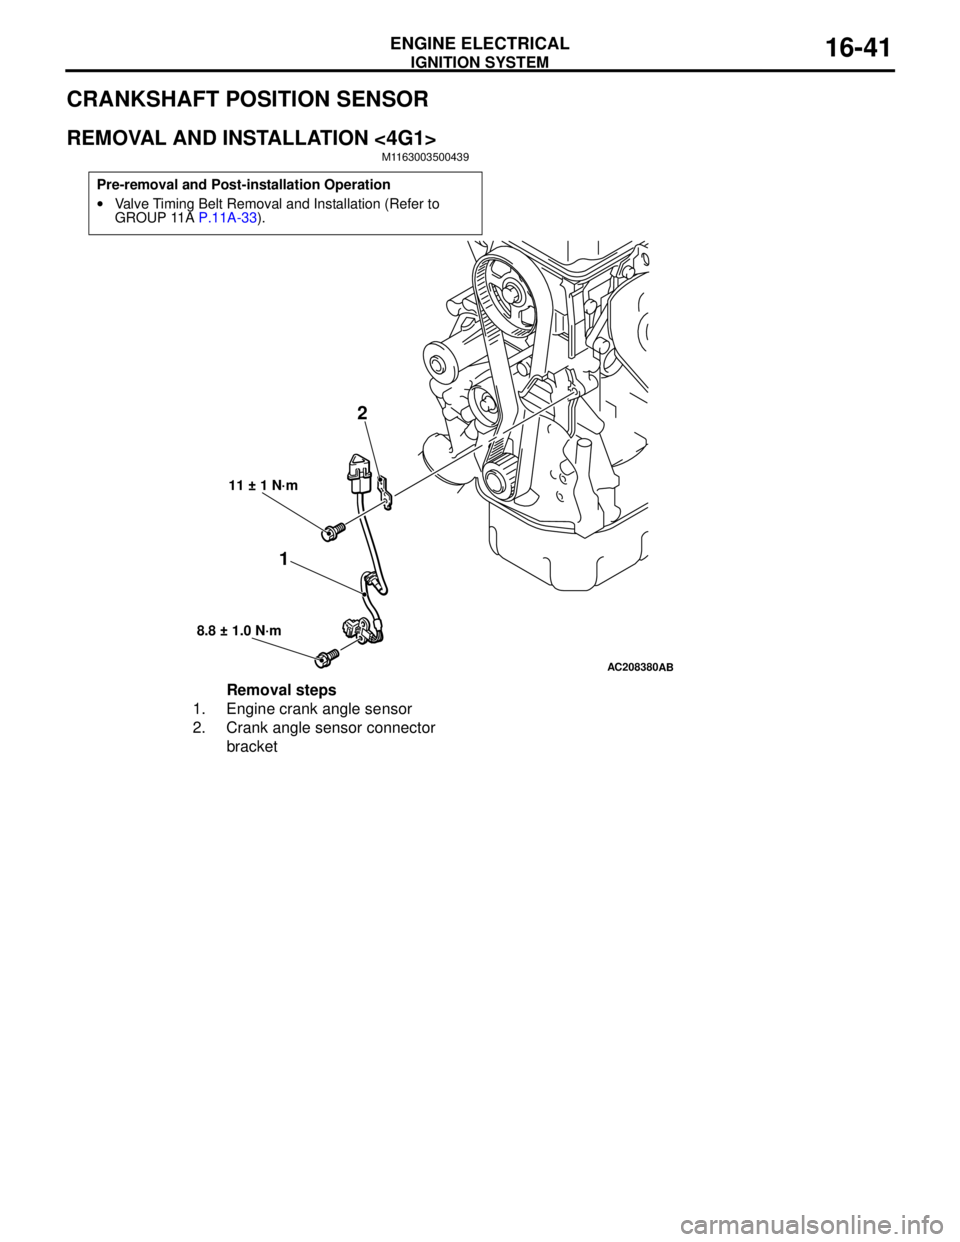
IGNITION SYSTEM
ENGINE ELECTRICAL16-41
CRANKSHAFT POSITION SENSOR
REMOVAL AND INSTALLATION <4G1>
M1163003500439
Pre-removal and Post-installation Operation
•Valve Timing Belt Removal and Installation (Refer to
GROUP 11A P.11A-33).
AC208380AB
12
11 ± 1 N·m
8.8 ± 1.0 N·m
Removal steps
1. Engine crank angle sensor
2. Crank angle sensor connector
bracket
Page 106 of 788
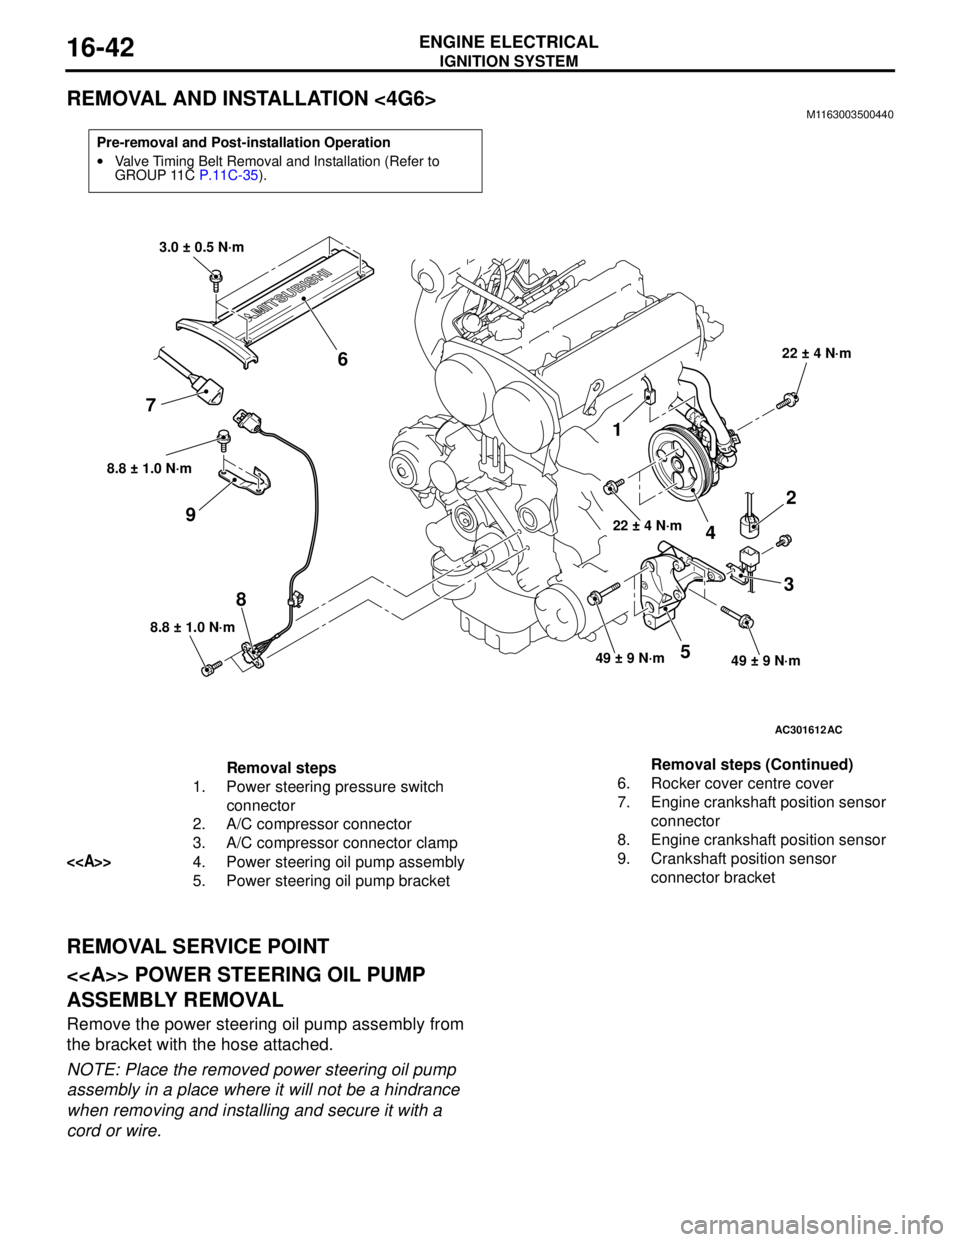
IGNITION SYSTEM
ENGINE ELECTRICAL16-42
REMOVAL AND INSTALLATION <4G6>M1163003500440
REMOVAL SERVICE POINT
<> POWER STEERING OIL PUMP
ASSEMBLY REMOVAL
Remove the power steering oil pump assembly from
the bracket with the hose attached.
NOTE: Place the removed power steering oil pump
assembly in a place where it will not be a hindrance
when removing and installing and secure it with a
cord or wire.
Pre-removal and Post-installation Operation
•Valve Timing Belt Removal and Installation (Refer to
GROUP 11C P.11C-35).
AC301612
8.8 ± 1.0 N·m
8
8.8 ± 1.0 N·m
9
1
22 ± 4 N·m
4
2
3
49 ± 9 N·m49 ± 9 N·m5
22 ± 4 N·m
3.0 ± 0.5 N·m
6
7
AC
Removal steps
1. Power steering pressure switch
connector
2. A/C compressor connector
3. A/C compressor connector clamp
<>4. Power steering oil pump assembly
5. Power steering oil pump bracket6. Rocker cover centre cover
7. Engine crankshaft position sensor
connector
8. Engine crankshaft position sensor
9. Crankshaft position sensor
connector bracket Removal steps (Continued)
Page 593 of 788
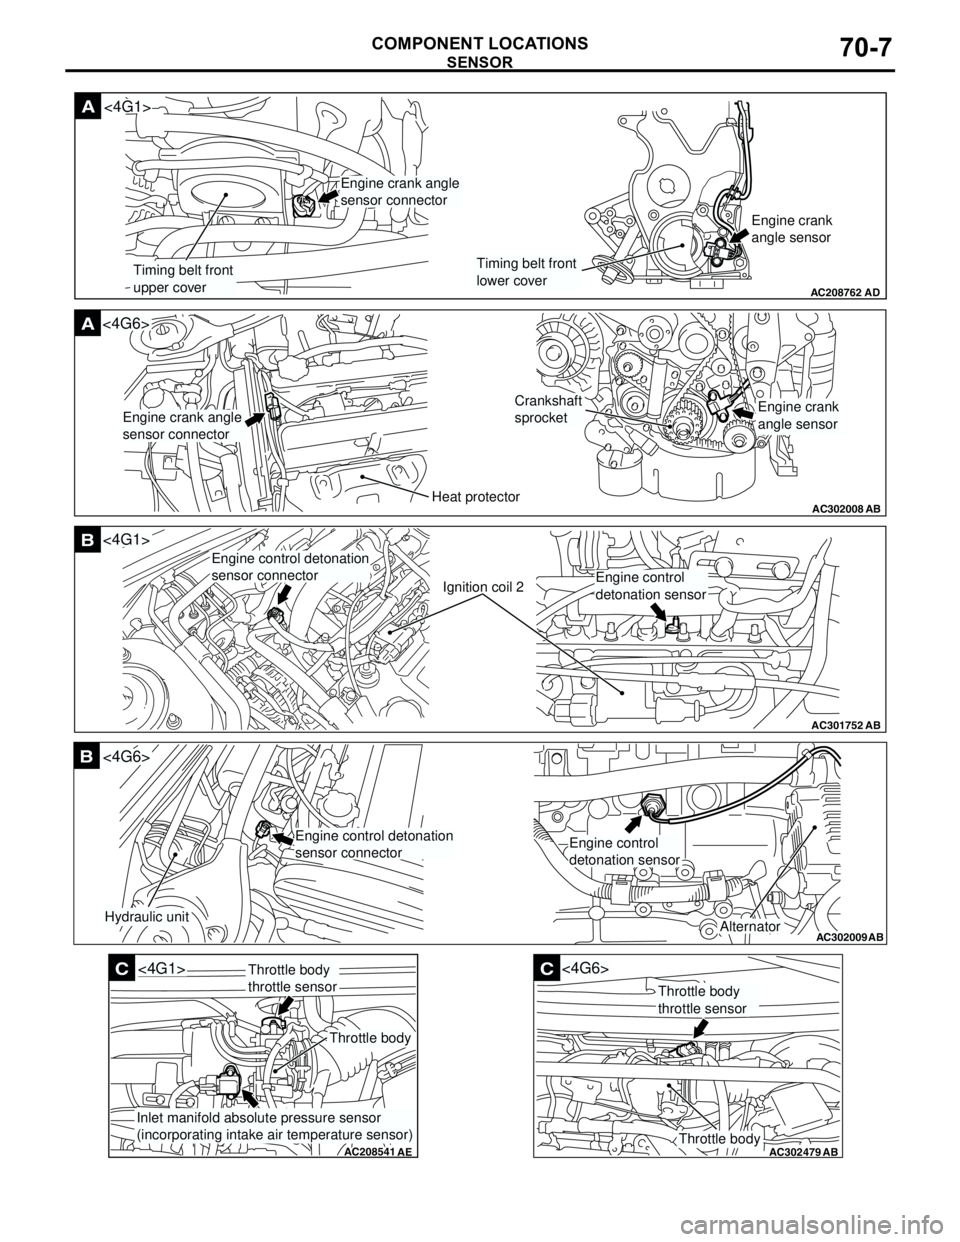
SENSOR
COMPONENT LOCATIONS70-7
AC208762
A
AD
Timing belt front
upper coverTiming belt front
lower coverEngine crank
angle sensor
<4G1>
Engine crank angle
sensor connector
AC302008
A<4G6>
ABHeat protector
Crankshaft
sprocket
Engine crank angle
sensor connectorEngine crank
angle sensor
AC301752
B
AB
Ignition coil 2
<4G1>
Engine control detonation
sensor connector
Engine control
detonation sensor
AC302009
B
AB
Hydraulic unit
<4G6>
Alternator
Engine control detonation
sensor connectorEngine control
detonation sensor
AC208541
C
AE
<4G1>
Throttle body
Throttle body
throttle sensor
Inlet manifold absolute pressure sensor
(incorporating intake air temperature sensor)
AC302479
AB
C
Throttle body
<4G6>
Throttle body
throttle sensor
Page 597 of 788
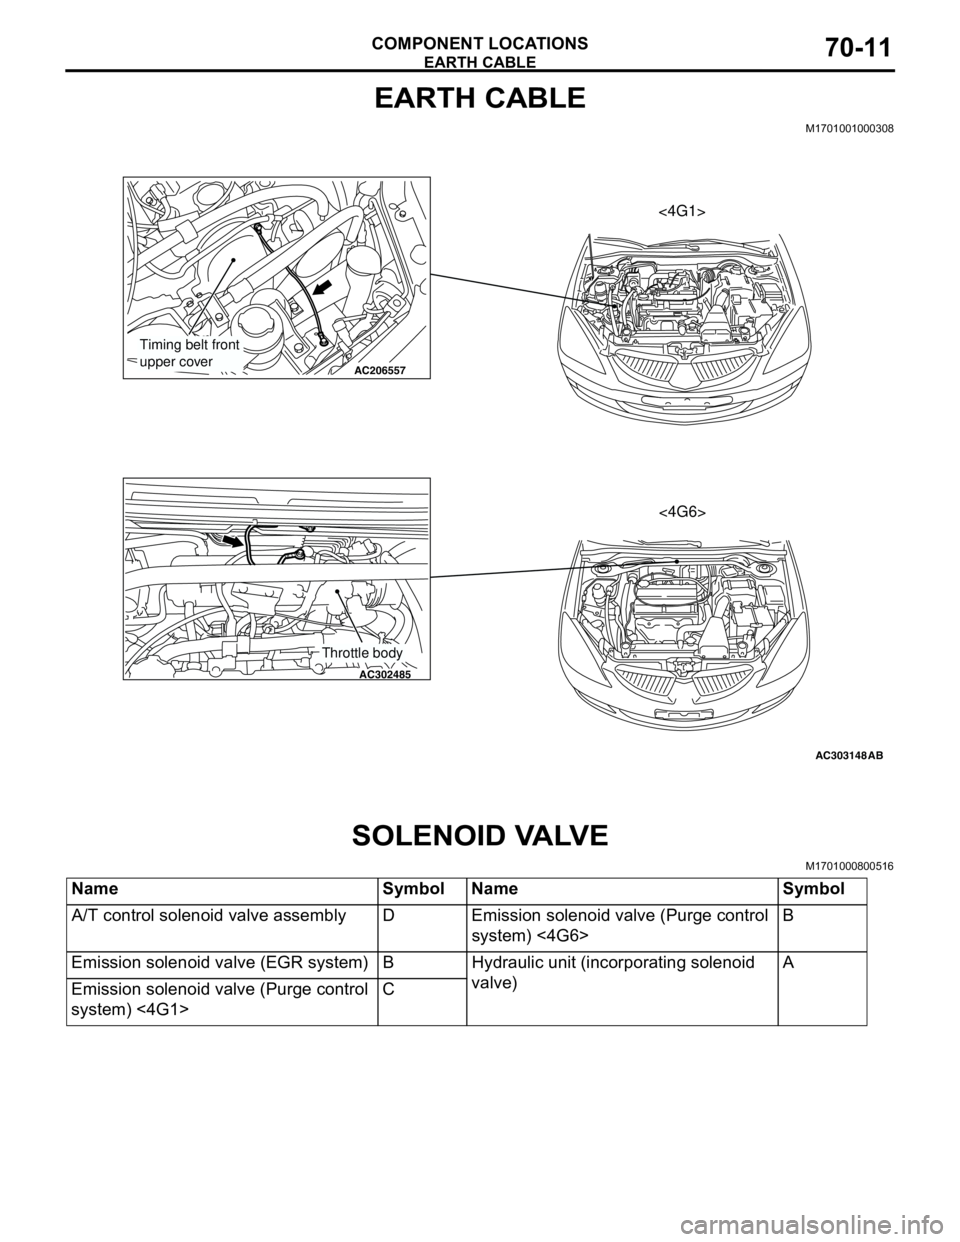
EARTH CABLE
COMPONENT LOCATIONS70-11
EARTH CABLE
M1701001000308
SOLENOID VALVE
M1701000800516
AC303148
AC206557
AC302485
AB
Timing belt front
upper cover
Throttle body
<4G1>
<4G6>
Name Symbol Name Symbol
A/T control solenoid valve assembly D Emission solenoid valve (Purge control
system) <4G6>B
Emission solenoid valve (EGR system) B Hydraulic unit (incorporating solenoid
valve)A
Emission solenoid valve (Purge control
system) <4G1>C