key MITSUBISHI LANCER 2006 User Guide
[x] Cancel search | Manufacturer: MITSUBISHI, Model Year: 2006, Model line: LANCER, Model: MITSUBISHI LANCER 2006Pages: 800, PDF Size: 45.03 MB
Page 326 of 800
KEYLESS ENTRY SYSTEM
BODY42-54
•Enable the hazard answerback function
when the doors are locked: The
ETACS-ECU buzzer will sound once.
•Disable the hazard answerback function
when the doors are locked: The
ETACS-ECU buzzer will sound twice.
3. If the transmitter “UNLOCK” button is pushed consecutively twice (wit hin two seconds), the
ETACS-ECU buzzer will sound, indicating that the
hazard answerback function can be enabled or
disabled when the doors are unlocked.
•Enable the hazard answerback function
when the doors are unlocked: The
ETACS-ECU buzzer will sound once.
•Disable the hazard answerback function
when the doors are unlocked: The
ETACS-ECU buzzer will sound twice.
4. Exit the hazard answer back customize mode by
observing one of the following steps.
(1) Disconnect diagnosis connector terminal (1) form the earth.
(2) Turn the ignition switch to position other then “LOCK”(OFF), or remove the ignition key.
(3) Open the driver's side door.
(4) Any other warning buzzer output occurs.
NOTE: If any operation is not done for at least three
minutes after the ETACS-ECU has entered the cus
-
tomize mode, the hazard answerback customize
mode will be canceled automatically.
connector>
1. Enter the hazard answerback customize mode by performing one of the following steps. If the
ETACS-ECU enters the customize mode, its
buzzer will sound once.
(1) Turn the ignition switch to “LOCK”(OFF) position.
(2) Turn off the hazard warning lamp switch.
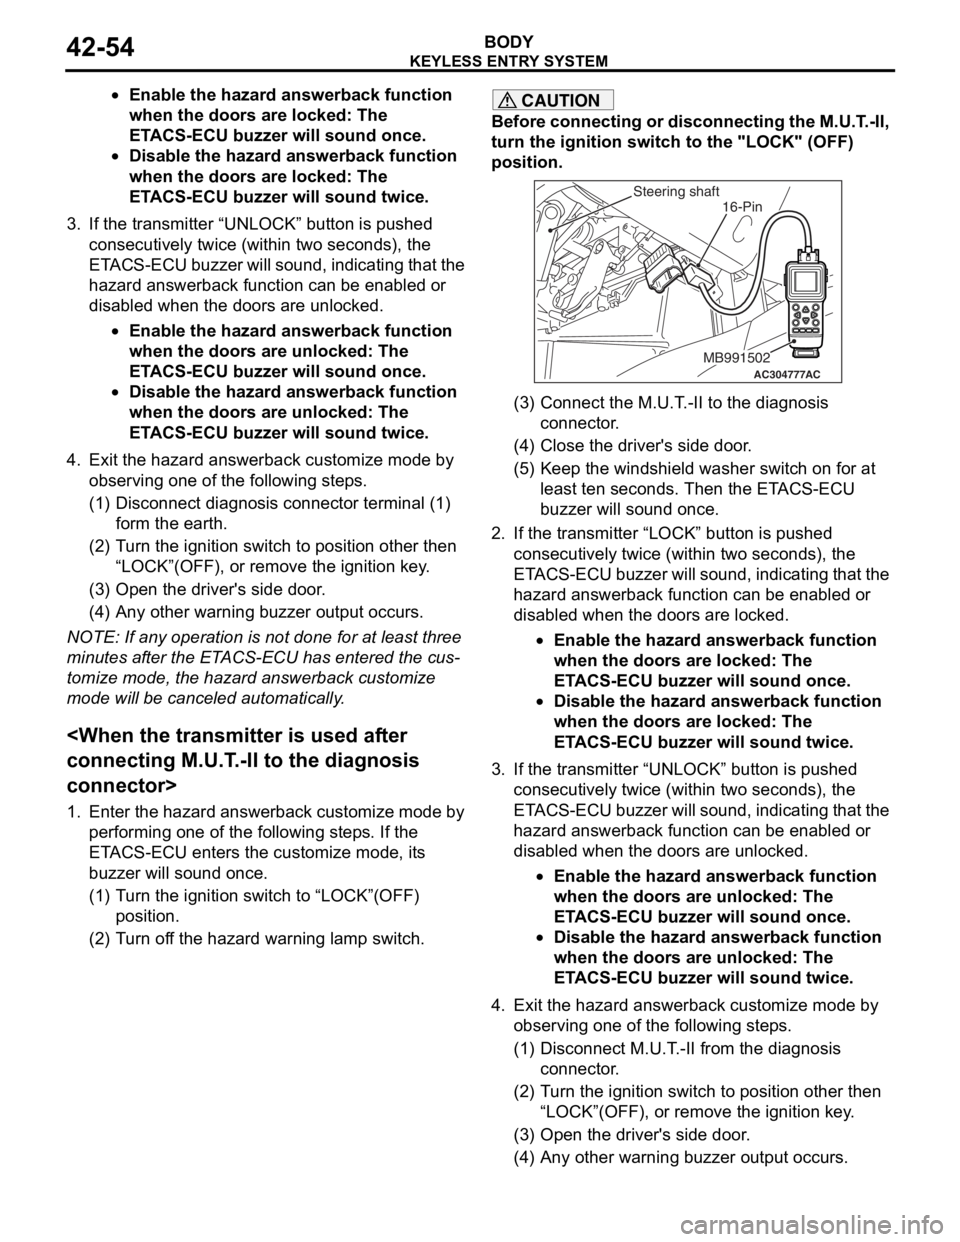
CAUTION
Before connecting or disconnecting the M.U.T.-II,
turn the ignition switch to the "LOCK" (OFF)
position.
AC304777
Steering shaft
ACMB991502
16-Pin
(3) Connect the M.U.T.-II to the diagnosis
connector.
(4) Close the driver's side door.
(5) Keep the windshield washer switch on for at least ten seconds. Then the ETACS-ECU
buzzer will sound once.
2. If the transmitter “LOCK” button is pushed consecutively twice (wit hin two seconds), the
ETACS-ECU buzzer will sound, indicating that the
hazard answerback function can be enabled or
disabled when the doors are locked.
•Enable the hazard answerback function
when the doors are locked: The
ETACS-ECU buzzer will sound once.
•Disable the hazard answerback function
when the doors are locked: The
ETACS-ECU buzzer will sound twice.
3. If the transmitter “UNLOCK” button is pushed consecutively twice (wit hin two seconds), the
ETACS-ECU buzzer will sound, indicating that the
hazard answerback function can be enabled or
disabled when the doors are unlocked.
•Enable the hazard answerback function
when the doors are unlocked: The
ETACS-ECU buzzer will sound once.
•Disable the hazard answerback function
when the doors are unlocked: The
ETACS-ECU buzzer will sound twice.
4. Exit the hazard answer back customize mode by
observing one of the following steps.
(1) Disconnect M.U.T.-II from the diagnosis
connector.
(2) Turn the ignition switch to position other then “LOCK”(OFF), or remove the ignition key.
(3) Open the driver's side door.
(4) Any other warning buzzer output occurs.
Page 327 of 800
KEYLESS ENTRY SYSTEM
BODY42-55
NOTE: If any operation is not done for at least three
minutes after the ETACS-ECU has entered the cus
-
tomize mode, the hazard answerback customize
mode will be canceled automatically.
(MB991824) to the diagnosis connector>
1. Enter the hazard answerback customize mode by
performing one of the following steps. If the
ETACS-ECU enters the customize mode, its
buzzer will sound once.
(1) Turn the ignition switch to “LOCK”(OFF) position.
(2) Turn off the hazard warning lamp switch.
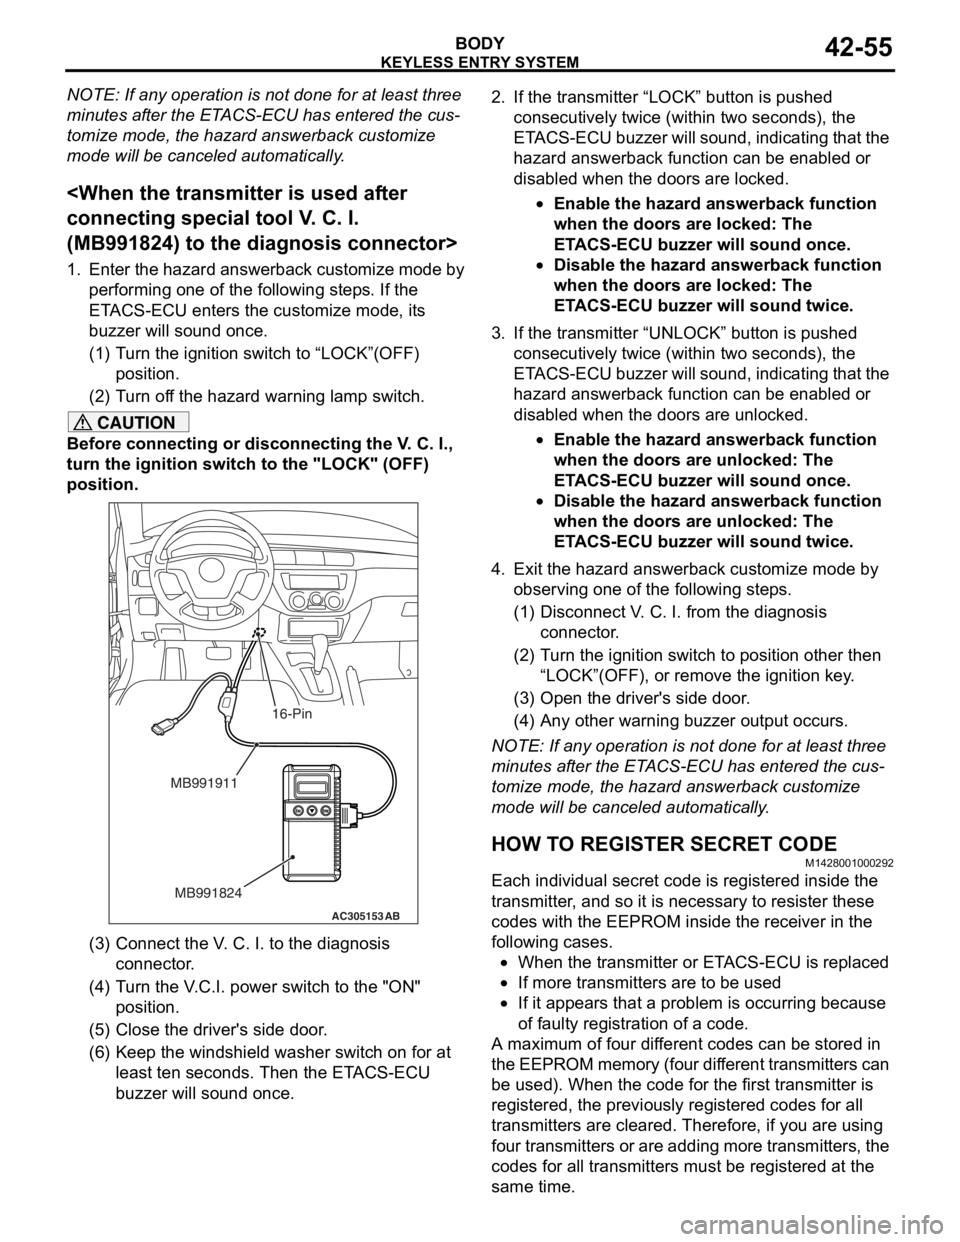
CAUTION
Before connecting or disconnecting the V. C. I.,
turn the ignition switch to the "LOCK" (OFF)
position.
AC305153AB
MB991911
MB991824
16-Pin
(3) Connect the V. C. I. to the diagnosis connector.
(4) Turn the V.C.I. power switch to the "ON" position.
(5) Close the driver's side door.
(6) Keep the windshield washer switch on for at least ten seconds. Then the ETACS-ECU
buzzer will sound once.
2. If the transmitter “LOCK” button is pushed
consecutively twice (wit hin two seconds), the
ETACS-ECU buzzer will sound, indicating that the
hazard answerback function can be enabled or
disabled when the doors are locked.
•Enable the hazard answerback function
when the doors are locked: The
ETACS-ECU buzzer will sound once.
•Disable the hazard answerback function
when the doors are locked: The
ETACS-ECU buzzer will sound twice.
3. If the transmitter “UNLOCK” button is pushed consecutively twice (wit hin two seconds), the
ETACS-ECU buzzer will sound, indicating that the
hazard answerback function can be enabled or
disabled when the doors are unlocked.
•Enable the hazard answerback function
when the doors are unlocked: The
ETACS-ECU buzzer will sound once.
•Disable the hazard answerback function
when the doors are unlocked: The
ETACS-ECU buzzer will sound twice.
4. Exit the hazard answer back customize mode by
observing one of the following steps.
(1) Disconnect V. C. I. from the diagnosis connector.
(2) Turn the ignition switch to position other then
“LOCK”(OFF), or remove the ignition key.
(3) Open the driver's side door.
(4) Any other warning buzzer output occurs.
NOTE: If any operation is not done for at least three
minutes after the ETACS-ECU has entered the cus
-
tomize mode, the hazard answerback customize
mode will be canceled automatically.
HOW TO REGISTER SECRET CODE
M1428001000292
Each individual secret code is registered inside the
transmitter, and so it is necessary to resister these
codes with the EEPROM insi de the receiver in the
following cases.
•When the transmitter or ETACS-ECU is replaced
•If more transmitters are to be used
•If it appears that a probl em is occurring because
of faulty registration of a code.
A maximum of four different codes can be stored in
the EEPROM memory (four different transmitters can
be used). When the code for the first transmitter is
registered, the previously registered codes for all
transmitters are cleared. Therefore, if you are using
four transmitters or are adding more transmitters, the
codes for all transmitters must be registered at the
same time.
Page 328 of 800

KEYLESS ENTRY SYSTEM
BODY42-56
WHEN THE SPECIAL TOOL DIAGNOSIS
CODE CHECK HARNESS (MB991529) IS
USED
1. Check that the doors lock normally when the key is used.
2. Insert the ignition key.
CAUTION
Before connecting or disconnecting the earth,
turn the ignition switch to the "LOCK" (OFF)
position.
AC305133AB
Diagnosis
connector
MB991529Steering shaft
3. Connect the diagnosis connector to the special tool diagnosis code check harness (MB991529).
NOTE: This will connect terminal (1) of the diag-
nosis connector to earth, and the system will be in
secret code registration standby mode.
ACX00571
Ground connected
Within 10 seconds
Hazard
warning
switch ON
OFF 1
23
45
6
AG
4. Press the hazard warning lamp switch six times
within 10 seconds.
NOTE: Once the process is completed six times,
then it will operate with al l doors and tailgate lock
and unlock operations once and then go to the
save mode.
NOTE: The hazard warning lamp switch is turned
on and off alternately whenever it is pushed.
5. Press the transmitter switch, and then press it two times within 10 seconds of the first press. This will
register the code.
6. Once the program is saved, it will operate once
with the all doors and tailgate lock and unlock
operations.
7. If you are using two or more transmitters or have
added a second transmitter, the next transmitter
should be registered within one minute after
registering the code for the previous transmitter.
The registration procedure is common for all the
transmitter.
8. Registration mode will be cancelled under the following conditions:
•When the secret code for four transmitters has
been registered;
•When no secret codes have been registered for
more than one minute after the registration mode
is entered;
•When passing one minute after finishing the reg-
istration of all transmitters;
•When the diagnosis connector is disconnected
from earth;
•When the key is removed from the key cylinder;
9. After the registration is completed, remove the ignition key and close all the doors, and then
check that the keyless entry system operates
normally.
WHEN THE M.U.T.-II IS USED
1. Check that the doors lock normally when the key
is used.
2. Insert the ignition key.
CAUTION
Before connecting or disconnecting the M.U.T.-II,
turn the ignition switch to the "LOCK" (OFF)
position.
AC304777
Steering shaft
ACMB991502
16-Pin
3. Connect the M.U.T.-II to the diagnosis connector.
Page 329 of 800
ACX00571
M.U.T.-II connectedWithin 10 seconds
Hazard
warning
switch ON
OFF 1
23
45
6
AB
KEYLE SS ENTR Y SYSTEM
BOD Y42-57
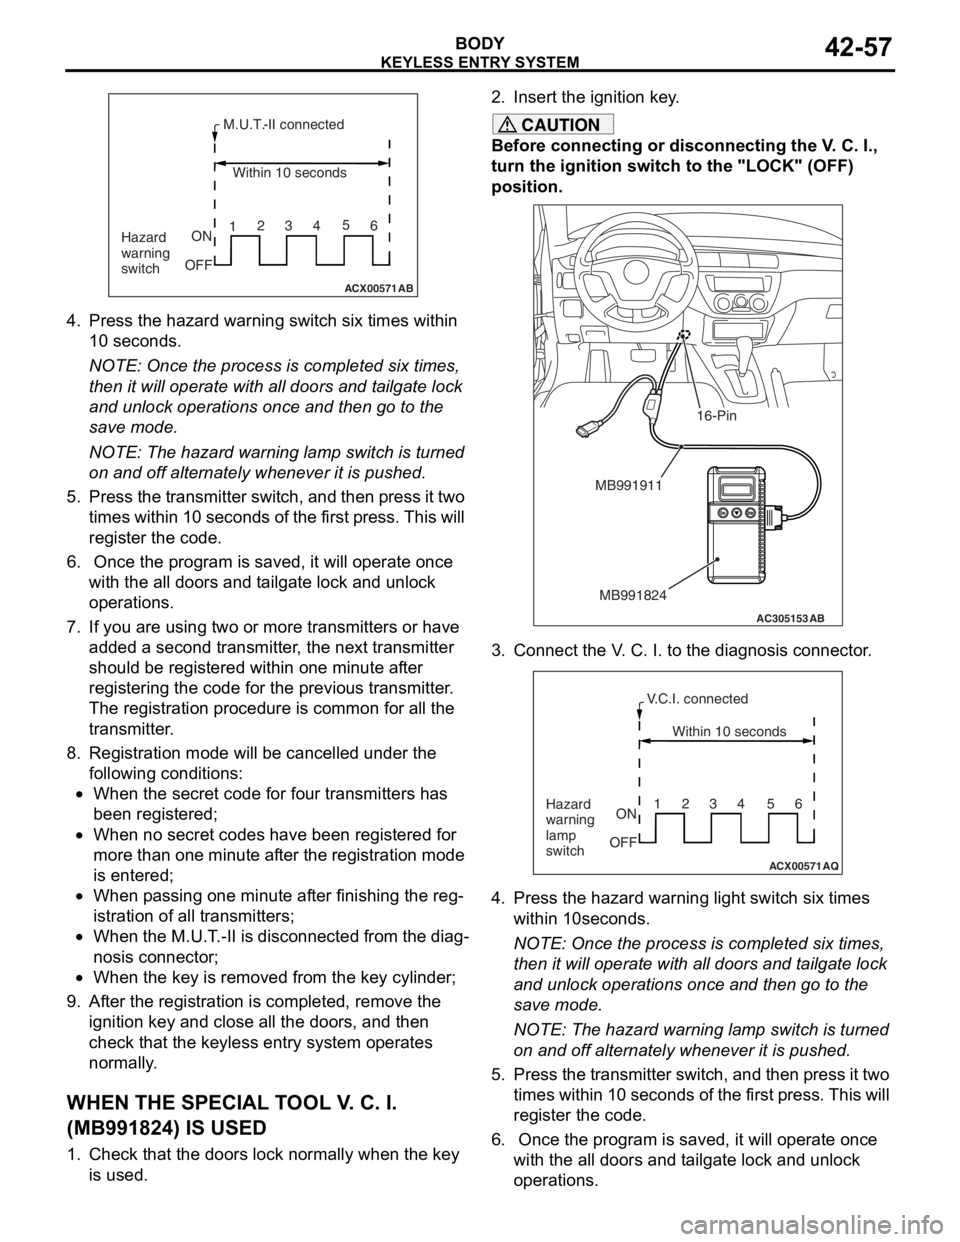
4.Press th e hazard warning switch six times within
10 seconds.
NOTE: Once th e process is comple ted six t i me s,
th
en it
will operate with al l do ors an d t a ilgate lock
an
d unlock opera t ions once and then go to th e
save
mode .
NOTE: The h a zard warnin g lamp switch is turned
on
and o ff alt e rnately when ever it is pushed.
5.Pre s s th e tr ansmitter switch, a nd then pre s s it two
t i mes within 10 second s of th e f i rst pre s s. This will
reg i st er the code.
6. Once the p r ogram is saved, it will opera t e once
wit h the a ll d oors a nd t a ilgate lock and unlo ck
op erations.
7.If you a r e using t w o or mo re transmitters or have
ad ded a second tra n smitter , the n e xt tra n smitter
should be re gistered within o ne minute af ter
reg i st ering the code fo r the pre v io us tra n smitter .
Th e registration pr oced ure is co mmo n for a ll th e
tra n smitter .
8.Registra tion mode will be ca ncelled under the
fo llowing condit i ons:
•When the secr et co de for fo ur transmitters has
bee
n registere d ;
•When no secre t cod e s h a ve b een re gist ered fo r
more tha
n one minute af ter the registration mode
is ente
r ed;
•When p a ssing o ne minute af ter fin i sh ing t he reg-
istration of all t r ansmitte rs;
•When the M.U.T . -II is d i sconne cted from th e dia g-
nosis connecto r;
•When the key is re moved fro m the key cylin der;
9.Af ter the registration is completed, remove the
ignition key a nd close all the d oors, and th en
check tha t the keyless entry syste m op erates
no rmally .
WH EN THE SPECIAL T O OL V . C. I.
(
M B991824) I S USED
1.Check t hat the doors lock n o rmally wh en the key
is used.
2. In sert t he ig nition ke y .
CAUTION
Before connecting or disconnecting the V. C. I.,
turn the ignition switch to the "LOCK" (OFF)
position.
AC305153AB
MB991911
MB991824
16-Pin
3. Connect the V. C. I. to the diagnosis connector.
ACX00571
Within 10 seconds
Hazard
warning
lamp
switch ON
OFF 1234 56
AQ
V.C.I. connected
4. Press the hazard warning
light switch six times
within 10seconds.
NOTE: Once the process is completed six times,
then it will operate with all doors and tailgate lock
and unlock operations once and then go to the
save mode.
NOTE: The hazard warning lamp switch is turned
on and off alternately whenever it is pushed.
5. Press the transmitter switch, and then press it two times within 10 seconds of the first press. This will
register the code.
6. Once the program is saved, it will operate once with the all doors and tailgate lock and unlock
operations.
Page 330 of 800
KEYLESS ENTRY SYSTEM
BODY42-58
7. If you are using two or more transmitters or have added a second transmitter, the next transmitter
should be registered within one minute after
registering the code for the previous transmitter.
The registration procedure is common for all the
transmitter.
8. Registration mode will be cancelled under the following conditions:
•When the secret code for four transmitters has
been registered;
•When no secret codes have been registered for
more than one minute after the registration mode
is entered;
•When passing one minute after finishing the reg-
istration of all transmitters;
•When the V.C.I. is disconnected from the diagno-
sis connector;
•When the key is removed from the key cylinder;
9. After the registration is completed, remove the ignition key and close all the doors, and then
check that the keyless entry system operates
normally.
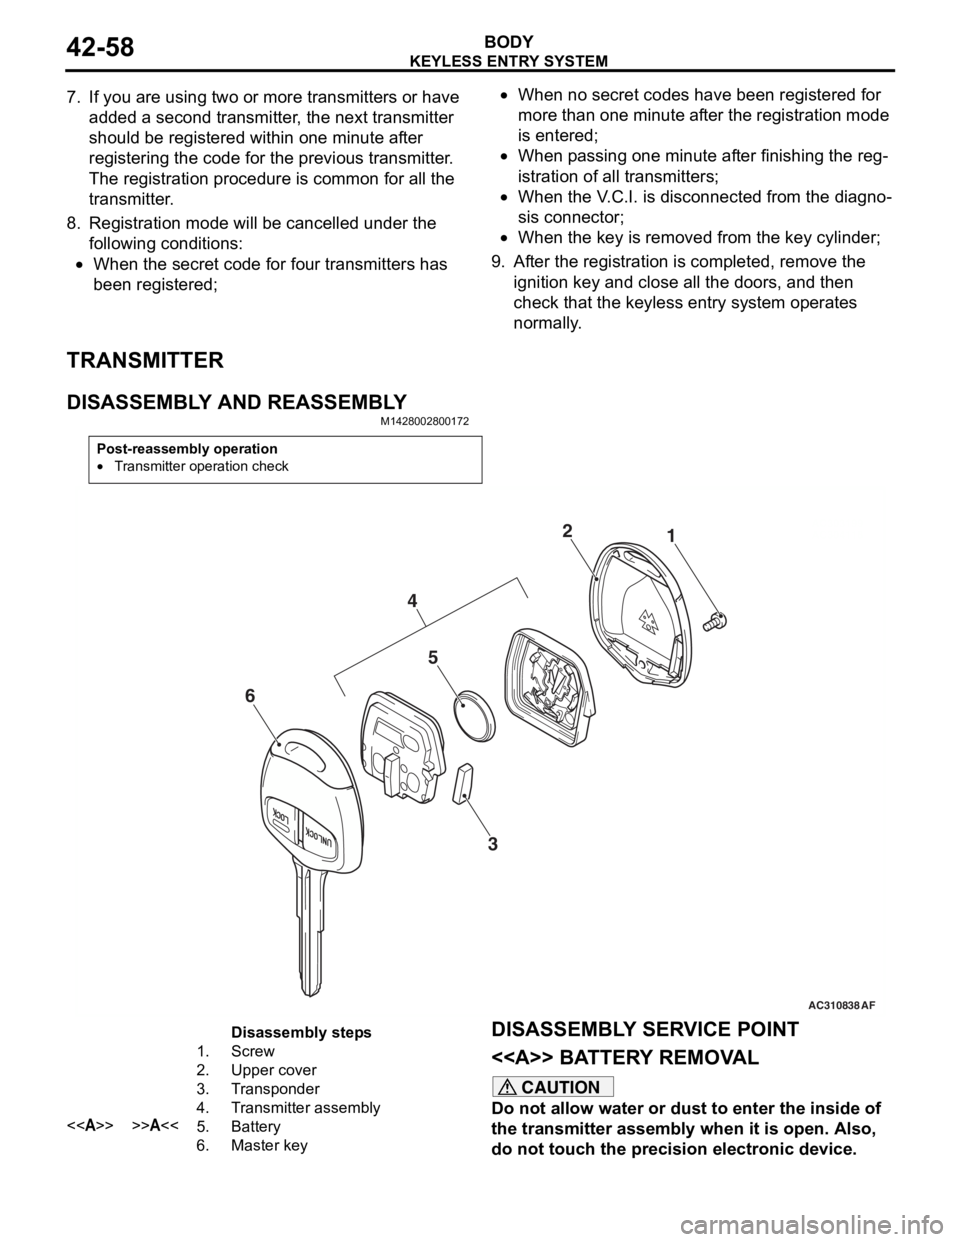
TRANSMITTER
DISASSEMBLY AND REASSEMBLY
M1428002800172
Post-reassembly operation
•Transmitter operation check
AC310838AC303199
AC3041181
2
AF
5
3
4
6
Disassembly steps
1.Screw
2.Upper cover
3.Transponder
4.Transmitter assembly
<>>>A<<5.Battery
6.Master key
DISASSEMBL Y SER V ICE POINT
<> BATTER Y REMOV A L
CAUTION
Do not allow water or dust to enter the inside of
the transmitter assembly when it is open. Also,
do not touch the precision electronic device.
Page 331 of 800
KEYLESS ENTRY SYSTEM
BODY42-59
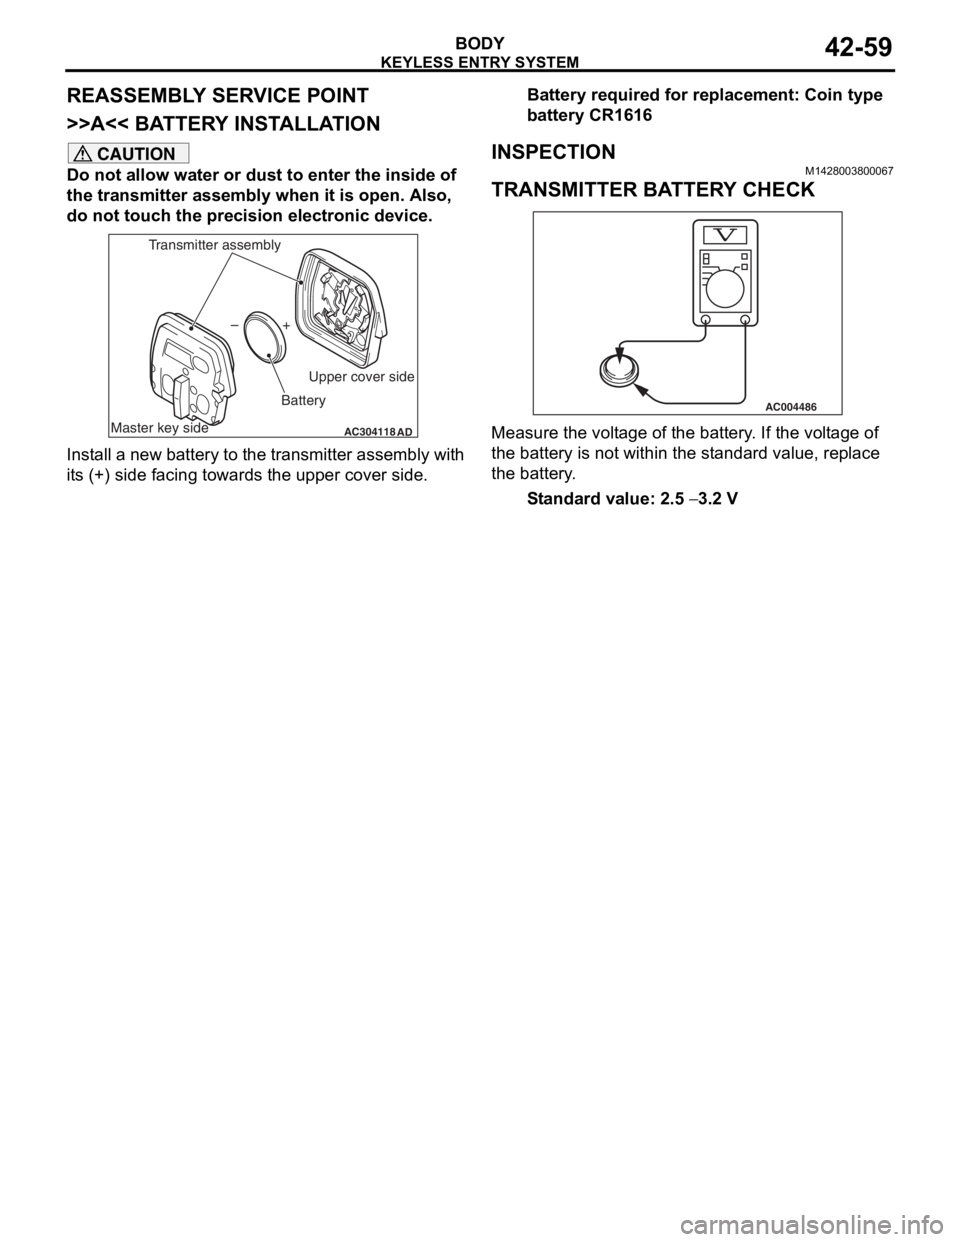
REASSEMBLY SERVICE POINT
>>A<< BATTERY INSTALLATION
CAUTION
Do not allow water or dust to enter the inside of
the transmitter assembly when it is open. Also,
do not touch the precision electronic device.
AC304118AD
+
–
Master key side Upper cover side
Battery
Transmitter assembly
Install a new battery to the transmitter assembly with
its (+) side facing towards the upper cover side.
Battery required for replacement: Coin type
battery CR1616
INSPECTION
M1428003800067
TRANSMITTER BATTERY CHECK
AC004486
Measure the voltage of the battery. If the voltage of
the battery is not within the standard value, replace
the battery.
Standard value: 2.5 − 3.2 V
Page 440 of 800
DASH PANEL
CONFIGURATION DIAGRAMS80-30
DASH PANEL
AC301179
Connector
symbol
-201
thru
-227
C
AB
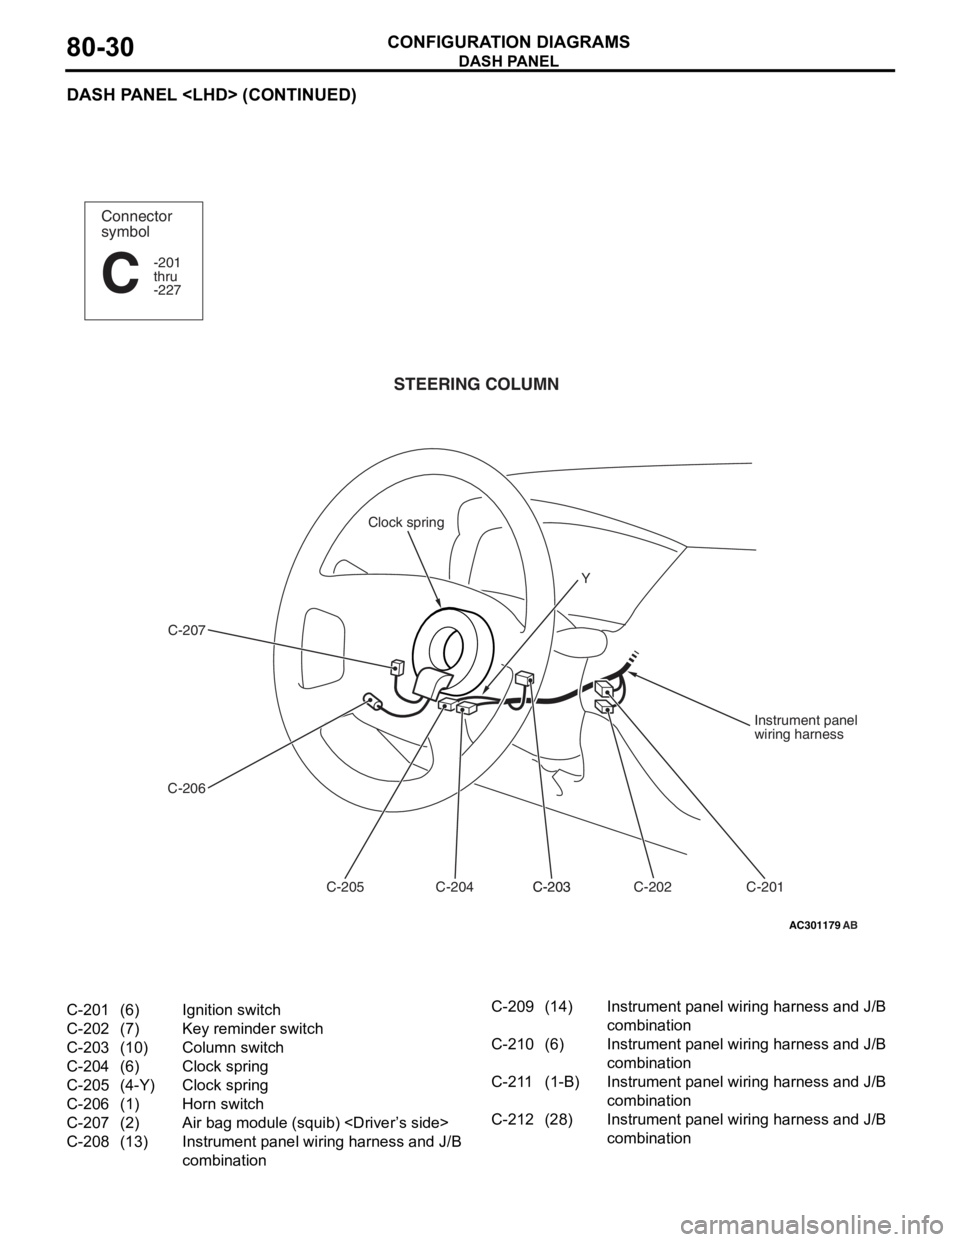
STEERING COLUMN
C-207
C-206 C-201
C-202
C-203C-203
C-204
C-205 Instrument panel
wiring harness
Clock spring
Y
C-201(6)Ignition switch
C-202(7)Key reminder switch
C-203(10)Column switch
C-204(6)Clock spring
C-205(4-Y)Clock spring
C-206(1)Horn switch
C-207(2)Air bag module (squib)
C-208(13)Instrument panel wiring harness and J/B
combination
C-209(14)Instrument panel wiring harness and J/B
combination
C-210(6)Instrument panel wiring harness and J/B
combination
C-211(1-B)Instrument panel wiring harness and J/B
combination
C-212(28)Instrument panel wiring harness and J/B
combination
Page 446 of 800
DASH PANEL
CONFIGURATION DIAGRAMS80-36
DASH PANEL
AC206572
Connector
symbol
-201
thru
-227
C
AC
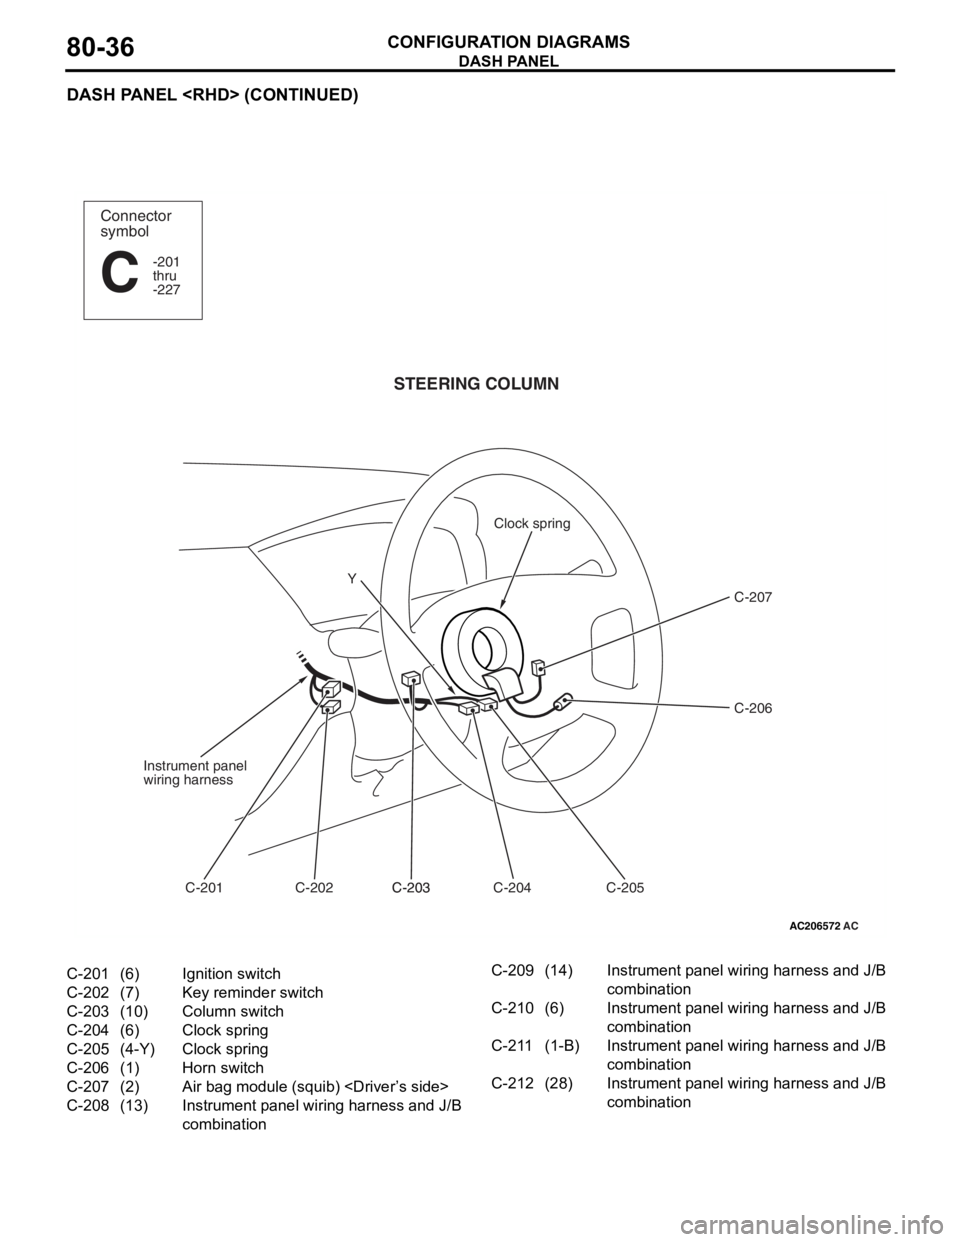
STEERING COLUMN
C-207
C-206
C-205
C-204
C-203C-203
C-202
C-201
Instrument panel
wiring harness
Clock spring
Y
C-201(6)Ignition switch
C-202(7)Key reminder switch
C-203(10)Column switch
C-204(6)Clock spring
C-205(4-Y)Clock spring
C-206(1)Horn switch
C-207(2)Air bag module (squib)
C-208(13)Instrument panel wiring harness and J/B
combination
C-209(14)Instrument panel wiring harness and J/B
combination
C-210(6)Instrument panel wiring harness and J/B
combination
C-211(1-B)Instrument panel wiring harness and J/B
combination
C-212(28)Instrument panel wiring harness and J/B
combination
Page 467 of 800
90-3
CENTRAL DOOR LOCKING
SYSTEM . . . . . . . . . . . . . . . . . . . . . . .90-212
CENTRAL DOOR LOCKING SYSTEM
CENTRAL DOOR LOCKING SYSTEM
CENTRAL DOOR LOCKING SYSTEM
CENTRAL DOOR LOCKING SYSTEM
CENTRAL DOOR LOCKING SYSTEM
CENTRAL DOOR LOCKING SYSTEM
HEATER . . . . . . . . . . . . . . . . . . . . . . .90-248
HEATER
HEATER
MANUAL AIR CONDITIONER . . . . . .90-256
MANUAL AIR CONDITIONER
MANUAL AIR CONDITIONER
AUTOMATIC AIR CONDITIONER . . .90-264
AUTOMATIC AIR CONDITIONER
AUTOMATIC AIR CONDITIONER
WINDSHIELD WIPER AND WASHER90-276
WINDSHIELD WIPER AND WASHER
WINDSHIELD WIPER AND WASHER
REAR WIPER AND WASHER . . . . . .90-284
REAR WIPER AND WASHER
REAR WIPER AND WASHER
REAR WINDOW DEFOGGER AND
DOOR MIRROR HEATER . . . . . . . . .90-292
REAR WINDOW DEFOGGER AND
DOOR MIRROR HEATER
REAR WINDOW DEFOGGER AND
DOOR MIRROR HEATER
REMOTE CONTROLLED MIRROR . .90-296
REMOTE CONTROLLED MIRROR
REMOTE CONTROLLED MIRROR
HEADLAMP WASHER . . . . . . . . . . . .90-298
SPARE CONNECTOR
(FOR AUDIO) . . . . . . . . . . . . . . . . . . .90-300
SPARE CONNECTOR (FOR AUDIO)
SPARE CONNECTOR (FOR AUDIO)
CLOCK . . . . . . . . . . . . . . . . . . . . . . . .90-304
CIGARETTE LIGHTER AND
ASHTRAY ILLUMINATION LAMP . . .90-305
ACCESSORY SOCKET . . . . . . . . . . .90-306
IMMOBILIZER SYSTEM . . . . . . . . . . .90-308
IMMOBILIZER SYSTEM
IMMOBILIZER SYSTEM
ABS . . . . . . . . . . . . . . . . . . . . . . . . . . .90-312
ABS
ABS
HEATED SEAT . . . . . . . . . . . . . . . . . .90-320
RHEOSTAT . . . . . . . . . . . . . . . . . . . . .90-322
RHEOSTAT
RHEOSTAT
SUPPLEMENTAL RESTRAINT
SYSTEM (SRS) . . . . . . . . . . . . . . . . . .90-324
SUPPLEMENTAL RESTRAINT SYSTEM
(SRS)
SUPPLEMENTAL RESTRAINT SYSTEM
(SRS)
SPARE CONNECTOR
(FOR FRONT FOG LAMP) . . . . . . . . .90-336
Page 468 of 800

J/B
CIRCUIT DIAGRAMS90-4
J/B
M1901000201607
POWER
WINDOW
RELAY
FUEL
PUMP
RELAY (2)
FUEL
PUMP
RELAY (1)
REAR
WINDOW
DEFOGGER
RELAYBLOWER
RELAY
REAR FOG
LAMP
RELAY
J/B SIDE HEATED
SEAT RELAY
ACCESSORY
SOCKET
RELAY
: LHD
: RHD
CONNECTOR NUMBERS ARE KEYED TO THE CONFIGIRATION
DIAGRAM (DASH PANEL) AND EACH CIRCUIT DIAGRAM. NOTE
·
·
·