check engine MITSUBISHI LANCER 2006 Owner's Manual
[x] Cancel search | Manufacturer: MITSUBISHI, Model Year: 2006, Model line: LANCER, Model: MITSUBISHI LANCER 2006Pages: 800, PDF Size: 45.03 MB
Page 37 of 800
ON-VEHICLE SERVICE
ENGINE COOLING14-23
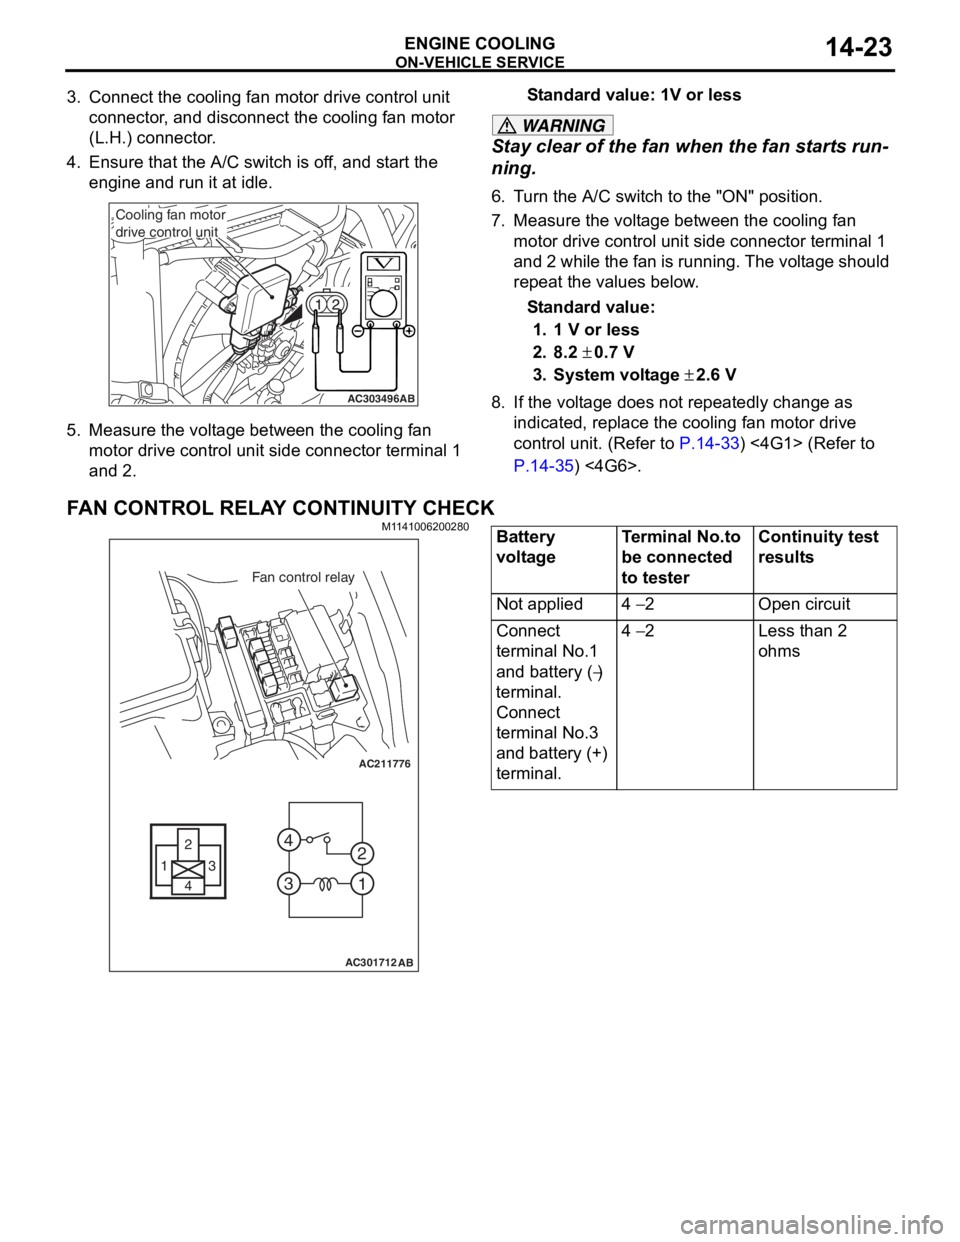
3. Connect the cooling fan motor drive control unit connector, and disconnect the cooling fan motor
(L.H.) connector.
4. Ensure that the A/C switch is off, and start the engine and run it at idle.
AC303496AB
Cooling fan motor
drive control unit
5.Measure the volt ag e betwee n the cooling f an
motor d r ive cont rol un it side conne ctor t e rminal 1
an d 2.
St andard va lue: 1V or le ss
WARNING
Stay clear of the fan when the fan starts run-
ning.
6. Turn the A/C switch to the "ON" position.
7. Measure the voltage between the cooling fan
motor drive control unit side connector terminal 1
and 2 while the fan is running. The voltage should
repeat the values below.
Standard value:
1. 1 V or less
2. 8.2 ± 0.7 V
3. System voltage ± 2.6 V
8. If the voltage does not repeatedly change as indicated, replace the cooling fan motor drive
control unit. (Refer to
P.14-33) <4G1> (Refer to
P.14-35) <4G6>.
FAN CONTROL RELAY CONTINUITY CHECK
M1141006200280
AC211776
13
4 2
3 4
1
2
AC301712
Fan control relay
AB
Battery
voltageTerminal No.to
be connected
to testerContinuity test
results
Not applied4 − 2Open circuit
Connect
terminal No.1
and battery (
−)
terminal.
Connect
terminal No.3
and battery (+)
terminal.
4 − 2Less than 2
ohms
Page 38 of 800
THERMOSTAT
ENGINE COOLING14-24
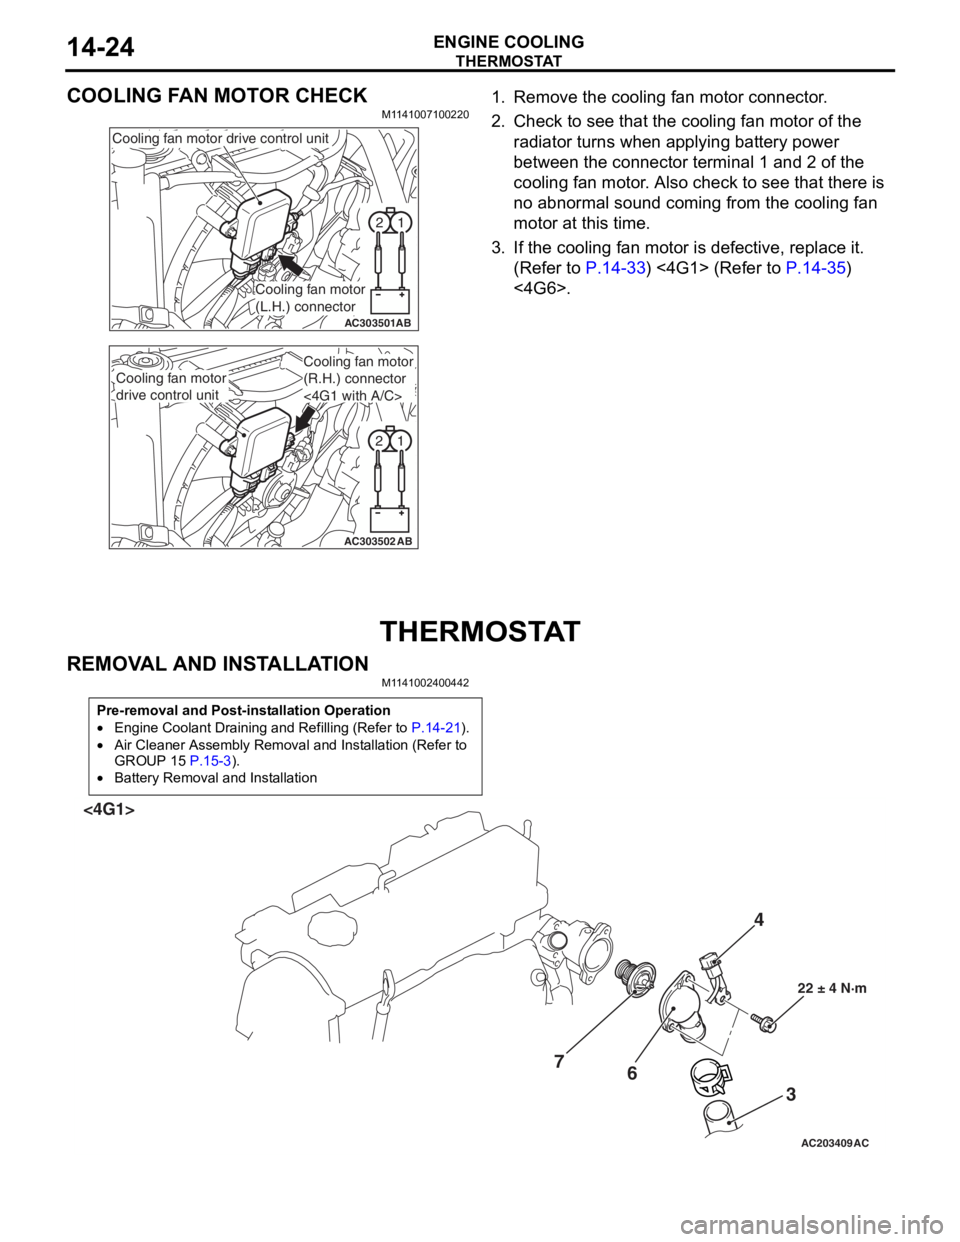
COOLING FAN MOTOR CHECK
M1141007100220
1
2
AC303501AB
Cooling fan motor drive control unit
Cooling fan motor
(L.H.) connector
1
2
AC303502AB
Cooling fan motor
drive control unit
Cooling fan motor
(R.H.) connector
<4G1 with A/C>
1. Remove the cooling fa n mot o r co nnector .
2.Check t o see that t he co oling fan motor of the
ra diato r turns wh en ap plying b a ttery power
b e tween th e con nect o r terminal 1 and 2 of t he
cooling fa n mo tor . Also ch eck to see tha t there is
n o abno rmal soun d co min g from the cooling fa n
motor a t this time.
3.If the cooling fan moto r is defective, replace it.
(Refe r to
P.14-33) <4G1> (Refer to P.14-35)
<4G6>.
THERMOSTA T
REMOVA L AND INST ALLA TION
M1141 0024 0044 2
Pre-removal and Post-installation Operation
•Engine Coolant Draining and Refilling (Refer to P.14-21).
•Air Cleaner Assembly Removal and Installation (Refer to
GROUP 15
P.15-3).
•Battery Removal and Installation
AC203409AC
4
3
6
7
22 ± 4 N·m
<4G1>
Page 40 of 800
THERMOSTAT
ENGINE COOLING14-26
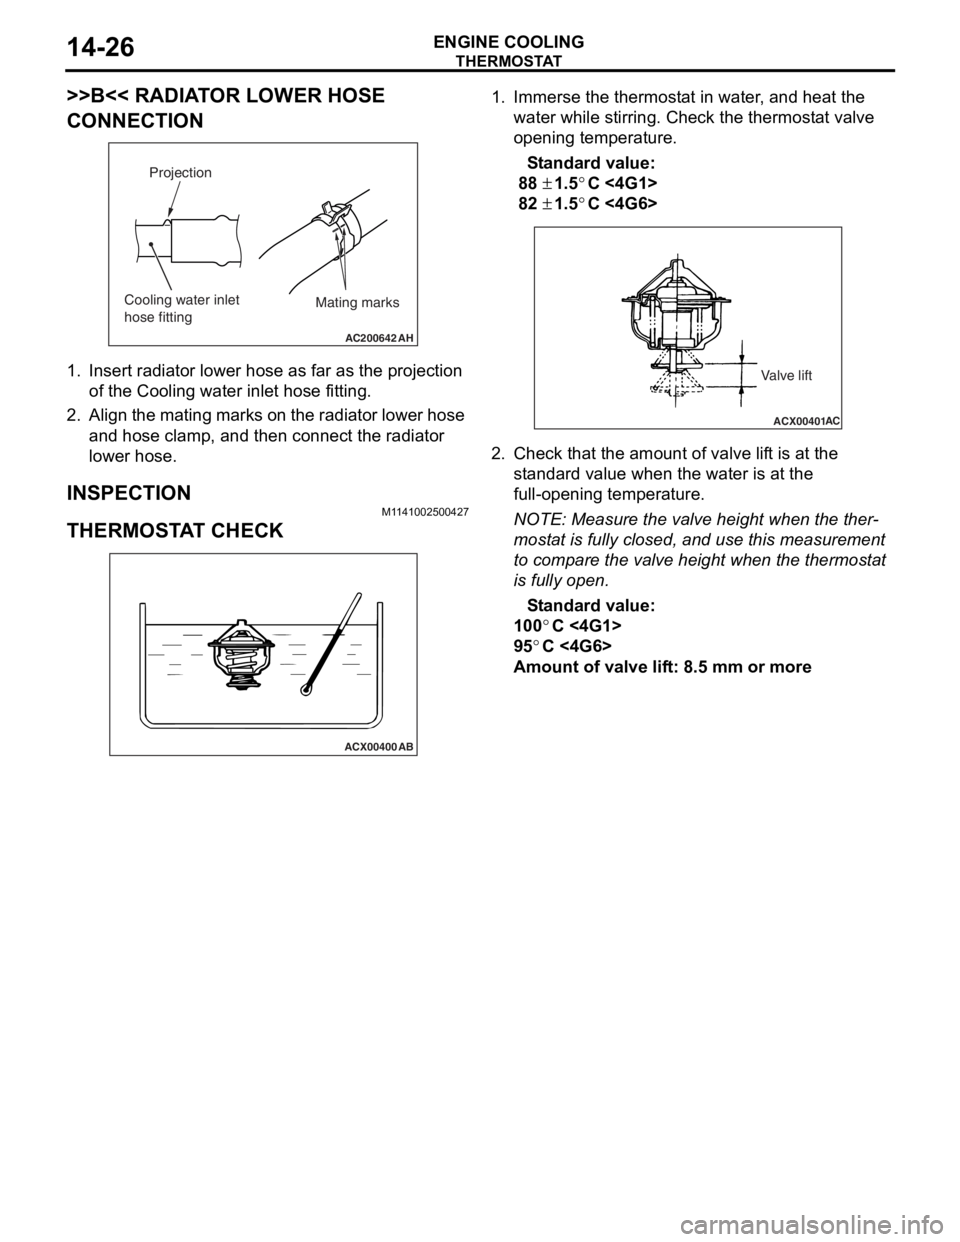
>>B<< RADIATOR LOWER HOSE
CONNECTION
AC200642
Mating marks
Projection
Cooling water inlet
hose fitting
AH
1.In sert ra diato r lower h o se a s fa r as th e projection
of the Cooling wa ter inlet ho se fitting .
2.Align the mating marks on the radiator lower hose
an d hose clamp, and then connect the radia t or
lower hose.
INSPECTION
M1 141 0025 0042 7
THERMOSTA T CHECK
ACX00400
AB
1.Imme rse th e thermost at in water , and h eat the
wate r wh ile stirring. Ch eck the th ermost a t va lve
o penin g temperatu r e.
St andard va lue:
88 ± 1.5°C <4G1 >
82 ± 1.5°C <4G6 >
ACX00401 AC
Valve lift
2.
Check t hat the amo unt of valve lif t is at the
st a ndard valu e when th e water is at the
fu ll-o penin g temperatu r e.
NOTE: Meas ure the valve height when the the r-
mostat is fu lly closed , and use t h is measurement
to
comp are the valve h e ight wh en the thermost at
is fully open.
St andard va lue:
100°C <4G1>
95°C <4G6>
Amou nt of val ve lif t: 8 . 5 mm or more
Page 46 of 800
Page 55 of 800
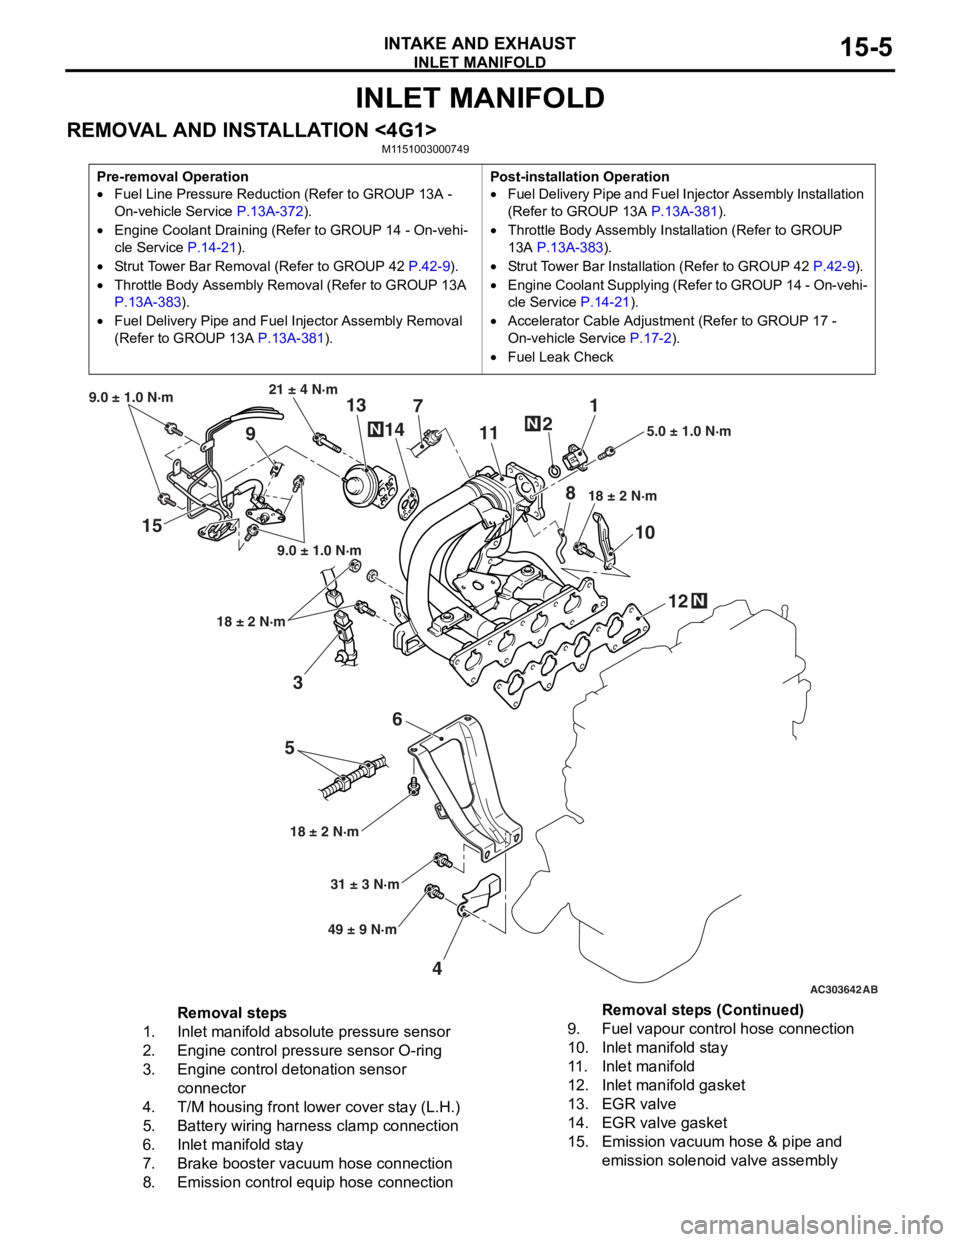
INLET MANIFOLD
INTAKE AND EXHAUST15-5
INLET MANIFOLD
REMOVAL AND INSTALLATION <4G1>M1151003000749
Pre-removal Operation
•Fuel Line Pressure Reduction (Refer to GROUP 13A -
On-vehicle Service
P.13A-372).
•Engine Coolant Draining (Refer to GROUP 14 - On-vehi-
cle Service P.14-21).
•Strut Tower Bar Removal (Refer to GROUP 42 P.42-9).
•Throttle Body Assembly Re moval (Refer to GROUP 13A
P.13A-383).
•Fuel Delivery Pipe and Fuel Injector Assembly Removal
(Refer to GROUP 13A
P.13A-381).
Post-installation Operation
•Fuel Delivery Pipe and Fuel Injector Assembly Installation
(Refer to GROUP 13A
P.13A-381).
•Throttle Body Assembly Inst allation (Refer to GROUP
13A
P.13A-383).
•Strut Tower Bar Installati on (Refer to GROUP 42 P.42-9).
•Engine Coolant Supplying (Refer to GROUP 14 - On-vehi-
cle Service P.14-21).
•Accelerator Cable Adjustment (Refer to GROUP 17 -
On-vehicle Service
P.17-2).
•Fuel Leak Check
AC303642AB
15
36
5
4 12
10
7
1
2
11
9 13
14
21 ± 4 N·m
9.0 ± 1.0 N·m
9.0 ± 1.0 N·m
18 ± 2 N·m
18 ± 2 N·m 18 ± 2 N·m
5.0 ± 1.0 N·m
31 ± 3 N·m
49 ± 9 N·m
N
N
N
8
Removal steps
1.Inlet manifold absolute pressure sensor
2.Engine control pressure sensor O-ring
3.Engine control detonation sensor
connector
4.T/M housing front lower cover stay (L.H.)
5.Battery wiring harness clamp connection
6.Inlet manifold stay
7.Brake booster vacuum hose connection
8.Emission control equip hose connection
9.Fuel vapour control hose connection
10.Inlet manifold stay
11 .Inlet manifold
12.Inlet manifold gasket
13.EGR valve
14.EGR valve gasket
15.Emission vacuum hose & pipe and
emission solenoid valve assembly
Removal steps (Continued)
Page 56 of 800
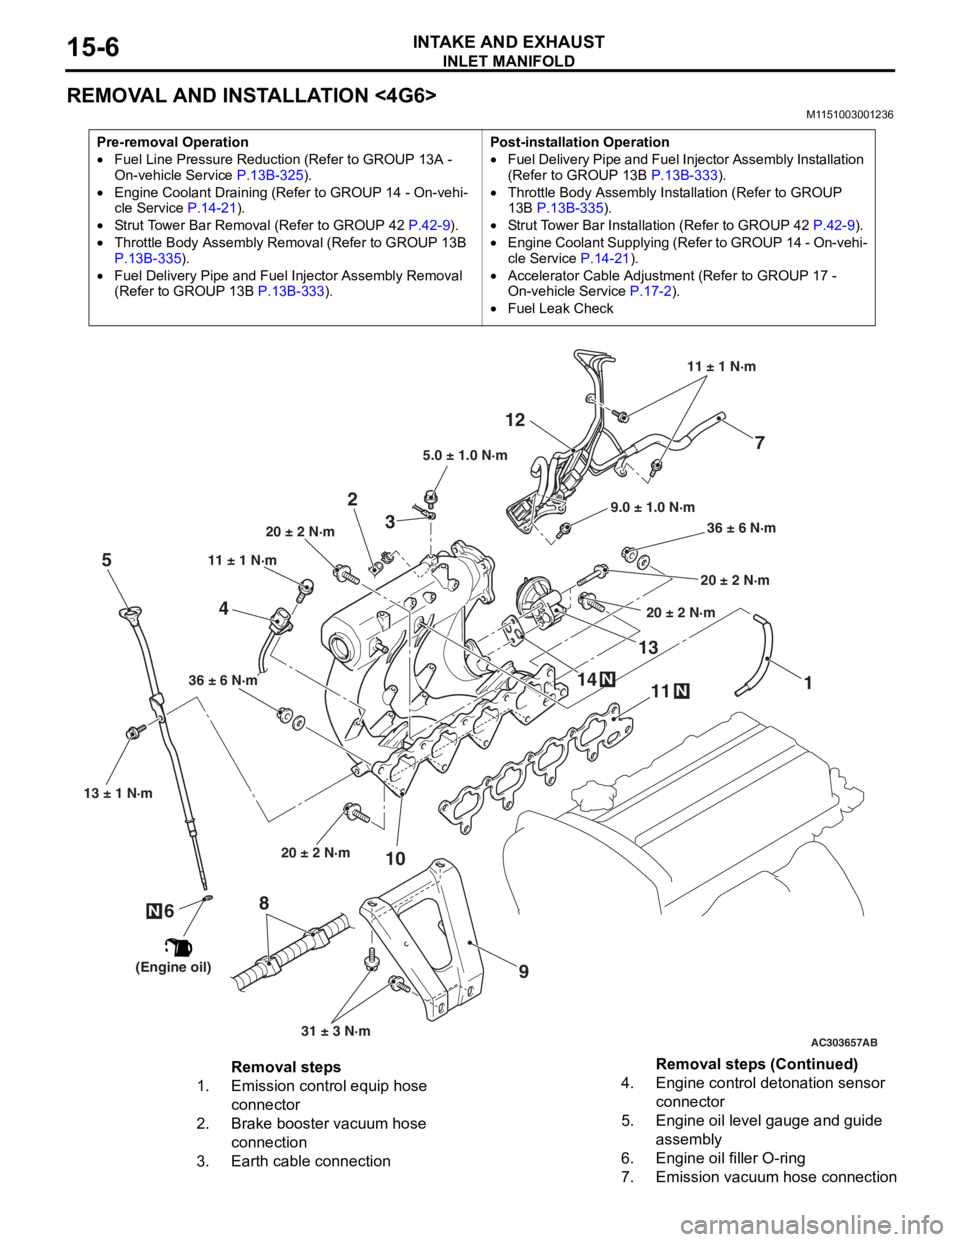
INLET MANIFOLD
INTAKE AND EXHAUST15-6
REMOVAL AND INSTALLATION <4G6>
M1151003001236
Pre-removal Operation
•Fuel Line Pressure Reduction (Refer to GROUP 13A -
On-vehicle Service P.13B-325).
•Engine Coolant Draining (Refer to GROUP 14 - On-vehi-cle Service P.14-21).
•Strut Tower Bar Removal (Refer to GROUP 42 P.42-9).
•Throttle Body Assembly Re moval (Refer to GROUP 13B
P.13B-335).
•Fuel Delivery Pipe and Fuel Injector Assembly Removal
(Refer to GROUP 13B
P.13B-333).
Post-installation Operation
•Fuel Delivery Pipe and Fuel Injector Assembly Installation
(Refer to GROUP 13B P.13B-333).
•Throttle Body Assembly Inst allation (Refer to GROUP
13B P.13B-335).
•Strut Tower Bar Installati on (Refer to GROUP 42 P.42-9).
•Engine Coolant Supplying (Refer to GROUP 14 - On-vehi-
cle Service P.14-21).
•Accelerator Cable Adjustment (Refer to GROUP 17 -
On-vehicle Service
P.17-2).
•Fuel Leak Check
AC303657
9.0 ± 1.0 N·m11 ± 1 N·m
20 ± 2 N·m 31 ± 3 N·m
36 ± 6 N·m
20 ± 2 N·m
20 ± 2 N·m
36 ± 6 N·m
20 ± 2 N·m
11
9
10
2
12
N14
13N
AB
5.0 ± 1.0 N·m
3
1
11 ± 1 N·m
4
N
13 ± 1 N·m
5
6
(Engine oil)
7
8
Removal steps
1.Emission control equip hose
connector
2.Brake booster vacuum hose
connection
3.Earth cable connection
4.Engine control detonation sensor
connector
5.Engine oil level gauge and guide
assembly
6.Engine oil filler O-ring
7.Emission vacuum hose connection
Removal steps (Continued)
Page 57 of 800
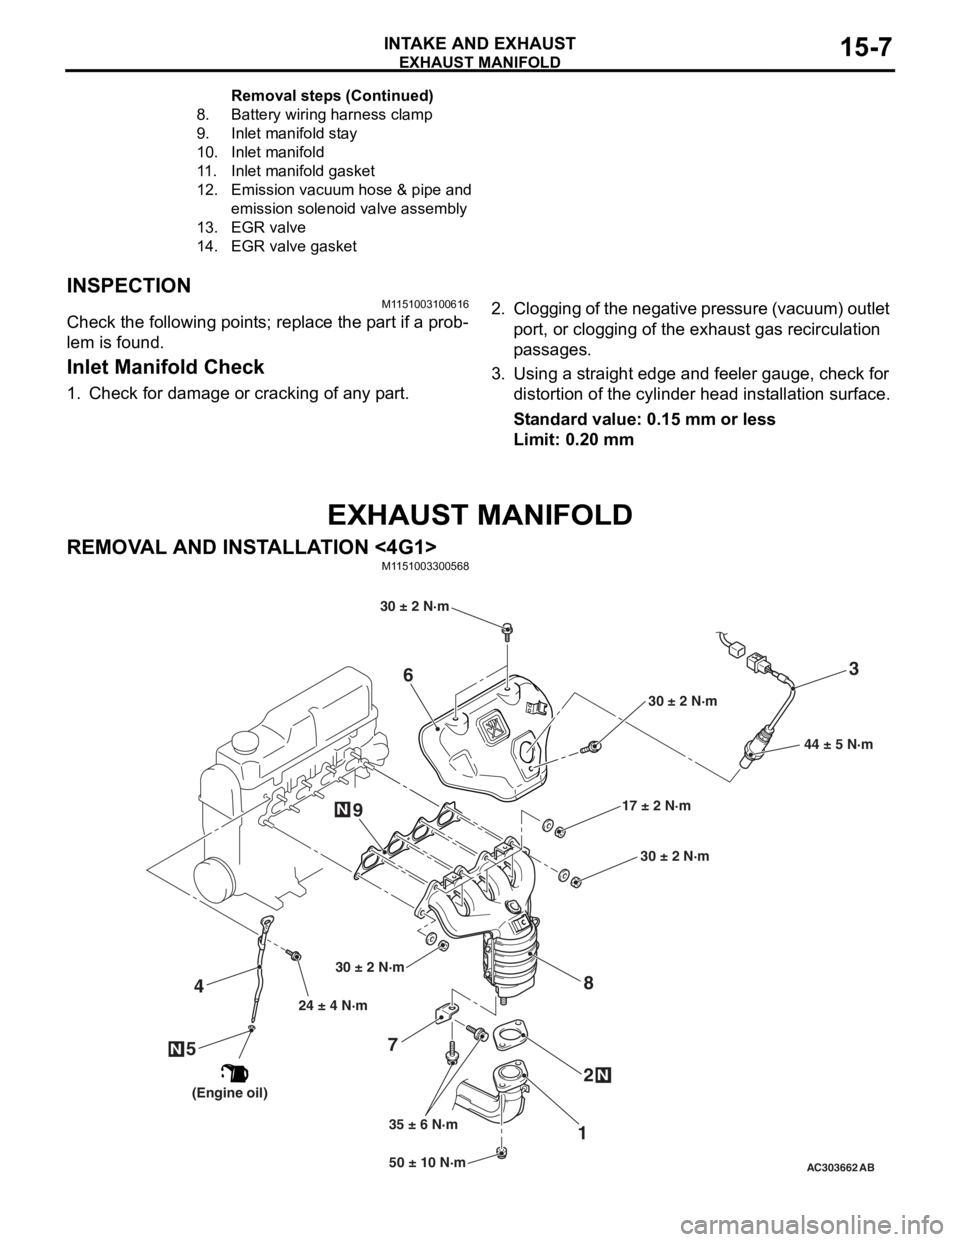
EXHAUST MANIFOLD
INTAKE AND EXHAUST15-7
INSPECTION
M1151003100616
Check the following points; replace the part if a prob-
lem is found.
Inlet Manifold Check
1. Check for damage or cracking of any part.
2. Clogging of the negative pressure (vacuum) outlet port, or clogging of the exhaust gas recirculation
passages.
3. Using a straight edge and feeler gauge, check for distortion of the cylinder head installation surface.
Standard value: 0.15 mm or less
Limit: 0.20 mm
EXHAUST MANIFOLD
REMOVAL AND INSTALLATION <4G1>
M1151003300568
AC30366250 ± 10 N·m
24 ± 4 N·m
35 ± 6 N·m 17 ± 2 N·m
30 ± 2 N·m
N
3
7 12
4
N
6
8
44 ± 5 N·m
AB
9
5N
30 ± 2 N·m
30 ± 2 N·m
30 ± 2 N·m
(Engine oil)
8.Battery wirin g ha rne s s clamp
9.Inlet manifold st ay
10.Inlet manifold
11.Inlet manifold gask et
12.Emission vacuu m hose & pipe and
emis
sion s o lenoid valve assembly
13.EGR v a lve
14.EGR v a lve gasket
Remo va l st ep s ( C o n t in u e d)
Page 60 of 800
Page 63 of 800
16-1
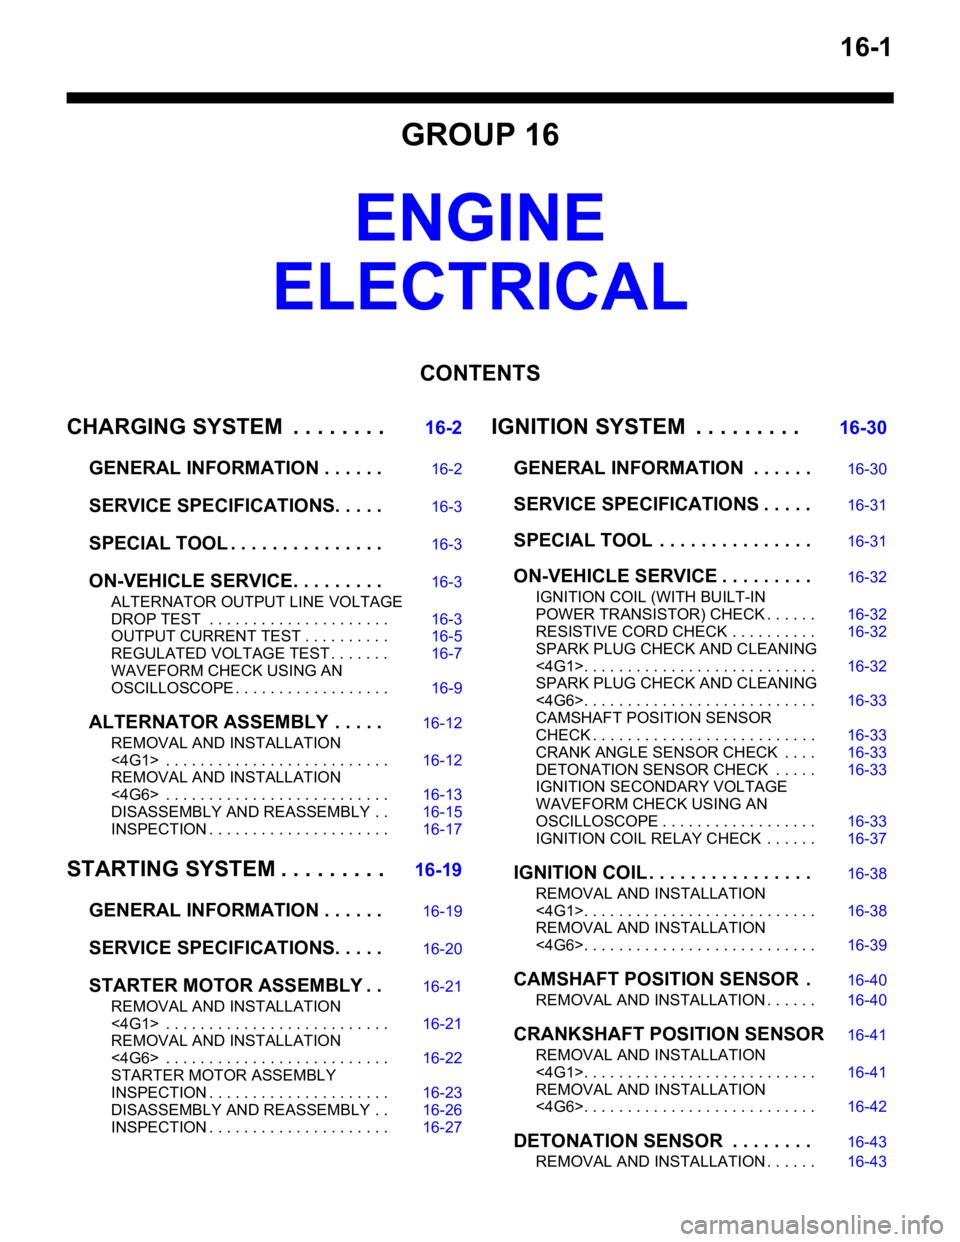
GROUP 16
ENGINE
ELECTRICAL
CONTENTS
CHARGING SYSTEM . . . . . . . .16-2
GENERAL INFORMATION . . . . . .16-2
SERVICE SPECIFICATIONS. . . . .16-3
SPECIAL TOOL . . . . . . . . . . . . . . .16-3
ON-VEHICLE SERVICE. . . . . . . . .16-3
ALTERNATOR OUTPUT LINE VOLTAGE
DROP TEST . . . . . . . . . . . . . . . . . . . . . 16-3
OUTPUT CURRENT TEST . . . . . . . . . . 16-5
REGULATED VOLTAGE TEST . . . . . . . 16-7
WAVEFORM CHECK USING AN
OSCILLOSCOPE . . . . . . . . . . . . . . . . . . 16-9
ALTERNATOR ASSEMB LY . . . . .16-12
REMOVAL AND INSTALLATION
<4G1> . . . . . . . . . . . . . . . . . . . . . . . . . . 16-12
REMOVAL AND INSTALLATION
<4G6> . . . . . . . . . . . . . . . . . . . . . . . . . . 16-13
DISASSEMBLY AND REASSEMBLY . . 16-15
INSPECTION . . . . . . . . . . . . . . . . . . . . . 16-17
STARTING SYSTEM . . . . . . . . .16-19
GENERAL INFORMATION . . . . . .16-19
SERVICE SPECIFICATIONS. . . . .16-20
STARTER MOTOR ASSEMBLY . .16-21
REMOVAL AND INSTALLATION
<4G1> . . . . . . . . . . . . . . . . . . . . . . . . . . 16-21
REMOVAL AND INSTALLATION
<4G6> . . . . . . . . . . . . . . . . . . . . . . . . . . 16-22
STARTER MOTOR ASSEMBLY
INSPECTION . . . . . . . . . . . . . . . . . . . . . 16-23
DISASSEMBLY AND REASSEMBLY . . 16-26
INSPECTION . . . . . . . . . . . . . . . . . . . . . 16-27
IGNITION SYSTEM . . . . . . . . . 16-30
GENERAL INFORMATION . . . . . .16-30
SERVICE SPECIFICATIONS . . . . .16-31
SPECIAL TOOL . . . . . . . . . . . . . . .16-31
ON-VEHICLE SERVICE . . . . . . . . .16-32
IGNITION COIL (WITH BUILT-IN
POWER TRANSISTOR) CHECK . . . . . . 16-32
RESISTIVE CORD CHECK . . . . . . . . . . 16-32
SPARK PLUG CHECK AND CLEANING
<4G1>. . . . . . . . . . . . . . . . . . . . . . . . . . . 16-32
SPARK PLUG CHECK AND CLEANING
<4G6>. . . . . . . . . . . . . . . . . . . . . . . . . . . 16-33
CAMSHAFT POSITION SENSOR
CHECK . . . . . . . . . . . . . . . . . . . . . . . . . . 16-33
CRANK ANGLE SENSOR CHECK . . . . 16-33
DETONATION SENSOR CHECK . . . . . 16-33
IGNITION SECONDARY VOLTAGE
WAVEFORM CHECK USING AN
OSCILLOSCOPE . . . . . . . . . . . . . . . . . . 16-33
IGNITION COIL RELAY CHECK . . . . . . 16-37
IGNITION COIL . . . . . . . . . . . . . . . .16-38
REMOVAL AND INSTALLATION
<4G1>. . . . . . . . . . . . . . . . . . . . . . . . . . . 16-38
REMOVAL AND INSTALLATION
<4G6>. . . . . . . . . . . . . . . . . . . . . . . . . . . 16-39
CAMSHAFT POSITION SENSOR .16-40
REMOVAL AND INSTALLATION . . . . . . 16-40
CRANKSHAFT POSITION SENSOR16-41
REMOVAL AND INSTALLATION
<4G1>. . . . . . . . . . . . . . . . . . . . . . . . . . . 16-41
REMOVAL AND INSTALLATION
<4G6>. . . . . . . . . . . . . . . . . . . . . . . . . . . 16-42
DETONATION SENSOR . . . . . . . .16-43
REMOVAL AND INSTALLATION . . . . . . 16-43
Page 65 of 800
CHARGING SYSTEM
ENGINE ELECTRICAL16-3
SERVICE SPECIFICATIONS
M1161000300258
ItemStandard valueLimit
Alternator output line voltage drop (at 30 A) V−maximum 0.3
Regulated voltage ambient
temperature at voltage regulator V−20°C14.2 − 15.4−
20°C13.9 − 14.9−
60°C13.4 − 14.6−
80°C13.1 − 14.5−
Output current−70 % of normal output current
SPECIAL TOOLM1161000600163
ToolNumberNameUse
MB991519Alterna t or test harn e ssChec king th e alt e rnator
("S" te rminal volt age )
ON-VEHICLE SERV ICE
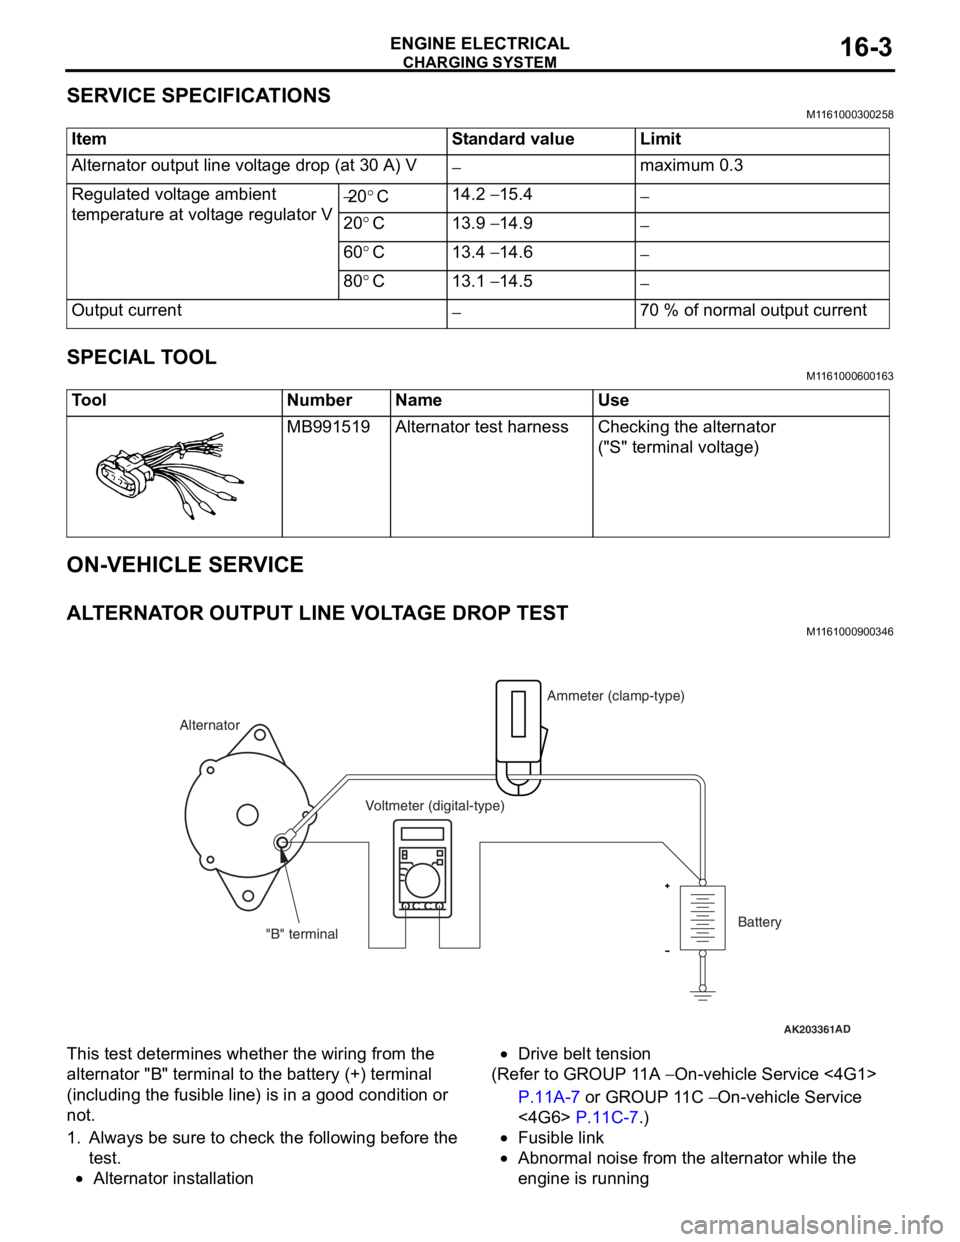
ALTERNA T O R OUTPUT LINE VOL T AGE DROP TEST
M1161 0009 0034 6
AK203361AD
Alternator Ammeter (clamp-type)
Voltmeter (digital-type)
"B" terminal Battery
This test
determine s whethe r the wiring fro m th e
altern
ator "B" termina l to t he batt e ry (+) terminal
(including the
fusible line ) is in a good condition or
not.
1.Always b e su re to check the following b e fore th e
te st.
•Alternator inst allatio n
•Drive belt tension
(Ref er to GROUP 1 1 A − On-veh icle Service <4G1>
P.11A-7 or GROUP 1 1 C − On-vehicle Service
<4G6> P.11C-7.)
•Fusible link
•Abnormal noise from the altern ator while the
eng
ine is ru nning