pulley MITSUBISHI LANCER 2006 Workshop Manual
[x] Cancel search | Manufacturer: MITSUBISHI, Model Year: 2006, Model line: LANCER, Model: MITSUBISHI LANCER 2006Pages: 800, PDF Size: 45.03 MB
Page 74 of 800
CHARGING SYSTEM
ENGINE ELECTRICAL16-12
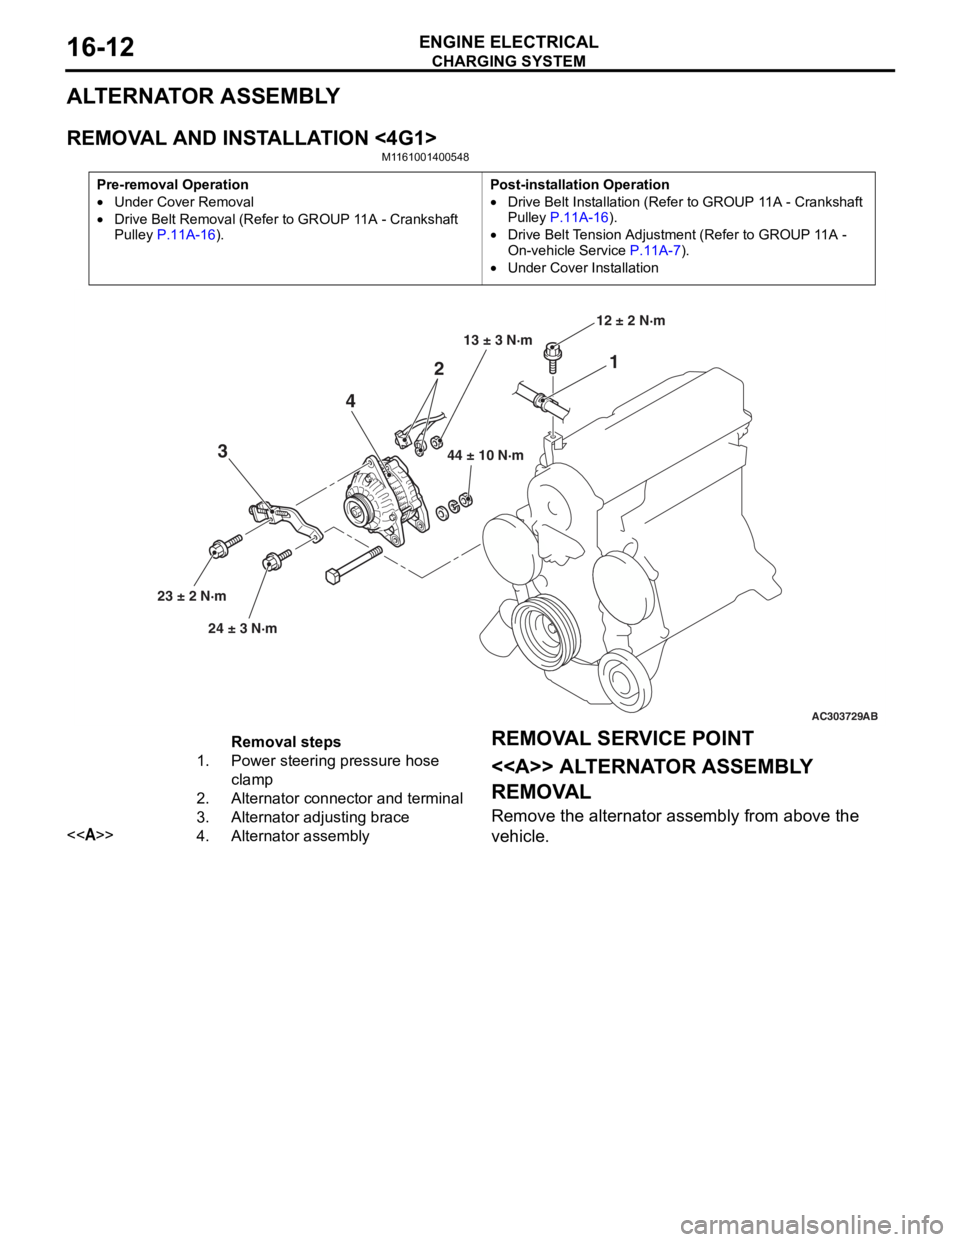
ALTERNATOR ASSEMBLY
REMOVAL AND INSTALLATION <4G1>
M1161001400548
Pre-removal Operation
•Under Cover Removal
•Drive Belt Removal (Refer to GROUP 11A - Crankshaft
Pulley
P.11A-16).
Post-installation Operation
•Drive Belt Installation (Refer to GROUP 11A - Crankshaft
Pulley P.11A-16).
•Drive Belt Tension Adjustment (Refer to GROUP 11A -
On-vehicle Service P.11A-7).
•Under Cover Installation
AC303729
1
2
4
3
44 ± 10 N·m
23 ± 2 N·m 24 ± 3 N·m 12 ± 2 N·m
AB
13 ± 3 N·m
Removal steps
1.Power steering pressure hose
clamp
2.Alternator connector and terminal
3.Alternator adjusting brace
<>4.Alternator assembly
REMOV
A L SER VICE POINT
<> ALTERNA T O R ASSEMBL Y
REMOV
A L
Remove the a l tern ator assembly from above the
vehicle.
Page 75 of 800
CHARGING SYSTEM
ENGINE ELECTRICAL16-13
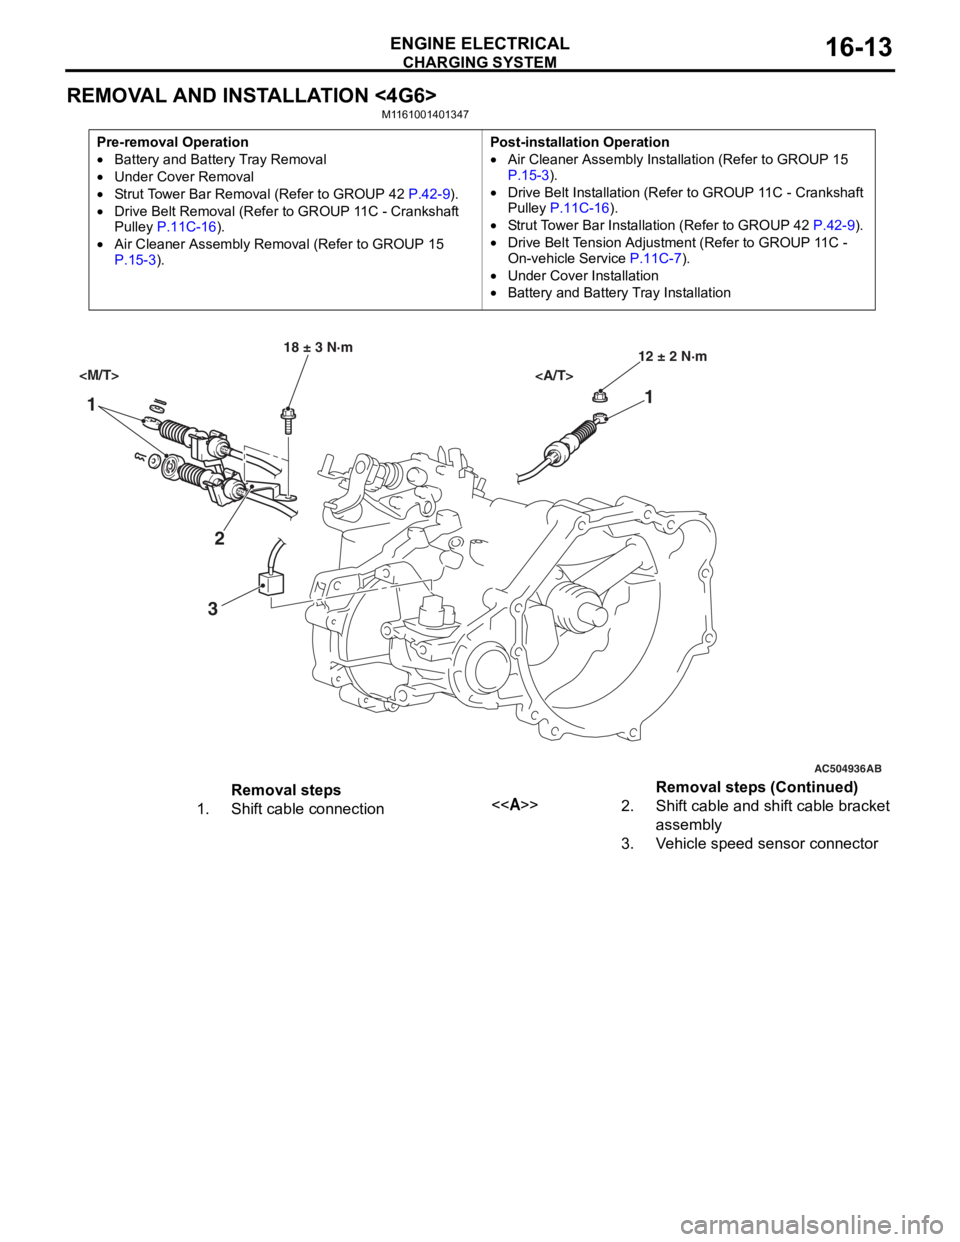
REMOVAL AND INSTALLATION <4G6>
M1161001401347
Pre-removal Operation
•Battery and Battery Tray Removal
•Under Cover Removal
•Strut Tower Bar Removal (Refer to GROUP 42 P.42-9).
•Drive Belt Removal (Refer to GROUP 11C - Crankshaft
Pulley P.11C-16).
•Air Cleaner Assembly Remo val (Refer to GROUP 15 P.15-3).
Post-installation Operation
•Air Cleaner Assembly Installation (Refer to GROUP 15 P.15-3).
•Drive Belt Installation (Refer to GROUP 11C - Crankshaft
Pulley P.11C-16).
•Strut Tower Bar Installation (Refer to GROUP 42 P.42-9).
•Drive Belt Tension Adjustment (Refer to GROUP 11C -
On-vehicle Service
P.11C-7).
•Under Cover Installation
•Battery and Battery Tray Installation
AC504936
1 1
2
3
18 ± 3 N·m 12 ± 2 N·m
AB
Removal steps
1.Shift cable connection<>2.Shift cable and shift cable bracket
assembly
3.Vehicle speed sensor connector
Removal steps (Continued)
Page 76 of 800
AC303827
65
84
9
7
22 ± 4 N·m
23 ± 3 N·m
8.8 ± 1.0 N·m 44 ± 10 N·m
AB
13 ± 3 N·m
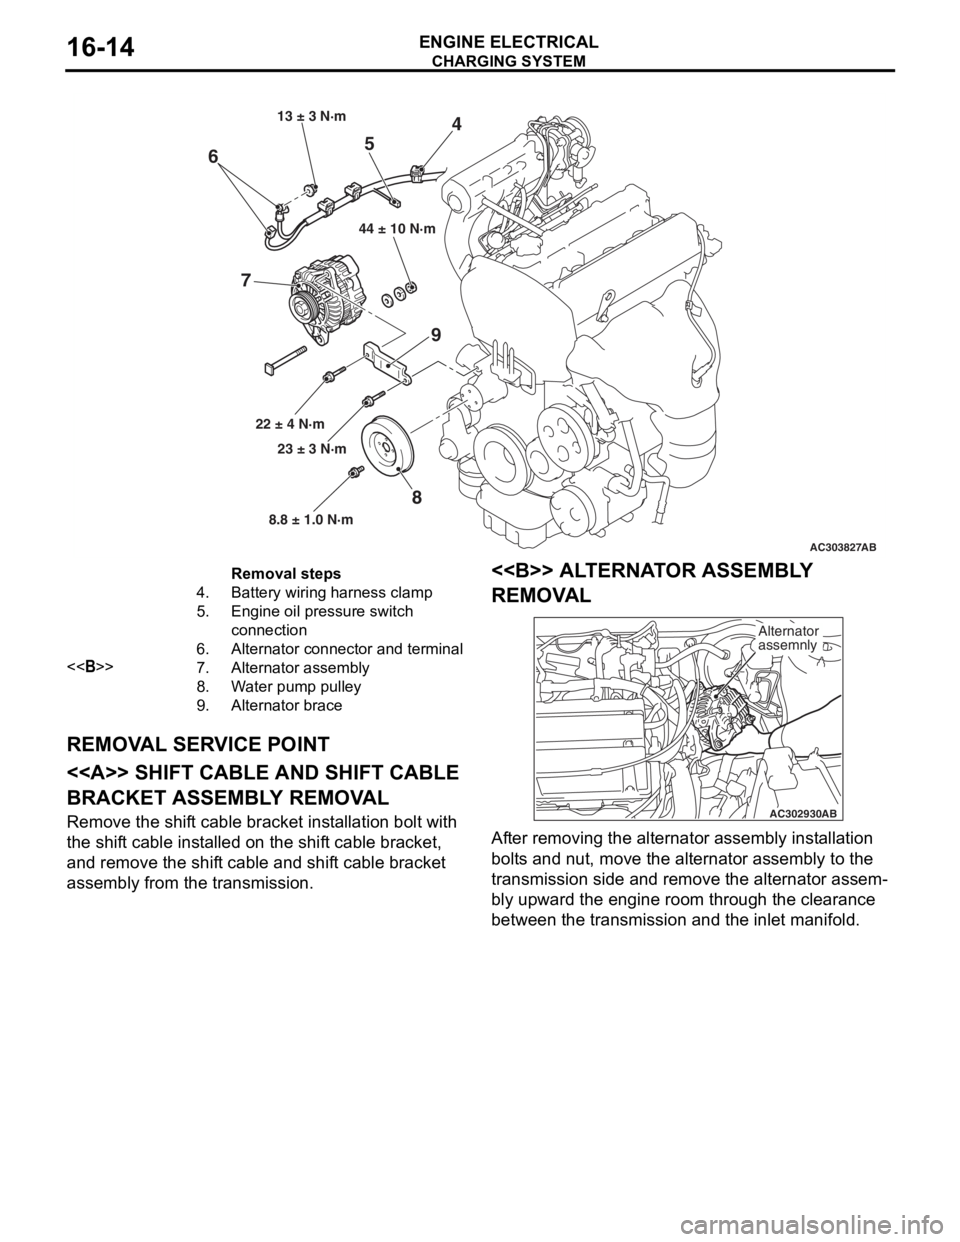
Removal steps
4.Battery wiring harness clamp
5.Engine oil pressure switch
connection
6.Alternator connector and terminal
<>7.Alternator assembly
8.Water pump pulley
9.Alternator brace
CHARGING SYSTEM
ENGINE ELECTRICAL16-14
REMOV
A L SER V ICE POINT
<> SHIFT CABLE AND SHIFT CABLE
BRACKET ASSEMBL
Y REMOV A L
Remove the shift cable bracket inst allation bolt with
the shif
t ca ble inst alled o n the shif t cable bracket,
and remove
the shif t cable and shif t cable bracket
assembly fro
m the transmission.
<> ALTERNA T O R ASSEMBL Y
REMOV
A L
AC302930 AB
Alternator
assemnly
Af
ter re moving the alternato r assembly inst allation
bolt
s a nd nu t, move the alte rnator a sse mbly to the
transmission side an
d remove the alternato r assem
-
bly upward the engine roo m thr ough th e clearan ce
between t
he tran smission and the inlet ma nifold.
Page 77 of 800
CHARGING SYSTEM
ENGINE ELECTRICAL16-15
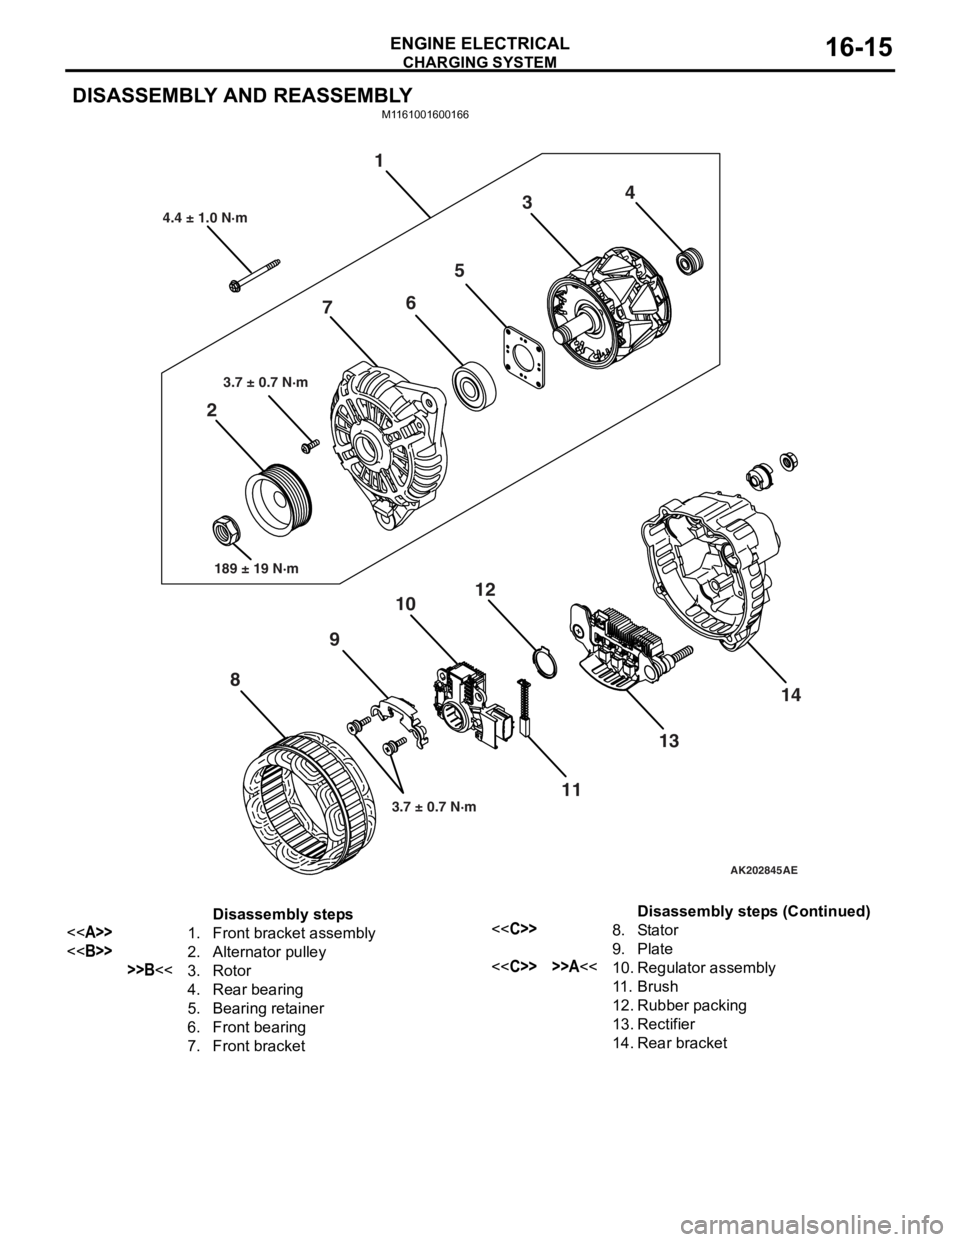
DISASSEMBLY AND REASSEMBLY
M1161001600166
AK202845
1
2 3
4
5
6
7
8 9
10
11
12
1314
AE
4.4 ± 1.0 N·m
3.7 ± 0.7 N·m
189 ± 19 N·m
3.7 ± 0.7 N·m
Disassembly steps
<>1.Front bracket assembly
<>2.Alternator pulley
>>B<<3.Rotor
4.Rear bearing
5.Bearing retainer
6.Front bearing
7.Front bracket
<
9.Plate
<
11 .Brush
12.Rubber packing
13.Rectifier
14.Rear bracket
Disassembly steps (Continued)
Page 78 of 800
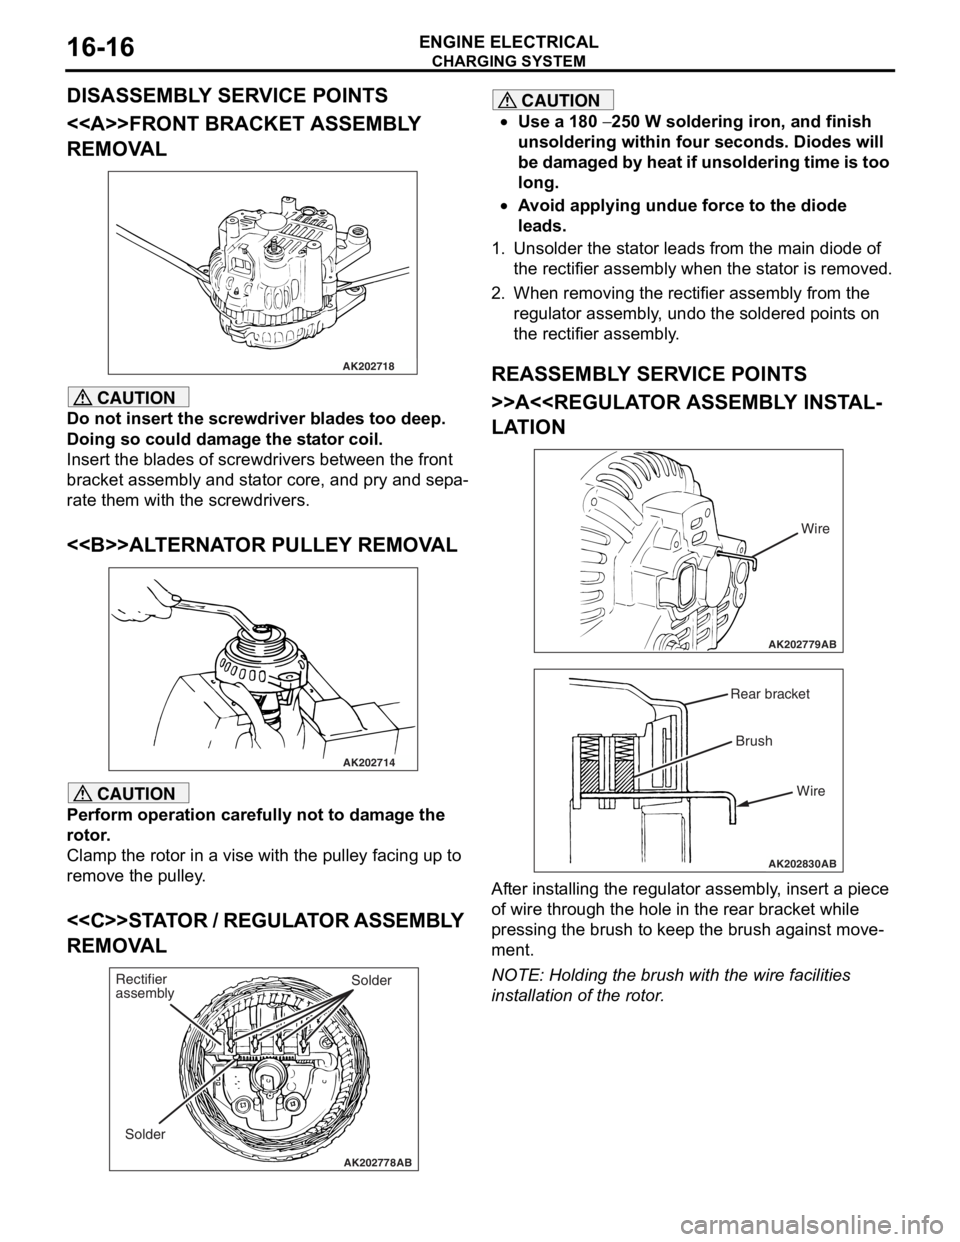
Page 266 of 800
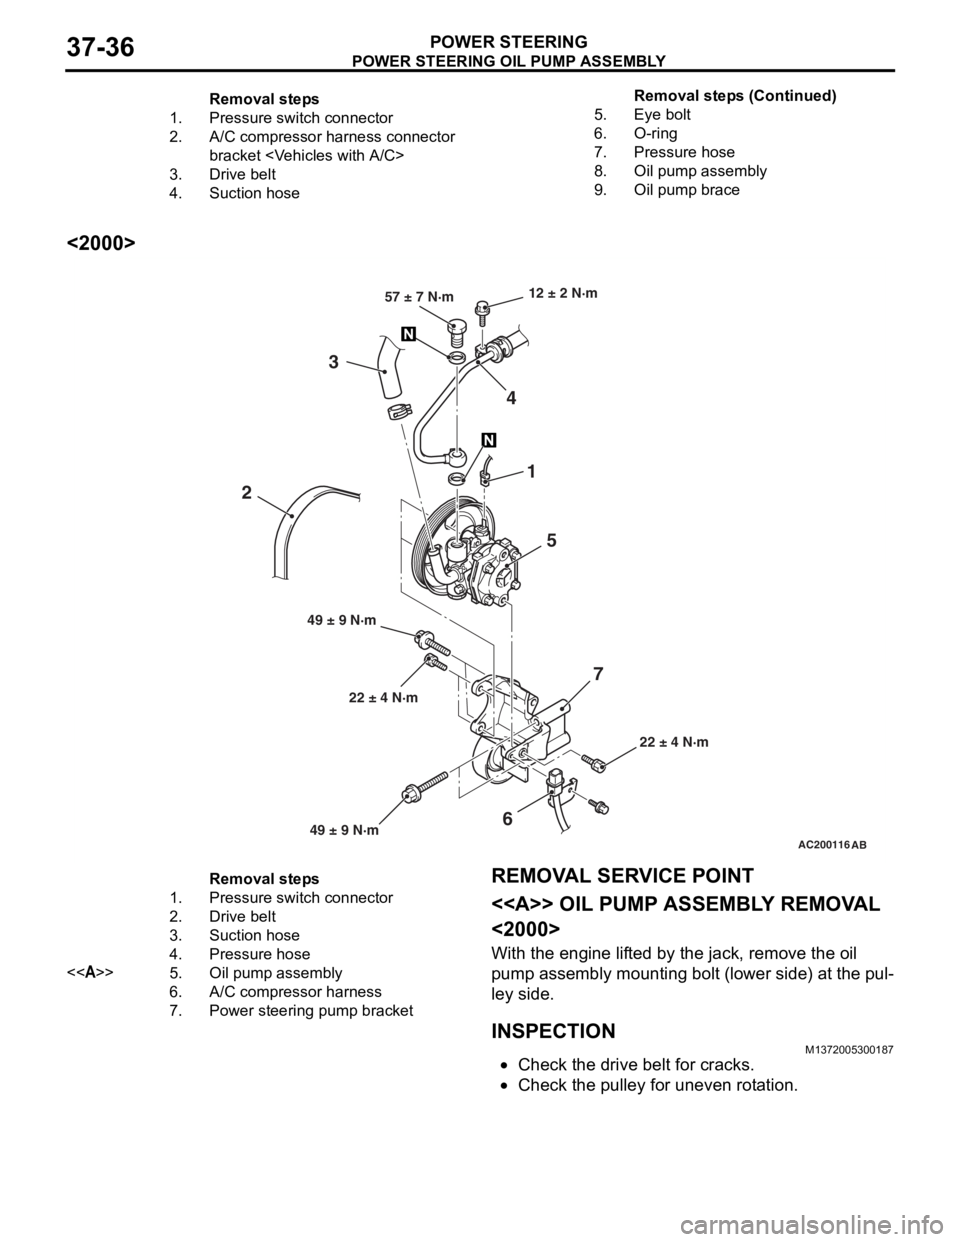
Removal steps
1.Pressure switch connector
2.A/C compressor harness connector
bracket
3.Drive belt
4.Suction hose
5.Eye bolt
6.O-ring
7.Pressure hose
8.Oil pump assembly
9.Oil pump brace
POWER STEERING OIL PUMP ASSEMBLY
POWER STEERING37-36
<2000>
AC200116AB
22 ± 4 N·m
12 ± 2 N·m
22 ± 4 N·m
49 ± 9 N·m 57 ± 7 N·m
1
5
4
3
6
2
7
49 ± 9 N·m
Removal steps
1.Pressure switch connector
2.Drive belt
3.Suction hose
4.Pressure hose
<>5.Oil pump assembly
6.A/C compressor harness
7.Power steering pump bracket
REMOVA L SER VICE POINT
<> OIL PUMP ASSEMBL Y REMOV A L
<2000>
With the eng ine lif t ed by the jack, remove the o il
pump
assembly mounting b o lt (lower side) a t the pul
-
ley side .
INSPECTIONM13720053 0018 7
•Check the drive belt for cracks.
•Check th e pulley for une ven r o t a tion.
Remova l st ep s ( C ont inu e d)
Page 267 of 800
POWER STEERING OIL PUMP ASSEMBLY
POWER STEERING37-37
DISASSEMBLY AND REASSEMBLY
M1372005400300
CAUTION
Never disassemble the terminal assembly. It cannot be reassembled.
<1300, 1600>
AC209709AC
411
13 18
102
9 8
6 5
7 3
1
18 15
10 2
11
1310 39 8
6 5
7 3 4
3
28 ± 1 N·m
16 1514
59 ± 9 N·m
1228 ± 2 N·m
17
12 ± 1 N·m
13
Oil pump seal kit Oil pump cartridge kit Oil pump pulley and shaft kit : ATF DEXRON III or DEXRON II
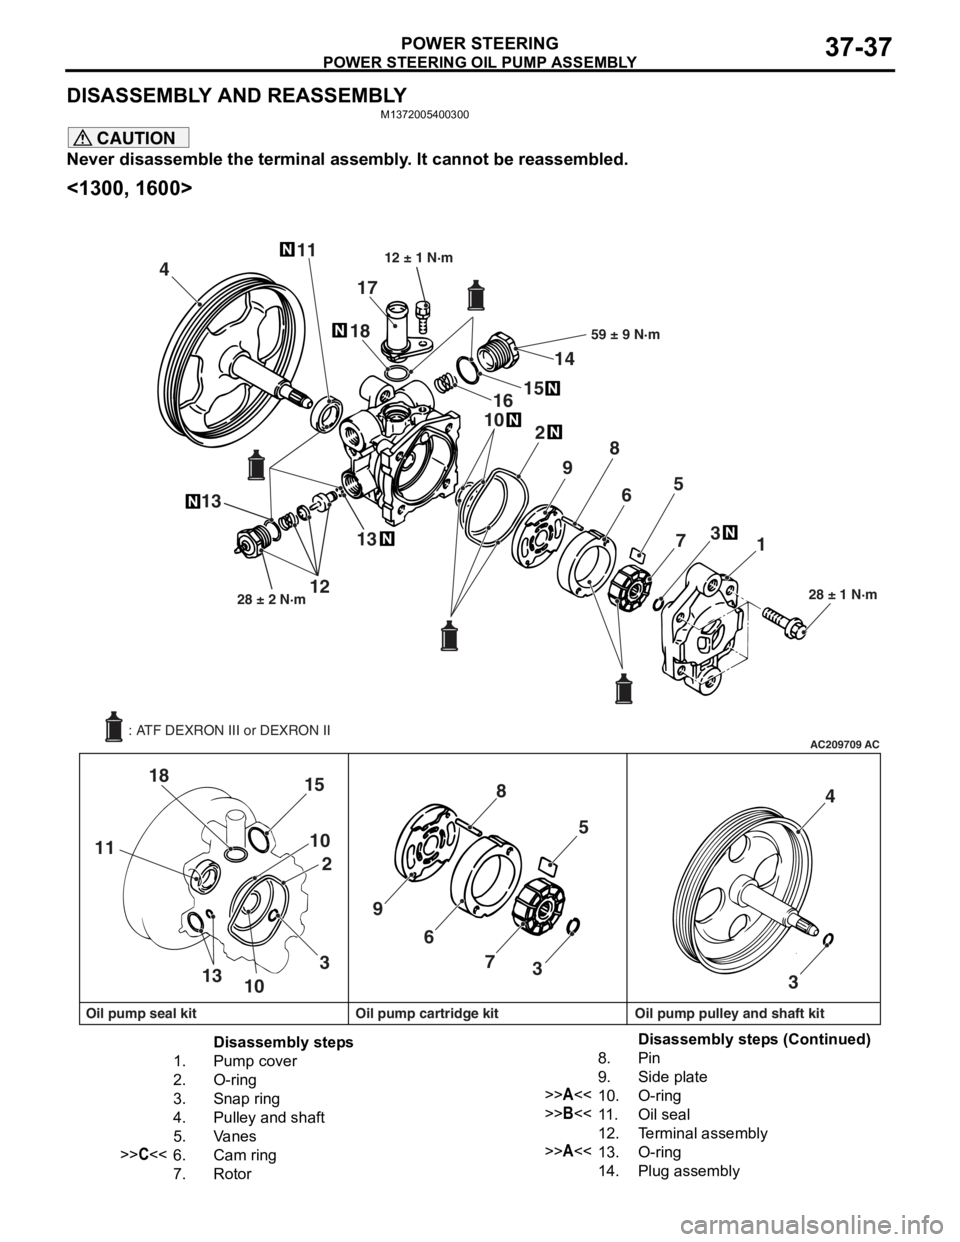
Disassembly steps
1.Pump cover
2.O-ring
3.Snap ring
4.Pulley and shaft
5.Va n e s
>>C<<6.Cam ring
7.Rotor
8.Pin
9.Side plate
>>A<<10.O-ring
>>B<<11 .Oil seal
12.Terminal assembly
>>A<<13.O-ring
14.Plug assembly
Disassembly steps (Continued)
Page 268 of 800
POWER STEERING OIL PUMP ASSEMBLY
POWER STEERING37-38
<2000>
AC100143AH
4 11
12
13
28 ± 2 N·m
102
9 8 65
7 3
1
28 ± 1 N·m
15
16
14
59 ± 9 N·m
12 ± 1 N·m
18
17
57
3
9 8
6
3
13
10 2
13
10
15
18
11
4
3
Oil pump seal kit Oil pump cartridge kit Oil pump pulley and shaft kit
: ATF DEXRON III or DEXRON II
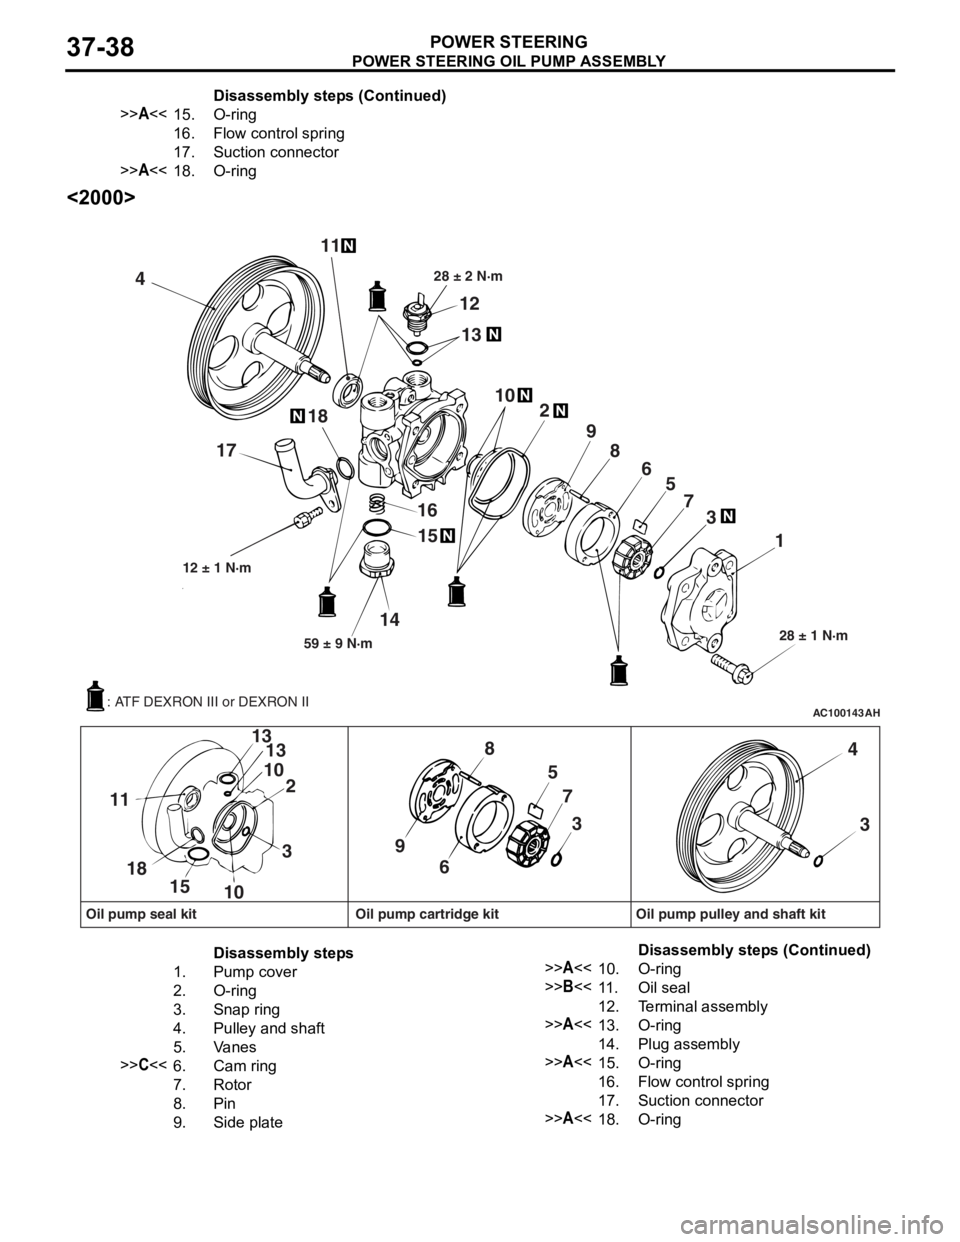
Disassembly steps
1.Pump cover
2.O-ring
3.Snap ring
4.Pulley and shaft
5.Va n e s
>>C<<6.Cam ring
7.Rotor
8.Pin
9.Side plate
>>A<<10.O-ring
>>B<<11 .Oil seal
12.Terminal assembly
>>A<<13.O-ring
14.Plug assembly
>>A<<15.O-ring
16.Flow control spring
17.Suction connector
>>A<<18.O-ring
>>A<<15.O- rin g
16.Fl ow co n t ro l s p r i ng
17.Suction connector
>>A<<18.O-rin g
Disass embly st ep s ( C ont inu e d)
Disassembly steps (Continued)
Page 269 of 800
POWER STEERING OIL PUMP ASSEMBLY
POWER STEERING37-39
REASSEMBLY SERVICE POINTS
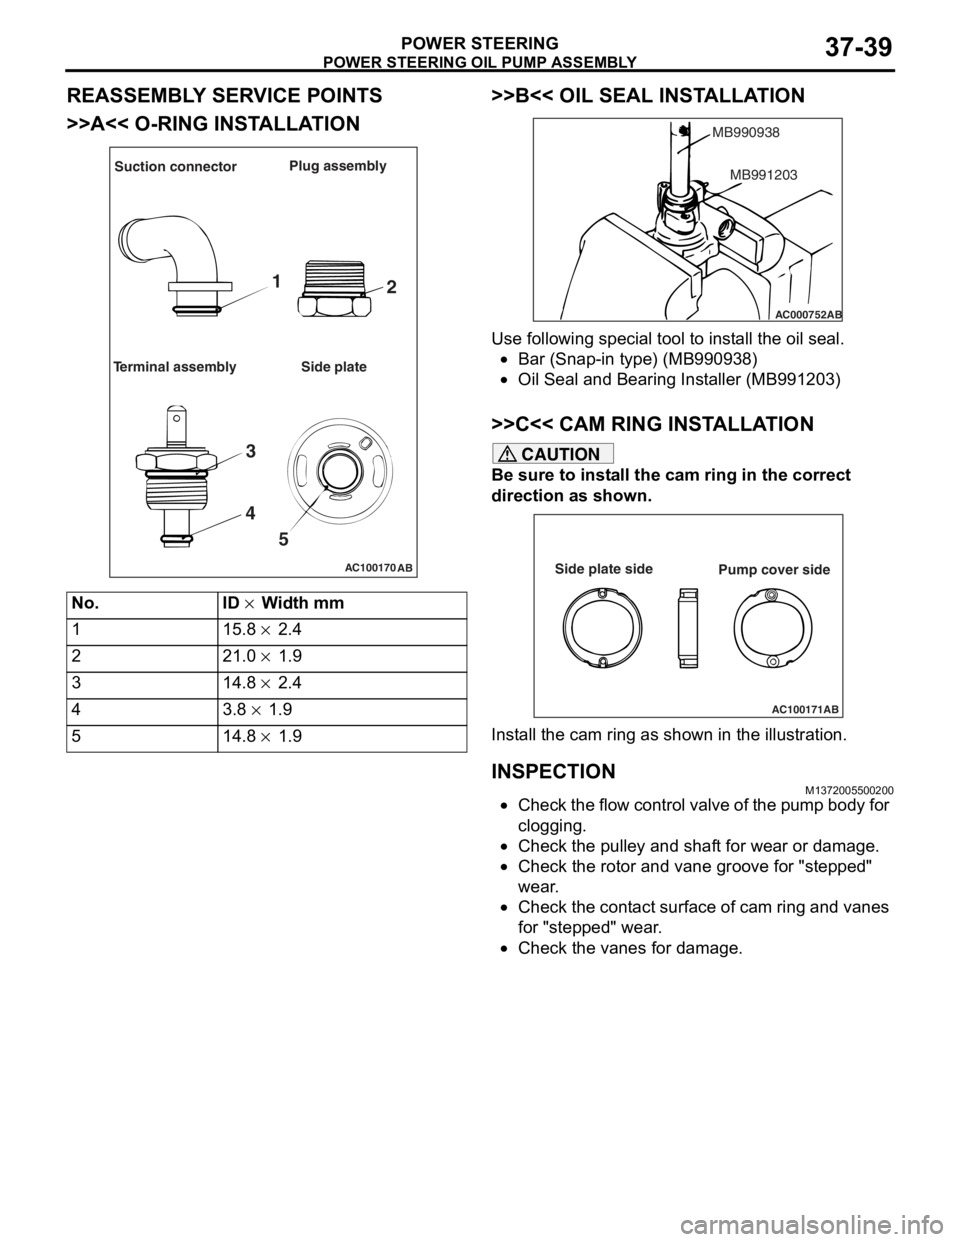
>>A<< O-RING INSTALLATION
AC100170AB
Suction connector Plug assembly
Terminal assembly Side plate
1 2
3
4 5
No.ID × Width mm
115.8 × 2.4
221.0 × 1.9
314.8 × 2.4
43.8 × 1.9
514.8 × 1.9
>>B<< OIL SEAL INST ALLA TION
AC000752
MB990938
AB
MB991203
Use following spe c ia l too l to inst all the oil seal.
•Bar (Snap-in type) (MB9909 38)
•Oil Seal and Bearin g Inst aller (MB9912 03)
>>C<< CAM RING INSTALLA TION
CAUTION
Be sure to install the cam ring in the correct
direction as shown.
AC100171AB
Side plate side
Pump cover side
Install the cam ring as shown in the illustration.
INSPECTION
M1372005500200
•Check the flow control valve of the pump body for
clogging.
•Check the pulley and shaft for wear or damage.
•Check the rotor and vane groove for "stepped"
wear.
•Check the contact surface of cam ring and vanes
for "stepped" wear.
•Check the vanes for damage.