tailgate MITSUBISHI LANCER 2006 Workshop Manual
[x] Cancel search | Manufacturer: MITSUBISHI, Model Year: 2006, Model line: LANCER, Model: MITSUBISHI LANCER 2006Pages: 800, PDF Size: 45.03 MB
Page 273 of 800
42-1
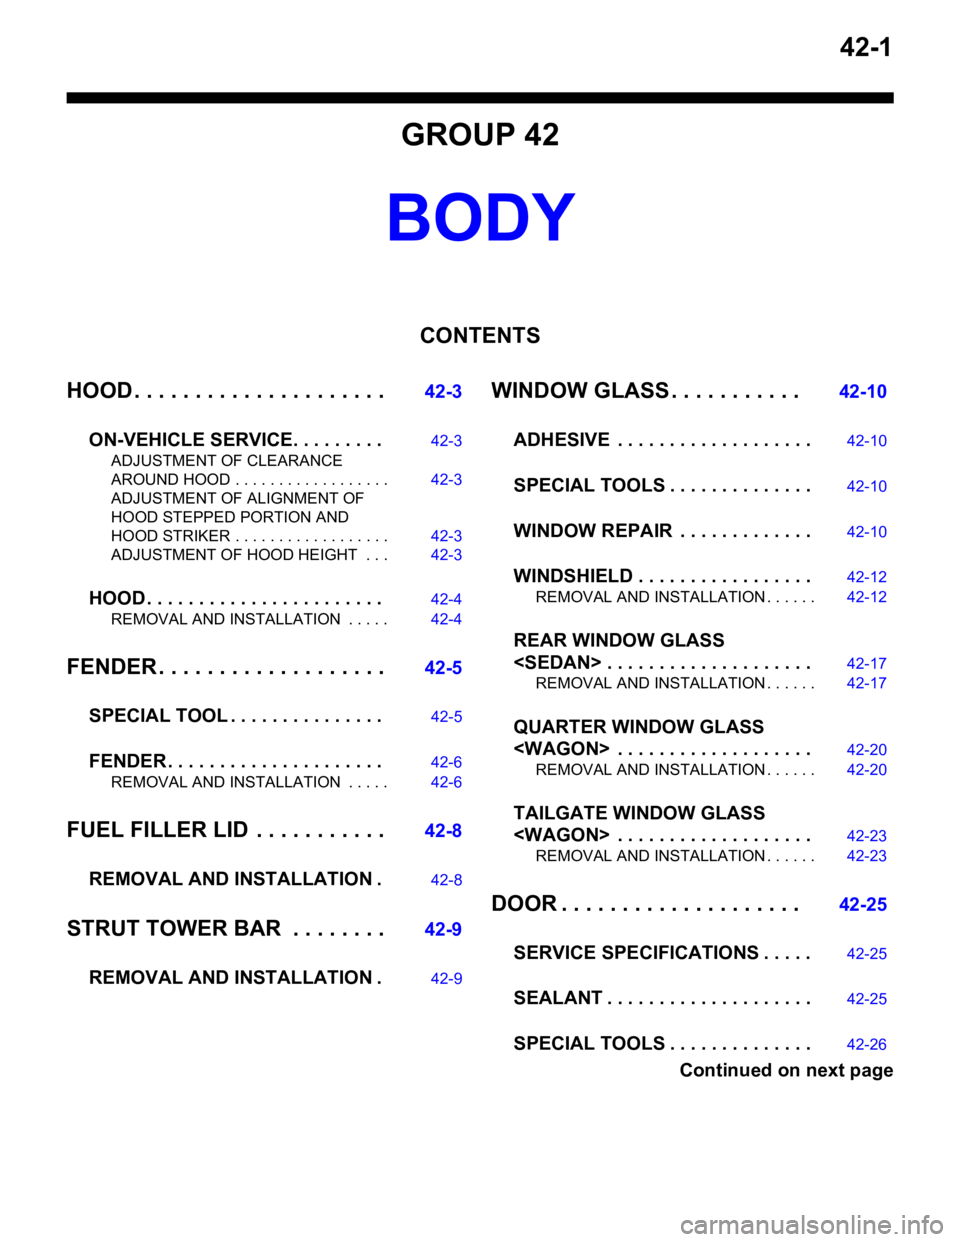
GROUP 42
BODY
CONTENTS
HOOD . . . . . . . . . . . . . . . . . . . . .42-3
ON-VEHICLE SERVICE. . . . . . . . .42-3
ADJUSTMENT OF CLEARANCE
AROUND HOOD . . . . . . . . . . . . . . . . . . 42-3
ADJUSTMENT OF ALIGNMENT OF
HOOD STEPPED PORTION AND
HOOD STRIKER . . . . . . . . . . . . . . . . . . 42-3
ADJUSTMENT OF HOOD HEIGHT . . . 42-3
HOOD . . . . . . . . . . . . . . . . . . . . . . .42-4
REMOVAL AND INSTALLATION . . . . . 42-4
FENDER . . . . . . . . . . . . . . . . . . .42-5
SPECIAL TOOL . . . . . . . . . . . . . . .42-5
FENDER . . . . . . . . . . . . . . . . . . . . .42-6
REMOVAL AND INSTALLATION . . . . . 42-6
FUEL FILLER LID . . . . . . . . . . .42-8
REMOVAL AND INSTALLATION .42-8
STRUT TOWER BAR . . . . . . . .42-9
REMOVAL AND INSTALLATION .42-9
WINDOW GLASS . . . . . . . . . . . 42-10
ADHESIVE . . . . . . . . . . . . . . . . . . .42-10
SPECIAL TOOLS . . . . . . . . . . . . . .42-10
WINDOW REPAIR . . . . . . . . . . . . .42-10
WINDSHIELD . . . . . . . . . . . . . . . . .42-12
REMOVAL AND INSTALLATION . . . . . . 42-12
REAR WINDOW GLASS
REMOVAL AND INSTALLATION . . . . . . 42-17
QUARTER WINDOW GLASS
REMOVAL AND INSTALLATION . . . . . . 42-20
TAILGATE WINDOW GLASS
REMOVAL AND INSTALLATION . . . . . . 42-23
DOOR . . . . . . . . . . . . . . . . . . . . 42-25
SERVICE SPECIFICA TIONS . . . . .42-25
SEALANT . . . . . . . . . . . . . . . . . . . .42-25
SPECIAL TOOLS . . . . . . . . . . . . . .42-26
Continued on next page
Page 274 of 800
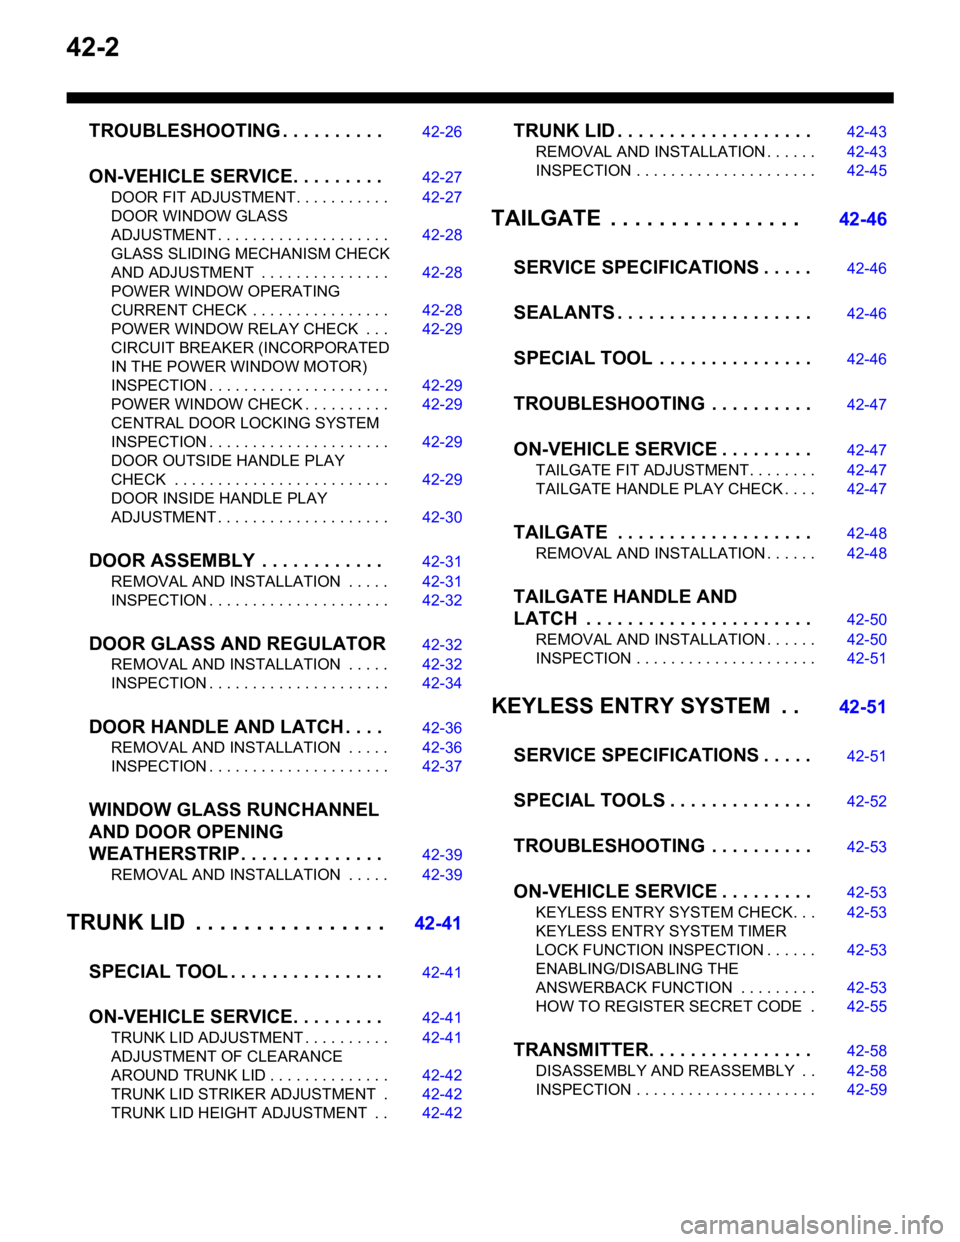
42-2
TROUBLESHOOTING . . . . . . . . . .42-26
ON-VEHICLE SERVICE. . . . . . . . .42-27
DOOR FIT ADJUSTMENT. . . . . . . . . . . 42-27
DOOR WINDOW GLASS
ADJUSTMENT . . . . . . . . . . . . . . . . . . . . 42-28
GLASS SLIDING MECHANISM CHECK
AND ADJUSTMENT . . . . . . . . . . . . . . . 42-28
POWER WINDOW OPERATING
CURRENT CHECK . . . . . . . . . . . . . . . . 42-28
POWER WINDOW RELAY CHECK . . . 42-29
CIRCUIT BREAKER (INCORPORATED
IN THE POWER WINDOW MOTOR)
INSPECTION . . . . . . . . . . . . . . . . . . . . . 42-29
POWER WINDOW CHECK . . . . . . . . . . 42-29
CENTRAL DOOR LOCKING SYSTEM
INSPECTION . . . . . . . . . . . . . . . . . . . . . 42-29
DOOR OUTSIDE HANDLE PLAY
CHECK . . . . . . . . . . . . . . . . . . . . . . . . . 42-29
DOOR INSIDE HANDLE PLAY
ADJUSTMENT . . . . . . . . . . . . . . . . . . . . 42-30
DOOR ASSEMBLY . . . . . . . . . . . .42-31
REMOVAL AND INSTALLATION . . . . . 42-31
INSPECTION . . . . . . . . . . . . . . . . . . . . . 42-32
DOOR GLASS AND REGULATOR42-32
REMOVAL AND INSTALLATION . . . . . 42-32
INSPECTION . . . . . . . . . . . . . . . . . . . . . 42-34
DOOR HANDLE AND LATCH . . . .42-36
REMOVAL AND INSTALLATION . . . . . 42-36
INSPECTION . . . . . . . . . . . . . . . . . . . . . 42-37
WINDOW GLASS RUNCHANNEL
AND DOOR OPENING
WEATHERSTRIP . . . . . . . . . . . . . .42-39
REMOVAL AND INSTALLATION . . . . . 42-39
TRUNK LID . . . . . . . . . . . . . . . .42-41
SPECIAL TOOL . . . . . . . . . . . . . . .42-41
ON-VEHICLE SERVICE. . . . . . . . .42-41
TRUNK LID ADJUSTMENT . . . . . . . . . . 42-41
ADJUSTMENT OF CLEARANCE
AROUND TRUNK LID . . . . . . . . . . . . . . 42-42
TRUNK LID STRIKER ADJUSTMENT . 42-42
TRUNK LID HEIGHT ADJUSTMENT . . 42-42
TRUNK LID . . . . . . . . . . . . . . . . . . .42-43
REMOVAL AND INSTALLATION . . . . . . 42-43
INSPECTION . . . . . . . . . . . . . . . . . . . . . 42-45
TAILGATE . . . . . . . . . . . . . . . . 42-46
SERVICE SPECIFICATIONS . . . . .42-46
SEALANTS . . . . . . . . . . . . . . . . . . .42-46
SPECIAL TOOL . . . . . . . . . . . . . . .42-46
TROUBLESHOOTING . . . . . . . . . .42-47
ON-VEHICLE SERVICE . . . . . . . . .42-47
TAILGATE FIT ADJUSTMENT. . . . . . . . 42-47
TAILGATE HANDLE PLAY CHECK . . . . 42-47
TAILGATE . . . . . . . . . . . . . . . . . . .42-48
REMOVAL AND INSTALLATION . . . . . . 42-48
TAILGATE HANDLE AND
LATCH . . . . . . . . . . . . . . . . . . . . . .42-50
REMOVAL AND INSTALLATION . . . . . . 42-50
INSPECTION . . . . . . . . . . . . . . . . . . . . . 42-51
KEYLESS ENTRY SYSTEM . . 42-51
SERVICE SPECIFICATIONS . . . . .42-51
SPECIAL TOOLS . . . . . . . . . . . . . .42-52
TROUBLESHOOTING . . . . . . . . . .42-53
ON-VEHICLE SERVICE . . . . . . . . .42-53
KEYLESS ENTRY SYSTEM CHECK. . . 42-53
KEYLESS ENTRY SYSTEM TIMER
LOCK FUNCTION INSPECTION . . . . . . 42-53
ENABLING/DISABLING THE
ANSWERBACK FUNCTION . . . . . . . . . 42-53
HOW TO REGISTER SECRET CODE . 42-55
TRANSMITTER. . . . . . . . . . . . . . . .42-58
DISASSEMBLY AND REASSEMBLY . . 42-58
INSPECTION . . . . . . . . . . . . . . . . . . . . . 42-59
Page 282 of 800
WINDOW GLASS
BODY42-10
WINDOW GLASS
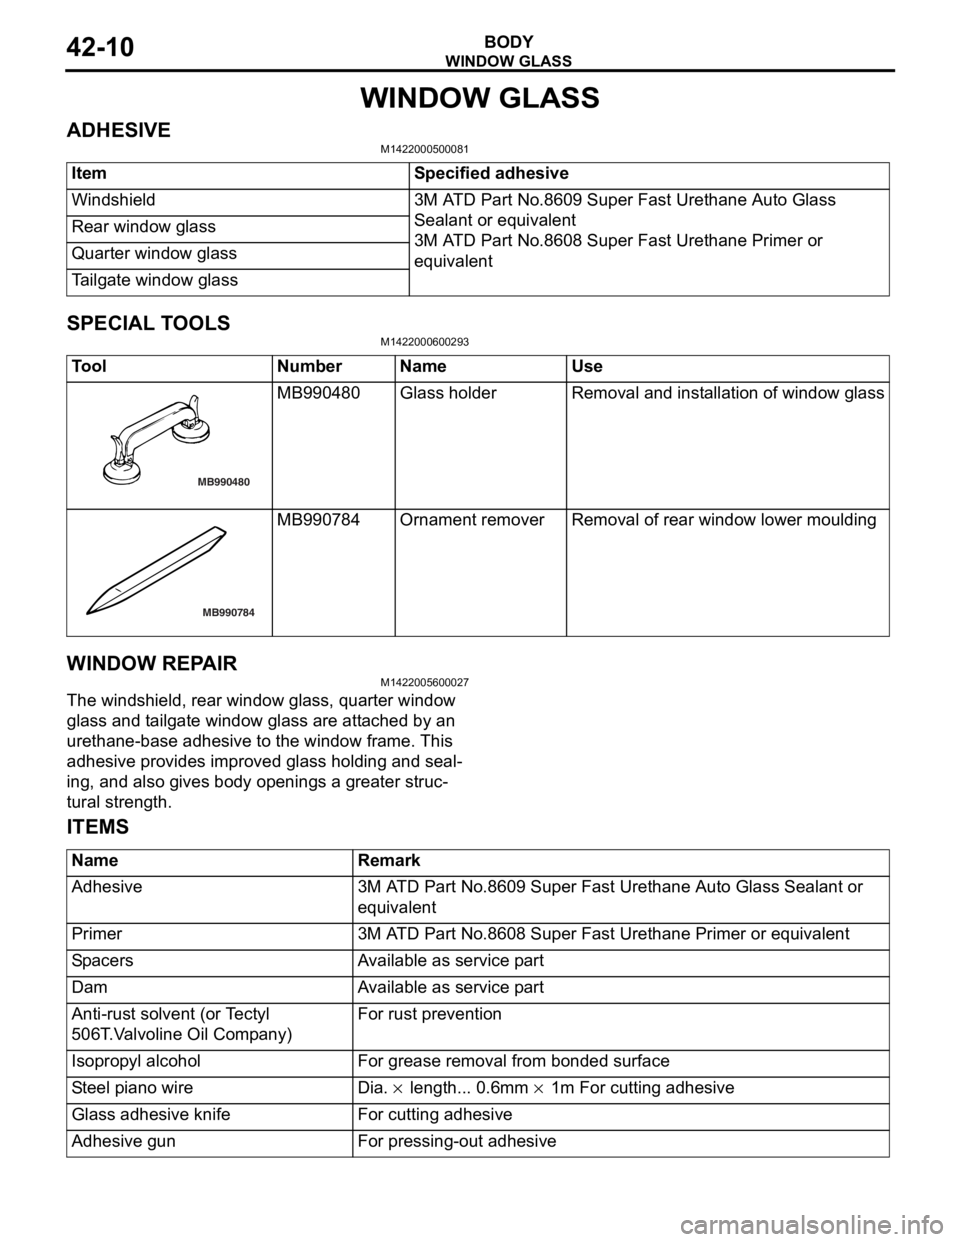
ADHESIVEM1422000500081
ItemSpecified adhesive
Windshield3M ATD Part No.8609 Super Fast Urethane Auto Glass
Sealant or equivalent
3M ATD Part No.8608 Super Fast Urethane Primer or
equivalentRear window glass
Quarter window glass
Tailgate window glass
SPECIAL TOOLS
M1422000600293
ToolNumberNameUse
MB990480
MB990480Gl as s h o l de rRemoval and inst a llat i on of wind ow glass
MB990784
MB990784Ornament removerRemoval of rea r window lower mo ulding
WI NDOW REP A IR
M14220056 0002 7
The windshield, rear wind ow glass, q uarter window
glass an
d t a ilg ate win dow gla ss a r e att a ched by an
urethan
e-base adhe sive to the wind ow frame . This
adhesive provides improv
ed glass hold i ng a nd seal
-
ing, and also g i ve s bod y op ening s a g r eater struc-
tural strength.
ITEMS
NameRemark
Adhesive3M ATD Part No.8609 Super Fast Urethane Auto Glass Sealant or
equivalent
Primer3M ATD Part No.8608 Super Fast Urethane Primer or equivalent
SpacersAvailable as service part
DamAvailable as service part
Anti-rust solvent (or Tectyl
506T.Valvoline Oil Company)For rust prevention
Isopropyl alcoholFor grease removal from bonded surface
Steel piano wireDia. × length... 0.6mm × 1m For cutting adhesive
Glass adhesive knifeFor cutting adhesive
Adhesive gunFor pressing-out adhesive
Page 295 of 800
WINDOW GLASS
BODY42-23
TAILGATE WINDOW GLASS
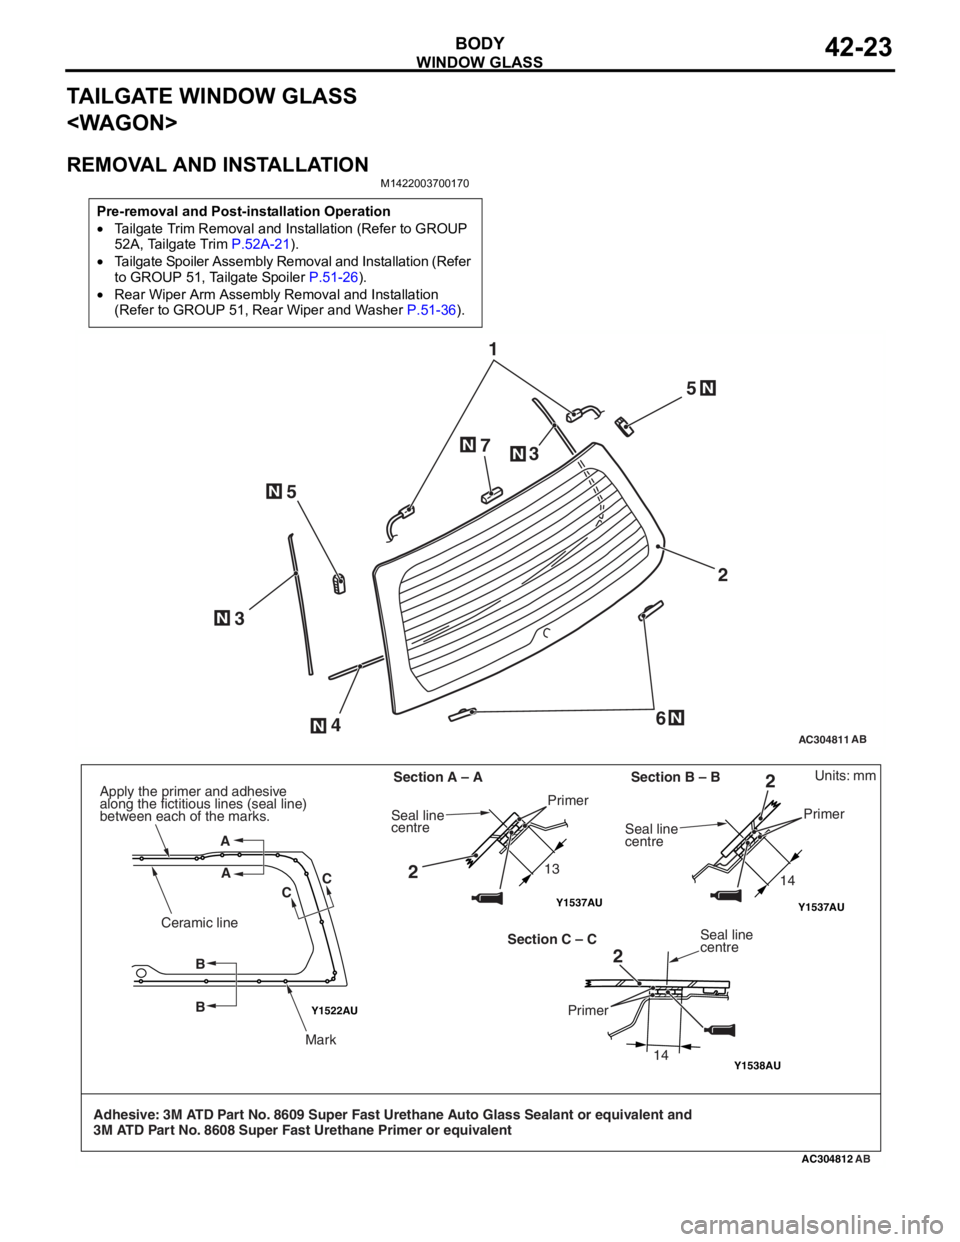
REMOVAL AND INSTALLATION
M1422003700170
Pre-removal and Post-installation Operation
•Tailgate Trim Removal and Installation (Refer to GROUP
52A, Tailgate Trim
P.52A-21).
•Tailgate Spoiler Assembly Removal and Installation (Refer
to GROUP 51, Tailgate Spoiler
P.51-26).
•Rear Wiper Arm Assembly Removal and Installation
(Refer to GROUP 51, Rear Wiper and Washer
P.51-36).
AC304811
12
6
5
5
4
3 3
7
AB
N
NN
N
N
N
N
Y1522AU
Y1538AU
AC304812
Y1537AUY1537AU
AB
Units: mm
Adhesive: 3M ATD Part No. 8609 Super Fast Urethane Auto Glass Sealant or equivalent and
3M ATD Part No. 8608 Super Fast Urethane Primer or equivalent Section A – A
13 14
14
Section B – B
Section C – C
A
A CC
B B
Ceramic line
Mark
Apply the primer and adhesive
along the fictitious lines (seal line)
between each of the marks.
Seal line
centre
Primer
Seal line
centre Primer
Seal line
centre
Primer
2 2
2
Page 296 of 800
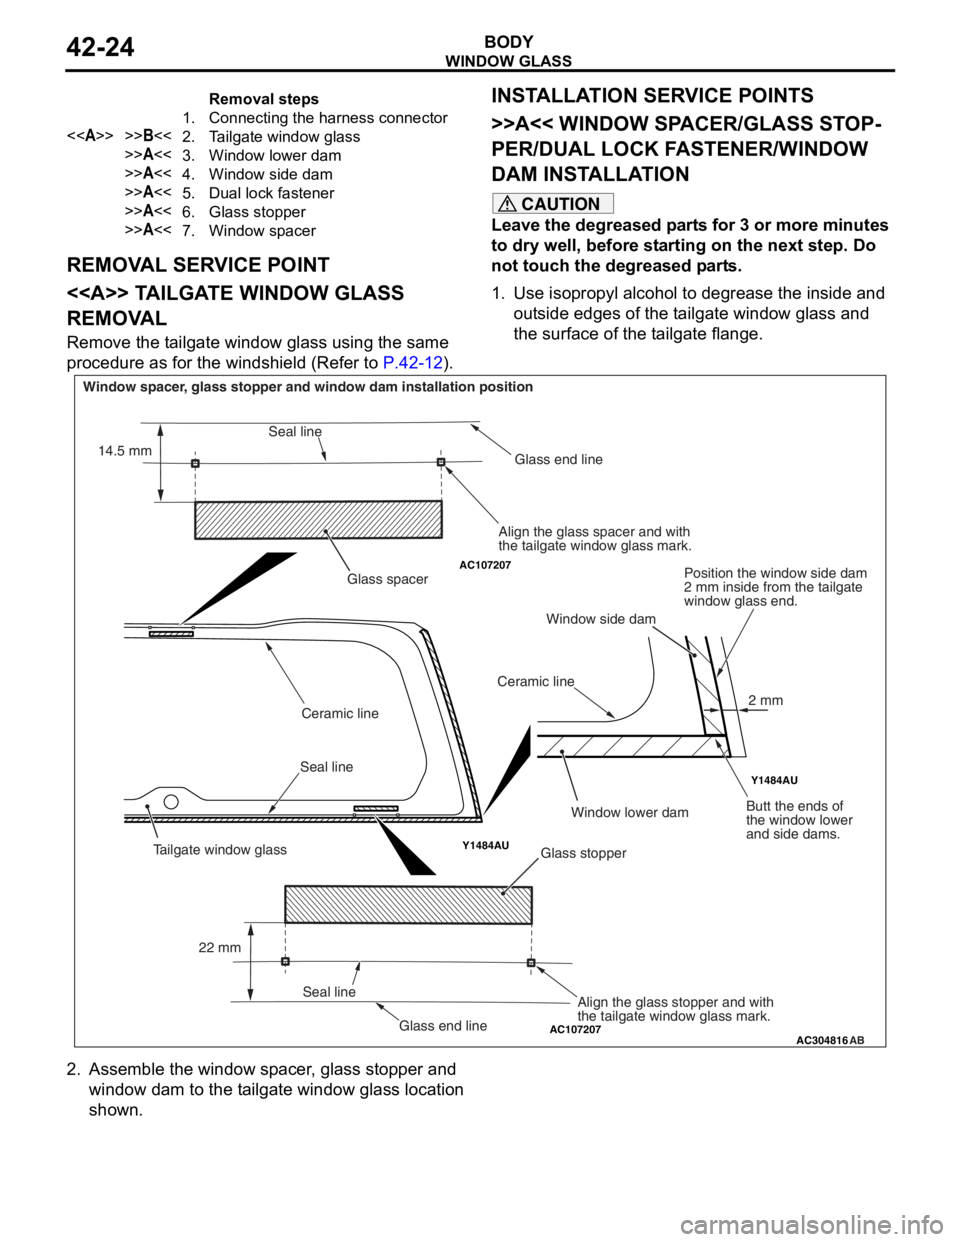
Removal steps
1.Connecting the harness connector
<>>>B<<2.Tailgate window glass
>>A<<3.Window lower dam
>>A<<4.Window side dam
>>A<<5.Dual lock fastener
>>A<<6.Glass stopper
>>A<<7.Window spacer
WI ND OW GLAS S
BODY42-24
REMOVA L SER V ICE POINT
<> TA ILGA TE WINDOW GLASS
REMOV
A L
Remove the t a ilgate window g l ass using the same
proce
dure as for th e windshie l d (Refe r to
P.42-12).
INSTALLA T ION SER VICE POINTS
>>A<< WI NDOW SP ACER/GLASS ST OP-
PER/DUAL LOCK FA STENER/WINDOW
DAM INST
ALLA TION
CAUTION
Leave the degreased parts for 3 or more minutes
to dry well, before starting on the next step. Do
not touch the degreased parts.
1. Use isopropyl alcohol to degrease the inside and outside edges of the tailgate window glass and
the surface of the tailgate flange.
AC107207
AC107207
Y1484AU Y1484AU
AC304816
AB
Glass stopper
Glass spacer
Seal line Ceramic line
Ceramic lineGlass end line
Glass end line
Window spacer, glass stopper and window dam installation position
Align the glass spacer and with
the tailgate window glass mark.Position the window side dam
2 mm inside from the tailgate
window glass end.
Butt the ends of
the window lower
and side dams.
Align the glass stopper and with
the tailgate window glass mark.
Seal line
Seal line
22 mm
14.5 mm
2 mm
Tailgate window glass
Window lower dam
Window side dam
2. Assemble the window spacer, glass stopper and
window dam to the tailgate window glass location
shown.
Page 297 of 800
AC304849AB
Dual lock fastener
Flange convex at the tailgate flange
DOOR
BO
D Y42-25
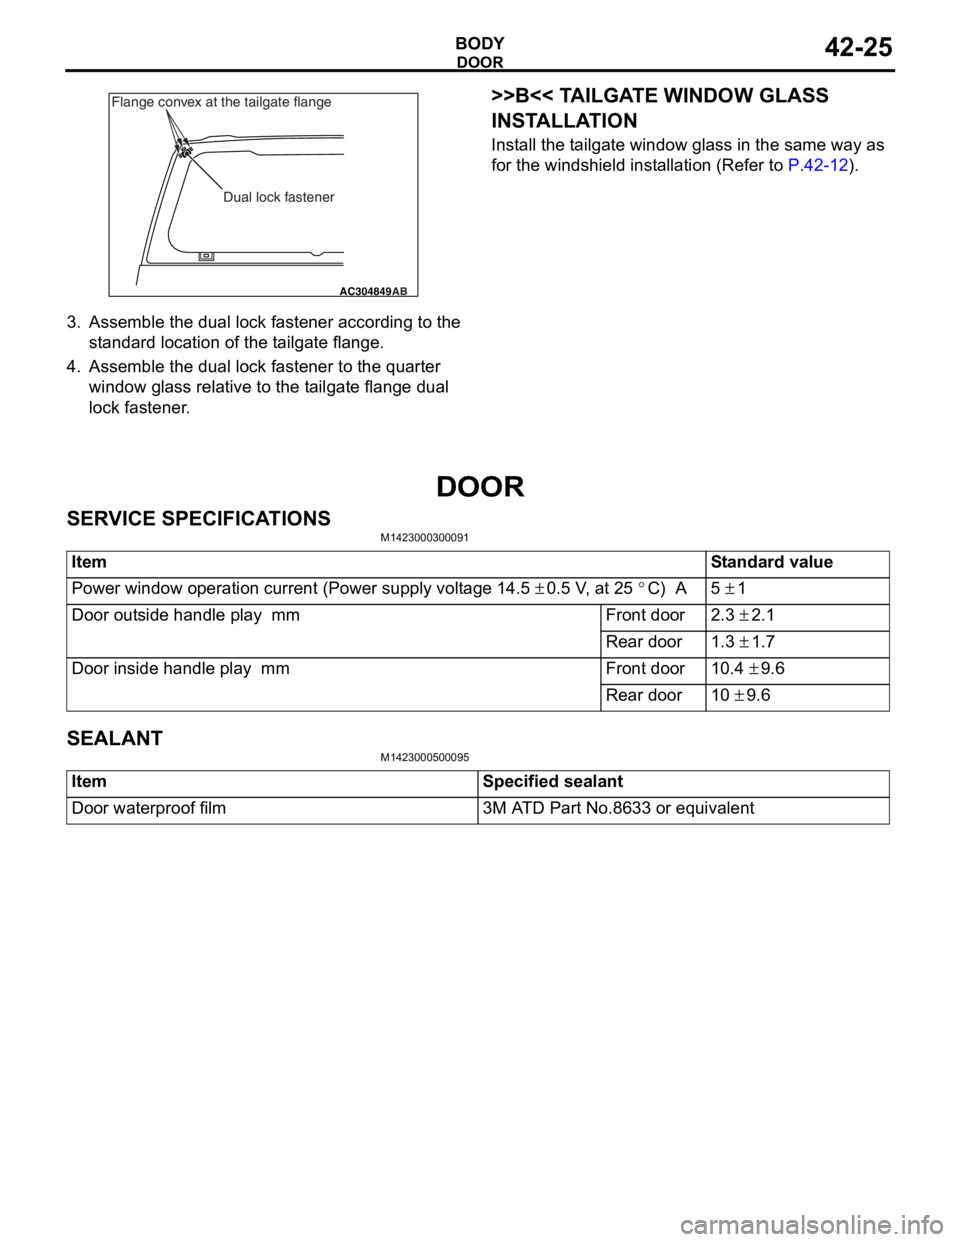
3.Assemble the dua l lo ck faste ner accord ing t o the
st a ndard loca tion of the t a ilgat e flan ge.
4.Assemble the dua l lo ck faste ner to t he qua rter
win dow gla ss relative to the t a ilgate flan ge dua l
lock fastener .
>>B<< TA ILGA TE WINDOW GLASS
INST
ALLA TION
Install the t a ilgat e window g l ass in the same wa y as
for the
windsh i eld inst a lla tion ( R ef er to
P.42-12).
DOOR
SER V ICE SPECIFICA T IONS
M14230003 0009 1
ItemStandard value
Power window operation current (Power supply voltage 14.5 ± 0.5 V, at 25 °C) A5 ± 1
Door outside handle play mmFront door2.3 ± 2.1
Rear door1.3 ± 1.7
Door inside handle play mmFront door10.4 ± 9.6
Rear door10 ± 9.6
SEALANT
M14230005 0009 5
ItemSpecified sealant
Door waterproof film3M ATD Part No.8633 or equivalent
Page 318 of 800
TAILGATE
BODY42-46
TA I L G AT E
SERVICE SPECIFICATIONSM1421000300288
ItemStandard value
Tailgate handle play (mm)2.3 − 5.9
SEALANTS
M1424000500098
ItemSpecified sealant
Tailgate waterproof film3M ATD Part No.8633 or equivalent
Tailgate hinge3M ATD Part No.8531 Heavy drip check sealer, 3M
ATD Part No.8646 Automotive joint and seam sealer
or equivalent
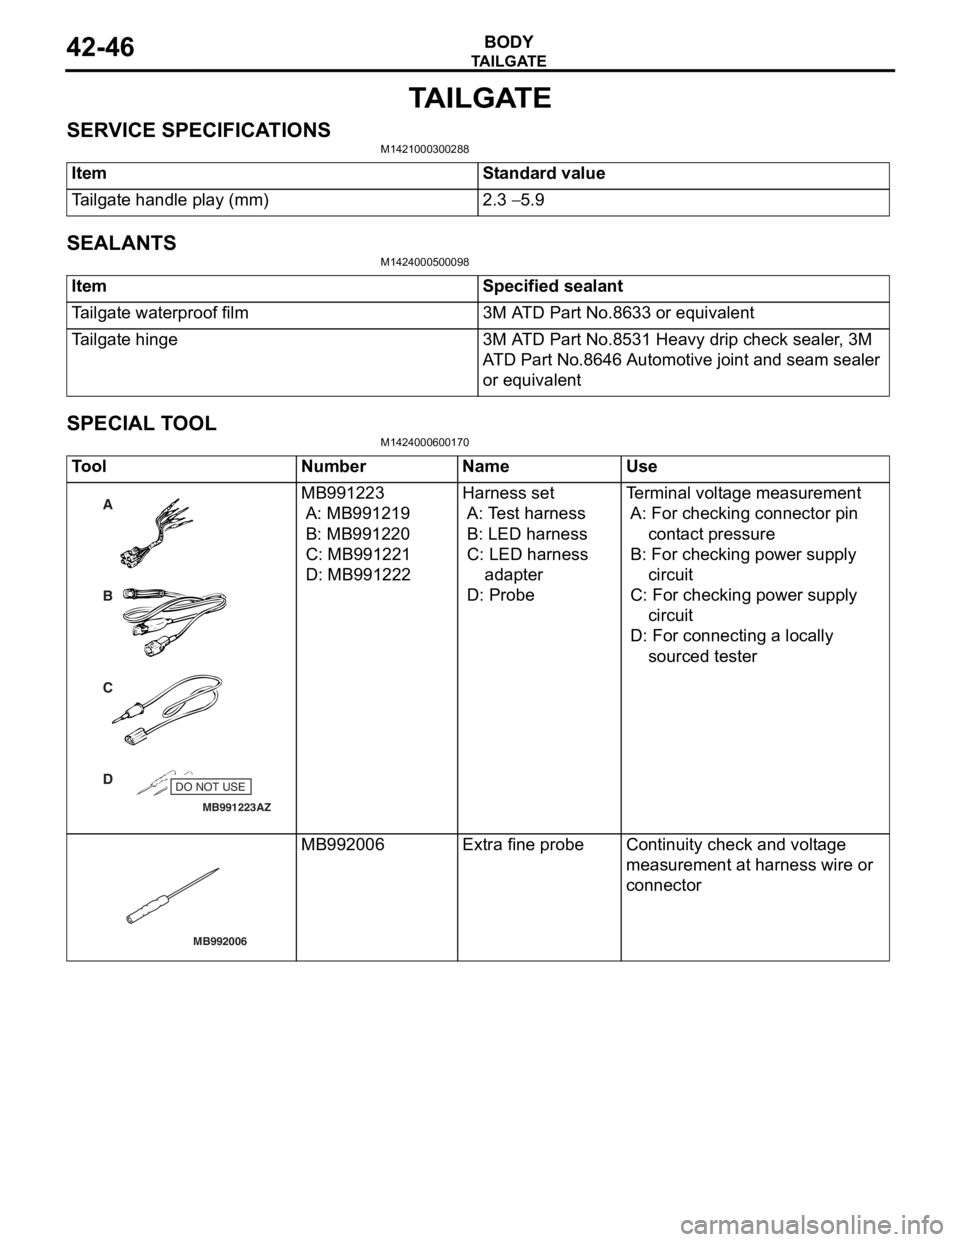
SPECIAL TOOLM1424000600170
ToolNumberNameUse
MB991223
A
D C
B
AZ
DO NOT USE
MB991223
A: MB9912 19
B: MB991220
C: MB99122 1
D: MB991222
Harness set
A: Te st harn e ss
B: LED harness
C: LED harness
adapt er
D: Probe
Te rminal volt a ge measu r emen t
A: For che cking connector pin
cont act pressure
B: For che cking po we r sup p ly
circuit
C: Fo r checking po we r supp ly
circuit
D: Fo r conn ecting a loca lly
sourced tester
MB992006
MB992 006Extra fine probeCont inuity check an d vo lt age
measurement at
harness wire or
conn
ector
Page 319 of 800
TAILGATE
BODY42-47
TROUBLESHOOTING
M1424000700207
The tailgate system is controlled by the Smart Wiring
System (SWS). For troubleshooting, refer to GROUP
54B, Troubleshooting
P.54B-15 or GROUP 54C,
Troubleshooting P.54C-4.
ON-VEHICLE SERVICE
TAILGATE FIT ADJUSTMENTM1424000900137
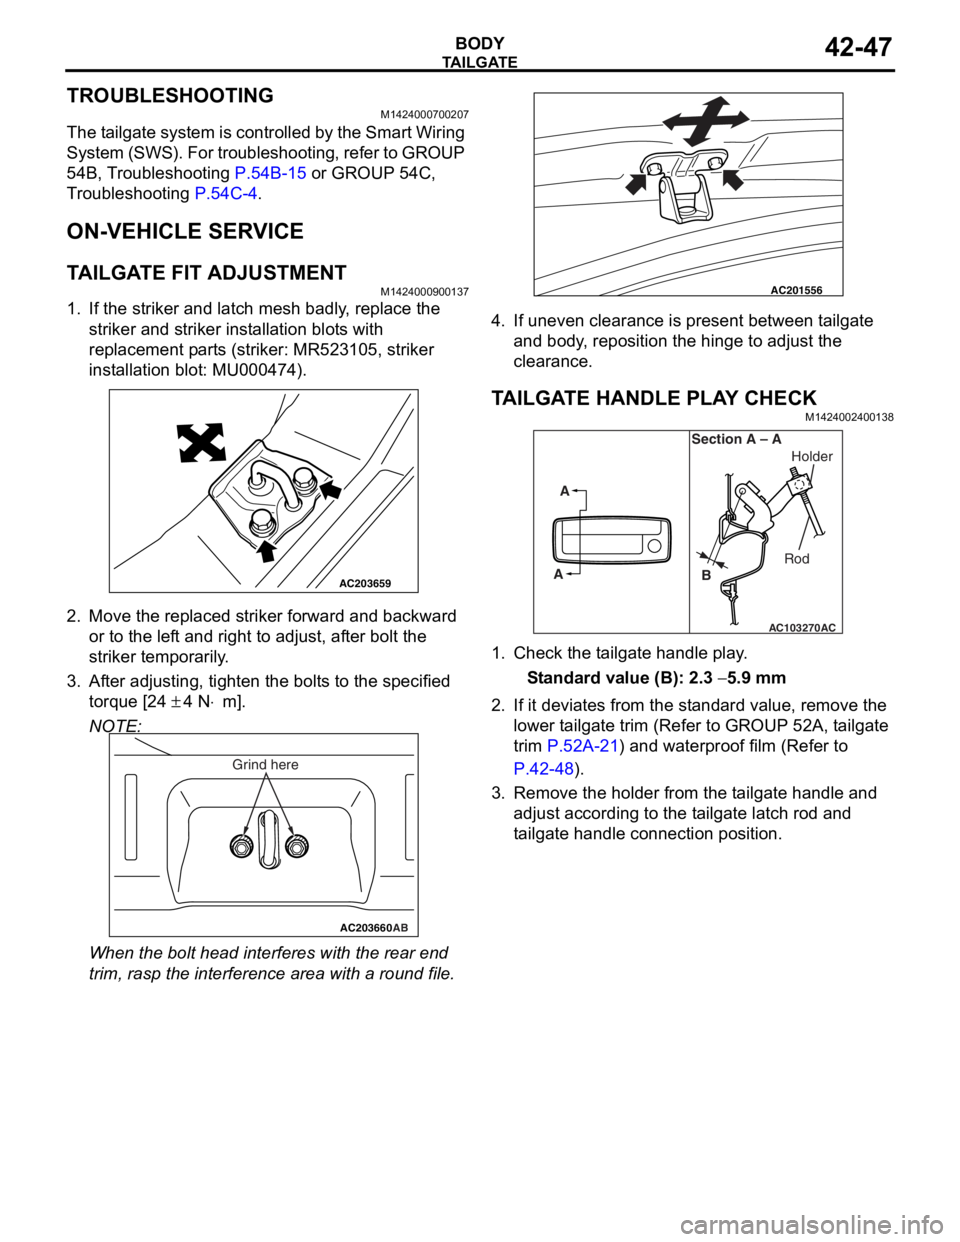
1. If the striker and latch mesh badly, replace the striker and striker installation blots with
replacement parts (striker: MR523105, striker
installation blot: MU000474).
AC203659
2.Move the rep l aced strike r forward a nd backward
or to the lef t and right to adjust, af te r bolt the
striker temporarily .
3.Af ter ad justing, tighte n the bolt s t o the specifie d
to rque [2 4
± 4 N⋅m].
NOTE:
AC203660AB
Grind here
When the bolt head interfe r es wit h the re ar end
trim, ra
sp th e int e rference are a with a round file .
AC201556
4.If uneven clearan ce is pre s en t between t a ilga te
a nd bod y , reposition the hing e to ad just the
clear ance .
TA ILGA TE HANDLE PLA Y CHECKM14240024 0013 8
AC103270
A
A Section A – A
RodHolder
B
AC
1. Check t he t a ilgate h andle play .
St andard va lue (B): 2.3 − 5.9 mm
2.If it de via t es fro m the st anda rd va lue, r e move the
lower t a ilgate trim (Refe r to GROUP 52A, t a ilgate
trim
P.52A-21) and waterproo f film (Refer to
P.42-48).
3.Remove the ho lder f r om th e t a ilg ate ha ndle and
a d just according to the t a ilgate latch rod an d
t a ilgate handle co nnection position .
Page 320 of 800
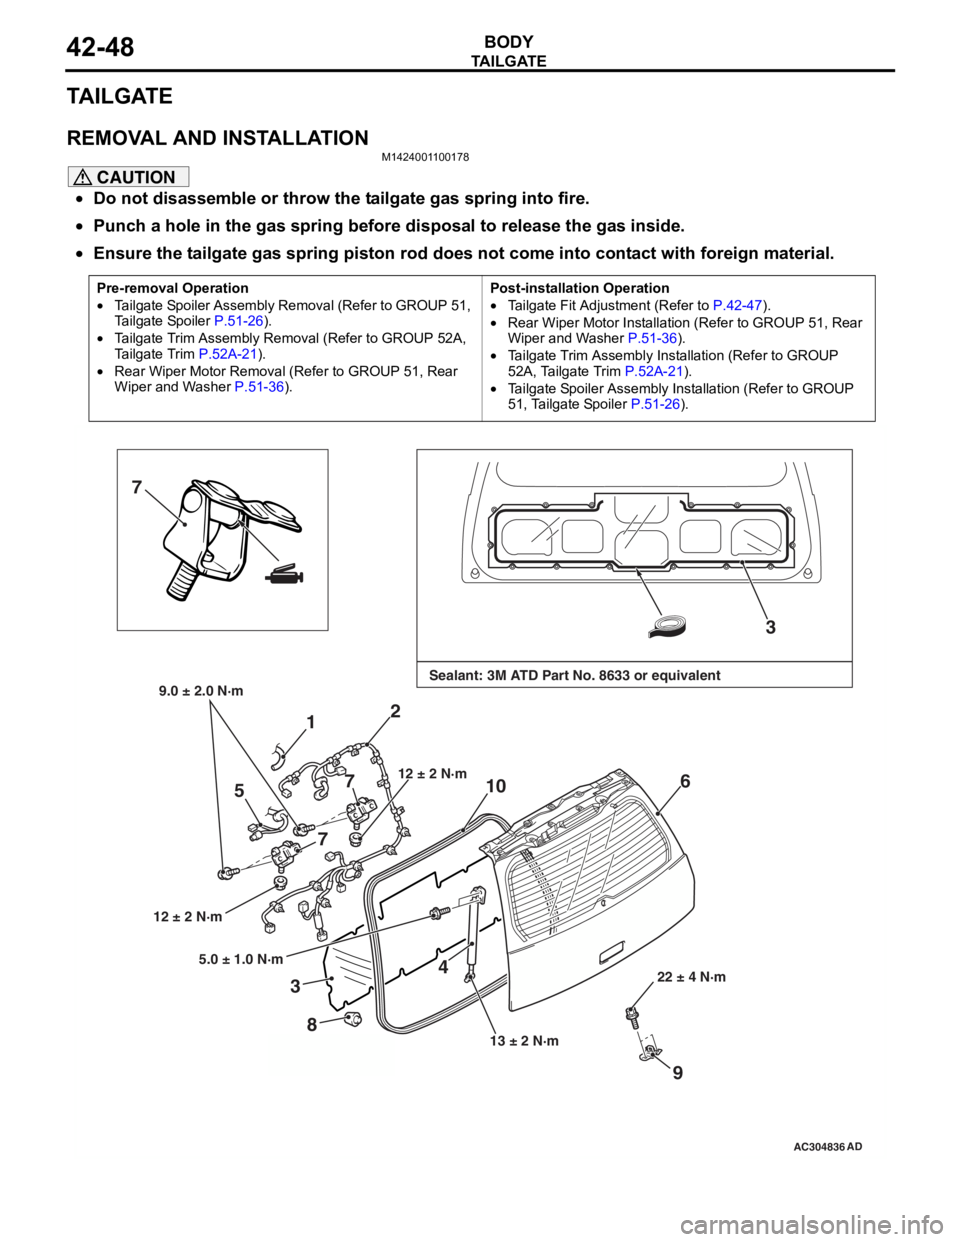
TAILGATE
BODY42-48
TA I L G AT E
REMOVAL AND INSTALLATION
M1424001100178
CAUTION
•Do not disassemble or throw the tailgate gas spring into fire.
•Punch a hole in the gas spring before disposal to release the gas inside.
•
Pre-removal Operation
•Tailgate Spoiler Assembly Removal (Refer to GROUP 51,
Tailgate Spoiler
P.51-26).
•Tailgate Trim Assembly Removal (Refer to GROUP 52A,
Tailgate Trim
P.52A-21).
•Rear Wiper Motor Removal (R efer to GROUP 51, Rear
Wiper and Washer
P.51-36).
Post-installation Operation
•Tailgate Fit Adjustment (Refer to P.42-47).
•Rear Wiper Motor Installation (Refer to GROUP 51, Rear
Wiper and Washer P.51-36).
•Tailgate Trim Assembly Installation (Refer to GROUP
52A, Tailgate Trim P.52A-21).
•Tailgate Spoiler Assembly Installation (Refer to GROUP
51, Tailgate Spoiler P.51-26).
AC304836
7
3
4
1
6
8
12 ± 2 N·m 13 ± 2 N·m22 ± 4 N·m
AD
Sealant: 3M ATD Part No. 8633 or equivalent9.0 ± 2.0 N·m
2
712 ± 2 N·m
5
7
9
5.0 ± 1.0 N·m
3
10
Ensure the tailgate gas spring piston rod does not come into contact with foreign material.
Page 321 of 800
AC305322
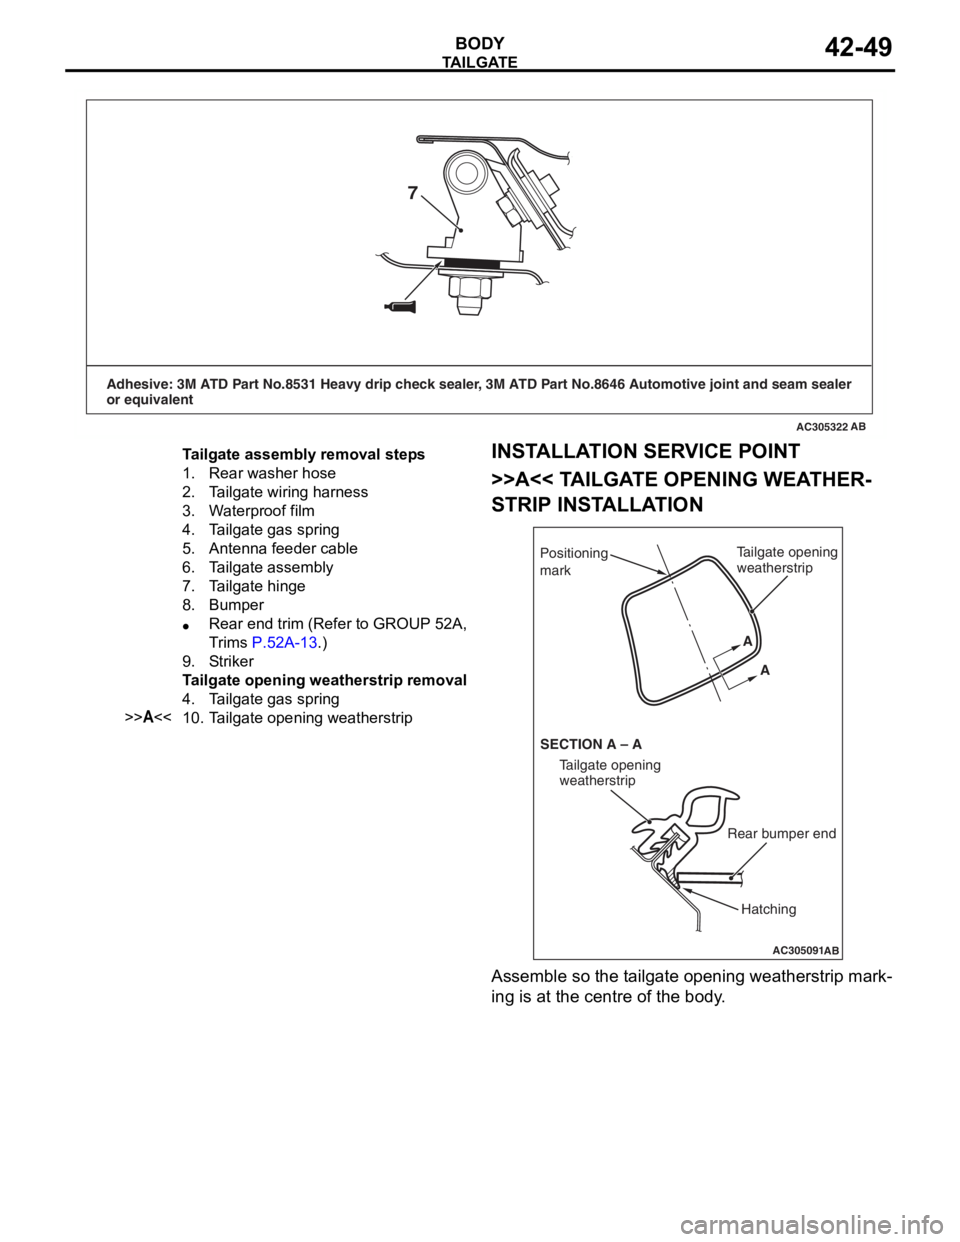
Adhesive: 3M ATD Part No.8531 Heavy drip check sealer, 3M ATD Part No.8646 Automotive joint and seam sealer
or equivalent
AB
7
Tailgate assembly removal steps
1.Rear washer hose
2.Tailgate wiring harness
3.Waterproof film
4.Tailgate gas spring
5.Antenna feeder cable
6.Tailgate assembly
7.Tailgate hinge
8.Bumper
•Rear end trim (Refer to GROUP 52A,
Trims
P.52A-13.)
9.Strik er
Tailgate opening weatherstrip removal
4.Tailgate gas spring
>>A<<10.Tailgate opening weatherstrip
TA ILGA TE
BOD Y42-49
INSTALLA T ION SER VICE POINT
>>A<< TA ILGA TE OPENING WEA T HER-
STRIP INSTALLA TION
AC305091
Positioning
mark
AB
Tailgate opening
weatherstrip
Rear bumper end
Tailgate opening
weatherstrip
SECTION A – A A
A
Hatching
Assemble so the t a ilgate o penin g weathe rstrip mark-
ing is at the centre o f the b ody .