MITSUBISHI LANCER 2014 8.G Owners Manual
Manufacturer: MITSUBISHI, Model Year: 2014, Model line: LANCER, Model: MITSUBISHI LANCER 2014 8.GPages: 434, PDF Size: 57.5 MB
Page 401 of 434
Replacement of light bulbs 9-42 Vehicle care and maintenance
9
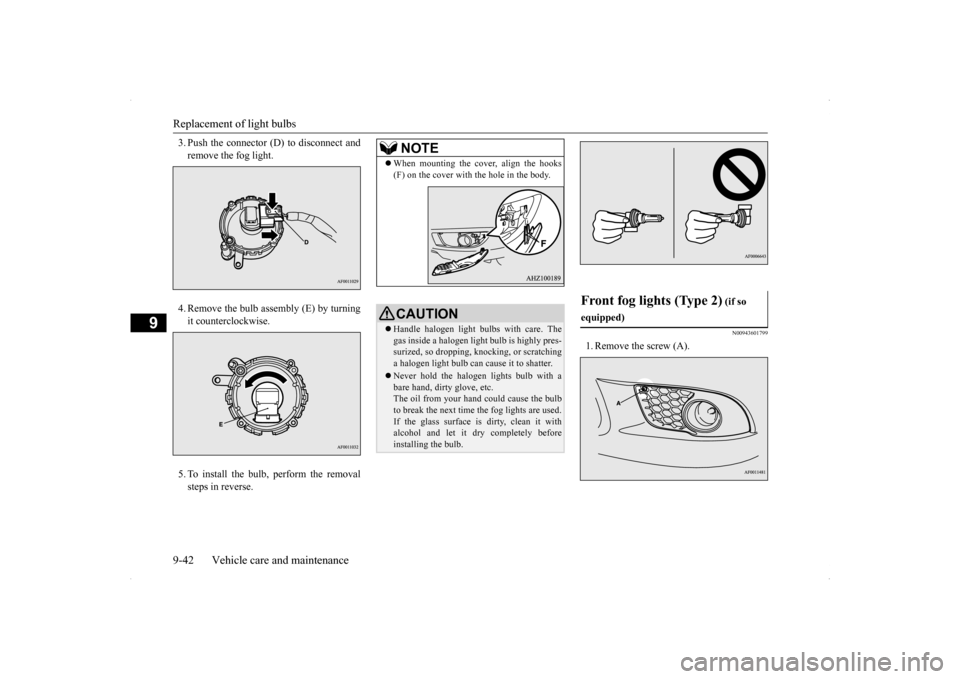
3. Push the connector (D) to disconnect and remove the fog light. 4. Remove the bulb assembly (E) by turning it counterclockwise. 5. To install the bulb, perform the removal steps in reverse.
N00943601799
1. Remove the screw (A).
NOTE
When mounting the cover, align the hooks (F) on the cover with the hole in the body.CAUTION Handle halogen light bulbs with care. The gas inside a halogen light bulb is highly pres-surized, so dropping, knocking, or scratching a halogen light bulb can cause it to shatter. Never hold the halogen lights bulb with a bare hand, dirty glove, etc. The oil from your hand could cause the bulbto break the next time the fog lights are used. If the glass surface is dirty, clean it with alcohol and let it dry completely beforeinstalling the bulb.
Front fog lights (Type 2)
(if so
equipped)
Page 402 of 434
Replacement of light bulbs
Vehicle care and maintenance 9-43
9
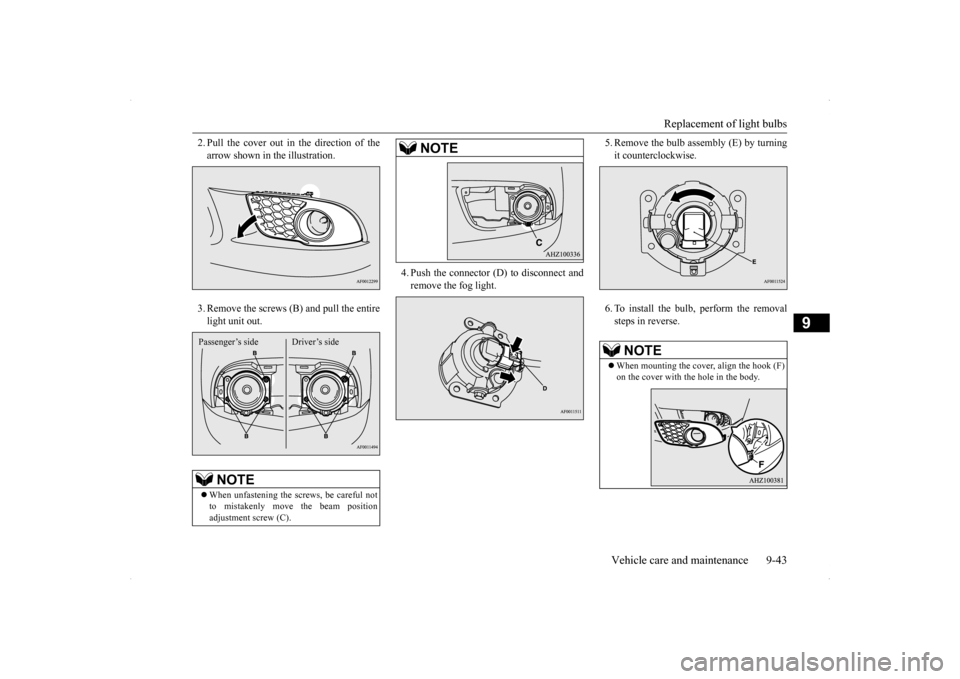
2. Pull the cover out in the direction of the arrow shown in the illustration. 3. Remove the screws (B) and pull the entire light unit out.
4. Push the connector (D) to disconnect and remove the fog light.
5. Remove the bulb assembly (E) by turning it counterclockwise. 6. To install the bulb, perform the removal steps in reverse.
NOTE
When unfastening the screws, be careful not to mistakenly move the beam position adjustment screw (C).Passenger’s side Driver’s side
NOTE
NOTE
When mounting the cover, align the hook (F) on the cover with the hole in the body.
Page 403 of 434
Replacement of light bulbs 9-44 Vehicle care and maintenance
9
N00943701514
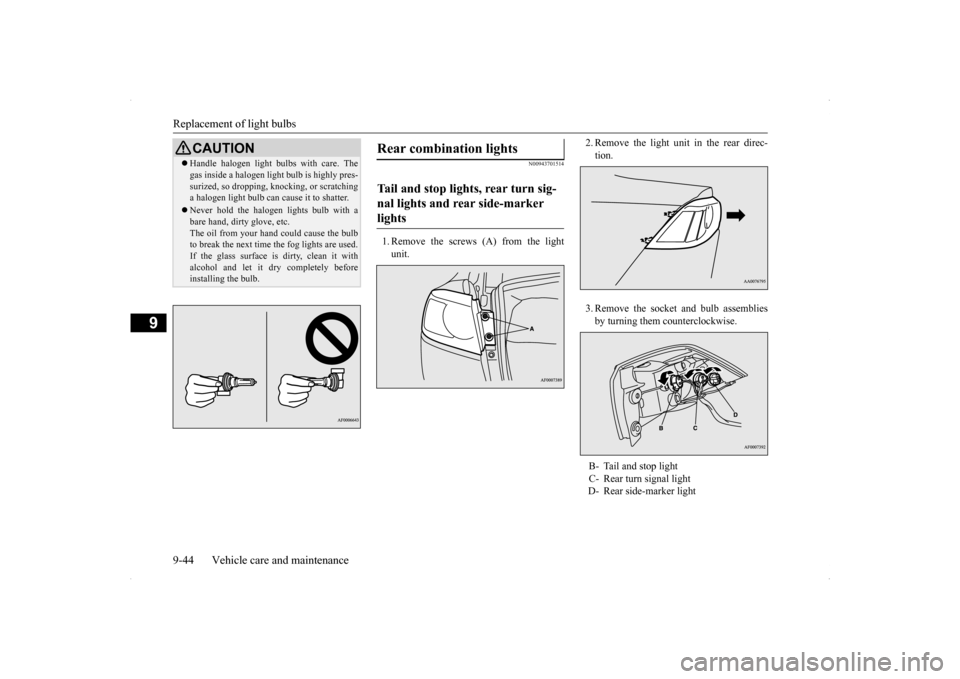
1. Remove the screws (A) from the light unit.
2. Remove the light unit in the rear direc- tion. 3. Remove the socket and bulb assemblies by turning them counterclockwise.
CAUTION Handle halogen light bulbs with care. The gas inside a halogen light bulb is highly pres- surized, so dropping, knocking, or scratching a halogen light bulb can cause it to shatter. Never hold the halogen lights bulb with a bare hand, dirty glove, etc. The oil from your hand could cause the bulbto break the next time the fog lights are used. If the glass surface is dirty, clean it with alcohol and let it dry completely beforeinstalling the bulb.
Rear combination lights Tail and stop lights, rear turn sig- nal lights and rear side-marker lights
B- Tail and stop light C- Rear turn signal lightD- Rear side-marker light
Page 404 of 434
Replacement of light bulbs
Vehicle care and maintenance 9-45
9
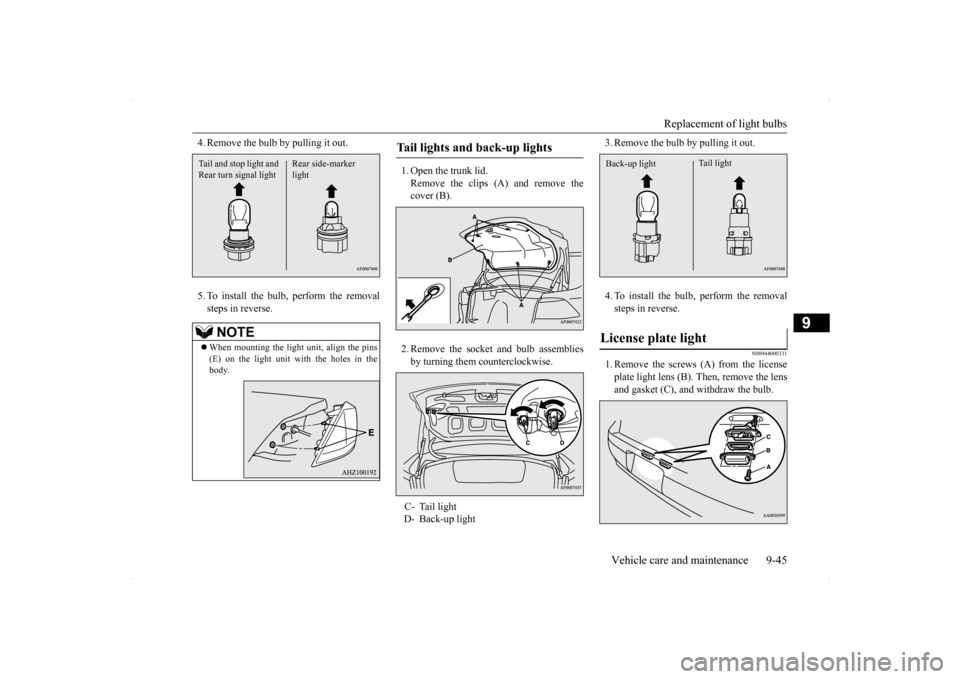
4. Remove the bulb by pulling it out. 5. To install the bulb, perform the removal steps in reverse.
1. Open the trunk lid. Remove the clips (A) and remove the cover (B). 2. Remove the socket and bulb assemblies by turning them counterclockwise.
3. Remove the bulb by pulling it out. 4. To install the bulb, perform the removal steps in reverse.
N00944000331
1. Remove the screws (A) from the licenseplate light lens (B). Then, remove the lensand gasket (C), and withdraw the bulb.
NOTE
When mounting the light unit, align the pins (E) on the light unit with the holes in thebody.
Rear side-marker light
Tail and stop light and Rear turn signal light
Tail lights and back-up lights C- Tail light D- Back-up light
License plate light
Tail light
Back-up light
Page 405 of 434
Replacement of light bulbs 9-46 Vehicle care and maintenance
9
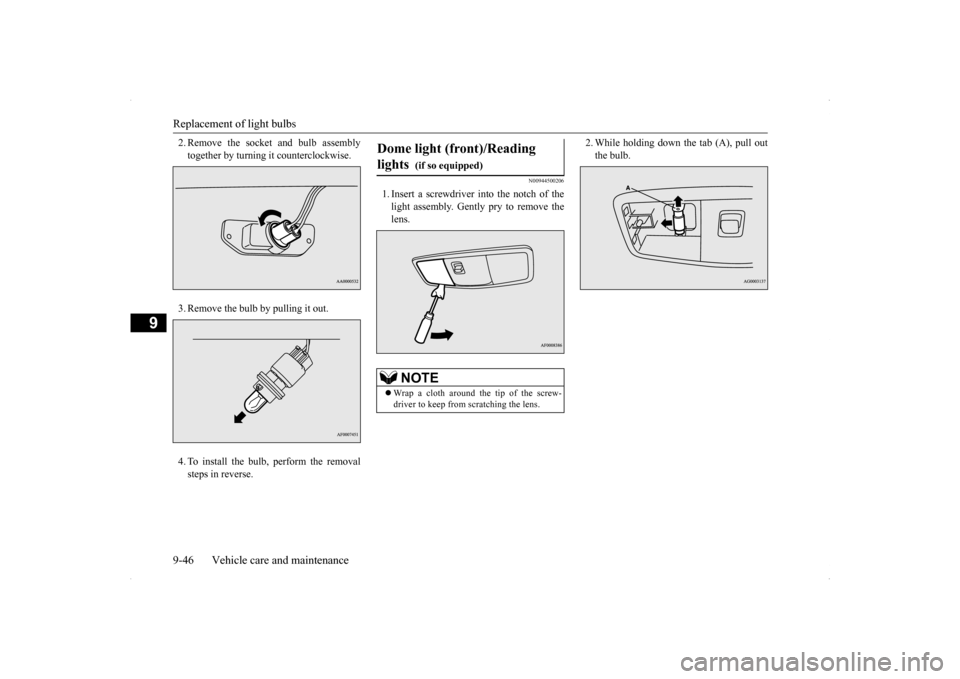
2. Remove the socket and bulb assembly together by turning it counterclockwise. 3. Remove the bulb by pulling it out.4. To install the bulb, perform the removal steps in reverse.
N00944500206
1. Insert a screwdriver into the notch of thelight assembly. Gently pry to remove the lens.
2. While holding down
the tab (A), pull out
the bulb.
Dome light (front)/Reading lights
(if so equipped)
NOTE
Wrap a cloth around the tip of the screw- driver to keep from scratching the lens.
Page 406 of 434
Replacement of light bulbs
Vehicle care and maintenance 9-47
9
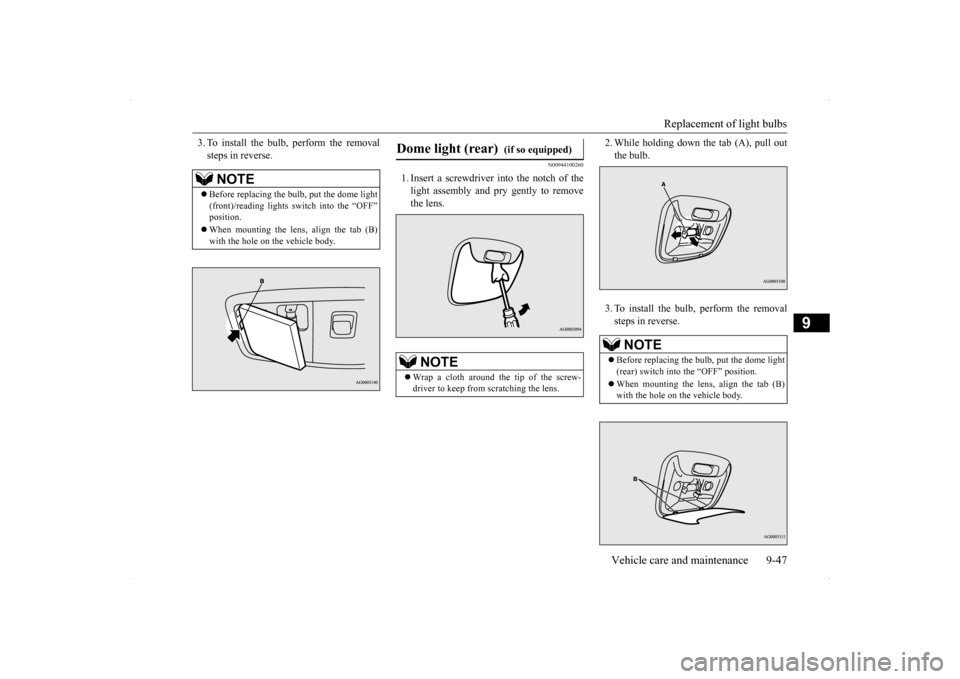
3. To install the bulb, perform the removal steps in reverse.
N00944100260
1. Insert a screwdriver into the notch of thelight assembly and pry gently to removethe lens.
2. While holding down
the tab (A), pull out
the bulb. 3. To install the bulb, perform the removal steps in reverse.
NOTE
Before replacing the bulb, put the dome light (front)/reading lights switch into the “OFF”position. When mounting the lens, align the tab (B) with the hole on the vehicle body.
Dome light (rear)
(if so equipped)
NOTE
Wrap a cloth around the tip of the screw- driver to keep from scratching the lens.
NOTE
Before replacing the bulb, put the dome light (rear) switch into the “OFF” position. When mounting the lens, align the tab (B) with the hole on the vehicle body.
Page 407 of 434
Vehicle care precautions 9-48 Vehicle care and maintenance
9
N00944800094
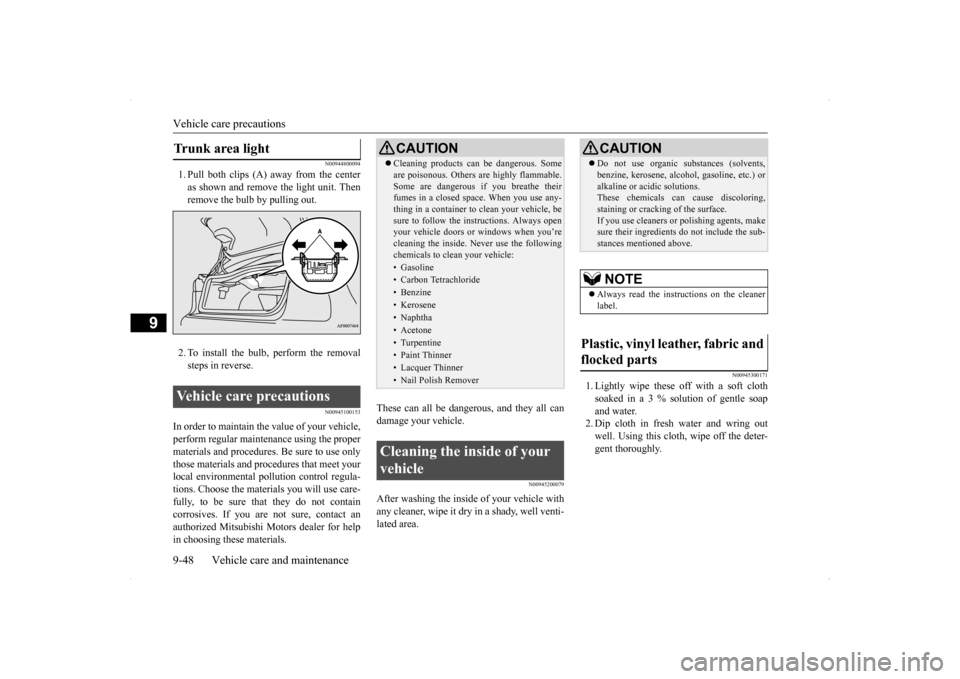
1. Pull both clips (A) away from the center as shown and remove the light unit. Thenremove the bulb by pulling out. 2. To install the bulb, perform the removal steps in reverse.
N00945100153
In order to maintain the value of your vehicle, perform regular maintenance using the proper materials and procedures. Be sure to use only those materials and procedures that meet yourlocal environmental pollution control regula- tions. Choose the materials you will use care- fully, to be sure that they do not containcorrosives. If you are not sure, contact an authorized Mitsubishi Motors dealer for help in choosing these materials.
These can all be dangerous, and they all can damage your vehicle.
N00945200079
After washing the inside of your vehicle withany cleaner, wipe it dry in a shady, well venti-lated area.
N00945300171
1. Lightly wipe these off with a soft clothsoaked in a 3 % solution of gentle soapand water. 2. Dip cloth in fresh water and wring out well. Using this cloth, wipe off the deter-gent thoroughly.
Trunk area light Vehicle care precautions
CAUTION Cleaning products can be dangerous. Some are poisonous. Others are highly flammable. Some are dangerous if you breathe their fumes in a closed space. When you use any- thing in a container to clean your vehicle, besure to follow the instructions. Always open your vehicle doors or windows when you’re cleaning the inside. Never use the followingchemicals to clean your vehicle:• Gasoline• Carbon Tetrachloride• Benzine• Kerosene• Naphtha• Acetone• Turpentine• Paint Thinner• Lacquer Thinner• Nail Polish Remover
Cleaning the inside of your vehicle
CAUTION Do not use organic substances (solvents, benzine, kerosene, alcohol, gasoline, etc.) or alkaline or acidic solutions. These chemicals can cause discoloring, staining or cracking of the surface.If you use cleaners or polishing agents, make sure their ingredients do not include the sub- stances mentioned above.NOTE
Always read the instructions on the cleaner label.
Plastic, vinyl leather, fabric and flocked parts
Page 408 of 434

Cleaning the outside of your vehicle Vehicle care and maintenance 9-49
9
N00945500131
1. To maintain the value of your new vehi- cle, maintain the upholstery carefully and keep the interior clean. Use a vacuum cleaner and brush to cleanthe seats. If stained, vinyl and synthetic leather should be cleaned with an appro- priate cleaner. Cloth fabrics can becleaned with either upholstery cleaner or a 3 % solution of gentle soap in lukewarm water. 2. Clean the carpeting with a vacuum cleaner and remove any stains with carpet cleaner. Oil and grease can be removed bylightly dabbing with a clean white cloth and spot remover.
N00945600161
1. To clean, lightly wipe the leather with a soft cloth soaked in a 5 % solution of gen-tle soap and water. 2. To rinse, dip the cloth in fresh water, wring it out well, and wipe off all thesoap. 3. To preserve and protect, use a leather pro- tecting agent on the genuine leather sur-face.
N00945700061
To protect your vehicle’s finish, wash it often and thoroughly. If desired, you may wax your vehicle using a nonabrasive automobile wax.
N00945800046
Industrial pollution, road tar, bird droppings,tree sap, insect remains, sea water and otherforeign matters can damage the finish on your vehicle. Generally, the longer any foreign materialstays on the finish, the worse the damage. Wash your vehicle as s
oon as possible when-
ever the finish gets soiled.
NOTE
Do not use cleaners, conditioners, and pro- tectants containing silicones or wax. Such products, when applied to the instru- ment panels or other parts, may cause reflec- tions on the windshield and obscure vision.Also, if such products get on the switches of the electrical accessories, it may lead to fail- ure of these accessories.
Upholstery
NOTE
If fuzzing is difficult to remove from the seat upholstery, draw a suitable defuzzing brush over the surface in one direction.
Genuine leather
(if so equipped)
NOTE
If genuine leather is wet with water, wipe it with a dry, soft cloth. If left damp, mildew may grow. The genuine leather surface can be damaged if brushed with a nylon or synthetic fiber brush. Organic solvents such as benzine, kerosene, alcohol, gasoline, acid or alkaline solvents can discolor the genuine leather surface and should not be used. Genuine leather seats can mildew if not kept clean. Clean up any oil stains immediately.
The genuine leather surface may harden and shrink if it is exposed to the direct sunlight for long hours. When your vehicle is parked, place it in the shade as much as possible. When the temperature of the vehicle interior rises in summer, vinyl products left on the genuine leather seat may deteriorate andstick to the seat.
Cleaning the outside of your vehicle Foreign material
NOTE
Page 409 of 434
Cleaning the outside of your vehicle 9-50 Vehicle care and maintenance
9
N00945900526
Chemicals contained in the dirt and dust picked up from air, rain, snow or road sur-faces can damage the paint and body of your vehicle if left on. Frequent washing and waxing is the best wayto protect your vehicle from this damage. Do not wash the vehicle in direct sunlight. Park the vehicle in the shade and spray it withwater to remove dust. Next, using plenty ofclean water and a car washing mitt or sponge, wash the vehicle from top to bottom. Use a mild car washing soap if necessary.Rinse thoroughly and wipe dry with a cham- ois or soft cloth. After washing the vehicle, carefully clean the joints and flanges of thedoors, hood, etc., where dirt is likely to remain.
Salt and other chemicals spread on winter roads in some geographical areas can have adetrimental effect on the vehicle underbody. You should flush the underbody with a high pressure hose every time you wash the out-side of your vehicle. Take special care to remove mud or other debris which could trap and hold salt andmoisture. After washing your vehicle, wipe off all waterdrops from the rubber parts around thedoors to prevent the doors from freezing.
Wa s h i n g
CAUTION When washing the underside of your vehicle or the wheels, wear a pair of gloves to pro-tect your hands. If your vehicle has rain sensor wipers, place the wiper switch lever in the “OFF” position to deactivate the rain sensor before washingthe vehicle. Otherwise, the wipers will oper- ate in the presence of water spray on the windshield and may get damaged as a result.
Never spray or splash water on the electrical parts in the engine compartment. This may damage them. Be careful also when washing the underbody. Do not spray water into the engine compartment. Avoid automatic car washers that use rotat- ing brushes. These brushes may scratch thepaint surface and make it dull. Scratches are more noticeable on darker col- ored vehicles. Some hot water washing equipment uses high pressure and heat to clean your vehicle.This heated water may damage your vehi- cle’s resin parts. It can flood the interior of the vehicle. Therefore, be sure of the follow-ing:• Keep the washing nozzle at least 20 inches(50 cm) away from the vehicle body.• When washing around the door glass, holdthe nozzle at a distance of more than 20 inches (50 cm) and at right angles to the glass surface.
When using high-pressure water to wash a vehicle equipped with the F.A.S.T.-key sys-tem, keep the water from spraying on the open button on the trunk. This could cause the trunk to open and flood the inside of the trunk. Make sure to do the following when using an automatic car wash, with help from either this manual or the car wash operator, toavoid damaging your vehicle:• Fold the outside mirrors.CAUTION
• Put down (except for vehicles with SIRIUS satellite radio antenna) or remove the antenna.• If your vehicle is equipped with rearspoiler, check with the car wash operator before using the car wash.• If your vehicle has rain sensor wipers, placethe wiper switch lever in the “OFF” posi- tion to deactivate the rain sensor.
During cold weather
CAUTION
Page 410 of 434
Cleaning the outside of your vehicle Vehicle care and maintenance 9-51
9
N00946000188
Wax your vehicle once or twice a year, or when water does not bead up on the paint. Use a soft cloth to put a small amount of wax on the painted surfaces. After the wax hasdried, polish with a dry soft cloth. Do not wax your vehicle in direct sunlight. You should wax when the painted surfacesare cool.
N00946100059
If painted surfaces have been severely dam-aged and lost their original luster and colortone, polish the surface lightly with a fine polishing compound. Avoid limiting your polishing to the damaged surface only; polisha somewhat wider area, moving the polishing cloth in one direction. After polishing, flush the compound from the surface and apply acoat of wax to regain a beautiful luster.
N00946200063
Small cracks and scratches in the paint coatshould be touched up as soon as possible withtouch-up paint to prevent corrosion. Check body areas facing the road or the tires carefully for damage to the paint caused byflying stones, etc. The paint code number for your vehicle can be found on the vehicle information code plate in the engine compart-ment.
N00946300178
Use a sponge or chamois to clean these parts.If a vehicle wax sticks to a gray or blackrough surface of the bumper, molding or lights, the surface may appear white in color. In this case, wipe it
off using lukewarm water
and a soft cloth or chamois.
NOTE
When the door is frozen, opening it by force may tear off or crack the rubber gasket installed around the door. Pour warm water to melt the ice. Be sure to thoroughly wipe off the water after opening the door. To pre-vent freezing of the weatherstripping on the doors, hood, etc., treat
with silicone lubri-
cant.
Waxing
CAUTION Waxes containing high abrasive compounds should not be used. These waxes remove rust and stain effectively from the paintwork, butare harmful to the finish
on the paint and the
plate, because they also remove clearcoat. They are also harmful to other glossy sur-faces such as the grill
e, trim, moldings, etc.
Do not use gasoline, kerosene, benzine or paint thinners to remove road tar or other dirt from the vehicle surface. Do not put wax on the areas having black matte coating because it can cause uneven discoloration, patches, blurs, etc. If these get wax on them, wipe the wax off right awaywith a soft cloth and warm water. On vehicles with sunroof, be careful not to apply any wax on the weatherstrip (black rubber) when waxing the area around the sunroof opening.If stained with wax, the weatherstrip cannot maintain a weatherproof seal with the sun- roof.
Polishing
CAUTION
Damaged paint Cleaning plastic parts
CAUTION Do not use a scrubbing brush or other rough scrubber as these may damage the plastic surface. Do not use wax containing compounds (pol- ishing powder) which may damage the plas-tic surface.