trunk MITSUBISHI LANCER 2014 8.G Owners Manual
[x] Cancel search | Manufacturer: MITSUBISHI, Model Year: 2014, Model line: LANCER, Model: MITSUBISHI LANCER 2014 8.GPages: 434, PDF Size: 57.5 MB
Page 5 of 434
Instruments and controls 1-3 Overview
1
N00100202502
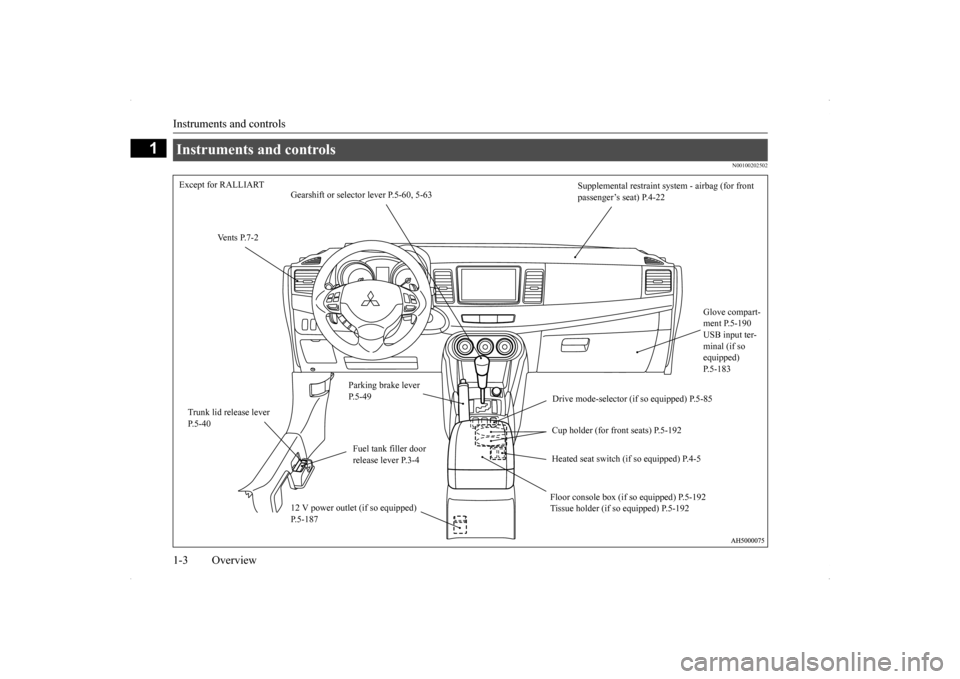
Instruments and controls Except for RALLIART
Supplemental restraint sy
stem - airbag (for front
passenger’s seat) P.4-22
Gearshift or selector lever P.5-60, 5-63
Vents P.7-2
Glove compart- ment P.5-190 USB input ter- minal (if so equipped) P.5-183
Parking brake lever P.5-49
Drive mode-selector (if so equipped) P.5-85
Trunk lid release lever P.5-40
Cup holder (for front seats) P.5-192
Fuel tank filler door release lever P.3-4
Heated seat switch (if so equipped) P.4-5 Floor console box (if so equipped) P.5-192 Tissue holder (if so equipped) P.5-192
12 V power outlet (if so equipped) P.5-187
Page 6 of 434
Instruments and controls
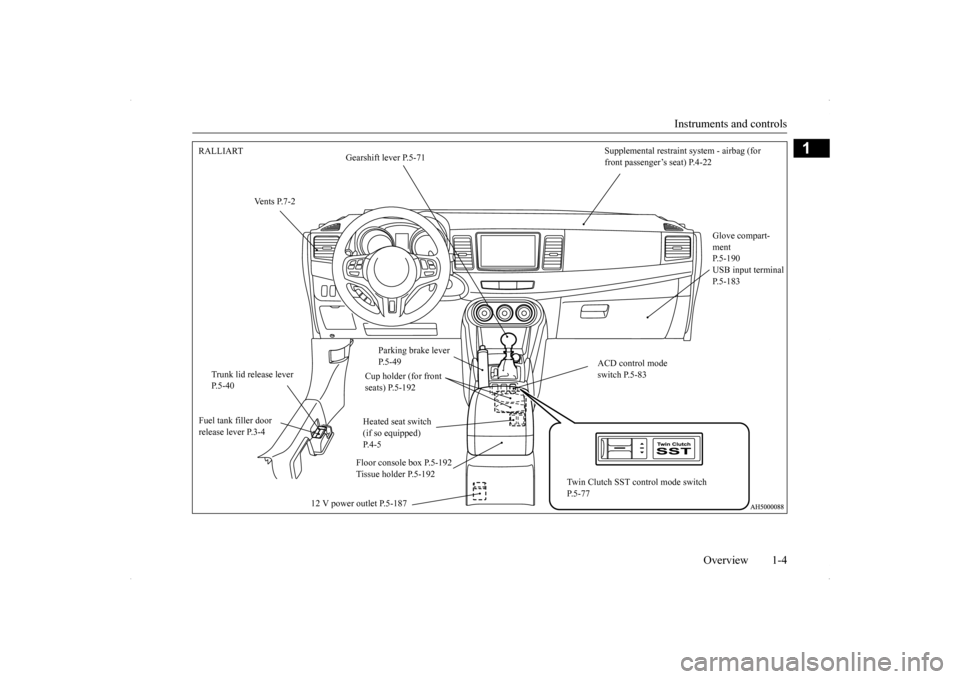
Overview 1-4
1
Supplemental restraint system - airbag (for front passenger’s seat) P.4-22
RALLIART
Gearshift lever P.5-71
Vents P.7-2
Glove compart- ment P.5-190USB input terminal P.5-183
Parking brake lever P.5-49
ACD control mode switch P.5-83
Trunk lid release lever P.5-40
Cup holder (for front seats) P.5-192 Heated seat switch (if so equipped) P.4-5
Fuel tank filler door release lever P.3-4
Floor console box P.5-192 Tissue holder P.5-192
Twin Clutch SST control mode switch P.5-77
12 V power outlet P.5-187
Page 10 of 434
Trunk area
Overview 1-8
1
N00100500413
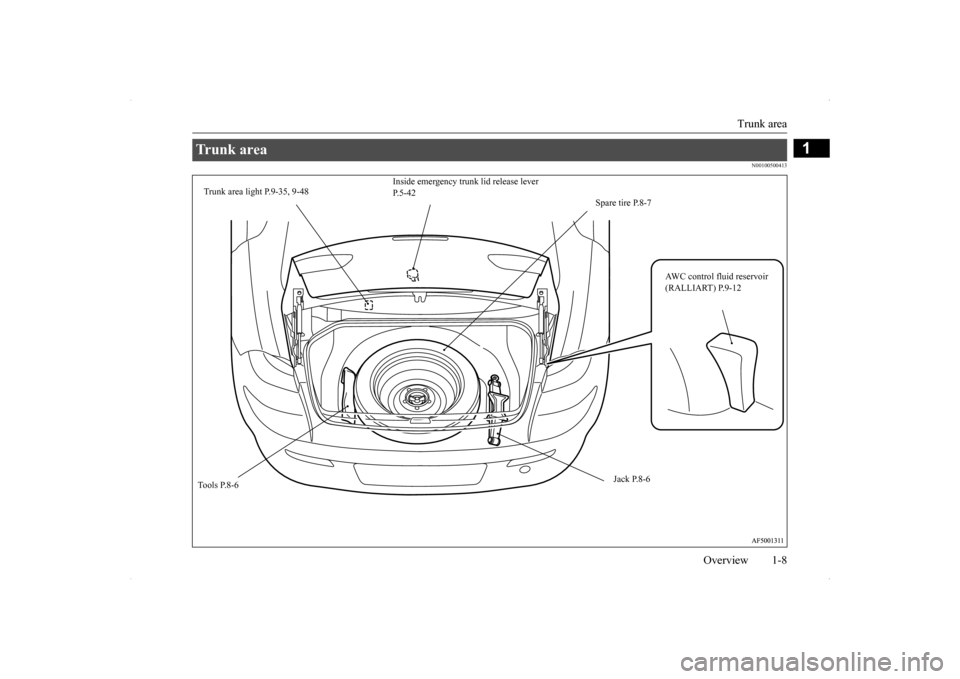
Trunk area
Inside emergency trunk lid release lever P.5-42
Trunk area light P.9-35, 9-48
Spare tire P.8-7
AWC control fluid reservoir (RALLIART) P.9-12
Jack P.8-6
Tools P.8-6
Page 13 of 434
Outside (Rear) 1-11 Overview
1
N00100602362
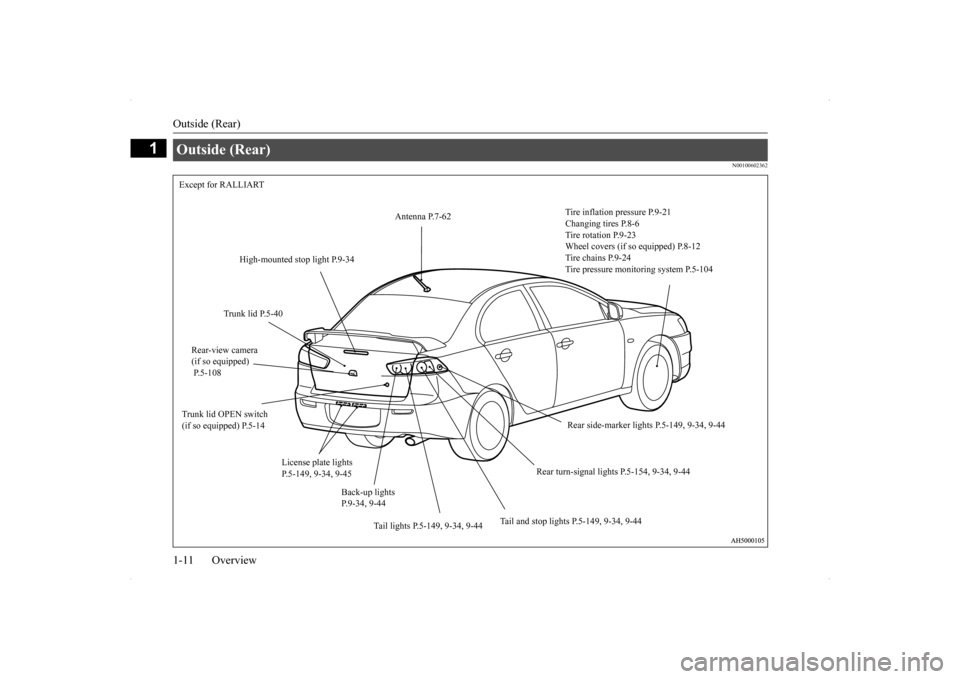
Outside (Rear) Except for RALLIART
Tire inflation pressure P.9-21 Changing tires P.8-6 Tire rotation P.9-23 Wheel covers (if so
equipped) P.8-12
Tire chains P.9-24 Tire pressure monitoring system P.5-104
Antenna P.7-62
High-mounted stop light P.9-34
Trunk lid P.5-40
Rear-view camera (if so equipped) P.5-108 Trunk lid OPEN switch (if so equipped) P.5-14
Rear side-marker lights P.5-149, 9-34, 9-44
License plate lights P.5-149, 9-34, 9-45
Rear turn-signal lights P.5-154, 9-34, 9-44
Back-up lights P.9-34, 9-44
Tail and stop lights P.5-149, 9-34, 9-44
Tail lights P.5-149, 9-34, 9-44
Page 14 of 434
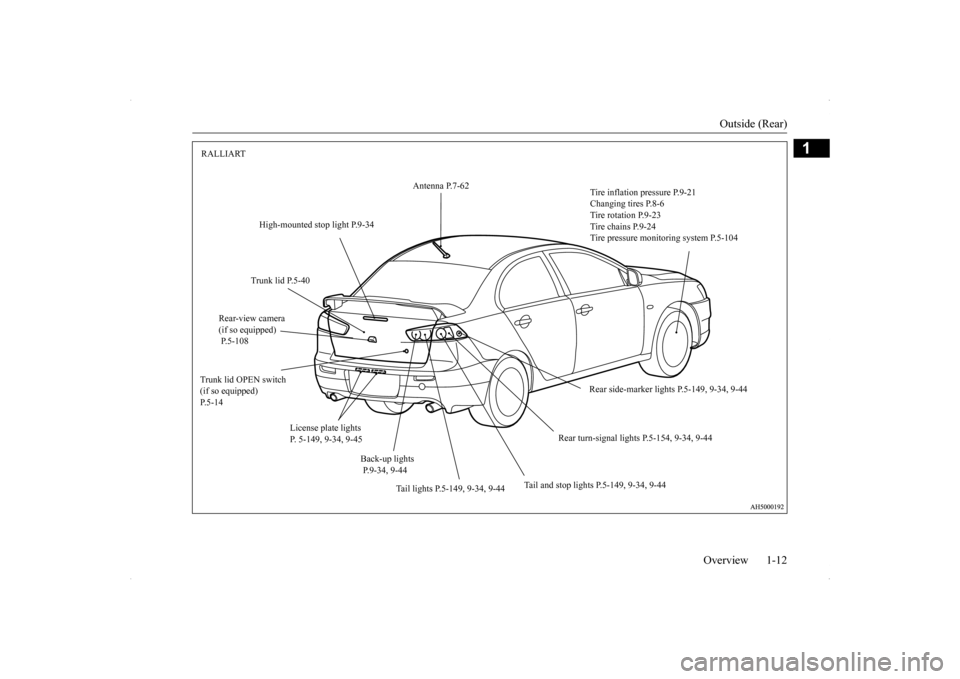
Outside (Rear)
Overview 1-12
1
RALLIART
Antenna P.7-62
Tire inflation pressure P.9-21 Changing tires P.8-6 Tire rotation P.9-23Tire chains P.9-24 Tire pressure monitoring system P.5-104
High-mounted stop light P.9-34 Trunk lid P.5-40
Rear-view camera (if so equipped) P.5-108
Trunk lid OPEN switch (if so equipped) P.5-14
Rear side-marker lights P.5-149, 9-34, 9-44
License plate lights P. 5-149, 9-34, 9-45
Rear turn-signal lights P.5-154, 9-34, 9-44
Back-up lights P.9-34, 9-44
Tail and stop lights P.5-149, 9-34, 9-44
Tail lights P.5-149, 9-34, 9-44
Page 50 of 434
Maintenance and inspection of seat belts
Seat and restraint systems 4-21
4
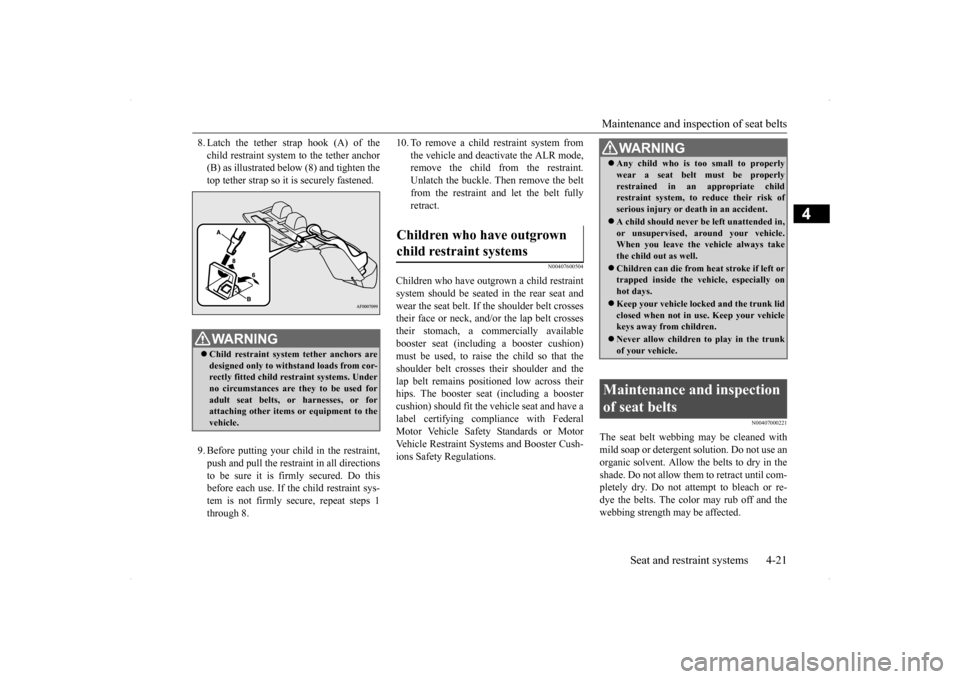
8. Latch the tether strap hook (A) of the child restraint system to the tether anchor (B) as illustrated below (8) and tighten the top tether strap so it is securely fastened. 9. Before putting your child in the restraint, push and pull the restraint in all directions to be sure it is firmly secured. Do this before each use. If the child restraint sys-tem is not firmly secure, repeat steps 1 through 8.
10. To remove a child restraint system from
the vehicle and deactivate the ALR mode, remove the child from the restraint. Unlatch the buckle. Then remove the beltfrom the restraint and let the belt fully retract.
N00407600504
Children who have outgrown a child restraintsystem should be seated in the rear seat and wear the seat belt. If the shoulder belt crossestheir face or neck, and/or the lap belt crosses their stomach, a commercially available booster seat (including a booster cushion)must be used, to raise the child so that the shoulder belt crosses their shoulder and the lap belt remains positioned low across theirhips. The booster seat (including a booster cushion) should fit the vehicle seat and have a label certifying compliance with FederalMotor Vehicle Safety Standards or Motor Vehicle Restraint Systems and Booster Cush- ions Safety Regulations.
N00407000221
The seat belt webbing may be cleaned withmild soap or detergent solution. Do not use anorganic solvent. Allow the belts to dry in the shade. Do not allow them to retract until com- pletely dry. Do not attempt to bleach or re-dye the belts. The color may rub off and the webbing strength may be affected.
WA R N I N G Child restraint system tether anchors are designed only to withstand loads from cor-rectly fitted child restraint systems. Under no circumstances are they to be used for adult seat belts, or harnesses, or forattaching other items or equipment to the vehicle.
Children who have outgrown child restraint systems
WA R N I N G Any child who is too small to properly wear a seat belt must be properly restrained in an appropriate child restraint system, to reduce their risk of serious injury or death in an accident. A child should never be left unattended in, or unsupervised, around your vehicle.When you leave the
vehicle always take
the child out as well. Children can die from he
at stroke if left or
trapped inside the vehicle, especially on hot days. Keep your vehicle locked and the trunk lid closed when not in use. Keep your vehiclekeys away from children. Never allow children to play in the trunk of your vehicle.
Maintenance and inspection of seat belts
Page 68 of 434
5
Features and controlsBreak-in recommendation
s ...............................................................5-3
Keys .....................................................
.............................................5-3
Electronic immobilizer (Anti-theft starting system) .........................5-4 Keyless entry system (if so equipped) ..............................................5-7Free-hand Advanced Security Transmitter (F.A.S.T.-key) (if so equipped)................................
.....................................................5-12
Door locks........................
...............................................................5-36
Power door locks .............
...............................................................5-38
“Child safety locks” for
rear door...................................................5-40
Trunk lid ....................................
.....................................................5-40
Inside emergency trunk lid
release .................................................5-42
Theft-alarm system ..........
...............................................................5-42
Power windows................
...............................................................5-45
Sunroof (if so equipped
) .........................................
........................5-47
Parking brake ...................
...............................................................5-49
Steering wheel tilt lock lever ..........................................................5-51Inside day/night rearview
mirror ....................................................5-51
Outside rearview mirr
ors ................................................................5-53
Ignition switch .................
...............................................................5-54
Steering wheel lock..........
...............................................................5-56
Starting and stopping the e
ngine ....................................................5-56
Turbocharger operation (if so equipped) ........................................5-60Manual transaxle (if so equipped) ..................................................5-60Continuously variable transmissi
on (CVT) (if so equipped)..........5-62
Twin Clutch SST (Sportronic Shif
t Transmission) (if so equipped)
...................................................................
..................................5-71
ACD (Active center differential system) (if so equipped)..............5-83 Electronically controlled 4WD system (if so equipped).................5-85
All-wheel driving opera
tion ........................................................... 5-87
Cautions on handling of all-wheel drive vehicles ......................... 5-89 Limited-slip differential (i
f so equipped) ....................................... 5-90
Service brake ..................
.................................................
............... 5-90
Brake assist system
................................................
......................... 5-91
Hill start assist (vehicles with
Twin Clutch SST) ........................... 5-91
Anti-lock braking syst
em ......................................
......................... 5-92
Active Stability Control (ASC
) (if so equipped) ............................ 5-95
Power steering system
...........................................
......................... 5-98
Cruise control (if so eq
uipped) ....................................................... 5-99
Tire pressure monitoring
system .................................................. 5-104
Rear-view camera (if so
equipped)..............
................................. 5-108
Instrument cluster ..........
.............................................................. 5-110
Multi-information display ............................................................ 5-112 Indicator light, warning light, and information screen display list
.................................................................
................................. 5-133
Indicators ..................................
.................................................... 5-145
Warning lights.................
.................................................
............. 5-146
Information screen disp
lay ....................................
....................... 5-147
Combination headlights and dimmer switch ................................ 5-149 Headlight leveling switch (if
so equipped)................................... 5-154
Turn signal lever ...
.................................................
....................... 5-154
Hazard warning flasher
switch ..................................................... 5-155
Front fog light switch (if so
equipped) ......................................... 5-156
Wiper and washer swit
ch ......................................
....................... 5-156
Electric rear window def
ogger switch .......................................... 5-160
Horn switch ..............................
.................................................... 5-161
Link System (if so equi
pped) ....................................................... 5-161
Page 74 of 434
Keyless entry system (if so equipped)
Features and controls 5-7
5
cles sold in U.S.A.) and Industry Canada Rules (For vehicles sold in Canada). This device complies with Part 15 of FCC Rules and Industry Canada licence-exempt RSSstandard(s). Operation is subject to the following two con- ditions. This device may not cause harmful inter- ference. This device must accept any interference received, including interference that maycause undesired operation.
N00509000763
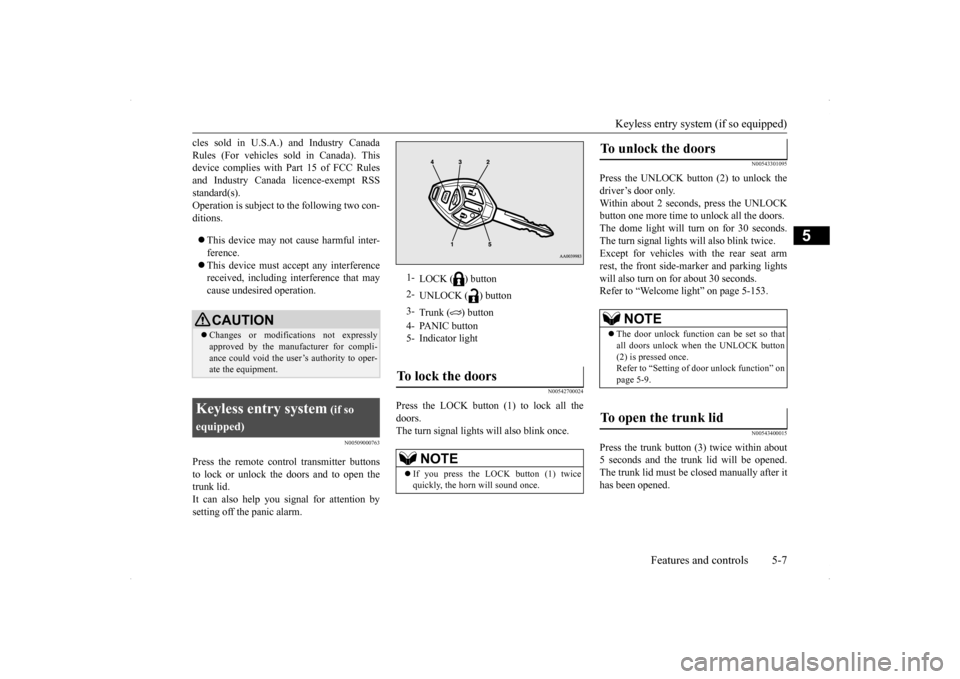
Press the remote control transmitter buttonsto lock or unlock the doors and to open the trunk lid. It can also help you signal for attention bysetting off the panic alarm.
N00542700024
Press the LOCK button (1) to lock all thedoors.The turn signal lights will also blink once.
N00543301095
Press the UNLOCK button (2) to unlock thedriver’s door only.Within about 2 seconds, press the UNLOCK button one more time to unlock all the doors. The dome light will turn on for 30 seconds.The turn signal lights will also blink twice. Except for vehicles with the rear seat arm rest, the front side-marker and parking lightswill also turn on for about 30 seconds. Refer to “Welcome light” on page 5-153.
N00543400015
Press the trunk button (3) twice within about5 seconds and the trunk lid will be opened.The trunk lid must be closed manually after it has been opened.
CAUTION Changes or modifications not expressly approved by the manufacturer for compli- ance could void the user’s authority to oper-ate the equipment.
Keyless entry system
(if so
equipped)
1-
LOCK ( ) button
2-
UNLOCK ( ) button
3-
Trunk ( ) button
4- PANIC button 5- Indicator lightTo lock the doors
NOTE
If you press the LOCK button (1) twice quickly, the horn will sound once.
To unlock the doors
NOTE
The door unlock function can be set so that all doors unlock when the UNLOCK button (2) is pressed once. Refer to “Setting of door unlock function” onpage 5-9.
To open the trunk lid
Page 77 of 434
Keyless entry system (if so equipped) 5-10 Features and controls
5
1. Have available all (current and new) remote control transmitters you wish to register. 2. With a valid (already registered) remotecontrol transmitter, press the UNLOCK button (2) for 4 to 10 seconds. Then press and hold the LOCK button (1).3. Within 10 seconds of pressing the LOCK button, release the LOCK and UNLOCK buttons in sequence.At this time, ID codes for all remote con-trol transmitters except for the transmitter used in steps 2 and 3 are erased and the answerback function (door is locked andunlocked) informs you that the registra- tion mode has been activated. 4. Within 60 seconds after step 3, completethe following ID code registration opera- tion using the next remote control trans- mitter you wish to register within 4seconds. i. Press both the LOCK and UNLOCK buttons for 2 seconds.ii. Release both the LOCK and UNLOCK buttons for 1 second.
iii. Press the UNLOCK button.
The answerback function informs you that the ID code registration of the transmitter is completed.
5. To register the ID codes of additional remote control transmitters, repeat step 4 within 60 seconds after step 4.
6. If no ID code of a remote control trans- mitter is registered within 60 seconds after step 4, the registration mode is can- celed and the normal mode returns.
N0054610
1111
Your keyless entry system operates on a radio frequency subject to Federal Communica-tions Commission (FCC) Rules (For vehicles sold in U.S.A.) and Industry Canada Rules (For vehicles sold in Canada). This devicecomplies with Part 15 of FCC Rules and Industry Canada licence-exempt RSS stan- dard(s).Operation is subject to the following two con- ditions. This device may not cause harmful inter- ference.
NOTE
For verification purposes, try to lock and unlock the doors after the registration iscompleted. The indicator light (5) comes on each time a button is pressed. The keyless entry system does not work if the key is in the ignition switch. The remote control transmitter can be used from about 40 feet (12 m) away. However, this distance may change if your vehicle is near a TV transmitting tower, a power sta-tion, or a radio station. If the UNLOCK button (2) is pressed when all doors are locked and no doors are opened within about 30 seconds, the doors will auto- matically re-lock. If the following conditions are observed after pressing the buttons on the remote controltransmitter, the battery in the remote control transmitter may need to be replaced. • The doors cannot be locked or unlocked. • The trunk lid cannot be opened.• The panic alarm cannot be operated.• The indicator light (5) is dim or does not come on.
If you lose your remote control transmitter, please contact an authorized Mitsubishi Motors dealer for a replacement. If you wish to obtain an additional remote control transmitter, please contact an autho- rized Mitsubishi Motors dealer. A maximum of eight remote control transmitters can beprogrammed for your vehicle. To use the new remote control transmitters, it is necessary to register the key with both the electronic immobilizer and keyless entry sys- tem.Also refer to “Electr
onic immobilizer (Anti-
theft starting system): Customer key pro- gramming” on page 5-6.
General information
NOTE
Page 79 of 434
Free-hand Advanced Security Transmitter (F.A.S.T.-key) (if so equipped) 5-12 Features and controls
5
7. Place the remote control transmitter in the remote control transmitter case, then securely close the remote control trans- mitter case.8. Check the keyless entry system to see that it works.
N00503100052
The Free-hand Advanced Security Transmit- ter (F.A.S.T.-key) enables the doors to be locked and unlocked, the trunk lid to be opened, and the engine to be started simplyby carrying it.
The F.A.S.T.-key can also be used as the remote control transmitter of the keyless entry system. Refer to “Free-hand Advanced SecurityTransmitter (F.A.S.T.-key)”: “Keyless entry system” on page 5-30.
NOTE
You may purchase a replacement battery at an electric appliance store. Your authorized Mitsubishi Motors dealer can replace the battery for you if you prefer.CAUTION When the remote control transmitter case is opened, be careful to keep water, dust, etc. out. Also, do not touch the internal compo-nents.
Free-hand Advanced Secu- rity Transmitter (F.A.S.T.-key)
(if so equipped)
The F.A.S.T.-key must be carried by the driver. The F.A.S.T.-key is required for vehicle operations such as locking and unlocking the doors, opening the trunk lid, and starting the engine. When leaving the vehicle, make sure you are carrying the F.A.S.T.-key and then lock the vehi-cle.
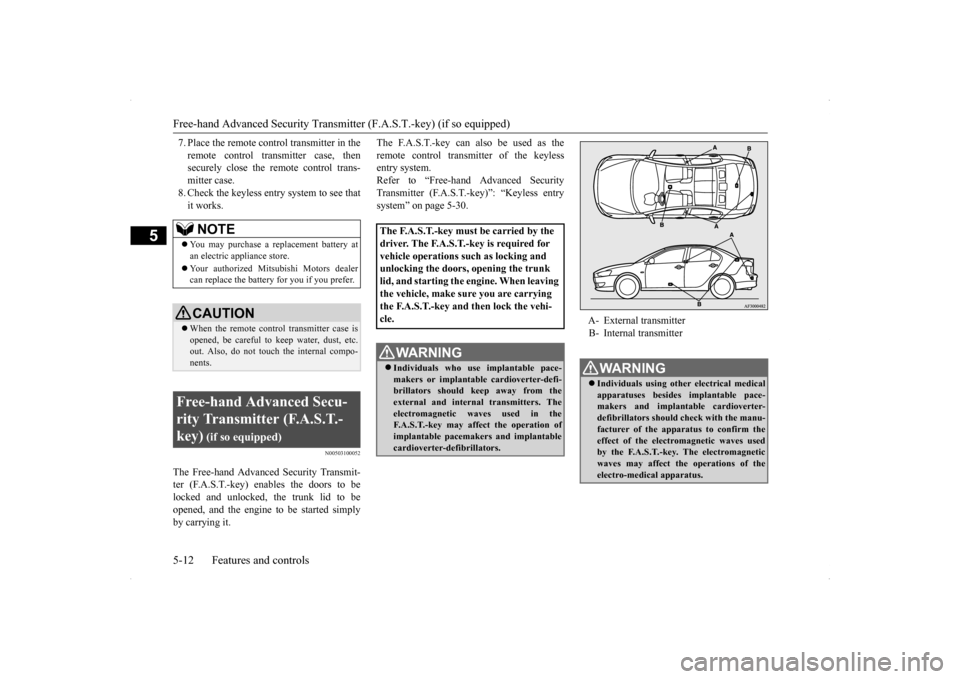
WA R N I N G Individuals who use implantable pace- makers or implantable cardioverter-defi- brillators should keep away from the external and internal
transmitters. The
electromagnetic waves used in the F.A.S.T.-key may affect the operation of implantable pacemakers and implantablecardioverter-defibrillators.
A- External transmitter B- Internal transmitterWA R N I N G Individuals using other electrical medical apparatuses besides implantable pace-makers and implantable cardioverter- defibrillators should check with the manu- facturer of the apparatus to confirm the effect of the electromagnetic waves used by the F.A.S.T.-key. The electromagneticwaves may affect the operations of the electro-medical apparatus.