headlights MITSUBISHI LANCER 2017 8.G Owner's Manual
[x] Cancel search | Manufacturer: MITSUBISHI, Model Year: 2017, Model line: LANCER, Model: MITSUBISHI LANCER 2017 8.GPages: 385, PDF Size: 14.34 MB
Page 197 of 385
Headlight leveling switch (if so equipped) 5-132 Features and controls
5
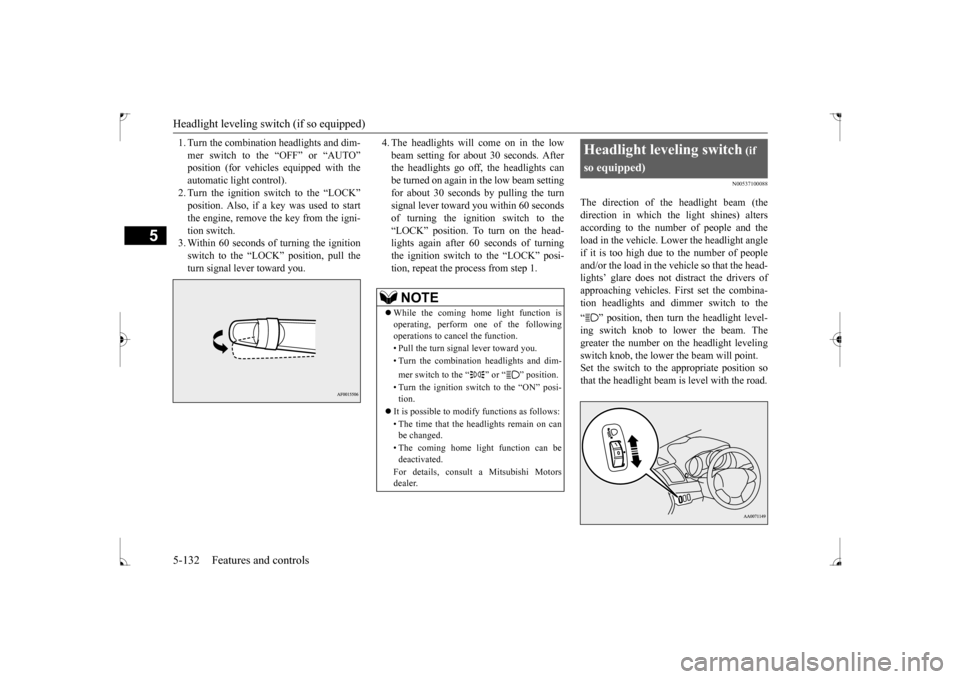
1. Turn the combination headlights and dim- mer switch to the “OFF” or “AUTO” automatic light control).2. Turn the ignition switch to the “LOCK” position. Also, if a key was used to start the engine, remove the key from the igni-tion switch. 3. Within 60 seconds of turning the ignition switch to the “LOCK” position, pull theturn signal lever toward you.
4. The headlights will come on in the low beam setting for about 30 seconds. After the headlights go off, the headlights can be turned on again in the low beam settingfor about 30 seconds by pulling the turn signal lever toward you within 60 seconds of turning the ignition switch to the“LOCK” position. To turn on the head- lights again after 60 seconds of turning the ignition switch to the “LOCK” posi-tion, repeat the process from step 1.
N00537100088
The direction of the headlight beam (thedirection in which the light shines) alters according to the number of people and the load in the vehicle. Lower the headlight angleif it is too high due to the number of people and/or the load in the vehicle so that the head- lights’ glare does not distract the drivers ofapproaching vehicles. First set the combina-tion headlights and dimmer switch to the “ ” position, then turn the headlight level- ing switch knob to lower the beam. The greater the number on the headlight levelingswitch knob, the lower the beam will point. Set the switch to the appropriate position so that the headlight beam is level with the road.
NOTE
While the coming home light function is operating, perform one of the following operations to cancel the function. • Pull the turn signal lever toward you. • Turn the combination headlights and dim- mer switch to the “ ” or “ ” position. • Turn the ignition switch to the “ON” posi- tion.
It is possible to modify functions as follows: • The time that the headlights remain on can be changed. • The coming home light function can be deactivated. For details, consult a Mitsubishi Motors dealer.
Headlight leveling switch
(if
so equipped)
BK0237700US.book
132 ページ 2016年4月15日 金曜日 午前11時28分
Page 199 of 385
Front fog light switch (if so equipped) 5-134 Features and controls
5
N00522801462
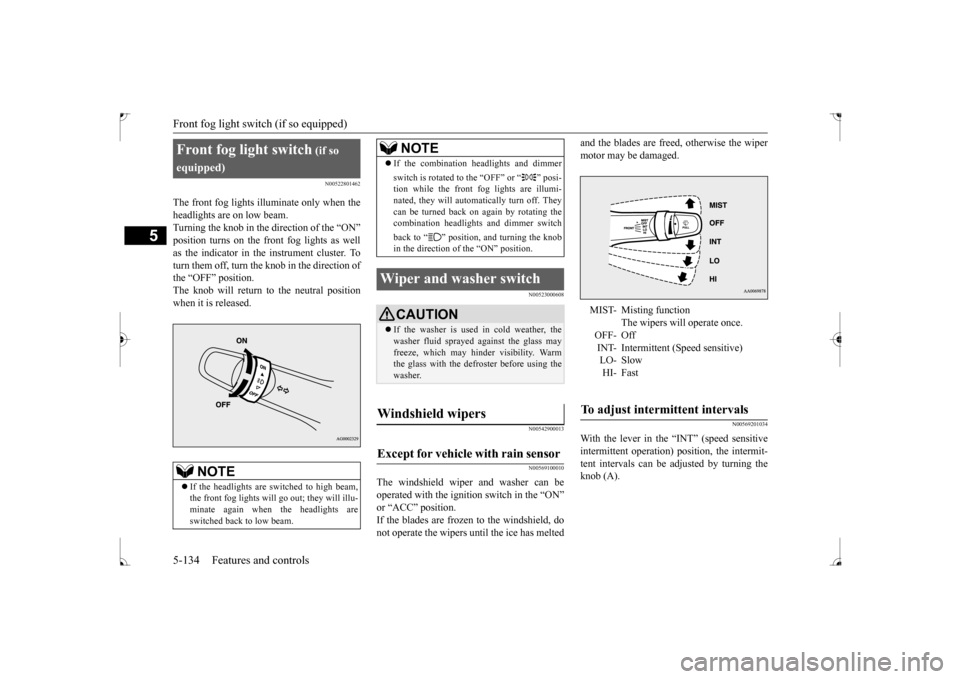
The front fog lights illuminate only when the headlights are on low beam. Turning the knob in the direction of the “ON” position turns on the front fog lights as wellas the indicator in the instrument cluster. To turn them off, turn the knob in the direction of the “OFF” position.The knob will return to the neutral positionwhen it is released.
N00523000608 N00542900013 N00569100010
The windshield wiper and washer can be operated with the ignition switch in the “ON” or “ACC” position. If the blades are frozen to the windshield, donot operate the wipers until the ice has melted
and the blades are freed, otherwise the wiper motor may be damaged.
N00569201034
With the lever in the “INT” (speed sensitiveintermittent operation) position, the intermit-tent intervals can be adjusted by turning the knob (A).
Front fog light switch
(if so
equipped)
NOTE
If the headlights are switched to high beam, the front fog lights will go
out; they will illu-
minate again when the headlights are switched back to low beam.
If the combination headlights and dimmer switch is rotated to the “OFF” or “ ” posi- tion while the front fog lights are illumi- nated, they will automatically turn off. Theycan be turned back on again by rotating the combination headlights and dimmer switch back to “ ” position, and turning the knob in the direction of the “ON” position.
Wiper and washer switch
CAUTION If the washer is used in cold weather, the washer fluid sprayed against the glass mayfreeze, which may hinder visibility. Warm the glass with the defroster before using the washer.
Windshield wipers Except for vehicle with rain sensor
NOTE
MIST- Misting function
The wipers will operate once.
OFF- Off INT- Intermittent (Speed sensitive)LO- SlowHI- Fast
To adjust intermittent intervals
BK0237700US.book
134 ページ 2016年4月15日 金曜日 午前11時28分
Page 239 of 385
Safe driving techniques 6-4 Driving safety
6
Replace your tires before they are heavily worn out. As your vehicle is equipped with a tire pres- sure monitoring system, there is a risk ofdamage to the tire inflation pressure sensors when the tire is replaced on the rim. Tire replacement should, therefore, be performedonly by an authorized Mitsubishi Motors dealer. Have someone watch while you turn all the exterior lights on and off. Also check the turn signal indicators and high-beam indicators on the instrument panel. Check the ground under the vehicle after parking overnight, for fuel, water, oil, orother leaks. Make sure all the fluid levels are correct. Also, if you can smell fuel, you need to find out why immediately and have itfixed.
N00629200111
Even this vehicle’s safety equipment, andyour safest driving, cannot guarantee that you
can avoid an accident or injury. However, if you give extra attention to the following areas, you can better protect yourself and your passengers: Drive defensively. Be aware of traffic, road and weather conditions. Leave plenty of stopping distance between your vehicle and the vehicle ahead. Before changing lanes, check your mir- rors and use your turn signal light. While driving, watch the behavior of other drivers, bicyclists, and pedestrians. Always obey applicable laws and regula- tions. Be a polite and alert driver. Always leave room for unexpected events, such assudden braking. If you plan to drive in another country, obey their vehicle registration laws andmake sure you will be able to get the right fuel.
N00629401497
Check the battery, including terminals and cables. During extremely cold weather, the battery will not be as strong. Also, thebattery power level may drop because more power is used for cold starting and driving.
Before driving the vehicle, check to see if the engine runs at the proper speed and if the headlights are as bright as normally. Charge or replace the battery if necessary.During extreme cold weather, it is possi- ble that a very low battery could freeze. Warm the engine sufficiently. After start- ing the engine, allow a short warm-up time to distribute oil to all cylinders. Thendrive your vehicle slowly. Stay at low speeds at first so that the transaxle, transfer case and rear axle oilhave time to spread to all the lubrication points. Manual transaxle can be harder to shift in cold weather conditions. This is normal and shifting will get easier as the transaxle warms up. Check the engine antifreeze. If there is not enough coolant because of a leak or from engine overheating, add Mit-subishi Motors Genuine Super Long Life Coolant Premium or equivalent.
Lights Fluid leaks Safe driving techniques
Driving during cold weather
WA R N I N G The battery gives off explosive hydrogen gas. Any spark or flame can cause the bat- tery to explode, which could cause seriousinjury or death. Always wear protective clothes and a face mask when working with your battery, orlet a skilled mechanic do it.
BK0237700US.bo
ok 4 ページ 2016年4月15日 金曜日 午前11時28分
Page 349 of 385

Replacement of light bulbs 9-30 Vehicle care and maintenance
9
N00943000099
The bulb should only be replaced with a new bulb with the same ra
ting and type. The type
and rating are listed on the base of the bulb.
N00950302056
[Except for vehicles with high intensity dis-charge headlights]
For vehicles with high intensity discharge headlights, the headlight bulbs on this vehi- cle are high intensity discharge bulbs which contain mercury. If you need to have your vehicle disposed of,you should remove the high intensity dis- charge headlights before disposal. The removed high intensity discharge head-lights should be disposed of or recycled in accordance with the applicable laws. [For vehicles sold in Canada] For more information on safe handling, dis- posal, and recycling of the product, and themeasures to be taken in case of accidental breakage, please visit
If you are unsure of how to carry out the work as required, it is recommended that these procedures be carried out by an autho- rized Mitsubishi Motors dealer or a repairfacility of your choice. Be careful not to scratch the vehicle body when removing a light and lens.CAUTION
When it rains, or when the vehicle has been washed, the inside of the lens sometimes becomes temporarily foggy. This is the same phenomenon as when window glass mists up on a humid day, and does not indicate a func-tional problem. When the light is switched on, the heat will remove the fog. However, if water gathersinside the light, please have it checked by an authorized Mitsubishi Motors dealer or a repair facility of your choice.
Bulb capacity Outside
NOTE
Description
Wattage
ANSI Trade No. or Bulb type
1-
Front turn sig- nal light
21 W WY21W
2-
Headlight, high beam
60 W
9005 HB3
3-
Headlight, low beam/ Daytime run-ning light (Type 2) (if so equipped) (Halogen bulb)
51 W
9006 HB4
4-
Front fog light (if so equipped)
19W H16
Front
BK0237700US.bo
ok 30 ページ 2016年4月15日 金曜日 午前11時28分
Page 350 of 385

Replacement of light bulbs
Vehicle care and maintenance 9-31
9
[For vehicles with high intensity discharge headlights] 5-
Parking light (Type 1)/ Daytime run-ning light (Type 1)(if so equipped)
——
6-
Front side- marker light/ Parking light (Type 2) (if so equipped)
5 W W5W
7-
Side turn signal light (on fender) (if so equipped)
5 W —
Side turn signal light (on out- side rear-view mirror) (if so equipped)
——
Description
Wattage
ANSI Trade No. or Bulb type
Description
Wattage
ANSI Trade No. or Bulb type
1-
Front turn sig- nal light
21 W WY21W
2-
Headlight, low/high beam (Discharge bulb)
35 W —
4-
Parking light (Type 1)/ Daytime run- ning light (Type 1)
——
5-
Front side- marker light
5 W WY5W
Front
6-
Side turn signal light (on out- side rear-view mirror)
——
WA R N I N G Check with an authorized Mitsubishi Motors dealer or a repair facility of your choice when it is necessary to repair a dis- charge headlight or to replace the bulb.The power circuit, bulb and electrodes generate high voltages that may cause a severe electrical shock.NOTE
The side turn signal light (on outside rear- view mirror), front side-marker and parking light (Type 1) and daytime running light(Type 1) uses LEDs rather than bulbs. For repair and replacement, contact an authorized Mitsubishi Motors dealer or arepair facility of your choice. It is not possible to re
pair or replace only the
bulb for the side turn signal light (on fender). Check with an authorized Mitsubishi Motorsdealer or a repair facility of your choice when the light needs to be repaired or replaced.Description
Wattage
ANSI Trade No. or Bulb type
BK0237700US.bo
ok 31 ページ 2016年4月15日 金曜日 午前11時28分
Page 351 of 385
Replacement of light bulbs 9-32 Vehicle care and maintenance
9
N00950401728
N00943101895
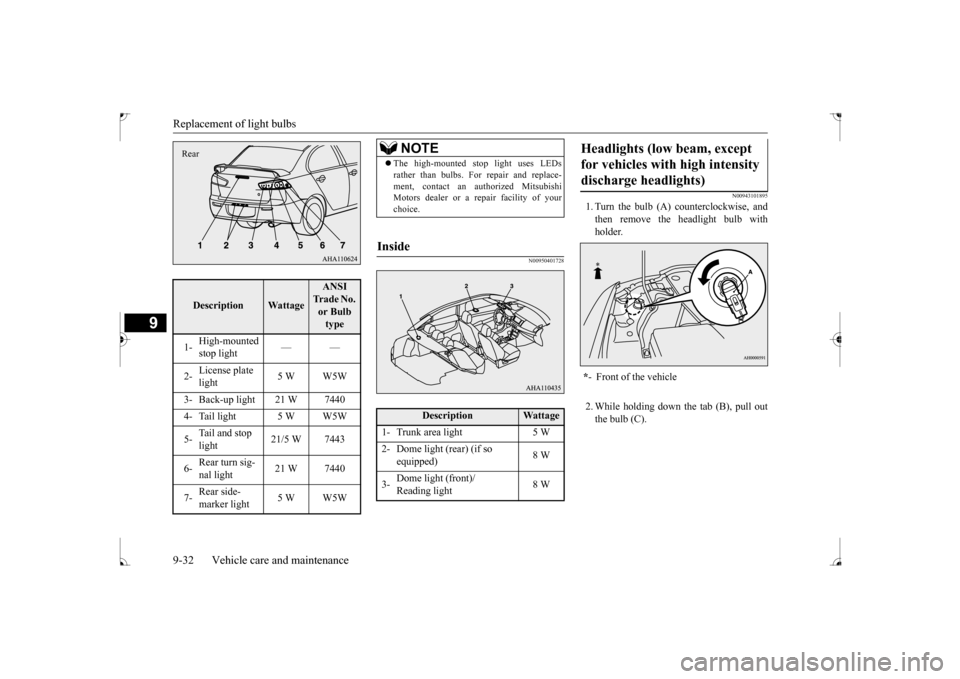
1. Turn the bulb (A) counterclockwise, and then remove the headlight bulb with holder. 2. While holding down the tab (B), pull out the bulb (C).
Description
Wattage
ANSI Trade No. or Bulb type
1-
High-mounted stop light
——
2-
License plate light
5 W W5W
3- Back-up light 21 W 7440 4- Tail light 5 W W5W 5-
Tail and stop light
21/5 W 7443
6-
Rear turn sig- nal light
21 W 7440
7-
Rear side- marker light
5 W W5W
Rear
NOTE
The high-mounted stop light uses LEDs rather than bulbs. For repair and replace- ment, contact an authorized Mitsubishi Motors dealer or a repair facility of your choice.
Inside
Description
Wattage
1- Trunk area light 5 W2- Dome light (rear) (if so
equipped)
8 W
3-
Dome light (front)/ Reading light
8 W
Headlights (low beam, except for vehicles with high intensity discharge headlights) * - Front of the vehicle
BK0237700US.bo
ok 32 ページ 2016年4月15日 金曜日 午前11時28分
Page 352 of 385
Replacement of light bulbs
Vehicle care and maintenance 9-33
9
3. To install the bulb, perform the removal steps in reverse.
N00943100885
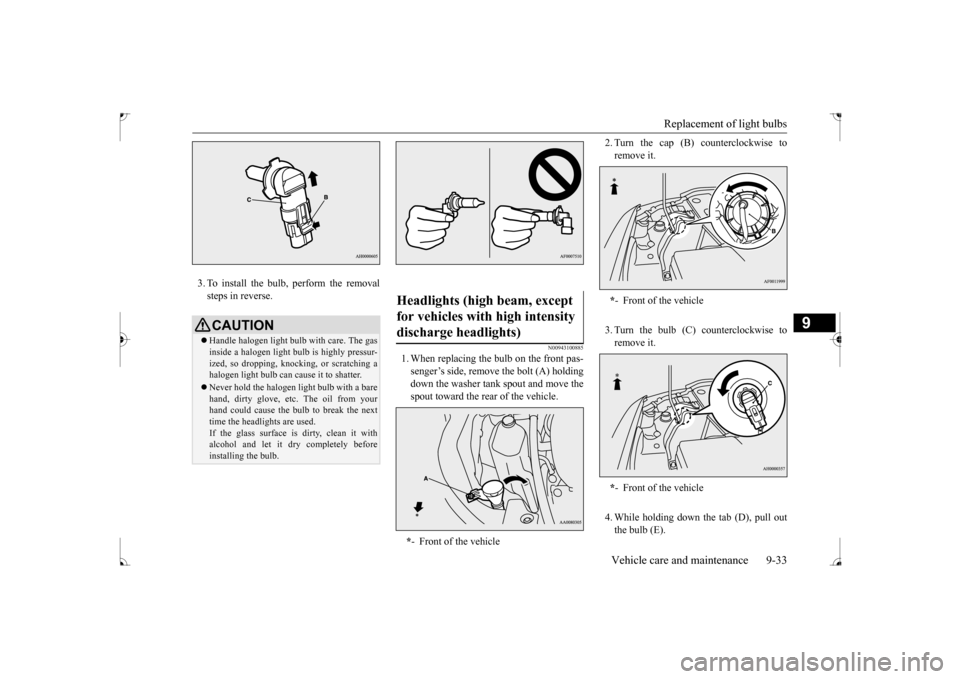
1. When replacing the bulb on the front pas- senger’s side, remove the bolt (A) holdingdown the washer tank spout and move thespout toward the rear of the vehicle.
2. Turn the cap (B) counterclockwise to remove it. 3. Turn the bulb (C) counterclockwise to remove it. 4. While holding down
the tab (D), pull out
the bulb (E).
CAUTION Handle halogen light bulb with care. The gas inside a halogen light bulb is highly pressur- ized, so dropping, knocking, or scratching a halogen light bulb can cause it to shatter. Never hold the halogen light bulb with a bare hand, dirty glove, etc. The oil from yourhand could cause the bulb to break the next time the headlights are used. If the glass surface is dirty, clean it withalcohol and let it dry completely before installing the bulb.
Headlights (high beam, except for vehicles with high intensity discharge headlights) * - Front of the vehicle
*- Front of the vehicle * - Front of the vehicle
BK0237700US.bo
ok 33 ページ 2016年4月15日 金曜日 午前11時28分
Page 353 of 385
Replacement of light bulbs 9-34 Vehicle care and maintenance
9
5. To install the bulb, perform the removal steps in reverse.
N00943100625
Do not attempt to disassemble or repair head- lights, and do not attempt to replace theirbulbs.
N00943200121
The alignment of the headlights should bechecked by an authorized Mitsubishi Motorsdealer or a repair facility of your choice.
N00917301708
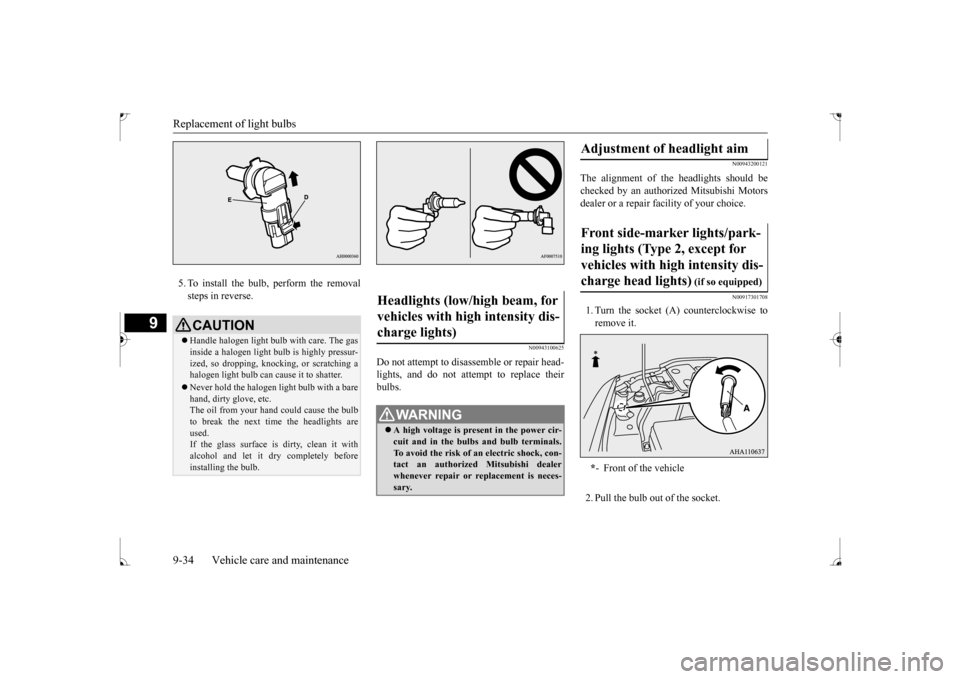
1. Turn the socket (A) counterclockwise toremove it. 2. Pull the bulb out of the socket.
CAUTION Handle halogen light bulb with care. The gas inside a halogen light bulb is highly pressur- ized, so dropping, knocking, or scratching a halogen light bulb can cause it to shatter. Never hold the halogen light bulb with a bare hand, dirty glove, etc.The oil from your hand could cause the bulb to break the next time the headlights are used.If the glass surface is dirty, clean it with alcohol and let it dry completely before installing the bulb.
Headlights (low/high beam, for vehicles with high intensity dis- charge lights)
WA R N I N G A high voltage is present in the power cir- cuit and in the bulbs and bulb terminals. To avoid the risk of an electric shock, con-tact an authorized Mitsubishi dealer whenever repair or replacement is neces- sary.
Adjustment of headlight aim Front side-marker lights/park- ing lights (Type 2, except for vehicles with high intensity dis-charge head lights)
(if so equipped)
* - Front of the vehicle
BK0237700US.bo
ok 34 ページ 2016年4月15日 金曜日 午前11時28分
Page 354 of 385

Replacement of light bulbs
Vehicle care and maintenance 9-35
9
3. To install the bulb, perform the removal steps in reverse.
N00917301711
1. To create enough work space, turn thesteering wheel all the way in the direction opposite to the side you wish to replace. 2. Remove the clips (A), and screws (B) orbolts (B) to turn up the cover (C).
3. Turn the socket (D) counterclockwise to remove it. 4. Pull the bulb out of the socket.
5. To install the bulb, perform the removal steps in reverse.
N00943401436
1. Remove the clips (A) and clips (B), thenremove the duct (C) and the upper cover(D).
Front side-marker lights (for vehicles with high intensity dis- charge headlights)
Front turn signal lights
BK0237700US.bo
ok 35 ページ 2016年4月15日 金曜日 午前11時28分
Page 380 of 385
Alphabetical index
12-1
12
A
Accessory (installation)
.........................
3-5
Active stability control (ASC)
..............
5-76
ASC OFF display or ASC indicator
..5-78
ASC operation display
....................
5-78
Air cleaner filter
...................
................
9-8
Air conditioning
Automatic air conditioning
.........
7-4
, 7-9
Important air conditioning operating tips
..
7-14
Air purifier
....................
.....................
7-15
All-wheel driving operation
.................
5-70
Aluminum wheels
...............................
9-45
AM/FM radio
....................
.................
7-15
Antenna
Roof antenna
.................
.................
7-51
Anti-lock braking system
.....................
5-74
Warning light / display
...........
5-74
, 5-75
Arm rest
........................
.......................
4-6
Assist grip
.....................
...................
5-168
Audio
AM/FM radio
................
.................
7-15
CD player
.....................
.................
7-15
Troubleshooting
.............................
7-49
Automatic air conditioning
.............
7-4
, 7-9
B
Back-up lights
Bulb capacity
..................
...............
9-30
Replacement
...................
...............
9-38
Ball joint, steering linkage seals and drive shaft boots
.....................
..................
9-23
Battery
........................
......................
9-12
Charging system warning light
.......
5-125
Checking battery electrolyte level
....
9-12
Disconnection and connection
.........
9-13
During cold weather
.......................
9-12
Specification
...................
...............
11-5
Bluetooth 2.0 interface
.......................
5-139
Bottle holder
....................
.................
5-168
Brake
Anti-lock braking system
................
5-74
Braking
.......................
....................
6-5
Fluid
....................
.................
9-11
, 11-6
Hose
.......................
......................
9-23
Parking brake
..................
...............
5-48
Parking brake lever stroke
...............
9-21
Pedal
.......................
......................
5-72
Pedal free play
................
...............
9-21
Power brakes
..................
...............
5-73
Service brake
..................
...............
5-72
Brake assist
......................
..................
5-73
Break-in recommendations
....................
5-3
Bulb capacity
...................
..................
9-30
C
California Perchlorate Materials Requirements
.....................
................
3-6
Capacities
.....................
.....................
11-6
Card holder
............................
5-163
, 5-167
Cargo loads
...................
.....................
6-10
Catalytic converter
................
................
9-2
CD player
......................
.....................
7-15
Center console box
............................
5-167
Certification label
...............................
11-3
Charging system warning light
...........
5-125
Chassis number
..................
.................
11-2
Checking battery electrolyte level
.........
9-12
Child restraint
....................
.................
4-13
Child safety locks for rear door
............
5-38
Cleaning
Inside of your vehicle
......................
9-42
Outside of your vehicle
...................
9-43
Clock
.........................
........................
7-52
Clutch
Fluid
..................
...................
9-11
, 11-6
Pedal free play
...............
.................
9-20
Coat hooks
....................
...................
5-169
Combination headlights and dimmer switch
.
5-127 Coming home light
...........................
5-131
BK0237700US.bo
ok 1 ページ 2016年4月15日 金曜日 午前11時28分