key MITSUBISHI LANCER EVOLUTION 2014 10.G MMCS Manual
[x] Cancel search | Manufacturer: MITSUBISHI, Model Year: 2014, Model line: LANCER EVOLUTION, Model: MITSUBISHI LANCER EVOLUTION 2014 10.GPages: 226, PDF Size: 31.21 MB
Page 48 of 226
48 Search for a Location
Search for a
Location
With this product, you can use various
methods to search for locations.
The location searched for here is used when
setting the destination
(P46), a waypoint (P60), or an address in the address book (P67).
This section explains the method for
searching from the destination menu
(P21).
Load from the Address Book
Loads Address Book.
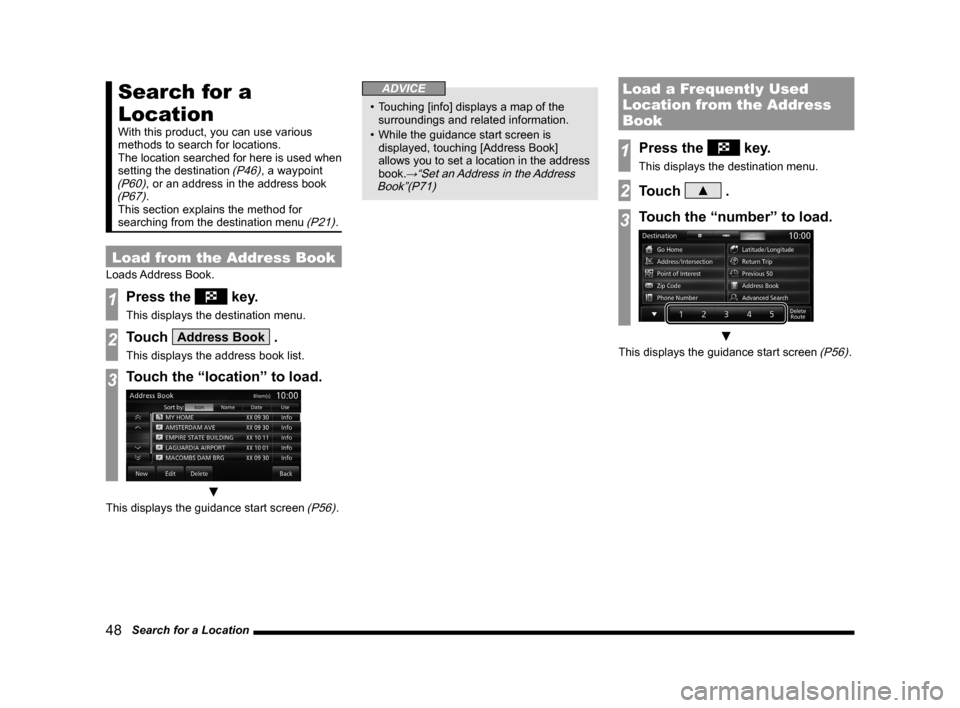
1Press the key.
This displays the destination menu.
2Touch Address Book .
This displays the address book list.
3Touch the “location” to load.
▼
This displays the guidance start screen (P56).
ADVICE
• Touching [info] displays a map of the
surroundings and related information.
• While the guidance start screen is
displayed, touching [Address Book]
allows you to set a location in the address
book.
→“Set an Address in the Address
Book”(P71)
Load a Frequently Used
Location from the Address
Book
1Press the key.
This displays the destination menu.
2Touch ▲ .
3Touch the “number” to load.
▼
This displays the guidance start screen (P56).
Page 49 of 226
Search for a Location 49
NAVIDestination Settings
Use the Search Histor y
You can use the search history of locations
that were set as the destination and display
again a map of the surroundings.
ADVICE
• The search history contains the most
recent 50 items.
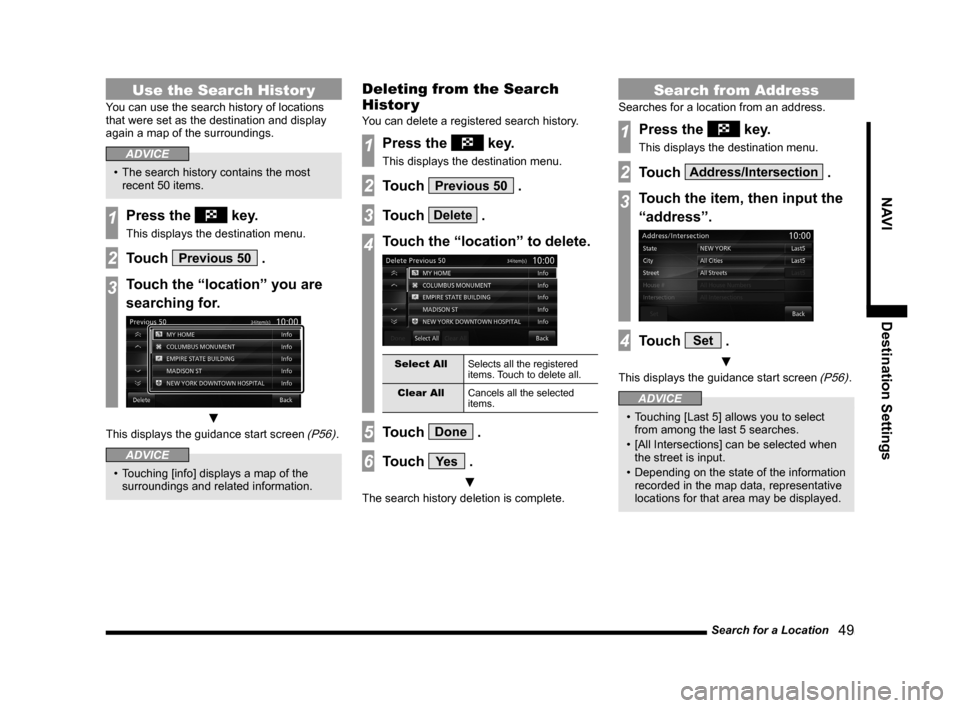
1Press the key.
This displays the destination menu.
2Touch Previous 50 .
3Touch the “location” you are
searching for.
▼
This displays the guidance start screen (P56).
ADVICE
• Touching [info] displays a map of the
surroundings and related information.
Deleting from the Search
Histor y
You can delete a registered search history.
1Press the key.
This displays the destination menu.
2Touch Previous 50 .
3Touch Delete .
4Touch the “location” to delete.
Select All Selects all the registered
items. Touch to delete all.
Clear All Cancels all the selected
items.
5Touch Done .
6Touch Ye s .
▼
The search history deletion is complete.
Search from Address
Searches for a location from an address.
1Press the key.
This displays the destination menu.
2Touch Address/Intersection .
3Touch the item, then input the
“address”.
4Touch Set .
▼
This displays the guidance start screen (P56).
ADVICE
• Touching [Last 5] allows you to select
from among the last 5 searches.
• [All Intersections] can be selected when
the street is input.
• Depending on the state of the information
recorded in the map data, representative
locations for that area may be displayed.
Page 50 of 226
50 Search for a Location
Search by Inputting an
Establishment Name
The name of an establishment can be input to
search for its location.
1Press the key.
This displays the destination menu.
2Touch Point of Interest .
Touching [Last 5] allows you to select from
among the last 5 searches.
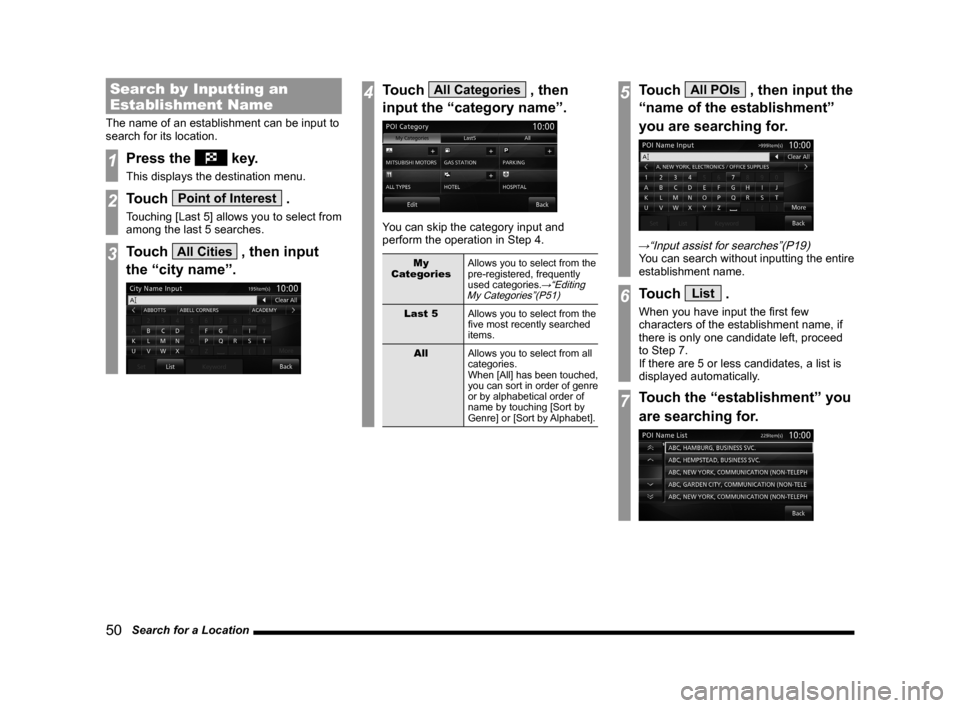
3Touch All Cities , then input
the “city name”.
4Touch All Categories , then
input the “category name”.
You can skip the category input and
perform the operation in Step 4.
My
Categories Allows you to select from the
pre-registered, frequently
used categories.
→“Editing
My Categories”(P51)
Last 5 Allows you to select from the
five most recently searched
items.
All Allows you to select from all
categories.
When [All] has been touched,
you can sort in order of genre
or by alphabetical order of
name by touching [Sort by
Genre] or [Sort by Alphabet].
5Touch All POIs , then input the
“name of the establishment”
you are searching for.
→“Input assist for searches”(P19)You can search without inputting the entire
establishment name.
6Touch List .
When you have input the first few
characters of the establishment name, if
there is only one candidate left, proceed
to Step 7.
If there are 5 or less candidates, a list is
displayed automatically.
7Touch the “establishment” you
are searching for.
Page 51 of 226
![MITSUBISHI LANCER EVOLUTION 2014 10.G MMCS Manual Search for a Location 51
NAVIDestination Settings
ADVICE
• If the list has the “+” mark, touch [Sub
POI], select the detailed establishment
name.
A list is displayed and you can select t MITSUBISHI LANCER EVOLUTION 2014 10.G MMCS Manual Search for a Location 51
NAVIDestination Settings
ADVICE
• If the list has the “+” mark, touch [Sub
POI], select the detailed establishment
name.
A list is displayed and you can select t](/img/19/7474/w960_7474-50.png)
Search for a Location 51
NAVIDestination Settings
ADVICE
• If the list has the “+” mark, touch [Sub
POI], select the detailed establishment
name.
A list is displayed and you can select the
detailed establishment.
8Touch Set .
▼
This displays the guidance start screen (P56).
Editing My Categories
Registers a frequently used establishment
category in “My Categories”.
Up to 6 entries can be registered in “My
Categories”.
1Press the key.
This displays the destination menu.
2Touch Point of Interest .
3Touch All Categories .
4Touch Edit .
5Touch the “category”
to register.
The registered category is displayed
inverted.
Default Restores the factory settings.
Clear All Cancels all the registered
categories.
Sort by
Alphabet or
Sort by Genre Sorts by genre or in
alphabetical order by name.
6Touch Back .
Returns to the previous screen.
ADVICE
•
You can also edit by touching [NAVI
MENU] key, [Personal], and [My
Categories] in “Edit”.
→“Personal”(P204)
Page 52 of 226
52 Search for a Location
Search for Nearby
Establishments
You can search for establishments near the
current location and destination and along the
route.
Searching for Establishments
around the Current Location
As an example, search for petrol stations.
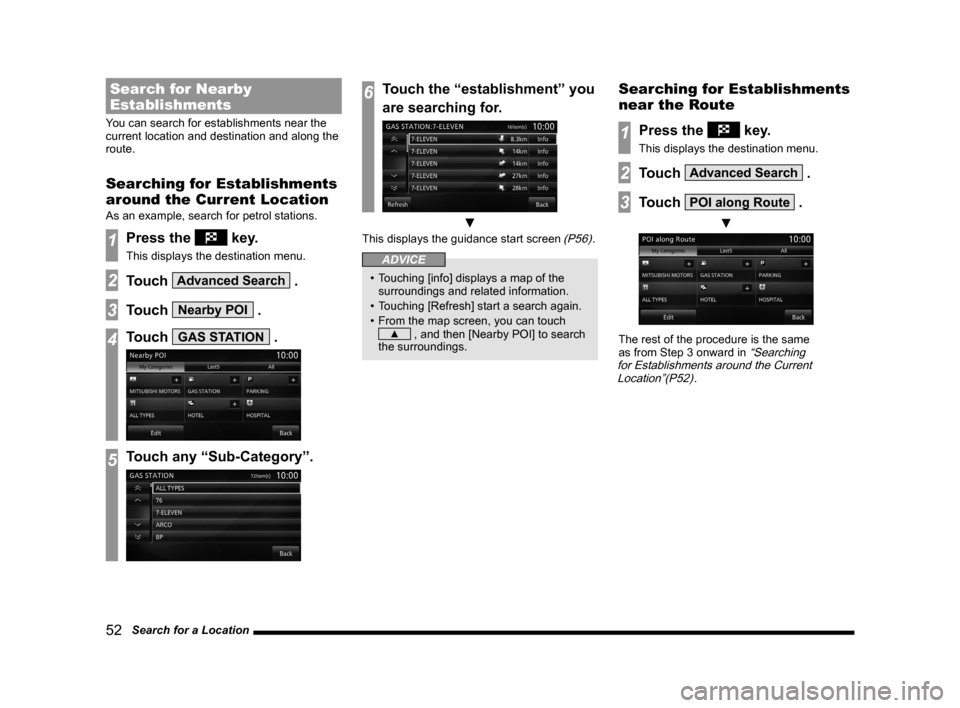
1Press the key.
This displays the destination menu.
2Touch Advanced Search .
3Touch Nearby POI .
4Touch GAS STATION .
5Touch any “Sub-Category”.
6Touch the “establishment” you
are searching for.
▼
This displays the guidance start screen (P56).
ADVICE
• Touching [info] displays a map of the
surroundings and related information.
• Touching [Refresh] start a search again.
• From the map screen, you can touch
▲ , and then [Nearby POI] to search
the surroundings.
Searching for Establishments
near the Route
1Press the key.
This displays the destination menu.
2Touch Advanced Search .
3Touch POI along Route .
▼
The rest of the procedure is the same
as from Step 3 onward in “Searching
for Establishments around the Current Location”(P52)
.
Page 53 of 226
Search for a Location 53
NAVIDestination Settings
Searching for Establishments
near the Destination or a
Waypoint
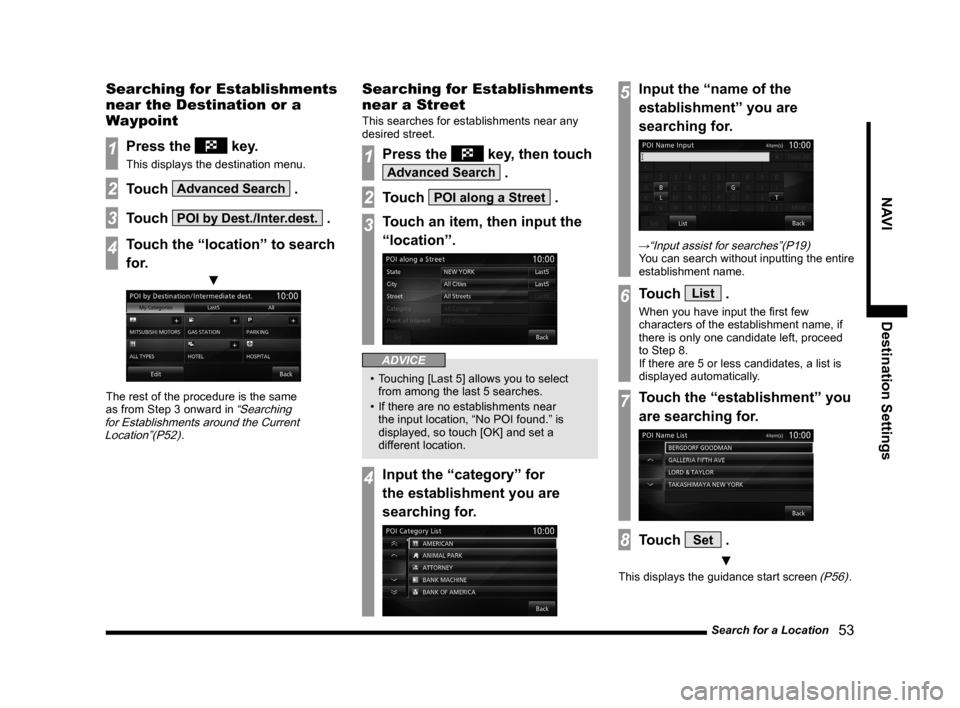
1Press the key.
This displays the destination menu.
2Touch Advanced Search .
3Touch POI by Dest./Inter.dest. .
4Touch the “location” to search
for.
▼
The rest of the procedure is the same
as from Step 3 onward in “Searching
for Establishments around the Current Location”(P52)
.
Searching for Establishments
near a Street
This searches for establishments near any
desired street.
1Press the key, then touch
Advanced Search .
2Touch POI along a Street .
3Touch an item, then input the
“location”.
ADVICE
• Touching [Last 5] allows you to select
from among the last 5 searches.
• If there are no establishments near
the input location, “No POI found.” is
displayed, so touch [OK] and set a
different location.
4Input the “category” for
the establishment you are
searching for.
5Input the “name of the
establishment” you are
searching for.
→“Input assist for searches”(P19)
You can search without inputting the entire
establishment name.
6Touch List .
When you have input the first few
characters of the establishment name, if
there is only one candidate left, proceed
to Step 8.
If there are 5 or less candidates, a list is
displayed automatically.
7Touch the “establishment” you
are searching for.
8Touch Set .
▼
This displays the guidance start screen (P56).
Page 54 of 226
54 Search for a Location
Searching for Establishments
along a Freeway or near an
Exit
This searches for establishments along a
freeway or near an exit. You can only use this
when you are driving on a freeway.
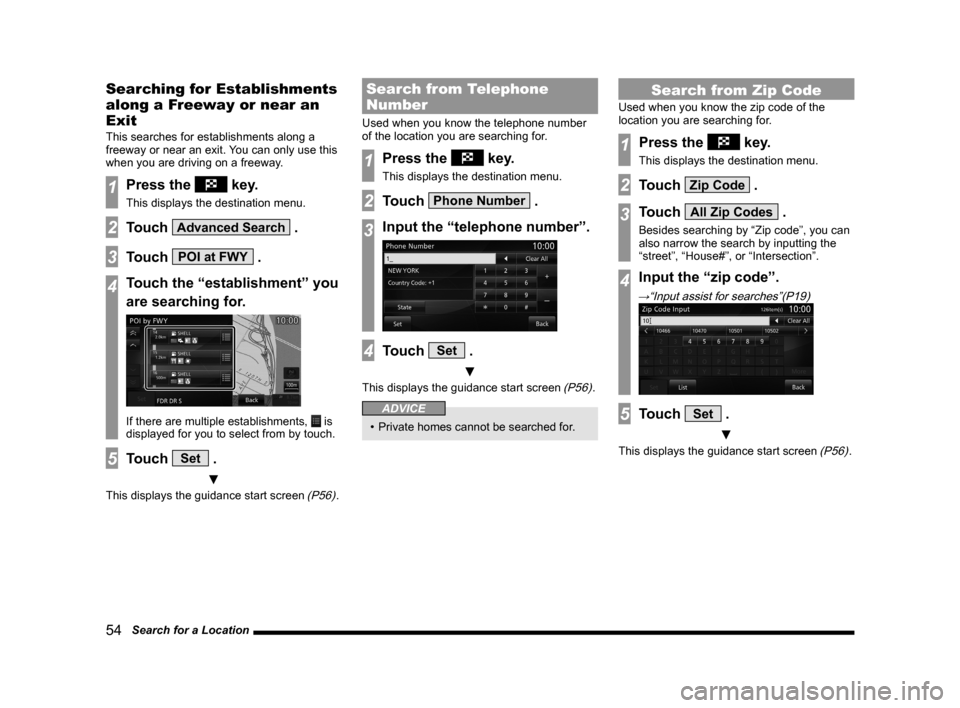
1Press the key.
This displays the destination menu.
2Touch Advanced Search .
3Touch POI at FWY .
4Touch the “establishment” you
are searching for.
If there are multiple establishments, is
displayed for you to select from by touch.
5Touch Set .
▼
This displays the guidance start screen (P56).
Search from Telephone
Number
Used when you know the telephone number
of the location you are searching for.
1Press the key.
This displays the destination menu.
2Touch Phone Number .
3Input the “telephone number”.
4Touch Set .
▼
This displays the guidance start screen (P56).
ADVICE
• Private homes cannot be searched for.
Search from Zip Code
Used when you know the zip code of the
location you are searching for.
1Press the key.
This displays the destination menu.
2Touch Zip Code .
3Touch All Zip Codes .
Besides searching by “Zip code”, you can
also narrow the search by inputting the
“street”, “House#”, or “Intersection”.
4Input the “zip code”.
→“Input assist for searches”(P19)
5Touch Set .
▼
This displays the guidance start screen (P56).
Page 55 of 226
Search for a Location 55
NAVIDestination Settings
Search by Latitude and
Longitude
You can set the destination by specifying the
latitude and longitude.
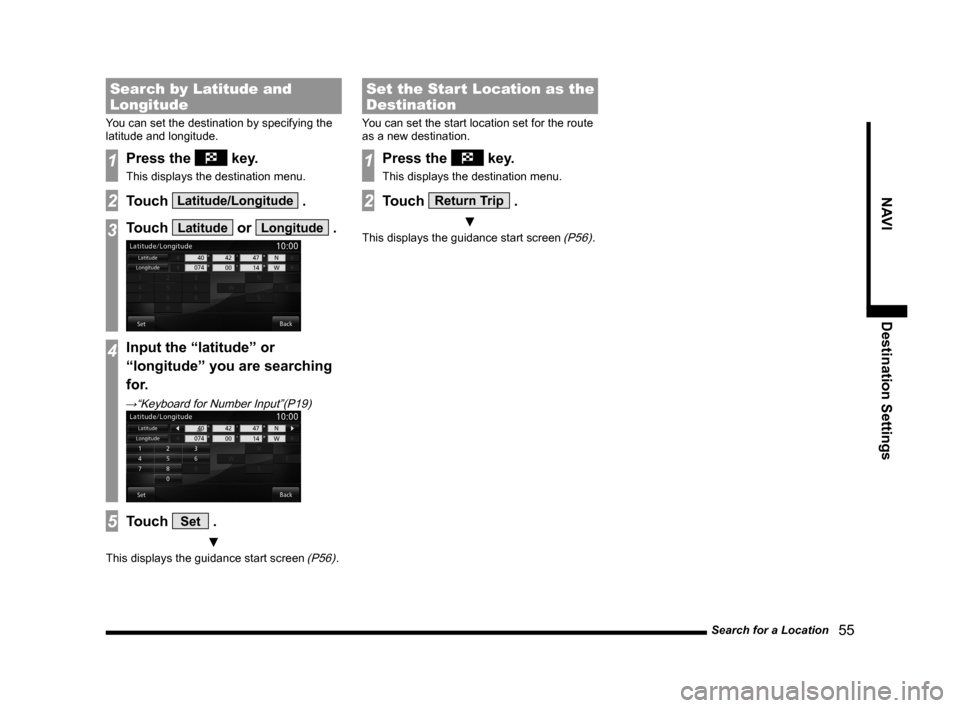
1Press the key.
This displays the destination menu.
2Touch Latitude/Longitude .
3Touch Latitude or Longitude .
4Input the “latitude” or
“longitude” you are searching
for.
→“Keyboard for Number Input”(P19)
5Touch Set .
▼
This displays the guidance start screen (P56).
Set the Start Location as the
Destination
You can set the start location set for the route
as a new destination.
1Press the key.
This displays the destination menu.
2Touch Return Trip .
▼
This displays the guidance start screen (P56).
Page 57 of 226
Route Checking 57
NAVI Route Checking and Changing
Route Checking and Changing
Route Checking
If a route has been set, you can check it.
Check the Next Junction to
Tur n
When the route you are traveling has a
junction ahead where you must turn left or
right, you can have audio guidance and
junction guidance map display provided ahead
of time.
ADVICE
• You must be traveling a route.
• For some maps, only audio guidance is
provided.
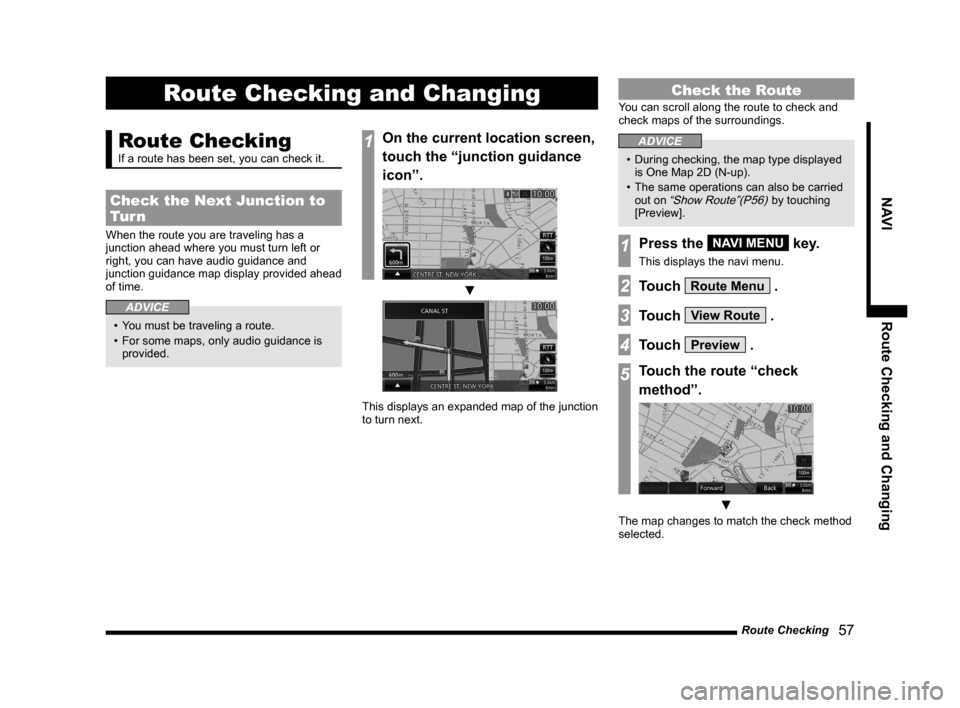
1On the current location screen,
touch the “junction guidance
icon”.
▼
This displays an expanded map of the junction
to turn next.
Check the Route
You can scroll along the route to check and
check maps of the surroundings.
ADVICE
• During checking, the map type displayed
is One Map 2D (N-up).
• The same operations can also be carried
out on
“Show Route”(P56) by touching
[Preview].
1Press the NAVI MENU key.
This displays the navi menu.
2Touch Route Menu .
3Touch View Route .
4Touch Preview .
5Touch the route “check
method”.
▼
The map changes to match the check method
selected.
Page 58 of 226
58 Route Checking
Types of Check Methods
Backward Scrolls from the destination
toward the start location.
Stop Stops scrolling for going
backward or forward.
Forward Scrolls from the start location
toward the destination.
Back Ends scrolling.
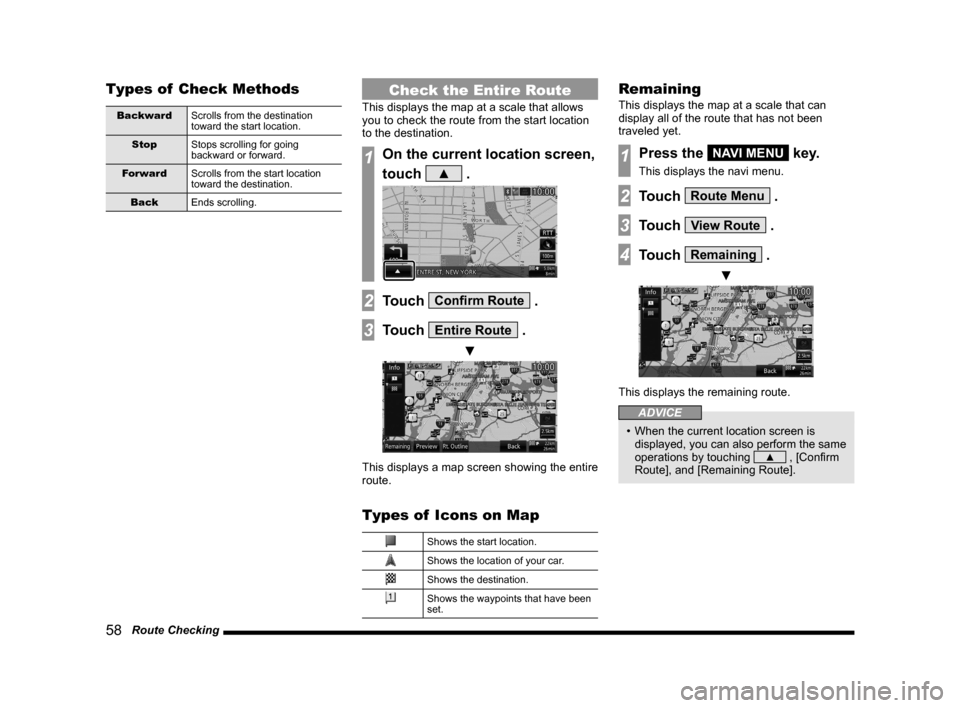
Check the Entire Route
This displays the map at a scale that allows
you to check the route from the start location
to the destination.
1On the current location screen,
touch
▲ .
2Touch Confirm Route .
3Touch Entire Route .
▼
This displays a map screen showing the entire
route.
Types of Icons on Map
Shows the start location.
Shows the location of your car.
Shows the destination.
Shows the waypoints that have been
set.
Remaining
This displays the map at a scale that can
display all of the route that has not been
traveled yet.
1Press the NAVI MENU key.
This displays the navi menu.
2Touch Route Menu .
3Touch View Route .
4Touch Remaining .
▼
This displays the remaining route.
ADVICE
• When the current location screen is
displayed, you can also perform the same
operations by touching
▲ , [Confirm
Route], and [Remaining Route].