ignition MITSUBISHI LANCER EVOLUTION 2014 10.G MMCS Manual
[x] Cancel search | Manufacturer: MITSUBISHI, Model Year: 2014, Model line: LANCER EVOLUTION, Model: MITSUBISHI LANCER EVOLUTION 2014 10.GPages: 226, PDF Size: 31.21 MB
Page 13 of 226
This Product 13
Introduction Basic Operation
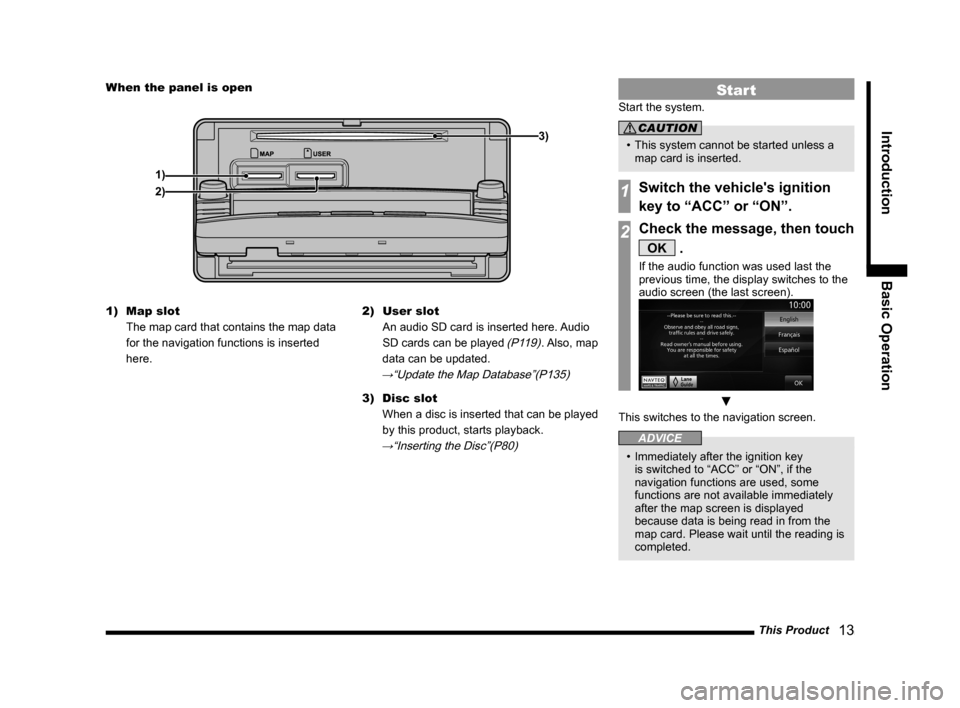
When the panel is open
1) 3)
2)
1) Map slot
The map card that contains the map data
for the navigation functions is inserted
here. 2)
User slot
An audio SD card is inserted here. Audio
SD cards can be played
(P119). Also, map
data can be updated.
→“Update the Map Database”(P135)
3) Disc slot
When a disc is inserted that can be played
by this product, starts playback.
→“Inserting the Disc”(P80)
Start
Start the system.
CAUTION
• This system cannot be started unless a
map card is inserted.
1Switch the vehicle's ignition
key to “ACC” or “ON”.
2Check the message, then touch
OK .
If the audio function was used last the
previous time, the display switches to the
audio screen (the last screen).
▼
This switches to the navigation screen.
ADVICE
• Immediately after the ignition key
is switched to “ACC” or “ON”, if the
navigation functions are used, some
functions are not available immediately
after the map screen is displayed
because data is being read in from the
map card. Please wait until the reading is
completed.
Page 59 of 226
Route Checking 59
NAVI Route Checking and Changing
Route Outline
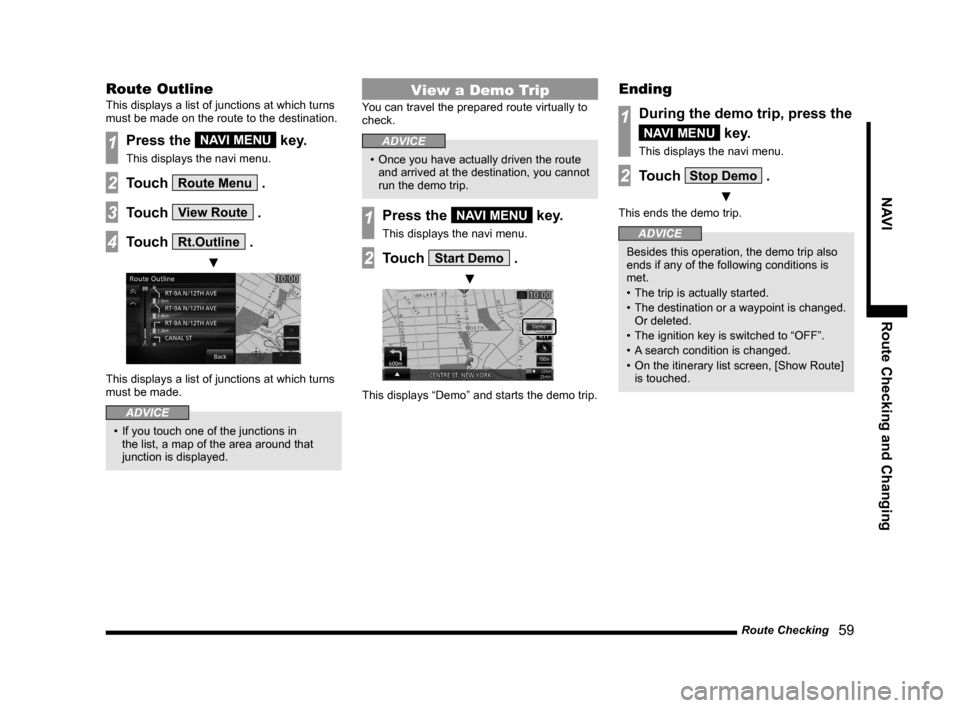
This displays a list of junctions at which turns
must be made on the route to the destination.
1Press the NAVI MENU key.
This displays the navi menu.
2Touch Route Menu .
3Touch View Route .
4Touch Rt.Outline .
▼
This displays a list of junctions at which turns
must be made.
ADVICE
• If you touch one of the junctions in
the list, a map of the area around that
junction is displayed.
View a Demo Trip
You can travel the prepared route virtually to
check.
ADVICE
• Once you have actually driven the route
and arrived at the destination, you cannot
run the demo trip.
1Press the NAVI MENU key.
This displays the navi menu.
2Touch Start Demo .
▼
This displays “Demo” and starts the demo trip.
Ending
1During the demo trip, press the
NAVI MENU key.
This displays the navi menu.
2Touch Stop Demo .
▼
This ends the demo trip.
ADVICE
Besides this operation, the demo trip also
ends if any of the following conditions is
met.
• The trip is actually started.
• The destination or a waypoint is changed.
Or deleted.
• The ignition key is switched to “OFF”.
• A search condition is changed.
• On the itinerary list screen, [Show Route]
is touched.
Page 117 of 226
Listen to Audio Files on a USB Device/SD Card 11 7
AViPod/USB/SD
Equipment by type
Listen to Audio Files
on a USB Device/SD
Card
By connecting commercially-available
USB devices such as USB memory to this
product, you can play back audio files on
these through the product.
By loading an audio SD card into the user
slot, you can play back audio files recorded
onto the SD card through the product.
CAUTION
• Never hold the USB device or SD card
in your hand to operate while driving, as
this is dangerous.
• Do not leave the USB device/SD card
unattended in the car.
• Do not use hard discs, card readers, or
memory readers, as damage may occur
to these or to the data contained therein.
If these are erroneously connected,
then turn the engine ignition “OFF”, then
remove.
• No indemnification for USB device or
audio SD card data loss will be possible.
• Depending on how the devices are
handled, audio files being damaged or
lost, therefore it is recommended that
data be backed up.
NOTE
• USB devices can be used in vehicles that
have a USB port.
• For information regarding details such
as types of USB devices, usage of USB
input ports, and types of files that can be
played back, if your car is equipped with
a Bluetooth
® 2.0 interface, refer to the
vehicle's user manual; if your car is not
equipped with a Bluetooth
® 2.0 interface,
refer to this manual.
• Please refer to your vehicle's user
manual regarding how to connect USB
devices.
• Depending on the type of USB device or
SD card, usage may not be possible or
the functions that can be used may be
restricted.
• The recommended file system for USB
memory and SD cards is FAT32.
• The maximum supported capacity for
USB memory or an SD card is 32GB
(SDHC standard supported).
• Operate the USB device containing
recorded audio files while connected to
this product or the SD card containing
audio files while inserted into this product.
• This manual refers to SD cards inserted
into the user slot as “audio SD cards”.
• When connecting a USB device, use a
commercially-available connection cable.
Failure to use a connection cable when
connecting may place undue load on, or
damage the USB connector.
NOTE
• Set up the device in order that no
unsafe actions, such as plugging in the
connection cable are taken while driving.
• When inserting or removing a USB
device or an SD card, for safety's sake
first stop the car.
• Do not insert other than audio devices
into the USB port. Damage to the device
or equipment may result.
• Depending on the status of the USB
device or SD card, it may take some time
until the device is recognized, or playback
starts.
• Depending on USB devices, buttons on
the product will not operate while the
USB device is connected.
• Data containing copyright information
may not play back.
• USB device/SD card specifications and
settings may mean that connection is
not possible, or result in differences in
operation or display.
• Depending on audio data in the
USB device or on the SD card, track
information may not be displayed
correctly.
• Depending on the status of the vehicle
and device, the iPod/iPhone may not play
back after starting the engine.
Continued on the next page
Page 139 of 226
Trip 139
INFO/SETTINGS INFO
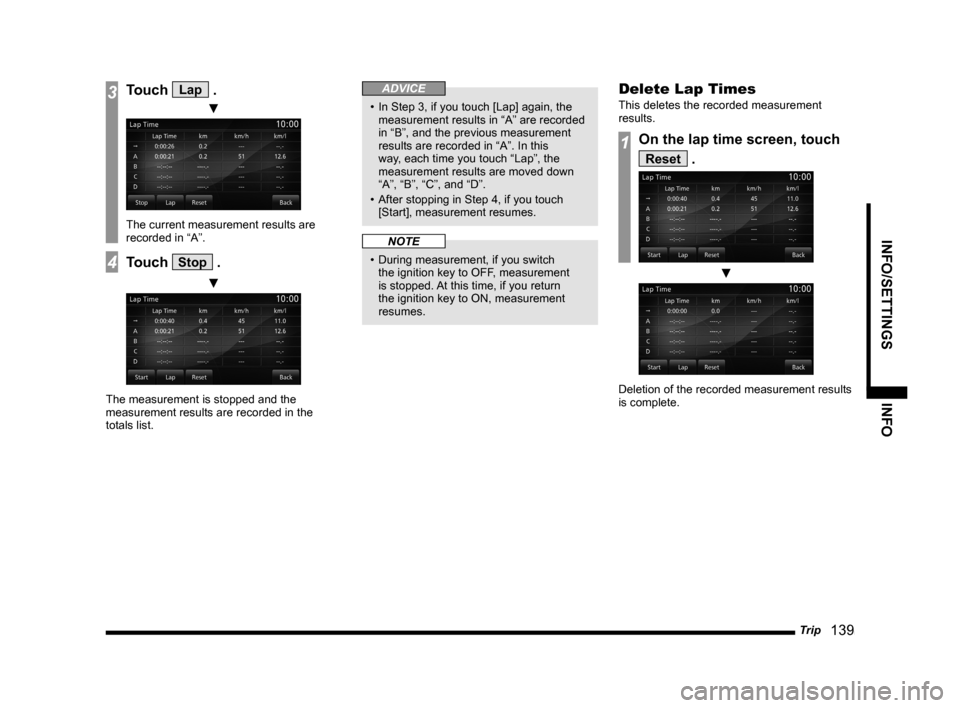
3Touch Lap .
▼
The current measurement results are
recorded in “A”.
4Touch Stop .
▼
The measurement is stopped and the
measurement results are recorded in the
totals list.
ADVICE
• In Step 3, if you touch [Lap] again, the
measurement results in “A” are recorded
in “B”, and the previous measurement
results are recorded in “A”. In this
way, each time you touch “Lap”, the
measurement results are moved down
“A”, “B”, “C”, and “D”.
• After stopping in Step 4, if you touch
[Start], measurement resumes.
NOTE
• During measurement, if you switch
the ignition key to OFF, measurement
is stopped. At this time, if you return
the ignition key to ON, measurement
resumes.
Delete Lap Times
This deletes the recorded measurement
results.
1On the lap time screen, touch
Reset .
▼
Deletion of the recorded measurement results
is complete.
Page 149 of 226
Mobile Phone 149
INFO/SETTINGS INFO
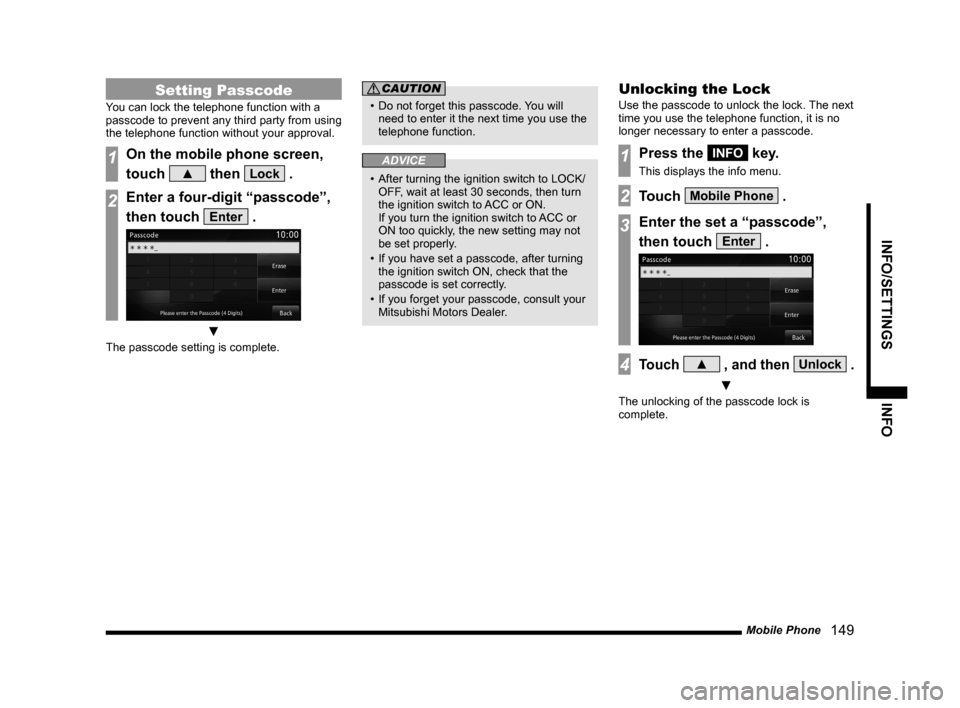
Setting Passcode
You can lock the telephone function with a
passcode to prevent any third party from using
the telephone function without your approval.
1On the mobile phone screen,
touch
▲ then Lock .
2Enter a four-digit “passcode”,
then touch
Enter .
▼
The passcode setting is complete.
CAUTION
• Do not forget this passcode. You will
need to enter it the next time you use the
telephone function.
ADVICE
• After turning the ignition switch to LOCK/
OFF, wait at least 30 seconds, then turn
the ignition switch to ACC or ON.
If you turn the ignition switch to ACC or
ON too quickly, the new setting may not
be set properly.
• If you have set a passcode, after turning
the ignition switch ON, check that the
passcode is set correctly.
• If you forget your passcode, consult your
Mitsubishi Motors Dealer.
Unlocking the Lock
Use the passcode to unlock the lock. The next
time you use the telephone function, it is no
longer necessary to enter a passcode.
1Press the INFO key.
This displays the info menu.
2Touch Mobile Phone .
3Enter the set a “passcode”,
then touch
Enter .
4Touch ▲ , and then Unlock .
▼
The unlocking of the passcode lock is
complete.
Page 217 of 226
Other Settings 217
INFO/SETTINGS SETTINGS
Others
Item Settings content
Horn Answerback with Remote Engine Start
*Enables/disables the function that sounds the horn when the
engine is started with the remote controller.
Accessor y Power Timeout Sets the duration ACC stays ON when the ignition switch is
ACC.
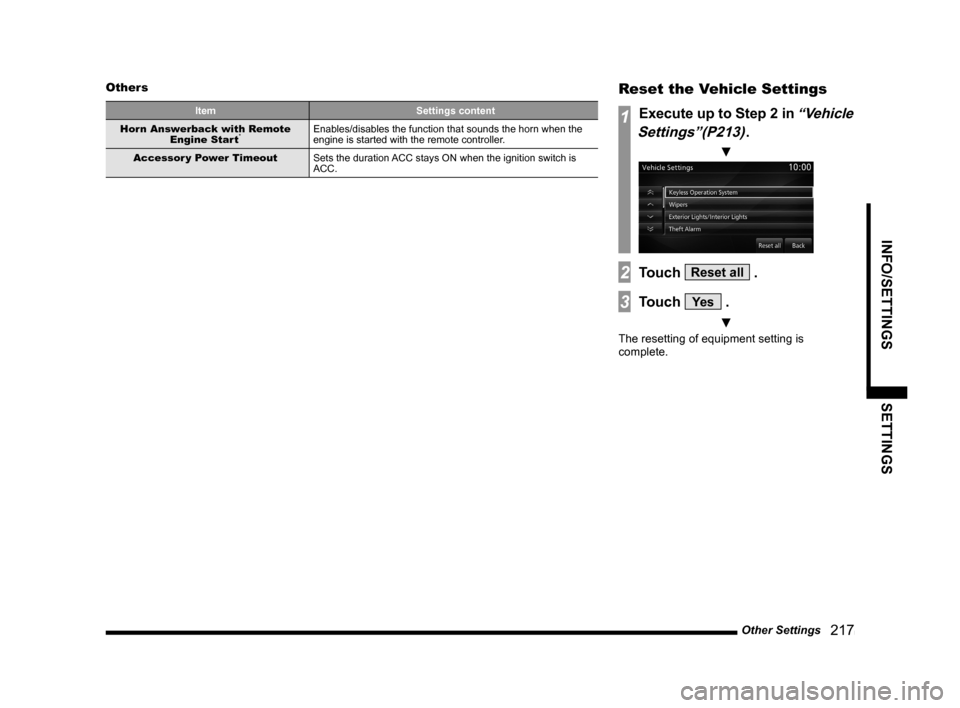
Reset the Vehicle Settings
1Execute up to Step 2 in “Vehicle
Settings”(P213)
.
▼
2Touch Reset all .
3Touch Ye s .
▼
The resetting of equipment setting is
complete.
Page 222 of 226
222 Troubleshooting
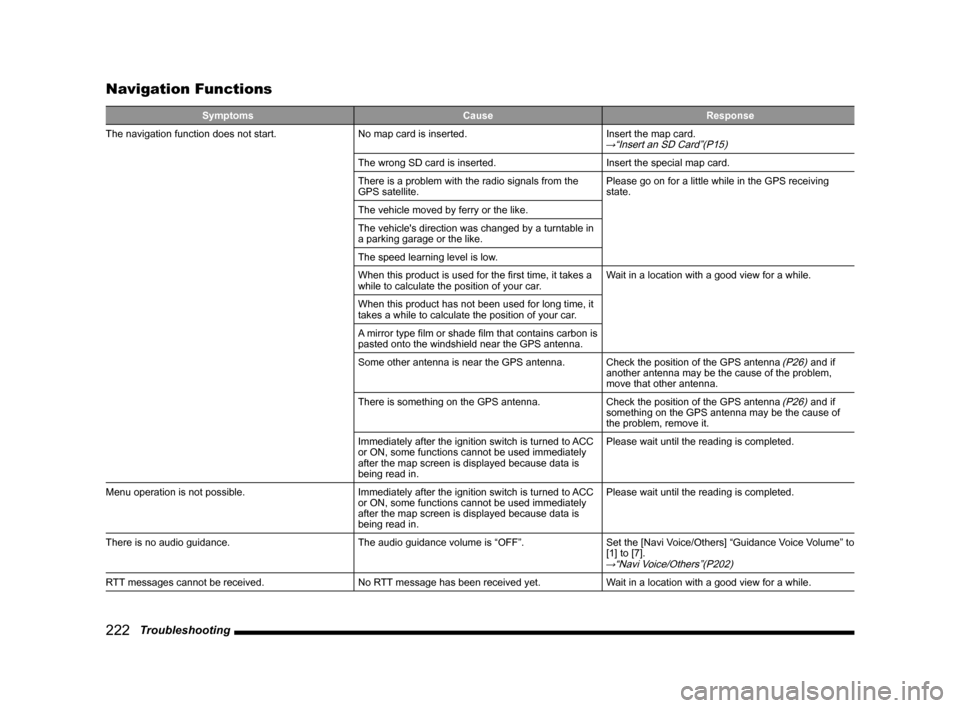
Navigation Functions
Symptoms CauseResponse
The navigation function does not start. No map card is inserted.Insert the map card.
→“Insert an SD Card”(P15)
The wrong SD card is inserted.Insert the special map card.
There is a problem with the radio signals from the
GPS satellite. Please go on for a little while in the GPS receiving
state.
The vehicle moved by ferry or the like.
The vehicle's direction was changed by a turntable in
a parking garage or the like.
The speed learning level is low.
When this product is used for the first time, it takes a
while to calculate the position of your car. Wait in a location with a good view for a while.
When this product has not been used for long time, it
takes a while to calculate the position of your car.
A mirror type film or shade film that contains carbon is
pasted onto the windshield near the GPS antenna.
Some other antenna is near the GPS antenna. Check the position of the GPS antenna
(P26) and if
another antenna may be the cause of the problem,
move that other antenna.
There is something on the GPS antenna. Check the position of the GPS antenna
(P26) and if
something on the GPS antenna may be the cause of
the problem, remove it.
Immediately after the ignition switch is turned to ACC
or ON, some functions cannot be used immediately
after the map screen is displayed because data is
being read in. Please wait until the reading is completed.
Menu operation is not possible. Immediately after the ignition switch is turned to ACC
or ON, some functions cannot be used immediately
after the map screen is displayed because data is
being read in.Please wait until the reading is completed.
There is no audio guidance. The audio guidance volume is “OFF”.Set the [Navi Voice/Others] “Guidance Voice Volume” to
[1] to [7].
→“Navi Voice/Others”(P202)
RTT messages cannot be received. No RTT message has been received yet.Wait in a location with a good view for a while.