height adjustment MITSUBISHI LANCER EVOLUTION 2014 10.G Owners Manual
[x] Cancel search | Manufacturer: MITSUBISHI, Model Year: 2014, Model line: LANCER EVOLUTION, Model: MITSUBISHI LANCER EVOLUTION 2014 10.GPages: 338, PDF Size: 40.99 MB
Page 31 of 338

Head restraints 4-6 Seat and restraint systems
4
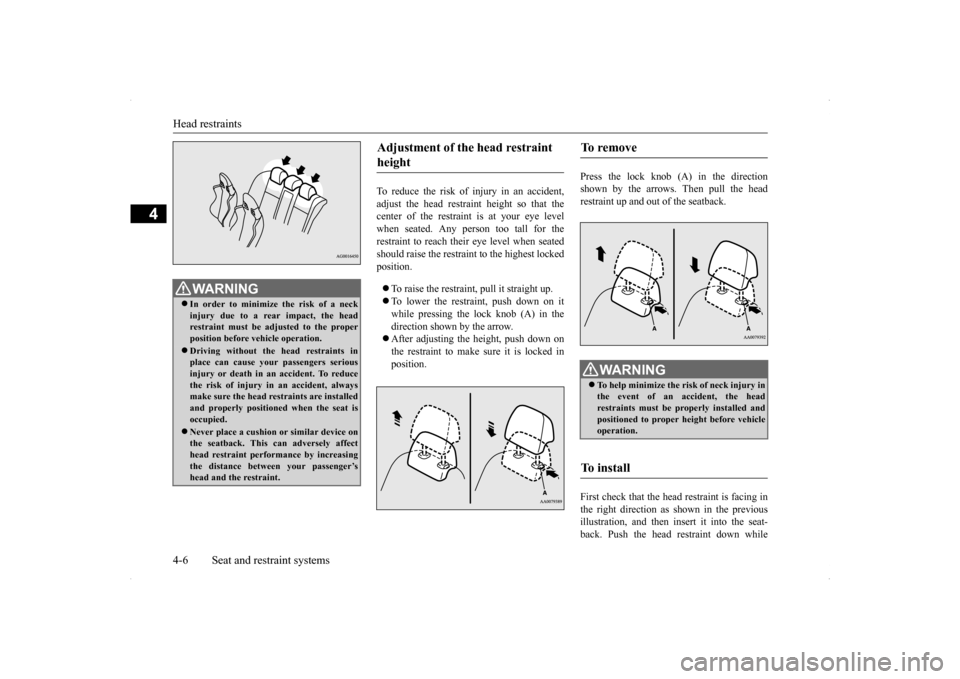
To reduce the risk of injury in an accident, adjust the head restraint height so that the center of the restraint is at your eye levelwhen seated. Any person too tall for the restraint to reach their eye level when seated should raise the restraint to the highest lockedposition. To raise the restraint, pull it straight up. To lower the restraint, push down on it while pressing the lock knob (A) in the direction shown by the arrow. After adjusting the height, push down on the restraint to make sure it is locked in position.
Press the lock knob (A) in the direction shown by the arrows. Then pull the headrestraint up and out of the seatback. First check that the head restraint is facing in the right direction as shown in the previousillustration, and then insert it into the seat- back. Push the head restraint down while
WA R N I N G In order to minimize the risk of a neck injury due to a rear impact, the head restraint must be adjusted to the properposition before vehicle operation. Driving without the head restraints in place can cause your passengers serious injury or death in an accident. To reduce the risk of injury in an accident, alwaysmake sure the head restraints are installed and properly positioned when the seat is occupied. Never place a cushion or similar device on the seatback. This can adversely affecthead restraint performance by increasing the distance between your passenger’s head and the restraint.
Adjustment of the head restraint height
To remove
WA R N I N G To help minimize the risk of neck injury in the event of an accident, the head restraints must be properly installed and positioned to proper height before vehicleoperation.
To i n s t a l l
BK0200800US.bo
ok 6 ページ 2013年2月14日 木曜日 午後2時28分
Page 108 of 338

Parking brake
Features and controls 5-47
5
N00511400360
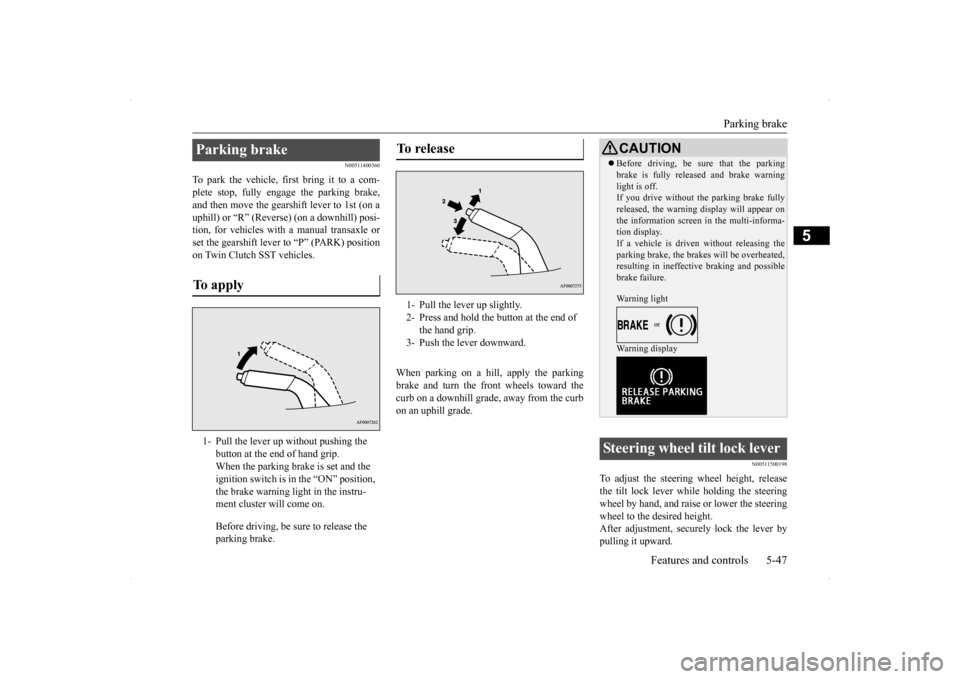
To park the vehicle, first bring it to a com- plete stop, fully engage the parking brake,and then move the gearshift lever to 1st (on a uphill) or “R” (Reverse) (on a downhill) posi- tion, for vehicles with a manual transaxle orset the gearshift lever to “P” (PARK) position on Twin Clutch SST vehicles.
When parking on a hill, apply the parking brake and turn the front wheels toward thecurb on a downhill grade, away from the curb on an uphill grade.
N00511500198
To adjust the steering wheel height, releasethe tilt lock lever while holding the steering wheel by hand, and raise or lower the steeringwheel to the desired height. After adjustment, securely lock the lever by pulling it upward.
Parking brake To apply 1- Pull the lever up without pushing the
button at the end of hand grip. When the parking brake is set and the ignition switch is in the “ON” position, the brake warning light in the instru-ment cluster will come on. Before driving, be sure to release the parking brake.
To release 1- Pull the lever up slightly. 2- Press and hold the button at the end of
the hand grip.
3- Push the lever downward.
CAUTION Before driving, be sure that the parking brake is fully released and brake warning light is off. If you drive without the parking brake fully released, the warning display will appear onthe information screen in the multi-informa- tion display. If a vehicle is driven without releasing theparking brake, the brakes will be overheated, resulting in ineffective braking and possible brake failure. Warning light Warning display
Steering wheel tilt lock lever
BK0200800US.bo
ok 47 ページ 2013年2月14日 木曜日 午後2時28分