display MITSUBISHI LANCER EVOLUTION 2015 10.G MMCS Manual
[x] Cancel search | Manufacturer: MITSUBISHI, Model Year: 2015, Model line: LANCER EVOLUTION, Model: MITSUBISHI LANCER EVOLUTION 2015 10.GPages: 229, PDF Size: 58.35 MB
Page 183 of 229
List of Accepted Commands
183
INFO/SETTINGS Voice Operation
Scroll Down-Left
Scroll Down-Left
Scroll Left
Scroll Left
Scroll Up-Left
Scroll Up-Left
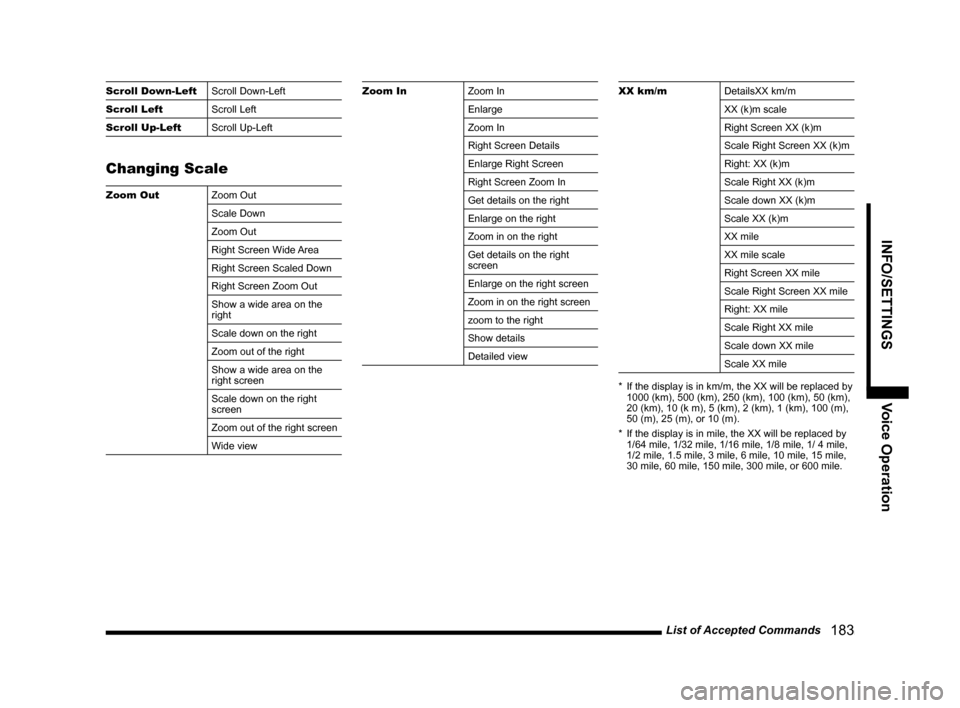
Changing Scale
Zoom Out
Zoom Out
Scale Down
Zoom Out
Right Screen Wide Area
Right Screen Scaled Down
Right Screen Zoom Out
Show a wide area on the
right
Scale down on the right
Zoom out of the right
Show a wide area on the
right screen
Scale down on the right
screen
Zoom out of the right screen
Wide view
Zoom In
Zoom In
Enlarge
Zoom In
Right Screen Details
Enlarge Right Screen
Right Screen Zoom In
Get details on the right
Enlarge on the right
Zoom in on the right
Get details on the right
screen
Enlarge on the right screen
Zoom in on the right screen
zoom to the right
Show details
Detailed viewXX km/m
DetailsXX km/m
XX (k)m scale
Right Screen XX (k)m
Scale Right Screen XX (k)m
Right: XX (k)m
Scale Right XX (k)m
Scale down XX (k)m
Scale XX (k)m
XX mile
XX mile scale
Right Screen XX mile
Scale Right Screen XX mile
Right: XX mile
Scale Right XX mile
Scale down XX mile
Scale XX mile
* If the display is in km/m, the XX will be replaced by
1000 (km), 500 (km), 250 (km), 100 (km), 50 (km),
20 (km), 10 (k m), 5 (km), 2 (km), 1 (km), 100 (m),
50 (m), 25 (m), or 10 (m).
* If the display is in mile, the XX will be replaced by
1/64 mile, 1/32 mile, 1/16 mile, 1/8 mile, 1/ 4 mile,
1/2 mile, 1.5 mile, 3 mile, 6 mile, 10 mile, 15 mile,
30 mile, 60 mile, 150 mile, 300 mile, or 600 mile.
Page 184 of 229
184 List of Accepted Commands
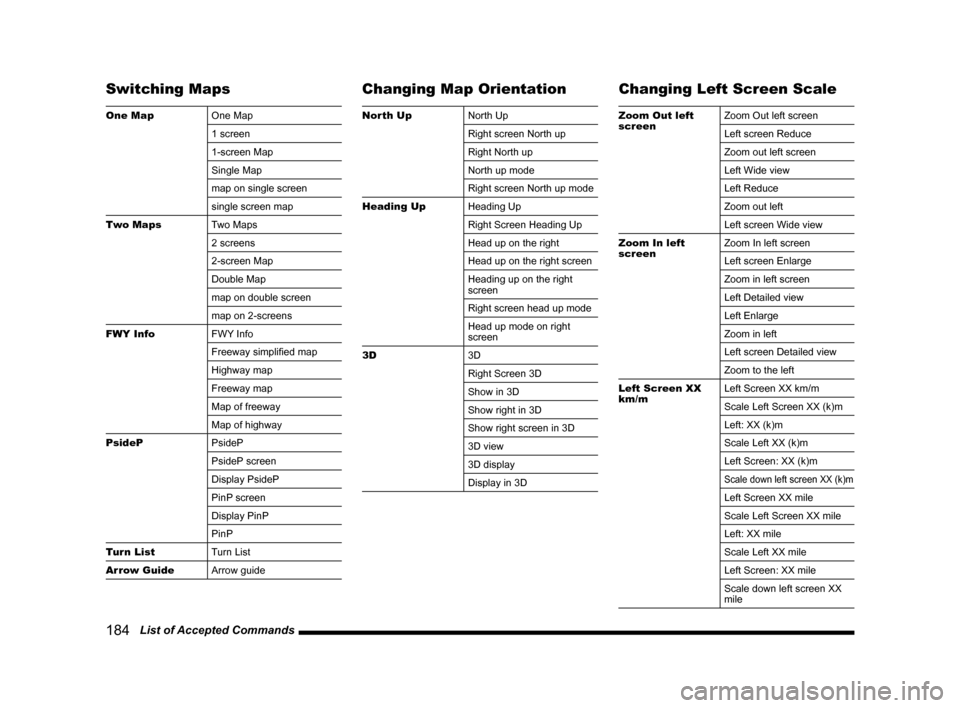
Switching Maps
One Map
One Map
1 screen
1-screen Map
Single Map
map on single screen
single screen map
Two Maps
Two Maps
2 screens
2-screen Map
Double Map
map on double screen
map on 2-screens
FWY Info
FWY Info
Freeway simplifi ed map
Highway map
Freeway map
Map of freeway
Map of highway
PsideP
PsideP
PsideP screen
Display PsideP
PinP screen
Display PinP
PinP
Turn List
Turn List
Arrow Guide
Arrow guide
Changing Map Orientation
North Up
North Up
Right screen North up
Right North up
North up mode
Right screen North up mode
Heading Up
Heading Up
Right Screen Heading Up
Head up on the right
Head up on the right screen
Heading up on the right
screen
Right screen head up mode
Head up mode on right
screen
3D
3D
Right Screen 3D
Show in 3D
Show right in 3D
Show right screen in 3D
3D view
3D display
Display in 3D
Changing Left Screen Scale
Zoom Out left
screenZoom Out left screen
Left screen Reduce
Zoom out left screen
Left Wide view
Left Reduce
Zoom out left
Left screen Wide view
Zoom In left
screenZoom In left screen
Left screen Enlarge
Zoom in left screen
Left Detailed view
Left Enlarge
Zoom in left
Left screen Detailed view
Zoom to the left
Left Screen XX
km/mLeft Screen XX km/m
Scale Left Screen XX (k)m
Left: XX (k)m
Scale Left XX (k)m
Left Screen: XX (k)m
Scale down left screen XX (k)m
Left Screen XX mile
Scale Left Screen XX mile
Left: XX mile
Scale Left XX mile
Left Screen: XX mile
Scale down left screen XX
mile
Page 185 of 229
List of Accepted Commands
185
INFO/SETTINGS Voice Operation
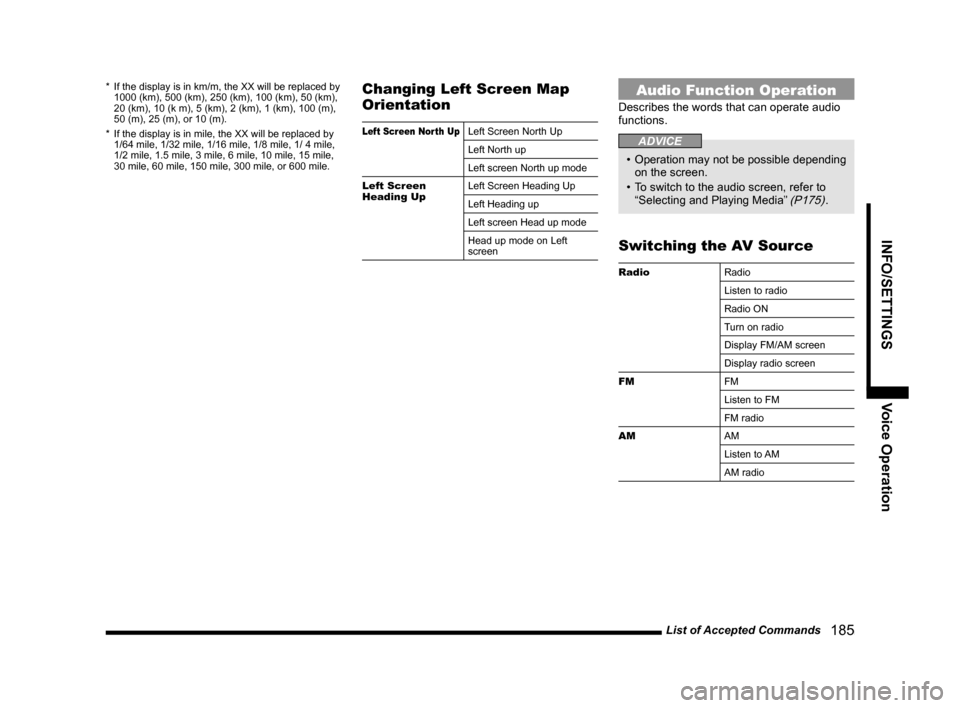
* If the display is in km/m, the XX will be replaced by
1000 (km), 500 (km), 250 (km), 100 (km), 50 (km),
20 (km), 10 (k m), 5 (km), 2 (km), 1 (km), 100 (m),
50 (m), 25 (m), or 10 (m).
* If the display is in mile, the XX will be replaced by
1/64 mile, 1/32 mile, 1/16 mile, 1/8 mile, 1/ 4 mile,
1/2 mile, 1.5 mile, 3 mile, 6 mile, 10 mile, 15 mile,
30 mile, 60 mile, 150 mile, 300 mile, or 600 mile.Changing Left Screen Map
Orientation
Left Screen North UpLeft Screen North Up
Left North up
Left screen North up mode
Left Screen
Heading UpLeft Screen Heading Up
Left Heading up
Left screen Head up mode
Head up mode on Left
screen
Audio Function Operation
Describes the words that can operate audio
functions.
ADVICE
• Operation may not be possible depending
on the screen.
• To switch to the audio screen, refer to
“Selecting and Playing Media”
(P175).
Switching the AV Source
Radio
Radio
Listen to radio
Radio ON
Turn on radio
Display FM/AM screen
Display radio screen
FM
FM
Listen to FM
FM radio
AM
AM
Listen to AM
AM radio
Page 196 of 229
196 Navi Settings
SETTINGS
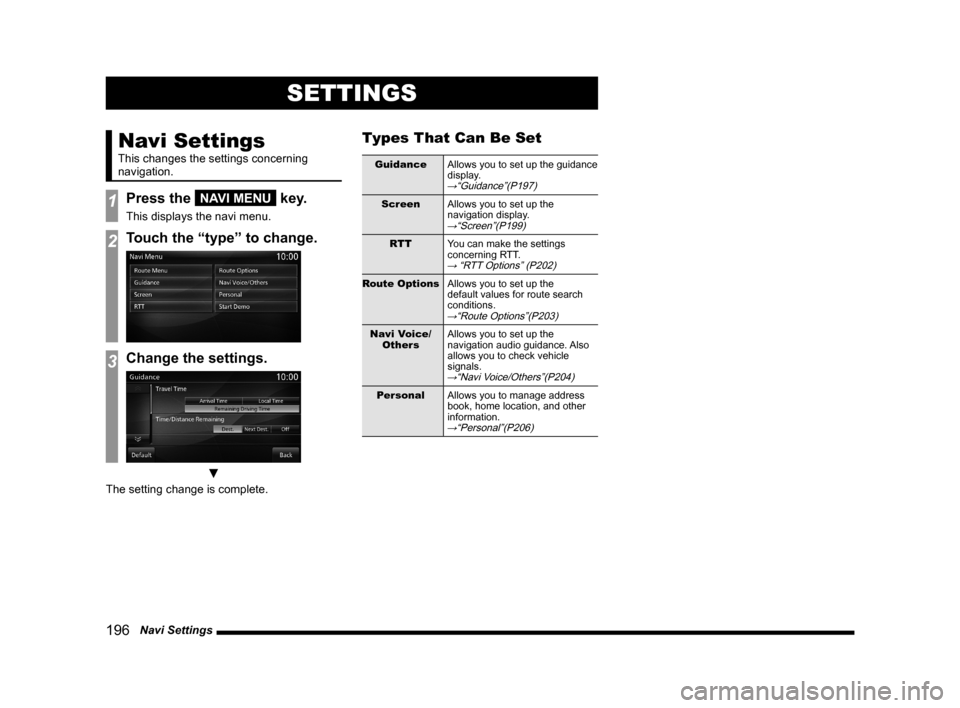
Navi Settings
This changes the settings concerning
navigation.
1Press the NAVI MENU key.
This displays the navi menu.
2Touch the “type” to change.
3Change the settings.
▼
The setting change is complete.
Types That Can Be Set
Guidance
Allows you to set up the guidance
display.
→“Guidance”(P197)
Screen
Allows you to set up the
navigation display.
→“Screen”(P199)
RTT
You can make the settings
concerning RTT.
→ “RTT Options” (P202)
Route Options
Allows you to set up the
default values for route search
conditions.
→“Route Options”(P203)
Navi Voice/
OthersAllows you to set up the
navigation audio guidance. Also
allows you to check vehicle
signals.
→“Navi Voice/Others”(P204)
Personal
Allows you to manage address
book, home location, and other
information.
→“Personal”(P206)
Page 197 of 229
Navi Settings
197
INFO/SETTINGS SETTINGS
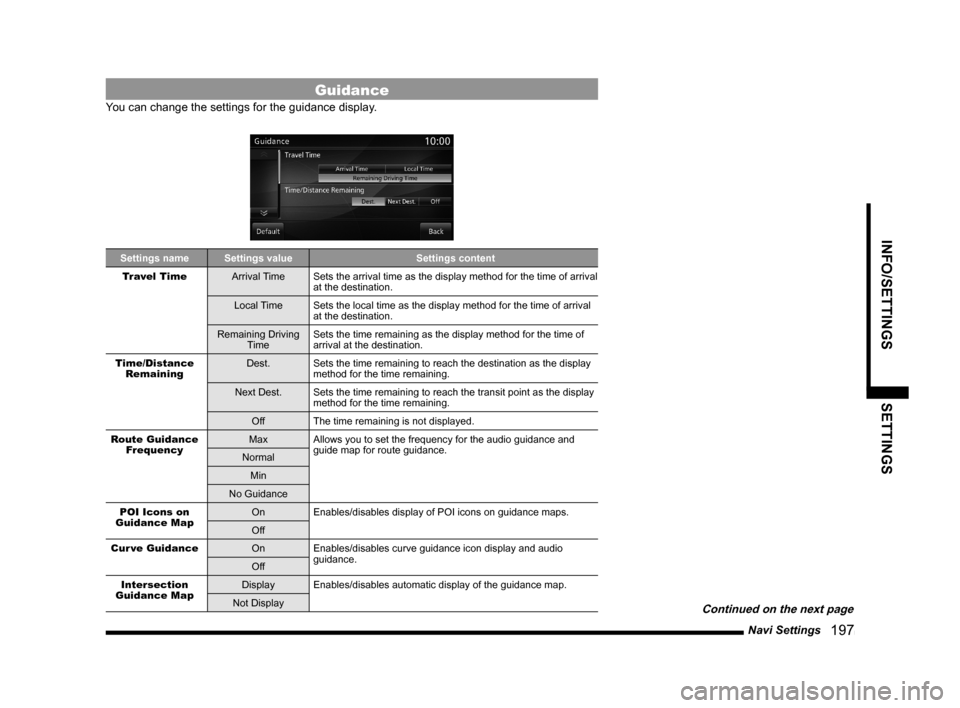
Guidance
You can change the settings for the guidance display.
Settings name Settings value Settings content
Travel Time
Arrival Time Sets the arrival time as the display method for the time of arrival
at the destination.
Local Time Sets the local time as the display method for the time of arrival
at the destination.
Remaining Driving
TimeSets the time remaining as the display method for the time of
arrival at the destination.
Time/Distance
RemainingDest. Sets the time remaining to reach the destination as the display
method for the time remaining.
Next Dest. Sets the time remaining to reach the transit point as the display
method for the time remaining.
Off The time remaining is not displayed.
Route Guidance
FrequencyMax Allows you to set the frequency for the audio guidance and
guide map for route guidance.
Normal
Min
No Guidance
POI Icons on
Guidance MapOn Enables/disables display of POI icons on guidance maps.
Off
Cur ve Guidance
On Enables/disables curve guidance icon display and audio
guidance.
Off
Intersection
Guidance MapDisplay Enables/disables automatic display of the guidance map.
Not Display
Continued on the next page
Page 198 of 229
198 Navi Settings
Settings name Settings value Settings content
DefaultReturns the guidance to their factory default settings.
NOTE
• “Intersection Guidance Map”
may not be displayed.
Page 199 of 229
Navi Settings
199
INFO/SETTINGS SETTINGS
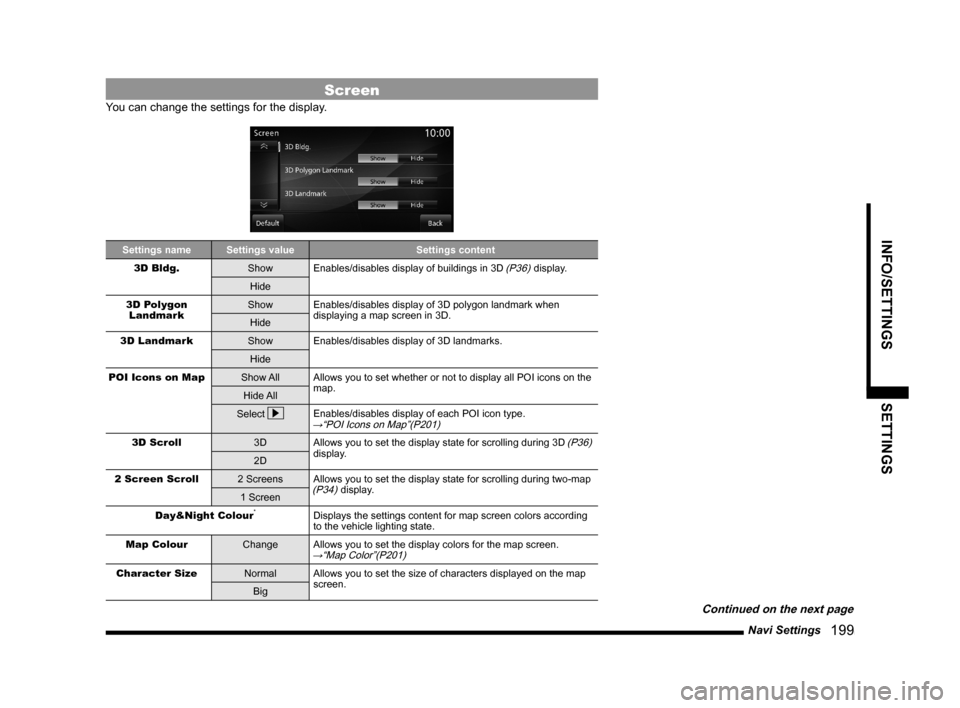
Screen
You can change the settings for the display.
Settings name Settings value Settings content
3D Bldg.
Show Enables/disables display of buildings in 3D (P36) display.
Hide
3D Polygon
LandmarkShow Enables/disables display of 3D polygon landmark when
displaying a map screen in 3D.
Hide
3D Landmark
Show Enables/disables display of 3D landmarks.
Hide
POI Icons on Map
Show All Allows you to set whether or not to display all POI icons on the
map.
Hide All
Select
Enables/disables display of each POI icon type.→“POI Icons on Map”(P201)
3D Scroll
3D Allows you to set the display state for scrolling during 3D (P36)
display.
2D
2 Screen Scroll
2 Screens Allows you to set the display state for scrolling during two-map
(P34) display.
1 Screen
Day&Night Colour
*Displays the settings content for map screen colors according
to the vehicle lighting state.
Map Colour
Change Allows you to set the display colors for the map screen.
→“Map Color”(P201)
Character Size
Normal Allows you to set the size of characters displayed on the map
screen.
Big
Continued on the next page
Page 200 of 229
200 Navi Settings
Settings name Settings value Settings content
Freeway
Simplifi ed Map
Automatic DisplayDisplay Allows you to set whether or not to automatically display
Freeway Info (P35) when traveling on a freeway.
Not Display
Current Street
NameOn Enables/disables display of the name of the current location.
Off
Address Book
NamesOn Enables/disables display of the Address book name.
Off
Lane Information
On Enables/disables display of lane information displayed on the
map screen.
Off
Route Tracking
On Enables/disables display of route tracking displayed on the
map.
(Even when it is set not to be displayed, the route tracking
information is stored.) Off
Erase Clears the stored route tracking information for your car.
Searched Route
Arrow Allows you to change the method route guidance marks
(P30)
are displayed.
Line
AV Icon
Show Allows you to set whether or not to display the AV icons (audio
status icons) displayed on the map screen.
Hide
Mobile Phone Icon
Show Allows you to set whether or not to display the telephone icon
displayed on the map screen.
Hide
Speed Indicator
On Enables/disables display of the speed indicator.
Off
Change 3D point
of viewChange Allows you to change the 3D
(P36) point of view.→“Change 3D point of view”(P201)
DefaultReturns the screen options settings to their factory default
settings.
* For some vehicle types, the screen is set to Daytime if the meter is at its maximum brightness level.
NOTE
• “3D Landmark”
is may not be
displayed.
Page 201 of 229
Navi Settings
201
INFO/SETTINGS SETTINGS
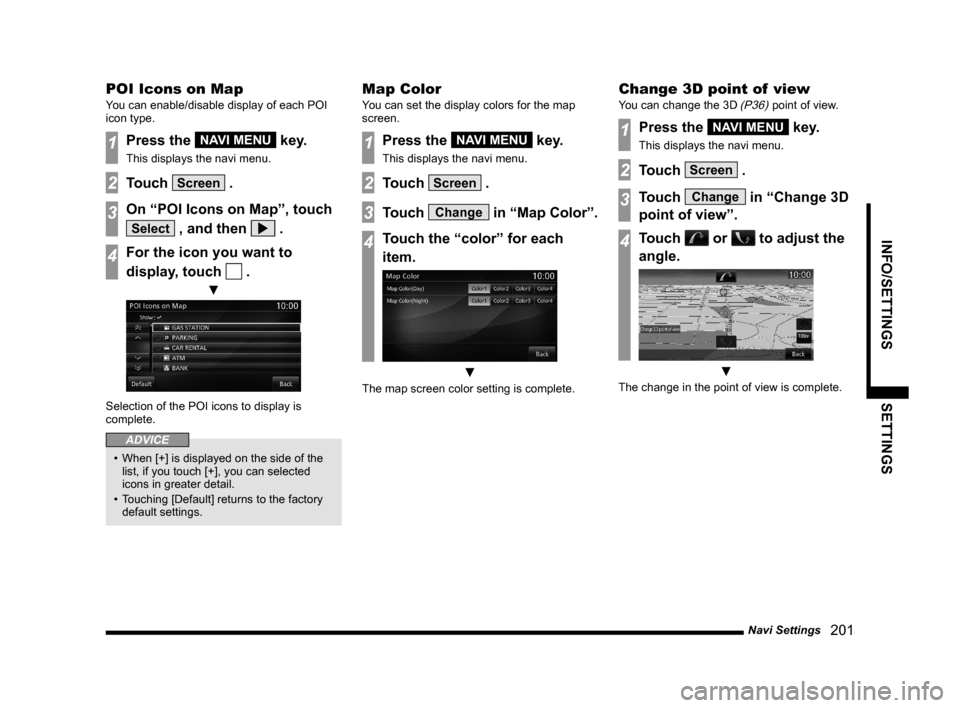
POI Icons on Map
You can enable/disable display of each POI
icon type.
1Press the NAVI MENU key.
This displays the navi menu.
2Touch Screen .
3On “POI Icons on Map”, touch
Select , and then .
4For the icon you want to
display, touch
.
▼
Selection of the POI icons to display is
complete.
ADVICE
• When [+] is displayed on the side of the
list, if you touch [+], you can selected
icons in greater detail.
• Touching [Default] returns to the factory
default settings.
Map Color
You can set the display colors for the map
screen.
1Press the NAVI MENU key.
This displays the navi menu.
2Touch Screen .
3Touch Change in “Map Color”.
4Touch the “color” for each
item.
▼
The map screen color setting is complete.
Change 3D point of view
You can change the 3D (P36) point of view.
1Press the NAVI MENU key.
This displays the navi menu.
2Touch Screen .
3Touch Change in “Change 3D
point of view”.
4Touch or to adjust the
angle.
▼
The change in the point of view is complete.
Page 202 of 229
202 Navi Settings
RTT Options
You can make the settings concerning RTT.
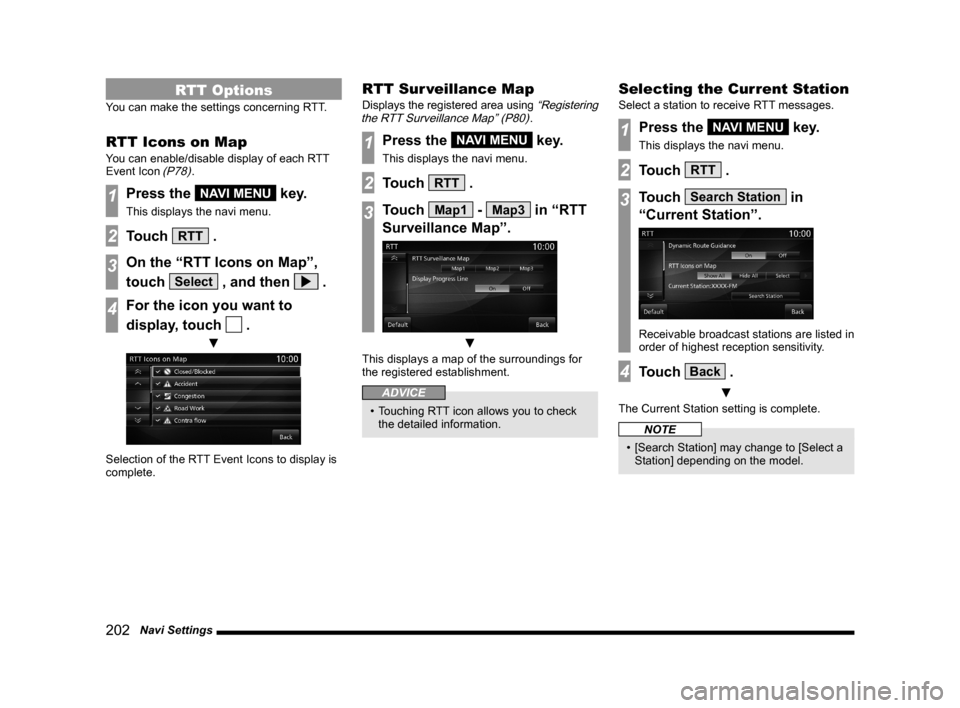
RTT Icons on Map
You can enable/disable display of each RTT
Event Icon (P78).
1Press the NAVI MENU key.
This displays the navi menu.
2Touch RTT .
3On the “RTT Icons on Map”,
touch
Select , and then .
4For the icon you want to
display, touch
.
▼
Selection of the RTT Event Icons to display is
complete.
RTT Sur veillance Map
Displays the registered area using “Registering
the RTT Surveillance Map” (P80).
1Press the NAVI MENU key.
This displays the navi menu.
2Touch RTT .
3Touch Map1 - Map3 in “RTT
Surveillance Map”.
▼
This displays a map of the surroundings for
the registered establishment.
ADVICE
• Touching RTT icon allows you to check
the detailed information.
Selecting the Current Station
Select a station to receive RTT messages.
1Press the NAVI MENU key.
This displays the navi menu.
2Touch RTT .
3Touch Search Station in
“Current Station”.
Receivable broadcast stations are listed in
order of highest reception sensitivity.
4Touch Back .
▼
The Current Station setting is complete.
NOTE
• [Search Station] may change to [Select a
Station] depending on the model.