torque MITSUBISHI LANCER IX 2006 Owner's Guide
[x] Cancel search | Manufacturer: MITSUBISHI, Model Year: 2006, Model line: LANCER IX, Model: MITSUBISHI LANCER IX 2006Pages: 800, PDF Size: 45.03 MB
Page 242 of 800
ON-VEHICLE SERVICE
POWER STEERING37-12
TIE ROD END BALL JOINT TURNING
TORQUE CHECK
M1372001500554
CAUTION
•Do not remove the tie rod end nut from the
ball joint. Loosen it and use special tool to
avoid possible damage to the ball joint
threads.
•
AC208247AJ
CordBoltMB991897
or
MB992011
Nut
Ball joint
Hang special tool with cord to prevent it from
falling.
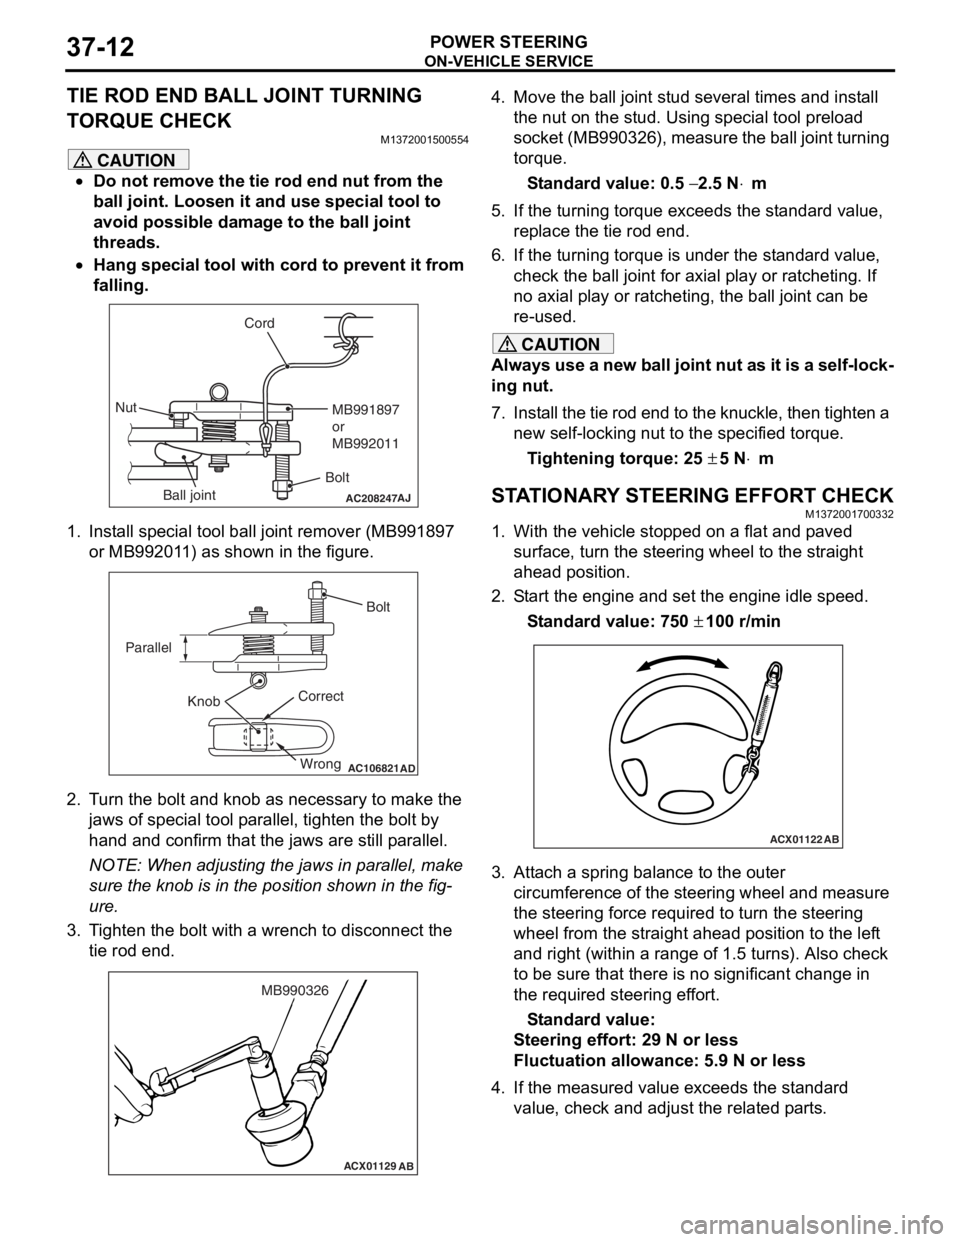
1. Install special tool ball joint remover (MB991897 or MB992011) as shown in the figure.
AC106821
Knob
Parallel
Bolt
Correct Wrong
AD
2. Turn the bolt and knob as necessary to make the jaws of special tool parallel, tighten the bolt by
hand and confirm that the jaws are still parallel.
NOTE: When adjusting the jaws in parallel, make
sure the knob is in the position shown in the fig
-
ure.
3. Tighten the bolt with a wrench to disconnect the tie rod end.
ACX01129 AB
MB990326
4. Move the ball joint stud several times and install
the nut on the stud. Using special tool preload
socket (MB990326), measure the ball joint turning
torque.
Standard value: 0.5 − 2.5 N⋅m
5. If the turning torque exceeds the standard value, replace the tie rod end.
6. If the turning torque is under the standard value, check the ball joint for axial play or ratcheting. If
no axial play or ratcheting, the ball joint can be
re-used.
CAUTION
Always use a new ball joint nut as it is a self-lock-
ing nut.
7. Install the tie rod end to the knuckle, then tighten a new self-locking nut to the specified torque.
Tightening torque: 25 ± 5 N⋅m
STATIONARY STEERING EFFORT CHECKM1372001700332
1. With the vehicle stopped on a flat and paved
surface, turn the steering wheel to the straight
ahead position.
2. Start the engine and set the engine idle speed.
Standard value: 750 ± 100 r/min
ACX01122 AB
3. Attach a spring balance to the outer
circumference of the steering wheel and measure
the steering force required to turn the steering
wheel from the straight ahead position to the left
and right (within a range of 1.5 turns). Also check
to be sure that there is no significant change in
the required steering effort.
Standard value:
Steering effort: 29 N or less
Fluctuation allowance: 5.9 N or less
4. If the measured value exceeds the standard value, check and adjust the related parts.
Page 245 of 800
ON-VEHICLE SERVICE
POWER STEERING37-15
6. Check whether or not the hydraulic pressure is the standard value when no-load conditions are
created by fully opening the shut-off valve of the
pressure gauge.
Standard value: 0.2 − 0.7 MPa
7. If it is not within the standard value, the probable cause is a malfunction of the oil line or steering
gear, so check these parts and repair as
necessary.
8. Turn the steering wheel all the way to the left or right; then check whether or not the retention
hydraulic pressure is the standard value.
Standard value: 8.8 − 9.5 MPa
9. If not the standard value, overhaul the steering gear. Remeasure fluid pressure.
10. Remove the special tools, and then tighten the
pressure hose to the specified torque.
Tightening torque: 57 ± 7 N⋅m
11. Bleed the system (Refer to P.37-14).
POWER STEERING PRESSURE SWITCH
CHECK
M1372007200324
ACX01134 AB
Temperature
gaugeAdapter
(MB991548)
Oil reservoir Oil
pump
Adapter
(MB991549)
Shut-off valve
Pressure gauge
(MB990662)
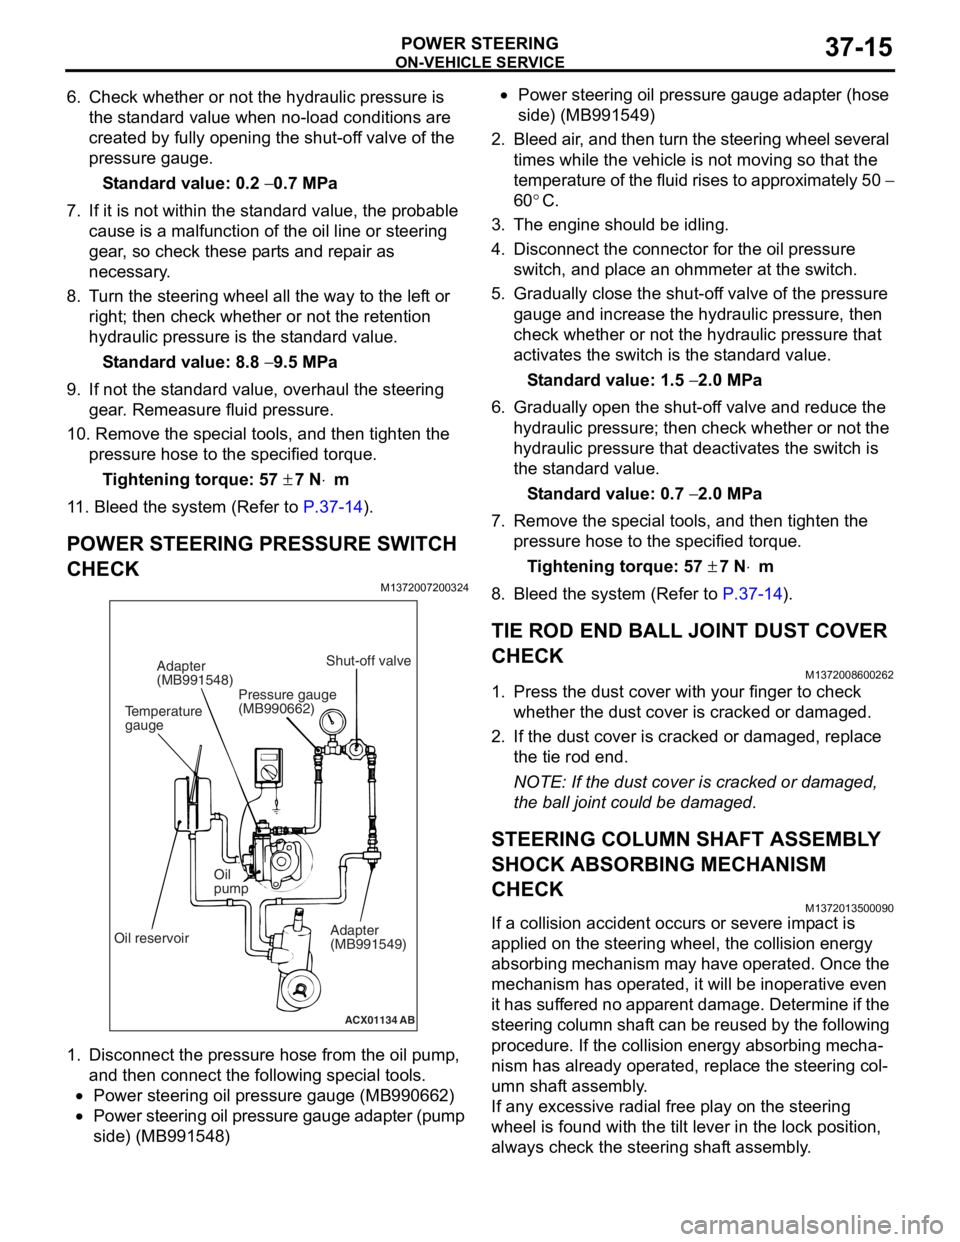
1. Disco nnect the pre s sure hose from the oil pump ,
an d then con nect the followin g sp ecial too l s.
•Power steering oil pressure gauge (MB990 662)
•Power steering oil pressure gauge ad apter (pump
side) (MB99154
8)
•Power steering oil pressure gaug e a dapte r (ho s e
side) (MB99154
9)
2. Bleed air , and the n turn t he steering wheel several
times while the vehicle is not moving so that the
tempe r atu r e o f th e flu i d rise s to approximately 50
−
60
°C.
3. Th e engine should be idling.
4.Disco nnect the conne ctor fo r the o il pr essure
switch , and p l ace an o h mmeter a t the switch .
5.Gradua lly close the shut-of f valve of the pressure
g auge a nd in crease the hyd r aulic pre ssu re, the n
check wheth e r or no t the h y drau lic pressure that
a c tivates the switch is the st a ndard valu e.
St andard va lue: 1.5 − 2.0 MPa
6.Gradua lly open the shut-of f va lve and re duce the
h y drau lic p r essure; then check whethe r o r n o t the
h y drau lic pressure that de activate s the switch is
th e st and ard va lue.
St andard va lue: 0.7 − 2.0 MPa
7.Remove the special tools, and then tighten the
p r essure hose to the specified torque .
Ti ghte n ing torque: 57 ± 7 N⋅m
8.Bleed the system (Refer to P.37-14).
TIE ROD END BALL JOINT DUST COVER
CHECK
M13720086 0026 2
1.Press th e dust co ver wit h you r fing er to check
whet her the dust cover is cra cke d or da mage d.
2.If the du st cover is cracked o r damaged, repla c e
th e tie rod end .
NOTE: If the dust cover is cra cke d or da mag ed,
th
e ball jo int could be da mage d.
STEERING COLUMN SHAFT ASSEMBL Y
SHOCK ABSORBING MECHANISM
CHECK
M13720135 0009 0
If a collision accid ent occu rs or seve re imp a ct is
applied on
the steering w heel, the collision energy
abso
r bing mechanism ma y h a ve opera t ed. Once the
mechanism
has o perate d , it will b e ino perative e v en
it has
suf f er ed no app a r en t d a mage . De termin e if the
steering colu
mn shaf t can b e reused b y th e following
proce
dure. If the collision en ergy a b sor b ing mecha
-
nism has already operated, rep l ace the steering col-
umn shaft assembly .
If any excessive radial fre e pla y on the steering
wh
eel is fo und with the tilt lever in the lock po sit i on,
always ch
eck the steering shaf t assembly .
Page 246 of 800
ON-VEHICLE SERVICE
POWER STEERING37-16
WARNING
•If the vehicle continues to be driven after
the collision absorbing mechanism has
operated, the steering column shaft may
be damaged while it is in use.
•If there is a slack in the one-way capsule,
do not attempt to repa ir it but replace the
steering column shaft assembly.
Inspection Procedure
1. Remove the lower and upper column covers.
CAUTION
Do not release the tilt lever until the steering col-
umn has been installed to complete this inspec-
tion procedure.
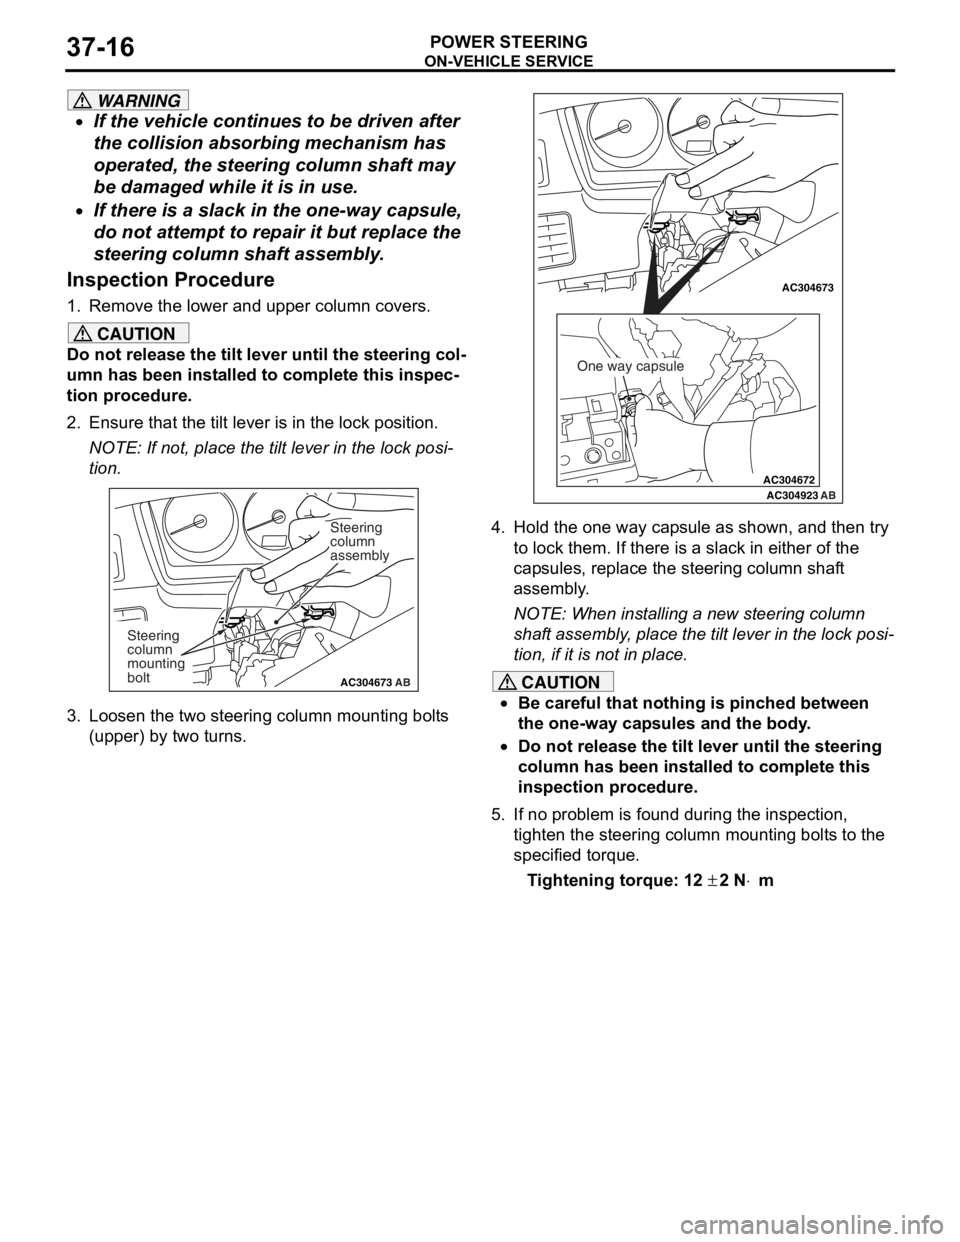
2. Ensure that the tilt lever is in the lock position.
NOTE: If not, place the tilt lever in the lock posi-
tion.
AC304673AC304673
Steering
column
assembly
AB
Steering
column
mounting
bolt
3. Loosen the two steering column mounting bolts
(upper) by two turns.
AC304672
AC304673AC304673
AC304923 AB
One way capsule
4. Hold the one way capsule as shown, and then try
to lock them. If there is a slack in either of the
capsules, replace the steering column shaft
assembly.
NOTE: When installing a new steering column
shaft assembly, place the tilt lever in the lock posi
-
tion, if it is not in place.
CAUTION
•Be careful that nothing is pinched between
the one-way capsules and the body.
•Do not release the tilt lever until the steering
column has been installed to complete this
inspection procedure.
5. If no problem is found during the inspection, tighten the steering column mounting bolts to the
specified torque.
Tightening torque: 12 ± 2 N⋅m
Page 251 of 800
AC210969AD
Clip
Steering column
shaft
STE E RING C O LUMN SHAFT AS SEMBL Y
POWER STEERING37-21
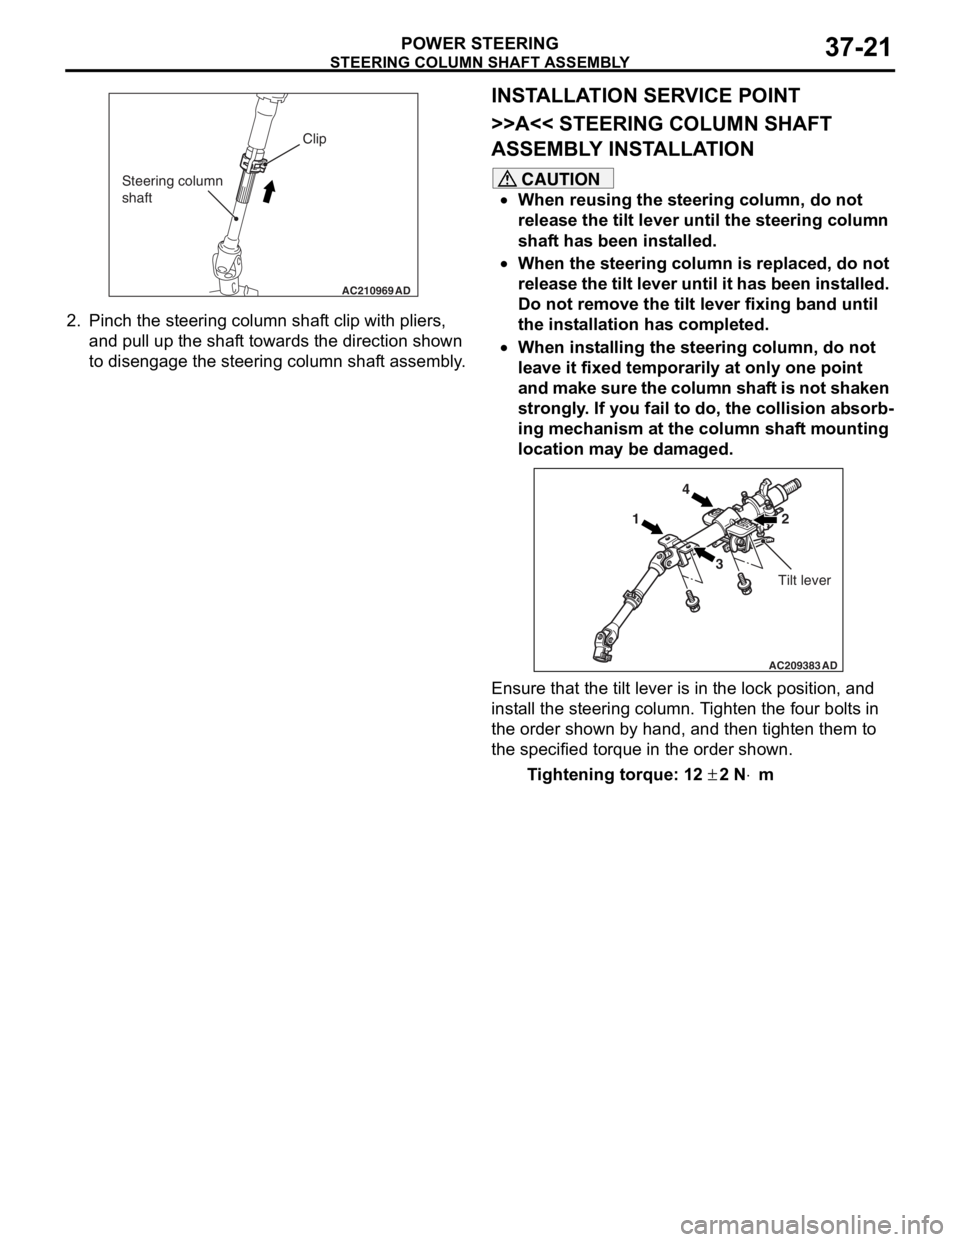
2.Pin c h t he st eering column shaf t clip with pliers,
an d pull up the shaf t towards the d i rection shown
to disengag e the steering column shaf t assembly .
INSTALLA T ION SER VICE POINT
>>A<< STEERING COLUMN SHAFT
ASSEMBL
Y INST ALLA TION
CAUTION
•When reusing the steering column, do not
release the tilt lever until the steering column
shaft has been installed.
•When the steering column is replaced, do not
release the tilt lever until it has been installed.
Do not remove the tilt lever fixing band until
the installation has completed.
•When installing the steering column, do not
leave it fixed temporarily at only one point
and make sure the column shaft is not shaken
strongly. If you fail to do, the collision absorb
-
ing mechanism at the column shaft mounting
location may be damaged.
AC209383AD
14
3 2
Tilt lever
Ensure that the tilt lever is in the lock position, and
install the steering column. Tighten the four bolts in
the order shown by hand, and then tighten them to
the specified torque in the order shown.
Tightening torque: 12 ± 2 N⋅m
Page 254 of 800
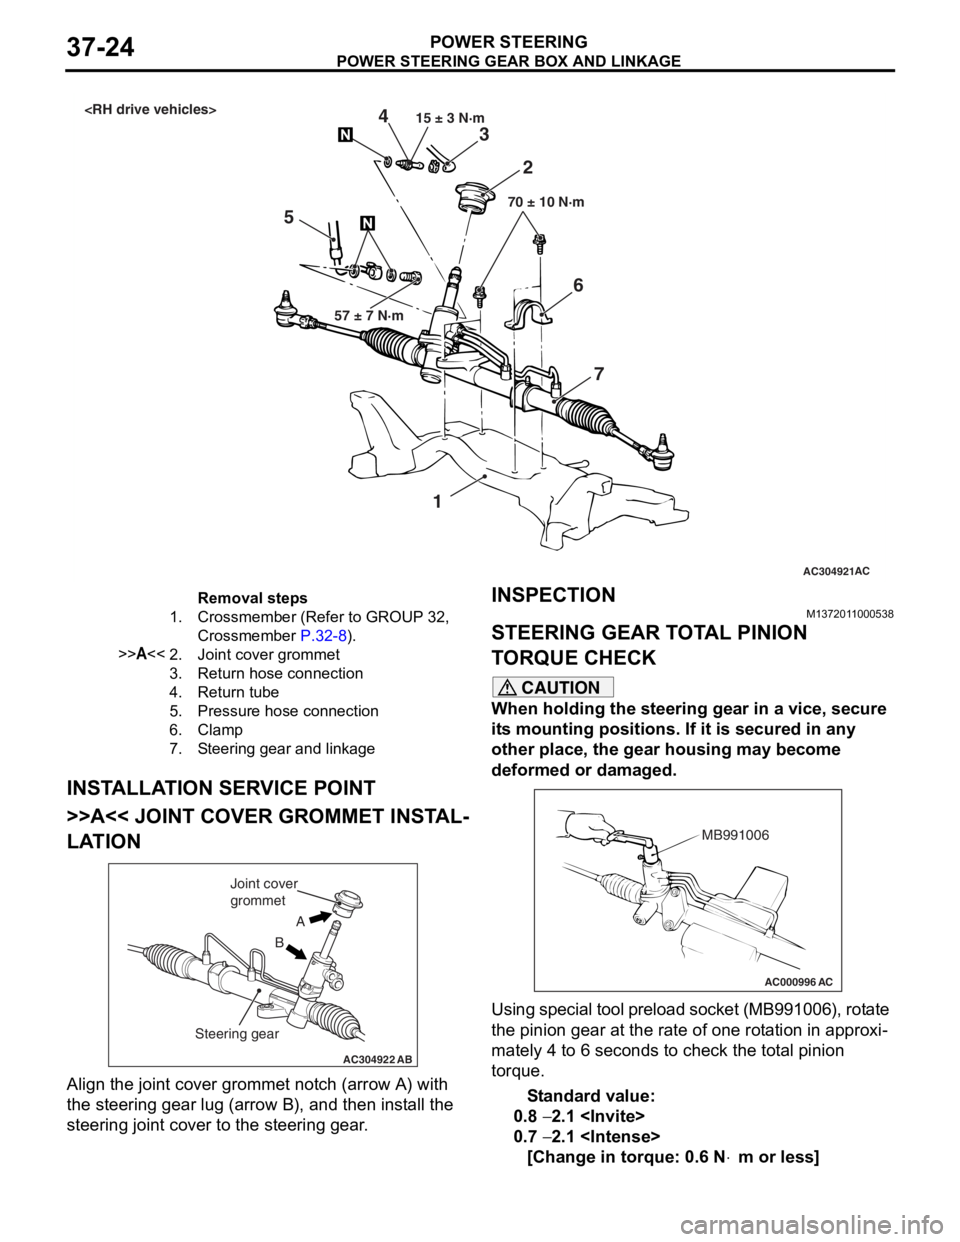
AC304921AC
57 ± 7 N·m 15 ± 3 N·m
70 ± 10 N·m
3
5 2
4
1
67
Removal steps
1.Crossmember (Refer to GROUP 32,
Crossmember
P.32-8).
>>A<<2.Joint cover grommet
3.Return hose connection
4.Return tube
5.Pressure hose connection
6.Clamp
7.Steering gear and linkage
PO WE R STEER ING GEAR BOX AND LINK AGE
POWER ST E E RING37-24
INSTALLA T ION SER VICE POINT
>>A<< JOINT COVER GROMMET INST AL-
LATION
AC304922AB
A
B
Joint cover
grommet
Steering gear
Align the jo int cove r grommet n o tch (arrow A) with
the steerin
g gear lug (a rrow B), and t hen inst all the
steering joint
cover to th e ste e ring gear .
INSPECTIONM137201 10 0053 8
STEERING GEAR T O T A L PINION
T
O RQUE CHECK
CAUTION
When holding the steering gear in a vice, secure
its mounting positions. If it is secured in any
other place, the gear housing may become
deformed or damaged.
AC000996 AC
MB991006
Using special tool preload socket (MB991006), rotate
the pinion gear at the rate of one rotation in approxi
-
mately 4 to 6 seconds to check the total pinion
torque.
Standard value:
0.8 − 2.1
0.7 − 2.1
[Change in torque: 0.6 N⋅m or less]
Page 255 of 800
POWER STEERING GEAR BOX AND LINKAGE
POWER STEERING37-25
NOTE: When measuring, remove the bellows from
the rack housing. Measure the pinion torque through
the whole stroke of the rack.
If the measured value is not within the standard
range, first adjust the rack support cover, and then
check the total pinion torque again.
If the total pinion torque cannot be adjusted to within
the standard range by adjusting the rack support
cover, check the rack support cover, rack support
spring, rack support and replace any parts if neces
-
sary.
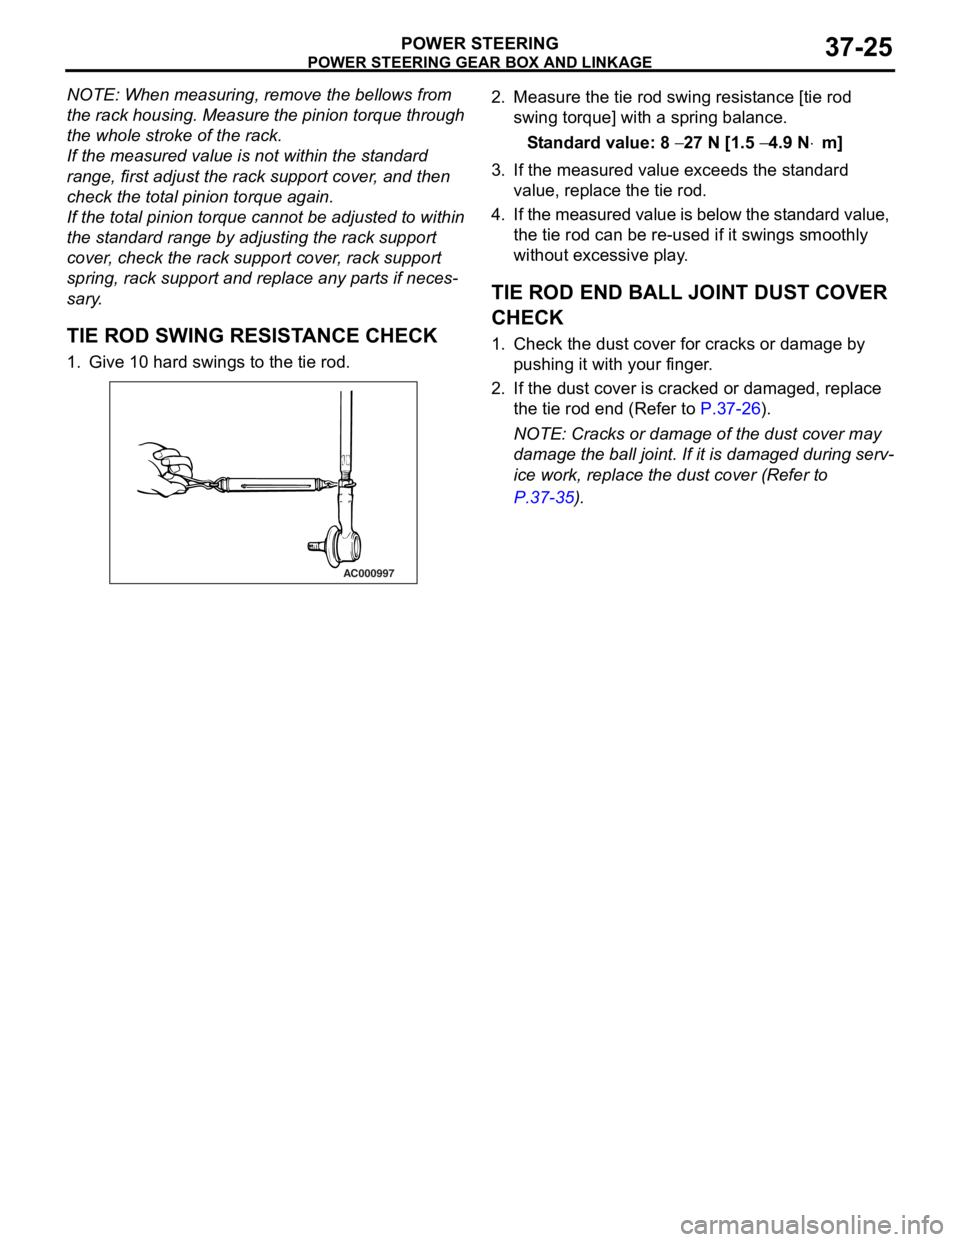
TIE ROD SWING RESISTANCE CHECK
1. Give 10 hard swings to the tie rod.
AC000997
2. Measure the tie ro d swin g resist ance [tie rod
swing to rque] with a spring bala n ce.
St andard va lue: 8 − 27 N [1.5 − 4.9 N⋅m]
3.If the measu r ed value exceeds the st a ndard
value , replace the tie rod.
4. If the measured value is below the st a ndard valu e,
th e tie rod can be re-use d if it swings smo o thly
wit hout e xce ssive play .
TIE ROD END BALL JOINT DUST COVER
CHECK
1.Check t he dust co ver f o r cracks or da mage by
p u shing it with your finger .
2.If the du st cover is cracked o r damaged, repla c e
th e tie rod end (Refer to
P.37-26).
NOTE: Cracks or dama ge of t he dust co ver may
d
a
mag
e the ball joint. If it is da mag ed du ring serv
-
ice work, replace the du st cove r (Re f er to
P.37-35).
Page 256 of 800
POWER STEERING GEAR BOX AND LINKAGE
POWER STEERING37-26
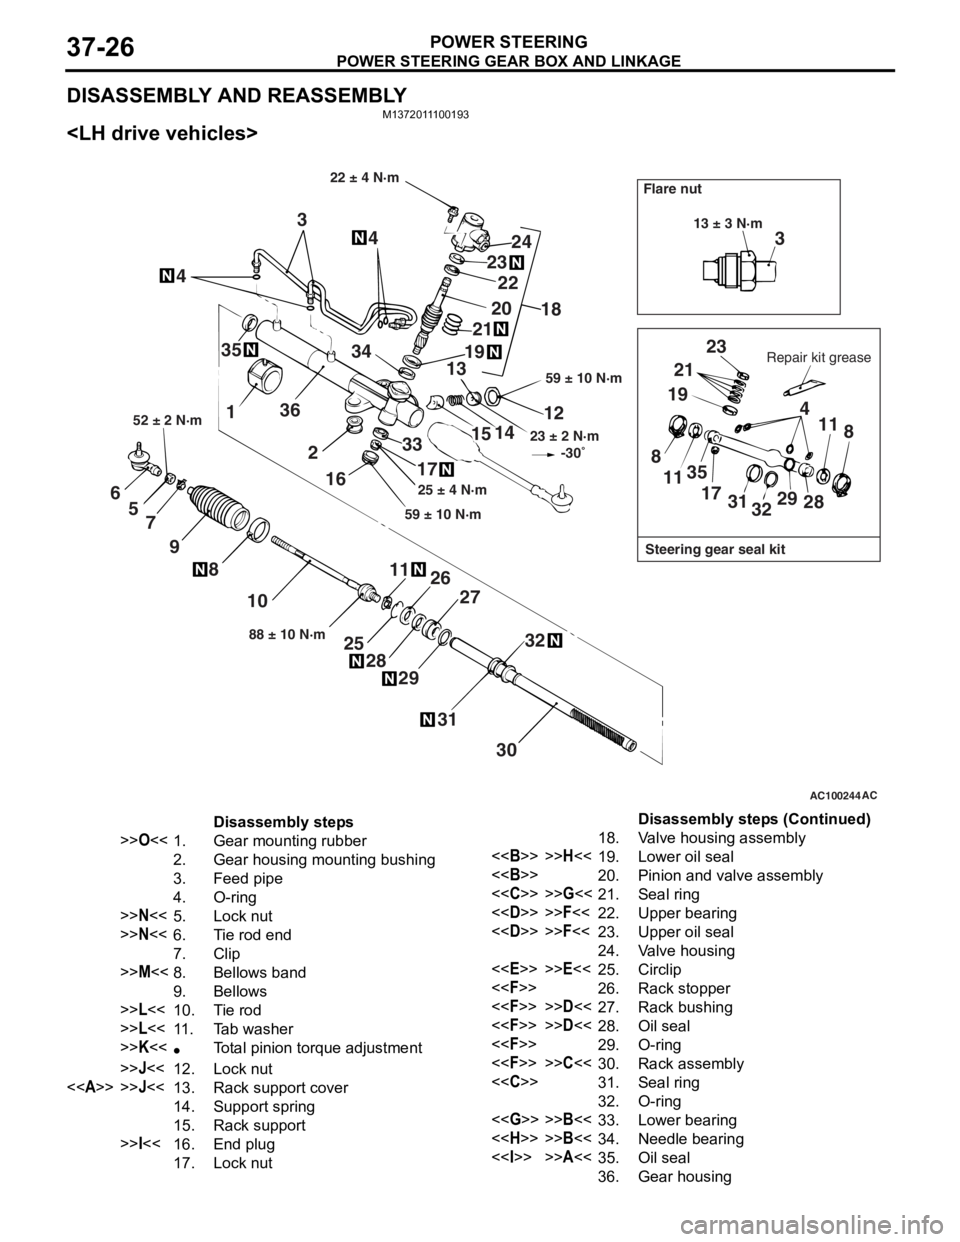
DISASSEMBLY AND REASSEMBLY
M1372011100193
AC100244AC
3
13 ± 3 N·m
Steering gear seal kit
Flare nut
Repair kit grease
23
21
19 4
11 8
28
29
32
31
17
35
11
8
22 ± 4 N·m
59 ± 10 N·m
23 ± 2 N·m
-30�
12
14
15
33
17
59 ± 10 N·m 25 ± 4 N·m
18
24
23
20
19
21
22
13
34 4
4
3
1 36
216
30
31
32
27
29
28
25 26
1188 ± 10 N·m
10
8
9
7
5
6
52 ± 2 N·m
35
Disassembly steps
>>O<<1.Gear mounting rubber
2.Gear housing mounting bushing
3.Feed pipe
4.O-ring
>>N<<5.Lock nut
>>N<<6.Tie rod end
7.Clip
>>M<<8.Bellows band
9.Bellows
>>L<<10.Tie rod
>>L<<11 .Tab washer
>>K<<•Total pinion torque adjustment
>>J<<12.Lock nut
<>>>J<<13.Rack support cover
14.Support spring
15.Rack support
>>I<<16.End plug
17.Lock nut
18.Valve housing assembly
<>>>H<<19.Lower oil seal
<>20.Pinion and valve assembly
<
<
<
24.Valve housing
<
<
<
<
<
<
<
32.O-ring
<
<
<>>>A<<35.Oil seal
36.Gear housing
Disassembly steps (Continued)
Page 257 of 800
POWER STEERING GEAR BOX AND LINKAGE
POWER STEERING37-27
AC102865
3
23
21
19 4
11 8
8 11 35
17 3132 29
28
6
5
7
9
8
10
11
25
26
28 29
27
32
31
30 12
13
14
15
16
17 33
35
36 1
4
2
34
4 4
3
24
23
22
21 20
19
18
AD
Steering gear seal kit
Flare nut
Repair kit grease
22 ± 4 N·m
59 ± 10 N·m
25 ± 4 N·m
88 ± 10 N·m52 ± 2 N·m
59 ± 10 N·m 13 ± 3 N·m
23 ± 2 N·m -30�
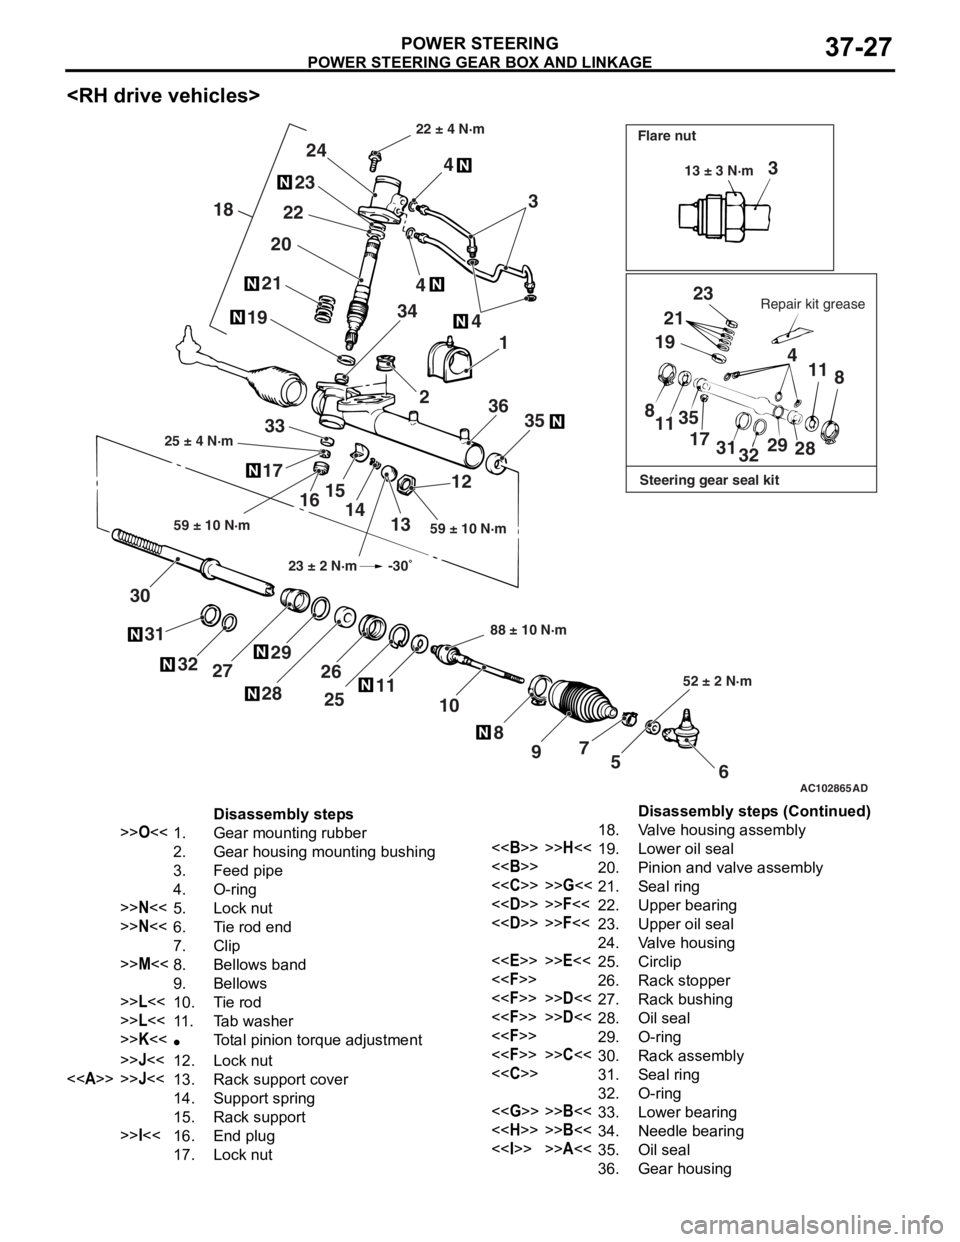
Disassembly steps
>>O<<1.Gear mounting rubber
2.Gear housing mounting bushing
3.Feed pipe
4.O-ring
>>N<<5.Lock nut
>>N<<6.Tie rod end
7.Clip
>>M<<8.Bellows band
9.Bellows
>>L<<10.Tie rod
>>L<<11 .Tab washer
>>K<<•Total pinion torque adjustment
>>J<<12.Lock nut
<>>>J<<13.Rack support cover
14.Support spring
15.Rack support
>>I<<16.End plug
17.Lock nut
18.Valve housing assembly
<>>>H<<19.Lower oil seal
<>20.Pinion and valve assembly
<
<
<
24.Valve housing
<
<
<
<
<
<
<
32.O-ring
<
<
<>>>A<<35.Oil seal
36.Gear housing
Disassembly steps (Continued)
Page 262 of 800
POWER STEERING GEAR BOX AND LINKAGE
POWER STEERING37-32
3. Wrap the rack end with plastic tape, and push the rack bushing onto the rack.
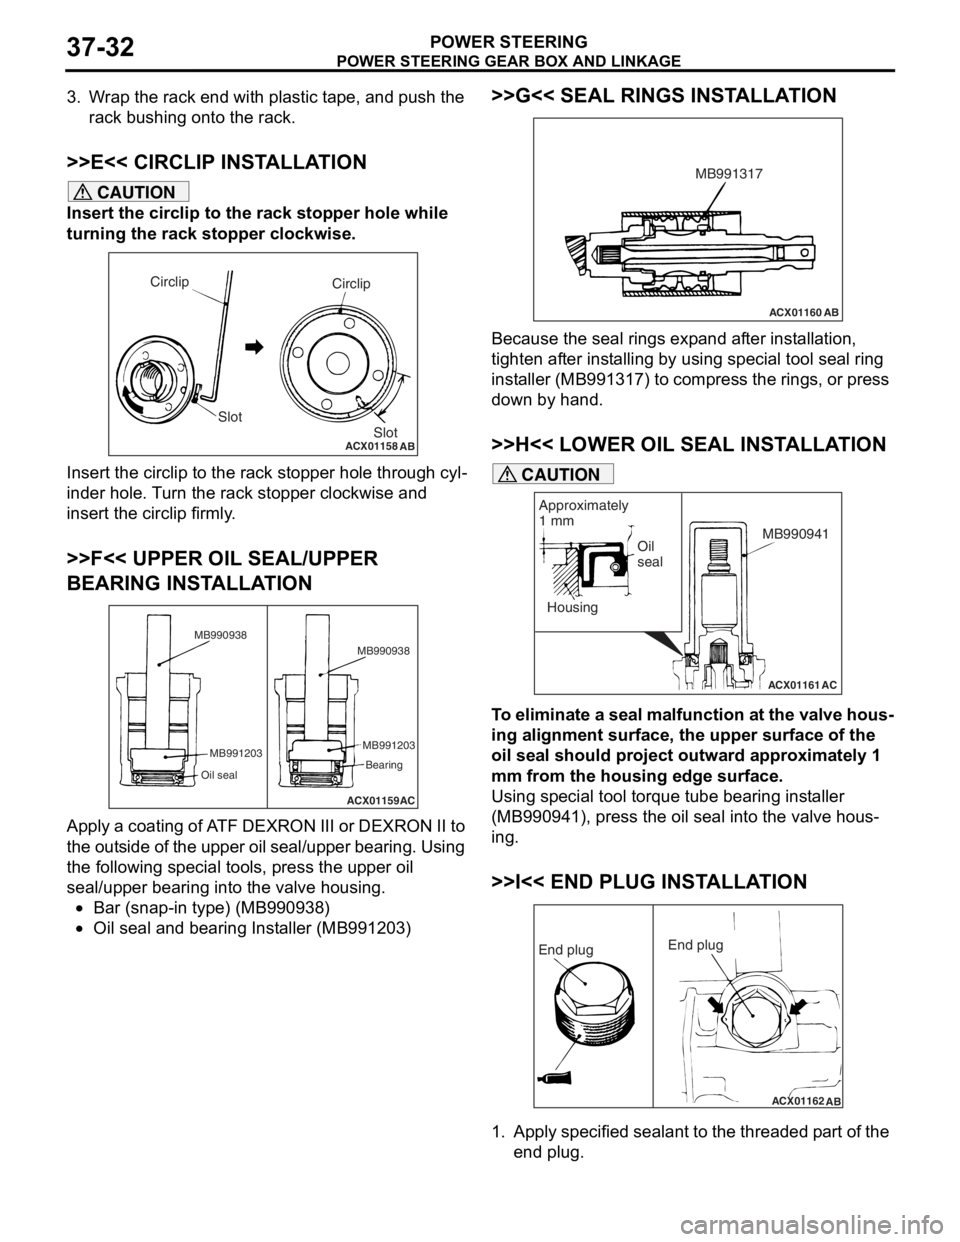
>>E<< CIRCLIP INSTALLATION
CAUTION
Insert the circlip to the rack stopper hole while
turning the rack stopper clockwise.
ACX01158
Circlip
Slot
AB
Circlip
Slot
Insert the circlip to the rack stopper hole through cyl-
inder hole. Turn the rack stopper clockwise and
insert the circlip firmly.
>>F<< UPPER OIL SEAL/UPPER
BEARING INSTALLATION
ACX01159AC
MB990938
MB991203
Oil seal
MB991203 Bearing
MB990938
Apply a coating of ATF DEXRON III or DEXRON II to
the outside of the upper oil seal/upper bearing. Using
the following special tools, press the upper oil
seal/upper bearing into the valve housing.
•Bar (snap-in type) (MB990938)
•Oil seal and bearing Installer (MB991203)
>>G<< SEAL RINGS INSTALLATION
ACX01160
AB
MB991317
Because the seal rings expand after installation,
tighten after installing by using special tool seal ring
installer (MB991317) to compress the rings, or press
down by hand.
>>H<< LOWER OIL SEAL INSTALLATION
ACX01161
Housing
AC
Oil
seal
Approximately
1 mm
MB990941
CAUTION
To eliminate a seal malfunction at the valve hous-
ing alignment surface, the upper surface of the
oil seal should project outward approximately 1
mm from the housing edge surface.
Using special tool torque tube bearing installer
(MB990941), press the oil seal into the valve hous
-
ing.
>>I<< END PLUG INSTALLATION
ACX01162
AB
End plug End plug
1. Apply specified sealant to the threaded part of the
end plug.
Page 263 of 800
POWER STEERING GEAR BOX AND LINKAGE
POWER STEERING37-33
Specified sealant: 3M ATD Part No.8661 or
equivalent
2. Secure the threaded portion of the end plug at two places by using a punch.
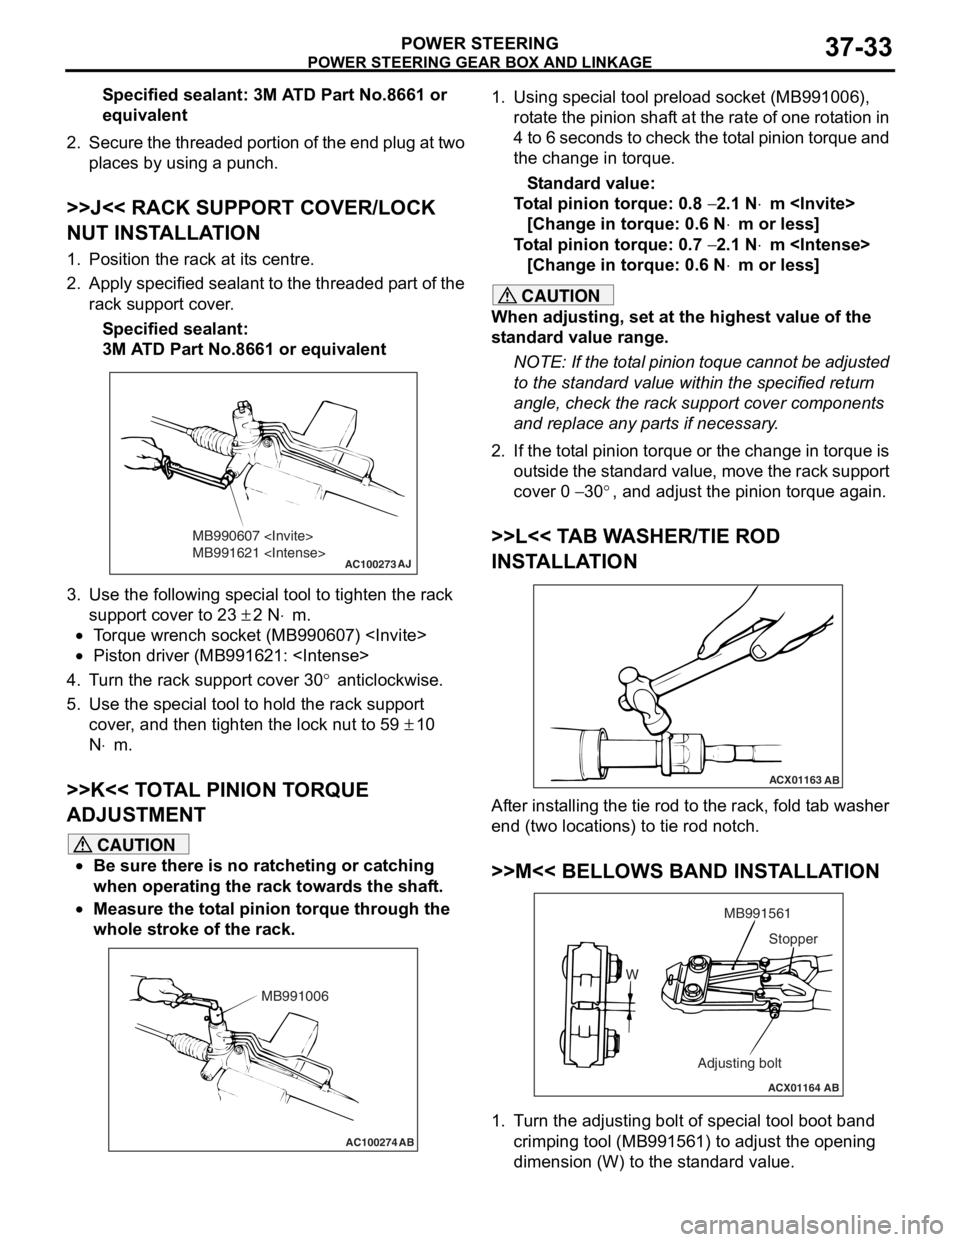
>>J<< RACK SUPPORT COVER/LOCK
NUT INSTALLATION
1. Position the rack at its centre.
2. Apply specified sealant to the threaded part of the
rack support cover.
Specified sealant:
3M ATD Part No.8661 or equivalent
AC100273
MB990607
MB991621
AJ
3.Use the fo llo wing special to ol to tigh ten the rack
suppor t cover to 2 3
± 2 N⋅m.
•To rque wren ch socket (MB990607 )
•Piston driver (MB9916 21:
4.T u rn the rack suppo rt cover 30° anticlockwise .
5.Use the special tool to hold the r a ck sup port
cove r , and t hen tighten the lock nut to 59
± 10
N
⋅m.
>>K<< T O T A L PINION T O RQUE
ADJUSTMENT
CAUTION
•Be sure there is no ratcheting or catching
when operating the rack towards the shaft.
•
AC100274 AB
MB991006
Measure the total pinion torque through the
whole stroke of the rack.
1. Using special tool preload socket (MB991006),
rotate the pinion shaft at the rate of one rotation in
4 to 6 seconds to check the total pinion torque and
the change in torque.
Standard value:
Total pinion torque: 0.8 − 2.1 N⋅m
[Change in torque: 0.6 N
⋅m or less]
Total pinion torque: 0.7 − 2.1 N⋅m
[Change in torque: 0.6 N
⋅m or less]
CAUTION
When adjusting, set at the highest value of the
standard value range.
NOTE: If the total pinion toque cannot be adjusted
to the standard value within the specified return
angle, check the rack support cover components
and replace any parts if necessary.
2. If the total pinion torque or the change in torque is outside the standard value, move the rack support
cover 0
− 30°, and adjust the pinion torque again.
>>L<< TAB WASHER/TIE ROD
INSTALLATION
ACX01163 AB
After installing the tie rod to the rack, fold tab washer
end (two locations) to tie rod notch.
>>M<< BELLOWS BAND INSTALLATION
ACX01164 AB
W MB991561
Adjusting bolt Stopper
1. Turn the adjusting bolt of special tool boot band
crimping tool (MB991561) to adjust the opening
dimension (W) to the standard value.