MITSUBISHI LANCER SPORTBACK 2014 8.G Owners Manual
Manufacturer: MITSUBISHI, Model Year: 2014, Model line: LANCER SPORTBACK, Model: MITSUBISHI LANCER SPORTBACK 2014 8.GPages: 422, PDF Size: 55.11 MB
Page 241 of 422

Bluetooth® 2.0 interface (if so equipped) 5-174 Features and controls
5
6. The voice guide will say “Number please.” Say the telephone number to reg- ister it. 7. The voice guide will repeat the telephone number you have just read, and then reg-ister the number.When the telephone number has been reg- istered, the voice guide will say “Number saved. Would you like to add anothernumber for this entry?” To add another telephone number for a new location for the current entry, answer“Yes.” The system will return to location selection in Step 5. Answer “No” to end the registration pro-cess and return to the main menu.
N00580700022
You can select 1 phonebook entry from the phonebook of the cellular phone and register it in the vehicle phonebook. 1. Press the SPEECH button (except for vehicles with Mitsubishi Multi-Commu-nication System) or PICK-UP button (for vehicles with Mitsubishi Multi-Commu- nication System).
2. Say “Phonebook.” 3. The voice guide will say “Select one of the following: new entry, edit number, edit name, list names, delete, erase all, orimport contact.” Say “Import contact.” 4. The voice guide will say “Would you like to import a single entry or all contacts?”Say “Single entry.” The Bluetooth
® 2.0 interface will become
ready to receive transferred phonebookdata. 5. After the voice guide says “Ready to receive a contact from the phone. Only ahome, a work, and a mobile number can be imported,” the Bluetooth
® 2.0 inter-
face will receive the phonebook data from the Bluetooth
® compatible cellular phone.
NOTE
In the case of English, the system will recog- nise both “zero” and “oh” (Letter “o”) for the number “0.”NOTE
When the confirmation function is on, after repeating the telephone number you haveread, the voice guide will ask “Is this cor- rect?” Answer “Yes.” Answer “No” to return to telephone numberregistration in step 6.
To select and transfer one phone- book entry from the phonebook of the cellular phone NOTE
Transfer is not permitted unless the vehicle is parked. Before transferring, make sure thatthe vehicle is parked in a safe location. All or part of data may not be transferred, even when the cellular phone supports Blue- tooth
®, depending on the compatibility of
the device. The maximum supported telephone number length is 19 digits. Any telephone number of 20 digits or more will be truncated to the first 19 digits. If telephone numbers contain characters other than 0 to 9,
*, # or +, these characters
are deleted before the transfer. For the connection settings on the cellular phone side, refer to the instructions for the cellular phone.
NOTE
If the maximum number of entries are already registered, the voice guide will say“The phonebook is full. Would you like to delete a name?” Say “Yes” if you want to delete a registered name.If you say “No,” the system will return to the main menu.
BK0200700US.book
174 ページ 2013年2月15日 金曜日 午後12時17分
Page 242 of 422

Bluetooth® 2.0 interface (if so equipped)
Features and controls 5-175
5
6. Operate the Bluetooth
® compatible cellu-
lar phone to set it up so that the phone- book entry you want to register in the vehicle phonebook can be transferred to the Bluetooth
® 2.0 interface.
7. When the reception is complete, the voice guide will say “
8. The voice guide will say “Adding
10. The voice guide will say “Would you like
to import another contact?”Answer “Yes” if you want to continue with the registration. You can continue to register a new phonebook entry from Step5. Answer “No,” the system will return to the main menu.
N00579800023
You can change or delete a name or telephone number registered in the vehicle phonebook. You can also listen to the list of names regis-tered in the vehicle phonebook.
N00579900037
1. Press the SPEECH button (except forvehicles with Mitsubishi Multi-Commu-nication System) or PICK-UP button (for vehicles with Mitsubishi Multi-Commu- nication System).2. Say “Phonebook.” 3. The voice guide will say “Select one of the following: new entry, edit number,edit name, list names, delete, erase all, orimport contact”. Say “Edit number.” 4. The voice guide will say “Please say the name of the entry you would like to edit,or say list names.” Say the name of the phonebook entry you want to edit.
NOTE
If the Bluetooth
® 2.0 interface cannot recog-
nise the Bluetooth
® compatible cellular
phone or the connection takes too much time, the voice guide will say “Import con- tact has timed out” and then the system will cancel the registration. In such case, start over again from Step 1. Pressing the HANG-UP button or pressing and holding the SPEECH button will cancelthe registration.NOTE
If the entered name is already used for other phonebook entry or similar to a name used for other phonebook entry, that name cannot be registered.
To change the content registered in the vehicle phonebook NOTE
The system must have at least one entry.
Editing a telephone number
NOTE
Say “List names,” and the names registered in the phonebook will be read out in order. Refer to “Vehicle phonebook: Listening to the list of registered names” on page 5-176.
BK0200700US.book
175 ページ 2013年2月15日 金曜日 午後12時17分
Page 243 of 422

Bluetooth® 2.0 interface (if so equipped) 5-176 Features and controls
5
5. The voice guide will say “Home, work, mobile or other?” Select and say the loca- tion where the telephone number you want to change or add is registered.When the confirmation function is on, the system will check the target name and location again. Answer “Yes” if you wantto continue with the editing. Answer “No,” the system will return to Step 3.6. The voice guide will say “Number,please.” Say the telephone number you want to register. 7. The voice guide will repeat the telephone number. When the confirmation function is on, the system will ask if the number is correct.Answer “Yes.” Answer “No,” the system will return to the Step 3.
8. Once the telephone number is registered, the voice guide will say “Number saved” and then the system will return to the main menu.
N00580100039
1. Press the SPEECH button (except forvehicles with Mitsubishi Multi-Commu-nication System) or PICK-UP button (for vehicles with Mitsubishi Multi-Commu- nication System).2. Say “Phonebook.” 3. The voice guide will say “Select one of the following: new entry, edit number,edit name, list names, delete, erase all, or import contact.” Say “Edit name.”
4. The voice guide will say “Please say the name of the entry you would like to edit, or say list names.” Say the name you want to edit. 5. The voice guide will say “Changing
N00580200027
1. Press the SPEECH button (except forvehicles with Mitsubishi Multi-Commu- nication System) or PICK-UP button (for vehicles with Mitsubishi Multi-Commu-nication System).
NOTE
If the telephone number is already registered in the selected location, the voice guide will say “The current number is
NOTE
If the location where a telephone number was already registered has been overwritten with a new number, the voice guide will say “Number changed” and then the system willreturn to the main menu.
Editing a name
NOTE
Say “List names,” and the names registered in the phonebook are read out in order. Refer to “Vehicle phonebook: Listening to the list of registered names” on page 5-176.
Listening to the list of registered names
BK0200700US.book
176 ページ 2013年2月15日 金曜日 午後12時17分
Page 244 of 422

Bluetooth® 2.0 interface (if so equipped)
Features and controls 5-177
5
2. Say “Phonebook.” 3. The voice guide will say “Select one of the following: new entry, edit number, edit name, list names, delete, erase all, orimport contact.” Say “List names.” 4. Bluetooth
® 2.0 interface will read out the
entries in the phonebook in order.5. When the voice guide is done reading the list, it will say “End of list, would you like to start from the beginning?” When youwant to check the list again from thebeginning, answer “Yes.” When you are done, answer “No” to return to the previous or main menu.
N00580300031
1. Press the SPEECH button (except forvehicles with Mits
ubishi Multi-Commu-
nication System) or PICK-UP button (for vehicles with Mits
ubishi Multi-Commu-
nication System).2. Say “Phonebook.” 3. The voice guide will say “Select one of the following: new entry, edit number,edit name, list names, delete, erase all, orimport contact.” Say “Delete.” 4. The voice guide will say “Please say the name of the entry you would like todelete, or say list names.” Say the name of the phonebook entry in which the tele- phone number you want to delete is regis-tered.
5. If only one telephone number is registered in the selected phonebook entry, the voice guide will say “Deleting
NOTE
You can call, edit or delete a name that is being read out.Press the SPEECH button and say “Call” to call the name, “Edit name” to edit it, or “Delete” to delete it.The system will beep and then execute your command. If you press the SPEECH button and say “Continue” or “Previous” while the list is being read, the system will advance or rewind the list. Say “Continue” to proceed to the next entry or “Previ
ous” to return to the
previous entry.
Deleting a telephone number
NOTE
Say “List names,” and the names registered in the phonebook are read out in order. Refer to “Vehicle phonebook: Listening to the listof registered names” on page 5-176.
NOTE
To delete the telephone numbers from all locations, say “All.”
BK0200700US.book
177 ページ 2013年2月15日 金曜日 午後12時17分
Page 245 of 422

Bluetooth® 2.0 interface (if so equipped) 5-178 Features and controls
5
7. When the telephone number deletion is complete, the voice guide will say “
N00580400029
You can delete all registered informationfrom the vehicle phonebook. 1. Press the SPEECH button (except for vehicles with Mitsubishi Multi-Commu- nication System) or PICK-UP button (forvehicles with Mitsubishi Multi-Commu- nication System). 2. Say “Phonebook.”3. The voice guide will say “Select one of the following: new entry, edit number, edit name, list names, delete, erase all, orimport contact.” Say “Erase all.”
4. For confirmation purposes, the voice guide will ask “Are you sure you want to erase everything from your hands-free system phonebook?” Answer “Yes.”Answer “No” to cancel the deletion of all registered information in the phonebook and return to the main menu. 5. The voice guide will say “You are about to delete everything from your hands-free system phonebook. Do you want to con-tinue?” Answer “Yes” to continue.Answer “No” to cancel the deletion of all registered information in the phonebook and return to the main menu.6. The voice guide will say “Please wait, erasing the hands-free system phone- book” and then the system will delete alldata in the phonebook. When the deletion is complete, the voice guide will say “Hands-free system phone-book erased” and then the system will return to the main menu.
N00566201062
All entries in the phonebook stored in the cel-lular phone can be transferred in a batch and registered in the mobile phonebook.Up to 7 mobile phonebooks, each containing up to 1,000 names, can be registered.
The Bluetooth
® 2.0 interface automatically
converts from text to voice the names regis- tered in the transferred phonebook entries, and creates names. Follow the steps below to transfer to the mobile phonebook the phonebook stored inthe cellular phone.
Erasing the phonebook
Mobile phonebook
NOTE
Only the mobile phonebook transferred from the connected cellular phone can be usedwith that cellular phone. You cannot change the names and telephone numbers in the phonebook entries registered in the mobile phonebook. You cannot select and delete specific phonebook entries, either.To change or delete any of the above, change the applicable information in the source phonebook of the cellular phone and thentransfer the phonebook again.
To import a devices phonebook
NOTE
Transfer should be completed while the vehi- cle is parked. Before transferring, make sure that the vehicle is parked in a safe location. The already stored phonebook in the mobile phonebook is overwritten by the storedphonebook in the cellular phone.
BK0200700US.book
178 ページ 2013年2月15日 金曜日 午後12時17分
Page 246 of 422
Bluetooth® 2.0 interface (if so equipped)
Features and controls 5-179
5
1. Press the SPEECH button (except for vehicles with Mitsubishi Multi-Commu- nication System) or PICK-UP button (for vehicles with Mitsubishi Multi-Commu-nication System). 2. Say “Phonebook.” 3. The voice guide will say “Select one ofthe following: new entry, edit number,edit name, list names, delete, erase all, or import contact.” Say “Import contact.” 4. The voice guide will say “Would you liketo import a single entry or all contacts?” Say “All contacts.”
5. The voice guide will say “Importing the contact list from the mobile phonebook. This may take several minutes to com- plete. Would you like to continue?”Answer “Yes,” transferring to the mobile phonebook the phonebook stored in the cellular phone will start.Answer “No,” the system will return to the main menu.
6. When the transfer is complete, the voice guide will say “Import complete” and then the system will return to the main menu.
N00566300053
MODEL: MMC FCC ID: CB2MDGMY10IC: 279B-MDGMY10 Your Bluetooth
® 2.0 interface operates on a
radio frequency subject to Federal Communi- cations Commission (FCC) Rules (For vehi- cles sold in U.S.A.) and Industry CanadaRules (For vehicles sold in Canada). This device complies with Part 15 of the FCC Rules and RSS-210 of the Industry CanadaRules. Operation is subject to the following two conditions: This device may not cause harmful inter- ference. This device must accept any interference received, including interference that may cause undesired operation.
All or part of data may not be transferred, even when the cellular phone supports Blue- tooth
®, depending on the compatibility of
the device. Only a home, a work, and a mobile number can be imported. The maximum supported telephone number length is 19 digits. Any telephone number of 20 digits or more will be truncated to the first19 digits. If telephone numbers contain characters other than 0 to 9,
*, # or +, these characters
are deleted before the transfer. For the connection settings on the cellular phone side, refer to the instructions for the cellular phone.NOTE
NOTE
The transfer may take some time to complete depending on the number of contacts. If the Bluetooth
® 2.0 interface could not be
connected to the Bluetooth
® compatible cel-
lular phone, the voice guide will say “Unable to transfer contact list from phone” and then the system will return to the main menu. If you press the HANG-UP button or press and hold the SPEECH button during the datatransfer, the transfer will be cancelled and the system will return to the main menu. If an error occurs during the data transfer, all transfer will be cancelled and the voice guide will say “Unable to complete the phonebookimport” and then the system will return to the main menu. If there are no contacts in the phonebook, the voice guide will say “There are no contacts on the connected phone.”
General information
CAUTION Changes or modifications not expressly approved by the manufacturer for compli-ance could void the user’s authority to oper- ate the equipment.
BK0200700US.book
179 ページ 2013年2月15日 金曜日 午後12時17分
Page 247 of 422
USB input terminal (if so equipped) 5-180 Features and controls
5
The term “IC:” before the radio certification number only signifies that Industry Canada technical specifications were met. The antenna used for this transmitter must notbe co-located or operating in conjunction with any other antenna or transmitter. End- users and installers must be provided withinstallation instructio
ns and transmitter oper-
ating conditions for satisfying RF exposure compliance.
N00566401093 N00566701054
You can connect your USB memory device or iPod
* to play music files stored in the USB
memory device or iPod.
The following explains how to connect and remove a USB memory device or iPod. Refer to the following sections for details on how to play music files:Refer to “Listen to Audio Files on a USB Device” on page 7-46.
N00566800074
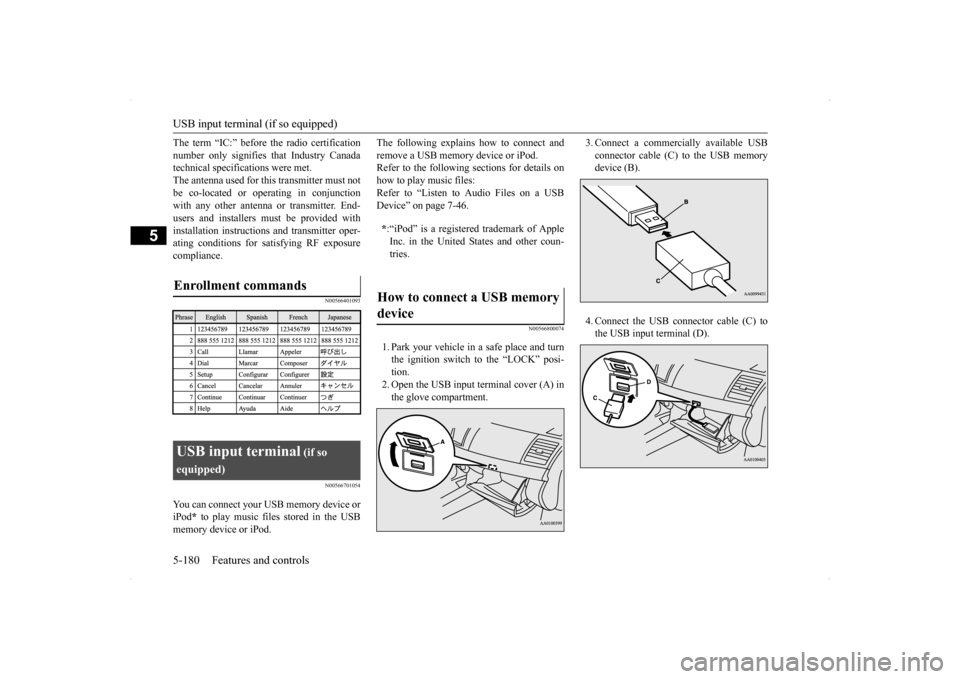
1. Park your vehicle in a safe place and turn the ignition switch to the “LOCK” posi- tion. 2. Open the USB input terminal cover (A) inthe glove compartment.
3. Connect a commercially available USB connector cable (C) to the USB memory device (B). 4. Connect the USB connector cable (C) to the USB input terminal (D).
Enrollment commands
USB input terminal
(if so
equipped)
* :“iPod” is a registered trademark of Apple Inc. in the United States and other coun- tries.
How to connect a USB memory device
BK0200700US.book
180 ページ 2013年2月15日 金曜日 午後12時17分
Page 248 of 422
USB input terminal (if so equipped)
Features and controls 5-181
5
5. To remove the USB connector cable, turn the ignition switch to the “LOCK” posi- tion first and perform the installation steps in reverse.
N00566900059
1. Park your vehicle in a safe place and turnthe ignition switch to the “LOCK” posi- tion.
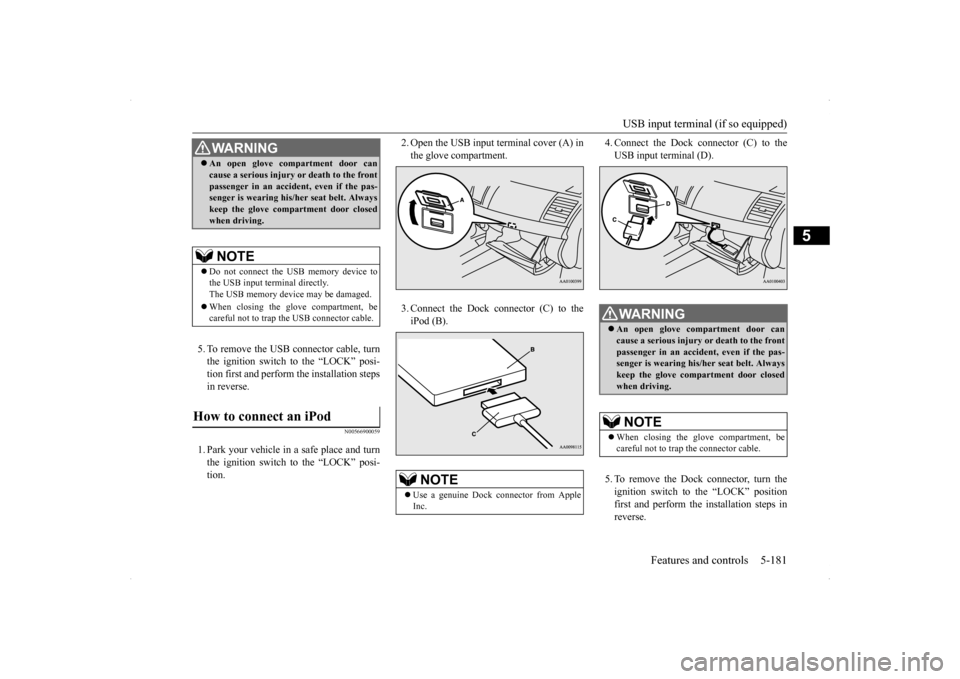
2. Open the USB input terminal cover (A) in the glove compartment. 3. Connect the Dock connector (C) to the iPod (B).
4. Connect the Dock connector (C) to the USB input terminal (D). 5. To remove the Dock connector, turn the ignition switch to the “LOCK” positionfirst and perform the installation steps in reverse.
WA R N I N G An open glove compartment door can cause a serious injury or death to the front passenger in an accident, even if the pas- senger is wearing his/her seat belt. Always keep the glove compartment door closedwhen driving.NOTE
Do not connect the USB memory device to the USB input terminal directly.The USB memory device may be damaged. When closing the glove compartment, be careful not to trap the USB connector cable.
How to connect an iPod
NOTE
Use a genuine Dock connector from Apple Inc.
WA R N I N G An open glove compartment door can cause a serious injury or death to the front passenger in an accident, even if the pas-senger is wearing his/her seat belt. Always keep the glove compartment door closed when driving.NOTE
When closing the glove compartment, be careful not to trap the connector cable.
BK0200700US.book
181 ページ 2013年2月15日 金曜日 午後12時17分
Page 249 of 422
Sun visors 5-182 Features and controls
5
N00567000015 N00567100087
Devices of the following types can be con- nected. * : “iPod touch,” “iPod classic,” “iPod” and “iPod nano” are registered trademarks of
Apple Inc. in the United States and other countries.
N00567200017
You can play music files of the following specifications that are saved in a USB mem- ory device or other device supporting massstorage class.
N00524600294
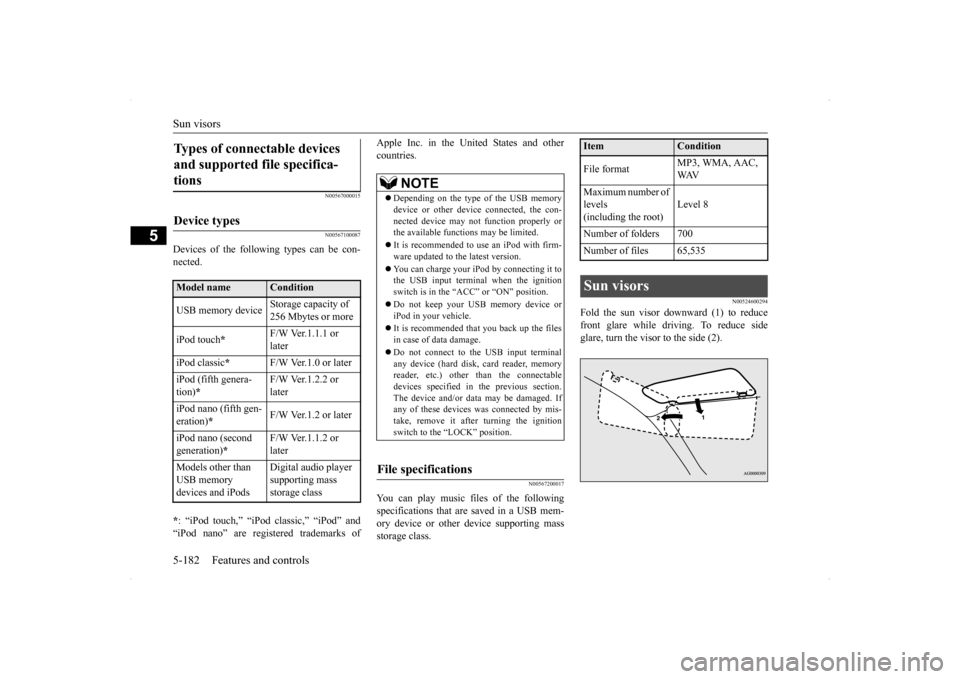
Fold the sun visor downward (1) to reduce front glare while driving. To reduce side glare, turn the visor to the side (2).
Types of connectable devices and supported file specifica- tions
Device types
Model name
Condition
USB memory device
Storage capacity of 256 Mbytes or more
iPod touch
*
F/W Ver.1.1.1 or later
iPod classic
*
F/W Ver.1.0 or later
iPod (fifth genera- tion)
*
F/W Ver.1.2.2 or later
iPod nano (fifth gen- eration)
*
F/W Ver.1.2 or later
iPod nano (second generation)
*
F/W Ver.1.1.2 or later
Models other than USB memory devices and iPods
Digital audio player supporting mass storage class
NOTE
Depending on the type of the USB memory device or other device connected, the con- nected device may not function properly orthe available functions may be limited. It is recommended to use an iPod with firm- ware updated to the latest version. You can charge your iPod by connecting it to the USB input terminal when the ignition switch is in the “ACC” or “ON” position. Do not keep your USB memory device or iPod in your vehicle. It is recommended that you back up the files in case of data damage. Do not connect to the USB input terminal any device (hard disk, card reader, memory reader, etc.) other than the connectabledevices specified in the previous section. The device and/or data may be damaged. If any of these devices
was connected by mis-
take, remove it after turning the ignition switch to the “LOCK” position.
File specifications
Item
Condition
File format
MP3, WMA, AAC, WAV
Maximum number of levels(including the root)
Level 8
Number of folders 700 Number of files 65,535Sun visors
BK0200700US.book
182 ページ 2013年2月15日 金曜日 午後12時17分
Page 250 of 422
12 V power outlet
Features and controls 5-183
5
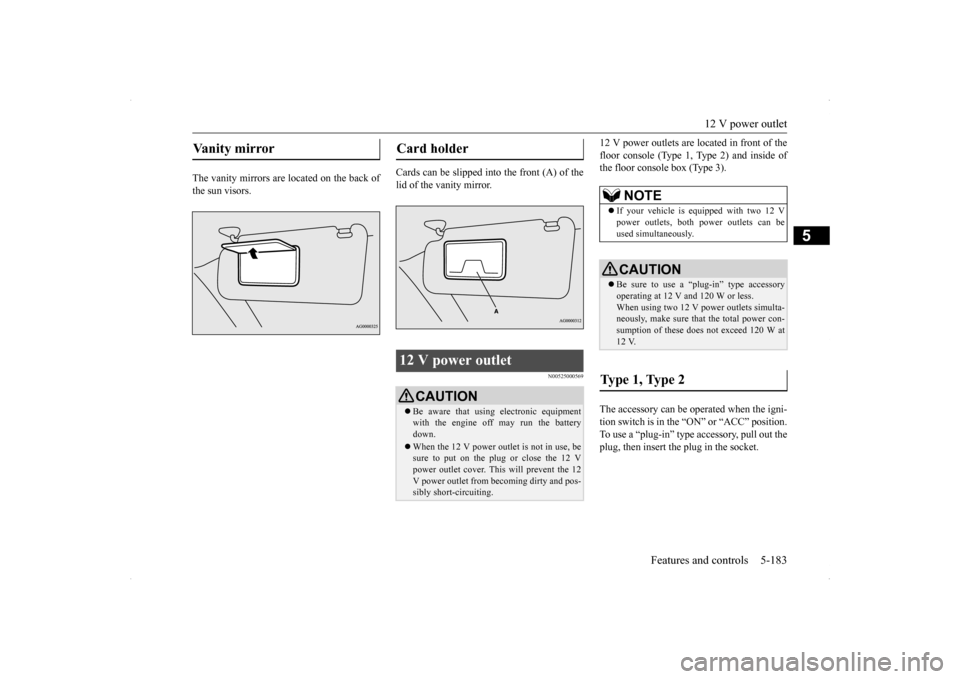
The vanity mirrors are located on the back of the sun visors.
Cards can be slipped into the front (A) of the lid of the vanity mirror.
N00525000569
12 V power outlets are located in front of the floor console (Type 1, Type 2) and inside of the floor console box (Type 3). The accessory can be operated when the igni- tion switch is in the “
ON” or “ACC” position.
To use a “plug-in” type accessory, pull out theplug, then insert the plug in the socket.
Vanity mirror
Card holder 12 V power outlet
CAUTION Be aware that using electronic equipment with the engine off may run the batterydown. When the 12 V power outlet is not in use, be sure to put on the plug or close the 12 V power outlet cover. This will prevent the 12 V power outlet from becoming dirty and pos-sibly short-circuiting.
NOTE
If your vehicle is equipped with two 12 V power outlets, both power outlets can be used simultaneously.CAUTION Be sure to use a “plug-in” type accessory operating at 12 V and 120 W or less. When using two 12 V power outlets simulta- neously, make sure that the total power con-sumption of these does not exceed 120 W at 12 V.
Type 1, Type 2
BK0200700US.book
183 ページ 2013年2月15日 金曜日 午後12時17分