wheel bolts MITSUBISHI LANCER SPORTBACK 2014 8.G Owners Manual
[x] Cancel search | Manufacturer: MITSUBISHI, Model Year: 2014, Model line: LANCER SPORTBACK, Model: MITSUBISHI LANCER SPORTBACK 2014 8.GPages: 422, PDF Size: 55.11 MB
Page 342 of 422

How to change a tire
For emergencies 8-9
8
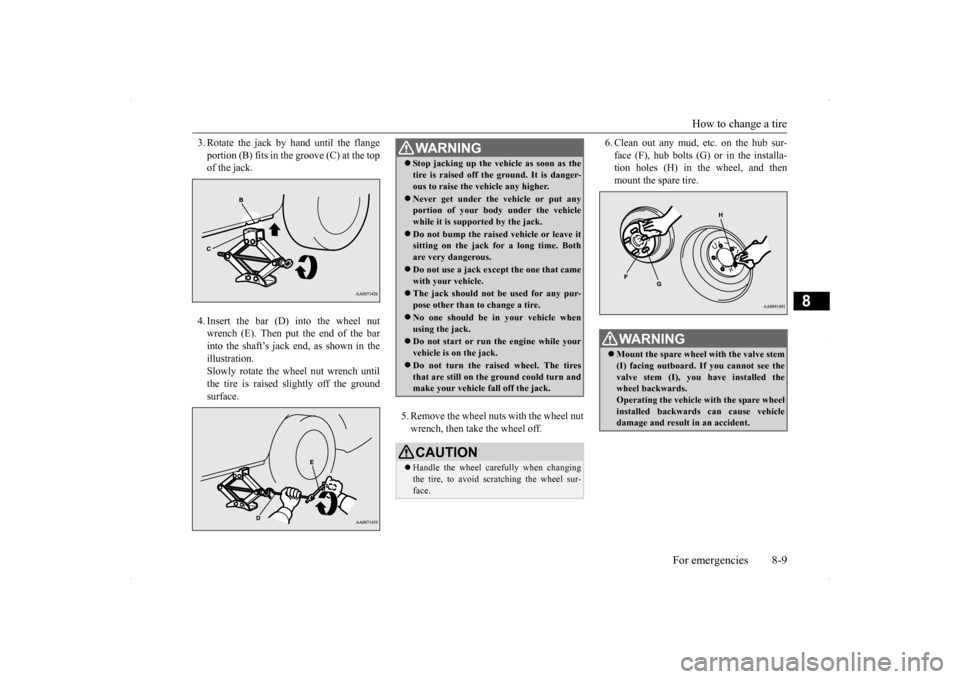
3. Rotate the jack by hand until the flange portion (B) fits in the groove (C) at the top of the jack. 4. Insert the bar (D) into the wheel nut wrench (E). Then put the end of the barinto the shaft’s jack end, as shown in the illustration. Slowly rotate the wheel nut wrench untilthe tire is raised slightly off the groundsurface.
5. Remove the wheel nuts with the wheel nut wrench, then take the wheel off.
6. Clean out any mud, etc. on the hub sur- face (F), hub bolts (G) or in the installa- tion holes (H) in the wheel, and then mount the spare tire.
WA R N I N G Stop jacking up the vehicle as soon as the tire is raised off the ground. It is danger- ous to raise the vehicle any higher. Never get under the vehicle or put any portion of your body under the vehicle while it is support
ed by the jack.
Do not bump the raised vehicle or leave it sitting on the jack for a long time. Both are very dangerous. Do not use a jack except the one that came with your vehicle. The jack should not be used for any pur- pose other than to change a tire. No one should be in your vehicle when using the jack. Do not start or run the engine while your vehicle is on the jack. Do not turn the raised wheel. The tires that are still on the ground could turn andmake your vehicle fall off the jack. CAUTION Handle the wheel carefully when changing the tire, to avoid scratching the wheel sur- face.
WA R N I N G Mount the spare wheel with the valve stem (I) facing outboard. If you cannot see the valve stem (I), you have installed the wheel backwards.Operating the vehicle with the spare wheel installed backwards can cause vehicle damage and result in an accident.
BK0200700US.bo
ok 9 ページ 2013年2月15日 金曜日 午後12時17分
Page 343 of 422
![MITSUBISHI LANCER SPORTBACK 2014 8.G Owners Manual How to change a tire 8-10 For emergencies
8
7. [Vehicle with steel wheels] • Normal wheels and compact spare wheel Install the wheel nuts (tapered nuts) with their tapered ends facing inward, thenti MITSUBISHI LANCER SPORTBACK 2014 8.G Owners Manual How to change a tire 8-10 For emergencies
8
7. [Vehicle with steel wheels] • Normal wheels and compact spare wheel Install the wheel nuts (tapered nuts) with their tapered ends facing inward, thenti](/img/19/7508/w960_7508-342.png)
How to change a tire 8-10 For emergencies
8
7. [Vehicle with steel wheels] • Normal wheels and compact spare wheel Install the wheel nuts (tapered nuts) with their tapered ends facing inward, thentighten by hand until the wheel is no lon- ger loose. [Vehicle with aluminum wheels] • Normal wheelsTemporarily tighten the wheel nuts(flange nuts) until their flange section comes in contact with the wheel and it is no longer loose.
• Compact spare wheel Install the wheel nuts with their taperedends facing inward, then tighten by hand until the wheel is no longer loose.CAUTION Never apply oil to either the wheel bolts or the nuts or they will tighten too much.
BK0200700US.bo
ok 10 ページ 2013年2月15日 金曜日 午後12時17分
Page 344 of 422

How to change a tire
For emergencies 8-11
8
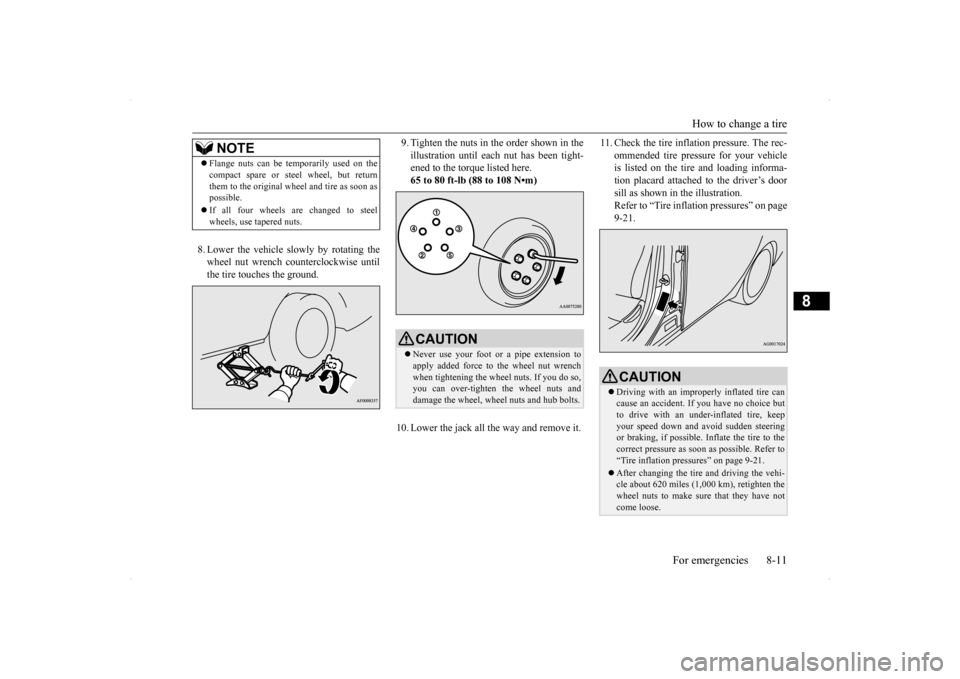
8. Lower the vehicle slowly by rotating the wheel nut wrench counterclockwise until the tire touches the ground.
9. Tighten the nuts in the order shown in the illustration until each nut has been tight- ened to the torque listed here. 65 to 80 ft-lb (88 to 108 N•m)
10. Lower the jack all the way and remove it.
11. Check the tire inflat
ion pressure. The rec-
ommended tire pressure for your vehicle is listed on the tire and loading informa- tion placard attached to the driver’s doorsill as shown in the illustration. Refer to “Tire inflation pressures” on page 9-21.
NOTE
Flange nuts can be temporarily used on the compact spare or steel wheel, but return them to the original wheel and tire as soon as possible. If all four wheels are changed to steel wheels, use tapered nuts.
CAUTION Never use your foot or a pipe extension to apply added force to the wheel nut wrench when tightening the wheel nuts. If you do so, you can over-tighten the wheel nuts anddamage the wheel, wheel nuts and hub bolts.
CAUTION Driving with an improperly inflated tire can cause an accident. If you have no choice but to drive with an under-inflated tire, keep your speed down and avoid sudden steeringor braking, if possible. Inflate the tire to the correct pressure as soon as possible. Refer to “Tire inflation pressures” on page 9-21. After changing the tire and driving the vehi- cle about 620 miles (1,000 km), retighten thewheel nuts to make sure that they have not come loose.
BK0200700US.bo
ok 11 ページ 2013年2月15日 金曜日 午後12時17分
Page 388 of 422

Replacement of light bulbs
Vehicle care and maintenance 9-39
9
4. Pull the bulb out of the socket. 5. To install the bulb, perform the removal steps in reverse.
N00917300541
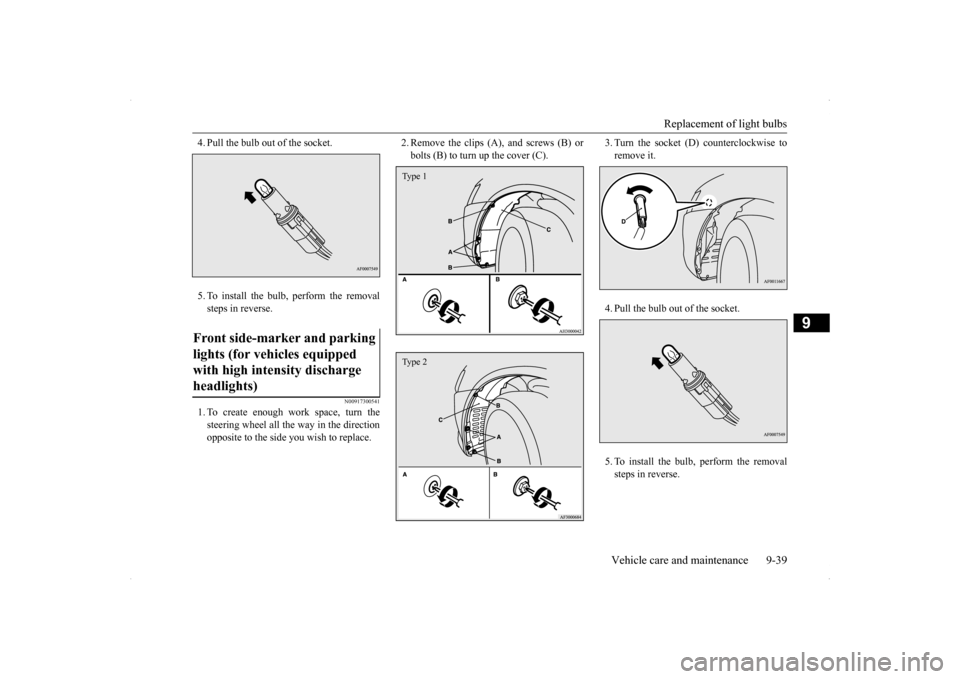
1. To create enough work space, turn thesteering wheel all the way in the directionopposite to the side you wish to replace.
2. Remove the clips (A), and screws (B) or bolts (B) to turn up the cover (C).
3. Turn the socket (D) counterclockwise to remove it. 4. Pull the bulb out of the socket.5. To install the bulb, perform the removal steps in reverse.
Front side-marker and parking lights (for vehicles equipped with high intensity discharge headlights)
Type 1Type 2
BK0200700US.bo
ok 39 ページ 2013年2月15日 金曜日 午後12時17分