warning MITSUBISHI MIRAGE 2014 6.G MMCS Manual
[x] Cancel search | Manufacturer: MITSUBISHI, Model Year: 2014, Model line: MIRAGE, Model: MITSUBISHI MIRAGE 2014 6.GPages: 135, PDF Size: 26.9 MB
Page 67 of 135
67
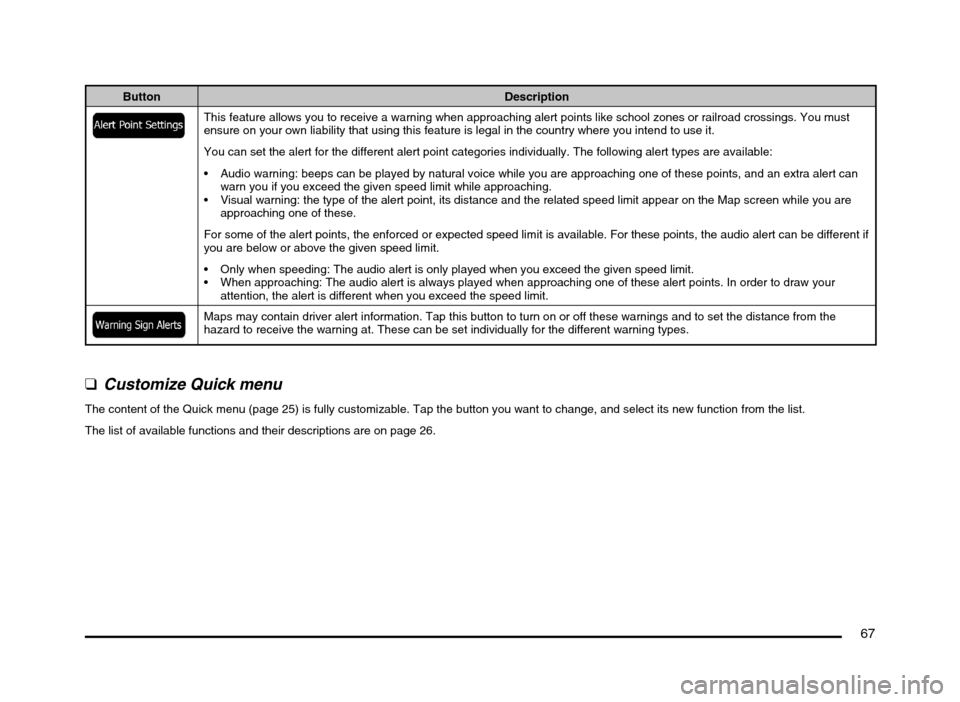
Button Description
This feature allows you to receive a warning when approaching alert points like school zones or railroad crossings. You must
ensure on your own liability that using this feature is legal in the country where you intend to use it.
You can set the alert for the different alert point categories individually. The following alert types are available:
Audio warning: beeps can be played by natural voice while you are approaching one of these points, and an extra alert can
warn you if you exceed the given speed limit while approaching.
Visual warning: the type of the alert point, its distance and the related speed limit appear on the Map screen while you are
approaching one of these.
For some of the alert points, the enforced or expected speed limit is available. For these points, the audio alert can be different if
you are below or above the given speed limit.
Only when speeding: The audio alert is only played when you exceed the given speed limit.
When approaching: The audio alert is always played when approaching one of these alert points. In order to draw your
attention, the alert is different when you exceed the speed limit.
Maps may contain driver alert information. Tap this button to turn on or off these warnings and to set the distance from the
hazard to receive the warning at. These can be set individually for the different warning types.
q
Customize Quick menu
The content of the Quick menu (page 25) is fully customizable. Tap the button you want to change, and select its new function from the list.
The list of available functions and their descriptions are on page 26.
205-0010-00_QY-7375M-A_EN.indb 67205-0010-00_QY-7375M-A_EN.indb 673/12/2013 9:57:24 AM3/12/2013 9:57:24 AM
Page 68 of 135
68
q
Route settings
These settings determine how routes will be calculated.
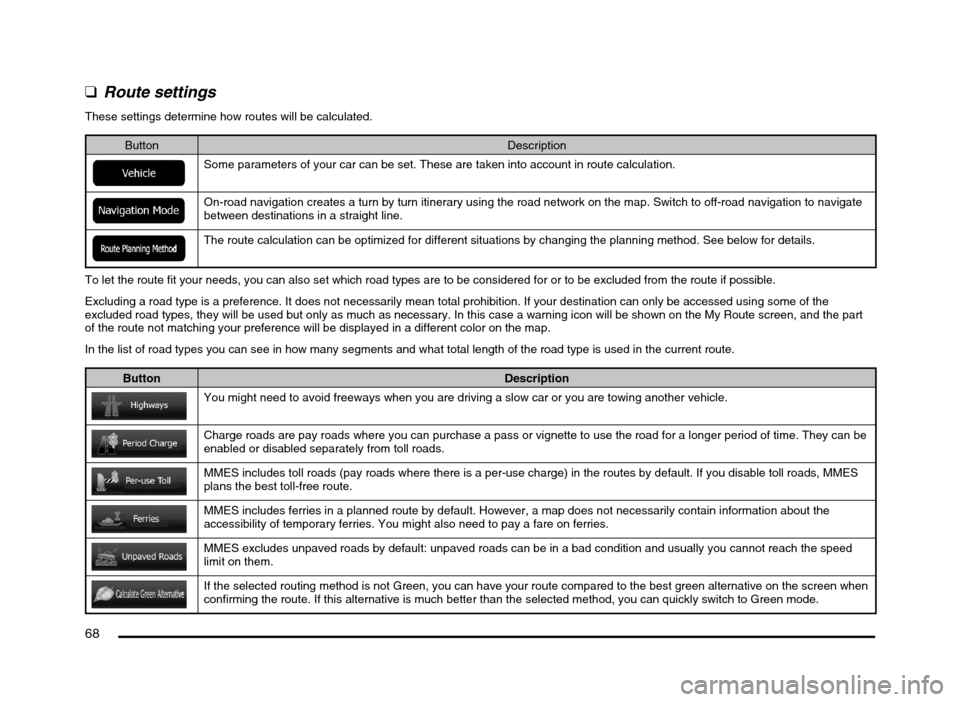
Button Description
Some parameters of your car can be set. These are taken into account in route calculation.
On-road navigation creates a turn by turn itinerary using the road network on the map. Switch to off-road navigation to navigate
between destinations in a straight line.
The route calculation can be optimized for different situations by changing the planning method. See below for details.
To let the route fit your needs, you can also set which road types are to be considered for or to be excluded from the route if possible.
Excluding a road type is a preference. It does not necessarily mean total prohibition. If your destination can only be accessed using some of the
excluded road types, they will be used but only as much as necessary. In this case a warning icon will be shown on the My Route screen, and the part
of the route not matching your preference will be displayed in a different color on the map.
In the list of road types you can see in how many segments and what total length of the road type is used in the current route.
Button Description
You might need to avoid freeways when you are driving a slow car or you are towing another vehicle.
Charge roads are pay roads where you can purchase a pass or vignette to use the road for a longer period of time. They can be
enabled or disabled separately from toll roads.
MMES includes toll roads (pay roads where there is a per-use charge) in the routes by default. If you disable toll roads, MMES
plans the best toll-free route.
MMES includes ferries in a planned route by default. However, a map does not necessarily contain information about the
accessibility of temporary ferries. You might also need to pay a fare on ferries.
MMES excludes unpaved roads by default: unpaved roads can be in a bad condition and usually you cannot reach the speed
limit on them.
If the selected routing method is not Green, you can have your route compared to the best green alternative on the screen when
confirming the route. If this alternative is much better than the selected method, you can quickly switch to Green mode.
205-0010-00_QY-7375M-A_EN.indb 68205-0010-00_QY-7375M-A_EN.indb 683/12/2013 9:57:24 AM3/12/2013 9:57:24 AM
Page 77 of 135
77
6. GLOSSARY
2D/3D GPS reception
The GPS receiver uses satellite signals to
calculate its (your) position and needs at
least four signals to give a three-dimensional
position, including elevation. Because the
satellites are moving and because objects
can block the signals, your GPS device might
not receive four signals. If three satellites
are available, the receiver can calculate the
horizontal GPS position but the accuracy is
lower and the GPS device does not give you
elevation data: only 2D reception is possible.
Active route
The currently navigated route. Whenever the
destination is set, the route is active until you
delete it, reach your destination or you quit
MMES. See also: Route.
City Center
The city/town center is not the geometric
center of the city/town but an arbitrary point
the map creators have chosen. In towns
and villages, it is usually the most important
intersection; in larger cities, it is one of the
important intersections.
Color theme
MMES comes with different color themes for
daytime or night use of the map and menu
screens. Themes are custom graphic settings
and they can have different colors for streets,
blocks or surface waters in 2D and 3D modes,
and they display shades or shadows in
different ways in 3D mode.
One daytime scheme and one night scheme
is always selected for the map and for the
menus. MMES uses them when it switches
from day to night and back.
GPS accuracy
Several factors have impact on the deviation
between your real position and the one given
by the GPS device. For example, signal delay
in the ionosphere or reflecting objects near
the GPS device have a different and varying
impact on how accurately the GPS device can
calculate your position.
Map
MMES works with digital maps which are not
simply the computerized versions of traditional
paper maps. Similarly to the paper road maps,
the 2D mode of digital maps show you streets,
roads, and elevation is also shown by colors.
In 3D mode, you can see the altitude
differences, for example valleys and
mountains, elevated roads, and in selected
cities 3D landmarks and 3D buildings are also
displayed.You can use digital maps interactively: you
can zoom in and out (increase or decrease
the scale), you can tilt them up and down, and
rotate them left and right. In GPS-supported
navigation, digital maps facilitate route
planning.
North-up map orientation
In North-up mode the map is rotated so its top
always faces North. This is the orientation for
example in Find on Map.
Road Safety Camera
Special alert points for speed, red light or
bus lane cameras. Different data sources
are available. You can configure MMES to
warn you when you approach one of these
cameras.
Detecting the location of Road Safety Cameras
is prohibited in certain countries. It is the sole
responsibility of the driver to check whether
this feature can be used during the trip.
The software is capable of showing and
warning for more than just cameras. Various
other types of proximity alert points like
school zones and railroad crossings are also
available.
Route
A sequence of route events, i.e. maneuvers
(for example, turns and traffic circles) to reach
the destination. The route contains one start
point and one or more destinations. The start
point is the current position by default. If you
need to see a future route, the start point can
be replaced with any other given point.
205-0010-00_QY-7375M-A_EN.indb 77205-0010-00_QY-7375M-A_EN.indb 773/12/2013 9:57:25 AM3/12/2013 9:57:25 AM
Page 89 of 135
89
9. PRECAUTIONS
WARNING
For your safety, the driver should not
watch the DVD video/movie data or
operate the controls while driving.
Please note that watching and operating
the DVD video/movie data while driving
are prohibited by law in some countries.
Also, while driving, keep the volume to
a level at which external sounds can be
heard.
1. When the inside of the vehicle is very cold
and the player is used soon after switching
on the heater, moisture may form on the
disc (DVD/CD) or the optical parts of the
player and proper playback may not be
possible. If moisture forms on the disc
(DVD/CD), wipe it off with a soft cloth. If
moisture forms on the optical parts of the
player, do not use the player for about one
hour. The condensation will disappear
naturally allowing normal operation.
2. Driving on extremely bumpy roads which
cause severe vibration may cause the
sound to skip.
3. This unit uses a precision mechanism.
Even in the event that trouble arises, never
open the case, disassemble the unit, or
lubricate the rotating parts.
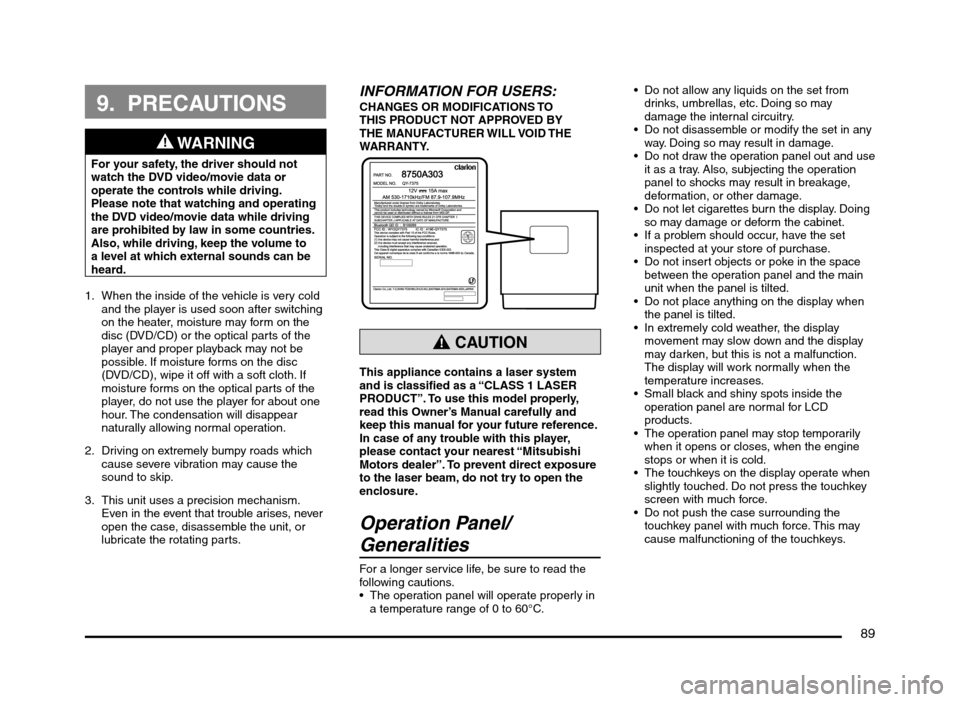
INFORMATION FOR USERS:CHANGES OR MODIFICATIONS TO
THIS PRODUCT NOT APPROVED BY
THE MANUFACTURER WILL VOID THE
WARRANTY.
CAUTION
This appliance contains a laser system
and is classified as a “CLASS 1 LASER
PRODUCT”. To use this model properly,
read this Owner’s Manual carefully and
keep this manual for your future reference.
In case of any trouble with this player,
please contact your nearest “Mitsubishi
Motors dealer”. To prevent direct exposure
to the laser beam, do not try to open the
enclosure.
Operation Panel/
Generalities
For a longer service life, be sure to read the
following cautions.
The operation panel will operate properly in
a temperature range of 0 to 60°C. Do not allow any liquids on the set from
drinks, umbrellas, etc. Doing so may
damage the internal circuitry.
Do not disassemble or modify the set in any
way. Doing so may result in damage.
Do not draw the operation panel out and use
it as a tray. Also, subjecting the operation
panel to shocks may result in breakage,
deformation, or other damage.
Do not let cigarettes burn the display. Doing
so may damage or deform the cabinet.
If a problem should occur, have the set
inspected at your store of purchase.
Do not insert objects or poke in the space
between the operation panel and the main
unit when the panel is tilted.
Do not place anything on the display when
the panel is tilted.
In extremely cold weather, the display
movement may slow down and the display
may darken, but this is not a malfunction.
The display will work normally when the
temperature increases.
Small black and shiny spots inside the
operation panel are normal for LCD
products.
The operation panel may stop temporarily
when it opens or closes, when the engine
stops or when it is cold.
The touchkeys on the display operate when
slightly touched. Do not press the touchkey
screen with much force.
Do not push the case surrounding the
touchkey panel with much force. This may
cause malfunctioning of the touchkeys.
205-0010-00_QY-7375M-A_EN.indb 89205-0010-00_QY-7375M-A_EN.indb 893/12/2013 9:57:26 AM3/12/2013 9:57:26 AM
Page 98 of 135
98
11. BASIC
OPERATIONS
Note:
Be sure to read this chapter while referring to
“Controls” (page 91).
Turning the Power On/Off
Note:
Start the engine before using this unit.
Be careful about using this unit for a long time
without running the engine. If you drain the
vehicle’s battery too far, you may not be able to
start the engine and this can reduce the service
life of the battery.
qTurning the power on
1. Start the engine. The power is
automatically turned on and the startup
screen is displayed.
Note:
The power is turned on even when the ignition
switch is set to the ACC ON position.
2. The startup screen automatically changes
to the caution screen. Touch the [OK] key.
The system resumes from its status when
the power was turned off.
The navigation system does not operate until
the [OK] key is touched.
Some audio features are available even if
the [OK] key is not touched.
qTurning the power off
1. Turn the ignition switch to the OFF position.
Opening the Operation
Panel and Adjusting the
Angle
The operation panel can be opened/closed to
insert/eject a disc or memory card. The angle
of the operation panel can be adjusted to suit
the mounting angle of the unit or light coming
into the vehicle.
WARNING
To prevent the battery from going
dead, operate this unit with the engine
running if possible.
When the operation panel is operating,
be careful not to get your hand or
finger caught between the panel and
main unit or the instrument panel of
the vehicle.
Do not move the operation panel by
hand.
qOpening/closing the
operation panel
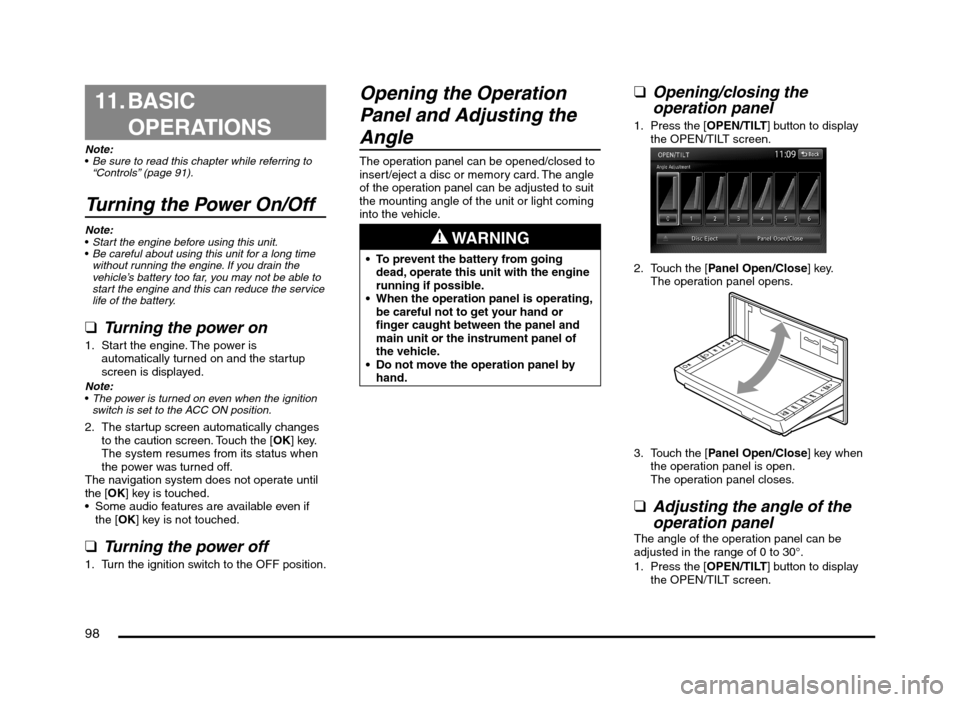
1. Press the [OPEN/TILT] button to display
the OPEN/TILT screen.
2. Touch the [Panel Open/Close] key.
The operation panel opens.
3. Touch the [Panel Open/Close] key when
the operation panel is open.
The operation panel closes.
qAdjusting the angle of the
operation panel
The angle of the operation panel can be
adjusted in the range of 0 to 30°.
1. Press the [OPEN/TILT] button to display
the OPEN/TILT screen.
205-0010-00_QY-7375M-A_EN.indb 98205-0010-00_QY-7375M-A_EN.indb 983/12/2013 9:57:27 AM3/12/2013 9:57:27 AM
Page 104 of 135
![MITSUBISHI MIRAGE 2014 6.G MMCS Manual 104
The buttons on the Steering Wheel Audio Remote
Control are effective only when the Audio features
are turned on. On the unit, press the [AV] button
once or twice until the Source screen is disp MITSUBISHI MIRAGE 2014 6.G MMCS Manual 104
The buttons on the Steering Wheel Audio Remote
Control are effective only when the Audio features
are turned on. On the unit, press the [AV] button
once or twice until the Source screen is disp](/img/19/7509/w960_7509-103.png)
104
The buttons on the Steering Wheel Audio Remote
Control are effective only when the Audio features
are turned on. On the unit, press the [AV] button
once or twice until the Source screen is displayed
and select a source before you operate the
Steering Wheel Audio Remote Control.
Function of controls
The operations differ depending on the type
of Steering Wheel Audio Remote Control that
you use.
[VOL UP], [VOL DOWN] buttons:
Press these buttons to increase/decrease
the volume.
[MODE/SOURCE] button:
Press this button to switch between the
source mode. Switching is performed in the
following order:
FM/AM (Tuner mode) É SD memory card
mode* É Bluetooth Audio mode* É DVD/
CD mode* É USB memory/iPod mode* É
FM/AM (Tuner mode) ...
* When a corresponding media is not
inserted or connected, the unit will skip
SD memory card mode, Bluetooth Audio
mode, DVD/CD mode, and USB memory/
iPod mode.
Press and hold this button to turn the power
off. When the power is turned off, press this
button to turn the power on.
[TRACK/CH UP], [TRACK/CH DOWN]
buttons:
Other than when in Tuner mode, these
buttons have the same function as the [
]
and [] (TUNE/TRACK) buttons on the unit.
É “Functions of Buttons” (page 91)
In Tuner mode, press these buttons to
change to the next/previous preset station.
Continue pressing these buttons to
automatically seek a station.
In Audio CD, MP3/WMA/AAC, SD memory
card, USB memory, iPod, and Bluetooth
Audio modes, press these buttons to select
a track to be played.
Other than when in Tuner mode, press and
hold these buttons to fast forward or fast
backward.
Using a Rear View Camera
When an optional Rear View Camera (if so
equipped) is connected to this unit, the rear
view video from the camera is displayed on
the screen when the vehicle’s gear lever is set
to the reverse position.
WARNING
Do not look only at the screen when
driving the vehicle in reverse. Always
inspect your surroundings by looking
at them directly, and slowly move the
vehicle.
CAUTION
Use the Rear View Camera only to assist
you when driving the vehicle in reverse.
Raindrops may get on the camera area
and obscure video.
Always perform adjustments to the video
settings when the vehicle is stopped and
in a safe location.
Note:
The Rear View Camera uses a wide-angle lens,
so objects in the screen may appear closer or
farther than they appear.Video from the Rear View Camera is inverted,
so it appears the same as it would from the
vehicle’s rear-view mirror.
Video from the Rear View Camera may be
difficult to see or impossible to see in dark
places or at night.
The lens features a splash-proof construction to
prevent fogging.
Do not loosen the Rear View Camera screws
or disassemble the Rear View Camera. The
splash-proofing may be affected, and the
camera may be damaged.
If the front cover of the lens is dirty, video will
not be clear. If raindrops, snow, or dirt gets on
the front cover of the lens, wipe it off with a soft
cloth moistened with water. If you use a dry
cloth to wipe the cover of the lens, dirt on the
cover of the lens may be damaged.
qDisplaying video from the
Rear View Camera
Set the gear lever to the reverse position while
the vehicle’s engine is turned on.
The display changes to the video from the
Rear View Camera. This video is preferentially
displayed even if you are watching a DVD
video, etc.
F
AB
C
D
E
A: This position is approximately 3 m from the
rear of the vehicle.
B: This position is approximately 2 m from the
rear of the vehicle.
205-0010-00_QY-7375M-A_EN.indb 104205-0010-00_QY-7375M-A_EN.indb 1043/12/2013 9:57:27 AM3/12/2013 9:57:27 AM
Page 106 of 135
106
Manual tuningThere are 3 manual tuning methods: step
tuning, seek tuning, and fast tuning.
When you are in step tuning mode, the
frequency changes one step at a time. In seek
tuning and fast tuning modes, you can quickly
tune the desired frequency.
1. Select the desired band by touching the
[FM/AM] key.
2. Tune into a station.
Step tuning:
Press the [
] or [] (TUNE/TRACK) button
to manually tune in a station.
Seek tuning:
Press and hold the [
] or [] (TUNE/
TRACK) button for at least 0.5 seconds
and then release it to tune in a station.
Fast tuning:
Press and hold the [
] or [] (TUNE/
TRACK) button for more than about 1.5
seconds to step up or down continuously.
When the button is released, a station will
be tuned by seek tuning.
Recalling a preset stationThere are total of 18 preset positions (6
for FM1, 6 for FM2, and 6 for AM) to store
individual radio stations in memory.
1. Touch the [FM/AM] key to select the
desired band.
2. Touch the desired Preset key on the Preset
key pane to recall the preset station.
Manual memory
1. Touch the [FM/AM] key to select the
desired band.
2. Select the desired station with the manual
tuning or preset tuning.3. Touch and hold one of the Preset keys for
more than about 1.5 seconds to store the
current station into the preset memory.
Displaying radio text
Note:
This function is only available when using Radio
Broadcast Data System functions.
When the station receiving broadcasts text
data, you can display the data on the screen.
1. Touch the [Info] key on the Tuner mode
screen.
The received radio text is displayed on the
screen.
qUsing the Scan functionThe tuner can continuously scan for stations.
1. Touch the [Scan] key.
The tuner changes from low to high
frequencies and stops at each broadcasting
station for about 5 seconds.
If you do not touch the [Scan] key within
about 5 seconds, scan tuning moves to the
next station.
2. Touch the [Scan] key again during this 5
second period to stop scanning. The tuner
remains tuned to that station.
Note:You can also stop scanning by touching a preset
key, pressing the [] or [] (TUNE/TRACK)
button, or pressing the [TRACK/CH UP] or
[TRACK/CH DOWN] button on the Steering
Wheel Audio Remote Control (if so equipped).
DVD Video Operations
qSelecting DVD Video mode
1. Insert a DVD video disc into the unit.
The system will automatically read the disc
data, change to DVD mode (DVD Video
mode), and start playback after a short
time.
É “Inserting/Ejecting a Disc” (page 101)
WARNING
Some videos may be recorded at a
higher volume level than desired.
Increase the volume gradually from the
minimal setting when starting playback.
For your safety, the driver should
not watch the video or operate the
controls while driving. Please note that
watching the video and operating the
controls while driving are prohibited
by law in some countries.
When a DVD video disc is already inserted:
1. Press the [AV] button to display the Source
screen.
2. Touch the [DVD/CD] key to select DVD
Video mode.
The system changes to DVD mode (DVD
Video mode), and starts playback from the
previous position.
When you touch the screen, the DVD
Video mode screen is displayed.
205-0010-00_QY-7375M-A_EN.indb 106205-0010-00_QY-7375M-A_EN.indb 1063/12/2013 9:57:27 AM3/12/2013 9:57:27 AM
Page 111 of 135
![MITSUBISHI MIRAGE 2014 6.G MMCS Manual 111
Deleting the password for the
parental level
1. From the DVD Setup screen, touch the
[Default] key to display the Default screen.
2. Touch the [Password] key to display the
Enter Password scr MITSUBISHI MIRAGE 2014 6.G MMCS Manual 111
Deleting the password for the
parental level
1. From the DVD Setup screen, touch the
[Default] key to display the Default screen.
2. Touch the [Password] key to display the
Enter Password scr](/img/19/7509/w960_7509-110.png)
111
Deleting the password for the
parental level
1. From the DVD Setup screen, touch the
[Default] key to display the Default screen.
2. Touch the [Password] key to display the
Enter Password screen.
Enter the current 4-digit password using
the number keys, and touch the [OK] key.
3. Touch the [Clear Password] key, and
touch the [Ye s] key.
The password is deleted.
Setting the country codeSet the country code for the parental level.
The factory setting is [8583] (United States).
1. From the DVD Setup screen, touch the
[Default] key to display the Default screen.
2. Touch the [Country Code] key to display
the Country Code screen.
3. Enter the country code for the parental
level country. See the following table.
Country Input code
Bermuda 6677
Canada 6765
United States 8583
Setting up the parental levelYou can change the parental lock level (audio/
video restriction level).
This function allows you to restrict the viewing
of DVDs. When setting the parental level and
a DVD which can be restricted is played, the
message “Please change the parental level
to play this disc.” is displayed.
The factory setting is [OFF].
1. From the DVD Setup screen, touch the
[Default] key to display the Default screen.
2. Touch the [Parental Level] key to display
the Default screen.
3. Enter the 4-digit password using the
number keys, and touch the [OK] key.
4. Touch the key for the level at which you
want to set the Parental Level setting.
[OFF] disables the Parental Level setting.
[Level 8] is the most restrictive. [Level 1] is
the least restrictive.
Displaying/hiding the playback
status
1. From the DVD Setup screen, touch the
[Default] key to display the Default screen.
2. Touch the [Always Show Status] key to
set Always show status to on.
The status bar is displayed at the top of the
screen during playback.
Audio CD Operations
This system is a CD TEXT compatible
model, and supports the display of DISC
TITLE, TRACK TITLE, and TRACK ARTIST
information from CD TEXT.
Note:
This unit supports CD TEXT in English,
German, French, Spanish, Dutch, Italian,
Portuguese, Danish, and Swedish. Some
characters may not be reproduced properly on
the display.
qSelecting Audio CD mode
1. Insert an audio CD into the unit.
The system will automatically read the disc
data, change to Audio CD mode, and start
playback after a short time.
É “Inserting/Ejecting a Disc” (page 101)
WARNING
Some CDs may be recorded at a higher
volume level than desired. Increase
the volume gradually from the minimal
setting when starting playback.
When an audio CD is already inserted:
1. Press the [AV] button to display the Source
screen.
2. Touch the [DVD/CD] key to select Audio
CD mode.
The system changes to Audio CD mode,
and starts playback from the previous
position.
You can also select Audio CD mode
(CD mode) by using the Steering Wheel
Audio Remote Control (if so equipped).
É “Steering Wheel Audio Remote Control
Operations” (page 103)
4 3
21
1 Information pane
2 Track keys and track list
3 Playback mode
4 Operation keys
205-0010-00_QY-7375M-A_EN.indb 111205-0010-00_QY-7375M-A_EN.indb 1113/12/2013 9:57:28 AM3/12/2013 9:57:28 AM
Page 114 of 135
114
*1 VBR playback is supported.
*2 WMA9 Pro, WMA9 Voice, and WMA9
Lossless are not playable.
*3 Only for monaural data.
*4 Monaural and stereo data.
*5 HE-AAC is only playable as AAC.
Precautions when preparing a disc
File system
Specify the following formats as the file
system.
Otherwise, normal playback may not be
possible.
CD: ISO9660 Level 1/Level 2, Joliet, Romeo
DVD: UDF (Ver. 1.02/1.5/2.0), UDF Bridge,
ISO9660 Level 1/Level 2, Joliet, Romeo
Folder structure
The folder hierarchy must be within 8
hierarchical levels (excluding root).
Otherwise, playback is not possible. When
many folders are present, there may be a
time lag before playback begins.
You can store MP3, WMA, and AAC files
together in a folder.
Number of files or folders
The maximum allowable number of folders
is 255 (including the root directory).
The maximum allowable number of folders
and files in a disc is 512.
The maximum allowable number of files in a
folder is 255.
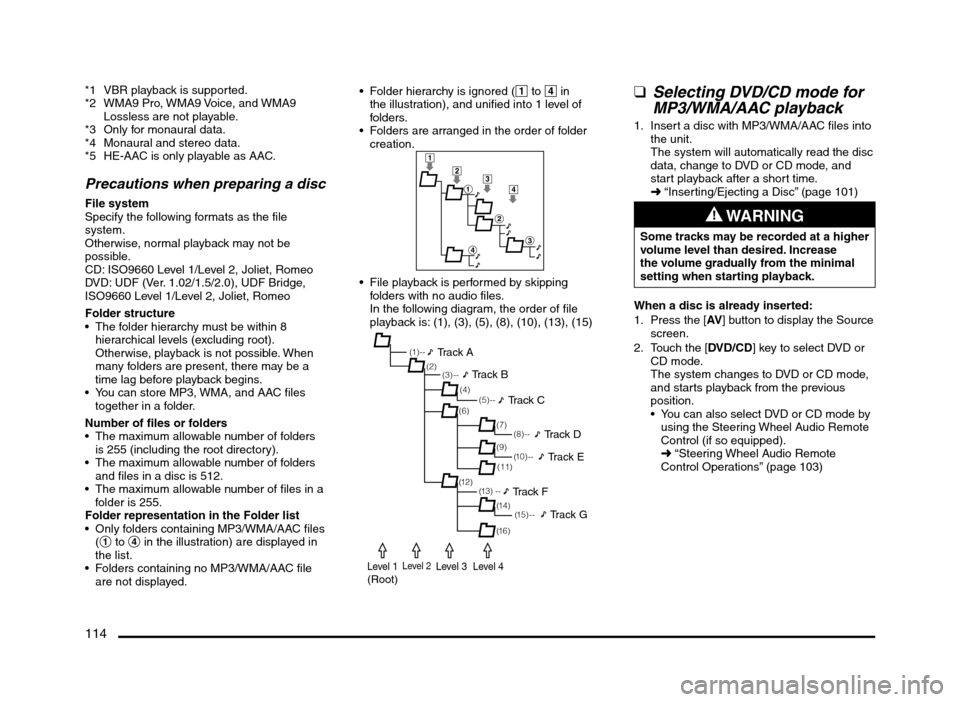
Folder representation in the Folder list
Only folders containing MP3/WMA/AAC files
(1 to 4 in the illustration) are displayed in
the list.
Folders containing no MP3/WMA/AAC file
are not displayed. Folder hierarchy is ignored (1 to 4 in
the illustration), and unified into 1 level of
folders.
Folders are arranged in the order of folder
creation.
1
2
1
2
3
4
3
4
File playback is performed by skipping
folders with no audio files.
In the following diagram, the order of file
playback is: (1), (3), (5), (8), (10), (13), (15)
(1 ) - -
(3) --
(6)
(12)(7) (2)
(4)
(13) --(5) --
(11)
(14) (9)
(1 5 ) - -
(16)
(8) --
(1 0 ) - -
Track A
Track B
Track C
Track D
Track E
Track F
Track G
Level 1(Root)Level 2Level 3Level 4
qSelecting DVD/CD mode for
MP3/WMA/AAC playback
1. Insert a disc with MP3/WMA/AAC files into
the unit.
The system will automatically read the disc
data, change to DVD or CD mode, and
start playback after a short time.
É “Inserting/Ejecting a Disc” (page 101)
WARNING
Some tracks may be recorded at a higher
volume level than desired. Increase
the volume gradually from the minimal
setting when starting playback.
When a disc is already inserted:
1. Press the [AV] button to display the Source
screen.
2. Touch the [DVD/CD] key to select DVD or
CD mode.
The system changes to DVD or CD mode,
and starts playback from the previous
position.
You can also select DVD or CD mode by
using the Steering Wheel Audio Remote
Control (if so equipped).
É “Steering Wheel Audio Remote
Control Operations” (page 103)
205-0010-00_QY-7375M-A_EN.indb 114205-0010-00_QY-7375M-A_EN.indb 1143/12/2013 9:57:28 AM3/12/2013 9:57:28 AM
Page 117 of 135
117
qSelecting SD memory card/
USB memory mode
1. Insert an SD memory card or connect a
USB memory with MP3/WMA/AAC files to
the unit.
For an SD memory card:
É “Inserting/Removing an SD Memory
Card” (page 102)
For a USB memory:
É “Connecting/Disconnecting a USB
Memory” (page 102)
2. Press the [AV] button to display the Source
screen.
3. Touch the [SD Memory CARD] key to
select SD memory card mode, or the
[USB/iPod] key to select USB memory
mode.
Playback starts from the first file in the first
folder.
You can also select SD memory card
mode/USB memory mode by using the
Steering Wheel Audio Remote Control (if
so equipped).
É “Steering Wheel Audio Remote
Control Operations” (page 103)
WARNING
Some tracks may be recorded at a higher
volume level than desired. Increase
the volume gradually from the minimal
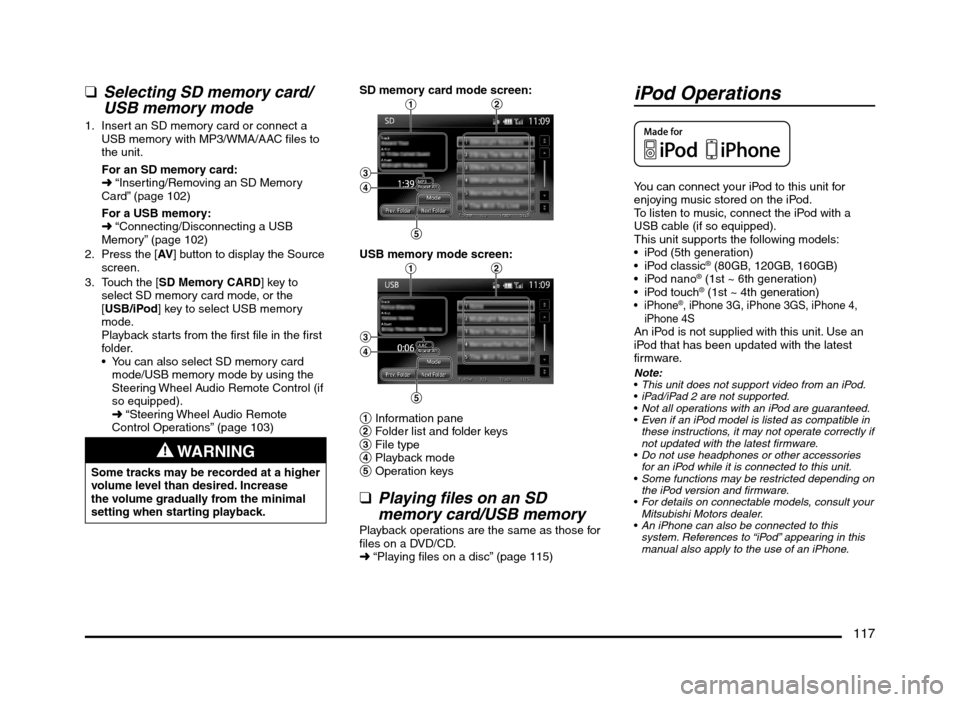
setting when starting playback.SD memory card mode screen:
12
3
4
5
USB memory mode screen:12
3
4
5
1 Information pane
2 Folder list and folder keys
3 File type
4 Playback mode
5 Operation keys
qPlaying files on an SD
memory card/USB memory
Playback operations are the same as those for
files on a DVD/CD.
É “Playing files on a disc” (page 115)
iPod Operations
You can connect your iPod to this unit for
enjoying music stored on the iPod.
To listen to music, connect the iPod with a
USB cable (if so equipped).
This unit supports the following models:
iPod (5th generation)
® (80GB, 120GB, 160GB)
® (1st ~ 6th generation)
® (1st ~ 4th generation)®, iPhone 3G, iPhone 3GS, iPhone 4,
iPhone 4S
An iPod is not supplied with this unit. Use an
iPod that has been updated with the latest
firmware.
Note:
This unit does not support video from an iPod.
iPad/iPad 2 are not supported.
Not all operations with an iPod are guaranteed.
Even if an iPod model is listed as compatible in
these instructions, it may not operate correctly if
not updated with the latest firmware.
Do not use headphones or other accessories
for an iPod while it is connected to this unit.
Some functions may be restricted depending on
the iPod version and firmware.
For details on connectable models, consult your
Mitsubishi Motors dealer.
An iPhone can also be connected to this
system. References to “iPod” appearing in this
manual also apply to the use of an iPhone.
205-0010-00_QY-7375M-A_EN.indb 117205-0010-00_QY-7375M-A_EN.indb 1173/12/2013 9:57:28 AM3/12/2013 9:57:28 AM