window MITSUBISHI MIRAGE 2015 6.G User Guide
[x] Cancel search | Manufacturer: MITSUBISHI, Model Year: 2015, Model line: MIRAGE, Model: MITSUBISHI MIRAGE 2015 6.GPages: 300, PDF Size: 43.44 MB
Page 89 of 300
Manual window control (if so equipped) 5-28 Features and controls
5
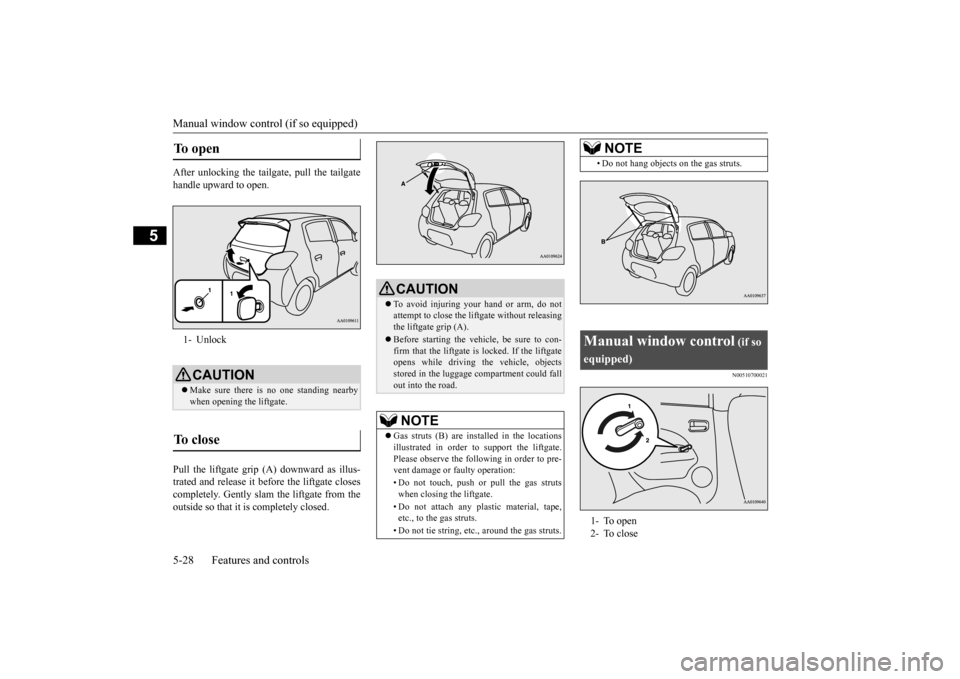
After unlocking the tail
gate, pull the tailgate
handle upward to open. Pull the liftgate grip (A) downward as illus- trated and release it before the liftgate closes completely. Gently slam the liftgate from the outside so that it is completely closed.
N00510700021
To open 1- UnlockCAUTION Make sure there is no one standing nearby when opening the liftgate.
To close
CAUTION To avoid injuring your hand or arm, do not attempt to close the lift
gate without releasing
the liftgate grip (A). Before starting the vehi
cle, be sure to con-
firm that the liftgate is locked. If the liftgate opens while driving
the vehicle, objects
stored in the luggage compartment could fallout into the road.NOTE
Gas struts (B) are installed in the locations illustrated in order to
support the liftgate.
Please observe the following in order to pre- vent damage or faulty operation: • Do not touch, push or pull the gas struts when closing the liftgate. • Do not attach any pl
astic material, tape,
etc., to the gas struts. • Do not tie string, etc., around the gas struts.
• Do not hang objects on the gas struts.
Manual window control
(if so
equipped)1- To open 2- To close
NOTE
BK0212400US.book 28 ページ 2014年4月1日 火曜日 午後2時21分
Page 90 of 300
Power window control
Features and controls 5-29
5
N00510800370
N00548700130
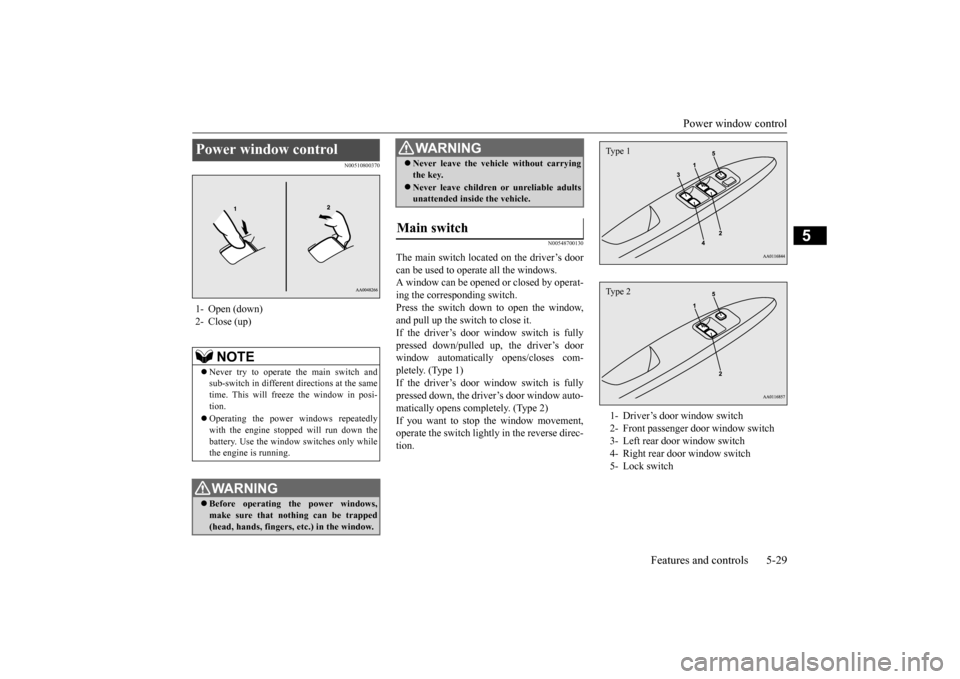
The main switch located on the driver’s door can be used to operate all the windows. A window can be opened or closed by operat-ing the corresponding switch. Press the switch down to open the window, and pull up the switch to close it.If the driver’s door window switch is fully pressed down/pulled up, the driver’s door window automatically opens/closes com-pletely. (Type 1) If the driver’s door window switch is fully pressed down, the driver’s door window auto-matically opens completely. (Type 2) If you want to stop the window movement, operate the switch lightly in the reverse direc-tion.
Power window control 1- Open (down)2- Close (up)
NOTE
Never try to operate the main switch and sub-switch in different directions at the same time. This will freeze the window in posi- tion. Operating the power
windows repeatedly
with the engine stopped will run down thebattery. Use the window
switches only while
the engine is running.WA R N I N G Before operating the power windows, make sure that nothing can be trapped (head, hands, fingers, etc.) in the window.
Never leave the vehi
cle without carrying
the key. Never leave children
or unreliable adults
unattended inside the vehicle.
Main switch
WA R N I N G
1- Driver’s door window switch 2- Front passenger door window switch3- Left rear door window switch 4- Right rear door window switch 5- Lock switchType 1Type 2
BK0212400US.book 29 ページ 2014年4月1日 火曜日 午後2時21分
Page 91 of 300
Power window control 5-30 Features and controls
5
N00548800098
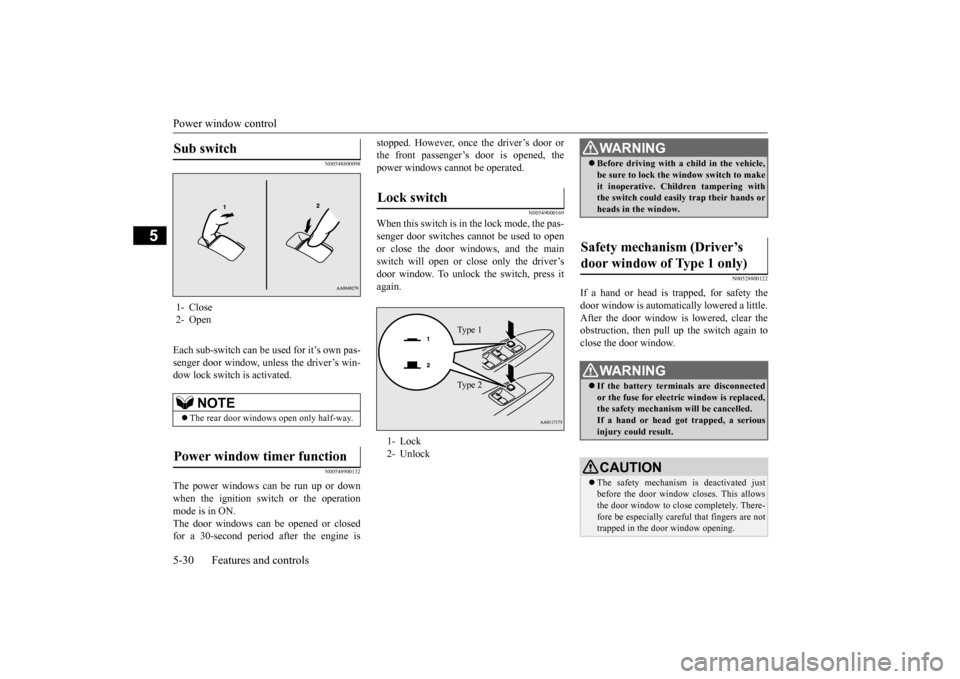
Each sub-switch can be
used for it’s own pas-
senger door window, unless the driver’s win-dow lock switch is activated.
N00548900132
The power windows can be run up or downwhen the ignition switch or the operationmode is in ON. The door windows can be opened or closed for a 30-second period after the engine is
stopped. However, once the driver’s door or the front passenger’s
door is opened, the
power windows cannot be operated.
N00549000169
When this switch is in the lock mode, the pas-senger door switches cannot be used to open or close the door windows, and the main switch will open or
close only the driver’s
door window. To unlock the switch, press it again.
N00528800122
If a hand or head is trapped, for safety thedoor window is automati
cally lowered a little.
After the door window is lowered, clear the obstruction, then pull up the switch again toclose the door window.
Sub switch 1- Close2- Open
NOTE
The rear door windows open only half-way.
Power window timer function
Lock switch 1- Lock 2- Unlock
Ty p e 1 Ty p e 2
WA R N I N G Before driving with a child in the vehicle, be sure to lock the window switch to makeit inoperative. Children tampering withthe switch could easily trap their hands or heads in the window.
Safety mechanism (Driver’s door window of Type 1 only)
WA R N I N G If the battery terminals are disconnected or the fuse for electric window is replaced, the safety mechanism will be cancelled. If a hand or head got
trapped, a serious
injury could result.CAUTION The safety mechanism is deactivated just before the door window closes. This allows the door window to close completely. There- fore be especially careful that fingers are nottrapped in the door window opening.
BK0212400US.book 30 ページ 2014年4月1日 火曜日 午後2時21分
Page 92 of 300
Parking brake
Features and controls 5-31
5
N00551400043
Wind buffeting can be de
scribed as the per-
ception of pressure on the ears or a boomingor rumbling sound. Your
vehicle may exhibit
wind buffeting when driving with one or both rear door windows down or partially opened.This is a normal occurrence that can be mini- mized. If the buffeting
occurs with the rear
door windows open, open the front door win- dows as well as the rear door windows to minimize the condition.
N00511400399
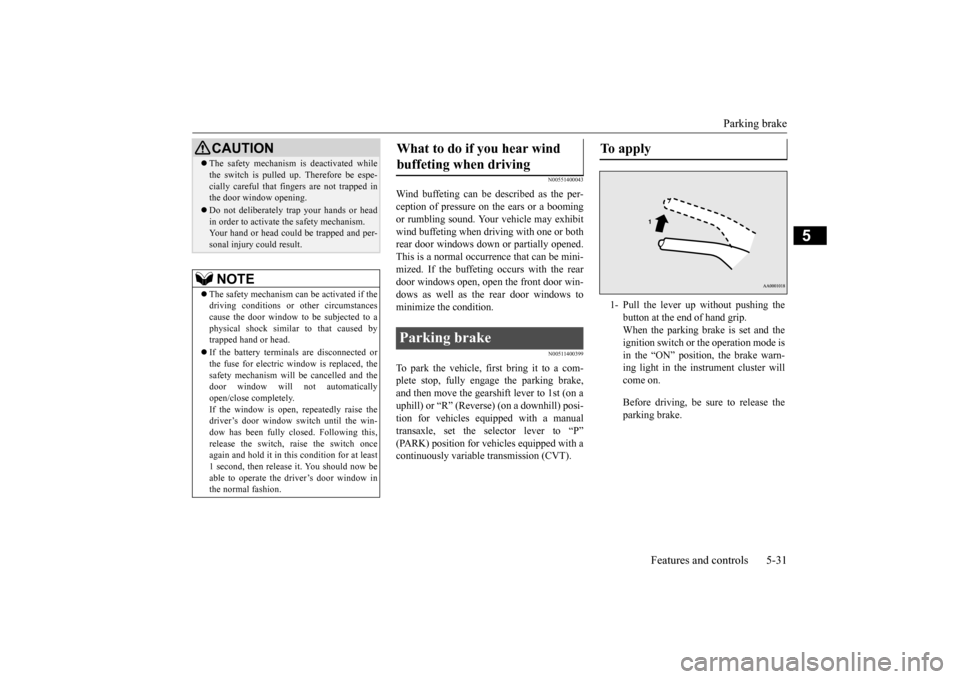
To park the vehicle, first bring it to a com-plete stop, fully engage the parking brake,and then move the gearshift lever to 1st (on a uphill) or “R” (Reverse) (on a downhill) posi- tion for vehicles equipped with a manualtransaxle, set the selector lever to “P” (PARK) position for vehi
cles equipped with a
continuously variable transmission (CVT).
The safety mechanism is deactivated while the switch is pulled up.
Therefore be espe-
cially careful that fi
ngers are not trapped in
the door window opening. Do not deliberately tr
ap your hands or head
in order to activate the safety mechanism. Your hand or head coul
d be trapped and per-
sonal injury could result.NOTE
The safety mechanism can be activated if the driving conditions or
other circumstances
cause the door window to be subjected to a physical shock similar to that caused by trapped hand or head. If the battery termin
als are disc
onnected or
the fuse for electric
window is replaced, the
safety mechanism will be cancelled and the door window will not
automatically
open/close completely.If the window is open,
repeatedly raise the
driver’s door window switch until the win- dow has been fully cl
osed. Following this,
release the switch, raise the switch onceagain and hold it in this
condition for at least
1 second, then release it. You should now be able to operate the driver’s door window inthe normal fashion.CAUTION
What to do if you hear wind buffeting when driving Parking brake
To apply 1- Pull the lever up without pushing the
button at the end of hand grip. When the parking brake is set and theignition switch or the operation mode is in the “ON” position, the brake warn- ing light in the instrument cluster willcome on. Before driving, be sure to release the parking brake.
BK0212400US.book 31 ページ 2014年4月1日 火曜日 午後2時21分
Page 94 of 300
Outside rearview mirrors
Features and controls 5-33
5
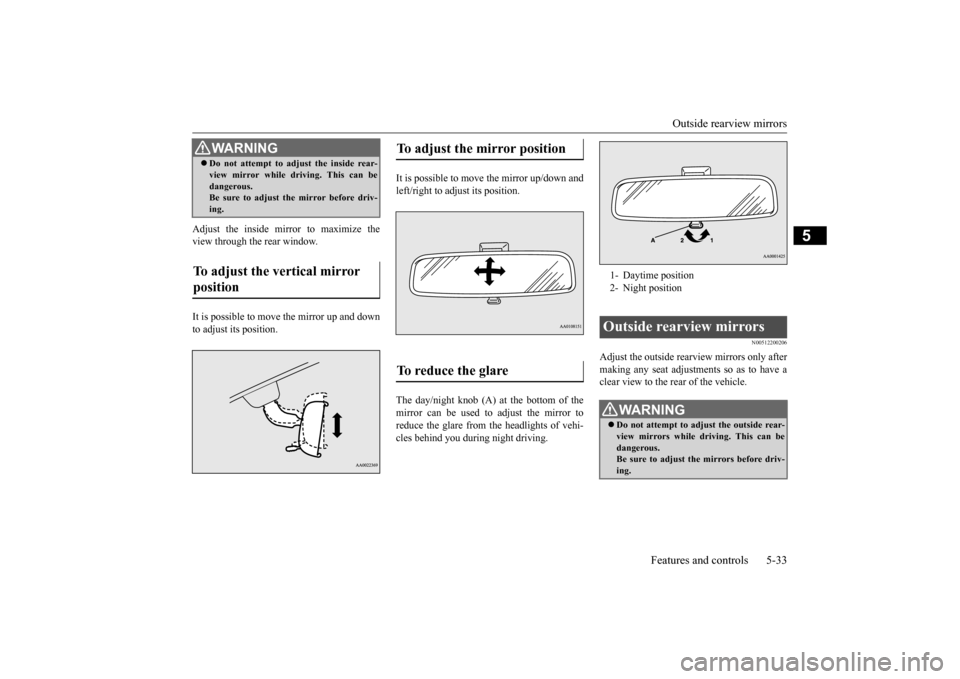
Adjust the inside mirror to maximize the view through the rear window. It is possible to move
the mirror up and down
to adjust its position.
It is possible to move the mirror up/down and left/right to adjust its position. The day/night knob (A) at the bottom of the mirror can be used to adjust the mirror to reduce the glare from the headlights of vehi- cles behind you during night driving.
N00512200206
Adjust the outside rearview mirrors only aftermaking any seat adjustme
nts so as to have a
clear view to the rear of the vehicle.
WA R N I N G Do not attempt to adjust the inside rear- view mirror while driving. This can bedangerous.Be sure to adjust the mirror before driv- ing.
To adjust the vertical mirror position
To adjust the mirror position To reduce the glare
1- Daytime position 2- Night positionOutside rearview mirrors
WA R N I N G Do not attempt to adjust the outside rear- view mirrors while driving. This can be dangerous. Be sure to adjust the mirrors before driv-ing.
BK0212400US.book 33 ページ 2014年4月1日 火曜日 午後2時21分
Page 95 of 300
Outside rearview mirrors 5-34 Features and controls
5
N00549100144
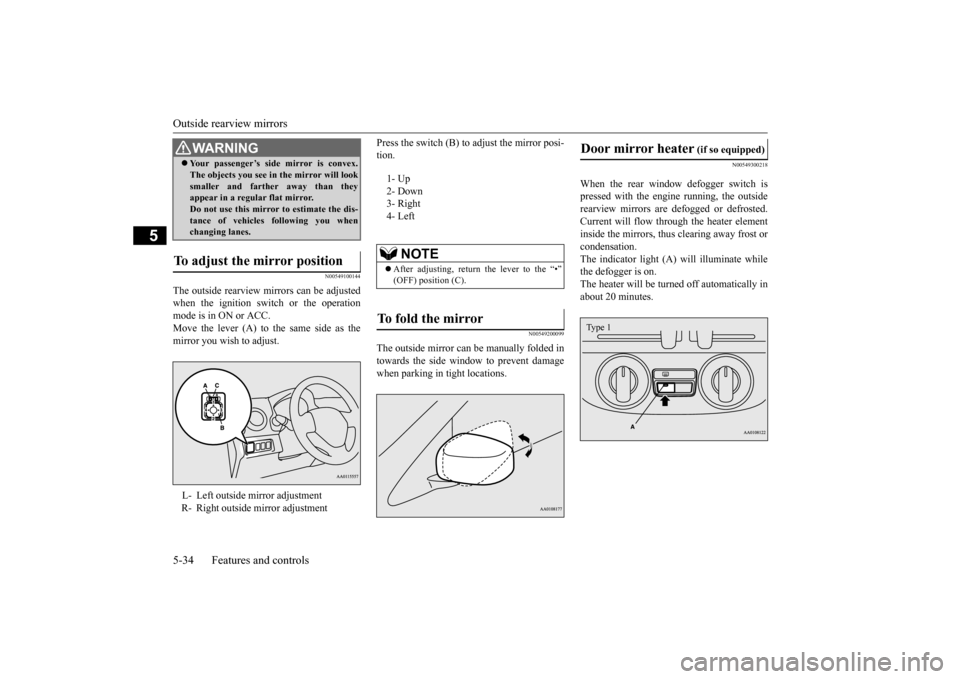
The outside rearview mirrors can be adjusted when the ignition switch or the operationmode is in ON or ACC. Move the lever (A) to the same side as the mirror you wish to adjust.
Press the switch (B) to adjust the mirror posi- tion.
N00549200099
The outside mirror can be manually folded in towards the side window to prevent damage when parking in tight locations.
N00549300218
When the rear window defogger switch ispressed with the engine running, the outsiderearview mirrors are defogged or defrosted. Current will flow throug
h the heater element
inside the mirrors, thus clearing away frost orcondensation. The indicator light (A) will illuminate while the defogger is on. The heater will be turned off automatically in about 20 minutes.
Your passenger’s side mirror is convex. The objects you see in
the mirror will look
smaller and farthe
r away than they
appear in a regular flat mirror. Do not use this mirror to estimate the dis- tance of vehicles following you whenchanging lanes.
To adjust the mirror position L- Left outside mirror adjustment R- Right outside mirror adjustmentWA R N I N G
1- Up 2- Down3- Right 4- Left
NOTE
After adjusting, return the lever to the “•” (OFF) position (C).
To fold the mirror
Door mirror heater
(if so equipped)
Type 1
BK0212400US.book 34 ページ 2014年4月1日 火曜日 午後2時21分
Page 98 of 300

Starting the engine
Features and controls 5-37
5
2. Insert the ignition key. 3. Make sure the parking brake is applied.4. Press and hold the
brake pedal down with
your right foot. 5. Press and hold the clut
ch pedal all the way
down (manual transaxle). 6. On vehicles equipped with manual trans- axle, place the gearshift lever in the “N” (Neutral) position.On vehicles equippe
d with continuously
variable transmission (CVT), make sure the selector lever is in the “P” (PARK)position.
7. Turn the ignition switch to the “ON” posi- tion and make certain that all warninglights are functioning properly before starting the engine. 8. Turn the ignition switch to the “START”position without pre
ssing the accelerator
pedal. Release the key when the engine starts.
After several attempts
, you may experience
that the engine still does not start. 1. Make sure that all electric devices, such as lights, air conditi
oning blower and rear
window defogger, are turned off. 2. While depressing the brake pedal {contin- uously variable transmission (CVT)} orthe clutch pedal (manual transaxle), press the accelerator peda
l halfway and hold it
there, then crank th
e engine. Release the
accelerator pedal, immediately after the engine starts.
3. If the engine still wi
ll not start, the engine
could be flooded with too much gasoline.While depressing the brake pedal (CVT) or the clutch pedal (manual transaxle), push the accelerator pedal all the waydown and hold it there, then crank the engine for 5 to 6 seconds. Return the igni- tion switch to the “OFF” position andrelease the accelerator pedal. Wait a few seconds, and then crank the engine again for 5 to 6 seconds while depressing the brake pedal (CVT) or the clutch pedal (manual transaxle), but do not push theaccelerator pedal. Release the ignition key if the engine starts.
If the engine fails to
start, repeat these procedures. If theengine still will not
start, contact your
local Mitsubishi Motors dealer or a repair facility of your choi
ce for assistance.
When the ambient temperature is -4 °F (-20 °C) or lower, it may not be possible to start from a standstill even with the selector lever in the “D” (DRIVE) or “R” (REVERSE)position. This phenomenon occurs because the trans- axle has not warmed up sufficiently; it does
NOTE
On vehicles equipped
with manual transaxle,
the starter will not ope
rate unless the clutch
pedal is fully depresse
d (Clutch interlock).
NOTE
On vehicles equipped wi
th CVT, the starter
will not operate unless th
e selector lever is in
the “P” (PARK) or “N” (NEUTRAL) posi-tion.For safety reasons, start the engine in the “P” (PARK) position so that the wheels are locked.
NOTE
Minor noises may be he
ard on engine start-
up. These will disappear
as the engine warms
up.
When the engine is hard to start
Startability of CVT vehicle with ambient temperature of -4 °F (-20 °C) or lower
BK0212400US.book 37 ページ 2014年4月1日 火曜日 午後2時21分
Page 120 of 300
Tire pressure monitoring system (if so equipped)
Features and controls 5-59
5
The tire pressure monitoring system may not work normally in the following circum- stances: A wireless facility or device using the same frequency is near the vehicle. Snow or ice is stuck inside the fenders and/or on the wheels. The tire inflation pres
sure sensor’s battery
is dead. Wheels other than Mitsubishi Genuine wheels are being used. Wheels that are not fitted with tire infla- tion pressure sensors are being used. Wheels whose ID codes are not memo- rized by the vehicle are used. Compact spare tire (if so equipped) is fit- ted on a road wheel. A window tint that affects the radio wave signals is installed.
N00532900153
If new wheels with new tire inflation pressuresensors are installed, their ID codes must be programmed into the tire pressure monitoring system. Have tire and
wheel replacement per-
formed by an authorized Mitsubishi Motors dealer to avoid the ri
sk of damaging the tire
inflation pressure sensors. If the wheelreplacement is not done by an authorized Mitsubishi Motors dealer
, it is not covered by
your warranty.
N00533000236
Your tire pressure monitoring system oper- ates on a radio frequenc
y subject to Federal
Communications Commission (FCC) Rules(For vehicles sold in
U.S.A.) and Industry
Canada Rules (For vehicles sold in Canada). This device complies with part 15 of FCCRules and Industry Ca
nada licence-exempt
RSS standard(s). Operation is subject to the following two con- ditions. This device may not
cause harmful inter-
ference This device must ac
cept any interference
received, including interference that may cause undesired operation.
Do not use an aerosol puncture-repair spray on any tire.Such a spray could damage the tire inflationpressure sensors. Have any puncture repaired by an authorized Mitsubishi Motors dealer. Using the tire repair kit may damage the tire inflation pressure sensor. The vehicle mustpromptly be inspected and repaired by an authorized Mitsubishi Motors dealer after using the tire repair kit.NOTE
NOTE
Tire inflation pressures vary with the ambi- ent temperature. If the vehicle is subjected tolarge variations in ambient temperature, thetire inflation pressures may be under-inflated (causing the warning light come on) when the ambient temperature is relatively low. Ifthe warning light comes on, adjust the tire inflation pressure.
Whenever the tires and wheels are replaced with new ones
CAUTION The use of non-genuine wheels will prevent the proper fit of the tire inflation pressure sensors, resulting air
leakage or damage of
the sensors.
General information
WA R N I N G Changes or modifica
tions not expressly
approved by the manufacturer for compli- ance could void the
user’s authority to
operate the equipment.
BK0212400US.book 59 ページ 2014年4月1日 火曜日 午後2時21分
Page 136 of 300
![MITSUBISHI MIRAGE 2015 6.G User Guide Combination headlights and dimmer switch
Features and controls 5-75
5
[When the engine is not
running, or when the
engine is running but the parking brake is not released] The engine starts when t](/img/19/7511/w960_7511-135.png "MITSUBISHI MIRAGE 2015 6.G User Guide Combination headlights and dimmer switch
Features and controls 5-75
5
[When the engine is not
running, or when the
engine is running but the parking brake is not released] The engine starts when t")
Combination headlights and dimmer switch
Features and controls 5-75
5
[When the engine is not
running, or when the
engine is running but the parking brake is not released] The engine starts when the lights are off.
N00532600570
If the following operation is performed with the combination headlights and dim- mer switch in the “ ” or “ ” position, the lights automatically turn off. [Except for vehicles
equipped with the
F. A . S . T. - k e y ]The ignition switch is turned to the “OFF” or “ACC” position or the key is removed from the ignition switch and the driver’sdoor is opened. [For vehicles equipped with the F.A.S.T.- key] The operation mode is changed to OFF orACC and the driver’s door is opened.
If the following operation is performed with the combination headlights and dim- mer switch in the “ ” or “ ” position, the lights automatically turn off after about 3 minutes. [Except for vehicles equipped with the F. A . S . T. - k e y ]The ignition switch is turned to the “OFF” or “ACC” position or
the key is removed
from the ignition switch and the driver’s door is not opened. [For vehicles equipped with the F.A.S.T.- key]The operation mode is changed to OFF or ACC and the driver’s door is not opened.
If the combination
headlights and dimmer
switch is turned to the “ ” or “ ” posi- tion again after the engine is turned off, theabout 3-minute auto-cutout function
NOTE
Once the daytime running light come on, they do not go out until the ignition switch isturned to the “OFF” or “ACC” position orthe operation mode is changed to OFF or ACC.
OFF All lights off
Parking, tail, front
and rear side-
marker lights, lic
ense plate and
instrument panel lights on Headlights and other lights onNOTE
Do not leave the head
lights and ot
her lights
on for a long period of time when the engine is not running. The battery will run down.
When it rains, or wh
en the vehicle has been
washed, the inside of the lens sometimesbecomes foggy. This is the same as whenwindow glass mists up on a humid day, and does not indicate a pr
oblem. When the light
is switched on, the heat will dry out the fog.However, if water collects inside the light, have it checked by an authorized Mitsubishi Motors dealer or a repair facility of yourchoice.
Light auto-cutout function (headlights and other lights)
NOTE
NOTE
The light auto-cutout f
unction can be deacti-
vated.See your authorized Mitsubishi Motors dealer for details.
When you want to keep the lights on:
BK0212400US.book 75 ページ 2014年4月1日 火曜日 午後2時21分
Page 140 of 300
Wiper and washer switch
Features and controls 5-79
5
N00504600298
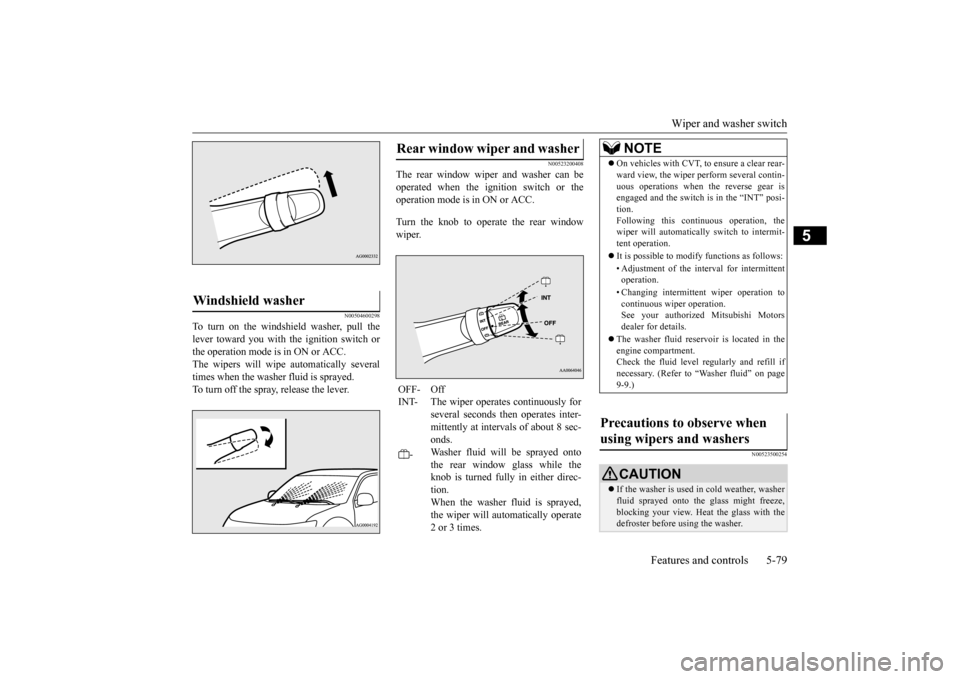
To turn on the windshield washer, pull the lever toward you with the ignition switch or the operation mode is in ON or ACC. The wipers will wipe automatically severaltimes when the washer fluid is sprayed. To turn off the spray, release the lever.
N00523200408
The rear window wiper and washer can beoperated when the ignition switch or the operation mode is in ON or ACC. Turn the knob to operate the rear window wiper.
N00523500254
Windshield washer
Rear window wiper and washer OFF- OffINT- The wiper operates continuously for
several seconds then operates inter- mittently at intervals of about 8 sec- onds.
-
Washer fluid will
be sprayed onto
the rear window glass while the knob is turned fully in either direc-tion. When the washer fluid is sprayed, the wiper will automatically operate2 or 3 times.
NOTE
On vehicles with CVT, to ensure a clear rear- ward view, the wiper perform several contin-uous operations when the reverse gear isengaged and the switch is in the “INT” posi- tion. Following this continuous operation, thewiper will automatically switch to intermit- tent operation. It is possible to modi
fy functions as follows:
• Adjustment of the interval for intermittent operation. • Changing intermittent
wiper operation to
continuous wiper operation. See your authorized Mitsubishi Motors dealer for details.
The washer fluid reservoir is located in the engine compartment.Check the fluid level re
gularly and refill if
necessary. (Refer to
“Washer fluid” on page
9-9.)
Precautions to observe when using wipers and washers
CAUTION If the washer is used in cold weather, washer fluid sprayed onto the glass might freeze, blocking your view. Heat
the glass with the
defroster before using the washer.
BK0212400US.book 79 ページ 2014年4月1日 火曜日 午後2時21分