change time MITSUBISHI MIRAGE G4 2018 (in English) User Guide
[x] Cancel search | Manufacturer: MITSUBISHI, Model Year: 2018, Model line: MIRAGE G4, Model: MITSUBISHI MIRAGE G4 2018Pages: 263, PDF Size: 37.9 MB
Page 133 of 263
Multi-information display 5-70 Features and controls
5
N00556701312
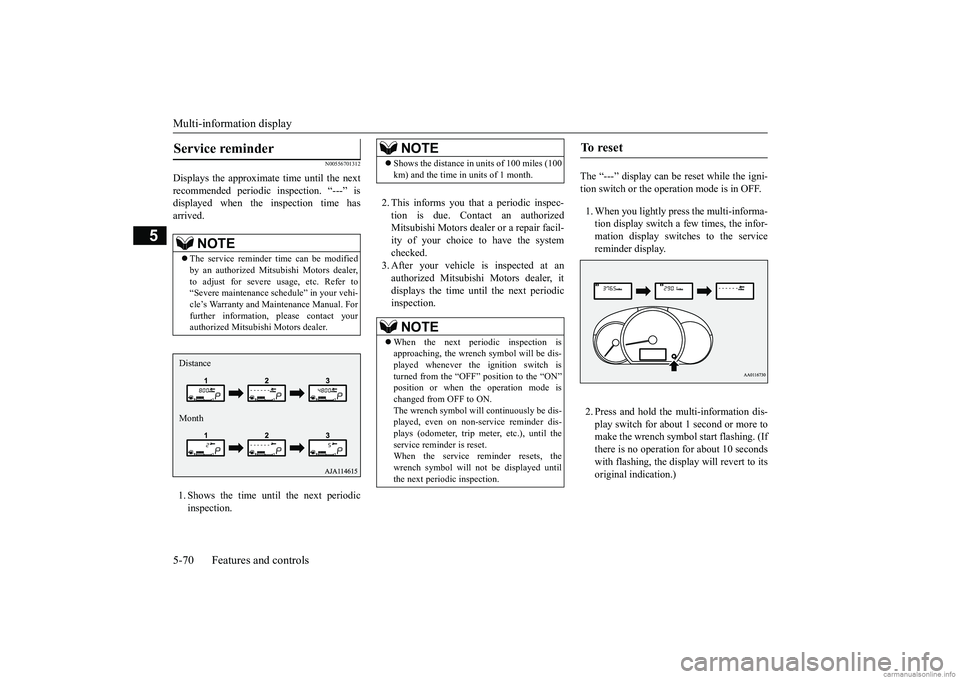
Displays the approximate time until the next recommended periodic
inspection. “---” is
displayed when the inspection time hasarrived. 1. Shows the time until the next periodic inspection.
2. This informs you that a periodic inspec- tion is due. Contact an authorized Mitsubishi Motors dealer
or a repair facil-
ity of your choice to have the system checked. 3. After your vehicle
is inspected at an
authorized Mitsubishi Motors dealer, it displays the time unt
il the next periodic
inspection.
The “---” display can be
reset while the igni-
tion switch or the opera
tion mode is in OFF.
1. When you lightly press the multi-informa- tion display switch a few times, the infor-mation display switches to the service reminder display. 2. Press and hold the multi-information dis- play switch for about 1 second or more tomake the wrench symbol start flashing. (If there is no operation for about 10 seconds with flashing, the displa
y will revert to its
original indication.)
Service reminder
NOTE
The service reminder time can be modified by an authorized Mitsubishi Motors dealer,to adjust for severe usage, etc. Refer to “Severe maintenance sc
hedule” in your vehi-
cle’s Warranty and Ma
intenance Manual. For
further information, please contact your authorized Mitsubishi Motors dealer.Distance Month
NOTE
Shows the distance in
units of 100 miles (100
km) and the time in units of 1 month.NOTE
When the next periodic inspection is approaching, the wrench symbol will be dis-played whenever the ignition switch is turned from the “OFF” position to the “ON” position or when the operation mode ischanged from OFF to ON. The wrench symbol will continuously be dis- played, even on non-service reminder dis-plays (odometer, trip meter, etc.), until the service reminder is reset. When the service reminder resets, thewrench symbol will not be displayed untilthe next periodic inspection.
To r e s e t
BK0249600US.book 70 ページ 2017年4月20日 木曜日 午後1時36分
Page 134 of 263
Multi-information display
Features and controls 5-71
5
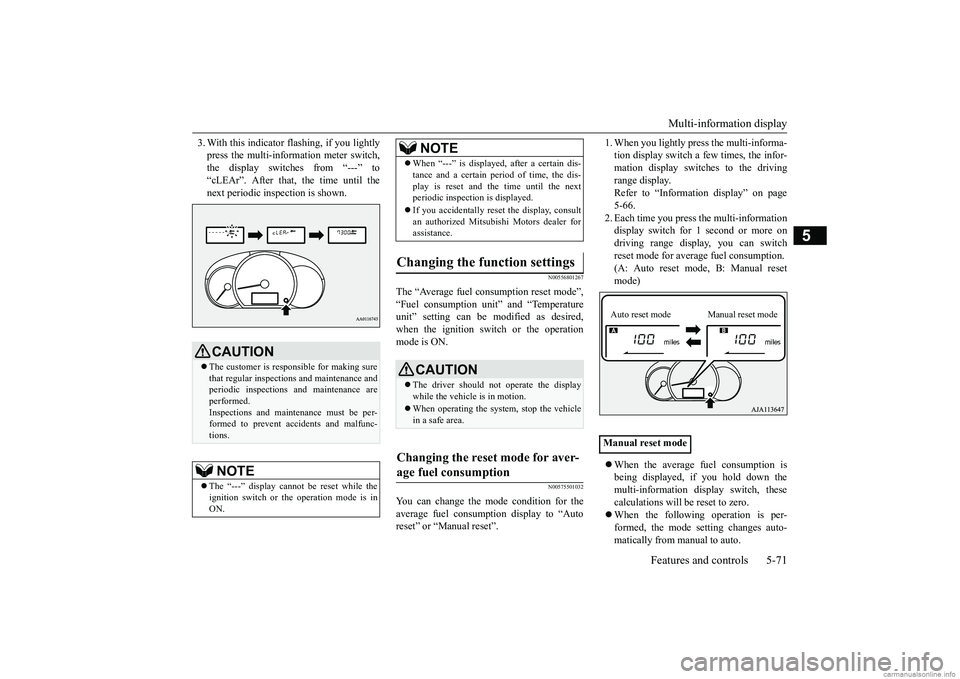
3. With this indicator
flashing, if you lightly
press the multi-information meter switch,the display switches from “---” to “cLEAr”. After that, the time until the next periodic inspection is shown.
N00556801267
The “Average fuel c
onsumption reset mode”,
“Fuel consumption uni
t” and “Temperature
unit” setting can be m
odified as desired,
when the ignition switch or the operation mode is ON.
N00575501032
You can change the mode condition for theaverage fuel consumpt
ion display to “Auto
reset” or “Manual reset”.
1. When you lightly press the multi-informa- tion display switch a few times, the infor-mation display switches to the driving range display. Refer to “Information display” on page5-66. 2. Each time you press th
e multi-information
display switch for 1 second or more ondriving range disp
lay, you can switch
reset mode for average fuel consumption. (A: Auto reset mode, B: Manual reset mode) When the average fuel consumption is being displayed, if you hold down themulti-information display switch, these calculations will be reset to zero. When the following operation is per- formed, the mode setting changes auto- matically from manual to auto.
CAUTION The customer is responsible for making sure that regular inspections and maintenance and periodic inspections
and maintenance are
performed.Inspections and mainte
nance must be per-
formed to prevent accidents and malfunc- tions.NOTE
The “---” display cannot
be reset while the
ignition switch or the operation mode is inON.
When “---” is displayed, after a certain dis- tance and a certain pe
riod of time, the dis-
play is reset and th
e time until the next
periodic inspection is displayed. If you accidentally reset
the display, consult
an authorized Mitsubishi Motors dealer for assistance.
Changing the function settings
CAUTION The driver should not operate the display while the vehicle is in motion. When operating the system, stop the vehicle in a safe area.
Changing the reset mode for aver- age fuel consumption
NOTE
Manual reset modeAuto reset mode Manual reset mode
BK0249600US.book 71 ページ 2017年4月20日 木曜日 午後1時36分
Page 135 of 263
![MITSUBISHI MIRAGE G4 2018 (in English) User Guide Multi-information display 5-72 Features and controls
5
[Except for vehicles
equipped with the
F. A . S . T. - k e y ]Turn the ignition switch to the “ON” posi- tion from the “ACC” or “OFF MITSUBISHI MIRAGE G4 2018 (in English) User Guide Multi-information display 5-72 Features and controls
5
[Except for vehicles
equipped with the
F. A . S . T. - k e y ]Turn the ignition switch to the “ON” posi- tion from the “ACC” or “OFF](/img/19/34855/w960_34855-134.png)
Multi-information display 5-72 Features and controls
5
[Except for vehicles
equipped with the
F. A . S . T. - k e y ]Turn the ignition switch to the “ON” posi- tion from the “ACC” or “OFF” position. [For vehicles equipped
with the F.A.S.T.-
key]Change the operation mode to ON from ACC or OFF. When the average fuel consumption is being displayed, if you hold down the multi-information display switch, these calculations will
be reset to zero.
When the engine switch or the operation mode is in the following conditions, the average fuel consumption display willautomatically reset. [Except for vehicles
equipped with the
F. A . S . T. - k e y ] The ignition switch has been set to the“ACC” or “OFF” position for about 4 hours or more. [For vehicles equipped
with the F.A.S.T.-
key]The operation mode has been set to ACC or OFF for about 4 hours or more.
N00557100156
The fuel consumption display unit can bechanged. The distance
and amount units are
also switched to match the selected fuel con-sumption unit. 1. When you lightly press the multi-informa- tion display switch a few times, the infor- mation display switches to the averagefuel consumption display. Refer to “Information display” on page 5-66.2. Press and hold the mu
lti-information dis-
play switch for about 5 seconds or more until buzzer sound is heard twice.
3. Press and hold the multi-information dis- play switch to switch in sequence from“km/L”
“L/100 km”
“mpg”
“km/L”.
The distance units is al
so changed in the fol-
lowing combinations to match the selected fuel consumption unit.
Auto reset mode
NOTE
The average fuel cons
umption display can be
reset separately for the auto reset mode andfor the manual reset mode. Disconnecting th
e battery cable will erase
from memory the manual reset mode or autoreset mode setting for the average fuel con- sumption display. The initial (default) setting is “Auto reset mode”.
Changing the fuel consumption display unit
NOTE
The display units for the driving range, the average fuel consumption are changed, but the units for the indicating needle (speedom- eter), the odometer, the trip odometer and theservice reminder will
remain unchanged.
If the battery is disconnected, the memory of the unit setting is erased and it returns auto- matically to factory setting.
BK0249600US.book 72 ページ 2017年4月20日 木曜日 午後1時36分
Page 141 of 263
Combination headlights and dimmer switch 5-78 Features and controls
5
N00590300021
This light comes on when the washer fluid is running low.If the light comes on, replenish the container with washer fluid. Refe
r to “Washer fluid” on
page 9-9.
N00522501889
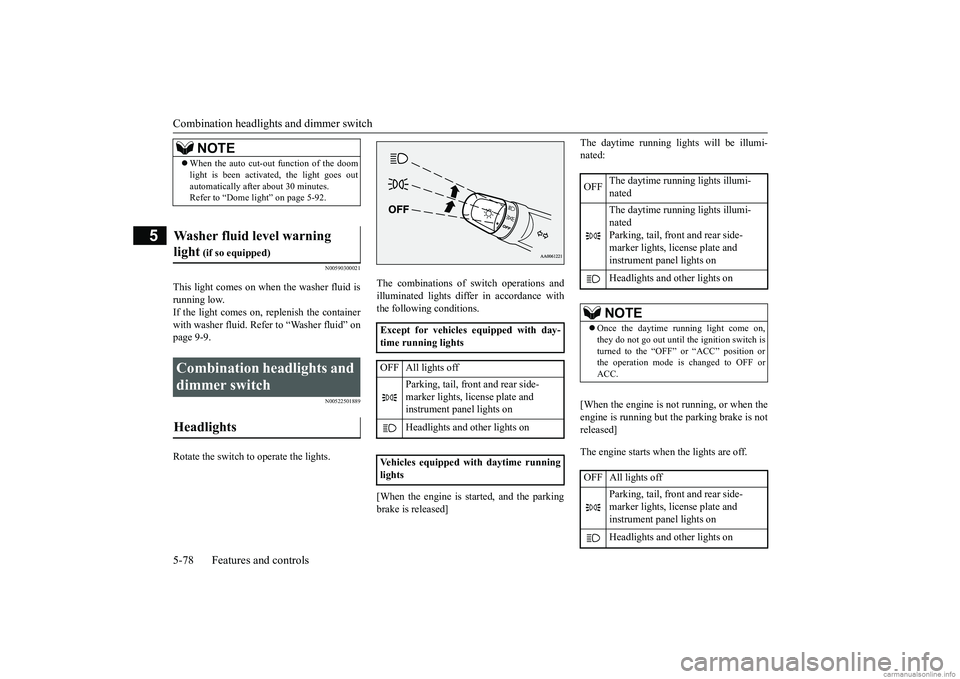
Rotate the switch to operate the lights.
The combinations of switch operations and illuminated lights differ in accordance withthe following conditions. [When the engine is started, and the parking brake is released]
The daytime running lights will be illumi- nated: [When the engine is not running, or when the engine is running but the parking brake is not released] The engine starts when the lights are off.
NOTE
When the auto cut-out function of the doom light is been activated, the light goes outautomatically after
about 30 minutes.
Refer to “Dome light” on page 5-92.
Washer fluid level warning light
(if so equipped)
Combination headlights and dimmer switch Headlights
Except for vehicles equipped with day- time running lights OFF All lights off
Parking, tail, front
and rear side-
marker lights, license plate and instrument panel lights on Headlights and other lights on
Vehicles equipped
with daytime running
lights
OFF
The daytime running lights illumi- nated The daytime running lights illumi- nated Parking, tail, front and rear side-marker lights, license plate and instrument panel lights on Headlights and
other lights on
NOTE
Once the daytime running light come on, they do not go out until the ignition switch isturned to the “OFF” or “ACC” position or the operation mode is changed to OFF or ACC.
OFF All lights off
Parking, tail, front and rear side- marker lights, license plate and instrument panel lights on Headlights and
other lights on
BK0249600US.book 78 ページ 2017年4月20日 木曜日 午後1時36分
Page 142 of 263
Combination headlights and dimmer switch
Features and controls 5-79
5
N00532600570
If the following operation is performed with the combination headlights and dim- mer switch in the “ ” or “ ” position, the lights automatically turn off. [Except for vehicles equipped with the F. A . S . T. - k e y ]The ignition switch is turned to the “OFF” or “ACC” position or
the key is removed
from the ignition switch and the driver’sdoor is opened. [For vehicles equipped with the F.A.S.T.- key]
The operation mode is changed to OFF or ACC and the driver’s door is opened. If the following operation is performed with the combination headlights and dim- mer switch in the “ ” or “ ” position, the lights automatically turn off after about 3 minutes. [Except for vehicles
equipped with the
F. A . S . T. - k e y ] The ignition switch is turned to the “OFF”or “ACC” position or the key is removed from the ignition switch and the driver’s door is not opened. [For vehicles equipped with the F.A.S.T.- key] The operation mode is changed to OFF or ACC and the driver’s door is not opened.
If the combination
headlights and dimmer
switch is turned to the “ ” or “ ” posi- tion again after the engine is turned off, the about 3-minute auto-cutout function described above will not
work. The lights (the
parking lights, tail lig
hts and license plate
lights) will stay on and will not turn off auto-matically.
N00549800226
[When using a key to
start the engine]
If the driver’s door is opened with the key in the “OFF” or “ACC” position or removed from the ignition switch while the lights areon, the tone will sound to remind you to turn off the lights. [When using the F.A.S.T.-key to start the engine]If the driver’s door is opened with the opera- tion mode is put in OFF or ACC, or if the operation mode is changed to OFF while thelights are on, the tone will sound to remind you to turn off the lights. In either case, the lights will turn off automat- ically and so will the tone. Or you can turn
NOTE
Do not leave the head
lights and ot
her lights
on for a long period of time when the engineis not running. The battery will run down. When it rains, or wh
en the vehicle has been
washed, the inside of the lens sometimesbecomes foggy. This is the same as when window glass mists up
on a humid day, and
does not indicate a problem. When the lightis switched on, the heat
will dry out the fog.
However, if water collects inside the light, have it checked by an
authorized Mitsubishi
Motors dealer or a repair facility of your choice.
Light auto-cutout function (headlights and other lights)
NOTE
The light auto-cutout
function can be deacti-
vated. See your authorized Mitsubishi Motorsdealer for details.
When you want to keep the lights on: Headlight reminder buzzer
BK0249600US.book 79 ページ 2017年4月20日 木曜日 午後1時36分
Page 143 of 263
Turn signal lever 5-80 Features and controls
5
the light switch to the “OFF” position to stop the tone.
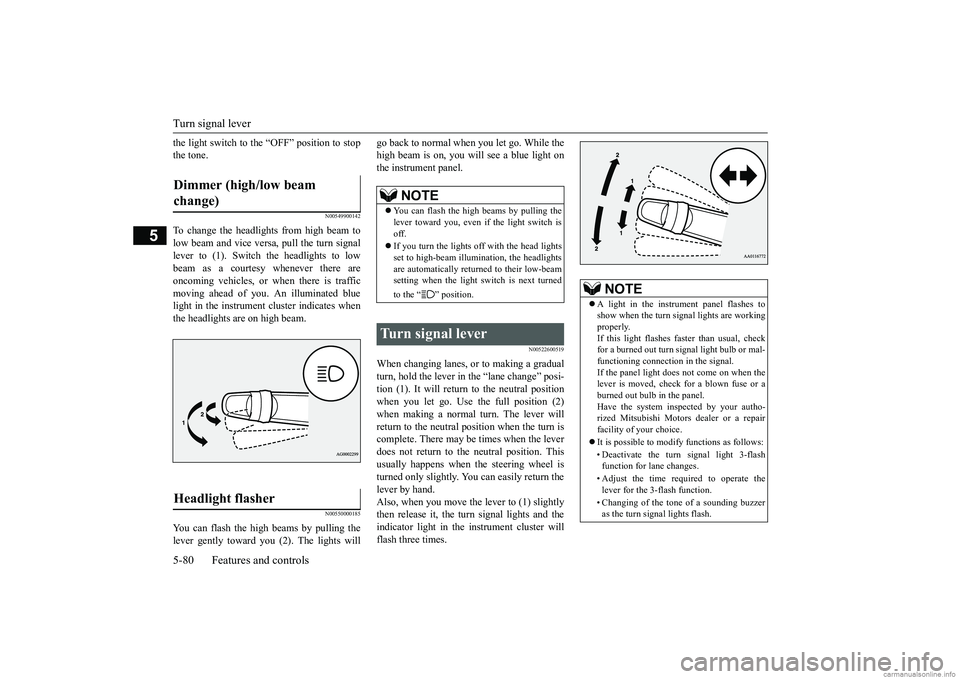
N00549900142
To change the headlights from high beam tolow beam and vice vers
a, pull the turn signal
lever to (1). Switch the headlights to low beam as a courtesy whenever there are oncoming vehicles, or when there is traffic moving ahead of you. An illuminated bluelight in the instrument cluster indicates when the headlights are on high beam.
N00550000185
You can flash the high beams by pulling the lever gently toward you (2). The lights will
go back to normal when you let go. While the high beam is on, you will see a blue light onthe instrument panel.
N00522600519
When changing lanes, or to making a gradual turn, hold the lever in the “lane change” posi- tion (1). It will return to the neutral positionwhen you let go. Use the full position (2) when making a normal turn. The lever will return to the neutral pos
ition when the turn is
complete. There may be times when the lever does not return to th
e neutral position. This
usually happens when the steering wheel isturned only slightly. You
can easily return the
lever by hand. Also, when you move the lever to (1) slightlythen release it, the turn signal lights and the indicator light in the instrument cluster will flash three times.
Dimmer (high/low beam change) Headlight flasher
NOTE
You can flash the high beams by pulling the lever toward you, even if the light switch isoff. If you turn the lights off with the head lights set to high-beam illumi
nation, the headlights
are automatically returned to their low-beam setting when the light
switch is next turned
to the “ ” position.
Turn signal lever
NOTE
A light in the instrument panel flashes to show when the turn signal lights are workingproperly. If this light flashes fast
er than usual, check
for a burned out turn
signal light bulb or mal-
functioning connecti
on in the signal.
If the panel light does not come on when the lever is moved, check
for a blown fuse or a
burned out bulb in the panel. Have the system inspected by your autho- rized Mitsubishi Motors
dealer or a repair
facility of your choice. It is possible to modify functions as follows: • Deactivate the turn signal light 3-flash function for lane changes. • Adjust the time required to operate the lever for the 3-flash function. • Changing of the tone of a sounding buzzer as the turn signal lights flash.
BK0249600US.book 80 ページ 2017年4月20日 木曜日 午後1時36分
Page 151 of 263
HomeLink® Wireless Control System (if so equipped) 5-88 Features and controls
5
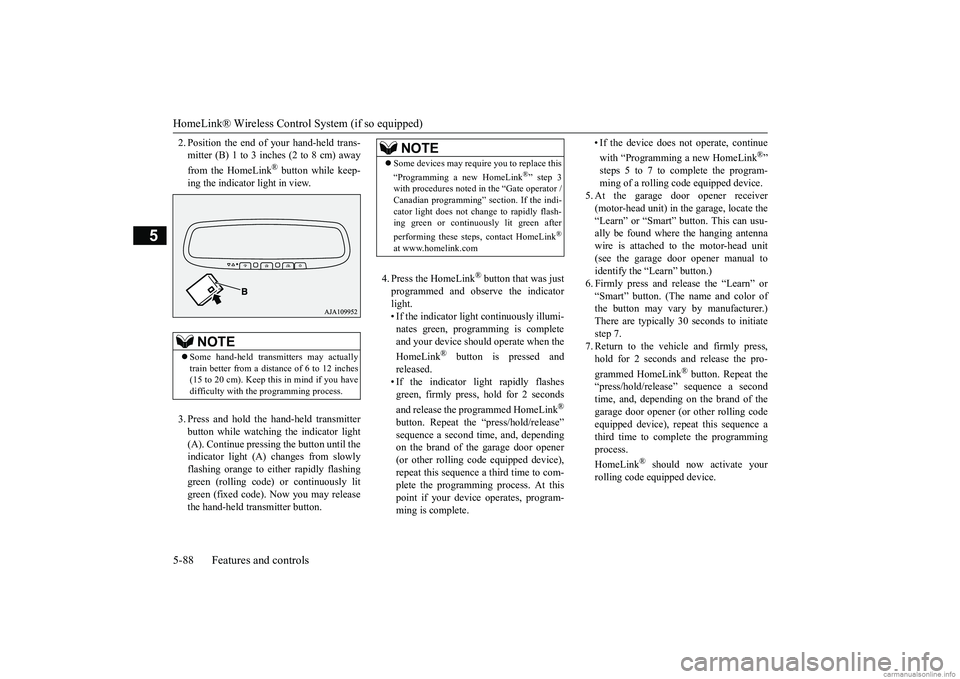
2. Position the end of your hand-held trans- mitter (B) 1 to 3 inches (2 to 8 cm) away from the HomeLink
® button while keep-
ing the indicator light in view. 3. Press and hold the hand-held transmitter button while watching the indicator light (A). Continue pressi
ng the button until the
indicator light (A) changes from slowlyflashing orange to ei
ther rapidly flashing
green (rolling code)
or continuously lit
green (fixed code). Now you may releasethe hand-held transmitter button.
4. Press the HomeLink
® button that was just
programmed and observe the indicator light.• If the indicator light continuously illumi- nates green, progr
amming is complete
and your device should operate when the HomeLink
® button is pressed and
released. • If the indicator light rapidly flashes green, firmly press, hold for 2 seconds and release the programmed HomeLink
®
button. Repeat the
“press/hold/release”
sequence a second ti
me, and, depending
on the brand of the garage door opener(or other rolling code equipped device), repeat this sequence a third time to com- plete the programming
process. At this
point if your device
operates, program-
ming is complete.
• If the device does
not operate, continue
with “Programming a new HomeLink
®”
steps 5 to 7 to complete the program- ming of a rolling c
ode equipped device.
5. At the garage door opener receiver(motor-head unit) in the garage, locate the “Learn” or “Smart” button. This can usu- ally be found where the hanging antennawire is attached to the motor-head unit (see the garage door opener manual to identify the “Learn” button.) 6. Firmly press and release the “Learn” or “Smart” button. (The name and color ofthe button may vary by manufacturer.) There are typically 30 seconds to initiate step 7.7. Return to the vehicle and firmly press, hold for 2 seconds and release the pro- grammed HomeLink
® button. Repeat the
“press/hold/release” sequence a second time, and, depending on the brand of the garage door opener (o
r other rolling code
equipped device), repeat this sequence a third time to complete the programming process. HomeLink
® should now activate your
rolling code equipped device.
NOTE
Some hand-held transmitters may actually train better from a distance of 6 to 12 inches (15 to 20 cm). Keep this in mind if you havedifficulty with th
e programming process.
NOTE
Some devices may requi
re you to replace this
“Programming a new HomeLink
®” step 3
with procedures noted in the “Gate operator / Canadian programming” se
ction. If the indi-
cator light does not cha
nge to rapidly flash-
ing green or continuous
ly lit green after
performing these step
s, contact HomeLink
®
at www.homelink.com
BK0249600US.book 88 ページ 2017年4月20日 木曜日 午後1時36分
Page 152 of 263
HomeLink® Wireless Control System (if so equipped)
Features and controls 5-89
5
N00584800021
Canadian radio-frequency laws require trans- mitter signals to “time-out” (or quit) afterseveral seconds of tr
ansmission - which may
not be long enough for HomeLink
® to pick
up the signal during pr
ogramming. Similar to
this Canadian law, some
U.S. gate operators
are designed to “time-out” in the same man-ner. The indicator LED on the hand-held transmit- ter will go off when the device times out indi-cating that it has finished transmitting. If you live in Canada or you are having diffi- culties programming a gate operator orgarage door opener by using the “Program- ming” procedures, replace “Programming a new HomeLink
®” step 3 with the following:
3. Press and release - every 2 seconds (“cycle”) your hand-held
transmitter until the
HomeLink
® indicator light changes from
slowly flashing orange to
either rapidly flash-
ing green (rolling code) or continuously litgreen (fixed code). Now you may release the hand-held transmitter button. Proceed with “Programming a new Home- Link
®” step 4 to complete.
N00584900022
The HomeLink
® has the capability of receiv-
ing garage door status from compatiblegarage door opener systems. Check your garage door opener manual for the available feature and HomeLink
® compatibility. Also
for a listing of compatible systems contact HomeLink
® at: www.homelink.com
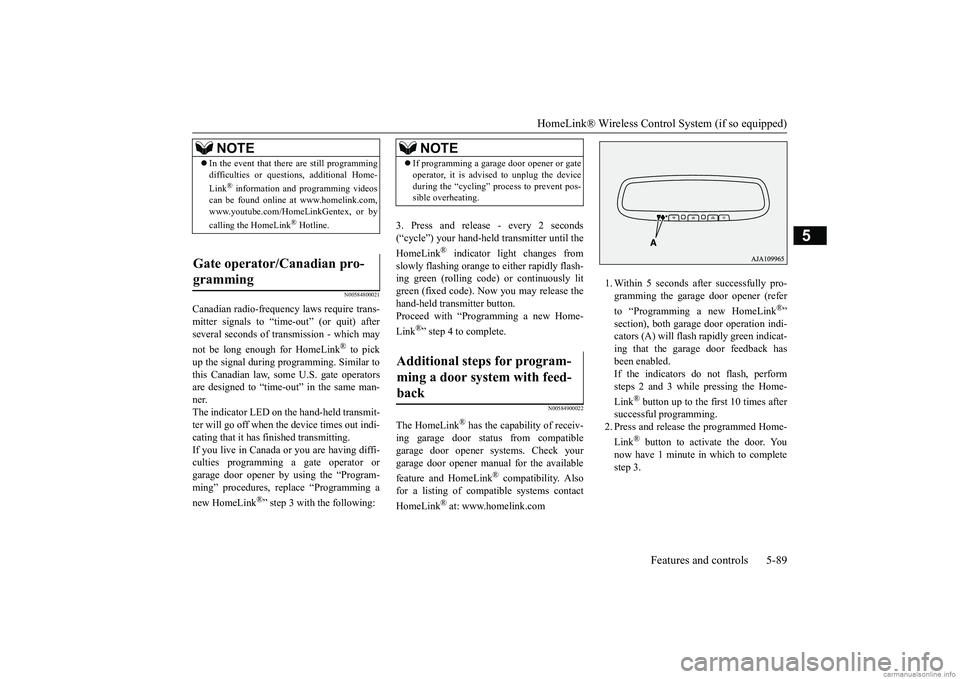
1. Within 5 seconds after successfully pro- gramming the garage
door opener (refer
to “Programming a new HomeLink
®”
section), both garage door operation indi- cators (A) will flash
rapidly green indicat-
ing that the garage
door feedback has
been enabled. If the indicators do not flash, performsteps 2 and 3 while pressing the Home- Link
® button up to the first 10 times after
successful programming.2. Press and release
the programmed Home-
Link
® button to activate the door. You
now have 1 minute in which to completestep 3.
NOTE
In the event that there are still programming difficulties or quest
ions, additional Home-
Link
® information and programming videos
can be found online at www.homelink.com,www.youtube.com/HomeLinkGentex, or by calling the HomeLink
® Hotline.
Gate operator/Canadian pro- gramming
NOTE
If programming a garage
door opener or gate
operator, it is advised to unplug the deviceduring the “cycling” process to prevent pos-sible overheating.
Additional steps for program- ming a door system with feed- back
BK0249600US.book 89 ページ 2017年4月20日 木曜日 午後1時36分
Page 154 of 263
Interior lights
Features and controls 5-91
5
1. Press and hold the 2 outer HomeLink
®
buttons for at least
10 seconds. The indi-
cator will change from continuous yellow to rapidly flashing green. 2. Release both buttons. 3. HomeLink
® is now in the train (or learn-
ing) mode and can be programmed at anytime beginning with
“Programming a new
HomeLink
®” step 1.
N00585400024
To reprogram a HomeLink
® button, complete
the following. 1. Press and hold the desired HomeLink
®
button. Do not release the button. 2. The indicator light
will begin to slowly
flash orange after 20 seconds. The Home- Link
® button can be released at this point.
Proceed with “Programming a new HomeLink
®” step 2.
N00585600026
Your HomeLink
® system operates on a radio
frequency subject to
Federal Communica-
tions Commission (FCC)
Rules (For vehicles
sold in U.S.A.) and Industry Canada Rules (For vehicles sold in
Canada). This device
complies with Part 15 of the FCC Rules and RSS- 210 of the Industry Canada Rules. Operation is subject to
the following two con-
ditions. This device may not
cause harmful inter-
ference. This device must ac
cept any interference
that may be received, including interfer- ence that may caus
e undesired operation.
This equipment complies with FCC radiation exposure limits set fo
rth for an uncontrolled
environment. End Users must follow the spe- cific operating instruct
ions for satisfying RF
exposure compliance. This transmitter must be at least 12 inches (20 cm) from the user and must not be co-loc
ated or operating in
conjunction with any other antenna or trans- mitter. The term “IC:” before
the certification/regis-
tration number only si
gnifies that Industry
Canada technical specifications were met.
N00525301644
NOTE
Do not hold for longer than 20 seconds.
Reprogramming a single HomeLink
® button
NOTE
If you do not complete the programming of a new device to the button, it will revert to thepreviously stored programming.For questions or comments, visit www.homelink.com, www.youtube.com/HomeLinkGentex, or by calling the HomeLink
® Hotline.
General information
CAUTION The transmitter has been tested and complies with FCC and IC rules.Changes or modifica
tions not expressly
approved by the party responsible for com- pliance could void the user’s authority to operate the device.
Interior lights
NOTE
Be aware that leaving the light illuminated with the engine off may run the batterydown. Never leave the vehi
cle without checking
that the light is off.
BK0249600US.book 91 ページ 2017年4月20日 木曜日 午後1時36分
Page 176 of 263
Heater without air conditioning function (if so equipped)
Comfort controls 7-5
7
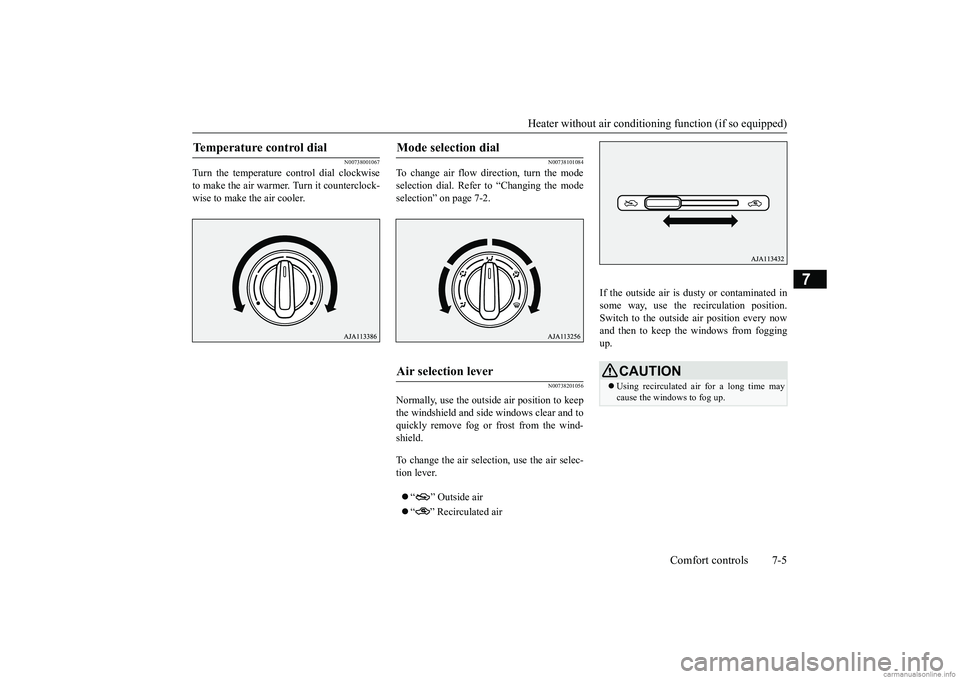
N00738001067
Turn the temperature c
ontrol dial clockwise
to make the air warmer
. Turn it counterclock-
wise to make the air cooler.
N00738101084
To change air flow di
rection, turn the mode
selection dial. Refer
to “Changing the mode
selection” on page 7-2.
N00738201056
Normally, use the outside air position to keepthe windshield and side
windows clear and to
quickly remove fog or frost from the wind- shield. To change the air selection, use the air selec- tion lever. “ ” Outside air “ ” Recirculated air
If the outside air is dusty or contaminated in some way, use the recirculation position. Switch to the outside
air position every now
and then to keep the windows from fogging up.
Temperature control dial
Mode selection dial
Air selection lever
CAUTION Using recirculated ai
r for a long time may
cause the windows to fog up.
BK0249600US.book 5 ページ 2017年4月20日 木曜日 午後1時36分