brake fluid MITSUBISHI MIRAGE G4 2019 Owner's Manual (in English)
[x] Cancel search | Manufacturer: MITSUBISHI, Model Year: 2019, Model line: MIRAGE G4, Model: MITSUBISHI MIRAGE G4 2019Pages: 267, PDF Size: 38.31 MB
Page 13 of 267
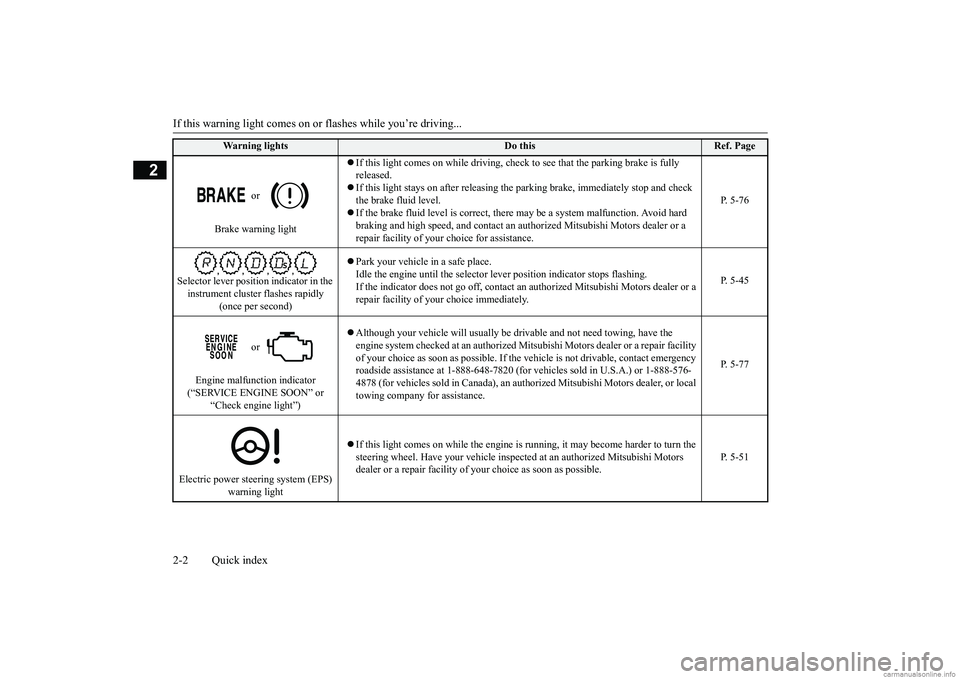
If this warning light comes on or flashes while you’re driving... 2-2 Quick index
2
or
Brake warning light
If this light comes on while driving, chec
k to see that the parking brake is fully
released. If this light stays on after releasing the
parking brake, immediately stop and check
the brake fluid level. If the brake fluid level is correct, there
may be a system malfunction. Avoid hard
braking and high speed, and contact an au
thorized Mitsubishi Motors dealer or a
repair facility of your
choice for assistance.
P. 5-76
Selector lever position indicator in the instrument cluster flashes rapidly
(once per second)
Park your vehicle in a safe place. Idle the engine until the selector le
ver position indicato
r stops flashing.
If the indicator does not go of
f, contact an authorized Mi
tsubishi Motors dealer or a
repair facility of your
choice immediately.
P. 5-45
or
Engine malfunction indicator (“SERVICE ENGINE SOON” or
“Check engine light”)
Although your vehicle will usually be dr
ivable and not need towing, have the
engine system checked at an authorized M
itsubishi Motors dealer
or a repair facility
of your choice as soon as possible. If the
vehicle is not drivab
le, contact emergency
roadside assistance at 1-888-648-7820 (for
vehicles sold in U.S.A.) or 1-888-576-
4878 (for vehicles sold in Canada), an auth
orized Mitsubishi Moto
rs dealer, or local
towing company for assistance.
P. 5-77
Electric power stee
ring system (EPS)
warning light
If this light comes on while the engine is
running, it may become harder to turn the
steering wheel. Have your ve
hicle inspected at an aut
horized Mitsubishi Motors
dealer or a repair facility of
your choice as soon as possible.
P. 5-51
Warning lights
Do this
Ref. Page
BK0267800US.book 2 ページ 2018年5月30日 水曜日 午後4時24分
Page 140 of 267
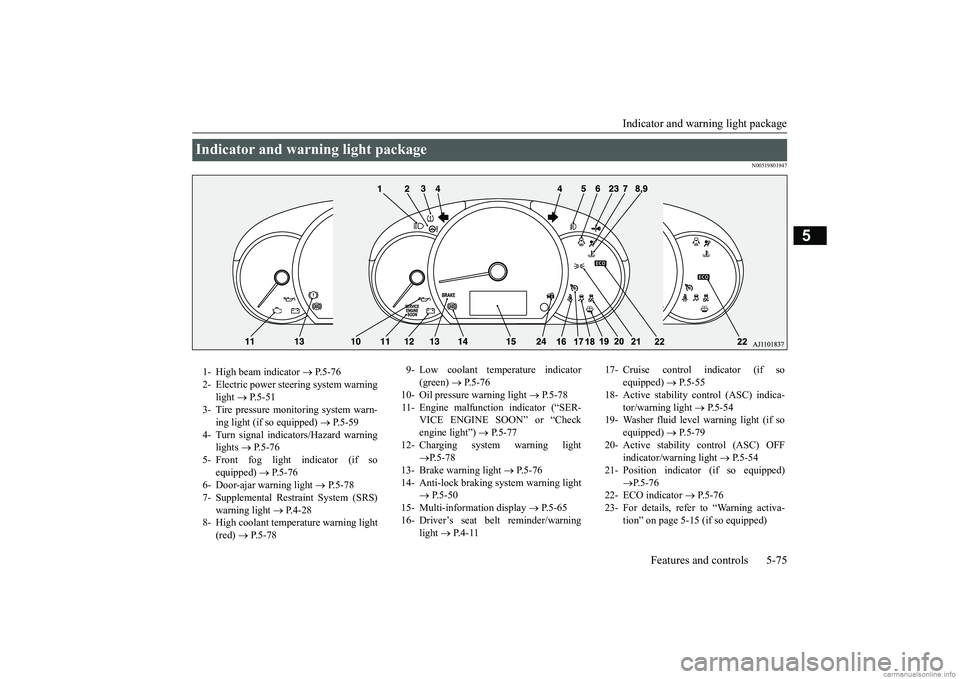
Indicator and warning light package
Features and controls 5-75
5
N00519801947
Indicator and warning light package 1- High beam indicator
P. 5 - 7 6
2- Electric power stee
ring system warning
light
P. 5 - 5 1
3- Tire pressure moni
toring system warn-
ing light (if so equipped)
P.5-59
4- Turn signal indicators/Hazard warning
lights
P.5-76
5- Front fog light indicator (if so
equipped)
P.5-76
6- Door-ajar warning light
P.5-78
7- Supplemental Restraint System (SRS)
warning light
P.4-28
8- High coolant temperature warning light
(red)
P.5-78
9- Low coolant temperature indicator
(green)
P.5-76
10- Oil pressure warning light
P.5-78
11- Engine malfunction indicator (“SER-
VICE ENGINE SOON” or “Check engine light”)
P. 5 - 7 7
12- Charging system warning light
P.5-78
13- Brake warning light
P. 5 - 7 6
14- Anti-lock braking system warning light
P.5-50
15- Multi-information display
P.5-65
16- Driver’s seat belt reminder/warning
light
P. 4 - 1 1
17- Cruise control indicator (if so
equipped)
P.5-55
18- Active stability control (ASC) indica-
tor/warning light
P.5-54
19- Washer fluid level warning light (if so
equipped)
P.5-79
20- Active stability control (ASC) OFF
indicator/wa
rning light
P.5-54
21- Position indicato
r (if so equipped)
P.5-76
22- ECO indicator
P.5-76
23- For details, refer to “Warning activa-
tion” on page 5-15 (if so equipped)
BK0267800US.book 75 ページ 2018年5月30日 水曜日 午後4時24分
Page 141 of 267

Indicators 5-76 Features and controls
5
N00519900127 N00520000216
The arrows will flash in time with the corre- sponding exterior turn signals when the turn signal lever is used. Both arrows will flash
when the hazard warn-
ing flasher swit
ch is pressed.
N00520100086
A blue light comes on when the headlights are on high beam.
N00520200175
This indicator comes on while the front fog lights are on.
N00551301049
This indicator light illuminates while theparking lights are on.
N00575600010
This indicator comes on in green while thecoolant temperature is low.
N00568800036
This indicator comes on while fuel-efficientdriving is achieved.
N00520300147 N00520400526
This light comes on when the ignition switch is turned to the “ON” position (engine off) or the operation mode is put in ON.When the engine is st
arted, the light should
go off a few seconds later. The warning light also illuminates after start- ing the engine under the following condi- tions. When the parking brake is still applied. When the brake fluid level is low. When the brake system circuit is not working properly.
When the vehicle is moving at more than 5 mph (8 km/h) and the parking brake applied, a buzzer will sound to in
form the driver that
the parking brake is not properly release. Before driving, be sure that the parking brake is fully released and the brake warning light is off.
24- For details, refer
to “Warning activa-
tion” on page 5-15 (if so equipped)
Indicators Turn signal indicators/Hazard warning lights
NOTE
If the indicator flashes faster than usual or if the indicator stays on wi
thout flashing, check
for a malfunctioning turn signal light bulb or turn signal connection.
High beam indicator
Front fog light indicator
(if so
equipped)Position indicator
(if so equipped)
Low coolant temperature indi- cator - green
NOTE
When the indicator goes out, this should be used as a rough indication of when the heat- ing starts working.
ECO indicator
Warning lights Brake warning light and buzzer
BK0267800US.book 76 ページ 2018年5月30日 水曜日 午後4時24分
Page 144 of 267

Combination headlights and dimmer switch
Features and controls 5-79
5
N00590300021
This light comes on when the washer fluid is running low.If the light comes on, replenish the container with washer fluid. Refe
r to “Washer fluid” on
page 9-9.
N00522501889
Rotate the switch to operate the lights.
The combinations of
switch operations and
illuminated lights differ in accordance withthe following conditions. [When the engine is st
arted, and the parking
brake is released]
The daytime running light
s will be illumi-
nated: [When the engine is not running, or when the engine is running but the parking brake is not released] The engine starts when the lights are off.
NOTE
When the auto cut-out function of the doom light is been activa
ted, the light goes out
automatically after about 30 minutes.Refer to “Dome light” on page 5-93.
Washer fluid level warning light
(if so equipped)
Combination headlights and dimmer switch Headlights
Except for vehicles equipped with day- time running lights OFF All lights off
Parking, tail, front and rear side- marker lights, license plate and instrument panel lights on Headlights and other lights on
Vehicles equipped with daytime running lights
OFF
The daytime running lights illumi- nated The daytime running lights illumi- nated Parking, tail, front and rear side-marker lights, lic
ense plate and
instrument panel lights on Headlights and other lights onNOTE
Once the daytime running light come on, they do not go out until the ignition switch isturned to the “OFF” or “ACC” position or the operation mode is changed to OFF or ACC.
OFF All lights off
Parking, tail, front and rear side- marker lights, lic
ense plate and
instrument panel lights on Headlights and other lights on
BK0267800US.book 79 ページ 2018年5月30日 水曜日 午後4時24分
Page 208 of 267

Operation under adverse driving conditions
For emergencies 8-13
8
Set the gearshift lever to the “N” (Neutral) position.Secure the steering wheel in a straight-ahead position with a rope or tie-down strap. Release the parking brake. Place the gearshift lever in the “N” (Neutral) position (manual transa
xle) or the selector
lever in the “N” (NEUTRAL) position (CVT).
N00837201799
If your vehicle becomes stuck in snow, sand, or mud, it can often be moved by a rockingmotion. Rock your vehicle back and forth to free it.
Towing the vehicle by a tow truck
CAUTION This vehicle must not be towed by a tow truck using sling lift
type equipment (Type
A) as illustrated. Using a sling lift will dam- age the bumper and front end.Towing with rear wheels off the ground. Do not tow CVT vehicles with this style. Towing with front wheels off the ground.
Do not tow continuously variable transmis- sion (CVT) vehicles with the driving wheelson the ground (Type B) as illustrated. If thevehicle is towed like
this, the continuously
variable transmission (CVT) fluid may not reach all parts of the transmission, thus dam-aging it. If you tow CVT vehicles, use Type C, D or E equipment. If the manual transaxl
e is malfunctioning or
damaged, transport the
vehicle with the driv-
ing wheels on a carriage (Type C, D or E) as illustrated. If the vehicle is towed with the ignition switch in the “ON” pos
ition or the operation
mode in ON and only the front wheels oronly the rear wheels raised off the ground (Type B or C), the Active Stability Control (ASC) may operate, result
ing in an accident.
When towing the vehicle with the rear wheels raised, turn the ignition switch to the “ACC” position or put
the operation mode in
ACC. When towing the vehicle with the front wheels raised, keep the ignition switch or the operation mode as follows.[Except for vehicles equipped with the F. A . S . T. - k e y ] The ignition switch is
in “OFF” or “ACC”
position. [Vehicles equipped with the F.A.S.T.-key] The operation mode is in OFF or ACC.CAUTION
Towing with rear wheels off the ground (Type B - M/T vehicles only) Towing with front wheels off the ground (Type C) Operation under adverse driving conditions If your vehicle becomes stuck in sand, mud or snow
BK0267800US.book 13 ページ 2018年5月30日 水曜日 午後4時24分
Page 212 of 267

9
Vehicle care and maintenanceService precautions ..........................................................................9-2 Catalytic converter ...........................................................................9-3 Engine hood .........
...........
...........
............
...........
.........
........
.........
.....9-4
View of the engine compartment .....................................................9-5 Engine oil and oil filter ....................................................................9-5 Engine coolant .................................................................................9-7Air cleaner filter ...............................................................................9-8 Manual transaxle oil (if so equipped) ...............................................9-9 Continuously variable transmission (CVT) fluid (if so equipped) ...........................................................................9-9 Washer fluid .....................................................................................9-9 Brake fluid .....................................................................................9-10Battery ............................................................................................ 9-11 Tires ...............................................................................................9-12 Clutch pedal free play (if so equipped)...........................................9-18Brake pedal free play .....................................................................9-19 Parking brake .................................................................................9-19 Wiper blades ..................................................................................9-19Emission-control system maintenance ..........................................9-20 General maintenance .....................................................................9-21 For cold and snowy weather ..........................................................9-22Fusible links ...................................................................................9-22 Fuses ..............................................................................................9-22 Replacement of light bulbs ............................................................9-26Vehicle care precautions ................................................................9-32 Cleaning the inside of your vehicle .......
...........
...........
...........
.......9-32
Cleaning the outside of your vehicle .....
...........
...........
...........
.......9-33
BK0267800US.book 1 ページ 2018年5月30日 水曜日 午後4時24分
Page 216 of 267

View of the engine compartment
Vehicle care and maintenance 9-5
9
Unlatch the prop from the engine hood and put it back in its retainer. Slowly lower the engi
ne hood approximately
8 inches (20 cm), then let it drop from its own weight.
N00937601781
N00937702011
It is normal for an engi
ne to use oil. You may
need to add oil betwee
n the recommended oil
change intervals. Before starting the engine,check the engine oil level. Refill if necessary. To check the oil level, remove the dipstick, wipe it off, and gently
reinsert it all the way.
Slowly pull the dipsti
ck straight out and
check the oil level by checking the upper sur- face of the dipstick. Th
e oil level must not go
above the line on the dipstick. If the level does not reach the line which shows the minimum amo
unt of oil required,
remove the oil filler cap on the engine valve cover, and fill to within the “Good” range.
To close
CAUTION Be careful not to trap your hands or fingers when closing the engine hood. Make sure the engine hood is firmly closed before driving.If you drive without the engine hood com- pletely closed, it c
ould open up while driv-
ing.
NOTE
If this does not clos
e the engine hood prop-
erly, drop it again from a slightly higherposition. Do not push down strongly on the engine hood. Depending on how strongly or whereyou push down, you could create a dent in the vehicle body.
View of the engine compart- ment 1- Engine oil level dipstick 2- Air cleaner filter 3- Battery 4- Brake fluid5- Windshield washer fluid reservoir 6- Engine oil filler cap 7- Radiator cap8- Engine cool
ant reservoir
Engine oil and oil filter To check and refill engine oil
NOTE
If it is difficult to verify the oil level, wipe off the dipstick and
reinsert it. Wait a
moment and then recheck the oil level by checking the upper surfa
ce of the dipstick.
BK0267800US.book 5 ページ 2018年5月30日 水曜日 午後4時24分
Page 221 of 267

Brake fluid 9-10 Vehicle care and maintenance
9
Check the washer fluid
level at regular inter-
vals and add washer fluid to reservoir if nec-essary. Open the reservoir cap and check the level of washer fluid.Full level is approximately 2 inches (5 cm) below from the upper surface of the reservoir. When freezing weather is anticipated, flush out the water in the reservoir by operating the pump. Fill the reservoir with windshield anti-freeze (not radiator an
tifreeze), and operate
the system for a few seconds to flush out the residual water.
N00938701314
The fluid level must be between the “MAX”and “MIN” marks on the reservoir. The fluid level falls slightly with wear of the brake pads, but this
does not indicate any
abnormality. The fluid in the master cylinder should be checked when doing other work under theengine hood. The brake system should also be checked for leaks at the same time. If the fluid level falls
noticeably in a short
length of time, it indi
cates leaks from the
brake system.
If this occurs, have the vehicle checked by an authorized Mitsubishi Motors dealer or arepair facility of your choice. Use the brake fluid conforming to DOT 3 or DOT 4. The reservoir cap must be tightly sealed to keep dirt and water out.
Upper surface Full
Brake fluid To check the fluid level
MAX MIN
Fluid type
WA R N I N G Take care in handling brake fluid as it is harmful to the eyes, may irritates your skin and will damage
painted surfaces.
Wipe up spills immediately. If brake fluid gets on your hands or in your eyes, flush immediately with cleanwater. Follow up with a doctor as neces- sary.CAUTION Do not let any petrol
eum-based fluid touch,
mix with, or get into
the brake fluid. This
will damage the seals. Be careful when handli
ng brake fluid. It can
damage painted surfaces. Use only the listed brake fluid. Different brands of brake fluid
have different addi-
tives, and these can cause a chemical reac- tion. Do not mix brands of brake fluid.
BK0267800US.book 10 ページ 2018年5月30日 水曜日 午後4時24分
Page 222 of 267

Battery
Vehicle care and maintenance 9-11
9
N00939100943
The condition of the batte
ry is very important
for quick starting and to keep the vehicle’s electrical system working properly. Check thebattery regularly.
N00901500072
The electrolyte level
must be between the
limits shown on the outside of the battery. Fill it with distilled water as needed. The inside ofthe battery is divided into several compart- ments. Take the cap off of each compartment and fill to the mark.Do not fill above the top line because a spill during driving could cause damage.
N00901600060
The battery is weaker in cold temperatures. This has to do with its chemical and physical properties and is why a very cold battery, especially one with a lo
w charge, will have a
hard time starting your vehicle. It is recommended that you have your battery and charging system checked by an autho-rized Mitsubishi Motors dealer or a repair
facility of your choice
before the start of cold
weather. If necessary, have it charged. Thiswill provide more reliab
le starting, and longer
battery life.
N00901701169
To disconnect the battery cable, stop theengine. Disconne
ct the negative (-) terminal
first, then the positive
(+) terminal. To recon-
nect the battery, first
connect the positive (+)
terminal and then the negative (-) terminal,before starting the vehicle.
Keep the reservoir cap closed to keep the brake fluid from evaporating.
Battery Checking battery electrolyte level
CAUTION
WA R N I N G If the battery goes flat, be sure to check the battery electrolyte level before con-necting booster cables. After checking the battery electrolyte level, make sure the caps are fitted securely. If any of the caps has a loose fit, replace the battery.
During cold weather
Disconnection and connection
NOTE
Open the terminal cover (A) before discon- necting or connecting the positive (+) termi- nal of the battery. Loosen the nut (B) and then disconnect the battery cable from the positive (+) terminal.
BK0267800US.book 11 ページ 2018年5月30日 水曜日 午後4時24分
Page 246 of 267

Cleaning the outside of your vehicle Vehicle care and maintenance 9-35
9
Use a soft cloth to put a small amount of wax on the painted surfaces. After the wax hasdried, polish with a dry soft cloth. Do not wax your vehicle
in direct sunlight.
You should wax when the painted surfacesare cool.
N00946100046
If painted surfaces ha
ve been severely dam-
aged and lost their original luster and color tone, polish the surface lightly with a finepolishing compound. Avoid limiting your polishing to the damage
d surface only; polish
a somewhat wider area, moving the polishing
cloth in one direction.
After polishing, flush
the compound from the surface and apply acoat of wax to regain a beautiful luster.
N00946200092
Small cracks and scratches in the paint coatshould be touched up as soon as possible with touch-up paint to prevent corrosion. Check body areas facing the road or the tires carefully for damage to the paint caused by flying stones, etc. The paint code number foryour vehicle can be found on the vehicle information code plate
on the front passenger
door sill.
N00946300194
Use a sponge or chamoi
s to clean these parts.
If a vehicle wax sticks
to a gray or black
rough surface of the bumper, molding or lights, the surface may appear white in color. In this case, wipe it off using lukewarm waterand a soft cloth or chamois.
N00946400052
To prevent spots and corrosion of chromeparts, wash with water, dry thoroughly, andapply a nonabrasive automotive wax. If the chrome is severely damaged or pitted, use a commercially available chrome polish.
N00946501236
1. Remove dirt using a wet sponge.2. Use a mild detergent
on any dirt that can-
not be removed easily with water. Rinse off the detergent after washing the wheels.3. Dry the wheels thoroughly using a cham- ois leather or a soft cloth.
CAUTION Waxes containing high abrasive compounds should not be used. These waxes remove rustand stain effectively from the paintwork, but are harmful to the finish of the paint, because they also remove paint/clearcoat.They are also harmful to other glossy sur- faces such as the grille, trim, moldings, etc. Do not use gasoline, benzine, kerosene or paint thinners to remove road tar or other dirt from the vehicle surface. Do not put wax on the areas having black matte coating because
it can cause uneven
discoloration, patches, bl
urs, etc. If these get
wax on them, wipe the wax off right away with a soft clot
h and warm water.
Polishing
Damaged paint Cleaning plastic parts
CAUTION Do not use a scrubbing brush or other rough scrubber as these may damage the plastic surface.
Do not use wax containing compounds (pol- ishing powder) which
may damage the plas-
tic surface. Do not let plastic parts
get soiled with gaso-
line, oil, brake fluids, engine oils, greases,paint thinner, and sulfuric acid (battery elec- trolyte), as such substa
nces will cause stains,
cracks, or discoloration.If any of these get on a plastic part, wipe them up with a soft cloth or chamois and a mild solution of soap and water. Then rinsethem immediately with water.
Chrome parts Aluminum wheels
(if so equipped)
CAUTION
BK0267800US.book 35 ページ 2018年5月30日 水曜日 午後4時24分